Vivo BLU Display Smartphone XL4
Content

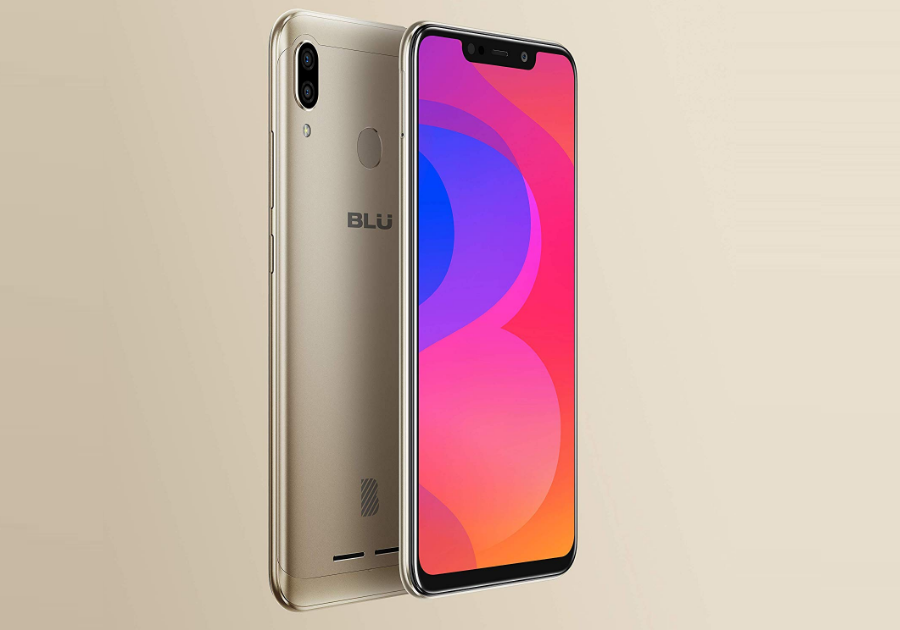
Introducing the Vivo BLU Display Smartphone XL4
The stylish and reasonably priced Vivo BLU Display Smartphone XL4 is a gadget that blends design and utility. With its big screen, strong performance, and standard smartphone functions, the XL4 is made to offer a smooth user experience to people who desire quality without going beyond budget.
Power On and Off
Power On
- Please ensure the SIM card has been properly inserted into the phone.
- Long press the Power key to switch the phone on.
Power Off
- In standby mode, long press on the Power key until an options menu appears.
- Select Power Off in the menu to power off the phone.
Detailed Specifications
Among the remarkable features of the vivo BLU Display Smartphone XL4 is its 6.4-inch FullView display, which has an aspect ratio of 19.5:9 and a resolution of 2340 x 1080 pixels. A MediaTek Helio P70 chipset powers the gadget, along with 6GB of RAM and 128GB of internal storage that can be increased to 256GB using a microSD card. With a 16-megapixel primary sensor and a 5-megapixel secondary sensor on the back of the device, the XL4 has two cameras: a 16-megapixel shooter on the front. With support for fast charging, the device's 4000mAh battery powers Android 9.0 Pie.
Navigation Bar
The navigation bar is a dedicated area that displays device navigation buttons. These system buttons allow the user to control the phone seamlessly.
 Back
Back
Returns to the previous screen; Closes the keyboard, any open program, or any menu option. Home
Home
The home button pauses any current action and returns to the home screen. Recent Apps
Opens a list of recently opened applications that allows you to switch conveniently between them. This option can also close any open applications by swiping to the side.
Notifications Bar
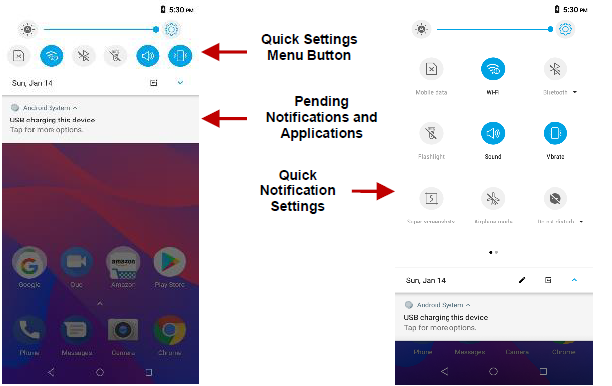
The notification bar is located on the top of the screen, containing useful and important information regarding your phone and the applications that are installed.

On the notification bar, several icons will appear such as signal bar, time, battery indicator, data indicator, Bluetooth, and Wi-Fi. You may slide the notification bar down with your finger to display any pending notifications or actions.
Notification Settings
The notification settings panel provides shortcuts to different phone settings for quick access. Click on any of the shortcut notification icons to power on or off.
- To clear notifications:
Drag down the notification bar and click the clear notification icon on the lower right-hand part of the notification screen. - To access the quick notification settings menu:
Drag down the notification bar completely. Some settings include Wi-Fi, Bluetooth, Location, Airplane mode, and Flashlight.
Call Functions
Placing a Call
- Click the Keypad button to open the dial keyboard. At the dial keyboard, enter the phone number you wish to dial.
- You may also press and hold the 0 key to add a (+) sign when adding an international dialing prefix.
- Click the dial button to make the call.
- If dialing an extension, you may click on the keypad button to open the keypad interface and enter the number of the extension.
- Click the end button to end the call.
Call Options
There are different options that can be used in the call log and dialing interface. You may press the menu key while in the general dialing interface to adjust call settings, enter call history, clear your frequently dialed numbers, and add a new contact.
Call Logs
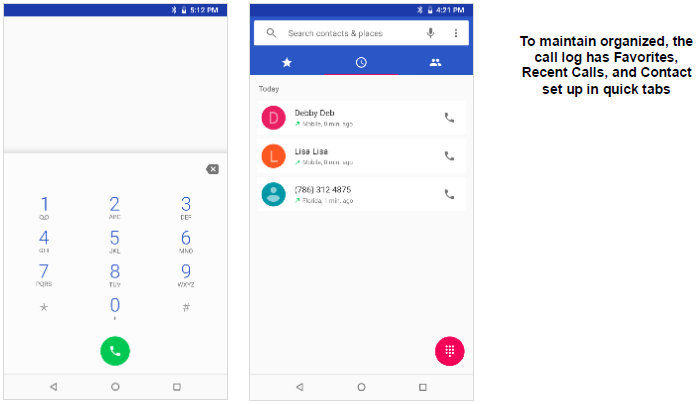
Every telephone number called and received will be saved in the phone's call log. All recently called numbers in the call log can be dialed by clicking on the contact tile in the speed dial tab, or by clicking on the contact and selecting call back in the recent tab. When the number appears on the list, click it to view details. To delete a call from the call history, press the menu key and select delete. You may remove one or multiple calls.
Vivo BLU Display Smartphone XL4 Contacts
Open Contacts
To access: Click on the applications menu, then on the Contacts icon.
- The default display is the phone contacts and SIM card contacts.
- Contacts are organized alphabetically by default.
Click the menu button to enter the contact search interface or scroll to search a contact. Any numbers or letters associated with any of the contacts saved in the list will be shown in the search results.
Add New Contact
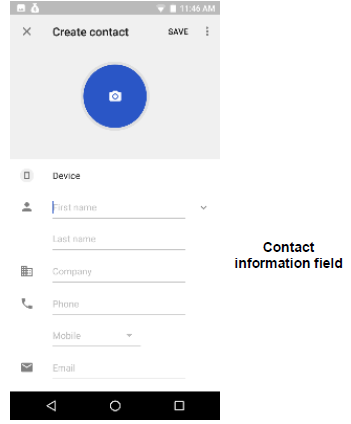
- Click the add contact icon in the bottom right.
- You may save your contacts to either your Google account, phone, or SIM card.
- Enter the contact information including adding a picture, name, telephone number, group, address, and email, among other options.
Click to save the contact.
Note: You may add individual contacts to any of the home screens by entering the contacts menu, clicking on the specific contact, pressing menu, and then selecting the ‘Add to home screen’ option. You can also share contacts via MMS, Gmail, Bluetooth, and other share options within the same settings menu.
Delete Contact
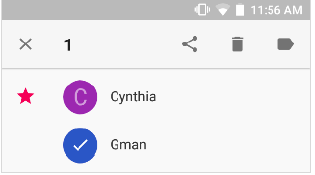
- Click on the Contacts icon to enter the phonebook.
- Click and hold on the contact that you wish to delete.
(Once selected, you may also scroll and select other contact(s) you wish to delete.) Click on the bin to delete.
Import / Export Contacts
- The phone allows you to import and export contacts to synchronize information between different storage types, including the SIM card, Gmail account, and your phone.
To import or export contacts:
- Click the Contacts icon to enter the phonebook.
- Click the menu button and select Import / Export.
- Select the source you want to copy the contacts from. Once selected, click next and select the destination where you want the contact to be copied to, then select the desired contacts to be copied.
Messaging
You may use this function to exchange text messages and multimedia messages with your family and friends. The messages to and from the same contact or phone number will be saved into a single conversation, so you may see the entire message history conveniently.
Open Messaging
To access: Click on the Application Menu, then on the Messaging icon.
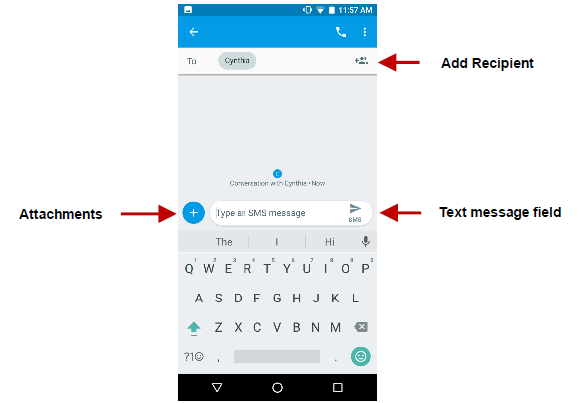
Sending an SMS
Application Menu > Messaging > New message
- Click the contact icon to enter the text message recipient.
- Compose a Text Message and click Send.
Sending an MMS
When creating a message, the default message style is SMS. The message will automatically convert to MMS when adding an attachment or when surpassing 10 pages of SMS messages.
- Click the attachment icon in the messaging interface.
- Click to add attachments and create an MMS message.
Bluetooth & Wi-Fi
Bluetooth is a short-range wireless communications technology that devices can use to exchange information and connect to different types of devices, including headsets and other devices. Wi-Fi allows mobile phones to connect to the internet wirelessly.
Power on Bluetooth
- To access: Click on the Settings icon, then on Connected Devices and select to power on Bluetooth.
- Click on Pair New Device.
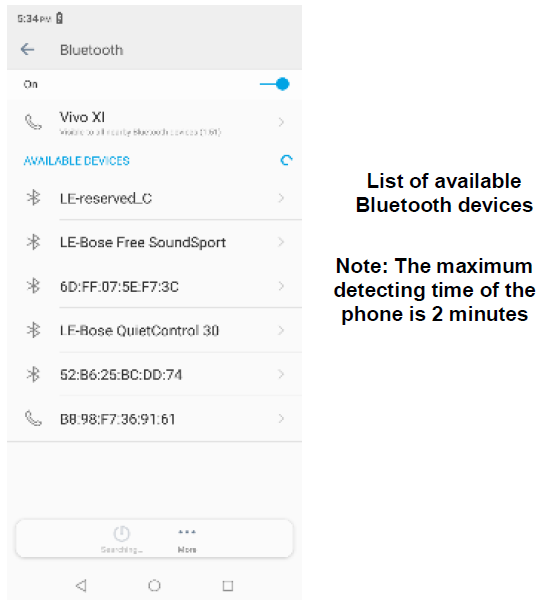
- The Bluetooth will then start to scan for all devices within its range and will display all available devices.
When the scan is complete, all the devices found will display in a list under available devices. Once the device has been identified, click on it to pair.
Power on Wi-Fi
- To access: Click on the Settings icon, then on Wi-Fi and select to power on Wi-Fi.
- Click on the desired Wi-Fi network to be connected.
Note: Unsecured networks can be connected to directly - secured networks require a password or credentials prior to connection.
To display advanced options, click on the available option tab.
Description
One gadget that really sticks out from the crowd is the vivo BLU Display Smartphone XL4. Its large 6.4-inch FullView display provides a striking visual experience with clear details and brilliant colors. The MediaTek Helio P70 engine inside the device provides responsive and effective performance Even while running many apps at once. With 128GB of internal storage and 6GB of RAM, the XL4 can easily manage all of your multimedia needs. The 16-megapixel front-facing camera makes sure that your selfies are always sharp, while the dual-camera arrangement on the back can produce amazing pictures and movies. With its long-lasting 4000mAh battery and support for quick charging, the device which is powered by Android 9.0 Pie ensures that you never run out of juice.
Settings
Cellular Networks
- Mobile Data
- Data Usage
- More
- Preferred Network Type
- Access Point Names
- Network Operators
SIM Settings
- Set default SIM Card provider
Wi-Fi
- Settings » Wi-Fi to power on. When on, the Wi-Fi will automatically search for available networks.
- Any unsecured network can be used directly, and any secured network requires a password or credentials prior to connection.
Bluetooth
- Power on Bluetooth. Once on, click to add a new device. If not, BT will automatically connect to any paired devices.
Tethering & Portable Hotspot
- WLAN Hotspot
- USB Tethering
- Bluetooth Tethering
Reverse Charge and OTG
- Charge other devices with your phone or exchange data using OTG.
More
- Airplane Mode
- VPN
- Emergency Broadcasts
Display
- Brightness
- Adaptive Brightness
- Wallpaper, Sleep, Font Size, Auto Rotate, and other advanced settings.
Navigation Bar
- Set button Layout and slide gestures
- Background color
Sound and Vibration
- This option sets the ringtone settings for receiving calls and notifications.
- Media Volume, Alarm Volume, and Ring Volume
- Vibration settings, Default notification sound and tones
Do Not Disturb
- Set automatic do not disturb rules
- Weekend, Weeknight, Special Events, or Custom
Notifications
- Notice Management
- Allow notification dots
- Notification in lock screen
Security
- Set up basic screen locks: Use slide, pattern, PIN, or password to lock the screen.
- Pattern: The initial setup will include simple unlock instructions and examples. Click to continue the security pattern step.
- PIN: Enter a PIN number to unlock the screen.
- Password: Use a password to unlock the screen.
- Make Passwords Visible
- Device Administrators
Apps
- Manage Applications: Manage and delete installed applications.
- Running Applications: Press the Stop button to terminate any of the applications from the running apps list and clear any RAM usage.
- Change default apps and set permissions.
Accounts
- Add and manage accounts.
- Add Emergency Information.
- Add and manage Google accounts and settings.
System
- Date & Time
- Select Date Format: There are 3 kinds of formats you can choose from: Month-Day-Year, Day-Month-Year, and Year-Month-Day.
Language & Input
- Language: Change the language of the phone.
- Personal Dictionary: Add or delete words to the custom dictionary keyboard.
Location
- High Accuracy: Use Wi-Fi and Mobile Networks to determine location.
- Battery Saving: Use Mobile Networks to determine location.
- Device Only: Use GPS to determine your location.
Printing
- Set print services.
Operation
Smart Gestures
- Turn on smart gestures on the device.
- Blank Screen Gestures: While in sleep mode, access several options such as Music Player, Gmail, or Camera. Current options can be edited or new gestures can be created.
- Smart Vibration Reminder: Reminds the user of any pending notifications or missed calls when the phone is picked up from sleep mode.
- Smart Bright Screen: The display will not turn off when the phone is in close proximity to the user.
- Double Click Wake up: Double click the screen to wake from sleep mode.
Suspend Button
- The suspend button gives the user different options such as lock screen, home screen, and back with a click.
- Set transparency, button size, and make other customizations.
Glove Patterns
- Allows for easier usage when wearing gloves.
Hardware
Memory
- General memory information.
Storage
- View phone files and storage information and free up space.
- Data Sync.
Battery
- General power usage information.
- Power on intelligent power saving.
- Show battery percentage.
Others
Schedule Power On/Off
- Schedule power on and power off times.
BLU Privacy
- Set BLU Privacy controls.
Backup & Reset
- Backup Data: Will back up all application data, WLAN passwords, and other settings to Google’s servers or services.
- Reset System and application preferences.
- Perform Factory Reset.
Accessibility
- Talk Back
- Power button ends call
- Color inversion
Developer Options
- If the phone does not display Developer options, press build number seven (7) times in the about phone tab.
- The developer option gives access to USB Debugging and other developer tools.
About Device
- Verify current device information.
US Storage
Open USB Storage
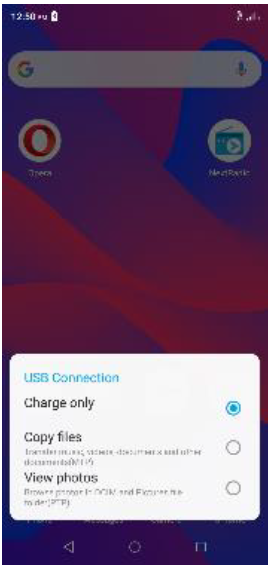
- Connect your phone to a computer using a USB cable. Once connected, a connection interface will appear on the notification settings.
Click the USB notification bar icon to access the USB computer connection menu and select the desired setting.
Vivo BLU Display Smartphone XL4 Troubleshooting
Below is a list of common problems that may occur when using your mobile phone. Try these easy troubleshooting steps to resolve any type of issues you may encounter.
The phone does not power on
- Press and hold the power key until the startup sequence appears on the display.
- Check the battery level and ensure there is sufficient charge.
The phone does not respond after several minutes
- Remove and insert the battery – If the phone has an internal battery, please press and hold the power button.
The phone powers off by itself
- Check if the screen lock of the phone is enabled.
- Check if the phone needs to be charged.
The battery will not charge
- Check if the battery is already fully charged.
- Make sure that the battery is inserted correctly.
- Ensure that the battery being used is a BLU approved battery.
- Double-check if the charger connector is properly connected to the phone.
Note: Connect charger only after the battery has been inserted.
The standby time is too short
- Please keep in mind that standby time relates directly to phone usage (Internet, Text, Voice Calls, Maps, etc.).
- Batteries typically have to be replaced after a year of use.
The phone cannot connect to the network (Voice or Data)
- Verify if you have active service with your service provider.
- Contact your local network service provider and verify if you are within its network coverage area.
The phone displays a SIM Error
- Make sure the SIM is properly inserted and in its intended slot.
- Make sure that the SIM card is not damaged or scratched.
The PIN code was entered incorrectly three times
- The SIM card will lock and you will need to enter the PUK code (PIN Unlock Code). Please contact your local service provider to obtain the PUK.
I cannot make calls
- Make sure that the number you dialed is correct and the dial key has been pressed.
- Use the full national area code when dialing out of your area, or when abroad, use country-specific international access codes.
I cannot receive calls
- Make sure that your phone is connected to a network.
The caller ID does not display on incoming calls
- Contact your local network service provider and verify you have the caller ID feature enabled on your account, or verify if the caller may have blocked his number from appearing.
The caller cannot leave a voicemail message
- Contact your local network service provider and verify if the voicemail service is active on your account, or check if the network is busy.
The phone does not connect to the internet
- Ensure with your service provider that your account has the appropriate internet/data plan enabled.
- Ensure internet APN settings are configured (Carrier dependent).
Text Messages cannot be Sent / Received
- Ensure text messaging is enabled with your service provider.
- Ensure APN settings are configured (Carrier dependent).
Note: The information provided in this user manual is subject to change without notice, and BLU Products reserves the right to modify the manual at any given time. BLU Products has made every effort to ensure that this user manual is accurate and disclaims responsibility and liability for any inaccuracies or omissions.
Pros & Cons
- Pros:
- Expansive 6.4-inch FullView display
- Powerful MediaTek Helio P70 processor
- Dual-camera setup on the back
- Long-lasting 4000mAh battery with fast charging support
- Cons:
- No water or dust resistance
- No wireless charging
- Camera performance could be improved
Customer Reviews
"I love the vivo BLU Display Smartphone XL4! The 6.4-inch FullView display is stunning, and the device performs smoothly and efficiently. The battery life is also impressive, and I appreciate the dual-camera setup on the back. The only downside is that there's no water or dust resistance, but overall, I highly recommend this device." - Jane D.
"I was hesitant to switch to a lesser-known brand, but the vivo BLU Display Smartphone XL4 has exceeded my expectations. The device is well-built, and the display is beautiful. The camera performance could be improved, but it's still decent for a mid-range device. The battery life is also impressive, and I appreciate the fast charging support. Overall, I'm very happy with my purchase." - John S.
Faqs
What is the internal storage and RAM capacity of the XL4?
Does dual SIM support exist for the Vivo BLU Display XL4?
How is the Vivo BLU Display's camera configuration set up?
Can I unlock the Vivo BLU Display with face recognition?
Which kind of charging port is used by the Vivo?
Does the XL4 support Bluetooth technology?
Leave a Comment
