Vivo Clamp-On Keyboard Tray Desk MOUNT-KB05E User Manual
Content
Introduction of Vivo Clamp-On Keyboard Tray
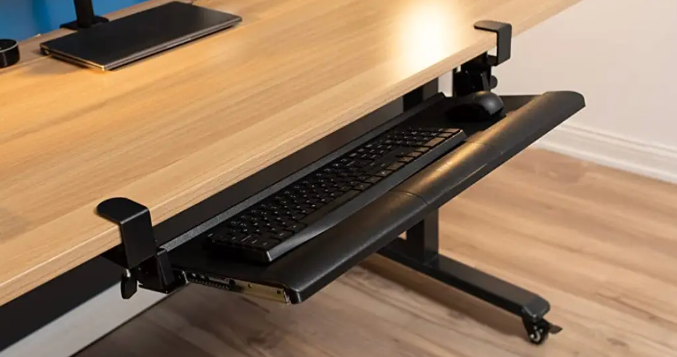
Vivo Clamp-On Keyboard Tray is a versatile and practical solution for anyone looking to improve their workspace ergonomics. This clamp-on keyboard tray allows you to easily attach it to your desk, providing a more comfortable typing position that can help reduce strain on your wrists and forearms. With an estimated price range of $50 to $70 and a launching date set for late 2023, this product is an affordable and convenient way to optimize your workspace.
Package Contents
DO NOT EXCEED WEIGHT CAPACITY. Failure to do so may result in serious injury.
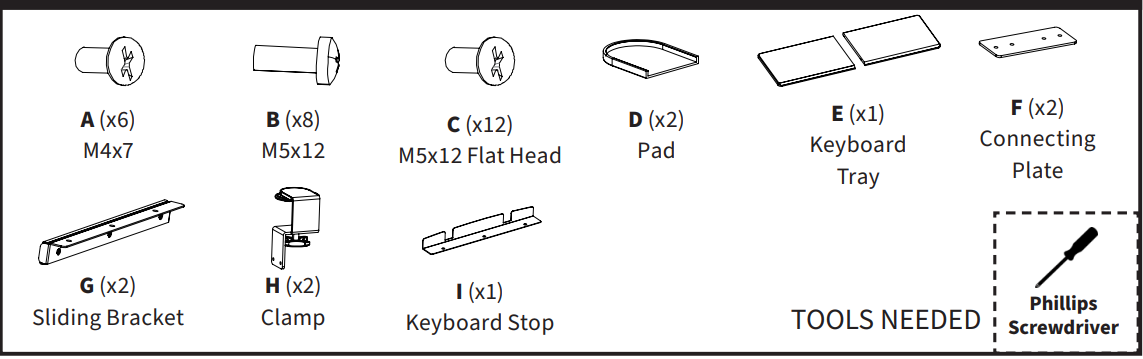
NOTE: 2-Extra screws have been included of each
Specifications
The vivo Clamp-On Keyboard Tray boasts several key features that make it a standout option for users:
- Sturdy construction: Made with high-quality materials to ensure durability and stability.
- Adjustable tilt: Allows you to customize the angle of the tray for optimal comfort.
- Clip-on design: Easy to install and remove, with no screws or tools required.
- Spacious surface: Accommodates full-sized keyboards and mouse pads with ease.
- Compatibility: Fits desks up to 2.4 inches thick.
Assembly of Vivo Clamp-On Keyboard Tray
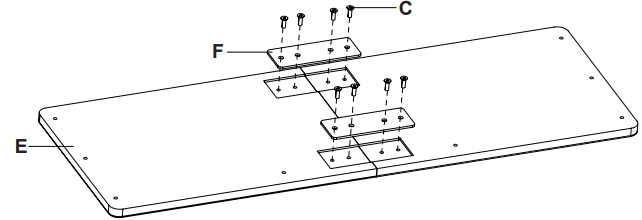
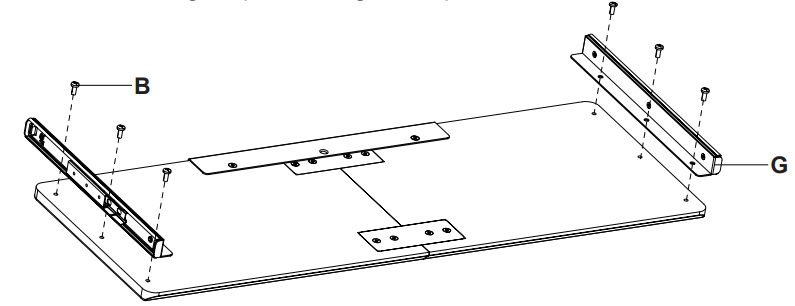
Assemble the Keyboard Tray (E) using Connecting Plates (F) and M5x12 Flat Head Screws (C), and tighten with a Phillips screwdriver.
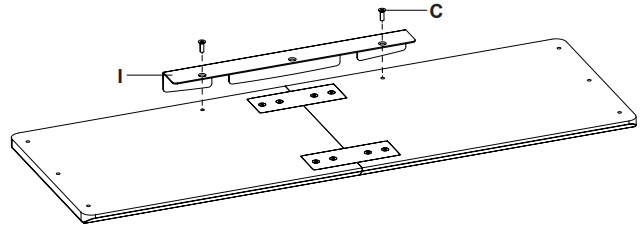
Attach the Keyboard Stop (I) to the back of the Keyboard Tray (E) using M5x12 Flat Head Screws (C). Tighten with a Phillips screwdriver.
Assemble Slider Brackets (G) to the Keyboard Tray (E) using M5x12 Screws (B), and tighten with a Phillips screwdriver. The slider brackets should protrude from the back of the keyboard tray.
NOTE: If the keyboard tray is not sliding in completely , remove the keyboard backstop on the tray. This will allow for an extra 0.75” (19mm) of clearance. If more clearance is needed, change the orientation of the desk having the sync rod facing towards you. This will avoid the crossbar and cable tray entirely.
Assemble Clamps (H) to the Slider Brackets (G) using M4x7 Screws (A). Tighten with a Phillips screwdriver.
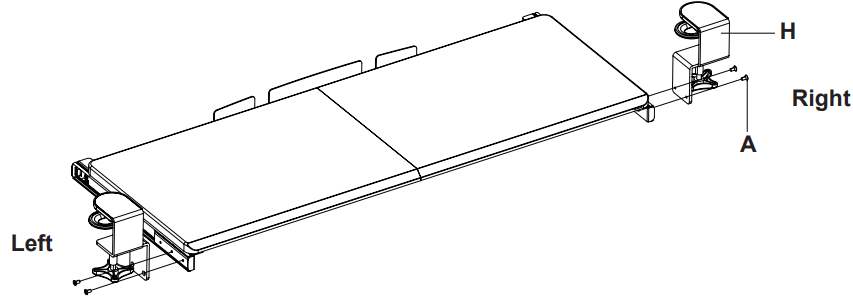
NOTE: Clamp can be offset using the extra holes in Slider Brackets (B) to allow the tray to be pulled out an extra 1.2” (30mm) when in use. If mounted this way the tray will sit further out from desk edge.
Place Pads (D) on the underside of each clamp. Place assembled keyboard mount on the edge of the desk and tighten clamps.
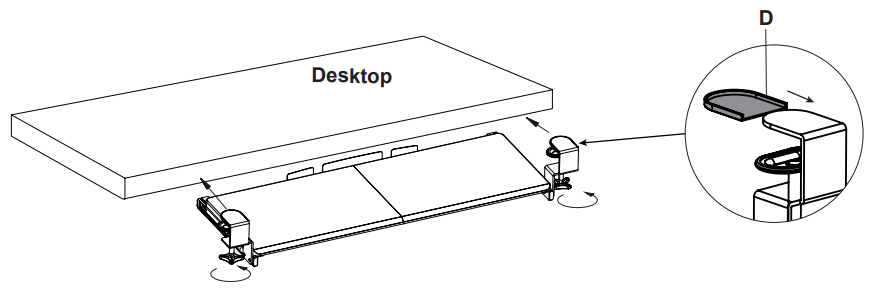
NOTE: To ensure keyboard tray is level, do not over-tighten clamps. Slide keyboard tray forward/back to the desired position.
Description
The vivo Tray is a sleek and functional addition to any workspace. With its simple clip-on design, you can easily attach it to your desk and adjust the tray to your preferred typing angle. The spacious surface is perfect for accommodating even the largest keyboards and mouse pads, and the high-quality construction ensures stability and durability. Whether you're working from home or in the office, the vivo Clamp-On Keyboard Tray is a must-have accessory for anyone looking to improve their ergonomics and comfort.
WARNING! If you do not understand these directions, or if you have any doubts about the safety of the installation, please call a qualified technician. Check carefully to make sure there are no missing or defective parts. Improper installation may cause damage or serious injury. Do not use this product for any purpose that is not explicitly specified in this manual. Do not exceed weight capacity. We cannot be liable for damage or injury caused by improper mounting, incorrect assembly or inappropriate use.
WARNING: CHOKING HAZARD
SMALL PARTS: NOT FOR CHILDREN UNDER 3 YEARS. ADULT SUPERVISION IS REQUIRED.
Vivo Clamp-On Keyboard Tray Setup Guide
Setting up the vivo Clamp-On Keyboard Tray is a breeze. Simply follow these steps:
- Place the tray on your desk and position it where you want it to be installed.
- Adjust the clamp to fit the thickness of your desk, then tighten the screw to secure it in place.
- Slide your keyboard and mouse pad onto the tray and adjust the tilt as needed for optimal comfort.
- You're now ready to start typing with improved ergonomics and comfort!
Troubleshooting
If you encounter any issues with the vivo Clamp-On Keyboard Tray, try these troubleshooting steps:
- If the tray is loose or wobbly, check to make sure the clamp is securely tightened and fit properly to the desk thickness.
- If the tray won't stay in place, make sure the clamp is properly aligned with the edge of the desk and the screw is tightened fully.
- If the tray is difficult to adjust, make sure the adjustment knob is loosened before attempting to change the tilt angle.
Pros & Cons
Pros
- Easy to install and remove
- Adjustable tilt for optimal comfort
- Spacious surface for full-sized keyboards and mouse pads
- High-quality construction for stability and durability
- Affordable price range
Cons
- May not fit desks thicker than 2.4 inches
- Adjustment knob can be difficult to loosen and tighten for some users
Customer Reviews about Vivo Clamp-On Keyboard Tray
Customers have praised the vivo Clamp-On Keyboard Tray for its ease of use, adjustable tilt, and spacious surface. The high-quality construction has also been noted as a standout feature, with many users impressed by the stability and durability of the tray. The affordable price range has also been a hit with customers, with many noting that it's a great value for the price.
The most common complaints about the vivo Clamp-On Keyboard Tray are that the adjustment knob can be difficult to loosen and tighten, and that it may not fit desks thicker than 2.4 inches. However, these issues have been relatively minor and have not detracted from the overall positive reviews of the product.
Faqs
What is included in the Vivo Clamp-On Keyboard Tray package?
What are the dimensions of the Vivo Clamp-On Keyboard Tray?
What desk thickness is compatible with the Vivo Clamp-On Keyboard Tray?
Can I adjust the height of the Vivo Clamp-On Keyboard Tray?
Can the Vivo Clamp-On Keyboard Tray slide in and out?
How much weight can the Vivo Clamp-On Keyboard Tray support?
Is the Vivo Clamp-On Keyboard Tray stable during use?
Can I use the Vivo Clamp-On Keyboard Tray with a standing desk?
How do I clean and maintain the Vivo Clamp-On Keyboard Tray?
What should I do if the Vivo Clamp-On Keyboard Tray is not stable or wobbly?
Leave a Comment