Vretti Thermal Barcode Printer D4602B User Manual

Content
Vretti Thermal Barcode Printer D4602B Introduction
Printing labels quickly and accurately has never been easier than with the Vretti Thermal Barcode Printer D4602B, a high-performance thermal barcode printer. Retail, logistics, manufacturing, and warehouse management are just a few of the many fields that could benefit from this multipurpose printer. The D4602B has a user-friendly interface, high resolution, and fast printing speed, so it can generate barcodes accurately and quickly. Reliable and high-quality barcode printing solutions are easily integrated into various work contexts because to its compact design and robust connectivity choices, including USB and Bluetooth.
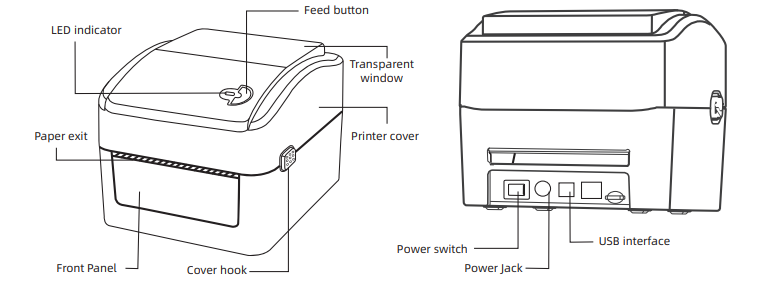
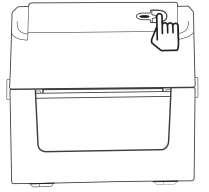
Printer Overview
Note: The interface picture in the quick start guide is for reference only. Please refer to the product specification for the interfaces availability.
Package List
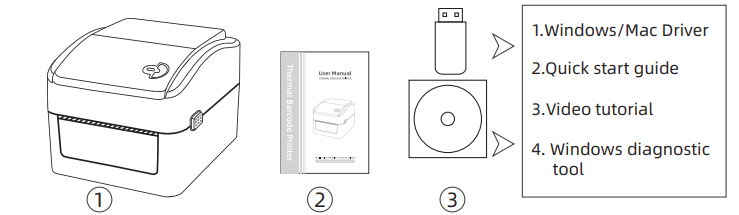
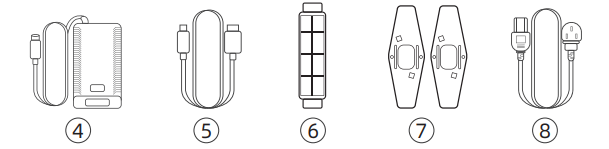
- 1x vretti 420B Thermal Label Printer
- 1x User manual
- 1x CD, U disk
- 1x Power Adapter
- 1x USB cable (Connect the printer to your computer or laptop)
- 1x Paper roll
- 2x Fix tab
- 1x Power Plug
Specifications
| Parameters | Values |
|---|---|
| Speed | 152 mm/s |
| Resolution | 203 DPI |
| Density | 10 |
| Paper width | Max 104mm (4.09”) (Default 4inch) |
| Paper length | Max 1778mm (70”) (Default 6inch) |
| Paper Thickness | 0.06 ~ |
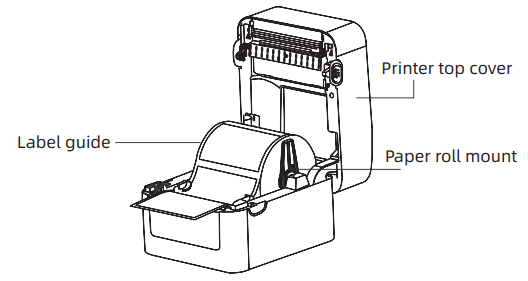
Loading The Label
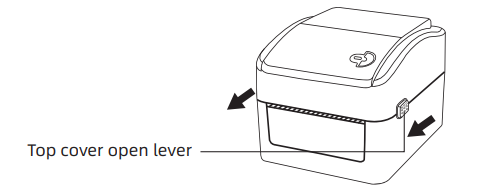
Open the printer top cover by pushing forward the top cover open levers.
Insert a 1" label spindle into a paper roll (*If your paper core is 1" inch, remove the 1.5" core adapter from the fixed tab, use the label spindle directly).
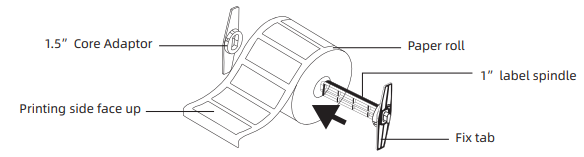
- Orient a roll of paper on the paper roll mount.
- Feed the paper, printing side face up, through the label guide and pass over the platen.
Adjust the black center-biased label guides in or out by turning the adjustment knob so they slightly touch the edges of the label backing.
Printer Installation
- Before installation, please ensure the printer is connected and turned on.
- Attach the power cord to the adapter.
- Plug the adapter cable into the circular DC adapter connector of the printer.
- Plug the USB cable into the USB port of the printer.
- Plug the USB cable into the USB port of the laptop.
- Plug the power cord into the socket and turn on the printer (I: ON, O: OFF).
When connected, the printer displays blue and is in standby mode.
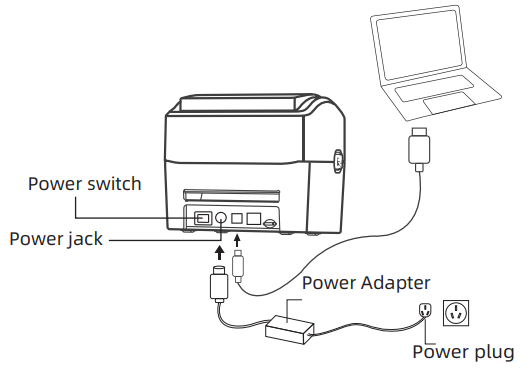
Note: Please switch OFF printer power switch prior to plugging in the power cord to the printer power jack.
Driver Installation For Windows
You can get the driver on CD or USB stick.
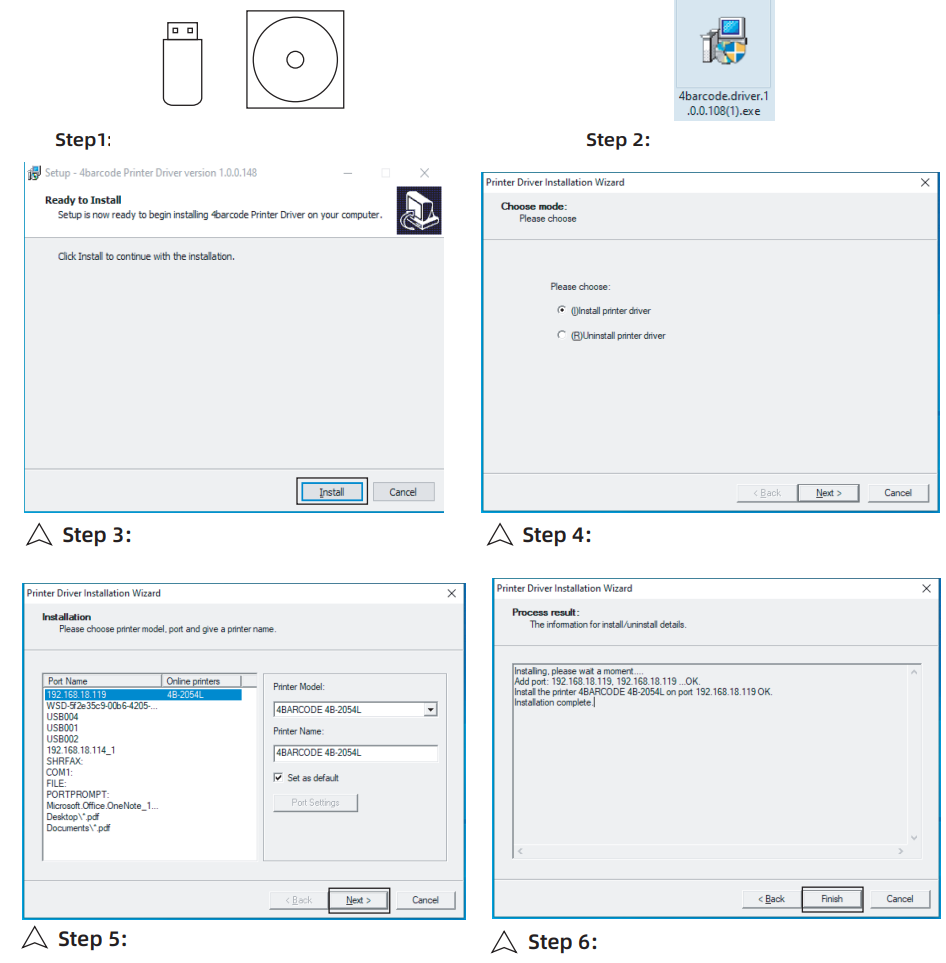
- Go to the 6printer.com to get the driver.
- Double click the .exe icon.
- Click the install button.
- Click the Next button.
- Choose model 4B-2054L and click the Next button.
- Click the finish button. By default, a 4"x 6" inches label is created.
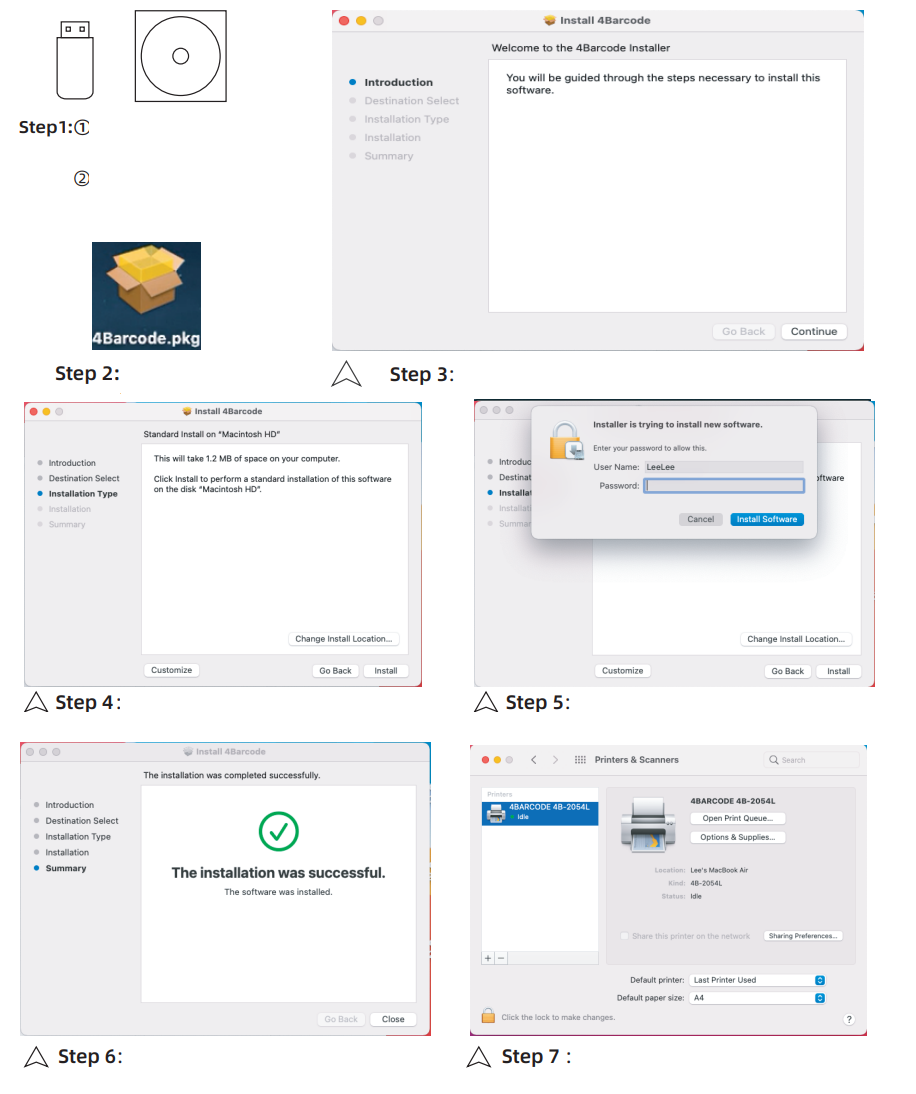
Driver Installation For Mac
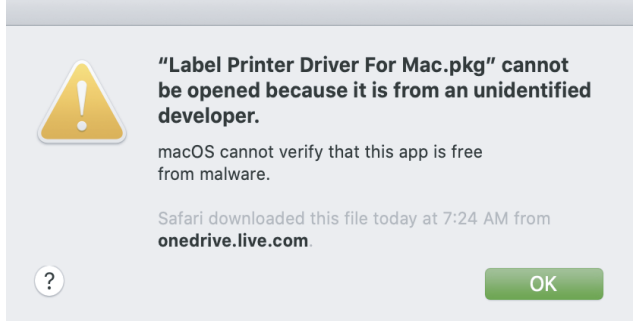
Click on the "pkg" installer to begin.
If the driver cannot be opened, please give permission to it first. Click "OK" and follow the steps below to allow the macOS system to process the installation.
Click "![]() " and go to "System Preferences".
" and go to "System Preferences".
Select "Security & Privacy".
- You can get the driver on CD or USB stick or go to 6printer.com to get the driver.
- Double click the .pkg icon.
- Click the continue button.
- Click the install button.
- Input the user name and password.
- Click the close button.
Click the + button to add the printer. If the printer is connected to Mac, the driver model will install automatically (Model: 4B-2054L).
Browser Printing For Windows
Please refer to the explanation of each item to set up accordingly.
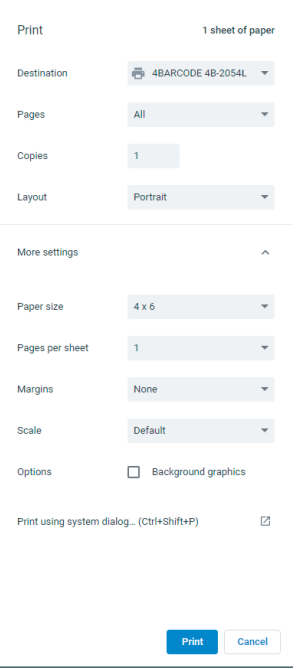
- Destination: Select 4BARCODE 4B-2054L to print.
- Pages: Select the pages needed to print. Default is to print all pages.
- Copies: Decide how many copies should be printed. Default is to print one copy.
- Layout: Portrait: Present image as width greater than height. Landscape: Present image as width smaller than height.
- More settings: Click to expand more settings.
- Paper size: Select the size that matches the installed label. If there is none, go to driver to create a label size and restart Google Chrome.
- Pages per sheet: Decide how many pages should be included in one label.
- Margin: Decide the blank area from the top, bottom, left, right of the label to content.
- Scale: To zoom in or out content on the label.
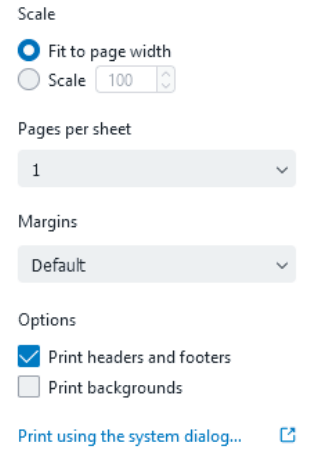
Firefox Browser
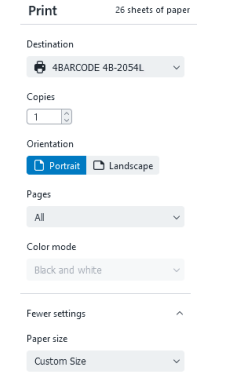
- Destination: Select 4BARCODE 4B-2054L to print.
- Copies: Decide how many copies should be printed. Default is to print one copy.
- Orientation: Portrait: Present image as width greater than height. Landscape: Present image as width smaller than height.
- Pages: Select the pages needed to print. Default is to print all pages.
- Color mode: Fix option. No additional available option.
- Paper size: Select the size that matches the installed label. If there is none, go to driver to create a label size and restart Firefox.
- Fit to page width: Zoom in or out content automatically to the same width or label.
- Scale: To zoom in or out content on the label.
- Pages per sheet: Decide how many pages should be included in one label.
- Margin: Decide the blank area from the top, bottom, left, right of the label to content.
Option: Please cancel “Print headers and footers” option if unexpected and irrelevant info is printed on the top and bottom of the page. Print the background: Decide whether to print the background of the website or not.
Description
Rugged and long-lasting, the Vretti Thermal Barcode Printer D4602B can endure rough situations. It can be easily transported and set up in any given spot thanks to its small and light weight. The D4602B's intuitive design makes it a breeze to set up and run. Users will have no trouble getting up and running with the printing of barcodes, labels, and invoices thanks to its user-friendly design. Users may print a lot of barcodes and labels at once thanks to the printer's high-speed printing capability.
Browser Printing for Mac
Please refer to the explanation of each item to set up accordingly.
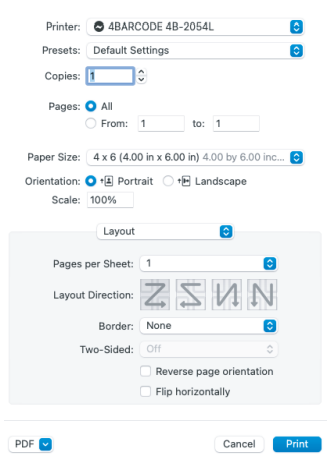
Safari Browser
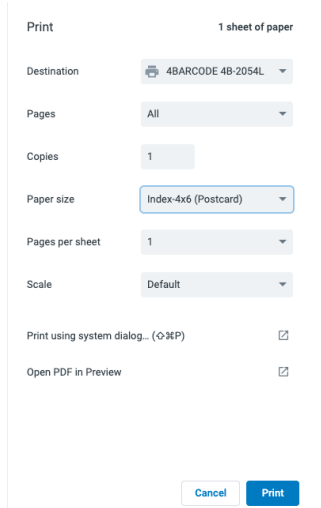
- Printer: Select 4BARCODE 4B-2054L to print.
- Presets: Select the setting configuration of the driver to print.
- Copies: Decide how many copies should be printed. Default is to print one copy.
- Paper size: Select the size that matches the installed label. If there is none, select Manage Custom Sizes.
- Orientation: Decide the direction of the paper out.
- Layout
- Pages per sheet: Decide how many pages should be included in one label.
- Layout Direction: Print direction of pages.
- Border: Set the border of the print result.
Two-Sided: Fix option and no additional available option.
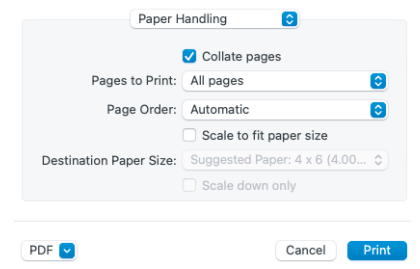
- Paper handling
- Pages to print: Decide old or even pages printed.
- Page Order: Decide the print order is in normal or reverse.
Destination Paper Size: The paper size selected.
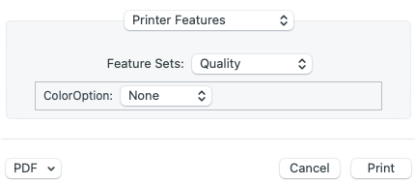
- Printer Features
- Feature Sets: Quality Color Option: Decide the color is none or grayscale.
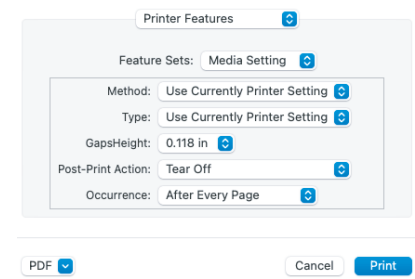
- Feature Sets: Media Setting Method: Decide the printing method of the printer.
- Type: Decide the label type.
Gaps Height: The height of gap or blackmark.
- Post-Print Action: The method of taking down paper.
Occurrence: The time to do post-print action.
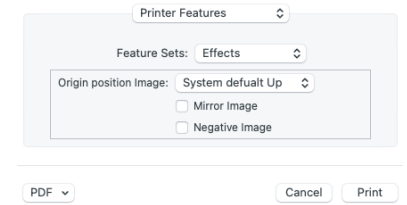
Feature Sets: Effects Origin position Image: Print image in default setting or rotation 180 degrees.
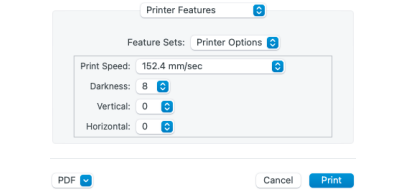
- Feature Sets: Printer Options Print speed: Decide the print speed of the printer.
Darkness: Decide the print density of the printer.
Google Chrome Browser
- Destination: Select 4BARCODE 4B-2054L to print.
- Pages: Select the pages needed to print. Default is to print all pages.
- Copies: Decide how many copies should be printed. Default is to print one copy.
- Paper size: Select the size that matches the installed label. If there is none, go to driver to create a label size and restart Google Chrome.
- Pages per sheet: Decide how many pages should be included in one label.
Scale: To zoom in or out content on the label.
Setup Guide
To set up the Vretti Thermal Barcode Printer D4602B, follow these steps:
- Unbox the printer and remove any protective packaging.
- Connect the printer to a power source and turn it on.
- Install the printer driver and software on your computer or mobile device.
- Connect the printer to your computer or mobile device using the appropriate cable or connectivity option.
- Load the media into the printer and adjust the media settings.
- Configure the printer settings, including the print quality, media type, and connectivity options.
- Test the printer by printing a sample label or receipt.
Button Function
Do the calibration of gap or black mark label
- Install the label and close the cover tightly.
- Turn on the printer.
- Press the FEED button and hold on for 2-3 seconds.
- Release the FEED button when the printer beeps once and the LED blinks red.
- The printer calibrates the label height and gap or black mark height.
Print Selftest Page
- Install the label and close the cover tightly.
- Turn on the printer.
- Press the FEED button and hold on for 5-6 seconds.
- Release the FEED button when the printer beeps twice and the LED blinks purple.
- The printer prints the self-test page.
Note
- Please calibrate the gap/black mark sensor when changing media.
- Failure to securely close and lock the cover will result in poor print quality.
- When you change the label size, please re-calibrate the label and set the label size in the driver settings.
LED Status
| LED Indicator Color | Description |
|---|---|
| Blue (fixed) | Power on, printer standby to print. |
| Blue (blinking) | The printer is downloading data or the printer is paused. |
| Purple | The printer is formatting the data. |
| Red (fixed) | Printer is in head opened status. |
| Red (blinking) | Printing error occurs, e.g. out of paper, paper jam, etc. |
Troubleshooting
Here are some common problems and solutions for the Vretti Thermal Barcode Printer D4602B: Problem: The printer is not responding. Solution: Check the power cord and make sure the printer is turned on. If the printer is connected to a computer, make sure it is properly connected and installed. Problem: The printer is printing blank or distorted labels. Solution: Check the media settings and make sure they match the media type being used. Ensure the media is loaded correctly and is not damaged. Problem: The printer is not connecting to Wi-Fi or Bluetooth. Solution: Make sure the printer is within range of the Wi-Fi or Bluetooth signal. Check the network settings and make sure they are correct. If necessary, reset the network settings and try reconnecting.
Pros & Cons
- Pros:
- High-speed printing capability
- Durable and rugged design
- User-friendly interface
- Various connectivity options
- Cons:
- Higher price point compared to other thermal printers
- Limited media width capacity
- No built-in display for standalone operation
Customer Reviews
"The Vretti Thermal Barcode Printer D4602B is a high-quality printer that is easy to use and reliable. I have been using it for several months, and it has not let me down yet. The high-speed printing capability is a game-changer for my business, and the rugged design ensures it can withstand the harsh environment of my warehouse." - John D.
"I was hesitant to spend the extra money on the Vretti Thermal Barcode Printer D4602B, but it was worth it. The printer is fast, reliable, and easy to use. The various connectivity options make it versatile and convenient. I highly recommend this printer to anyone who needs a high-performance thermal printer." - Sarah K.
Faqs
Which driver is required to set up my Vretti Thermal Barcode Printer D4602B?
The Vretti D4602B printer is compatible with which operating systems?
Could you please tell me how to link the Vretti D4602B to my desktop?
If my Vretti D4602B isn't detected by my computer, what am I to do?
Can you tell me how to configure the Vretti Thermal Barcode Printer D4602B to print from a network?
What are the several ways I may adjust the Vretti D4602B's print preferences?
If my Vretti D4602B printer keeps producing empty labels, what am I doing wrong?
The Vretti Thermal Barcode Printer D4602B needs a firmware upgrade; how can I get one?
When printing with the Vretti D4602B, what am I to do if something goes wrong?
After using the Vretti Thermal Barcode Printer D4602B, how can I clean the print head?
Leave a Comment