How to Use: Wagner Furno 750 LCD Heat Gun User Guide
Content
Introduction of Wagner Furno 750 LCD Heat Gun
The Wagner Furno 750 LCD Heat Gun is a versatile and powerful tool designed to make a variety of household and professional tasks easier and more efficient. This heat gun features an LCD display, adjustable temperature settings, and a comfortable grip for user-friendly operation. With an estimated price range of $60 to $80 and a launching date of January 2021, this heat gun is an affordable and reliable option for anyone in need of a high-quality heat gun.
Specifications
The Wagner Furno 750 LCD Heat Gun boasts a number of key features, including:
- LCD display for easy temperature and setting adjustments
- Adjustable temperature range of 120 to 1,100 degrees Fahrenheit
- Built-in stand for hands-free use
- Lightweight and ergonomic design for comfortable use
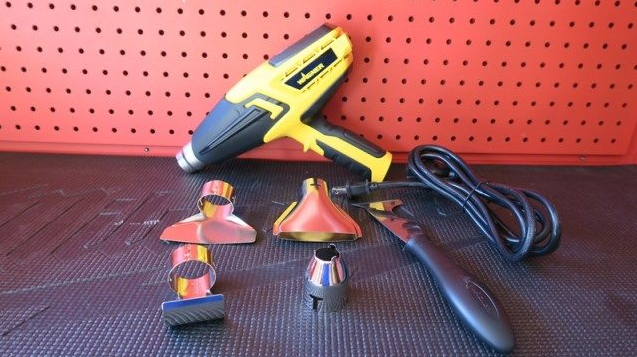
- Includes a concentrator nozzle and a deflector nozzle for added versatility
- Cool-down mode to prolong the life of the tool
- Housing: Engineered high-impact corrosion and heat-resistant polymers
- Wattage: 1500 Watts on highest, 30 Watts on lowest
- Heat Output: Approximately 1300°F on high, approximately 125°F on low
- Weight: 1.95 pounds
Wagner Furno 750 LCD Heat Gun Using the Heat Gun
WARNING: Always read the safety information included in this manual before using the heat gun.
Component Description
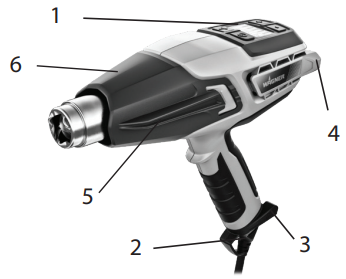
- Graphic LCD screen and control panel
- Hanging hook
- Cordset with integrated stabilizers
- Rear stabilizer fins (stand)
- Side bars to prevent nozzle touching surface
- Heat shield
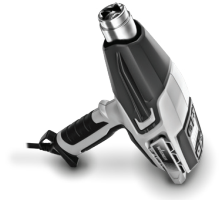
Attaching the power cord
The power cord (Fig. 2, 1) for the heat gun is delivered detached from the gun (Fig. 2, 2). To attach, line up the cord by the forward facing groove with the socket on the handle of the gun and press together until you hear a click. This will permanently attach the cord. It cannot be removed once installed.

Hands-free operation
The heat gun has an integrated stand for bench top applications and cool down mode.
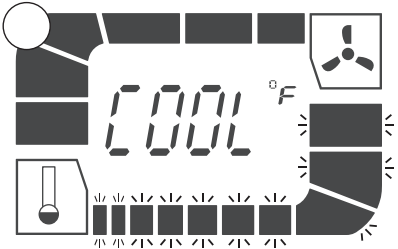
Touch Pad Control Panel
The heat gun gives you a wide temperature range to choose from, depending upon the type of project. These can be controlled via the Control Panel.
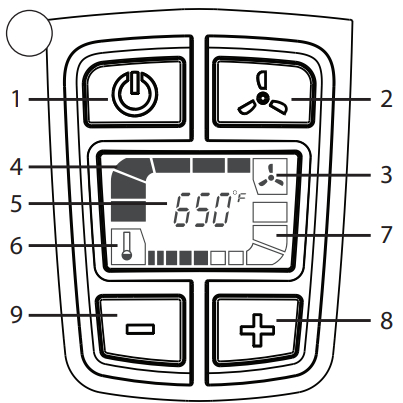
- Power button: Turns the heat gun ON and OFF or switches the heat tool into cool down mode
- Mode selector: Changes the fan speed in which you are operating
- Air flow icon
- Air flow indicator. Fills from right to left
- Text/number display
- Temperature icon
- Temperature indicator. Fills from left to right
- Temperature selector: Increases the temperature (+)
- Temperature selector: Decreases the temperature (-)
Screen currently shows default start-up display. 650oF at highest fan speed.
Cool Down Mode
While the heat gun is operating, press the power button once to enter cool down mode. When cool down mode is entered, the gun will run for 3 minutes with maximum air flow. During this period, the temperature bars will all flash and step down to indicate cooling. To override cool down mode, press and hold the power button for 2-3s.
Startup
- 1. Plug the unit into a standard wall outlet.
- Turn on the heat gun by pressing the POWER button on the touch pad (Fig. 4, 1). When the gun is turned on, it is automatically set to the default temperature of 650ºF as shown in Fig. 4.
- Use the plus and minus buttons (Fig. 4, #8 & #9) to adjust the temperature. Single press to increase temperature in ten degree increments. Hold to increase more quickly.
- As the temperature is increased, bars will flash to indicate that the gun is coming up to temperature. As the higher temperature is reached, the bars turn solid.
- As the temperature is decreased, bars will flash to indicate that the gun is still at a high temperature. As the lower temperature is reached, the bars turn off.
IMPORTANT: If the blower motor in the heat gun does not turn on when the POWER button is activated, turn the switch OFF immediately. The heating element will burn out if it is not cooled by the blower. - During rest periods or when you are finished with your project, press the power button to enter cool down mode.
- Set the gun down in an upright position. The heat gun will shut itself off after 30 seconds.
- To over-ride cool down mode press and hold the power button for 2- 3 seconds. The gun will power off immediately.
Following cool down mode the barrel of the heat gun
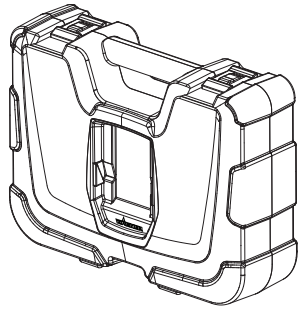
Carry Case
The heat gun case has been specifically designed to secure the heat gun in the upright position for work on uneven surfaces (see AngleLoc, below).
AngleLoc
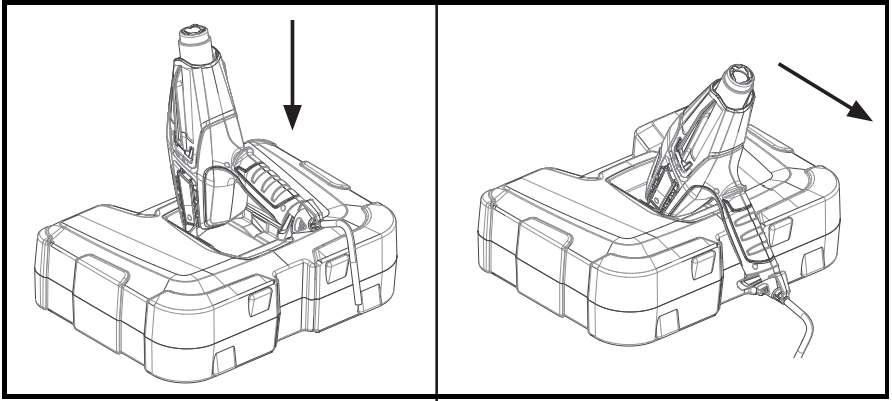
- A: Insert the back of the heat gun so that the rear stabilizing fins locate themselves below the ridges on the side wall of the cavity in the top of the carry case.
- B: Then slide the heat gun forward so that it naturally locks into place at a 135 degree angle. The heat gun should now be secure for upright use.: Then slide the heat gun forward so that it naturally locks into place at a 135 degree angle. The heat gun should now be secure for upright use.
Note: Always set the heat gun upright after it is turned off, either for a short break or for storage. Avoid laying the unit on the side after shutdown. The heat will remain in the unit and cooling will take longer. Store the unit only after the nozzle is cool. Unplug the unit before storing to prevent accidental startup.
Many variables affect heating applications, such as the material being heated, ambient temperature, the distance from the gun to the substrate and the heating technique. For this reason, Wagner has provided temperature guidelines for certain applications. Always start the heat gun at the lowest temperature in the range then raise the temperature until the optimum temperature is achieved. Always keep the heat gun in motion and at least 2” from the substrate when applying heat.
IMPORTANT: Always protect glass when working near windows.
WARNING: Do not touch nozzle or the scraper blade when working. These become extremely hot and will cause severe burns. Wear gloves to protect hands from hot scrapings.
Description of Wagner Furno 750 LCD Heat Gun
The Wagner Furno 750 LCD Heat Gun is a durable and reliable tool that is perfect for a wide range of tasks, from shrinking heat shrink tubing and loosening rusted bolts to thawing frozen pipes and removing old paint. The LCD display makes it easy to adjust the temperature and settings, and the lightweight and ergonomic design ensures comfortable use. With a built-in stand and cool-down mode, this heat gun is both convenient and safe to use. The concentrator and deflector nozzles allow for added versatility, making this heat gun a must-have tool for any household or professional toolkit.
Heating Guidelines
The heat gun is one of the most versatile tools you can own. It can be used for a great variety of projects, from big DIY to small Art & Crafts jobs.
| Use | Heat Setting | Nozzle Tip Options* |
|---|---|---|
| DIY | ||
| Stripping paint | HIGH | Concentrator or Flare |
| Wall repair | LOW/MED | Open (no tip) |
| Drying paint | LOW/MED | Open (no tip) |
| Soften adhesives to remove floor tiles | LOW/MED | Flare |
| Bend plastic, plexiglass, formica | LOW/HIGH | Open / Concentrator |
| Removing formica and linoleum | LOW/MED | Flare |
| Soften paint, caulking and putty for easier removal (use heat shield) | HIGH | Concentrator or Flare |
| Shrink plastic film for wrapping or weatherproofing | LOW/MED | Flare |
| Small jobs (including repair) | ||
| Loosen rusted nuts, bolts and fittings | HIGH | Open / Concentrator |
| Removing adhesives | LOW/MED | Open (no tip) |
| Waxing skis/snowboard | LOW/MED | Flare |
| Glass fiber work | MED/HIGH | Concentrator or Flare |
| Unfreezing pipes | LOW | Curved Deflector |
| Lighting a BBQ grill | HIGH | Concentrator / BBQ Nozzle |
| Heat concrete prior to patching | LOW/HIGH | Concentrator |
| Defrosting refrigerator/freezer | LOW/MED | Open (no tip) |
| Arts & Crafts | ||
| Making candles | LOW | Open (no tip) |
| Making soap | LOW | Open (no tip) |
| Shrink wrapping presents | LOW | Open (no tip) |
| Forming foam | LOW | Open (no tip) |
| Cookie decoration | LOW/HIGH | Open (no tip) |
| Automotive | ||
| Removing stickers, emblems and decals | LOW/MED | Open (no tip) |
| Removing dents | MED/HIGH | Open (no tip) |
| Removing paint | HIGH | Concentrator or Flare |
| Applying and removing window tint | LOW/MED | Open (no tip) |
| Restoring bumpers | MED/HIGH | Open (no tip) |
| Electronics | ||
| Smartphone & tablet repair | LOW | Concentrator |
| PlayStation and Xbox repair | LOW | Concentrator |
IMPORTANT: If the blower motor in the heat gun does not turn on when the switch is set to either LOW or HIGH, turn the switch OFF immediately. The heating element will burn out if it is not cooled by the blower.
Stripping Paint
IMPORTANT: Read the general operating and safety information sections of this owner’s manual before using the heat gun.
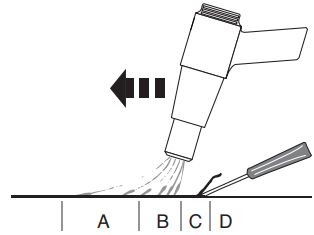
The heat gun heats up the surface and causes the paint to soften, at which time it can be scraped off easily without damaging the surface. Some paints may soften even though they do not blister; some may become rubbery, and some may require higher heat. When working with several layers of paint, it speeds up the scraping process to heat the surface thoroughly, all the way to the wood. Then all the layers can be scraped at one time. A soft wire brush may be the best tool to use for very intricate surfaces. Mineral paints and finishes, such as cement paint and porcelain, do not soften with heat, so using a heating tool will not work for paint removal. The best method of paint removal Move the gun slowly and steadily forward at an angle to the surface, pointing the nozzle in the direction of motion. This allows you to scrape safely outside the hot air stream and keeps the scraper and the scraped surface cooler.
- A. Warm air preheats the surface.
- B. Paint is softened by hot air.
- Deep penetration of heat over total area.
- C. Paint can be easily scraped off as soon as it is softened and the gun is moved forward.
D. Stripped surface allowed to cool.
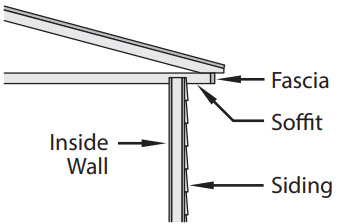
Note: Do not use the heat gun on surfaces that can be damaged by heat, such as vinyl-coated paneling, siding or window frames. When removing paint from window frames, the heat gun will soften the putty. Be careful not to gouge the putty with the scraper. The putty will firm up after it cools. Do not use the heat gun on insulating laminated window glass such as Thermopane. The glass edge expansion may break the edge seal. When scraping fascia, do not overheat the edges of the asphalt shingles protruding over the edge of the sheathing. Too much heat will melt the asphalt.
IMPORTANT: The removal of paint by heat gun is safe if the above guidelines are used, but always keep either a container of water or an ABC fire extinguisher (suitable against class A, B and C type fires) within reach.
Wagner Furno 750 LCD Heat Gun Setup Guide
To set up the Wagner Furno 750 LCD Heat Gun, follow these steps:
- Plug in the heat gun and turn it on using the power switch.
- Select the desired temperature setting using the LCD display.
- Attach the desired nozzle (concentrator or deflector) to the end of the heat gun.
- Place the heat gun on a stable, flat surface using the built-in stand.
- Press the trigger to begin using the heat gun.
Cleaning and Maintenance
- Keep the intake openings on the housing clean and free of obstructions.
- Us a soft, dry brush to clean the openings periodically. Use only mild soap and a damp cloth to clean the heat gun.
- Many household cleaners contain chemicals which could seriously damage the housing.
- Do not use gasoline, turpentine, lacquer or paint thinner, dry cleaning fluids or similar products when cleaning the heat gun.
- Never allow any liquid to get inside the tool or immerse any part of the tool into a liquid.
Storage
Allow the heat gun nozzle to cool to room temperature before placing in storage.The nozzle will turn dark over time because of the high heat. This is normal and will not affect the performance or life of the unit.
Accessories
The following accessories may come with the heat gun or may be purchased separately.
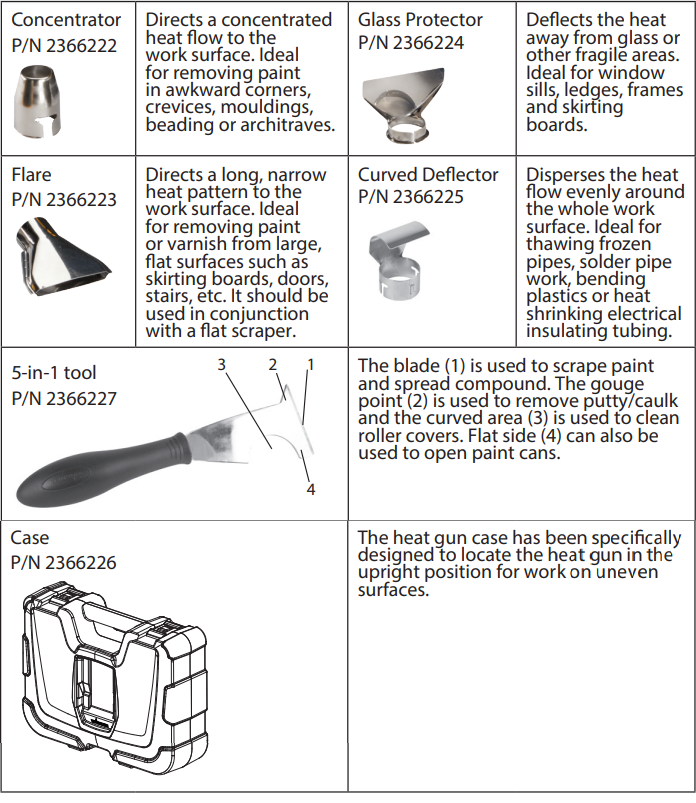
IMPORTANT: Always use gloves when handling the heat gun.
To attach a nozzle to the gun
- Set the heat gun upright on a level surface until the tip is cool.
- Set the item onto the tip of the heat gun and push firmly into place by hand.
To remove a nozzle
- Set the heat gun upright on a level surface until the tip is cool.
- Pull the item off of the tip.
Important Safety Information
Read all safety information before operating the equipment.
SAVE THESE INSTRUCTIONS
To reduce the risks of fire or explosion, electrical shock and the injury to persons, read and understand all instructions included in this manual. Be familiar with the controls and proper usage of the equipment.
WARNING: Indicates a hazardous situation which, if not avoided, could result in death or serious injury.
HAZARD: POISON
- Extreme care should be taken when stripping paint. The peelings, residue and vapors of paint may contain lead, which is poisonous.
- Any paint applied to homes before 1950 is likely to contain lead.
- Any paint manufactured before 1977 may contain lead.
- Once the paint is deposited on surfaces, hand-to-mouth contact can result in the ingestion of lead. Exposure to even low levels of lead can cause irreversible brain and nervous system damage.
- Young and unborn children are particularly vulnerable to lead poisoning.
- Before beginning any paint removal process you should determine whether the paint you are removing contains lead. This can be done by your local health department or by a professional who uses a paint analyzer to check the lead content of the paint to be removed. Lead-based paint should only be removed by a professional and should not be removed using a heat gun.
PREVENTION
Move the work piece outdoors. If this is not possible, keep the work area well ventilated. Open the windows and put an exhaust fan in one of them. Be sure the fan is moving the air from inside to outside.
- Remove or cover any carpets, rugs, furniture, clothing, cooking utensils and air ducts.
- Place drop cloths in the work area to catch any paint chips or peelings. Wear protective clothing such as extra work shirts, overalls and hats.
- Work in one room at a time. Furnishings should be removed or placed in the center of the room and covered. Work areas should be sealed off from the rest of the dwelling by sealing doorways with drop cloths.
- Children, pregnant or potentially pregnant women and nursing mothers should not be present in the work area until the work is done and all cleanup is complete.
- Wear a dust respirator mask of a dual filter respirator mask for dust and fumes which has been approved by the Occupational Safety and Health Administration (OSHA) the National Institute of Safety and Health (NIOSH), or the United States Bureau of Mines. These masks and replaceable filters are readily available at major hardware stores. Be sure that the mask fits properly. Beards and facial hair may keep masks from sealing properly. Change the filters often. Disposable paper masks are not adequate.
- Use caution when operating the heat gun. Keep the heat gun moving as excessive heat will generate fumes which can be inhaled by the operator.
- Keep food and drink out of the work area. Wash hands, arms and face and rinse mouth before eating or drinking. Do not smoke or chew gum or tobacco in the work area.
- Clean up all removed paint and dust by wet mopping the floors. Use a wet cloth to clean all walls, sills and any other surface where paint dust is clinging. Do not sweep, dry dust or vacuum. Use a high phosphate detergent of trisodium phosphate (TSP) to wash and mop areas.
- At the end of each work session, put the paint chips and debris in a double plastic bag, close it with tape or twist ties and dispose of properly.
- Remove protective clothing and work shoes in the work area to avoid carrying dust into the rest of the building. Wash work clothes separately. Wipe shoes off with a wet rag and then wash it with the work clothes. Wash hair and body thoroughly with soap and water.
HAZARD: EXPLOSION OR FIRE
This heat gun produces extremely high temperatures (as high as 1300º F). It must be used with caution to prevent combustible material from igniting.
PREVENTION
- Keep the gun in constant motion. Do not stop or dwell in one spot.
- Use extreme caution if the other side of the material being scraped is inaccessible, such as house siding. Hidden areas such as behind walls, ceilings, floors, soffit boards and other panels may contain flammable materials that could be ignited by the heat gun when working in these locations. The ignition of these materials may not be readily apparent and could result in property damage and injury to persons. When working in these locations, keep the heat gun moving in a back-and-forth motion. Lingering or pausing in one spot could ignite the panel or the material behind it.
- Do not use near surfaces with cracks or near metal pipes or flashing. Heat may be conducted behind the work surface and ignite hidden material. The ignition of hidden materials may not be readily apparent and can result in property damage and injury.
- Do not use electric tools in the presence of flammable liquids or gases.
- Do not use near combustible materials such as dry grass, leaves, and paper which can scorch and catch fire.
- The nozzle becomes very hot. Do not lay the heat gun on flammable surfaces when operating the gun or immediately after shutting the gun off. Always set the gun on a flat, level surface so that the nozzle tip is directed upwards and away from the supporting surface.
- Do not touch the nozzle until the tool has cooled.
- Do not use the heat gun as a hair dryer.
- Tools and paint scrapings become very hot. To avoid burns, use work gloves when scraping.
- Always treat the hot air units with the same respect as an open flame.
- A fire may result if the appliance is not used with care, therefore: – be careful when using the appliance in places where there are combustible materials;
- do not apply to the same place for a long time;
- do not use in presence of an explosive atmosphere;
- be aware that heat may be conducted to combustible materials that are out of sight;
- place the appliance on its stand after use and allow it to cool down before storage;
- do not leave the appliance unattended when it is switched on.
HAZARD: ELECTRIC
May cause property damage, severe injury or loss of life.
PREVENTION
- Do not disassemble the heat gun.
- Do not work in wet areas or expose the heat gun to rain.
- Guard against electric shock by preventing body contact with grounded surfaces such as pipes, radiators, ranges, aluminum ladders or other grounded devices.
- Do not abuse the electric cord. Never carry the heat gun by the cord or yank on the cord to disconnect if from the power supply. Keep the electric cord away from heat, oil and sharp edges. Inspect the cord for wear or damage regularly.
- Use only extension cords rated for outdoor use. If an extension cord is damaged or otherwise unsuitable for use, replace it with a new cord.
- WARNING: To reduce the risk of electric shock, do not expose this product to rain or moisture. Store indoors. Read instruction manual before using.
- If the supply cord is damaged, it must be replaced by the manufacturer, its service agent or similarly qualified person in order to avoid a hazard.
HAZARD: GENERAL
May cause property damage or severe injury.
PREVENTION
- Do not point heat tool at yourself, others, or animals.
- ALWAYS disconnect the heat gun from the power supply when not in use. Store indoors in a dry place and out of the reach of children.
- Keep your work area well lit and clean.
- Do not overreach, especially when working on ladders. Keep proper footing and balance at all times. Be certain any ladders being used are sturdy, stable, on a firm surface, or on firm ground and erected at safe working angles.
- Avoid power lines.
- Keep moveable items secured and steady while scraping.
- Always use protective eyewear when working.
- Stay alert and use common sense when operating any tool.
- When using to thaw frozen pipes, always use the curved deflector (P/N 2366225). NEVER use to thaw pipes located inside walls or near combustibles.
- This appliance is not intended for use by persons (including children) with reduced physical, sensory or mental capabilities, or lack of experience and knowledge, unless they have been given supervision or instruction concerning use of the appliance by a person responsible for their safety.
- Children should be supervised to ensure that they do not play with the appliance.
WARNING!
Some dust, peelings, residue, and vapors caused by paint removal activities contain chemicals known to the state of California to cause birth defects or other reproductive harm. An example of a chemical would be lead from lead-based paints (do not use a heat tool to remove lead-based paint). Your risk from exposure varies, depending on how often you do this type of work. To reduce your exposure to these chemicals: work in a ventilated area, and work with approved safety equipment, such as those dust masks that are specially designed to filter out microscopic particles.
Important Electrical Information
Use only an extension cord that will accept the plug on the product. Make sure your extension cord is in good condition. When using an extension cord, be sure to use one heavy enough to carry the current your product will draw. An undersized cord will cause a drop in line voltage resulting in loss of power and overheating. A SJT type cord is required. Cord shall be 14 AWG minimum for general indoor use.
This appliance has a polarized plug (one blade is wider than the other). To reduce the risk of electric shock, this plug is intended to fit in a polarized outlet only one way. If the plug does not fit fully in the outlet, reverse the plug. If it still does not fit, contact a qualified electrician. Do not modify the plug in any way. When servicing, only use identical service parts. Contact WAGNER for a replacement cordset.
General Description
This heat gun is a quality power tool. Like any power tool, it can be dangerous when misused. Read the following instructions carefully and follow all safety precautions. It is the responsibility of the owner to use the heat gun properly. Only adults should use a heat gun.
Wagner Furno 750 LCD Heat Gun Troubleshooting
If you experience any issues with the Wagner Furno 750 LCD Heat Gun, try the following troubleshooting steps:
- Make sure the heat gun is properly plugged in and turned on.
- Check that the temperature setting is not set too high for the task at hand.
- Make sure the nozzle is securely attached to the end of the heat gun.
- Allow the heat gun to cool down before touching any hot parts.
- If the heat gun still does not work, contact Wagner customer support for further assistance.
Pros & Cons
Pros
- LCD display for easy temperature and setting adjustments
- Adjustable temperature range of 120 to 1,100 degrees Fahrenheit
- Built-in stand for hands-free use
- Lightweight and ergonomic design for comfortable use
- Includes a concentrator nozzle and a deflector nozzle for added versatility
- Cool-down mode to prolong the life of the tool
Cons
- May be too powerful for some delicate tasks
- May be more expensive than some competing heat guns
Customer Reviews about Wagner Furno 750 LCD Heat Gun
Customers who have used the Wagner Furno 750 LCD Heat Gun have praised its user-friendly LCD display and adjustable temperature settings. Many have also noted its lightweight and ergonomic design, making it comfortable to use for extended periods of time. However, some have noted that the heat gun may be too powerful for some delicate tasks and may be more expensive than some competing heat guns. Overall, the Wagner Furno 750 LCD Heat Gun is a highly-rated and reliable tool that is well-suited for a wide range of tasks.
Faqs
What are the key features of the Wagner Furno 750 LCD Heat Gun?
How do I change the temperature settings on the Wagner Furno 750 LCD Heat Gun?
Can I use the Wagner Furno 750 LCD Heat Gun for stripping paint?
How do I use Wagner Furno 750 LCD Heat Gun cool-down feature?
What should I do if the Wagner Furno 750 LCD Heat Gun stops working?
Is it possible to adjust the fan speed on the Wagner Furno 750 LCD Heat Gun?
Can I use extension cords with this Wagner Furno 750 LCD Heat Gun?
Can the Wagner Furno 750 LCD Heat Gun be used to bend plastics or other materials?
What precautions should I take while using the Wagner Furno 750 LCD Heat Gun?
How long is the warranty period for the Wagner Furno 750 LCD Heat Gun?
Leave a Comment