
Setup: Dewalt Paper Collated Framing Nailer DCN692 User Guide
Content
Dewalt Paper Collated Framing Nailer DCN692
Introduction
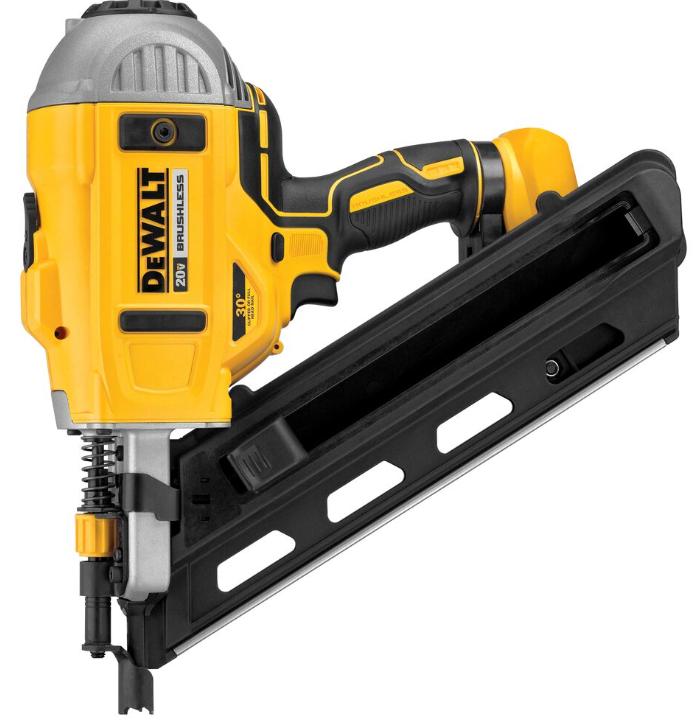
The Dewalt Paper Collated Framing Nailer DCN692 is a powerful and versatile tool designed for professional contractors and serious DIY enthusiasts. Launched in 2016, this nailer has quickly become a favorite among users due to its reliability, ease of use, and robust performance. The DCN692 is specifically engineered for framing, sheathing, and other heavy-duty nailing applications. It is part of Dewalt's 20V MAX line, ensuring compatibility with a wide range of Dewalt batteries and chargers. With an estimated price range of $250 to $350, depending on the kit and retailer, this nailer offers excellent value for its performance and durability.
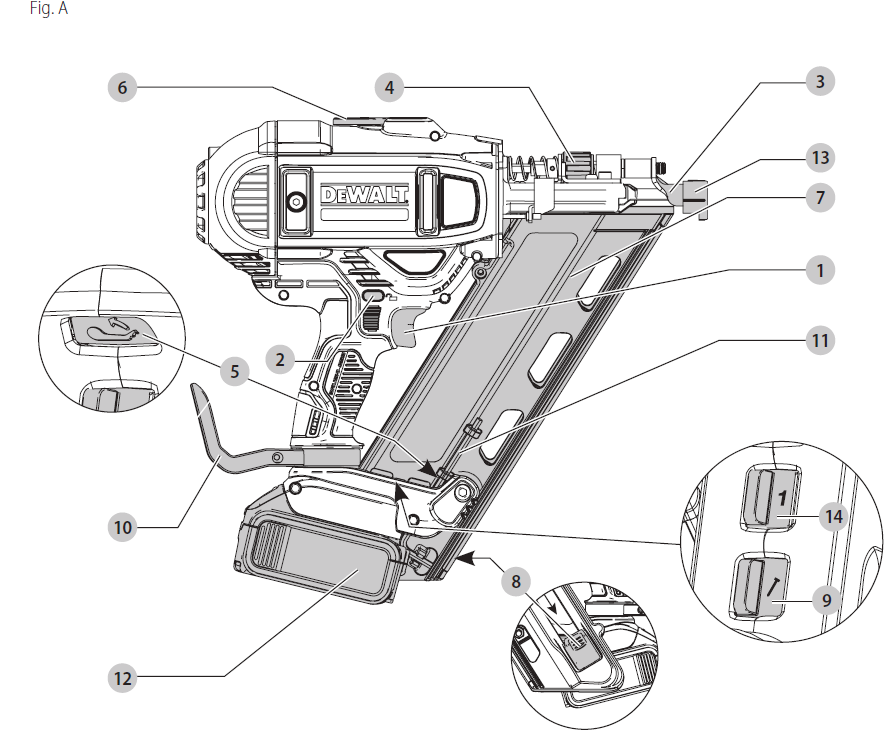
- Trigger
- Trigger lock-off
- Contact trip
- Depth adjustment wheel
- Jam/stall indicator light
- Stall release lever
- Magazine
- Pusher latch
- Mode selector switch 10 Rotating rafter/belt hook
- On-board hex wrench 12 Battery pack
- No-mar tip
- Speed selector switch
Detailed Specifications (Key Features)
- Firing Mode Selective: Bump or Sequential
- Voltage: 20
- Height :13.5" (346 mm)
- Width: 4" (104 mm)
- Length :13.25" (335 mm)
- Weight: 8.0 lbs. (3.63 kg)
- Magazine: Angle 33°
- Loading: Capacity Up to 55 nails
NAIL SPECIFICATIONS
Clipped Head or Full Head
- Nail Lengths :2"– 3–1/2" (50 mm–90 mm)
- Shank Diameters: .113"–.131" (2.8 mm–3.3 mm)
- Nail Stick Angles :30°– 34°
- Shank Types: Smooth and Ring
OPERATION
- WARNING: To reduce the risk of serious personal injury, turn the unit off and remove the battery pack before making any adjustments or removing/installing attachments or accessories. An accidental start-up can cause injury.
- WARNING: Read the section titled Nailer Safety Warnings at the beginning of this manual. Always wear eye and ear protection when operating this tool. Keep the nailer pointed away from yourself and others. For safe operation, complete the following procedures and checks before each use of the nailer. WARNING: If the tool has been dropped or you suspect tool damage, perform a tool operation check as defined in the Mode Selection section of the manual. If it doesn’t perform according to the manual, stop using the tool and have it serviced at an authorized DEWALT service center.
- Wear proper eye, hearing, and respiratory protection.
- Remove the battery pack from the tool.
- Lock the pusher in the back position and remove all nail strips from the magazine.
- Check for smooth and proper operation of the contact trip and pusher assemblies. Do not use the tool if either assembly is not functioning properly. NEVER use a tool that has the contact trip restrained in the up position.
- NEVER use a tool that has damaged parts.
- WARNING: To reduce the risk of personal injury, disconnect the battery pack from the tool before performing maintenance, clearing a jammed nail, leaving the work area, moving the tool to another location, or handing the tool to another person.
Installing and Removing the Battery Pack
- NOTE: For best results, make sure your battery pack is fully charged.
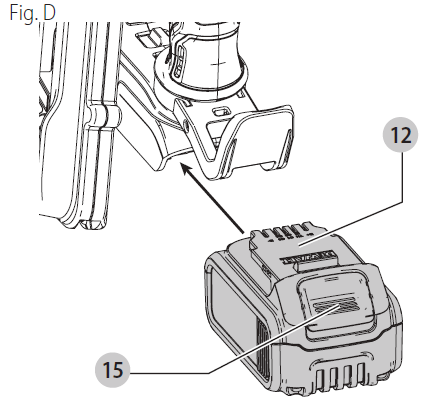
- To install the battery pack 12 into the tool handle, align the battery pack with the rails inside the tool’s handle and slide it into the handle until the battery pack is firmly seated in the tool,, l and ensure that it does not disengage.
- To remove the battery pack from the tool, press the release button 15 and firmly pull the battery pack out of the tool handle. Insert it into the charger as described in the charger section of this manual.
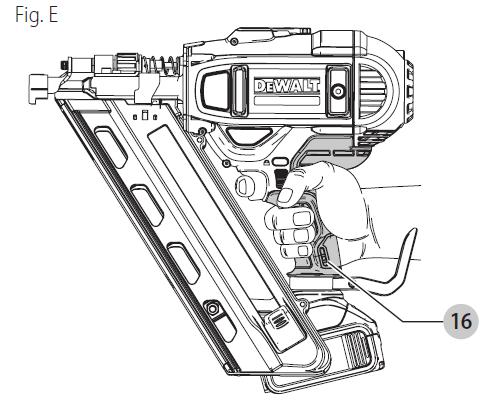
Proper Hand Position (Fig. E)
- WARNING: To reduce the risk of serious personal injury, ALWAYS use proper hand position as shown.
- WARNING: To reduce the risk of serious personal injury, ALWAYS hold securely in anticipation of a sudden reaction.
Proper hand position requires one hand on the handle 16 as shown.
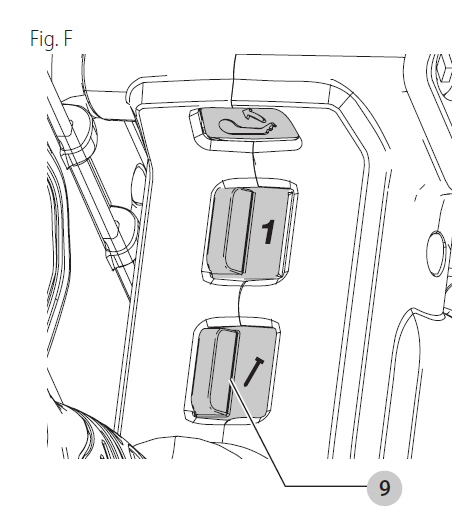
Mode Selection (Fig. F)
- WARNING: Always wear proper eye [ANSI Z87.1 (CAN/CSA Z94.3)] and ANSI S12.6 (S3.19) hearing protection when operating the tool.
- The DEWALT cordless nailers are assembled in accordance with the ANSI Standard SNT-101-2002.
The framing nailer is capable of firing nails using bump actuation or sequential actuation. If you would like to have the bump actuation mode disabled, have the tool serviced by an authorized DEWALT service center. Before operating this tool, look at the selector switch to determine the actuation mode. Read all instructions before selecting actuation mode. - WARNING: Keep fingers AWAY from the trigger when not driving nails to avoid accidental firing. NEVER carry a tool with a finger on the trigger. In bump mode tool will fire a nail if the contact trip is bumped while the trigger is depressed.
Sequential action
Use sequential action for intermittent nailing where very careful and accurate placement and depth control are desired. The sequential actuation mode provides the maximum delivery of power for driving the longest nails.
- To operate the nailer in sequential action mode
- Slide the mode selector switch 9 to the left.
- Fully depress the osepiece against the work surface (motor will start).
- Pull the rigger (nail will drive into the work surface).
- Release trigger.
- Lift the nosepiece off the work surface.
- Repeat steps 2 through 4 for the next application.
- NOTICE: The contact trip needs to be depressed,, followed by a trigger pull for each nail, il followed by a release of both the contact trip and trigger after each nail.
- Bump action
Bump action is intended for rapid nailing on flat, stationary surfaces ais nd typically most effective for applications that require driving shorter nails.
When using a bump action, two methods are available: place actuation and bump actuation.
Slide the mode selector switch 9 to the right.
To Operate the Tool Using the Place Actuation Method - WARNING: A nail will fire each time the trigger is depressed as long as the contact trip remains depressed.
- Depress the contact trip against the work surface.
- Depress the trigger.
- To Operate the Tool Using the Bump Actuation Method
- Depress the trigger.
- Push the contact trip against the work surface. As long as the trigger is depressed, the tool will fire a nail every time the contact trip is depressed. This allows the user to drive multiple nails in sequence.
- WARNING: Do not keep the trigger depressed when the tool is not in use. Keep the trigger lock-off in the locked position when the tool is not in use.
- WARNING: When the tool’s motor is running, the next actuation, pulling the trigger or depressing the contact trip, will cause a nail to fire.
Speed Selection (Fig. A)
This nailer is equipped with a dual speed selection switch 14 located on the foot.
- For shorter nails, select speed 1 by setting the switch to the left-most position.
- For longer nails and more rigorous applications, select speed 2 by setting the switch to the right-most position.
- If nails are not driving to depth in speed setting 1, you may have to switch to speed setting 2 for additional driving power.
Dry Fire Lock Out
The nailer is equipped with a dry fire lockout,, which prevents the tool from actuating when the magazine is nearly empty. When approximately 7 to 9 nails remain in the magazine, the tool ceases to operate. Refer to Loading the Tool to reload a stick of collated nails.
Preparing the Tool
- NOTICE: NEVER spray or in any other way apply lubricants or cleaning solvents inside the tool. This can seriously affect the life and performance of the tool.
- NOTE: The battery pack is not fully charged out of the carton. Follow the instructions outlined (refer to Charging a Battery).
- Read the Nailer Safety Warnings section of this manual.
- Wear eye and ear protection.
- Remove the battery from the tool.
- Ensure the magazine is empty of all fasteners.
- Check for smooth and proper operation of the contact trip and pusher assemblies. Do not use the tool if either assembly is not functioning properly. NEVER use a tool that has the contact trip restrained in the actuated position.
- Keep the tool pointed away from yourself and others.
- Insert a fully charged battery pack.
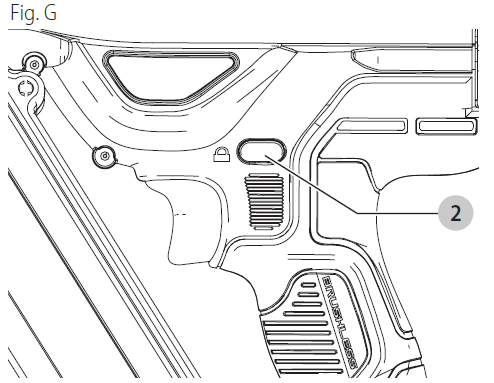
Using the Trigger Lock-off (Fig. G)
- WARNING: To reduce the risk of serious personal injury, do not keep the trigger depressed when the tool is not in use. Keep the trigger lock-off switch LOCKED (Fig. G) when the tool is not in use.
- WARNING: To reduce the risk of serious personal injury, lock off the trigger, disconnect the battery pack from the tool , and remove nails from the magazine before making adjustments.
- Each DEWALT nailer is equipped with a trigger lock-off 2, which,, when pushed to the right as shown in Figure G, prevents the tool from firing a nail by locking the trigger and bypassing power to the motor.
When the trigger lock-off is pressed to the left, the tool will be fully operational. The trigger lock-off should always be locked off (Fig. G) whenever any adjustments are made or when the tool is not in immediate use. - NOTICE: Do not store the tool with the battery pack installed. To prevent damage to the pack and to ensure the best battery life, store battery packs out of the tool or charger in a cool, dry location.
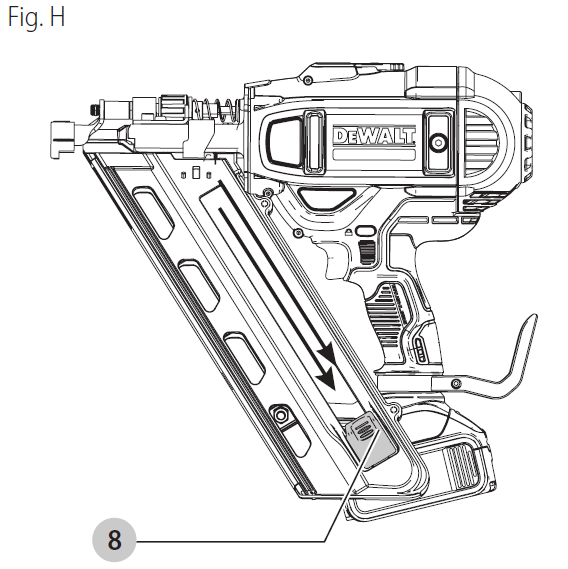
Loading the Tool (Fig. H)
- WARNING: Keep the tool pointed away from yourself and others.
- WARNING: Never load nails with the contact trip or trigger activated.
- WARNING: Always remove the battery pack before loading or unloading nails.
- CAUTION: Keep fingers clear of the pusher latch track to prevent injury.
- WARNING: The trigger lock-off should always be engaged whenever any adjustments are made or when the tool is not in use.
- Turn the nailer upside down.
- Slide the spring-loaded pusher latch 8 to the base of the magazine to lock it into place, Fig. H
- Drop nail strips into the loading slot of the magazine, making sure the nail heads align correctly with the slot opening. (Refer to Nail Specifications to determine compatible size.)
- Keeping fingers clear of the track, close the magazine by releasing the pusher latch. Carefully allow the latch to slide forward and engage the nail strip.
Unloading the Tool
- WARNING: The trigger lock-off should always be locked off whenever any adjustments are made or when he tool is not in use.
- Slide the spring-loaded pusher latch to the base of the magazine to lock it into place.
- Tip the tool up until the fastener strip slides freely out of the magazine.
- With the battery removed, check the nosepiece to verify no nails are remaining.
- NOTE: The tool is equipped with a magnet in the nose area for improved tool performance. When unloading, always verify that the small sticks of nails are not held to the magnetized nose piece.
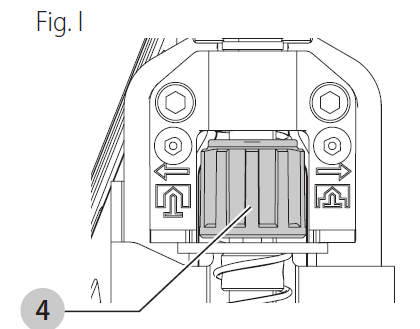
Adjusting Depth (Fig. I)
- The depth that the nail is driven can be adjusted using the depth adjustment wheel 4 on the nose of the tool.
- WARNING: To reduce the risk of serious injury from accidental actuation when attempting to adjust depth, ALWAYS:
- Remove the battery pack
- Engage trigger lock-off.
- Always point the nose of the nailer away from you.
- Avoid contact with the trigger during adjustments
- To drive the nail shallower, rotate the depth adjustment wheel 4 to the left, toward the shallow nail icon.
- To drive a nail deeper, rotate the depth adjustment wheel 4 to the right, toward the deeper nail icon .
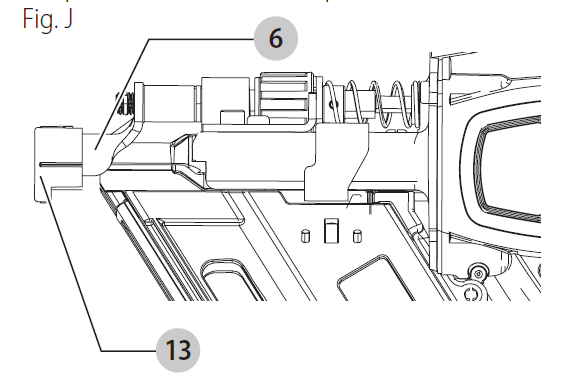
Non-mar Tip (Fig. J)
- When using this tool on softer materials that you do not want to mark, such as wood cladding, use the plastic no-mar tip 13 over the contact tip 6 .
LED Indicator (Fig. A)
- Your nailer is equipped with an LED indicator light 5 to alert you of a jam/stall. Also refer to to the Troubleshooting Guide for further instruction.
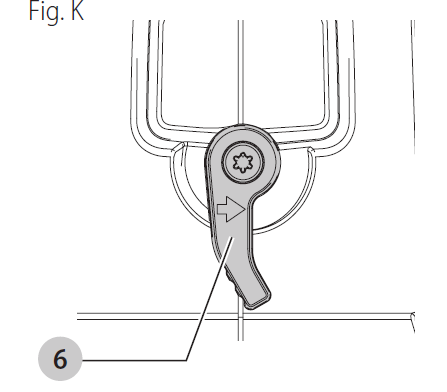
Stall Release (Fig. K)
- If the nailer is used in harder wood where all available energy in the motor is used to drive a fastener, the tool may stall. The driver blade will not complete the drive cycle, and the jam/stall indicator will flash. Rotate the stall release lever 6 on the tool,l and the mechanism will release. NOTE: The tool will disable itself and not reset until the battery pack has been removed and reinserted. If the driver blade does not automatically return to the home position, proceed to Clearing a Jammed Nail.
- If the unit continues to stall, ll please review the material and fastener length to be sure that it is not too rigorous an application.
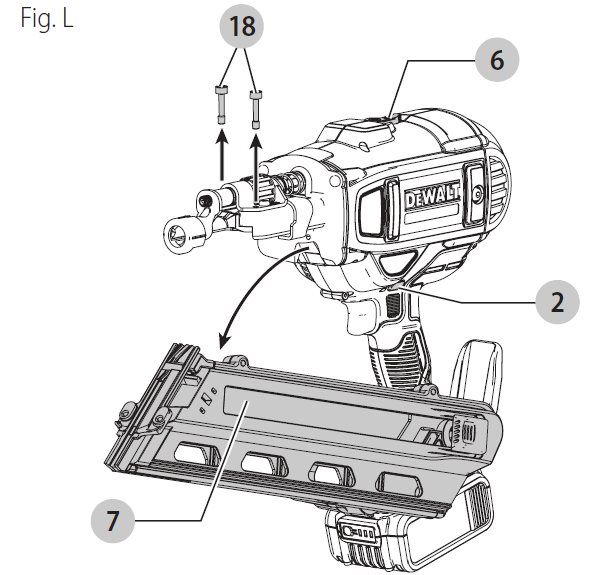
Clearing a Jammed Nail (Fig. A, L)
- WARNING: To reduce the risk of serious personal injury, disconnect the battery pack from the tool before making any adjustments, changing accessories, servicing, or moving the tool. Such preventative safety measures reduce the risk of starting the
tool accidentally. - If a nail becomes jammed in the nosepiece, keep the tool pointed away from you and follow these instructions to clear:
- Remove the battery pack from the tool and engage trigger lock-off 2 .
- Slide the spring-loaded pusher latch to the base of the magazine to lock it into place and unload the nail strip.
- Using the hex tool 11 provided, loosen the two hex bolts 18 at the top of the magazine.
- Rotate the magazine 7 forward.
- Remove jammed/bent nail, using pliers if necessary.
- If the driver blade is in the down position, rotate the stall release lever on the top of the nailer.
NOTE: If the driver blade will not reset after rotating the stall release lever 6 , manually resetting the blade with a long screw driver may be necessary. - Rotate the magazine back into position under the nose of the tool and tighten the hex bolts.
- Reinsert the battery pack.
NOTE: The tool will disable itself and not reset until the battery pack has been removed and reinserted. - Reinsert nails into the magazine (refer to Loading the Tool).
- Release the pusher latch.
- Disengage the trigger lock-off when ready to continue nailing.
- NOTE: Should nails jam frequently or the driver blade continually fail to reset, have the tool serviced by an authorized DEWALT service center.
Cold Weather Operation
- When operating tools at temperatures below freezing:
- Actuate the tool 10 or 15 times into scrap lumber before using.
Hot Weather Operation
- The tool should operate normally. However, keep the oil out of direct sunlight as excessive heat can deteriorate bumpers and other rubber parts, resulting in increased maintenance.
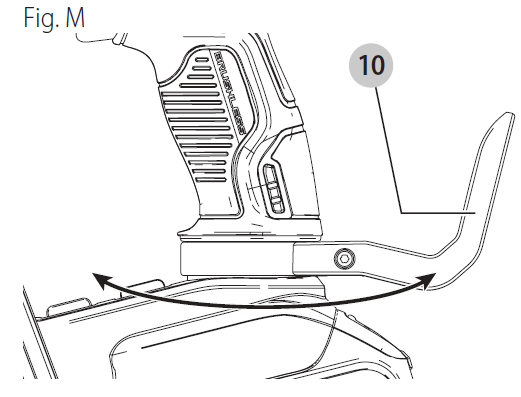
Rotating Rafter Hook (Fig. M)
- WARNING: Never use a hook to hang a tool from a belt or other clothing unless the tool is in sequential action mode. WARNING: Remove nails from the agazine before making any adjustments or servicing this tool. Failure to do so may result in serious injury.
- CAUTION: When not in use, place the tool on its side on a stable surface where it will not cause a tripping or falling hazard.
- CAUTION: Some tools with large battery packs will stand upright on the battery pack but may be easily knocked over.
- The DEWALT cordless nailer includes a rotating rafter hook 10 and can be easily positioned to the left or right of the tool to accommodate left- or right-handed users.
- If the use of the hook is not desired at all, it can be rotated to the front or back of the handle base..
MAINTENANCE
WARNING: To reduce the risk of serious personal injury, turn the unit off and remove the battery pack before making any adjustments or removing/installing attachments or accessories. An accidental start-up can cause injury.
Cleaning
- WARNING: Blow dirt and dust out of all air vents with clean, dry air at least once a week. To minimize the risk of eye injury, always wear ANSI Z87.1-approved eye protection when performing this.
- WARNING: Never use solvents or other harsh chemicals for cleaning the non-metallic parts of the tool. These chemicals may weaken the plastic materials used in these parts. Use a cloth dampened only with water and mild soap. Never let any liquid get inside the tool; never immerse any part of the tool in liquid.
Three-Year Limited Warranty
- DEWALT will repair, without charge, any defects due to faulty materials or workmanship for three years from the date of purchase. This warranty does not cover part failure due to normal wear or tool abuse. For further details of warranty coverage and warranty repair information, visit www.dewalt.com or call 1-800-4-DEWALT (1-800-433-9258). This warranty does not apply to accessories or damage caused where repairs have been made or attempted by others.
- THIS LIMITED WARRANTY IS GIVEN INSTEAD OF ALL OTHERS, INCLUDING THE IMPLIED WARRANTY OF MERCHANTABILITY AND FITNESS FOR A PARTICULAR PURPOSE, AND EXCLUDES ALL INCIDENTAL OR CONSEQUENTIAL DAMAGES. Some states do not allow limitations on how long an implied warranty lasts or the exclusion or limitation of incidental or consequential damages, so these limitations may not apply to you. This warranty gives you specific legal rights, and you may have other rights which vary in certain states or provinces.
- In addition to the warranty, DEWALT tools are covered by our:
- 1 YEAR FREE SERVICE
DEWALT will maintain the tool and replace worn parts caused by normal use, for free, any time during the first year after purchase. - 2 YEARS FREE SERVICE ON DEWALT BATTERY PACKS DC9071, DC9091, DC9096, DC9182, DC9280, DC9360, DCB120, DCB127, DCB201, DCB203, DCB203BT, DCB207, DCB361
- 3 YEARS FREE SERVICE ON DEWALT BATTERY PACKS DCB200, DCB204, DCB204BT, DCB205, DCB205BT, DCB206, DCB606, DCB609
- NOTE: Battery warranty voided if the battery pack is tampered with in any way. DEWALT is not responsible for any injury caused by tampering and may prosecute warranty fraud to the fullest extent permitted by law.
- 90 DAY MONEY BACK GUARANTEE
- If you are not completely satisfied with the performance of your DEWALT Power Tool, Laser, or Nailer for any reason, you can return it within 90 days from the date of purchase with a receipt for a full refund – no questions asked.
- LATIN AMERICA: This warranty does not apply to products sold in Latin America. For products sold in Latin America, see country country-specific warranty information contained in
The packaging, call the local company or see the website for warranty information. - FREE WARNING LABEL REPLACEMENT: If your warning labels become illegible or are missing, call 1-800-4-DEWALT (1-800-433-9258) for a free replacement.
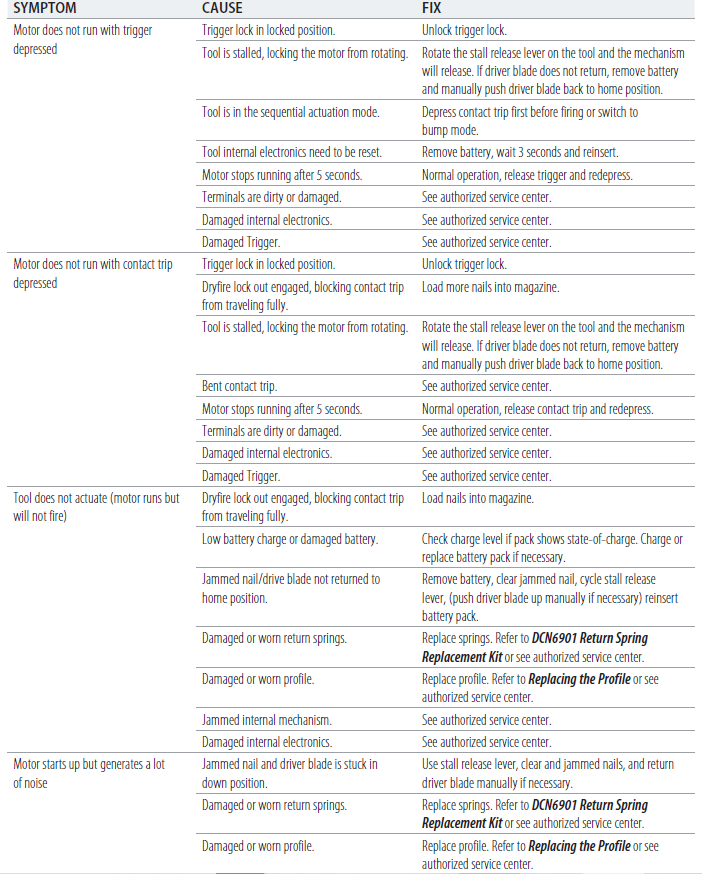
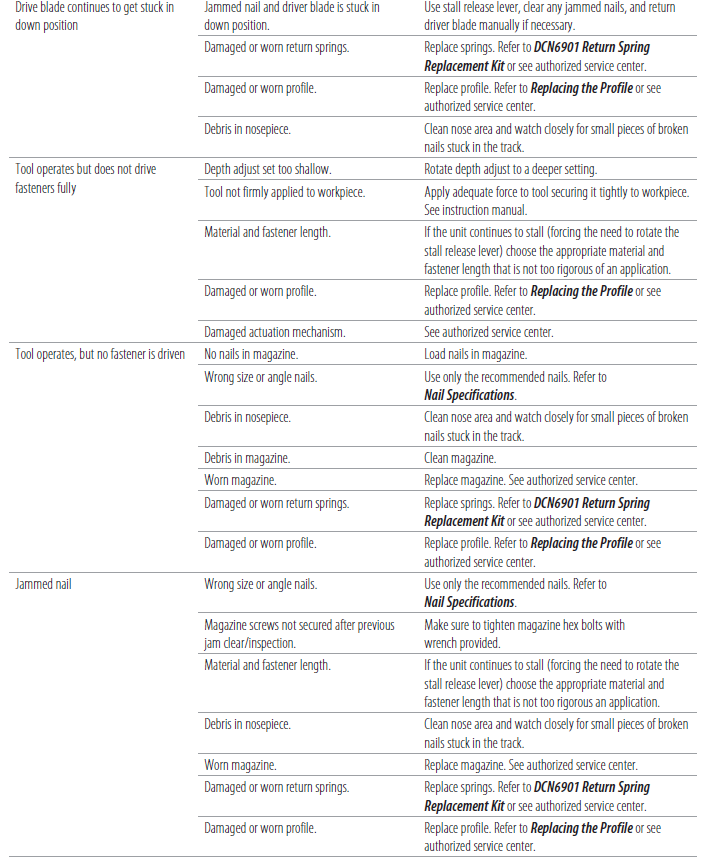
TROUBLESHOOTING GUIDE
Many common problems can be solved easily by utilizing the chart below. For more serious or persistent problems, contact a DEWALT service center or call 1-800-4-DEWALT.
Pros & Cons
Pros:
- Powerful and reliable performance
- Lightweight and ergonomic design for reduced fatigue
- Tool-free selector switch for easy mode transition
- Adjustable depth setting for precise control
- Compatible with a wide range of Dewalt 20V MAX batteries and chargers
- Durable construction with magnesium body and weather-sealed battery pack
Cons:
- Slightly heavier than some other cordless nailers on the market
- No LED light for working in dark areas (available in some kits but not standard)
- Some users report occasional jamming issues if nails are not properly aligned
Customer Reviews
Customers generally praise the Dewalt DCN692 for its consistent performance, ease of use, and durability. Many contractors appreciate the tool's ability to handle heavy-duty framing tasks without significant battery drain. However, some users have noted that the nailer can be slightly heavier than expected and that occasional jamming may occur if the nails are not loaded correctly.
Common complaints include the lack of an integrated LED light in the base model and the occasional need for maintenance to prevent jamming.
Faqs
What is the voltage and battery type of the Dewalt DCN692?
What are the nail length and gauge specifications for the DCN692?
Does the Dewalt DCN692 come with a battery and charger?
How many nails can the magazine of the DCN692 hold?
What types of firing modes does the DCN692 offer?
Is the Dewalt DCN692 suitable for heavy-duty framing?
What kind of warranty does the Dewalt DCN692 come with?
Can I use any 20V MAX battery with the DCN692?
How do I prevent jamming issues with the DCN692?
Does the Dewalt DCN692 have an integrated LED light?
Tags
More dewalt manuals
Leave a Comment