Webb WEER33 1300W Electric Lawnmower Guide
Content
Introduction of Webb WEER33 1300W Electric Lawnmower
The Webb WEER33 Electric Lawnmower is a powerful and efficient tool designed for residential lawn care. With a 1300W motor, this mower is capable of handling lawns up to 300m². Its compact and lightweight design makes it easy to maneuver, while the 33cm cutting width ensures efficient cutting. The estimated price of the Webb WEER33 is around $200, and it was launched in 2021.
Specification
| Specification | Detail |
|---|---|
| Model | WEER33 |
| Product No. | 1938122001 |
| Motor - Rated Power | 1300W |
| Motor - Rated Voltage | 230-240V ~50Hz |
| No Load Speed | 3600rpm |
| Cutting Width | 33cm |
| Height of Cut | 25-65mm |
| Height Adjustments | 5 |
| Grassbox Capacity | 35L |
| Sound Pressure Level | 76.8dB(A) |
| Guaranteed Sound Power Level | 89dB(A) |
| Vibration | 3.47m/s² |
| Insulation | Double Insulated IPX4 |
| Weight | N.W 8.8kg - G.W 10.5kg |
COMPONENTS
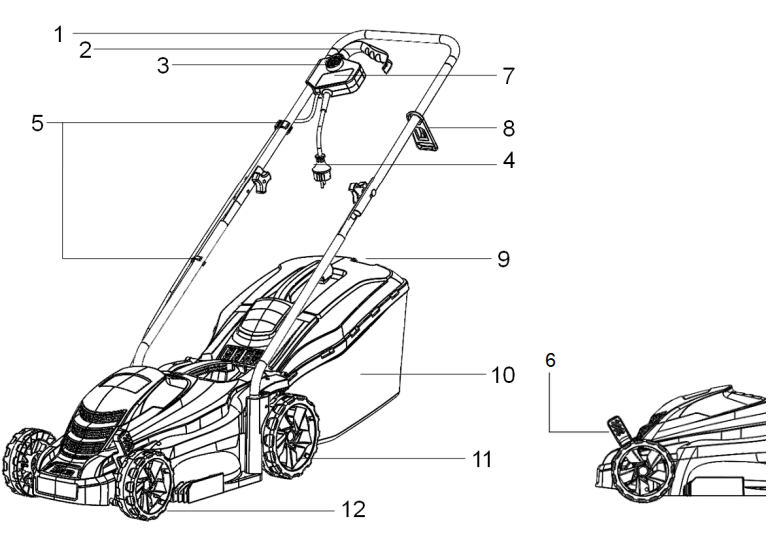
- Handle
- Trigger
- Safety Button
- Electric Cable
- Electric Cable Clips
- Single Height Adjuster
- Switch Box
- Electric Cable Retainer
- Grassbox Full Indicator
- Grassbox
- Rear Wheel
- Front Wheel
PARTS DIAGRAM
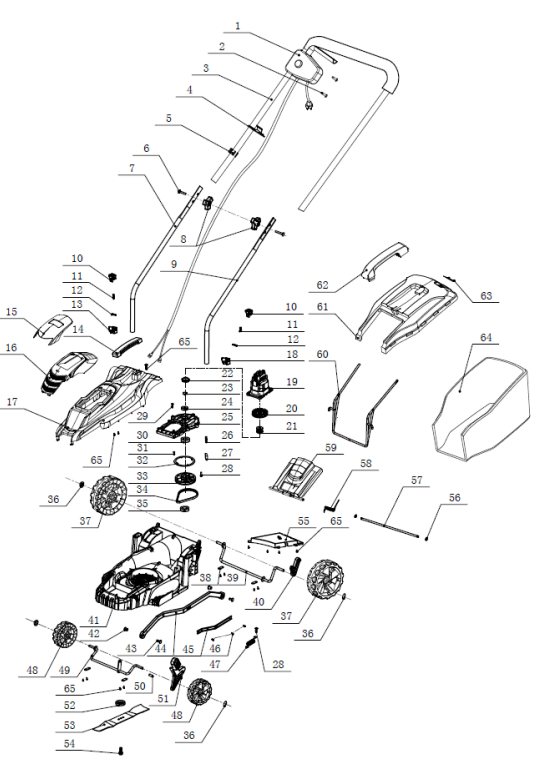
Parts List for Webb WEER33 Electric Lawnmower
| ITEM | PART NUMBER | DESCRIPTION | QTY |
|---|---|---|---|
| 1 | WE124-14080262 | Switch Box Assembly | 1 |
| 2 | WE124-14030424 | ST4.2×25 Screw | 34 |
| 3 | WE124-13080388 | Top Handle Assembly | 1 |
| 4 | WE124-301070859 | Handle Adjustment | 1 |
| 5 | WE124-301070858 | Cable Clip | 1 |
| 6 | WE124-140040122 | M6X45 Bolt | 2 |
| 7 | WE124-301070121 | Right Lower Handle | 1 |
| 8 | WE124-301070851 | Handle Knob & Nut | 2 |
| 9 | WE124-130702132 | Left Lower Handle | 1 |
| 10 | WE124-301070912 | Handle Adjustment Button | 2 |
| 11 | WE124-130603194 | Handle Adjustment Spring | 2 |
| 12 | WE124-301070286 | Pin | 4 |
| 13 | WE124-301070827 | Right Support Seat | 1 |
| 14 | WE124-301070936 | Motor Cover Carry Handle | 1 |
| 15 | WE124-301070910 | Motor Cover 1 | 1 |
| 16 | WE124-301070911 | Motor Cover 2 | 1 |
| 17 | WE124-301070913 | Upper Deck | 1 |
| 18 | WE124-301070854 | Left Support Seat | 1 |
| 19 | WE124-140702212 | Motor Assembly | 1 |
| 20 | WE124-301070572 | Motor Fan | 1 |
| 21 | WE124-130070189 | Pulley | 1 |
| 22 | WE124-301070160 | Dust Cap | 1 |
| 23 | WE124-140040220 | Locknut | 1 |
| 24 | WE124-130502543 | Bearing | 2 |
| 25 | WE124-301070575A | Motor Bracket | 1 |
| 26 | WE124-130602088 | Spring | 1 |
| 27 | WE124-140509919 | Brake Block | 1 |
| 28 | WE124-140030378 | ST4.8×18 Screw | 5 |
| 29 | WE124-140303162 | ST4.2×18 Screw | 7 |
| 30 | WE124-130502040 | Bearing | 1 |
| 31 | WE124-140030042 | ST3*8 Screw | 4 |
| 32 | WE124-130400115 | Brake Block | 1 |
| 33 | WE124-301070855 | Pulley Assembly & Axle | 1 |
| ITEM | PART NUMBER | DESCRIPTION | QTY |
|---|---|---|---|
| 34 | WE124-150902072A | Ribbed Belt | 1 |
| 35 | WE124-140303024 | ST4.2×25 Screw | 1 |
| 36 | WE124-130903947 | Bearing Holder | 4 |
| 37 | WE124-150910118 | Rear Wheel | 2 |
| 38 | WE124-130903797 | Axle Clamp | 4 |
| 39 | WE124-130502851 | Back Axle | 1 |
| 40 | WE124-301070127 | Axle Bracket | 1 |
| 41 | WE124-301070914 | Lower Deck | 1 |
| 42 | WE124-301070793 | Lockpin | 2 |
| 43 | WE124-301070706 | Lockpin Seat | 2 |
Description
The WEER33 1300W Electric Lawnmower is an environmentally friendly alternative to gas-powered mowers. Its 1300W motor provides ample power for even tough grass, while the 33cm cutting width allows for efficient cutting. The mower features a 30L grass collection box and a rear roller, which provides a striped finish to your lawn. The Webb WEER33 also has five adjustable cutting heights, ranging from 25mm to 75mm, allowing you to achieve your desired lawn length.
Setup of Webb 1300W Electric Lawnmower
Setting up the Webb 1300W Electric Lawnmower is a straightforward process. First, ensure that the mower is in a stable and flat area. Then, plug in the mower and ensure that the power switch is in the "off" position. Next, unfold the handle and secure it in place. Attach the grass collection box and ensure that it is securely fastened. Finally, adjust the cutting height to your desired setting.
PREPARATION
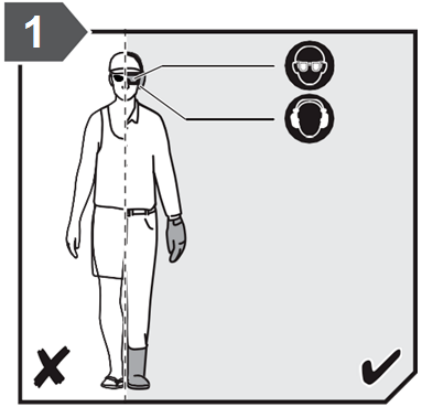
- Always wear appropriate footwear, such as work boots, and trousers when operating the mower. Do not operate the equipment when barefoot or wearing open sandals. Always wear safety goggles or safety glasses with side shields when operating the mower.
- Thoroughly inspect the area where the equipment is to be used and remove all objects thatauthorized can be thrown by the machine.
- Before using, always visually inspect to see that the blades, blade bolts and cutter assembly are not worn or damaged. Replace worn or damaged blades and bolts in sets to preserve balance.
- Only use accessories approved by the manufacturer.
- Do not operate the machine while under the influence of alcohol or drugs.
- Never operate the machine in wet grass. This could cause you to slip while mowing.
ELECTRICAL SAFETY
Power plugs must match the outlet. Never modify the plug in any way. Do not use any adapter plugs with earthed (grounded) power tools. Unmodified plugs and matching outlets will reduce risk of electric shock.
- Avoid unintentional starting. Always check that the switch is in Off position before plugging in the product to the power supply. Do not carry a plugged in product with your finger on the switch.
- Avoid body contact with earthed or grounded surfaces, such as pipes, radiators, ranges and refrigerators. There is an increased risk of electric shock if your body is earthed or grounded.
- Do not expose the product to rain or wet conditions.
- Water entering an appliance will increase the risk of electric shock.
- Electrical power should be supplied via a residual current device (RCD) with a tripping current of not more than 30 mA.
- Before use, check the supply and extension cord for signs of damage or aging. If the cord becomes damaged during use, disconnect the cord from the supply immediately. Do not touch the cord before disconnecting the supply. Do not use the product if the cord is damaged or worn.
- If you need to use an extension cable, ensure it is suitable for outdoor use and has a current capacity rating, sufficient to supply your product. Check it before every use for damage, always uncoil it completely, during use because coiled cables can overheat. Damaged extension cables should not be repaired; they should be replaced with an equivalent type.
- Make sure the power cable is positioned so that it cannot be damaged by the cutting means and will not be stepped on, tripped over or otherwise subjected to damage or stress.
- Never pick up or carry the product by the electric cable.
- Never pull by the power cord to disconnect from the power supply.
- Keep the power cord away from heat, oil and sharp edges.
- Make sure voltage is correct for your product. A nameplate on the product indicates the product’s voltage. Never connect the product to an AC voltage that differs from this voltage.
- Always ensure the cord from the handlebar to the mower body is never trapped, pinched or otherwise damaged during assembly or handle folding. Never apply power to the mower if this cable is damaged. Return to authorised service centre for professional repair.
OPERATION
- Only operate the mower in daylight or in good artificial light.
- Avoid operating the equipment in wet grass.
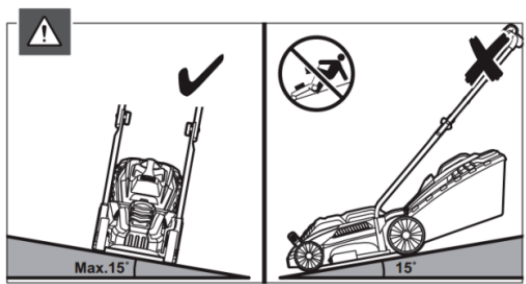
- Always be sure of your footing on slopes. Exercise extreme caution when changing direction on slopes. Do not mow excessively steep slopes, which exceed 15°. For wheeled rotary machines, mow across the face of slopes, never up and down.
- Never run while using the mower, always walk.
- Do not pull the mower backwards unless absolutely necessary. Use extreme caution when reversing or pulling the lawnmower towards you.
- Stop the blade(s) if the lawnmower has to be tilted for transportation when crossing surfaces other than grass (such as gravel drives, walks, or roads) & when transporting the lawnmower to & from the area to be mowed. Never pick up or carry a lawnmower while the electric motor is running.
- Never operate the lawnmower with defective guards, or without safety devices, for example deflectors and/or grass catchers, in place.
- Do not put hands or feet near or under rotating parts. Keep clear of the discharge opening at all times.
Stop the motor and disconnect the electrical plug from the power source
- before clearing blockages or unclogging the chute;
- before checking, cleaning or working on the lawnmower;
- after striking a foreign object inspect the lawnmower for damage and make repairs before restarting and operating the lawnmower,
- if lawnmower starts to vibrate abnormally (check immediately).
- Shut the motor off and wait until the motor and the blade come to a complete stop before removing the grass catcher.
- Watch for holes, ruts, or bumps. Tall grass can hide obstacles.
- Do not mow near drop-offs, ditches or embankments. The operator could lose footing or balance.
- Be alert and turn the machine off if children enter the area.
- Never tamper with safety devices. Check their proper operation regularly.
- Never attempt to make wheel height adjustments while the motor is running.
GENERAL MOWING TIPS
- When cutting long grass, reduce walking speed to allow for more effective cutting and a proper discharge of the clippings. It is recommended that you cut longer grass in stages. Start at a higher cutting height and go over the same area a second time with a lower cutting height.
- Do not cut wet grass; it will stick to the underside of the deck and prevent proper collection or discharge of grass clippings.
- New or thick grass may require a higher cutting height.
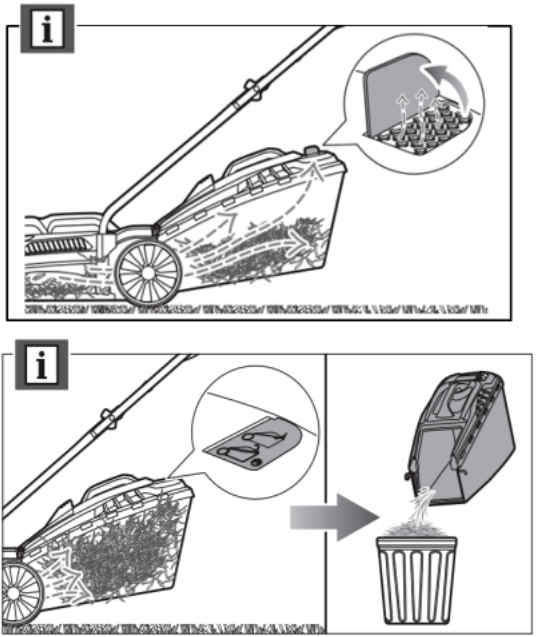
- Empty the grass box regularly, the discharge chute will become blocked with grass cuttings.
- The mower is designed to operate and cut most effectively when moving forwards.
OVERLOAD PROTECTION
- The product has an overload protection device. When overloading is detected, the product will automatically switch off. If the overload protector is actuated, the motor must be allowed to cool down for 5 to 10 minutes.
- Turn off the power and remove the plug from the supply. The blades are sharp, wear heavy duty gloves before touching. Make sure the blade can rotate freely and is not jammed or tight.
- When the motor is cool, connect the plug to the power supply, turn the power on. Press the Safety Button & then the Trigger to start the product. If the product will still not start, return it to an authorised service centre for repair.
MAINTENANCE AND STORAGE
- Keep all nuts, bolts and screws tight to be sure the equipment is in safe working condition.
- Replace worn or damaged parts for safety.
- Keep the machine free of grass, leaves, or other debris build-up.
- Allow the machine to cool before storing.
- Grass catcher components are subject to wear, damage, & deterioration, which could expose moving parts or allow objects to be thrown. Frequently check & replace them with the manufacturer’s recommended parts, when necessary.
- Mower blades are sharp and can be dangerous. Wrap the blade(s) or wear gloves, and use extra caution when servicing them.
ASSEMBLY
ASSEMBLY/PRE-OPERATION
Read these instructions in its entirety before you attempt to assemble and operate your new lawnmower.
REMOVE LAWN MOWER FROM CARTON
Roll the lawn mower out of the carton and check thoroughly for additional loose parts. Please ensure that you have all the below necessary parts, before commencing with the assembly
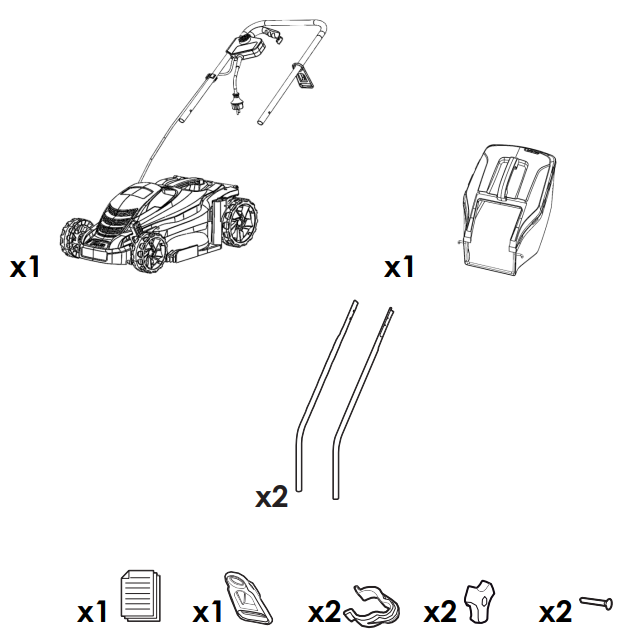
HANDLE ASSEMBLY
- Insert the lower handles into the deck of the machine, individually. Press the height adjustment button to allow the lower handle to be inserted and ensure both handles are fixed to the same height.
- Slide the Cable Restraint over the left hand side of the Upper Handle and secure the Upper Handle to the Lower Handles using the Handle Knob and Bolts provided.
- Ensure the Electric Cable run down the outside of the handle assembly.
- Secure the Electric Cable to the handle assembly, using the Cable Clips provided.

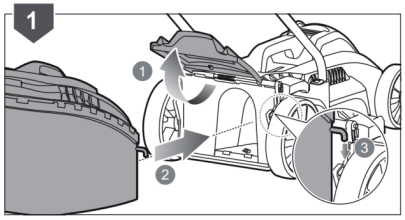
GRASSBOX COLLECTOR
- Ensure the lower mesh collector is fully clear open and away from the collector top.
- Lift the Grass Flap.
- Secure The Grassbox to the machine, ensuring the hooks are firmly housed onto the machine deck.
OPERATION
STARTING THE MACHINE
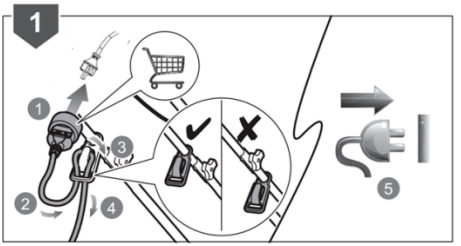
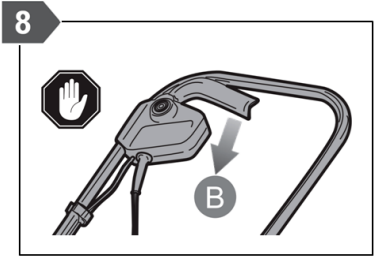
Ensure the machine is within the working grassed area. Plug the machine into the electric supply, ensuring it meets the recommended requirements. Feed the cable through the cable restraint as imaged
Press the Safety Button (A) and pull the Trigger (B) towards the main handle.
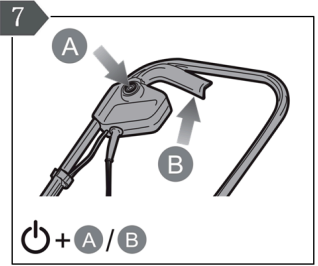
The mower will start and blade immediately rotate. When operating the machine, you can release the Safety Button and the machine will still operate.
STOP THE MOTOR
To stop the motor, release the Trigger. (WARNING – The blade will still rotate for a small time, after the trigger has been released).
ADJUST THE CUTTING HEIGHT
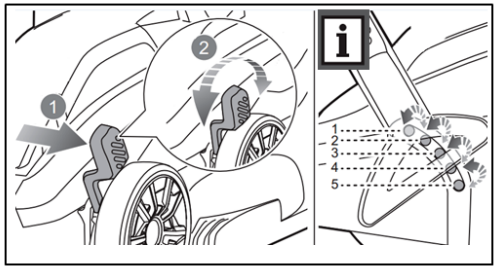
- Raise the wheels for a low cut and lower the wheels for a high cut, adjust the cutting height to suit your requirements. Medium position is best for most lawns.
- The single height adjustment lever is located on the front axle, left wheel.
- Push the lever towards the wheel and rotate up or down the five settings, depending on your needs.
GRASSBOX FULL INDICATOR
Your machine grassbox collector is fitted with a full indicator at the rear of the hard top. Whilst air is still rotating around the collector and grass is being collected, the flap will raise and remain open. Once the collector is full, the flap will remain closed and you should empty the grassbox.
MOWING TIPS
Under certain conditions, such as very tall grass, it may be necessary to raise the height of cut to reduce pushing effort, prevent overloading of the motor and leaving clumps of grass clippings.
It may also be necessary to reduce ground speed and/or push the lawn mower over the area a second time. For extremely heavy cutting, reduce the width of cut by overlapping the previously cut path and mow slowly. The side combs allow the machine to cut up to walls.
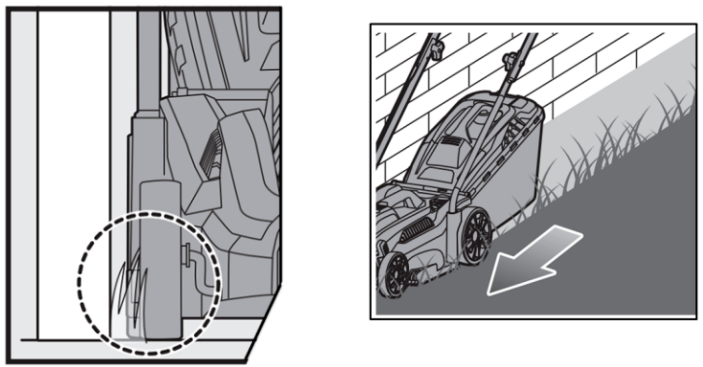
When cutting on slopes, ensure your footing is secure, the grass is not wet and the machine is used across the slope and not up or down the slope. The slope gradient should not exceed 15°.
MAINTENANCE
IMPORTANT: Regular, careful maintenance is essential for keeping the safety level and original performance of the machine unchanged over time.
- Keep all nuts, bolts and screws tight to be sure the equipment is in safe working condition. Regular maintenance is essential for safety and performance.
- Do not use the equipment with worn or damaged parts, this can be dangerous. Parts are to be replaced and not repaired. Use genuine spare parts. Parts that are not of the same quality can damage the equipment and create safety hazards.
- Wear strong work gloves when removing and reassembling the blade.
- Check the blade’s balance after sharpening.
- Check the grass flap and grassbox collector frequently for wear and deterioration.
- Whenever the machine is to be handled, transported or tilted you must:
- Wear strong working gloves;
- Grasp the machine at the points that offer a safe grip, taking account of the blades, the mower’s weight and its distribution.
BLADE MAINTENANCE
- The cutting blade will continue to rotate after the motor is switched off. Slicing is possible if care is not taken. Wear appropriate hand coverage.
- Remove the electric plug from the mains supply. Clean the underside of the deck with a stiff brush, before any maintenance is undertaken to the blade.

REMOVE AND REPLACE THE BLADE
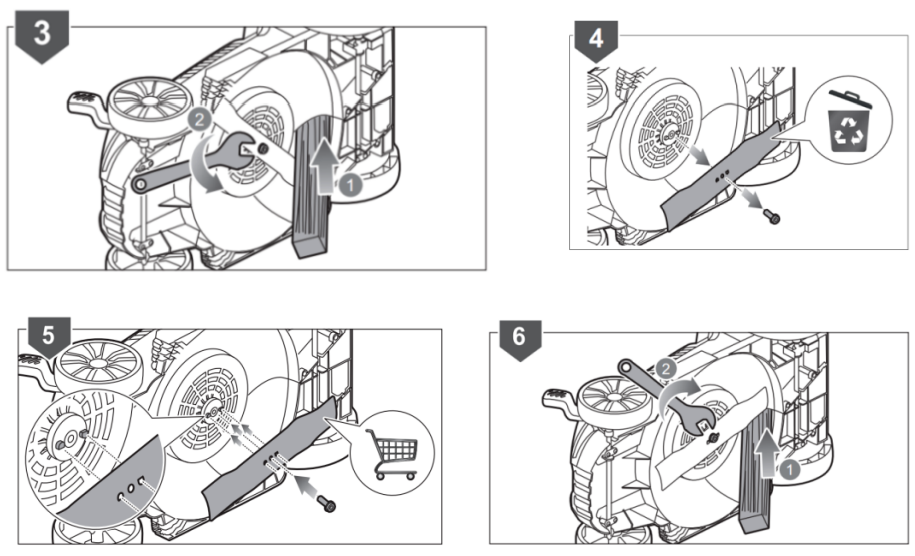
- Block the rotation of the blade, using a good sixed piece of wood, which the blade cannot cut. Hold the blade using gardening gloves (not provided) and spanner wrench (not provided) rotating the spanner anti-clockwise.
- Remove the bolt, washer and blade. Dispose of the old blade responsibly.
- Attach a new blade, fastening with the washer and blade bolt. Ensure that the blade is correctly positioned on the blade boss and then firmly tighten the bolt, clockwise.
CLEANING
Always remove the electric plug from the mains supply, before any cleaning is undertaken.
Carefully clean the underside of the deck with a stiff brush after each cut; remove the grass debris and mud accumulated inside the deck to prevent it drying. Remove the belt casing by removing the screws and clean around the transmission and drive belts with a brush or compressed air once or twice a year. Do not use water on any part of the main machine

GRASSBOX COLLECTOR CLEANING
Pores in the grassbox can become filled with dirt and dust, during use and will collect less grass. To prevent this, regularly hose the catcher off with water and let dry before using. Keep the top of the motor housing vents clear and clean of grass clippings & dust. This will assist motor air flow and extend the machine life.
STORAGE
- For trouble free service, make sure the machine is clean and dry before storing.
- Please ensure the machine is stored away from direct sunlight.
- Store indoors or in a safe, locked protected area during severe weather and winter months.
- If storing for an extended period, inspect, clean and repair the machine if necessary.
- Store in a clean, dry, dust free area.
- Ensure the machine is stored in a position, where any persons cannot step on to attempt to reach items up high, due to risk of movement.
- For compact storage, follow the below steps.
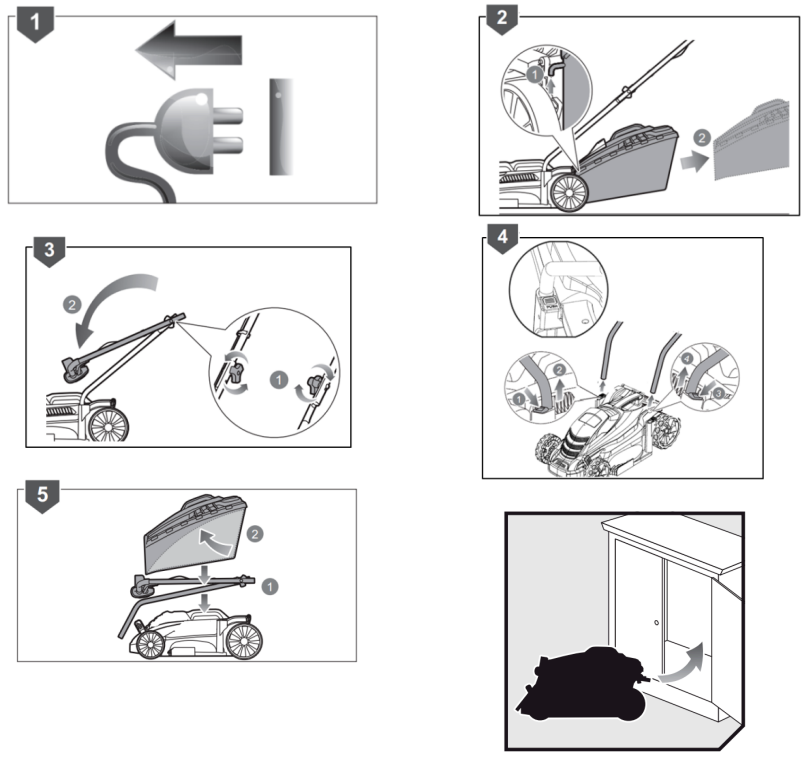
SAFETY INSTRUCTIONS
WARNING
Read this instruction manual carefully before operating this lawn mower. Make sure that you are familiar with the controls and properly operate the machine. Following these instructions can reduce the risk of fire, electric shock and personal injury.
IF NOT USED PROPERLY THIS LAWN MOWER CAN BE DANGEROUS
- This lawn mower can cause serious injury to the operator and others, the warning and safety instructions must be followed to ensure reasonable safety and efficiency in using this lawn mower. The operator is responsible for following the warning and safety instructions in this manual and on the lawn mower. Never use the lawn mower unless the grass box or guards are correctly positioned. THE LAWN MOWER IS DESIGNED FOR DOMESTIC USE ONLY.
- Lawn mowers for use in private gardens are mowers whose annual use does not generally exceed 50 hours and that are primarily used for tending GRASS OR LAWN AREAS, but not in public facilities, parks or sports grounds and not for agricultural or forestry use.
- Compliance with the operating manual supplied by the manufacturer is a prerequisite for the proper usage of the lawn mower. The operating manual contains servicing and maintenance instructions as well as directions for use.
IMPORTANT
- The lawn mower must not be used to trim bushes, hedges and shrubs, to cut or shred climbing plants or lawns on roof gardens or in balcony boxes or to clean footpaths, nor must it be used as a chopper for shredding tree or hedge cuttings.
- Furthermore, the lawn mower must not be used as a cultivator or to level off uneven areas of ground, e.g. molehills.
TRAINING
- Read the instructions carefully: Be familiar with the controls and the proper use of the equipment. Never allow children or people unfamiliar with these instructions to use the lawnmower. Local regulations can restrict the age of the operator.
- Never operate the mower while people, especially children, or pets are nearby.
- Keep in mind that the operator or user is responsible for accidents or hazards involving the lawnmower that occur to other people or their property.
TROUBLESHOOTING
| ISSUE | CORRECTION |
|---|---|
| Motor does not run | 1. Check the mains connection cable, plug fuse and circuit breaker. |
| 2. Start on short grass or on an area which has already been mown. | |
| 3. Unplug the mower. Clean the discharge chute/housing, the blade must rotate freely. | |
| 4. Correct the cutting height. | |
| Reduced Motor Power | 1. Correct the cutting height. |
| 2. Clean the discharge chute/housing. | |
| 3. Have the blade re-sharpened or replaced by an authorised service dealer. | |
| The grass collector does not fill completely | 1. Correct the cutting height. |
| 2. Allow the lawn to dry. | |
| 3. Have the blade re-sharpened or replaced by an authorised service dealer. | |
| 4. Clean the grille on the grass catcher. | |
| 5. Clean the discharge chute/housing. |
Pros & Cons
Pros
- Environmentally friendly: The Webb WEER33 1300W Electric Lawnmower is an environmentally friendly alternative to gas-powered mowers.
- Compact and lightweight: The mower's compact and lightweight design makes it easy to maneuver and store.
- Adjustable cutting heights: The Webb WEER33 has five adjustable cutting heights, allowing you to achieve your desired lawn length.
- Rear roller: The mower's rear roller provides a striped finish to your lawn.
Cons
- Corded: The Webb WEER33 is a corded mower, which may limit its range of use.
- Not suitable for large lawns: The mower's 33cm cutting width and 30L grass collection box may not be suitable for large lawns.
Customer Reviews of Webb WEER33 1300W Electric Lawnmower
Customers have praised the Webb 1300W Electric Lawnmower for its ease of use and efficient cutting. However, some have noted that the mower's cord can be a hassle to manage.
Faqs
Before the first cut, what are the proper instructions for setting up the Webb WEER33 Lawnmower?
In the event that my Webb WEER33 Lawnmower does not start, what steps should I take?
Does the Webb WEER33 Lawnmower have the capability of cutting through a variety of grasses?
How can I ensure that my Webb WEER33 Electric Lawnmower is properly maintained and when it is cleaned?
If I purchase the Webb WEER33 Lawnmower, should I be aware of any particular safety features that include the mower?
What is the recommended frequency for replacing the blade on my Webb WEER33 Lawnmower?
When it comes to moist weather, is it possible to operate the Webb WEER33 Electric Lawnmower?
In order to adjust the cutting height of the Webb WEER33 Lawnmower, what are the actions that need to be taken?
How do I rectify the problem of my Webb WEER33 Lawnmower making cuts that are not even?
Where can I find information regarding the guarantee that comes with the Webb WEER33 Electric Lawnmower?
Leave a Comment

