How to Connect: Worx Robotic Lawn Mower WR153 Owners Manual

Content
Introduction
Equipped with the latest technology, this robotic lawn mower features GPS-assisted navigation and Wi-Fi connectivity, allowing you to control and monitor it from your smartphone through the Worx Landroid app. The WR153 can navigate complex terrains, avoid obstacles, and even mow on slopes up to 20 degrees. Its customizable mowing schedule and automatic return to the charging base ensure your lawn is always perfectly maintained. With its quiet operation, environmentally friendly design, and safety features, the Worx Robotic Lawn Mower WR153 is the ideal choice for those seeking a convenient and hassle-free way to keep their lawn looking its best.
WHAT’S IN THE BOX

- 1 Worx Landroid M
- 2 wire repair connectors
- 3 spare blades kits
- 1 Allen key
- 1 charging base
- 8 screws
- 250 wire pegs
- 1 power supply
- Boundary wire 590ft
- 1 20V 4.0Ah battery
- 1 boundary wire distance gauge
- 1 Bertelsen ruler
SPECIFICATIONS
| WR140 | WR143 | WR150 | WR153 | |
|---|---|---|---|---|
| Rated voltage | 20V Max.* | 20V Max.* | 20V Max.* | 20V Max.* |
| No load speed | 2800/min. | 2800/min. | 2200/min | 2200/min |
| Cutting area | 1/4 acre | 1/2 acre | 1/4 acre | 1/2 acre |
| Cutting diameter | 7” | 8.7” | 7” | 8.7” |
| Cutting height | 1.9” - 3.5” | 1.6”-3.9” | 1.9” - 3.5” | 1.6”-3.9” |
| Cutting height positions | 5 | 5 | 5 | 5 |
| Battery type | Lithium-ion | Lithium-ion | Lithium-ion | Lithium-ion |
| Battery model | WA3578.3 | WA3578.3 | WA3578.3 | WA3578.3 |
| Charging time | approx 90 min. | approx 90 min. | approx 90 min. | approx 90 min. |
| Charger model | WA3752 | WA3752 | WA3752 | WA3752 |
| Charger rating | Input: 120 V~ 60 Hz, 90 W, Output: 20 V, 3.0 A | Input: 120 V~ 60 Hz, 90 W, Output: 20 V, 3.0 A | Input: 120 V~ 60 Hz, 90 W, Output: 20 V, 3.0 A | Input: 120 V~ 60 Hz, 90 W, Output: 20 V, 3.0 A |
| Machinery weight | 21.16 lbs | 22.9 lbs | 21.16 lbs | 22.9 lbs |
| Protection degree | III | III | III | III |
| App | Yes | Yes | Yes | Yes |
| Frequency band of embedded WLAN module | 2.14GHz-2.484GHz | 2.14GHz-2.484GHz | 2.14GHz-2.484GHz | 2.14GHz-2.484GHz |
| Max. radio-frequency power of embedded WLAN module | 802.11b:+16±2dBm(@11Mbps) 802.11g:+14±2dBm(@54Mbps) 802.11n:+13±2dBm(@HT20,MCS7) | 802.11b:+16±2dBm(@11Mbps) 802.11g:+14±2dBm(@54Mbps) 802.11n:+13±2dBm(@HT20,MCS7) | 802.11b:+16±2dBm(@11Mbps) 802.11g:+14±2dBm(@54Mbps) 802.11n:+13±2dBm(@HT20,MCS7) | 802.11b:+16±2dBm(@11Mbps) 802.11g:+14±2dBm(@54Mbps) 802.11n:+13±2dBm(@HT20,MCS7) |
*Voltage measured at no load. Initial battery voltage reaches a maximum of 20 volts. Nominal voltage is 18 volts.
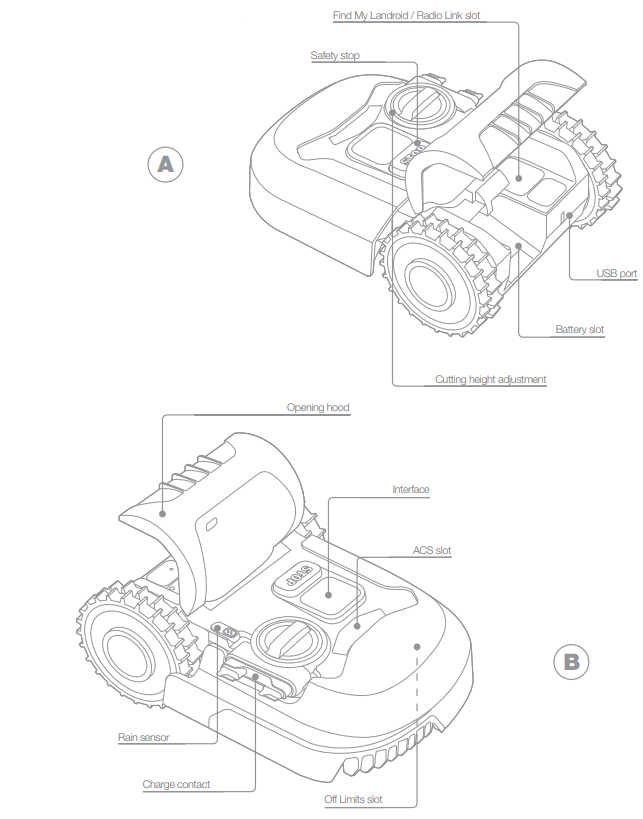
GETTING TO KNOW LANDROID M
HOW LANDROID WORKS
In the following section, we would like to help you better understand how Landroid works. Landroid is an autonomous machine, capable of operating on its own. It knows when it needs to go to its charging base, can sense when it is raining, can stop itself if it senses a problem, and knows to stop, draw back, and turn around when it bumps into something blocking its path. To prevent an accident, Landroid will also automatically stop its blade disc from rotating if it is lifted off the ground.

- Smart Auto Scheduling
Landroid programs itself, learns about your lawn, and builds the perfect schedule for it. Even though you can manually program it, we recommend you take advantage of this advanced auto-scheduling by connecting Landroid to the internet and using the free Landroid app.

- Charges Itself
When your Landroid needs to recharge, it will stop mowing and follow the boundary wire in a counter-clockwise direction back to its charging base. Once charging is complete, Landroid will automatically resume mowing or stay in the charging base according to its mowing schedule.

- Border Management
Landroid is programmed to mow the grass along the perimeter of your lawn once a week on Monday. If you want to change this preset, you can modify it via your smartphone or by using the control panel in the “Work time-Customize Work time” menus. See detailed instructions at the end of this manual.

- Rain Sensor
Landroid is 100% weatherproof and happy to be outside. But mowing wet grass does not give you the best finish or result. Landroid is equipped with a rain sensor that detects rain and tells Landroid to stop mowing and go back to its charging base.

- Rain Delay Time
After a rainfall, Landroid re-starts when the grass is no longer wet. The default Rain Delay time is 180 minutes. You can change the Rain Delay time setting via Landroid App or by using the control panel. See detailed instructions at the end of this manual.

- In More Extreme Weather…
In case of a lightning storm, protect Landroid by unplugging the charging base, disconnecting the boundary wire, and making sure Landroid is not allowed to charge. In the winter and especially in case of very cold weather and snow, we recommend you store your Landroid inside.

- No More Grass Clippings to Collect
Landroid’s daily mowing produces very short clippings that don’t need to be raked. These clippings are a perfect organic nutrient for your lawn. Frequent mowing boosts the density of grass blades and effectively prevents the propagation of weeds.

- Cut to Edge
Landroid M and L models have a cut-to-edge feature. The special offset blade gets as close as possible to the border of your lawn, leaving you little trimming to do.

- Cutting Height
Landroid L’s cutting height can be adjusted between 1.6” and 3.9” in 0.4” steps. The blade disc can be assembled in two ways as per the grass height. The original cutting height can be adjusted from 1.6” to 3.1”. When turning over the blade disc assembly, the cutting height can be adjusted from 2.4” to 3.9” with the blades on the bottom side of the blade disc. Before starting your Landroid for the first time, make sure your grass is no longer than 4”. If longer, use a regular mower to cut it before operating Landroid. If you want to drastically shorten the height of your grass, it is recommended that you do so progressively, by adjusting the cutting height in steps.

- Security & PIN Protection
- To prevent unauthorized people from being able to use it, Landroid is protected by a PIN code that you can easily set up. If Landroid is connected to your Wi-Fi network, you can lock it on your smartphone through the app. If additional security is required, we even have a Find My Landroid option which allows you to track your Landroid via a built-in pre-paid SIM.
Description
The Worx Robotic Lawn Mower WR153 is designed for convenience and ease of use. With its intelligent navigation system, the mower can navigate through narrow passages and obstacles with ease. The WR153 is also equipped with a cutting-edge rain sensor, which allows it to automatically return to its charging station when it starts to rain. The mower's anti-theft protection system includes a PIN code and an alarm, providing peace of mind for homeowners. The WR153 can be controlled and programmed through a smartphone app, making it easy to schedule and customize mowing preferences. The mower's eco-friendly battery system is both quiet and energy-efficient, making it an ideal choice for environmentally conscious homeowners.
CONNECTING LANDROID TO THE INTERNET
Why Connect Landroid
Landroid is an IoT (Internet of Things) device. To get full functionality out of your Landroid and keep it always updated to the latest software, it must be connected to the internet via your Wi-Fi network or by using Find My Landroid Accessory.
BEFORE YOU START
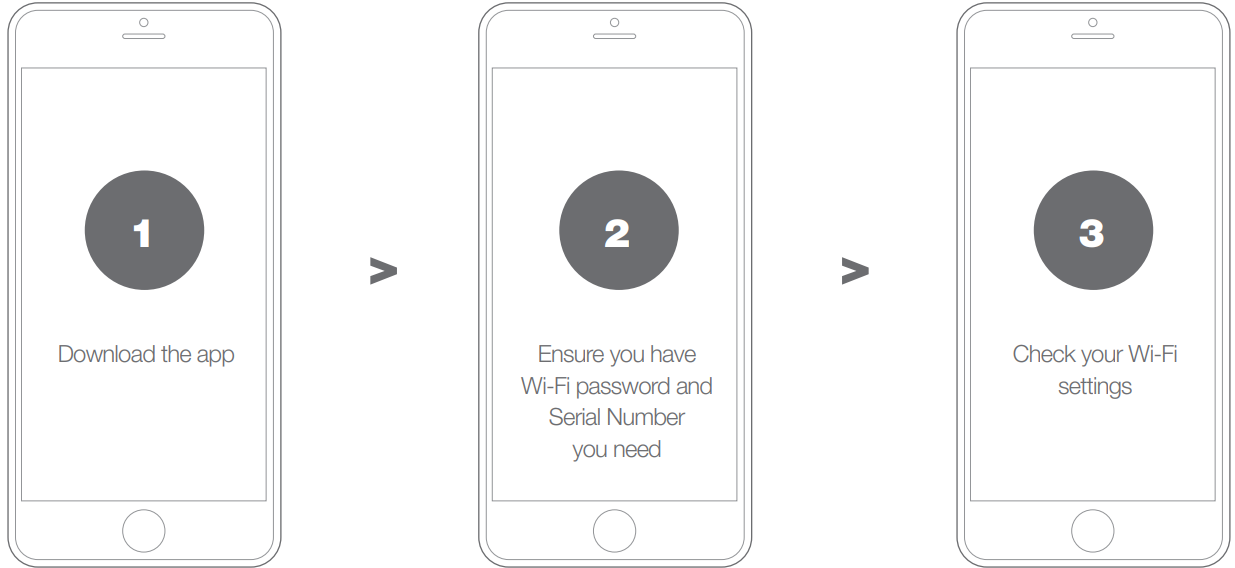
Download the App: Download the free Landroid app first. Get it from Android (4.4.2 or higher) or Apple (iOS 11 or higher) app stores.

- Ensure you have:
- Your Wi-Fi network password
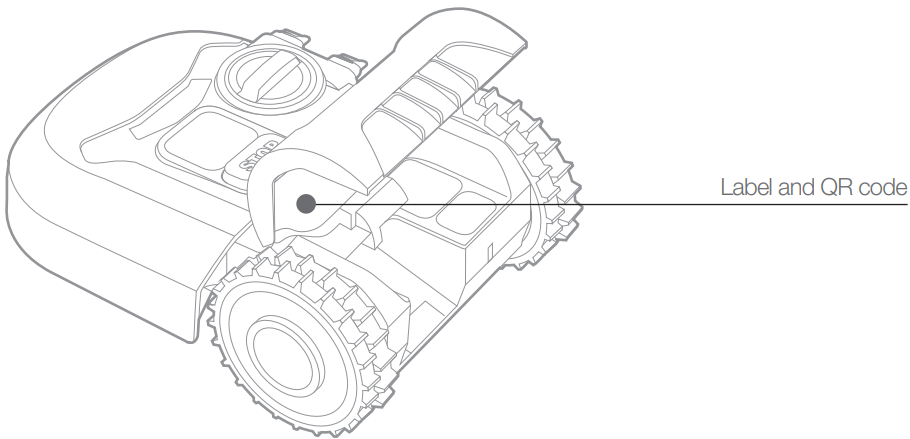
Landroid Serial Number: it can be found in the label under the rear bonnet of the machine. If you don’t want to type the 20-digit Serial Number, input it by scanning the QR code with your smartphone’s camera.
- Check your Wi-Fi settings:
- Landroid works with a 2.4GHz Wi-Fi signal.
- Make sure your Landroid is in the same router environment as your smartphone.
- Make sure the distance between your Landroid, smartphone, and your router is as close as possible during connection.
Tip: When Landroid moves to an area of your lawn with poor or no Wi-Fi signal, instructions sent from the app will only be executed when Landroid returns to an area with a good signal.
HOW TO CONNECT LANDROID TO THE INTERNET
Launch the app and follow these instructions.

- Register your account: Register your account by typing your username and password, or logging in through Facebook or Google.
- Input Landroid Serial Number: Register your Landroid by inputting the Serial Number manually or by scanning the QR code.
- Choose your connection: Select your Wi-Fi network or you can connect Landroid via Find My Landroid or RadioLink Options.
If your Wi-Fi does not cover the entire lawn you may consider the purchase of the Landroid Radio Link option, which extends the signal up to .6 miles in range. As an alternative, you can purchase the Find My Landroid option that besides connecting Landroid to the internet via its built-in SIM card, also allows you to track it in the unfortunate event it gets stolen.
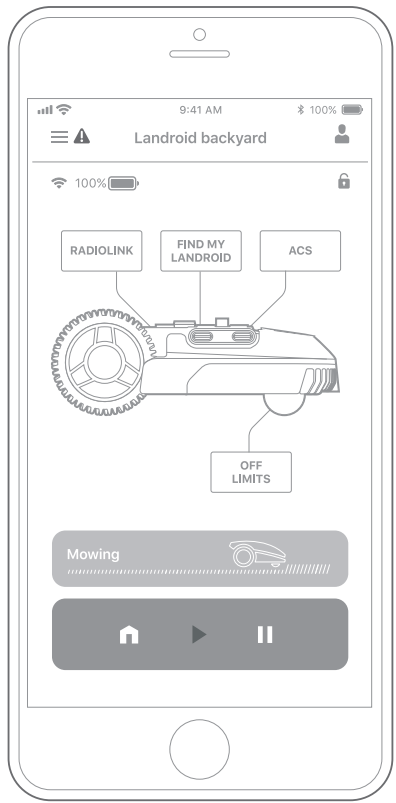
Worx Robotic Lawn Mower WR153 LANDROID APP
NOT A SIMPLE REMOTE CONTROL
Don’t think of it as a remote control. The app is an integral part of the Worx Landroid advanced ecosystem based on cloud computing and artificial intelligence.
- You can measure the exact area of your lawn. It’s as easy as taking a walk along its border. The app also lets you view statistics on what Landroid has been doing for you.
- The app also notifies you when there’s new software available for Landroid to download automatically over the air.
- Once connected, Landroid can access its unique auto-scheduling instructions from the cloud and is able to download the latest software to optimize its performance.
Setup Guide
Setting up the Worx Robotic Lawn Mower WR153 is simple and straightforward:
- Charge the mower's battery fully before the first use.
- Install the boundary wire around the perimeter of the lawn, using the included wire and pegs.
- Set the cutting height and schedule preferences on the mower or through the smartphone app.
- Place the mower on the charging station and ensure that the charging contacts are aligned properly.
- Turn on the mower and allow it to charge for 2-3 hours before the first use.
CONFIGURE LANDROID TO YOUR SPECIFIC NEEDS
You can supercharge your Landroid model with five unique options that can optimize the performance of Landroid to fit your unique garden and your individual needs. Here is a quick overview—for more information visit our website.
 Intelligent Obstacle Avoidance with Ultrasonic Sensors
- Conventional robotic mowers are blind. They bump into objects and can easily get lost. Daily bumps also damage your trees, plants, and outdoor furniture. A Landroid fitted with the ACS option avoids all this: it steers effortlessly through obstacles.
- Landroid uses automotive-grade ultrasonic sensors to detect obstacles. Using this object awareness, Landroid’s auto-pilot technology steers to avoid them.
 Off Limits Option
- Creates a boundary around areas of your lawn without the need to connect with your main boundary wire.
- You can use it to greatly simplify the installation of Landroid by removing the need to surround inner areas with the main boundary wire.
- It’s also great for making areas of your lawn temporarily off limits. For example, with seasonal equipment like a trampoline.
- Or, you can make a permanent change to your lawn without disturbing your original Landroid boundary wire.
 RadioLink Option
Regular domestic Wi-Fi networks typically only cover a fraction of the entire garden—RadioLink solves this. It creates bomb-proof radio connectivity that extends as much as .3 miles from your Wi-Fi router.
Unleash the full potential of your Landroid’s advanced Artificial Intelligence with constant online connectivity thanks to the RadioLink option.
Find My Landroid
 Protect your Landroid from theft using GPS combined with a mobile signal. Thanks to its cellular module, this accessory also eliminates the need for Wi-Fi or RadioLink to stay connected to the internet at all times.
- If your Landroid is taken outside its geofenced area, you will get immediately notified on your smartphone via the Landroid app. You will be able to lock the robot and track it. The GPS module will work even if the main battery is removed.
- Find My Landroid provides data connectivity with its multi-IMSI SIM card that works with a multitude of telecom providers, ensuring the best possible signal all the time.
LANDROID CONTROL PANEL
Advanced Functions via the Built-in Interface
Despite its minimalistic design, you can set several advanced functions through the built-in control panel. However, for the best user experience we recommend you use the free Landroid app to do this, given its much richer and intuitive interface.
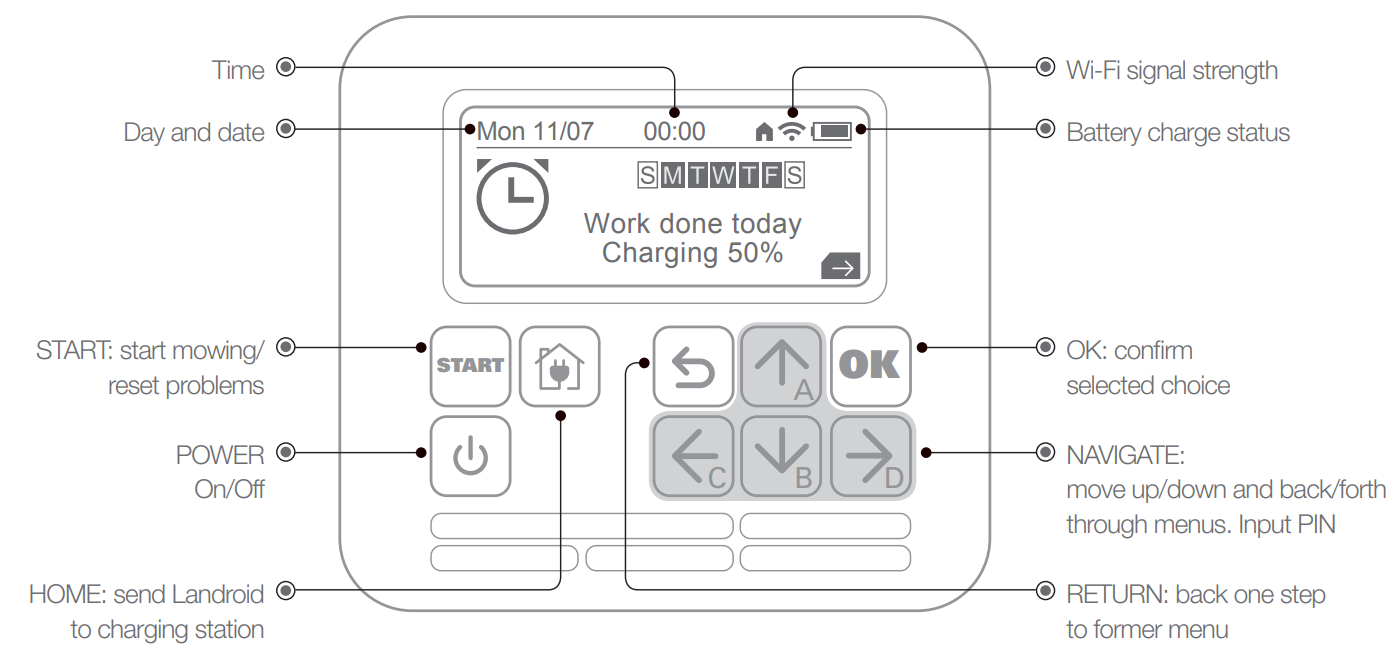
Choose Your Time Format of Preference — 24h or 12h (AM/PM)
- Turn on Landroid and insert PIN.
- Press the → (D) key; the screen displays the menu.
- Select the gear icon with the navigation keys, confirm with OK button.
- Scroll down to ‘Time format’ using the ↑(A) and ↓(B) keys. Press OK to confirm.
- Select your option between ‘24 hour’ and ‘12 hour’ using the ↑(A) and ↓(B) keys.
- Press OK to confirm your option.
Choose Your Date Format of Preference
- Turn on Landroid and insert PIN.
- Press the → (D) key; the screen displays the menu.
- Select the gear icon with the navigation keys, confirm with OK button.
- Scroll down to ‘Date format’ using the ↑(A) and ↓(B) keys. Press OK to confirm.
- Choose among the three options YYYY/MM/DD, DD/MM/YYYY, and MM/DD/YYYY using the ↑(A) and ↓(B) keys.
- Press OK to confirm your option.
Date and Time Setting
- Turn on Landroid and insert PIN.
- Press the → (D) key; the screen displays the menu.
- Select the gear icon with the navigation keys, confirm with OK button.
- Scroll down to ‘Set date & time’ using the ↑(A) and ↓(B) keys. Press OK to confirm.
- Date is highlighted.
- By pressing OK, the first digit highlights.
- Use the ↑(A) and ↓(B) keys to change the highlighted digit.
- Use the ←(C) and →(D) arrows to select other digits of the date.
- Use the ↑(A) and ↓(B) keys to input a new value.
- Press OK to confirm the date.
- Move down to time with the ↓(B) key. Time gets highlighted. Press OK to select.
- Change the time with the same procedure as for the date. Press OK to confirm.
- Time and date have now been set.
ADJUSTING THE MOWING TIME
Landroid creates its own automatic schedule and working time based on the size of your lawn and other factors. Our recommendation is not to manually adjust these settings. However, there are three ways to adjust the mowing time if you want to.
Use the app and follow the simple on-screen menus.
- Adjust the working time percentage via Landroid’s control panel.
Depending on the growth rate of your grass, you may want Landroid to work a little harder or a little less. You can adjust the working time in percentage increments and Landroid will recalculate its working time automatically.
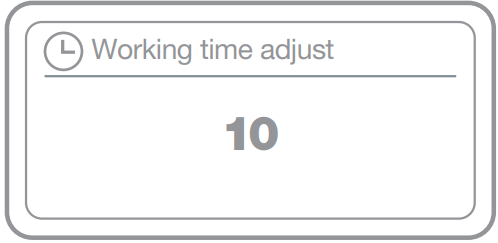
- Turn on the mower and insert PIN code.
- Press the ↑(A) key or the ↓(B) key to adjust the working time in 10% increments.
- Landroid will now automatically calculate a revised working time.
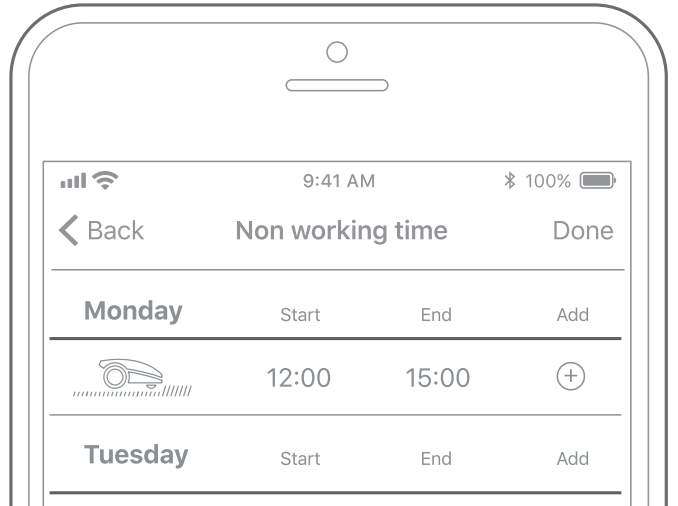
- Specifically adjust each day.
- Landroid is factory set to automatically start at 09:00 AM each day, but you might want to adjust this. Here’s how:
- Turn on Landroid and insert PIN code.
- Press the → (D) key.
- Scroll with the ←(C) and → (D) keys to the clock icon and press OK to confirm.
- Now you are in the ‘working time’ menu.
- Select ‘Auto Work Time’ and press OK.
- Select the size of your lawn in m² by scrolling with the ↑(A) and ↓(B) key and choosing the right size.
- Press the Return key to go back to the ‘working time’ menu.
- Now select the ‘Customize work time’ option, press OK.
- Days of the week will appear with working time in hours and minutes.
- Now select a day of the week, press OK.
- Now a working time menu will appear for that day.
- Press OK to make the time digits flash.
- Select new start time in hours and minutes by pressing the ←(C) and →(D) arrows. You can change hour or minute time values using the ↑(A) and ↓(B) keys.
- Then select new stop time in hours and minutes. Then press OK to confirm.
- When successful you will see the total working time for that day has been updated based on the start and stop times that you have input.
- To change the start time for other days of the week, go back to the previous customize working time menu and repeat the steps above.
Please note that because Landroid is autonomous, if you select ‘Auto Work Time’ you will reset any customized working times you might have programmed earlier.
Rain Delay Change
If you live in an area of high rainfall, it might be useful to adjust the rain delay setting to allow Landroid to operate when it is wet. To do this follow these steps:
- Turn on Landroid and insert PIN code.
- Press the → (D) key and press OK to select the gear icon into the ‘General Settings’ menu.
- From the ‘General Settings’ menu go to the ‘Rain start delay’ option by pressing the ↓(B) key, then press OK.
- You will now see the default rain delay of 180 min. Press OK to edit this timing.
- You can use the ←(C) and →(D) arrows to select the digits and ↑(A) and ↓(B) arrows to increase or decrease the rain delay.
- To remove the rain delay completely, select 000 min.
- Then press the back button to exit.
Setting Up Different Zones
Landroid is designed for mowing complex lawns evenly. Nevertheless, sometimes you might need to adjust the working time in each zone. To set this feature up, first you must define these different zones of your garden (up to a maximum of 4) and then you can adjust the working time in each one. To define each zone follow these steps:
- Start with Landroid in its charging base.
- Turn on Landroid and insert PIN code.
- Press the → (D) key and select the clock icon and press OK to confirm.
- Now you are in the working time menu.
- Scroll down to the ‘Define zones’ option. Press OK.
- You can select up to 4 zones.
- Select the number of zones you want and press OK.
- Now the display prompts you to press START to set up the zone.
- As soon as you press START, the mower will start to follow the wire.
- Press STOP as Landroid reaches the zone you want to mark as Zone 1.
- Save your choice by selecting YES.
- Press START to make Landroid reach the following zone, then press STOP when it reaches Zone 2.
- Repeat the steps above if you need more zones to be defined.
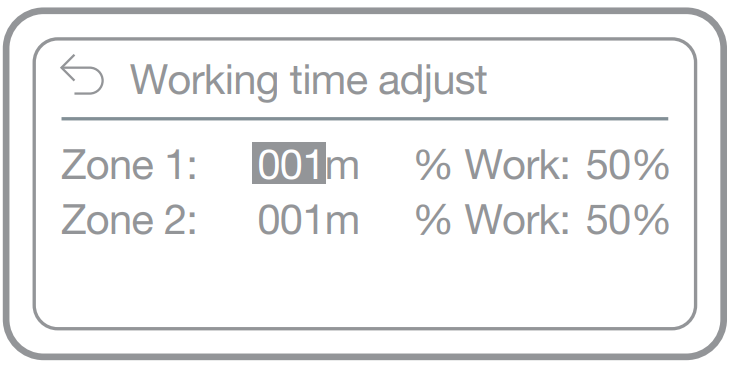
Customize Working Zones
To customize the working time in each zone:
- Turn on Landroid and insert PIN code.
- Press the → (D) key.
- Scroll with the → (D) key to the clock icon and press OK to confirm.
- Now you are in the working time menu.
- Scroll down with ↓(B) key to ‘Working time adjust’ and press OK.
- Numbered zones will appear.
- Zone 1 will have a prompt to input the working area in m² and the working time percentage for this zone.
- Use the ↑(A) and ↓(B) arrows to input the working area in m² then press OK.
- Then the cursor moves to the working percentage.
- Here you can adjust the percentage.
- You can then scroll to the next zone using the ←(C) and →(D) arrows to adjust the size and working time of Zone 2.
- Then press the back button to exit.
Please note the sum of the percentages of all zones must equal 100%.
OPERATION MESSAGES
| Message | Action |
|---|---|
| Cutting grass | Cutting grass according to the mowing schedule. |
| Raining | The rain sensor detects water. Landroid will return to the charging base and stay there for the time you have programmed it to do so. When dry, Landroid will automatically begin the rain delay countdown and then return to mow. If you want Landroid to mow before this, simply turn it off then on again, but only when the rain sensor is dry, or you can remove the rain delay completely by setting the rain delay time to zero. |
| Going home | Needs to recharge—during the journey to the base, the cutting blade is stopped in order to save energy. |
| Charging | ‘Charging’ and charge percentage are displayed. |
| No working time scheduled | Stand-by, needs to be programmed as desired. |
| Not working today | Stand-by, will start according to the mowing schedule. |
| Work done today | |
| Zone searching | According to the setting of ‘Customize work zone’, Landroid is searching a certain area to mow. |
| Charge complete | Landroid has completed its charging. |
| Emergency charge | Landroid is charging in a powered-off state. |
ERROR MESSAGES
Sometimes things can go wrong. Fortunately, Landroid is smart enough to tell you if it is encountering an issue, so you can fix it. If in doubt, please visit our website where you will find useful videos and further support.
MESSAGE CAUSE ACTION
| Message | Action |
|---|---|
| Outside working area! Press START to reset. | Landroid cannot find the boundary wire signal. <br> If Landroid is actually outside of its working area: turn the power off, take Landroid inside the working area, turn the power on, and press start. <br> If Landroid is inside its working area check if the LED on the charging base is solid green. If red, check if the boundary wire is properly connected to the charging base and that the base is connected to a suitable power supply. If they are properly connected, the boundary wire terminals are clamped incorrectly and must be reversed. |
| WRONG PIN! Please retry. | PIN code is wrong. Input the correct PIN or re-set your PIN. |
| Blade motor fault! Press START to reset. | Blade disc is blocked by an object, e.g. a branch. <br> Turn power off. <br> Turn Landroid upside down and check if there’s anything preventing the blade disc from rotating and remove any obstruction. <br> Turn Landroid upright. <br> Turn power on. Press start. <br> Blade is overloaded by thick dense grass. <br> Turn power off. <br> Take Landroid to an area with short grass or adjust the cutting height to a higher setting. <br> Turn power on. Press start. |
| Wheels motor fault! Press START to reset. | Wheel motor is blocked in some way. <br> Turn power off and take Landroid to an area free from obstacles. <br> Turn power on. Press start. <br> If the error message is still displayed, turn power off. Turn Landroid upside-down and check if there’s anything preventing the wheels from rotating. <br> Remove any obstruction, turn Landroid upright, turn power on. |
| Upside down! Press START to reset. | This could have happened when Landroid came into contact with a sloping surface which made it overturn. <br> Turn Landroid upright and remove any obstacle that might have caused Landroid to overturn. |
| Mower trapped! Press START to reset. | Landroid is trapped. <br> Turn power off. <br> Take Landroid to an area of your lawn free of obstacles, then turn power on. Press start. <br> If the error message is still displayed: <br> Turn power off, turn Landroid upside-down. Check if there is anything preventing the wheels from rotating. <br> Remove any obstruction, turn the Landroid upright, turn power on. |
| Mower lifted! Press START to reset. | Landroid is lifted up. <br> Turn power off. <br> Take Landroid to an area clear of obstacles, turn power on. Press start. <br> If the error message is still displayed: <br> Turn power off, turn Landroid upside-down and check if there’s anything that can cause Landroid to be lifted up. <br> Remove any possible object, turn Landroid upright, turn power on. |
| Battery voltage too low! Please change battery. | Battery exhausted. <br> In this case, you must turn Landroid off and place it in the charging base, then ‘Emergency charging’ will be displayed and it will start charging. <br> If the battery error still persists, your battery is damaged and needs to be changed. |
| Wire missing! Press START to reset. | Machine can’t find boundary wire signal. <br> If the LED light is red, check if the boundary wire is well connected to the clamps on the charging base. <br> If the problem persists, check that the boundary wire hasn’t been cut. |
| Battery temperature out of range! Please wait. | Temperature is too high (more than 131°F) when charging. <br> Place the charging base in a shady area or wait until the temperature has cooled down. |
| Can’t find charge station press START to reset. | Boundary wire is beyond its maximum length (1145 ft.) or the machine doesn’t have enough power to go back to the charging station. <br> Take Landroid to the charging station. |
| Mower locked! | With the ‘Lock Function’ enabled, if your Landroid does not receive a signal from your Wi-Fi router for 3 days, then it gets locked as a security measure. <br> This could be because your router lost its power or because you changed your Wi-Fi router or network provider. <br> Please reconnect Landroid to the Wi-Fi network it has been originally paired with. <br> If this is not possible, contact Customer Service. |
NOTES
- Before turning the power on, always check Landroid is inside its working area. If not, the message “Outside working area! Press START to reset” will be displayed. This message is also displayed when Landroid is partly but not completely inside its working area.
- If for any reason—i.e. a party, children playing—you want to park your Landroid in the charging base: press home then OK. Landroid will go to its base and stay there. Please note Landroid will now wait until the next scheduled mowing session. If you want to re-start it at any time, press start then OK to start your Landroid.
- If an error repeatedly occurs in the same area of your lawn, you might have a problem with the boundary wire so please refer to the installation instructions and check your setup is correct with its help.
- If your lawn is divided into two separated areas, connected by a corridor less than 3 ft. wide, one of which is not provided with the charging base: when Landroid runs out of charge, take it manually to the charging base.
- If Landroid runs abnormally once in a while, please reset it by turning it off and removing the battery for 30 seconds, then restart it. If the problem cannot be solved, please contact our Customer Service for help.
TROUBLESHOOTING
If your Landroid does not work correctly, follow the troubleshooting guide below. If the fault persists, contact Customer Service.
| Symptom | Cause | Solution |
|---|---|---|
| The LED light on the charging base does not turn on. | There is no power. | Check the charging base is connected properly to the charger and the charger is connected to a suitable power supply. |
| Red light on the charging base. | The boundary wire isn’t connected. | Check that the boundary wire has been connected correctly to the charging base. Check there are no breaks in the boundary wire. |
| Landroid turns on, but the blade disc does not spin. | Landroid is searching for the charging base. | This is normal: when Landroid needs to recharge, the blade disc does not rotate while it is searching for the charging base automatically. |
| Landroid vibrates. | The blade disc is unbalanced. <br> Blades may be damaged. | Check the blades and replace them if damaged. <br> Remove debris and foreign objects from the blades and blade disc. |
| Grass is being cut unevenly. | Landroid does not work enough hours per day to cut the grass. <br> Mowing area is too big for the size of Landroid you have. <br> The blades are dull and not sharp. <br> The cutting height is set too low for the length of the grass. <br> Grass or another object has wrapped around the blade disc. <br> There is a build-up of grass in the blade disc or motor frame box. | Try adding more hours to the mowing schedule. <br> Try decreasing the size of the mowing area. <br> Change all the blades and screws in order to balance the blade disc. <br> Raise the cutting height and then gradually lower. <br> Check the blade disc and remove any grass or other objects that might prevent it from spinning. <br> Make sure the blade disc rotates easily. If need be, you may take off the blade disc and then remove the debris. |
| Your Landroid is inside its working area and the boundary wire is connected, but the display says ‘Outside working area! Press START to reset’ | The boundary wire ends are clamped incorrectly. | Reverse the boundary wire ends and reconnect to the charging station. |
| The charging time is far more than the rated charging time. | Poor connection caused by debris on the charging strip. <br> The charging protection program is activated due to high temperature. | Clean the contact pins located on the charging base and the charging strip on Landroid using a cloth. <br> Place the charging base in a shady area or wait until the temperature has cooled down. |
| The mower does not charge. | There is no power. | Check the power cord is connected properly to the charger and the charger is connected to a suitable power supply. <br> Make sure both the charging strips on the mower touch the center of the contact strips on the charging base. |
| Landroid is starting to have shorter run-times between charges. | Something is clogging in the blade disc creating friction and increasing power consumption. <br> Maybe the grass is too high and too thick. <br> Landroid is shaking heavily because the blade disc is unbalanced. <br> The battery may be exhausted or old. | Take off the blade disc and clean it. <br> Check the blade disc and blades, remove debris and foreign objects from the blades and blade disc. <br> Replace the blades with a new set. <br> Replace the battery. |
| Landroid is not operating at the correct time. | The clock is not set to the correct time. <br> Programmed cutting times for Landroid are not correct. | Set the clock to the correct time. <br> Change the time settings for the mower to start and stop. |
| Landroid cannot correctly dock with the charging base. | Environmental influences. <br> Poor connection caused by debris on the charging strip. | Restart Landroid. <br> Clean the contact pins located on the charging base and the charging strip on Landroid using a cloth. |
| The green light on the charging base turns on before charging is complete. | The charging base is overheating. | Place the charging base in a shady area or wait until the temperature has cooled down. |
| Landroid wheels skid or repeatedly slip. | Foreign obstacles, such as twigs and branches may be lodged under Landroid. <br> The lawn is too wet. | Remove foreign objects from the underside of Landroid. <br> Wait until the lawn has dried. |
| Landroid runs outside the boundary wire. | The boundary wire of another Landroid or robotic mower is positioned too closely. <br> In wet conditions, the boundary wire electric signal may leak where the wire has been joined or repaired incorrectly. <br> There is boundary wire electric signal leakage due to broken insulation. | Ensure at least 3 ft clearance is provided in between your boundary wire and that of your neighbor. <br> Check boundary wire joints. Insulate to provide a fully waterproof connection. <br> Repair damaged boundary wire with the wire connectors supplied. |
| Landroid slips out of its working area going down a hill. | Low grip of Landroid drive wheels. | Please check the wheels are clean and free of mud in order to have the maximum grip possible. |
| Landroid operative system crashes when charging or on standby. | Software or display fault. | Restart Landroid. |
| Landroid shuts off when docking in the charging base. | Landroid fails to charge due to over-temperature protection and is powered off. <br> Poor connection. | Place the charging base in a shady area or wait until the temperature has cooled down. <br> Check the LED light on the charging base. <br> Check the connection between the contact pins located on the charging base and the charging strip. |
| Landroid stops in the working area. | There is an obstacle in the working area. <br> The cutting height is set too low for the length of the grass or the grass is too dense. <br> The extended boundary wire should not exceed 1145 ft or it may cause a signal problem. <br> The distance between the center of the lawn and the boundary wire should not exceed 82 ft or it may cause signal attenuation. | Remove the obstacle from Landroid’s working area. <br> Raise the cutting height and then gradually lower. <br> Reduce the length of the boundary wire. <br> Reduce the distance between the center of the lawn and the boundary wire perimeter within 82 ft. |
| Landroid flips over. | There is an inclined obstacle on the lawn. | Exclude the obstacle from Landroid’s working area. |
| Landroid fails to connect to the internet. | Various router and network settings issues. | Please check your router has the correct settings. <br> Make sure your router is 2.4GHz. If your router has two settings, please enable the 2.4GHz band. <br> Make sure your router is set to 802.11 mode and the wireless setting is b/g/n mixed. <br> Make sure your router has the SSID Broadcast function enabled when you connect the machine with the app. You can close it after you connect successfully. <br> Make sure DHCP function is enabled. <br> If you changed your Wi-Fi network, you need to connect Landroid to the new network. <br> If you have a “Fritz!box” router, please make sure to activate “Allow communication between devices in the same network” in the settings. |
Environmental Protection
Waste electrical products should not be disposed of with household waste. Please recycle where facilities exist. Check with your Local Authority or retailer for recycling advice.
Worx Robotic Lawn Mower WR153 Pros & Cons
Pros
- Easy to use and program
- Eco-friendly and quiet operation
- Smartphone app control and rain sensor
- Anti-theft protection
Cons
- May not be suitable for large lawns
- Requires boundary wire installation
- Initial setup may be time-consuming
Customer Reviews
Customers are raving about the Worx Robotic Lawn Mower WR153, praising its quiet operation, ease of use, and precision cutting. Some users have reported issues with the boundary wire installation, but overall, the mower has received high marks for its innovative features and eco-friendly design. The mower's anti-theft protection and rain sensor have been particularly popular with users, who appreciate the added peace of mind and convenience.
Most Common Complaints
The most common complaints about the Worx Robotic Lawn Mower WR153 include difficulty with boundary wire installation and the mower's relatively high price point. Some users have also reported issues with the mower's cutting height and precision. However, overall, the mower has received positive reviews and high marks for its innovative design and convenience.
Faqs
What is the cutting diameter of the WR153?
How long does the Worx Robotic Lawn Mower run on a single charge?
How long does it take to charge the Worx WR153?
What is the cutting height range of the Worx Robotic?
Is the Worx Robotic Lawn Mower suitable for large lawns?
What type of battery does the Worx Robotic Lawn Mower use?
Leave a Comment