Wyze Smart Heating & Cooling Thermostat User Manual
Content
Introduction
The Wyze Smart Heating & Cooling Thermostat is a user-friendly device designed to enhance home comfort while optimizing energy efficiency. It allows homeowners to control their heating and cooling systems remotely through the Wyze app, making it easy to adjust settings from anywhere. Compatible with Alexa and Google Assistant, this thermostat provides seamless integration into smart home ecosystems. Priced at $71, it offers an affordable solution for those looking to upgrade their home climate control.
Specifications
The Wyze Smart Heating & Cooling Thermostat comes with several key features that set it apart from traditional thermostats:
- Compatibility with most HVAC systems
- Remote control via the Wyze app
- Geofencing for location-based temperature adjustments
- Smart learning to adapt to your temperature preferences
- Energy usage tracking and reports
- Integration with Amazon Alexa and Google Assistant
- Touchscreen display for local control
- Weather forecasting and outdoor temperature display
Wyze Smart Heating & Cooling Thermostat Overview
In the Box
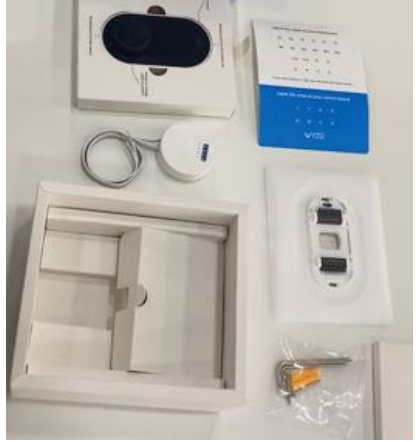
- Wyze Thermostat x1
- C-Wire Adapter x1
- Back Panel x1
- Wall Cover x1
- Mounting Screws with anchors x2
- Wire Labels x1
- Screwdriver x1
- Quick Start Guide x1
Thermostat Compatibility
- Ensure that your system is compatible with Wyze Thermostat before installing. Check the compatibility by reviewing your current wiring.
- Remove the cover from your old thermostat.
- Use the Wyze app or Compatibility Checker website to select the wire labels you currently have.
- The thermostat is compatible with most residential heating and cooling systems in North America, including gas, oil, electric, and dual fuel systems.
Below are some compatible and incompatible HVAC systems:
Compatible systems:
- 24-volt systems such as forced air, hydronic, heat pump (including dual fuel), oil, gas and electric.
- Most single-stage and multi-stage conventional and heat pump heating and cooling systems with backup heat.
| Feature | Specification |
|---|---|
| Electrical Requirements | 24VAC |
| Wires | No need for Common (C-wire) |
| Conventional (Furnace and Air Conditioning) | Up to 2 stages heat Up to 2 stages cool |
| Heat Pumps | Up to 4 heat stages Up to 2 stages cool |
| Accessory Support | One accessory support available (Humidifier, Dehumidifier, Emergency heat, Ventilator) |
| Transformer (Boiler and Air Conditioning) | Can support all combinations of dual and single transformers |
Incompatible systems:
- Non-standard labels (for instance 1,2,3, or A, B, C).
- Electric baseboard (110-240v).
- System with only two wires (R/Rc/Rh & W/Y), and have no Common wire.
- Millivolt systems. (They use much less electricity than low voltage systems and can't deliver the right amount of power.)
- High voltage systems.
- Not compatible with modulating equipment (Redlink, Comfortmaker, ClimateTalk).
- House units that do not have C, Y, and G wires.
- Communicating equipment (furnace, heat pump).
- Systems that use coal, wood chips, pellets, anthracite, or other biomass materials are typically incompatible.
- No R/Rc and Rh wires.
- No C and G wires.
Regarding Proprietary Systems:
Wyze Thermostat is not compatible with communicating equipment. To determine whether or not your current thermostat is communicating:
- Look up your current thermostat model.
- Check the terminals of your current thermostat and look for special terminals such as: A, B, C, D or 1, 2 ,3.
Is the thermostat compatible with zone boards?
Wyze Thermostat is compatible with most zone board models. You do not need to do anything special to set up Wyze Thermostat with a zone board and you don’t need to set up a zone controller as an accessory. Just follow the guided setup instructions to install your zone board.
What do my thermostat's wire labels mean?

Common Wiring Diagrams
| Common Terminals | Wyze Wire Terminals | Meaning |
|---|---|---|
| G | G | This wire controls the blower fan, which is responsible for pushing warm or cool air through all the vents in your house. |
| C | C | This stands for the "common" wire in an HVAC system, and it provides power to the thermostat. |
| Y, Y1 | Y1 | The Y wire is used to send a signal to your HVAC system, telling it to fire up the air conditioner. For cooling. |
| Y2 | Y2 | Second stage cooling. |
| W, W1 | W1 | Just like the Y wire, the W wire(s) control the heating aspect of your system. |
| This works nearly identically to auxiliary heat, but for emergency purposes only. | ||
| It has to be turned on manually, whereas auxiliary heat can turn on automatically if need be. | ||
| E | * | |
| O, O/B | O/B | These wires are responsible for switching the changeover valve in a heat pump system. |
| The O wire reverses the valve from heating to cooling, and the B wire switches the valve from cooling to heating. | ||
| W2, Aux | W2 | Second stage heating, usually auxiliary (electric) heating. |
Less common thermostat wires
| Uncommon Terminals | Wyze Wire Terminals | Meaning |
|---|---|---|
| X, X1, X2 | W1, W2, or C | X wire is for back-up on a heat pump and allows for auxiliary heating from the back-up heat source. |
| B | C or O/B | Some systems use B for common wire. Determine if your B wire is a common or O/B wire. |
| ACC, H, Hum, Hum1, H2, Hum2, D, DH, Dhum, Dehum, D2, DH2, Dehum2 | * | Some thermostats have this terminal to connect equipment like a whole-house humidifier or dehumidifier. |
| L | Not needed | The L wire is a system monitor and used to light a light on the thermostat. |
| S, S1, S2, T | Not needed | These wires run directly outside and provide outdoor temperature information to the thermostat. |
Description
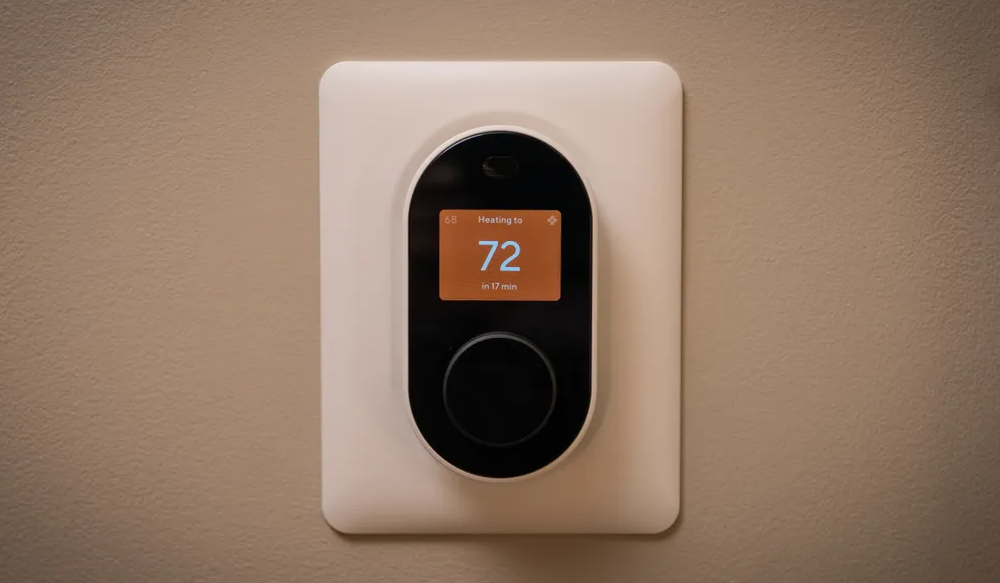
The Wyze Smart Heating & Cooling Thermostat boasts a sleek and modern design, featuring a high-resolution touchscreen display that makes it easy to adjust settings and view important information. The device is built with durability in mind, using high-quality materials that ensure long-lasting performance. The thermostat's advanced sensors provide accurate temperature readings, ensuring your home remains comfortable at all times.
The device also supports multi-stage heating and cooling systems, making it versatile enough to work with a wide range of HVAC setups. With its energy-saving features and detailed usage reports, the Wyze Smart Thermostat helps you manage your energy consumption more effectively.
Installing Your Wyze Thermostat
Installing a Wyze Thermostat is an easy DIY project that takes about 20-30 minutes. The Wyze app provides step-by-step instructions to make it easy to install and wire your thermostat, so follow the app setup as your main guide. We hope you have a great experience installing your Wyze Thermostat.
Preparation
In the Box:
- Wyze Thermostat x1
- C-Wire Adapter x1
- Back Panel x1
- Wall Cover x1
- Mounting Screws with anchors x1
- Wire Labels x1
- Screwdriver x1
- Quick Start Guide x1
Tools you will need:
- Phillips screwdriver
- Small flat head screwdriver
- Your smartphone with enough juice
- Home WiFi (2.4 GHz) name and password
- Drill and drill bit for mounting (optional)
- Wire stripper (optional)
- Pencil (optional)
If you’d like to pre-drill holes, use a 3/32” drill bit or if you’re drilling into hard materials such as stone, brick, concrete or marble, use a masonry drill bit and drill.
Complete Installation Instructions
The Wyze app provides a thorough installation guide. However, here are some more detailed instructions to walk you through the process of installing your Wyze Thermostat.
Begin installation with the app
- You must have the latest version of the Wyze app to complete setup. Download it from the Apple App Store or from Google Play. If you don’t already have a Wyze account, the app will ask you to create one and sign in.
- Tap the plus sign (+) on the upper left corner of the screen on the app’s home screen.
- Select Add Device, then Home and Wyze Thermostat to start the setup guide.
- The app will show you how to install your thermostat. It will also ask you some questions about your current thermostat’s wiring. Answer these questions as accurately as possible.
You’ll get a custom wiring diagram for your system after you’ve selected your wires.
Step 1. Turn power off
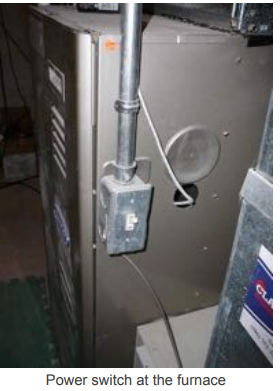
To protect yourself, turn off the switch that controls your heating/cooling system at the breaker box or use the switch on your furnace or air handler. If necessary, turn off the main power at the breaker box. After verifying the power is off, confirm in your app by tapping Next.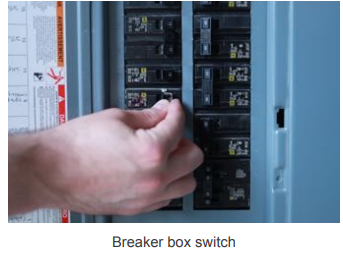
Note: Try changing the temperature on your old thermostat. Wait 5 minutes to make sure that the system does not run.
Step 2. Remove your existing thermostat cover
On most thermostats, you can take off the thermostat cover by grasping and gently pulling it off. Some thermostats may have screws, buttons, or clasps to undo. Use the included screwdriver to remove all the screws or use the button/clasps to remove the cover. You should have wires that run from your heating/cooling system attached to the back panel of your old thermostat, and your thermostat’s back panel is screwed to the wall. Tap Next to confirm.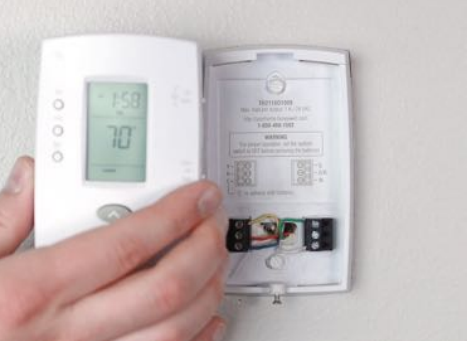
Note: Do not remove any wires at this step! If you don't see any wires, you may have a mid-layer that needs to be removed by unscrewing.
- Step 3. Make sure you are not using a high-voltage system
If your existing thermostat has:- 110/120V thick wires capped with wire nuts,
- Caution label saying 120/240V,
- Only two terminals labeled as L1 and L2,
Then it is a high voltage system and is not compatible with Wyze Thermostat. You can find information about our Wyze return policy at https://wyze.com/return-warranty-policy. If you do not have a high voltage system, confirm in the app by tapping No to continue.
Step 4. Take picture of your current thermostat wiring
Don't forget to include the letters next to the terminals where the wires are inserted. This will be a helpful reference when wiring your thermostat. We’d greatly appreciate it if you shared your old wiring pictures with us so we can improve our training materials.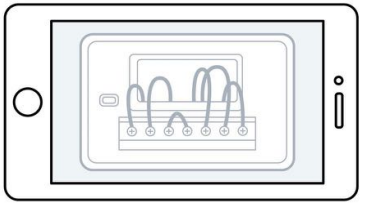
Step 5. Remove jumper wires
Your old thermostat may have a jumper wire connecting one terminal to another. It may look like a small staple or a colored wire. Use a screwdriver or press a lever to release the wires from their terminals and remove the jumper wire. Your Wyze Thermostat does not require any jumper wires.
Note: Do not disconnect any other wires in this step.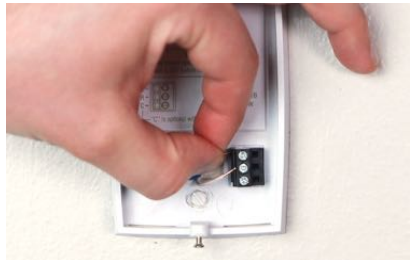
Step 6. Get a wiring diagram from the Wyze app
To get a custom wiring diagram for installation, simply follow the Wyze app’s thermostat installation instructions. Select the letter(s) of all the terminals with wires connected on your old thermostat. The Wyze app is confirming the thermostat’s compatibility before moving to the next steps.
The Wyze app will generate a customized wire diagram with how your wiring should look like to make your installation easier.
Note: If you don't have a C-wire selected in the compatibility checker, you will need to install a C-wire adapter to supply power to your Wyze Thermostat.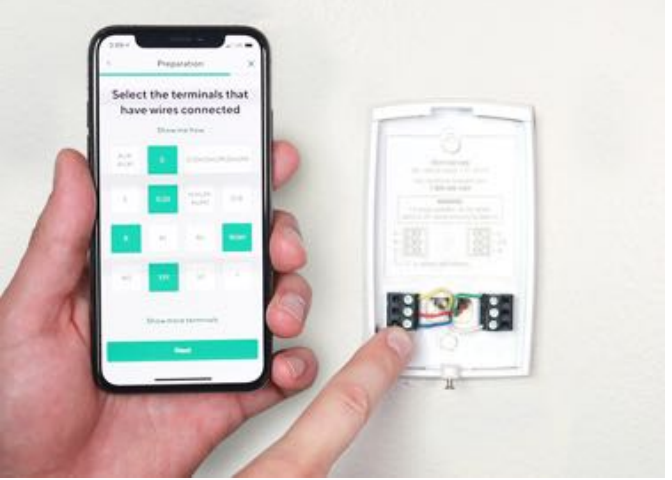
Some common issues:
Thermostat with 2 sets of labels: Some thermostats may have 2 sets of terminal labels, including "conventional" and "heat pump". Please select the terminal names based on your actual system.
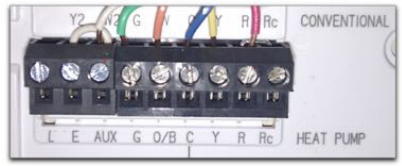
- Unused wire(s): It is best to identify if the wire is used at the control panel as well. If the wire is being used at the control panel, please label it clearly with the included label. If it is not being used, label your unused wire with the empty sticker label.
- Two wires in one terminal: You may have a dual transformer system.
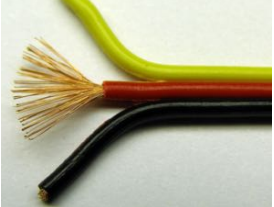
Incompatible wires:Stranded wires: Wyze Thermostat is not compatible with stranded wires. Do not connect Wyze Thermostat to stranded wires.
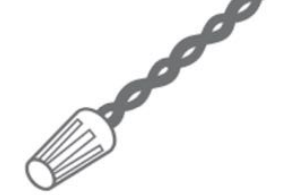
High voltage wires: If your thermostat is labeled 120V or 240V or has thick wires with wire nuts, your system is high voltage and isn’t compatible with Wyze Thermostat. Do not connect Wyze Thermostat to high-voltage wires.
- Step 7. Label the wires
It is time to install your Wyze Thermostat! Using the old thermostat base as a guide, put the provided sticky label on each wire as you disconnect it. Make sure all wires are disconnected from the old thermostat.
Note: Label wires according to old thermostat terminal designations, NOT by wire color. - Step 8. Disconnect and remove your old thermostat
Remove the old thermostat’s back panel by unscrewing it from the wall after wires are all labeled and disconnected. Make sure the wires do not fall back into the wall due to gravity. Step 9. Mount your Wyze Thermostat back panel
Thread the wires through the center of the back panel (the wall cover is optional). Hold the back panel to your wall, use a pencil to mark the holes for your thermostat to be placed. Drill mounting holes for the drywall anchors (e.g., 3/16 inch holes for drywall).
Use the included drywall anchors and screws to mount the back panel to the wall. Keep centering the bubble on the built-in level to make sure your thermostat is in alignment.
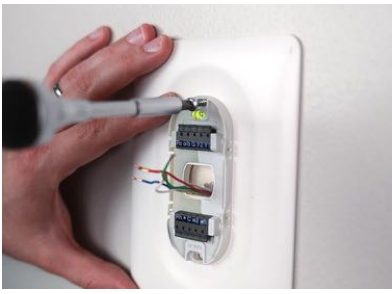
Note: You may use your existing wall anchors. Hold the back panel up against the existing anchors to check for alignment.
- Step 10. Connect the wires to Wyze Thermostat
Push down on the levers to insert the wires into the inner holes of their corresponding terminals on the wall panel (only one wire per terminal) until it is firmly in place. Gently tug on each wire to verify they are securely connected. If you need to release the wires again, push down on the terminal levers.
Note: Make sure the wires have at least 1/4'' exposed for inserting to the back panel terminals Step 11. Attach Wyze Thermostat to the back panel
Push excess wires back into the wall and snap your Wyze Thermostat into the back panel. After a satisfying "click" sound, your Wyze Thermostat is ready for setup.
- Step 12. Turn on on the power
Go back to the circuit breaker or where you powered off your system to turn on the power. Wait a moment for the Wyze logo to appear on your screen. It is now in pairing mode. Follow the app instructions to personalize your thermostat settings and enjoy!
Installing a thermostat with less common configurations
3-wire heating-only thermostat system (R, G, W)
For a heat-only system that only contains connections R, G, and W, The G wire can be repurposed as a C-wire.
- Identify the G wire at your control board.
- Remove the G wire from the G terminal on the control board and connect it to the C terminal at the control board.
- Connect a jumper wire from the W terminal to the G terminal on the control board.
- At the thermostat, label the G wire from the old thermostat as the C-wire.
- Follow the Wyze app to complete installation, selecting the Rc, C, W wires.
NOTE: To keep fan power, you’ll need to add an additional jumper wire between the G terminal and the W terminal. You will lose independent fan control.
Installing your Wyze Thermostat with a boiler and AC (dual transformer system)
If you have a boiler as well as an air conditioner, you have a dual transformer system. The installation process for a dual transformer system is different from a standard installation, so please refer to the information below
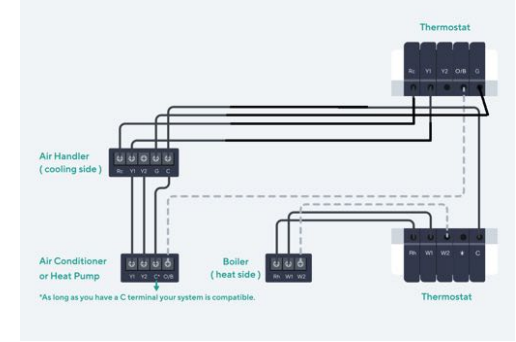
With dual transformer setups, you will have two R wires—one from the cooling transformer (RC) and one from the heating transformer (RH).
It’s also important to note that your C-wire must come from the cooling side. If your current thermostat has a C-wire that’s coming from your boiler, this will not work with Wyze Thermostat. If you don’t already have a C-wire coming from your air handler, you have two options:
- Run an additional wire from the air handler to Wyze Thermostat to use as a C, or
- Repurpose your G wire as the C using the CWA.
Setting up your Wyze Thermostat
After installing the thermostat and powering it, your Wyze Thermostat will guide you through a series of simple questions about setting your temperature preferences, and about your heating and cooling system. This information is used to set your comfort preferences and save on energy.
Configuring your Wyze Thermostat for the first time
Turn the knob on the thermostat like a dial to highlight different options and press it like a button to make your choices. Below are the topics your thermostat will cover during setup. Select each to learn more.
Equipment detected
Your thermostat will show you the wires it detects in its connectors.
- If there’s a wire missing, pull off the thermostat display and check that each wire is fully inserted into their connector, and that the connector button stays down.
- If you see a wiring error on your thermostat you’ll need to fix it before continuing. If you selected less wires in the wire selections stage in the app than you connected in the thermostat terminals, ensure that the wires connected are correct and restart the installation process in the app to select the correct wires.
Once you’ve confirmed the wiring is correct, your thermostat will ask some questions about your system, such as what kind of fuel it uses and what type of heating you have.
Fuel Source
- If you have a conventional system installed, your thermostat will ask about the fuel source for your heat and how that heat is delivered.
- Wyze Thermostat uses this information to determine how to control your heating and cooling system.
- If you know your fuel source, select it from the list. You can also choose “I don’t know/Others” if you’re not sure.
Type of heating
You may also be asked whether you have a furnace/forced air, in-floor radiant, or a radiator system for heating. For help determining what kind of heating you have, go to the following article.
How can you tell which heating system you have?
| Heating System Type | Description |
|---|---|
| Forced Air | Warm air comes out of vents throughout your home. |
| In-Floor Radiant | Utilizes electric coils or hot water pipes under the floor of your home to provide heating. |
| Radiators | Sealed metal containers filled with hot water, steam, or electric coils. Similar to in-floor systems but not installed under the floor and do not use vents or fans. |
Finish setup with the app
Once your thermostat is connected to your account, the Wyze app will ask you a few more questions about setting a temperature schedule and testing your system.
Setup Guide
Setting up the Wyze Smart Heating & Cooling Thermostat is relatively straightforward:
- Begin by turning off the power to your HVAC system at the circuit breaker or fuse box.
- Remove the old thermostat and take note of the wiring configuration.
- Mount the new thermostat base to the wall using the provided mounting bracket.
- Connect the wires to the corresponding terminals on the new thermostat, following the wiring diagram provided in the manual.
- Turn the power back on and follow the on-screen instructions to complete the setup process.
- Download and install the Wyze app to pair your thermostat with your smartphone or tablet.
Customizing Your Thermostat
Renaming your Wyze Thermostat
Go to Settings > Name. You can choose from a list of suggested names, or enter the name you wish to use for the device in the text box. If you have multiple devices, this will help differentiate where in the home the thermostat is located and will be used for device organization and voice commands.
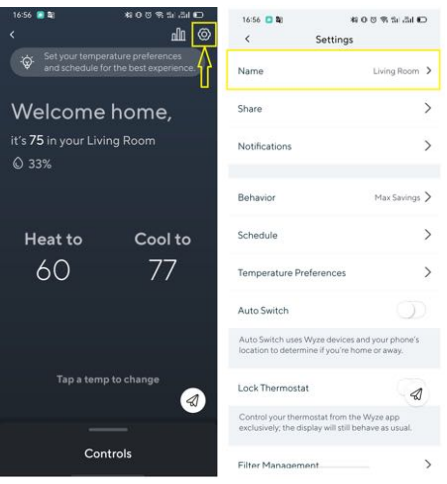

Smart Home/Away
Auto Switch is a feature that can be turned on to use geofencing when the Away routine starts, and return to your scheduled temperatures when the Home routine starts.
To access this feature:
- In your phone settings, allow the Wyze app to access your location.
- In the Wyze app, add a home address for the app to know if you are home or away by tapping Wyze Thermostat > Settings > Location > Enter your home address.
- In the Wyze app, tap Wyze Thermostat > Settings > Auto Switch > Turn on.
Smart Home Integration (Alexa, Google Assistant, IFTTT)
Alexa Commands
- “Alexa, what’s the <thermostat name> set to?”
- “Alexa, what’s the <thermostat name> temperature?”
- “Alexa, Set the temperature to <number> degrees”
- “Alexa, Set the <thermostat name> to <number> degrees”
- “Alexa, Set the <thermostat> between <number> and <number> degrees” (Auto mode)
- “Alexa, decrease the <thermostat> by <number> degrees”
- “Alexa, increase the <thermostat> by <number> degrees”
- “Alexa set the <thermostat> to <mode>” (modes: heat, cool,auto, off)
Google Assistant
Thermostat Lock Access Control
Now you can stop your kids (but not your spouse) from accessing the thermostat. The locking feature is available from both the app and on the device itself. No passcode needed.
To turn on or off the Lock Thermostat feature in the app:
- In the Wyze app, tap Wyze Thermostat > Settings.
- Scroll down to Lock Thermostat and toggle it on/off.
To turn on or off the Lock Thermostat feature on the thermostat;
- Press the thermostat knob once and then turn the knob clockwise to the Settings icon.
- Press the knob again to enter your settings.
- Turn the knob clockwise again to the Lock icon.
- Press the knob to lock or unlock the thermostat.
Setting Weekly Schedules
Time-Based scheduling: Program your thermostat for one week; each day (each day is a different schedule); or any group of days, like Mon-Fri, Sat, Sun, or Mon-Fri, Sat-Sun. You can further customize the temperature of a specific time period without changing the rest of the time slots.
Deleting Schedule
To delete a schedule from your list of schedules, swipe left on that schedule. A Delete icon will appear. Tap the icon to delete the schedule.
Auto Switch
When the Auto Switch feature is enabled, we’ll use the motion sensor in the thermostat and the location of your phone to switch between Home and Away status. Your thermostat will switch from Home to Away when your phone is 3 km away from home, or switch from Away to Home when your phone is within 3 km from home. Once the motion sensor detects movement in front of the thermostat while the status is Away, it will switch to Home. The Auto Switch feature can be toggled on/off in your settings.
Coast to Cool
Wyze Thermostat can send a signal to turn off your compressor or furnace before the end of a cooling cycle or heating cycle, and keep the fan on to blow the remaining cool air or warm air into your home. This feature can help save energy during summer or winter months.
Humidity Preferences
If the * terminal has been connected with an integrated (whole house) humidifier or dehumidifier, the thermostat can turn the accessory device on to moderate the humidity level. Go to Settings > Humidity Preferences to adjust the desired humidity level.
Safety Temps
Safety Temps can help protect your home from extremely cold or hot weather by turning on your heating or cooling system when your set limits are reached, even if your thermostat is set to Off or no heating is scheduled. You will receive a notification when the safety temperature is reached.
By default, your heating Safety Temp is set to 40°F / 4°C and cooling is off. But both can be adjusted by going to Settings > Advanced > Safety Temperature.
For example, when the weather becomes lower than the frost point when you are away from home, Wyze Thermostat can heat the room up to prevent low temperatures from damaging your water pipes. Another good use of this feature is when you have to leave plants or pets at home. You can set the Safety Temp higher in the winter and lower in the summer to keep them comfortable during extreme temperatures.
Note: This feature works without WiFi.
Differential Temp
You can set the value of the minimum difference between the current temperature and set temperature before the system calls to heat or cool. A smaller difference means shorter cycle times, whereas a larger difference results in longer cycle times. By default the differential temp is 1°F which means if the heat is set to 65°F the thermostat will turn the HVAC on when the temperature falls to 65°F. A higher differential temp will help prevent unnecessary short cycles from wearing out your heating/cooling system and reduce starting cost.
The temperature range is adjustable from 0.5ºF to 3°F (0.5ºC to 2°C) by going to Settings > System > Differential Temp.
Minimum Comfort Zone
Minimum Comfort Zone is the minimum difference between the heat mode set temperature and the cool mode set temperature when the system mode is in Auto Mode. The delta is adjustable from 3ºF to 10°F (1.7ºC to 5.5°C). The default value is 5°F (2.8°C).
Temperature & Humidity Correction
Wyze Thermostat has built-in temperature and humidity sensors that are calibrated during production. If the sensors seem to be consistently reading slightly above or below the actual temperature or humidity, you can adjust it with a reference thermometer. For example, if the thermostat reading is higher than your reference temperature, apply "-1". or "-2" in this setting.
You can update these features in Settings > Advanced > Temperature Correction or Settings > Advanced > Humidity Correction.
Minimum Runtime (Short Cycling Protection-alternative name) (N/A)
If the compressor is restarted too soon after a shutdown, system damage can occur. This feature allows the compressor to wait a few minutes before restarting, helping to prevent damage to the heating or cooling system. During the brief wait period, the thermostat will show Cool on (or Heat on if you have a heat pump) until the wait period is over, at which point the compressor will turn back on.
The time is 5 minutes by default, but you can adjust it from 2 to 8 minutes by going to Settings > System > Minimum Runtime.
Changing Measurement Units
You can switch between using Celcius and Fahrenheit by going to Settings > Advanced > Temperature Units.
Note: this setting will be applied on both Wyze Thermostat and the Wyze app when adjusting and displaying the temperature. The unit for system settings will always be in Fahrenheit.
HVAC Accessories (* Terminal)
Wyze Thermostat offers an accessory terminal that is capable of connecting to 1 of the following 4 devices:
- Dehumidifier. To configure the dehumidifier, select:
- Cooling: Dehumidifier will only run when cooling stage is active and the humidity is outside the desired range.
- Fan: Run the fan when the dehumidifier is active.
Energize: Active on or Active off.
_wyze_smart_heating_&_cooling_thermostat..png)
- Humidifier. To configure the humidifier, select:
- Fan: Runs the fan when the humidifier is active.
Heating: Humidifier only runs when the cooling stage is active and the humidity is outside the desired range.
_wyze_smart_heating_&_cooling_thermostat.png)
- Ventilator.
Emergency Heat. Can be activated from the settings in the Wyze app.
_wyze_smart-heating_&_cooling_thermostat.png)
Note: This feature is only available when Emergency Heat is chosen as the terminal during the setup process. Emergency Heat can only be turned on manually by going to Settings > Advanced in the Wyze app.
Sharing Access
You can share access to the thermostat with your family members, roommates, and even Airbnb guests.
Restrictions on shared devices:
There are some restrictions to what a shared user can do in the Wyze app.
A shared user:
- Cannot name or rename the device.
- Cannot share the device with others.
- Cannot execute OTA.
- Tapping on the Delete Device icon in Settings only removes the device from the shared user's Wyze app device list, but does not delete the device from the primary user's list.
Important:
Shared devices can use Auto Switch. This means anyone who leaves home who activates Auto Switch, changes the state to Away.
Hold Schedule (Going on Vacation)
Use this feature when you go on vacation or are away from home for an extended period of time. Quickly access the Hold function on the controls panel on Wyze Thermostat’s page in the app. When enabled, motion detection and the Auto Switch features will be disabled but you will still receive notifications. Three configurations are available:
- Indefinitely: Schedule is on hold until you manually turn it off.
- Time: Set the time for your schedule to resume.
- Date: Set the day for your schedule to resume.
Filter reminder
Wyze Thermostat has a built-in filter management system that can store filter information like sizing factors. You will be notified when the filter needs to be replaced.
Installing Zone Control
Wyze Thermostat is compatible with most zone control systems, including zone systems with dampers. However Wyze Thermostat uses standard thermostat connections; proprietary connections such as DAMP or MISC are not compatible.
Zoned Systems: If your house has multiple thermostats connected, then it can be considered a zoned system. A zoned system will use dampers in the HVAC duct to open and close off zones in your house. You can replace one or all of your thermostats with a Wyze Thermostat.
Master/Slave
In a master/slave-controlled HVAC system, one thermostat (master) controls the other thermostats (slave). Some master slave configuration thermostats may not be compatible.
Thermostat controlled dampers
Some dampers are controlled from the thermostat through specialty wiring connections on the thermostat, such as Damp. Wyze Thermostat is not compatible in this case.
Zoned system panels
By far the most common type of zone system utilizes a zone system panel. Wyze Thermostat is compatible with most of these panels. If the old thermostat doesn’t have special terminals like MISC or Damp then it will be compatible. Follow the Wyze app to install as normal.
Zoned system panel without C-wire
Connecting the C-Wire Adapter (CWA) module to a zoned system is almost the same as connecting to a normal control board. Two things to remember:
- Identify the correct control board. Your system may have multiple control boards. You must identify the zone control board, as that will be the board used to connect the C-wire adapter.
- Identify the correct zone on the panel. As shown below, the panel can connect several thermostats. You must identify which zone thermostat you are changing.
Connect the C-Wire Adapter (CWA). Follow the Wyze app for how to connect the thermostat. Remember, connect the CWA to the zone thermostat wires. Refer to the image below for a common wiring scenario.
_wyze_smart_heating_&_cooling_thermostat.png)
Troubleshooting
If you encounter any issues with your Wyze, here are some common problems and solutions:
- Thermostat not turning on: Check that the power is turned on at the circuit breaker or fuse box. Ensure all wires are properly connected.
- Temperature inaccuracies: Calibrate the thermostat by going to the settings menu and selecting "Calibrate Temperature."
- App connectivity issues: Ensure your smartphone or tablet is connected to the same Wi-Fi network as the thermostat. Restart both devices if necessary.
- Warning signs: Avoid exposing the thermostat to direct sunlight or extreme temperatures. Keep it away from children and pets to prevent accidental damage.
Pros & Cons
Pros
- Affordable pricing compared to other smart thermostats
- User-friendly interface and app control
- Advanced features like geofencing and smart learning
- Energy efficiency and detailed usage reports
- Compatibility with major smart home ecosystems (Alexa, Google Assistant)
Cons
- Limited compatibility with certain HVAC systems
- No built-in voice assistant (requires external devices)
- Slightly longer setup process compared to simpler thermostats
- Dependence on Wi-Fi connection for full functionality
Customer Reviews
Customers have praised the Wyze Smart Heating & Cooling Thermostat for its ease of use, energy-saving capabilities, and seamless integration with other smart devices. Some users have noted that the setup process can be a bit complex, but overall, the thermostat has received positive reviews for its performance and value.
A common complaint is the lack of built-in voice assistant capabilities, but this is mitigated by its compatibility with external voice assistants like Alexa and Google Assistant.
Faqs
How do I install the Wyze Heating & Cooling?
Is the Wyze Smart Thermostat compatible with all HVAC systems?
How does geofencing work on the Wyze Thermostat?
Can I control the thermostat remotely?
Does the Wyze Smart Thermostat support voice assistants?
How accurate is the temperature reading on the Wyze?
What kind of energy-saving features does the Thermostat offer?
Can I use multiple Wyze in one home?
How do I troubleshoot connectivity issues with my Wyze Smart Thermostat?
What kind of maintenance does the Wyze require?
Leave a Comment
