X-Tool Smart Scanner Diagnosis D7 Beginners Guide

Content

Introduction
This guide will provide an overview of the Tool Smart Scanner Diagnosis D7, a state-of-the-art diagnostic device that is specifically designed for automotive professionals and enthusiasts. It provides a wide range of diagnostic capabilities, such as the ability to detect error codes, analyze real-time data, and perform advanced system diagnostics. The D7 is a must-have instrument for any garage or workshop, as it guarantees precise and efficient troubleshooting due to its user-friendly interface and compatibility with a wide range of vehicle models.
PACKAGE KIT
MAIN UNIT
- Tablet 1 pcs
OTHER ACCESSORIES
- OBDⅡ-16 Connector (1 pcs)
Used to access vehicle ECU data - Main Test Cable (1 pcs)
The main cable is used to connect the Tablet to the connector. - USB Cable
Connect the display table to the PC or DC power adapter - Power Adapters
- Charger DC5V AC100-300V 2A USB socket output No AC movable feet 1 pcs
- AC Charger Adapter 1 pcs (EU Standard)
- AC Charger Adapter 1 pcs (US Standard)
- Used to connect a USB cable to connect the tablet to an external DC power port for charging.
- User Manual
*Tool operation instructions
TECHNICAL SPECIFICATIONS
| Specification | Details |
|---|---|
| Operating System | Android |
| Processor | Quad-core 1.6GHz Processor |
| Memory | 32GB |
| Display | 7.0-inch touch screen with 1024 × 600 resolution |
| Connectivity | USB, Wi-Fi |
| Sensors | Gravity sensor, light sensor |
| Auto Input/Output | Microphone, dual speakers, 4-band 3.5mm stereo/standard headset jack |
| Power and Battery | 4000mAh, 3.7V lithium-polymer battery |
| Power Voltage | 5V |
| Power Consumption | 8W |
| Operating Temperature | -20 to 60℃ (-4 to 140℉) |
| Storage Temperature | -40 to 70℃ (-40 to 158℉) |
| Humidity | <90% |
| Dimension (LWH) | 21815029mm |
GETTING STARTED
ACTIVATION
After first-time users press and hold the power button to turn on the system, the system will automatically enter the guide process and request to select the language for the operating system.
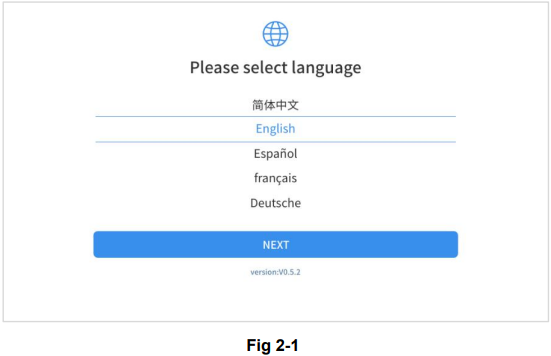
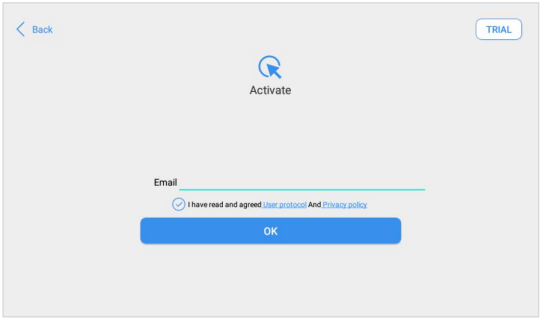
After setting the system language, you will enter the activation page, as shown in the figure below. You can also click the "Trial" button in the upper right corner to try it out before activation.

Click Start Activate to enter the activation page, as shown below:
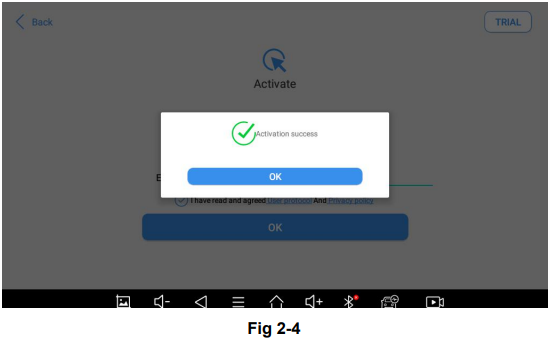
A pop-up window showing Activation Success indicates that you have completed the first boot setup, click OK to enter the diagnostic system and start using the device.
Description
The X-Tool Smart Scanner Diagnosis D7 is a professional-grade automotive diagnostic tool that offers a wide range of features and functionalities for vehicle owners and mechanics. With its large and intuitive touchscreen display, you can easily access various vehicle systems, read and clear fault codes, and monitor live data streams. This device also supports automatic vehicle identification, making it easy to use even for beginners. Its compact and portable design allows you to take it with you wherever you go, whether for personal use or professional work.
MAIN INTERFACE
OPERATION SYSTEM
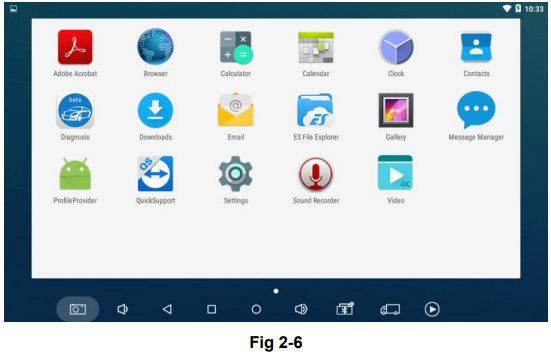
As shown in the figure below, this interface is the main page of the operating system of the device. You can also return to this interface at any time by clicking 【⚪ 】on the bottom navigation bar.
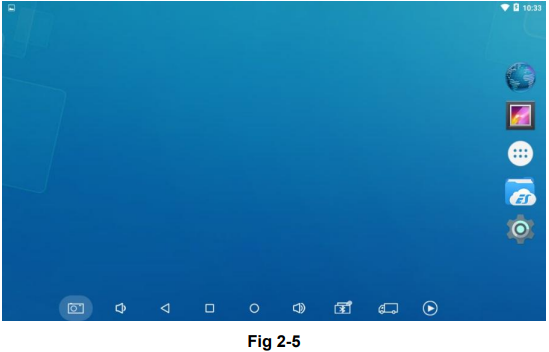
The icons on the right, from top to bottom, are browser, photo album, application square, file manager, system settings, as shown below:
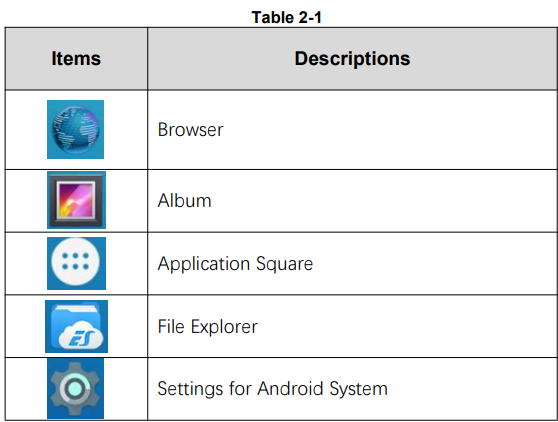
- Browser: Click on the browser icon to enter the browser to view the official website of XTOOL or search for other information.
- Gallery: Click the Gallery icon to enter the album to quickly view the pictures or screenshots stored in the device. You can select the picture you need, click the share button on the upper right, and send the picture to your mobile phone or PC via Bluetooth or USB connection
Application Square: This function is suitable for power balance after replacing and repairing the cylinder. You can remove or add apps here.
- ES File Explorer: You can manage APP, music, files, pictures, etc. in the device in this function, and you can also use Local/Home/Cleaner to clean up files.
DIAGNOSIS SYSTEM ENTRANCE
Once activated, you will automatically enter the diagnostic system with the following main screen. Tap on the diagnosis application button on the menu, the main interface will be shown as below:
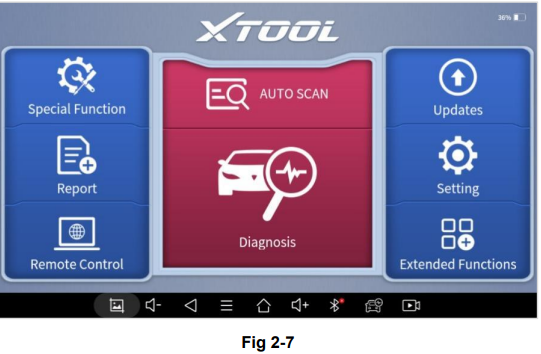
The main interface is mainly composed of Function Buttons and Navigation Buttons. The touch screen navigation is menu-driven, and you can quickly access functions by clicking on the option title and answering the dialogue window. A detailed description of the menu structure can be found in the next section Function Buttons.
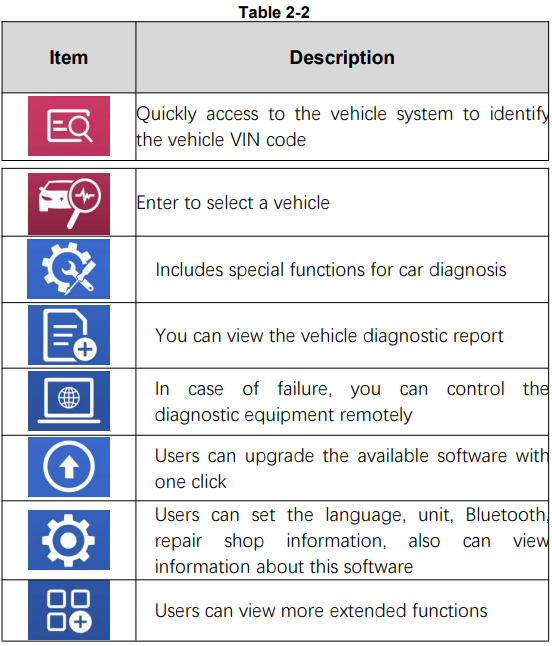
FUNCTION BUTTONS
The following table briefly describes each function button
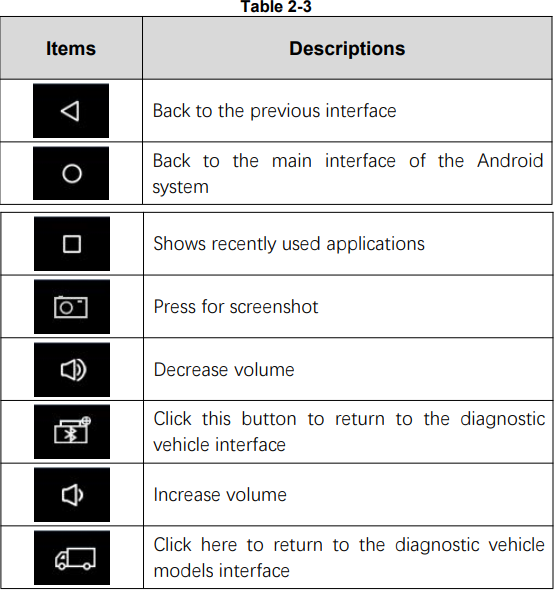
NAVIGATION BUTTONS
Instructions for operating the navigation bar buttons at the bottom of the screen, as described in the table below:
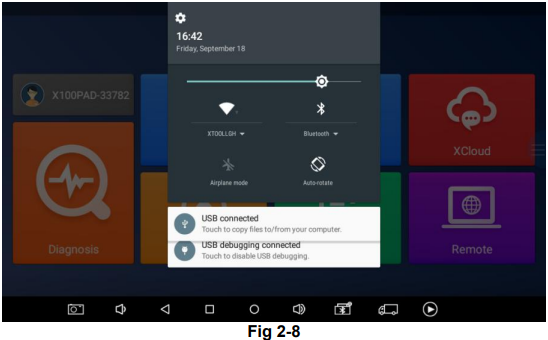
NOTIFICATION BAR
Slide down to open the notification bar. Users can adjust the brightness of the screen when they need it, and you can also connect Wi-Fi and so on.
FACTORY RESET
When you choose to restore factory settings in the OS system, the device will automatically restart and enter the factory mode to pull the software. You can select the language in the following interface.
After selecting the system language, click Next to enter the Wi-Fi connection page, as shown below:
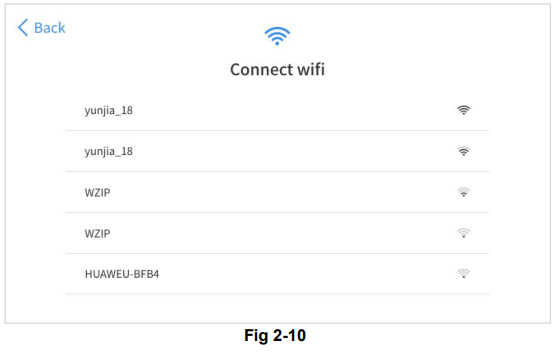
Select a network to connect to on the Wi-Fi connection page. After successful network connection, the automatic system will jump to Factory mode to download the software:
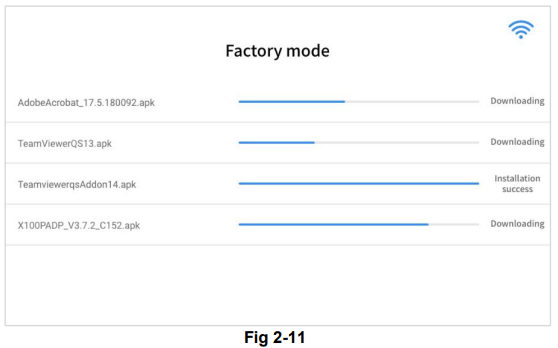
Once the software has been downloaded, the tablet will automatically reboot and request the system language selection again.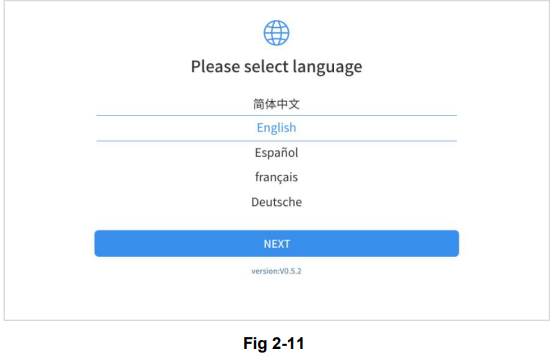
Since restoring the factory settings will erase the user information on your device, you need to enter the email again to activate your device

Setup Guide
- Fully charge the X-Tool Smart Scanner Diagnosis D7 before using it for the first time.
- Turn on the device and connect it to your vehicle's OBD2 or EOBD port.
- Wait for the device to identify your vehicle and select the appropriate system for scanning.
- Use the touchscreen display to navigate through the various functions and features of the device.
- Disconnect the device from your vehicle when not in use to conserve battery life.
X-Tool Smart Scanner Diagnosis D7 SETTINGS
Click the Settings button to adjust the default settings and view information about the D7 Smart Diagnosis System. There are seven options available in the system settings:
- Language
- Units
- My Workshop Info
- VCI Info
- About
LANGUAGE
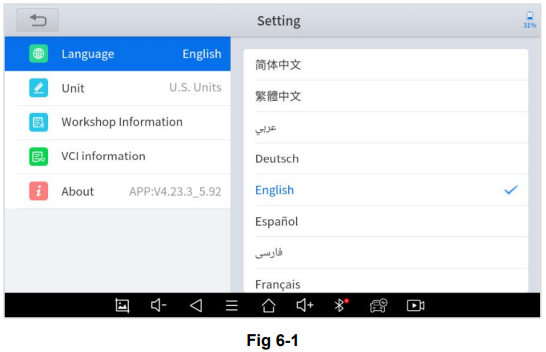
The languages supported by this device are listed in Settings. In areas outside the English area, the default language is English and the local official language. Users can switch between English and local official languages on the device by themselves. If you need to switch other languages, please contact the dealer to unbind the current language configuration and rebind it to the language configuration you need to switch. After the configuration is successfully changed, you can switch the target language.
INFO: This will only change the language of the APP. If you want to change the system language, please go to Android Settings.
How to change the language of your software?
- Step1: Contact your dealer and leave a message about the language you need and the S/N of your device, The technician will modify the language configuration for you in the background.
- Step2: Settings->Language->Choose language
- Step3: OS Settings->Language & input->Choose Language
Note: The types and quantities of languages supported are subject to the actual language types displayed on the device - Step4: Back to Updates to pull all packages again
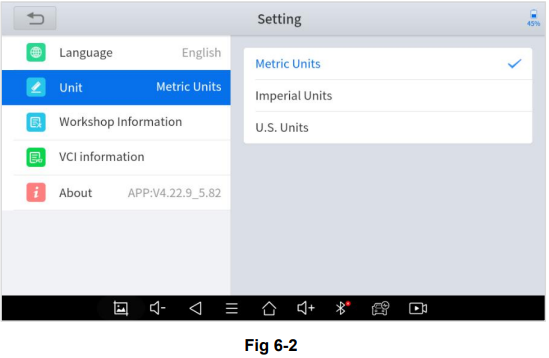
UNITS
You can switch the unit used by the system. D7 Smart Diagnosis System provides you with Metric, Imperial, and U.S. units. You can directly click on the unit you need, after the switch is successful, a blue checkmark will be displayed behind the unit’s name.
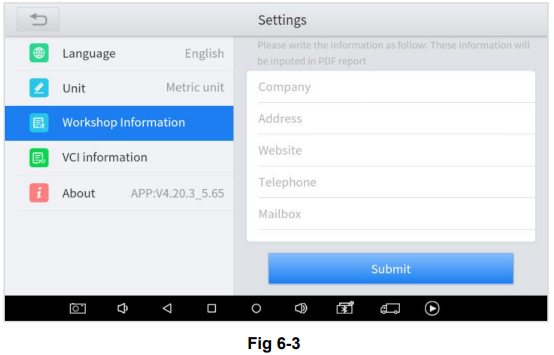
MY WORKSHOP INFO
Click on My Workshop Information, you can input your workshop information here. As shown in the figure below, you just need to fill in the valid information in the corresponding column and click "SUBMIT". And then it will show your workshop information in the report when you generate a diagnostic report, including your company name, address, website, telephone, and mailbox.
VCI INFORMATION
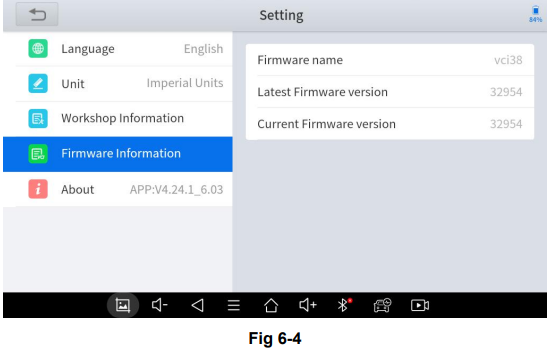
You can view the VCI information here, including the VCI firmware name, the latest firmware version, the currently used firmware version, and the VCI firmware type.
INFO: The diagnosis tablet supports automatic firmware update, please make sure that the device is connected to the network when you enter the diagnostic software and the firmware will be automatically updated to the latest version.
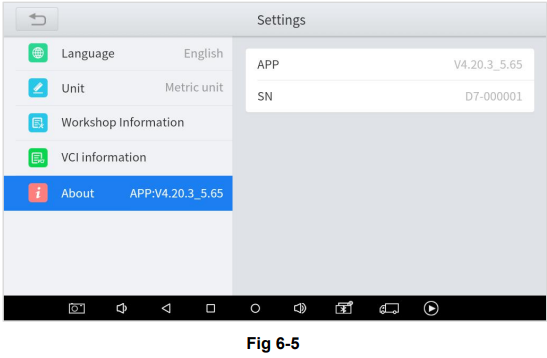
ABOUT
Tap on ABOUT, you can check the serial number and APP version on here.
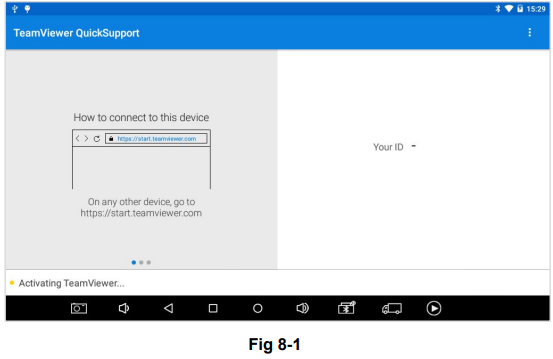
REMOTE ASSISTANCE
Tap on "Remote" to start the TeamViewer quick support program, which is a simple, fast, and secure remote-control screen. You can use this application to enable them to control your tablet on a PC through the TeamViewer software, thereby obtaining temporary remote support from XTOOL's technical support centre. Computers and mobile devices running TeamViewer are identified by a globally unique ID. When the remote application is started for the first time, the ID will be automatically generated according to the hardware characteristics and will not be changed in the future. This TeamViewer ID can individually access all TeamViewer clients. Before launching the remote desktop application, make sure that the tablet is connected to the Internet so that you can access the tablet to receive remote support from a third party. If you encounter problems and are not able to solve them, you could open this application and ask for remote assistance.
To obtain remote support from your partners or XTOOL After-service Center:
- Turn on the power of the tablet.3
- Click Remote in the diagnosis application. The TeamViewer screen is displayed, and the device ID will be generated.
- Your partner must install the remote-control software on his/her computer by downloading the full version of the TeamViewer program (http://www.teamviewer.com) online, and then start the software on his/her computer at the same time, to provide support and remote control of the tablet.
- Provide your ID to the partner or XTOOL technician, and then wait for him/her to send you a remote-control request.
- A pop-up window will be displayed, asking you to confirm to allow the remote-control program to control your device.
Click Allow to accept, or click Reject to reject.
Troubleshooting
If you encounter any issues with the X-Tool Smart Scanner Diagnosis D7, such as connectivity problems, fault code reading errors, or software glitches, try the following solutions:
- Make sure the device is fully charged.
- Check the connection between the device and your vehicle's OBD2 or EOBD port.
- Update the device's software via Wi-Fi or USB.
- Restart the device and try again.
- Contact X-Tool's customer support for further assistance.
X-Tool Smart Scanner Diagnosis D7 Pros & Cons
Pros
- Comprehensive vehicle system scans and fault code reading and clearing
- Live data streaming and graphical representation
- Automatic vehicle identification and system scanning
- Updatable via Wi-Fi or USB
- Compact and portable design
Cons
- May be too expensive for some users
- May not support all vehicle makes and models
- Limited battery life
Customer Reviews
"I've been using the X-Tool Smart Scanner Diagnosis D7 for a few months now, and I'm really impressed with its performance and features. It's easy to use, and the live data streaming is a game-changer for me as a professional mechanic. Highly recommended!" - John D.
"I bought the X-Tool Smart Scanner Diagnosis D7 for my personal car, and it's been a lifesaver. I was able to diagnose and fix a few issues with my car's engine and transmission, and the device's compact design makes it easy to store in my glove compartment. Great value for the money!" - Sarah K.
Faqs
Which vehicles are compatible with the X-Tool Smart Scanner Diagnosis D7?
Is it possible for the X-Tool D7 to receive and clear error codes?
What is the process for updating the software on the X-Tool D7?
Does the X-Tool D7 provide bidirectional control?
What is the X-Tool D7's portability?
Is the X-Tool D7 appropriate for DIY mechanics?
Is there a warranty available for the X-Tool D7?
Leave a Comment