Xega Battery Security Camera User Manual | Settings & Connectivity
Content
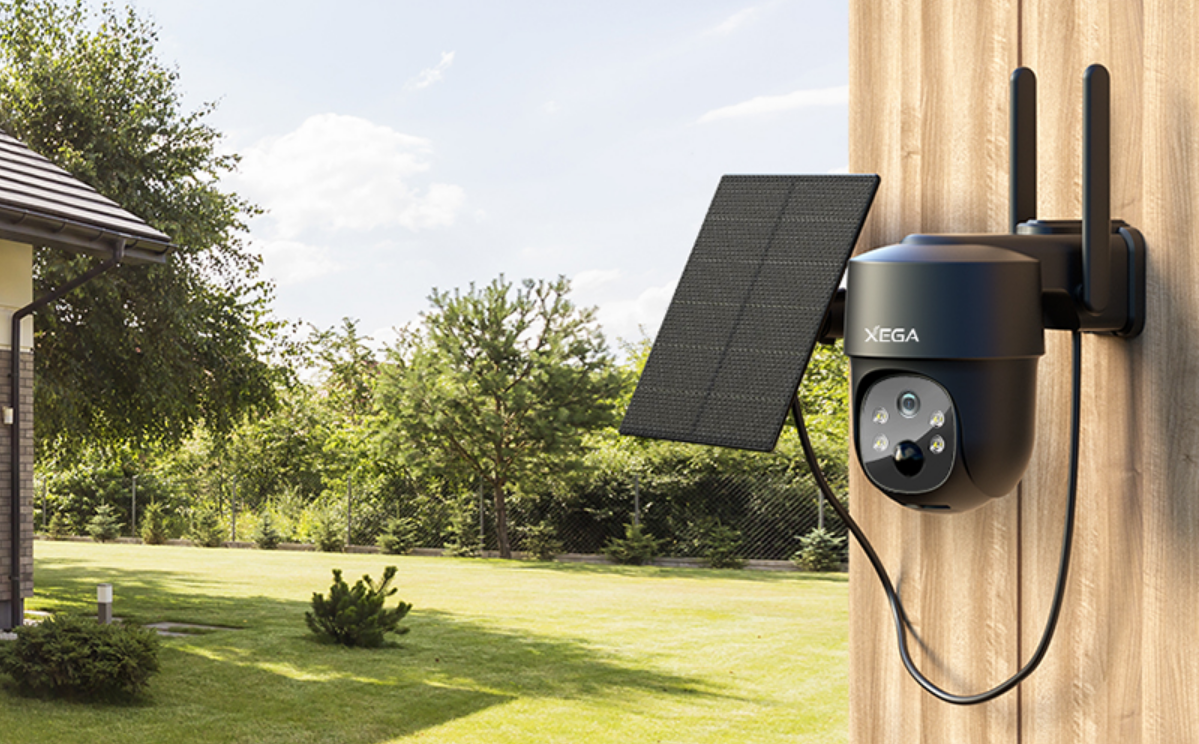
Introduction of Xega Battery Security Camera
The Battery Security Camera is a versatile and innovative home security solution that offers high-quality video recording and advanced motion detection features. With a long-lasting battery life and easy installation process, this camera is perfect for both indoor and outdoor use. The Xega Battery Security Camera is expected to launch in the coming months with an estimated price range of $150 to $200.
Detailed Specifications
The Battery Security Camera boasts the following key features
- 1080p HD video recording
- Night vision up to 30 feet
- 110-degree field of view
- IP65 weather-resistant rating
- Mobile app control and monitoring
- Up to 6 months of battery life on a single charge
- Advanced motion detection and alerts
- Two-way audio communication
- Local and cloud storage options
Description of Xega Battery Security Camera
The Xega Battery Security Camera is a versatile and reliable home security solution that offers high-quality video recording and advanced motion detection features. With a sleek and modern design, this camera is perfect for both indoor and outdoor use. The camera features 1080p HD video recording and night vision capabilities, allowing you to capture clear and detailed footage even in low light conditions. The 110-degree field of view and IP65 weather-resistant rating make this camera suitable for a variety of environments. The Xega Battery Security Camera also includes mobile app control and monitoring, providing you with real-time alerts and notifications. With up to 6 months of battery life on a single charge, this camera is designed for long-term use and convenience. The advanced motion detection and two-way audio communication features make this camera an ideal choice for home security and monitoring.
Recommended installation method
It is suggested to install the camera at a height of about 2.6m and with an inclination angle of 15°to 30°(manually adjustable according to the real-time view in the APP on your mobile phone to focus on the motion detection areas to capture the trigger monitions more accurately).
Setup Guide
Setting up the Xega Battery Security Camera is a simple and straightforward process
- Charge the camera for at least 8 hours before use.
- Download the Xega app and create an account.
- Turn on the camera and follow the prompts in the app to connect to Wi-Fi.
- Place the camera in your desired location and adjust the angle as needed.
- Test the motion detection and two-way audio features to ensure proper functionality.
Download and register of APP on mobile phone
Download
Please find the “UBox” APP in the Google Play Store or App Store on your mobile phone.
Account Registration
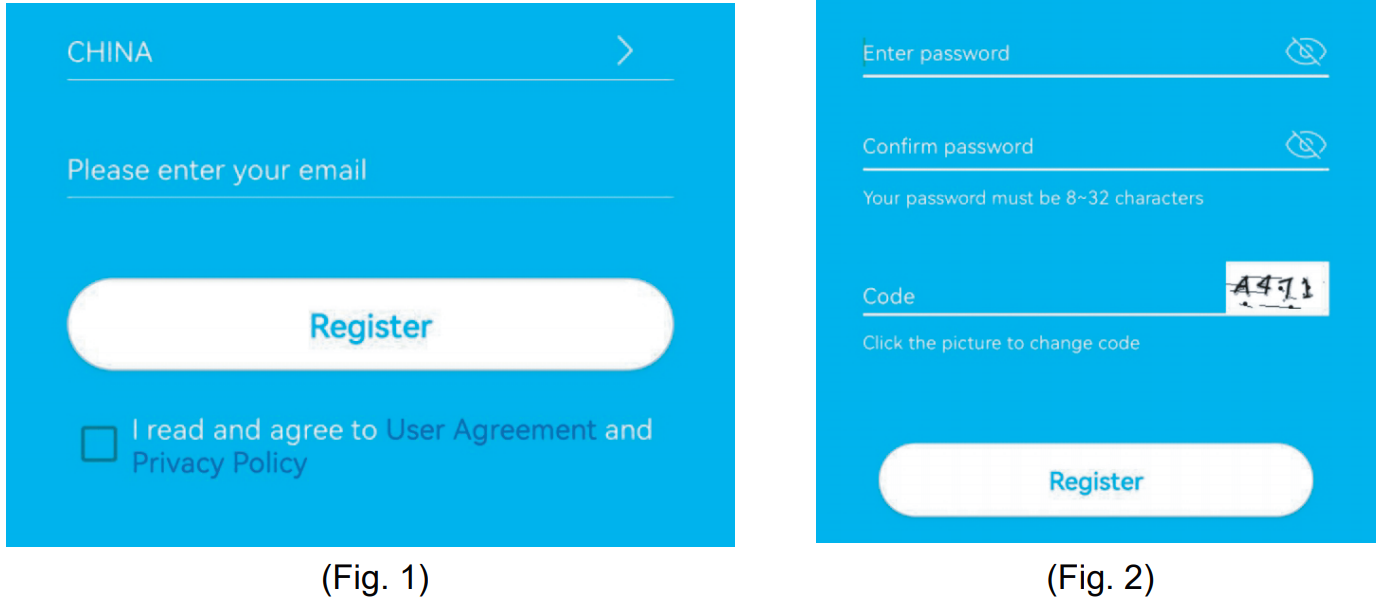
- Open the APP, choose the region where you are and register an account with a mobile phone number or e-mail address. It is suggested to verify the account through an e-mail address for purpose of password retrieving (Fig. 1).
- Set and note down a password consisting of 8 to 32 digits or letters for the account (Fig. 2).
- In any access in “UBox” APP download and account setting, please click “Permit” or “Agree” to enable the APP to have access to your camera and mobile phone. If not so, your camera may have insufficient functions or incomplete settings.
Camera connection
- Prepare
- After long-time transportation, the battery level of the camera may decrease. Please charge the camera via a 5V charger or a computer USB interface before using it. When in charging, the LED indicator on the camera is red.
- After the camera is fully charged, power it on. After the LED indicator close to its lens is lit, press the reset button for 8 seconds. A prompt tone suggests successful reset.
- Enter the setting interface of your mobile phone and click the WiFi of your home in the WiFi list.
- Connect the camera.
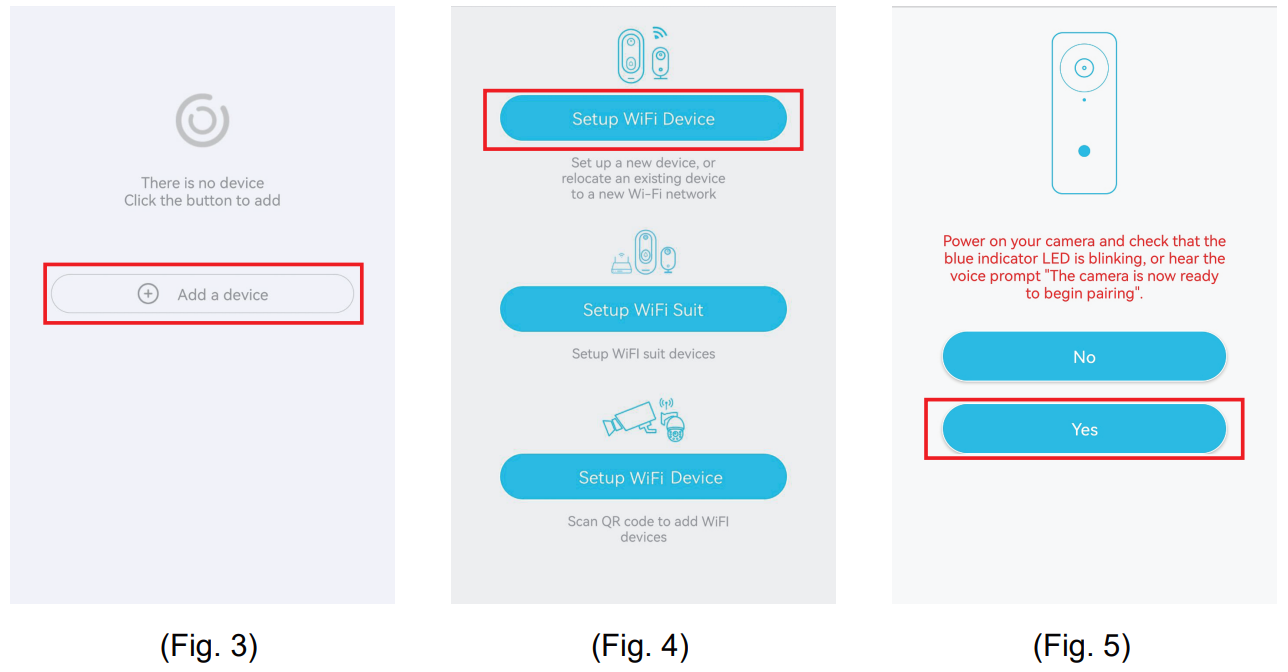
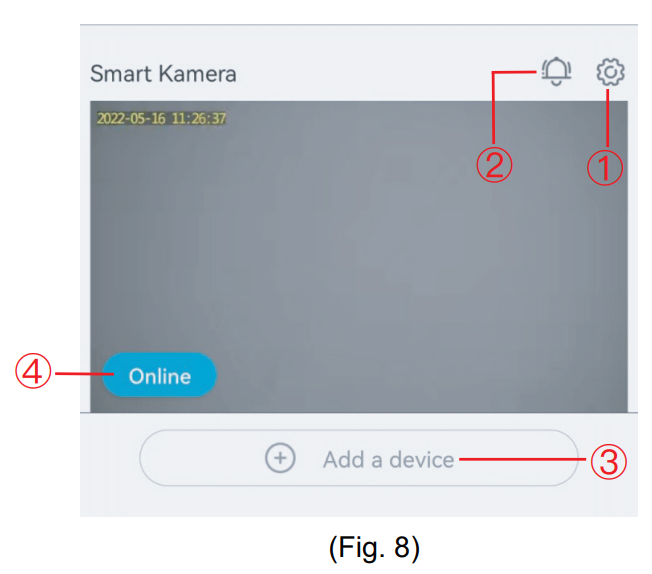
- Enter “UBox APP”, click “Add a device” to enter the device list (Fig. 3). Choose “Setup WiFi Device” (Fig. 4).
- Check whether the LED indicator close to the lens is flashing. If it is, click “Yes” to enter the device information interface (Fig. 5).
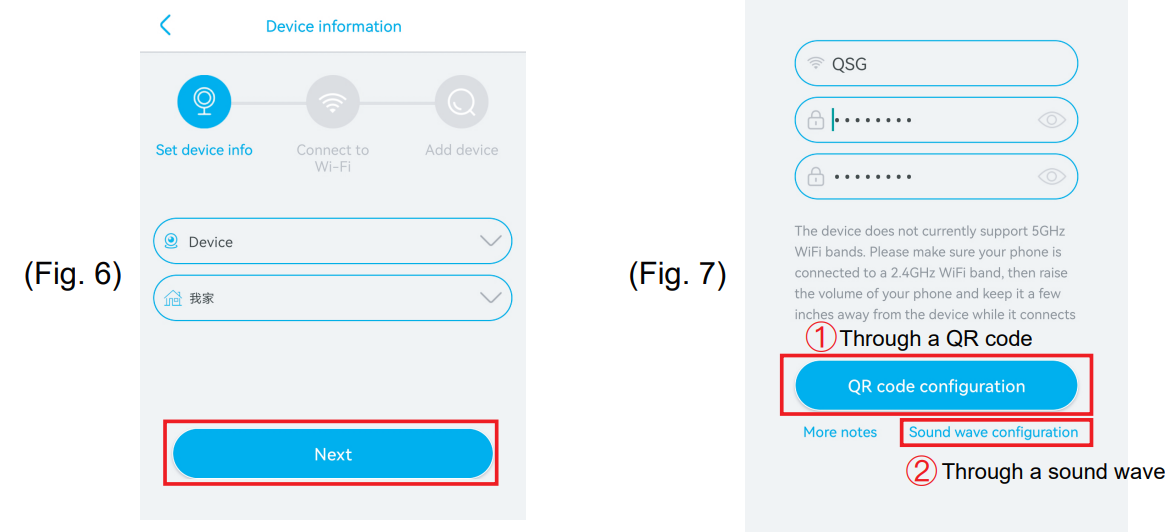
- Set name of the camera, or use its default name and then click “Next” (Fig. 6).
- Choose the method of camera network configuration.
- Through a QR code
- After entering the WiFi network setting interface, the APP will display name of the WiFi network connected because your mobile phone has connected to the WiFi network of your home. Just enter the WiFi password and confirm it and then click “QR code configuration”. (Fig. 7)
- The APP will generate a QR code automatically. Have the QR code on your mobile phone point at the lens of the camera (distance: about 15cm) for identification. When there is a prompt tone given by the camera, it suggests that the QR code scanning has succeeded and the camera has been connected to the APP automatically.
- Through a sound wave
- After entering the WiFi network setting interface, the APP will display name of the WiFi network connected because your mobile phone has connected to the WiFi network of your home. Just enter the WiFi password and confirm it and then click “Sound wave configuration”.(Fig. 7)
- The APP on our mobile phone will then send a sound wave automatically (you can volume up your mobile phone for better configuration). Put your mobile phone by the camera for sake of its reading. When there is a prompt tone given by the camera, it suggests that the sound wave reading has succeeded and the camera has been connected to the APP automatically.
- Through a QR code
Note: If camera connection fails, try as below.
- Check the battery level of the camera is sufficient, power on the camera, press and hold the reset button for 10 seconds and then release it for camera connection.
- Check whether the WiFi password of your home is longer than 31 characters and make sure there is no special character such as “?!”, or “&,.”. It is suggested to use a combination of digits and letters.
Buttons
Device list interface
- Basic settings
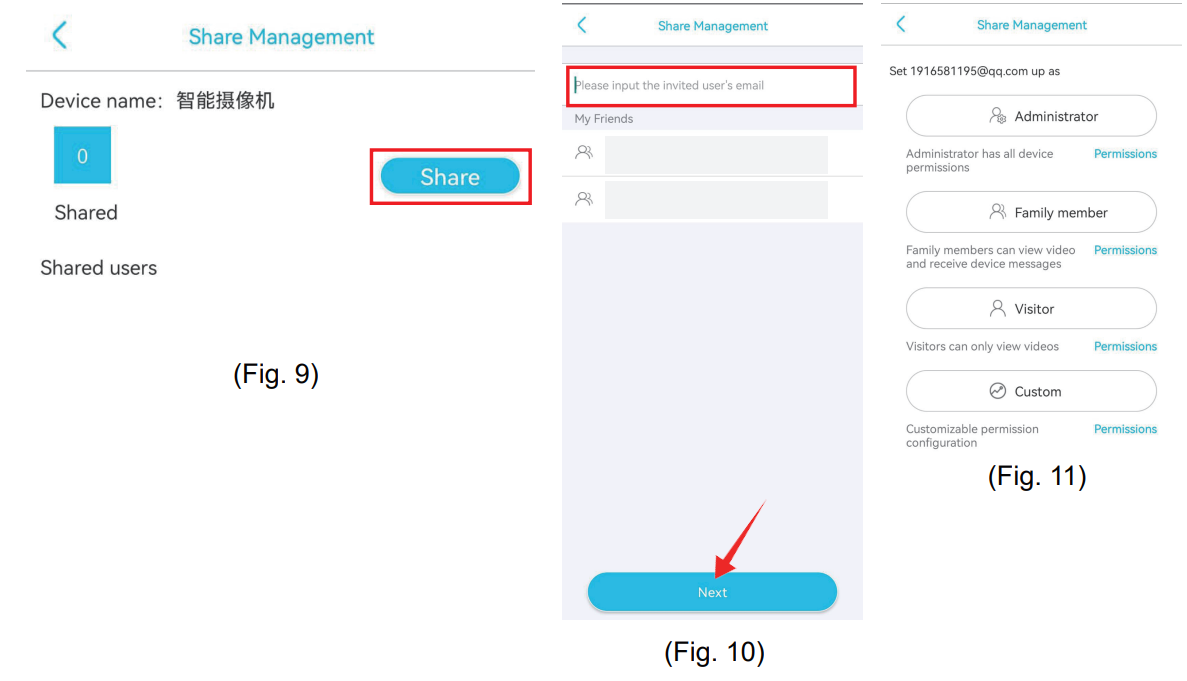
Permission sharing: Click “Share” to enter the sharing interface (Fig. 9). Enter the e-mail address or mobile phone number of a family member to whom you would like to share permissions for camera viewing (Fig. 10) and click “Next” to set the permissions of camera viewing by the family member. The family number should then find option “My Friend” on “Mine” page on the APP on his mobile phone and click to view content on the camera (Fig. 11)
Cloud service: For viewing the cloud service package information of the current device or subscribing the cloud storage service for the current device
View UID: For viewing the current UID number of the camera
Delete device: For deleting the device information currently on the APP - Push alarm: If this icon is clicked, the alarm push function will be enabled; if it is clicked again, the alarm push function will be disabled, and you will receive no notification. (Note: In the latter case, the motion triggering events will be recorded to the cloud service or the micro SD card continually.)
- Add smart device: For adding a camera to be connected.
- Operating state of the device: For displaying the device’s online or offline operating state
Real-time interface of device
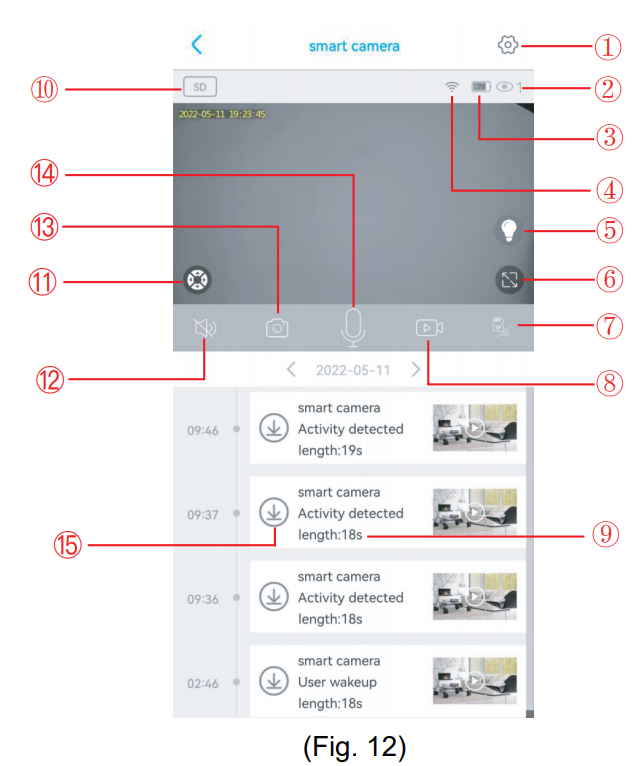
1.Setting interface | Forsetting parameters of the camera |
2.Number of viewers | For displaying numberof the personsviewing real-time images at the same time |
3.Battery icon | For displaying the current batterylevel (during charge, this icon is green and has a lightning symbol) |
4.WiFi signal | Checking the existing signalintensity of the WiFi network of the camera |
5. Night vision mode | For switching betweenthe full-color nightvision mode and the infrared night vision mode |
6. Full-screen button | Forfull-screen viewing of real-time imagesof the camera |
7. Video recording mode | For switching betweencloud storage-based video recording and TF card-based video recording |
8. Manual video recording | For recording videosof real-time interfaces and saving them to the photo album of the APP |
9.Video play | Forplaying videos and going to the videoplay interface |
10. Image quality | For switching between HD image qualityand SD image quality |
11. PTZ interface | For going to the PTZ interface to control rotation of the PTZ |
12. Monitoring function |
For monitoring the sounds close to the camera |
| 13. Manual photographing | For taking photosof real-time interfaces and saving them to the photo album of the APP |
14. Intercom button | For enabling the sounds of talks to come out of the camera |
15.Video download from TF card | For downloading videosfrom the TF card and saving them to the photo album |
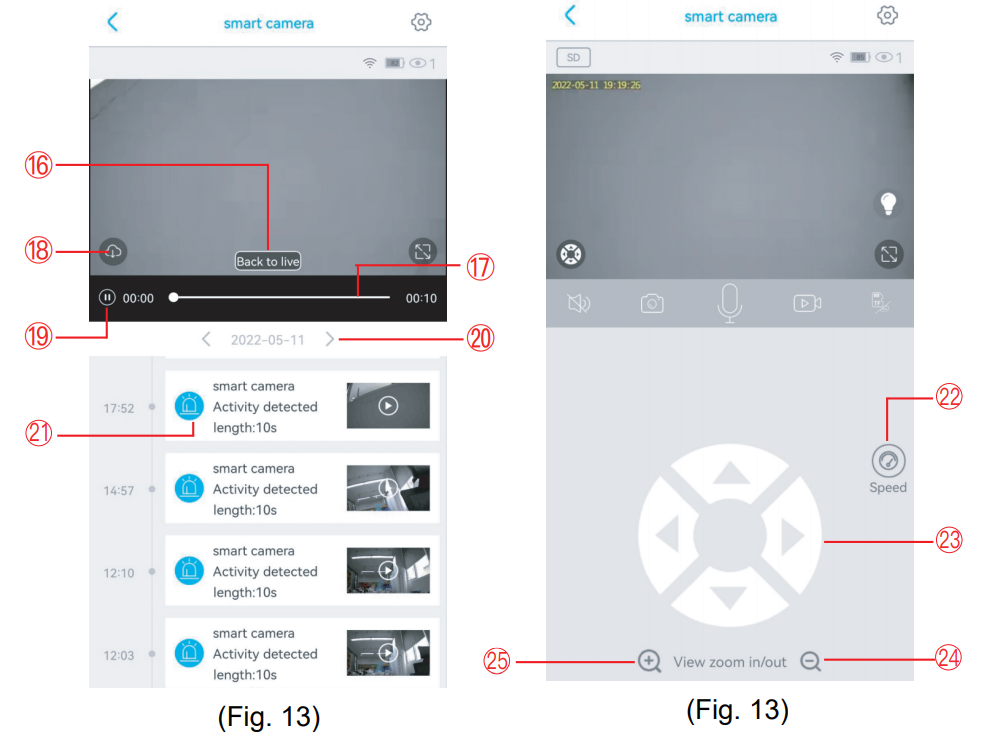
16. Back to live streaming interface | For backing to the real-time monitoring interface to view images |
17. Video viewing progress | For viewing videosquickly with help of the video progress bar |
18. Cloud video download | For choosing a cloud videoto play, and clicking the download button to download it to the photo album |
19. Play/Pause button | Forplaying or pausing a video |
| 20.Date | Forchoosing a date to view the videos on it |
21. Video choosing | Forplaying a videoor making it slide leftto delete it |
| 22. Speed | For choosing rotating speed (high, medium,low) of the PTZ |
23. PTZ wheel disc | For controlling rotation of the PTZthrough the four directional buttons |
24. Video zoom out | For zooming outreal-time images (digital zooming function) |
25. Video zoom in | Forzooming in real-time images (digital zooming function) |
Setting interface
- Storage management
It is for enabling or disabling video storage to the cloud and the TF card, checking total capacity and available capacity of the TF card, or judging whether the camera has read the TF card. - Image flip
It is for adjusting image angles when the camera has a wrong mounting angle. - PIR human detection
There are three options (low, medium, high) for detection sensitivity. A higher detection sensitivity corresponds to easier triggering of detection and a larger power consumption. If the camera is insensitive in detection, increase its detection sensitivity; if the camera gives any false alarm, decrease its detection sensitivity. - Set arming
User can set certain period of time in a week for detection and alarming. The camera does not detect or alarm in other periods of time. - Sleep time
The camera will wake up after detecting any moving object. After the object leaves the detection area, the camera will sleep automatically after the set value. The longer the delay, the larger the power consumption will be. - Alarm sound
If this function is enabled, the camera will alarm audibly automatically after detecting any moving object. - Synchronize time
If the time on the camera is not synchronous with the time on your mobile phone, you can click this button to make the APP synchronize them automatically. - Upgrade firmware
It is for automatically testing whether the camera’s firmware is of the latest edition. If the edition is lower than expected, there will be a firmware update prompt.
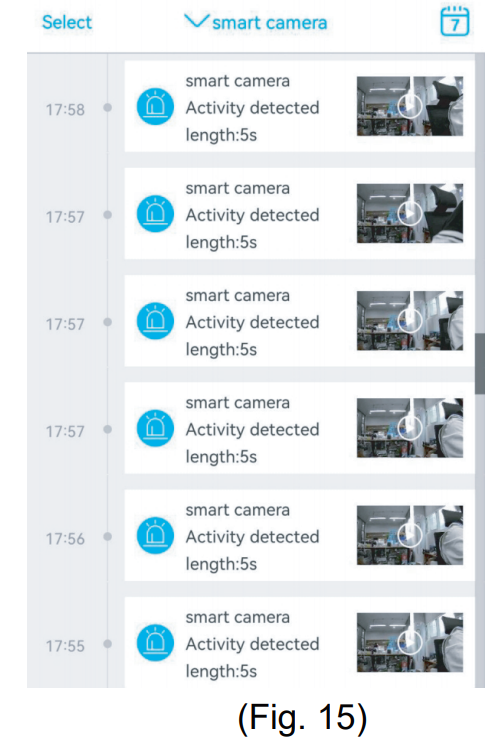
Cloud video interface
On this page, user can choose the target camera, click the calendar, choose the target date of video recording and play the videos by clicking them, or choose multiple videos through the selector buttons and download or delete the corresponding cloud videos.
(Fig. 15)
Troubleshooting
Here are some common issues and solutions for the Xega Battery Security Camera
- Camera not connecting to Wi-Fi: Ensure that the camera is within range of your Wi-Fi network and that the password is correct. Try resetting the camera and repeating the setup process.
- Motion detection not working: Check the camera's settings to ensure that motion detection is enabled and adjust the sensitivity as needed.
- Battery not charging: Ensure that the charger is properly plugged in and that the camera is turned off while charging.
- Video footage not saved: Check the camera's storage settings to ensure that footage is being saved to the correct location, either locally or in the cloud.
Pros & Cons of Battery Security Camera
Pros
- High-quality video recording
- Advanced motion detection features
- Long-lasting battery life
- Weather-resistant design
- Mobile app control and monitoring
Cons
- May be priced higher than some competitor cameras
- Cloud storage fees may apply
Customer Reviews about Xega
Customers rave about the Battery Security Camera's high-quality video recording and advanced motion detection features. Many also appreciate the long-lasting battery life and easy installation process. However, some customers have reported issues with the Wi-Fi connection and cloud storage fees. Overall, the Xega Battery Security Camera is a reliable and versatile home security solution.
Faqs
How long does the Xega Battery Security Camera C's battery last, and is it rechargable?
Is it possible to combine the Xega Security Camera C with solutions for smart homes?
How should my Xega Battery Security Camera be installed and configured?
Can I change the resolution that the Xega Battery Security Camera records in?
How can I view the video that the Xega Security Camera captured?
How can I resolve the issue of my Xega Camera not connecting to WiFi?
What is the Xega Security Camera motion detection range?
Where can I buy replacement batteries for my Xega Security Camera and how can I change the battery in it?
Can the Xega Security Camera tolerate high temperatures and is it weatherproof?
Is there a warranty for the Xega Battery Security Camera, and if so, how long is it valid for?
Leave a Comment