How to Use : 3m Cylinder Spray Adhesive Usage Guide
Content
Introduction of 3M Cylinder Spray Adhesive
The 3M Cylinder Spray Adhesive is a powerful bonding solution for various surfaces, offering a quick-drying and versatile adhesive experience. It is designed for a multitude of applications, including trims, upholstery, and craft projects. The estimated price ranges between $15 to $25, and it is now available in the market.
Detailed Specifications
This Spray Adhesive boasts several key features, such as
- Low odor for user comfort
- Fast-drying formula, enabling a quick bond
- High-strength adhesion for rigid and flexible materials
- Spray pattern control for precise application
- Tacky residue-free finish
Content
- Equipment Set Up
- Application Temperature
- Surface Preparation
- Handling/Application Information
- Directions for Use
- Spraying Adhesive
- Spray Distance
- Spray Angle
- Application Speed
- Adjusting Spray Pattern
- Changing Nozzles
- Coverage
- Dry Time
- Open Time – Bonding Range
- Bonding
- Shut Down
- Storage
- Cylinder Changeover
- Cylinder Disposal/Return
- Cylinder Sizes
- Equipment List (Part Numbers & UPC Numbers)
Description
The 3M Cylinder Spray is an ideal choice for professionals and hobbyists alike, providing a reliable and efficient bonding experience. Its low-odor formulation ensures a more pleasant work environment, while the fast-drying property allows for immediate handling of applied materials. With its high-strength adhesion, this product can bond a wide range of surfaces, from delicate fabrics to robust plastics and metals. The spray pattern control feature enables users to apply the adhesive with precision, minimizing wastage and ensuring a neat, clean finish. Additionally, the residue-free property eliminates the need for extra cleanup, saving time and effort.
Setup of 3M Cylinder Spray Adhesive
To operate the Cylinder Spray Adhesive, follow these steps
- Shake the can well to ensure proper adhesive mixing.
- Hold the can upright and 10-12 inches away from the surface to be bonded.
- Depress the nozzle and apply a light, even coat to the surface.
- Apply a second coat to the mating surface, ensuring proper overlap.
- Press the surfaces together and allow the adhesive to set.
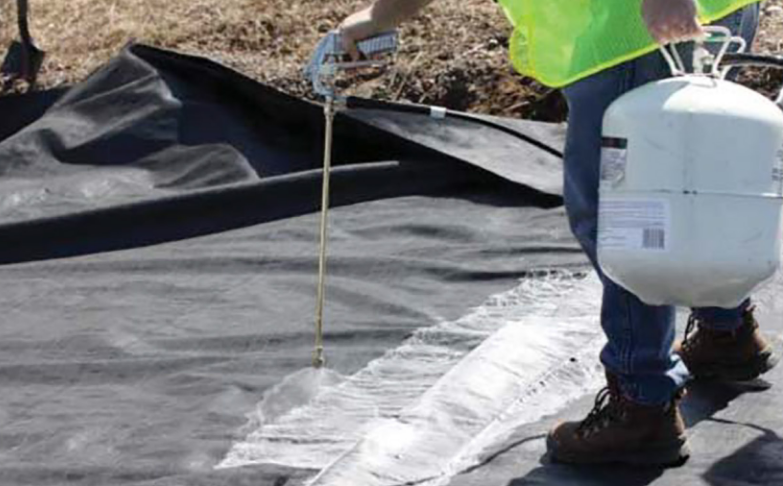
Equipment Set Up
Attach the larger flare fitting end of the hose to the spray applicator and 2tighten the nut securely. 3Check to see that the applicator gun trigger stop/adjusting nut is fully locked against the trigger. 4Attach the other end of the hose, the smaller flare fitting, to the cylinder valve and tighten securely.

Application Temperature
For best results the temperature of the adhesive and the surfaces being bonded should be between 60o-80oF (16o-27oC). Temperatures outside this range may affect bonding range and sprayability.
Surface Preparation
For best results all surfaces to be bonded must be clean, dry and free from dirt, dust, oil, loose paint, wax or grease, etc.
Handling/Application Information
Directions for Use
- Slowly open the cylinder valve and inspect the connections for any leaks. Tighten if needed.
- Fully open the valve.
- Unscrew the trigger stop/adjusting nut away from the trigger 3-4 turns and spray a test pattern. For more adhesive output, continue to screw the nut away from the trigger. For less adhesive output, screw the nut back towards the trigger.
- Hold the applicator 3-10 inches away from the surfaces to be sprayed and apply a uniform coat of adhesive. (The smaller the spray pattern chosen in step 3 the closer the applicator gun will need to be to the surface and vice versa for larger patterns.)
- Apply 1-3 even coats of adhesive. (This will depend on the needed coverage for the bonding application.)
- Allow adhesive to dry until tacky and then apply sufficient pressure to ensure complete contact.
Note: Test for tackiness by gently touching the adhesive with your knuckle. If the adhesive transfers to your skin it is too wet. If the adhesive is aggressively tacky and does not transfer to your skin, it is ready to bond. If the adhesive is dry or only has a very light tack it is too dry and another coat of adhesive should be applied to at least one of the surfaces.
Spraying Adhesive
Spray patterns will vary depending on product due to variations in formulations and cylinder pressure. Ambient temperatures may also have an effect. Higher temperatures may increase solubility of the adhesive and create greater pressure in the cylinder causing an increase in spray width. Colder temperatures will typically cause a decrease in the cylinders pressure resulting in smaller spray widths. See figures 6-13 below for information on spray technique.
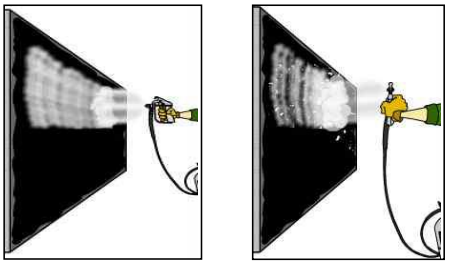
Spray Distance: Unscrew the trigger stop/adjusting nut away from the trigger 3-4 turns and spray a test pattern. The best distance is where the pattern is the widest. For more adhesive output and a wider spray pattern, continue to unscrew the nut away from the trigger. For less output and smaller spray pattern, screw the adjusting nut back towards the trigger. Hold the applicator 3-10 inches away from the surfaces to be sprayed and apply a uniform coat of adhesive. The smaller the spray pattern the closer the applicator gun will need to be to the surface.
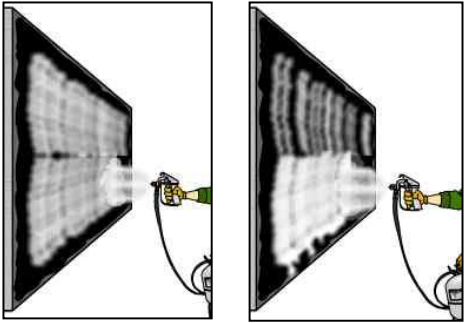
- Lace Spray Adhesives form an elliptical pattern and should be sprayed at the patterns 6widest point.
- Pebble Spray Adhesives form more of a continuous triangular pattern that gets larger as you continue to move the applicator from the surface being sprayed.
- Mist Spray Adhesives also have the more triangular pattern, like the pebble, but will have considerably more overspray.
- 7Spraying from too close may cause an excess of adhesive to be deposited creating a wet film or puddling. 8Spraying from too far away may cause a “cobwebbing” of the adhesive and many open areas that have no adhesive coverage at all.
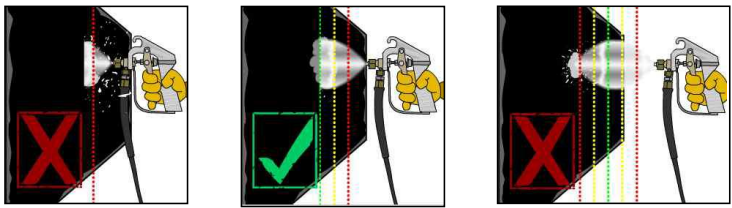
Spray Angle: For best results, 9maintain a 90o angle, between the surface and the applicator gun. This is done by moving the applicator parallel to the spray surface and keeping the wrist in a fixed position, moving at a constant rate. 10Poor coverage with inconsistent bond strength may be seen if the wrist is turned, as the spray distance (see notes above) will constantly be changing.
Application Speed: 11Maintaining a constant speed that is delivering between 80-90% adhesive coverage per pass is optimal. Applications requiring more adhesive should be achieved with multiple coats not heavier coats.
- 12Spraying too fast may result in inadequate adhesive coverage.
- 12Spraying too slow may cause an excessive amount of adhesive to be deposited creating a wet film or puddling.
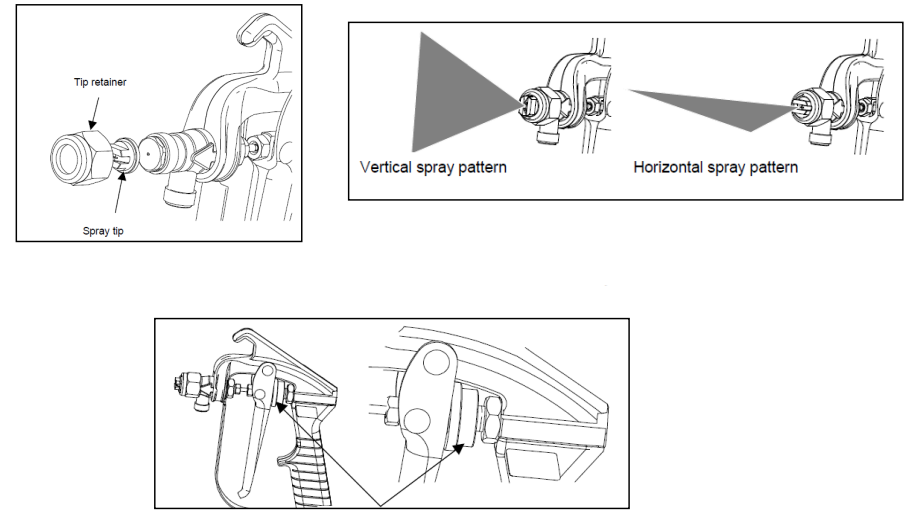
Adjusting Spray Pattern
- Adhesive formula cannot be adjusted in the cylinder system.
- Trigger Stop/Adjusting Nut can be adjusted to dial the spray pattern width from a range dependent upon the selected spray tip - smaller pattern (opened a little), larger pattern (continued further opening in the counter clockwise direction).
- Spray distance, spray angle and application speed can and should be adjusted for optimal spray pattern. See notes above on spray distance, spray angle and application speed.
- Surface to be bonded should be understood. The porosity, soak-in properties, and surface texture may warrant spraying from a distance that is typically not optimal. Example: It is possible that spraying from a further distance could allow for more adhesive to sit up higher on the surface of a rough substrate.
- Spray Tip selection should be based on the application needs. Most of the spray tips have a number associated with them, for example: 9501, 4001, 250050. The first two numbers represent a spray angle and the rest of the numbers represent an orifice size. A QSS tip is a much higher output tip and should only be used with a few of our products (70, 78ET, and 78HT). The table below shows spray pattern width estimates and tip-product matching guidelines. These should be considered only representative. Different adhesives may have different capabilities.
- Most cylinders are to be used with a standard output applicator gun. However, 94CA and 94ET products, with a higher internal pressure, are to be sprayed using a reduced output applicator gun, denoted as an “H-gun” for “high pressure”.
| Tip | 250050 | 4001 | 650050 | 6501 | 9501 | QSS |
|---|---|---|---|---|---|---|
| 60CA | OK | OK | OK | OK | OK | OK |
| 70 | OK | OK | OK | OK | OK | OK* |
| 74 | OK | OK | OK | OK | OK* | OK |
| 74NF | OK | OK | OK | OK | OK* | OK |
| 77 | OK | OK | OK | OK | OK | OK |
| 78ET | OK | OK | OK | OK | OK | OK |
| 78HT | OK | OK | OK | OK | OK | OK |
| 90 | OK | OK | OK | OK | OK | OK |
| 92 | OK | OK | OK | OK | OK | OK |
| 94CA | OK | OK | OK | OK | OK | OK |
| 94ET | OK | OK | OK | OK | OK | OK |
| 98NF | OK | OK | OK | OK | OK | OK |
indicates recommended spray tip for product.
Changing Nozzles: To change tips, 14unscrew the tip retainer completely, remove the tip and replace with the alternate tip. 15Adjust the orientation for the desired pattern direction and retighten the retainer nut. 1
Note - 16Trigger stop/adjusting nut should always be fully screwed forward against the trigger to prevent accidental discharge of adhesive material when making spray tip adjustments.
Coverage: Coverage yield is dependent on spray technique. Coverage for light weight bonding may be 0.5–1.0 grams (of dried adhesive) per square foot but more typically 2.0-3.0 grams per square feet is needed. Coverage yield can be estimated by multiplying the net weight (grams) of adhesive by the percent solids in the adhesive and then dividing by the intended coverage to be used.
Example:
3MTM Postforming Hi-Strength 94 CA Spray Adhesive
- Large Cylinder Net Weight: 26.2 pounds = 11,884.12 grams
- 11, 884.12 grams x 28% solids = 3,327.55 grams of solid adhesive
- 3,327.55 grams / 2.5 grams per square feet = 1,331 square feet of coverage per cylinder
Dry Time: This is the time needed after applying the adhesive before a bond should be made.
Note: Test for tackiness by gently touching the adhesive with your knuckle. If the adhesive transfers to your skin it is too wet. If the adhesive is tacky and does not transfer to your skin, it is ready to bond. If the adhesive is dry or only has a very light tack it is too dry and another coat of adhesive should be applied to at least one of the surfaces.
Open Time: Bonding Range: This is the time immediately following the dry time and extending until the adhesive has very little to no tack. This can be tested using the above-noted knuckle test. Different products have different Open individual products Technical Data Sheet should be referenced.
Bonding: Substrates should be joined during the adhesives Open Time. Applying sufficient and uniform pressure is very import for ensuring strong and lasting bonds.
Shut Down
Shut the trigger stop/adjusting nut all the way to the trigger lock position (Figure 16). The cylinder valve can be either left open or closed. An open valve is best for minimizing potential for drying adhesive in the hose. A closed valve is best for protecting against inadvertent connection leaks. Another option would be to shut off the valve and then purge the remaining adhesive in the hose to completely empty the hose before shutting the trigger stop/adjusting nut all the way.
Cylinder Sizes
Not all products are available in every size. Check with sales or distribution for specific size availability.
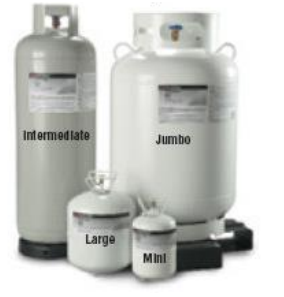
| Size | Width (inches) | Height (inches) | Empty Weight (pounds) |
|---|---|---|---|
| Mini | 7.5 | 15 | 3.7 |
| Large | 12.2 | 17.6 | 10.8 |
| Intermediate | 15 | 47 | 75 |
| Jumbo* | 24 | 45 | 225 |
Equipment List
| Applicators | Description | 3M ID Numbers | UPC Numbers |
|---|---|---|---|
| Cylinder Adhesive Applicator w/ 9501 tip | 62-9880-9930-5 | 00-048011-61706-0 | |
| Cylinder Adhesive Applicator H Reduced Output w/ 4001 tip | 62-9880-9950-3 | 00-051115-25039-2 | |
| Cylinder Adhesive Applicator High Output w/ QSS tip | 62-9880-9960-2 | 00-051115-07329-2 | |
| Cylinder Adhesive Applicator EX w/ 18” Extension and 9501 tip | 62-9880-9940-4 | 00-051115-25779-7 | |
| Hoses | Cylinder Adhesive 6’ Hose | 62-9880-0006-3 | 00-051115-25036-1 |
| Cylinder Adhesive 12’ Hose | 62-9880-0012-1 | 00-048011-61988-0 | |
| Cylinder Adhesive 25’ Hose | 62-9880-0025-3 | 00-048011-61989-7 | |
| Cylinder Adhesive 50’ Hose | 62-9880-0050-1 | 00-051115-25050-7 | |
| Tips | Cylinder Adhesive 250050 Spray Tip | 62-9880-8133-7 | 00-051115-25780-3 |
| Cylinder Spray Adhesive 4001 Spray Tip | 62-9880-4001-0 | 00-048011-61990-3 | |
| Cylinder Spray Adhesive 650050 Spray Tip | 62-9880-8173-3 | 00-051115-25781-0 | |
| Cylinder Spray Adhesive 6501 Spray Tip | 62-9880-6501-7 | 00 |
Troubleshooting
Common issues with the 3M Cylinder Spray Adhesive may include uneven bonding, adhesive residue, or poor spray pattern control. To troubleshoot these issues, consider the following:
- Uneven bonding: Ensure adequate adhesive coverage and proper surface preparation.
- Adhesive residue: Thoroughly clean the surface with a suitable solvent before reapplying.
- Poor spray pattern control: Adjust the nozzle or distance to achieve the desired pattern.
Warranty
Unless an additional warranty is specifically stated on the applicable 3M product packaging or product literature, 3M warrants that each 3M product meets the applicable 3M product specification at the time 3M ships the product. 3M MAKES NO OTHER WARRANTIES OR CONDITIONS, EXPRESS OR IMPLIED, INCLUDING, BUT NOT LIMITED TO, ANY IMPLIED WARRANTY OR CONDITION OF MERCHANTABILITY OR FITNESS FOR A PARTICULAR PURPOSE OR ANY IMPLIED WARRANTY OR CONDITION ARISING OUT OF A COURSE OF DEALING, CUSTOM, OR USAGE OF TRADE. If the 3M product does not conform to this warranty, then the sole and exclusive remedy is, at 3M’s option, replacement of the 3M product or refund of the purchase price.
Pros & Cons of Cylinder Spray
Pros
- Low odor
- Fast-drying formula
- High-strength adhesion
- Spray pattern control
- Residue-free finish
Cons
- Limited spray time due to can size
- May require multiple applications for heavy-duty bonding
Customer Reviews of 3M Cylinder Spray Adhesive
Users appreciate the 3M Cylinder Spray Adhesive for its strong bonding capabilities, low odor, and ease of use. Some common complaints include limited can size and the need for multiple applications for heavy-duty bonding.
Faqs
Is the 3M Cylinder Spray Adhesive appropriate for use in applications that take place outside?
Following the application of 3M Cylinder Spray Adhesive, is it possible to rearrange the materials?
How can I use the 3M Cylinder Spray Adhesive inside without putting myself in danger?
Can you tell me how long a canister of 3M Cylinder Spray Adhesive can be stored for?
What is the best way to remove excess 3M Cylinder Spray Adhesive from these surfaces?
Is it possible to use the 3M Cylinder Spray Adhesive on leather or synthetic materials?
How much of an area does the 3M Cylinder Spray Adhesive have the ability to cover?
When it is not being used, what is the proper way to store the 3M Cylinder Spray Adhesive?
What kind of resistance does the 3M Cylinder Spray Adhesive have to heat and cold?
A guarantee of what kind is included with the purchase of the 3M Cylinder Spray Adhesive?
Leave a Comment