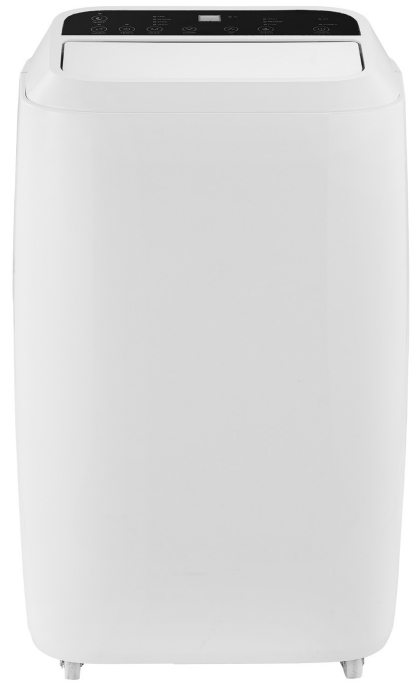
Active Air Portable Air Conditioner ACAN1402 User Manual
Content
Introduction
The Active Air Portable Air Conditioner ACAN1402 is a versatile cooling unit designed for efficient temperature control in various environments. With multiple operational modes, including cooling, dehumidifying, and fan, it effectively adapts to your comfort needs. This portable air conditioner features a user-friendly control panel and a remote for convenient adjustments. Its compact design makes it easy to move from room to room. The cost of the Active Air ACAN1402 is approximately $349.99, providing an accessible solution for personal cooling.
Specifications
| Input voltage | 115V |
| Input | 10.8A, 1205W |
| Refrigerant type | R410A/ 16.9 oz |
| GWP | R410A:2088 |
| Cooling capacity | 14000 Btu/h |
| Design pressure | Hi 550PSIG / Lo 300 PSIG |
| Coverage area | Up to 800 cubicfeet |
| Weight | 60.0 lbs |
| Dimension | 17.32" L x13.19" W x28.15" H |
| Warranty | One year |
WHAT’S IN THE BOX
After unpacking the box, please confirm that all of the following parts and accessories are included.

Overview of Air Conditioner Unit

Control Panel

Remote Control
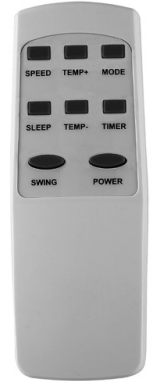
- The POWER button turns the power on or off to the portable air conditioner.
- The SPEED button determines the fan speed.
- The TEMP+ button raises the temperature by one degree.
- The TEMP- button lowers the temperature by one degree.
- The MODE button toggles the air conditioner between fan, dehumidify, cooling, and auto modes.
- The SLEEP button controls night time operation.
- The TIMER button operates the air conditioner’s timer.
- The SWING button toggles louver movements between ON and OFF.
SAFETY
Before installing and using the portable air conditioner, please review this manual, including the following safety recommendations.
IMPORTANT: If any parts are damaged, turn off the Power switch and disconnect the power supply immediately. Contact an authorized service technician for repair or maintenance of this unit.
If the supply cord is damaged, it must be replaced by the manufacturer, its service agent or similarly qualified persons in order to avoid a hazard.
- Plug the unit into properly grounded power outlets only.
- Install the unit in accordance with national wiring regulations.
- Do not place the unit in any position besides vertical/upright, even temporarily or for storage.
- Maintain at least 12 inches of clearance around the unit. Do not cover or block air flow through the inlet or outer grilles, as doing so may result in internal damage to the unit.
- Do not vent the unit into an attic or crawlspace, as the exhausted humidity is very likely to cause mold problems.
- Do not use an adapter plug, surge protector, power splitter, or extension cord with the unit.
- Wait three minutes before restarting cooling mode if the unit is turned off or power is lost.
- Never place or use flammable vapors or liquids near the unit, or where exposure to fire is possible.
- Do not pour or spray water directly on the unit or into the grilles, or use in an area where water is likely to splash, such as a bath, shower, or swimming pool.
- Do not operate or stop the unit by inserting or pulling out the power plug; this may cause electric shock or fire due to heat generation.
- Do not pull, deform, or modify the power supply cord, or immerse it in water. Pulling or misuse of the power supply cord can cause electrical shock and/or damage the unit.
- Never insert anything into the air outlet.
- Always disconnect power supply before cleaning the air conditioner.
- Before moving the air conditioner, always turn it off, disconnect the power supply, and move it slowly.
- Unplug the unit if strange sounds, smell, or smoke come from it.
- Do not allow children to access the unit.
- Recycling: This mark indicates that this product should not be disposed with other household wastes throughout the EU.
To prevent possible harm to the environment or human health from uncontrolled waste disposal, recycle it responsibly to promote the sustainable reuse of material resources. To return your used device, please use the return and collection systems or contact the retailer where the product was purchased. They can take this product for environmental safe recycling.
IMPORTANT: Any person who is involved with working on or breaking into a refrigerant circuit should hold a current valid certificate from an industry-accredited assessment authority, which authorizes their competence to handle refrigerants safely in accordance with an industry recognized assessment specification.
Maintenance and repairs shall be performed only as recommended by the equipment manufacturer. Maintenance and repair requiring the assistance of other skilled personnel shall be carried out under the supervision of a person competent in the use of flammable refrigerants.
Description
Air Conditioner ACAN1402 is designed with convenience and efficiency in mind. Its compact and lightweight design makes it easy to move from room to room, while the included window kit ensures a simple and secure installation process. The unit features multiple fan speeds and cooling modes, allowing users to customize their comfort level.
The integrated dehumidifying function helps maintain optimal humidity levels, reducing the risk of mold and musty odors. Additionally, the air purification system with a HEPA filter captures 99.97% of particles as small as 0.3 microns, ensuring cleaner and healthier air.
INSTALLING THE AIR CONDITIONER
Before you begin, determine where to install the air conditioner. If you are using the included window kit, the location must be near a window. Otherwise, we recommend three to four feet of separation between the intake and exhaust holes. The location must also have a power outlet (we recommend running the unit on a dedicated 15A circuit if possible). Be sure to maintain at least 12 inches (30 cm) of clearance around the unit at all times as shown in Figure 1.

NOTE: Do not attempt to operate this unit without properly ventilating it, as this will not work to cool the room and will void the warranty. The exhaust and intake ducts must be routed outside the room to the exterior of the structure.
Window Slider Kit Installation
The window slider kit can be installed in a window that opens horizontally or vertically; the installation process is the same for both. Before installing the window slider kit, make sure your window meets the minimum and maximum size requirements shown Figure 2.
- Clear and clean the windowsill where you will install the air conditioner.
- Open window and attach window kit to window.
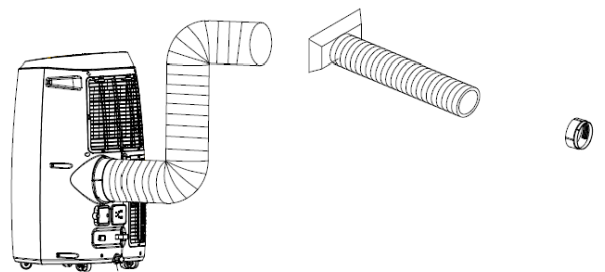
- Attach the oval fixing clip to the window unit kit.
- Expand the first exhaust hose to its full length.
- Twist both ends of the exhaust hose, fitting one end into the square fixing clip and one end into the flat fixing clip.
- Repeat steps 4 and 5 for the second exhaust hose.
- Attach the exhaust hoses to the bottom holes on the back of the unit and the other openings on the window unit kit.
- Close the window so it that it firmly closes on the window unit kit.
- Insert the power cord into a grounded AC 120V/60 Hz receptacle.
Press the ON/OFF button to turn on the air conditioner.
USING THE AIR CONDITIONER
CAUTION: Always wait at least three minutes before switching from cooling to dehumidifying.
Important: Operation temperature range
| MAXIMUM COOLING | MINIMUM COOLING | |
| DB/WB | 95o/75oF | 64o/5oF |
| MAXIMUM HEATING | MINIMUM HEATING | |
| DB/WB | 81oF/––– | 45oF/––– |
AUTO Mode
In Auto mode, the air conditioner automatically selects the mode (cooling, dehumidifying, or fan) in response to room temperature. It cools above 79°F and dehumidifies under 70°F. For horticultural applications, Cooling mode should be used instead.
| ROOM TEMPERATURE(Tr) | Tr<73oF | 73F≤Tr < 70oF | Tr ≥ 79oF |
| MODE | HEATING | DEHUMIDIFY | COOLING |
| Set Temperature | 70oF | 73oF | 77oF |
Cooling
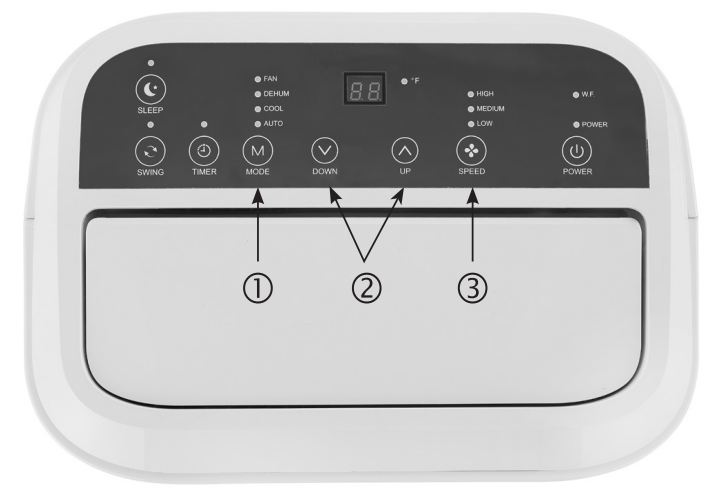
- Press the MODE button until the “Cool” icon – which looks like a snowflake – appears.
- Press the TEMP+ or TEMP- button until the desired room temperature appears.
Press the SPEED button to select wind speed (Low, Medium, or High).
Dehumidifying
Press the MODE button until the “Dehumidify Indicator Lamp” icon – which looks like a water droplet – lights up. The temperature will drop 2o F lower than the room temperature. This temperature change is not adjustable.
Fan
- Press the MODE button until the “Fan” icon appears.
- Press the SPEED button to select wind speed (Low, Medium, or High).
Turning the Timer ON/OFF
- Power on the air conditioner to turn off the timer and power off the air conditioner to turn on the timer. Press the TIMER button.
- Press the TEMP+ or TEMP- button to set the desired on-time. The preset off time is displayed on the control panel.
Setting the Timer
This feature is designed to turn the unit on or off after a designated amount of time passes, one time only (it does not cycle daily, and needs to be set manually every time).
Setting the ON time:
- With the unit turned OFF: Press the TIMER button. The panel blinks at 01.
- Press the TEMP+ or TEMP- button for the desired length of time in hours.
(Examples: Setting the time to 02 will turn on the unit after 2 hours. Setting the time to 15 will set the unit to turn on after 15 hours.) - Press the TIMER button again to activate the setting.
Setting the OFF time:
- With the unit turned ON: Press the TIMER button. The panel blinks at 01.
- Press the TEMP+ or TEMP- button for the desired length of time in hours.
(Note: Setting the time to 02 will turn off the unit after 2 hours. Setting the time to 15 will set the unit to turn off after 15 hours.) - Press the TIMER button again to activate the setting.
Optional: Press the TIMER button again to revert the panel to the temperature display. Your time will remain set.
(Note: This timer function would rarely be used in a grow room situation, and is much more useful when the air conditioner is used for common household cooling use.)
SWING (Air Flow)
- With the unit turned ON: press the SWING button and the louver will begin to swing continuously left and right.
- To stop the louver from swinging, press the SWING button again when the louver is in the desired position. The louver will remain in that position.
SLEEP Control Function
- While in cooling mode, press the SLEEP button to set the temperature.
Temperature increases 1oC/OoF after one hour (to a maximum increase of 2oC/OoF after 2 hours). - While in heating mode, press the SLEEP button to set the temperature.
Temperature decreases 1oC/OoF after one hour (to a maximum decrease of 2oC/OoF after 2 hours). - Press the SLEEP button again to cancel the setting.
Draining the Inner Water Tank
Intermittent Drainage
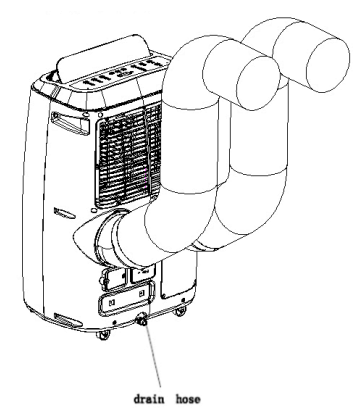
The inner water tank in the air conditioner has a safety switch that controls the water level. When the water level reaches an anticipated height, the "Water Full" indicator lamp lights up. Connect a hose to the drainage outlet located on the backside of the bottom of the unit. Make sure the hose is lower than the unit—you may need to elevate the unit if using a catch pan or reservoir.
Continuous Drainage
This air conditioner is built to facilitate continuous drainage. When you plan to leave the air conditioner unused for one week or more, remove the rubber plug from the drainage hole at the bottom of the unit. Connect the drainage hose, making sure the hose is lower than the unit.
Setup Guide
To set up the Active Air, follow these steps:
- Unbox the unit and all included components.
- Install the window kit according to the manufacturer's instructions.
- Place the air conditioner on a level surface near a window.
- Connect the exhaust hose to the back of the unit and extend it through the window kit.
- Plug in the air conditioner and turn it on using the remote control or control panel.
- Configure your desired settings using the remote control or control panel.
CLEANING THE AIR CONDITIONER
- Before cleaning, be sure to disconnect the unit from any electric supply outlet.
- Clean outer surfaces with a neutral detergent and wet cloth, then wipe with a dry cloth.
- Do not use gasoline or other chemicals to clean the unit.
- Do not immerse the unit in water or spray or pour water directly on it.
- If the air conditioner is damaged, please contact the dealer or repair shop.
- Clean the air filter every two weeks, or whenever it becomes clogged with dust or dirt.
- Remove the square fixing clip on the back of the unit.
- Open the air inlet grille and remove the air filter.
- Wash the filter in lukewarm water and neutral detergent.
- Let the air filter dry.
- Replace the filter in the grille.
- Replace the square fixing clip.
Active Air Portable Air Conditioner ACAN1402 Troubleshooting
| Issue | Possible Causes | Suggested Remedies |
Unit does not start when pressing on/off button. | Water full indicator lamp blinks, and water tank is full. | Dump thewater out of the watertank. |
| Room temperature is lower than the setting temperature (cooling mode). | Reset the temperature. |
Unit doesnot cool the room enough. | Windows or doors are open. | Make sure all the windows and doors are closed. |
| There are heat sources inside the room. | Remove the heatsources if possible (other significant heat sources in the room include CO2 burners, multiple ballasts, etc.). |
| Exhaust air hose is not connected or is blocked. | Connect or clean the exhaust air hose. |
| Inlet air is too hot. | The maximum temperature for the inlet air is 95°F. |
| Temperature setting is too high. | Reset the temperature. |
| Air inletis blocked. | Clean the airinlet. Be surethat the unit's ventilation has been setup properly andthat the unit is exhausting to the exterior(outdoors) and is also pulling intake air from the exterior. |
| Maximum room size is exceeded. | This unit is recommended for areas up to 800 cubic feet. |
| Unit is too noisy. | The ground is not levelor not flatenough. | Place theunit on a flat, levelsurface. |
| The soundcomes from theflowing of the refrigerant inside the air conditioner. | This is normal. |
| E0 Code | Room temperature sensor failed. | Replace room temperature sensor (the unit can also work without replacement). |
| E3 Code | Pipe temperature sensor failed (evaporator). | Replace pipetemperature sensor (theunit can also work without replacement). |
| E1 Code | Pipe temperature sensor failed (condenser). | Replace pipetemperature sensor (theunit can also work without replacement). |
| E2 Code | Water tank is full. | Empty thewater tank. |
Pros & Cons
Pros
- Compact and lightweight design for easy portability.
- Multiple cooling modes and fan speeds for customized comfort.
- Integrated dehumidifying function and air purification system.
- Energy-efficient with a high EER rating.
- 24-hour programmable timer for convenient use.
Cons
- Limited coverage area compared to larger models.
- May require frequent emptying of the water tank in humid environments.
- Slightly higher noise level on high fan speed.
Customer Reviews
Customers have praised the Active Air Portable Air Conditioner ACAN1402 for its ease of use, efficient cooling, and quiet operation. Many have noted its effectiveness in small to medium-sized rooms and appreciate the additional features such as dehumidification and air purification.
Some common complaints include the need for frequent water tank emptying in humid environments and the slightly higher noise level on high fan speed. However, overall customer satisfaction remains high due to its performance and value for money.
Warranty
Hydrofarm warrants the ACAN1402 to be free from defects in materials and workmanship. The warranty term is for one year beginning on the date of purchase. Misuse, abuse, or failure to follow instructions is not covered under this warranty. Hydrofarm will, at our discretion, repair or replace the ACAN1402 covered under this warranty if it is returned to the original place of purchase.
Faqs
Is the unit sealed? Will it draw CO2 out of my tent?
Will it work with a controller/thermostat?
What is deadband?
Why isn’t there a dehumidify and cool mode together?
Does the Active Air Portable Air Conditioner ACAN1402 have an air purification system?
What about the water that collects?
Can I program the Active Air Portable Air Conditioner to turn on and off automatically?
Can I extend the ducting?
My TV remote is changing settings on the AC! How do I stop this?
Leave a Comment
