
Setup: Aeg KM3000 Kitchen Machine User Manual
Content
Aeg KM3000 Kitchen Machine
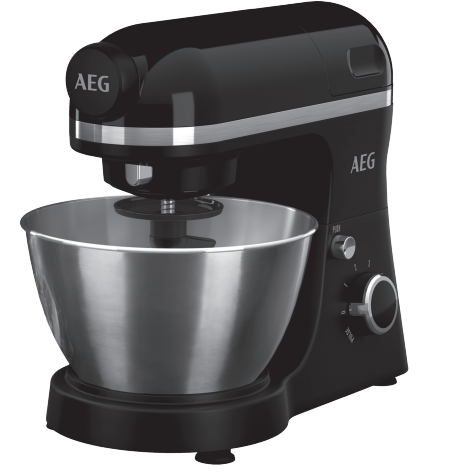
Introduction
The AEG KM3000 Kitchen Machine is a versatile, high-performance kitchen appliance designed for modern home cooks and culinary enthusiasts. With its robust motor, intuitive controls, and wide range of attachments, this kitchen machine streamlines food preparation, making it easier to bake, mix, knead, and blend with professional results. Whether you're whipping up a batch of cookies, kneading bread dough, or preparing sauces, the AEG KM3000 Kitchen Machine delivers consistent, reliable performance every time.
Key benefits include a powerful motor, a large mixing bowl capacity, and multiple speed settings, allowing for precise control over your recipes. The machine’s sleek design and durable construction make it a standout addition to any kitchen, while its easy-to-clean components ensure hassle-free maintenance. The AEG KM3000 Kitchen Machine is ideal for families, bakers, and anyone who values efficiency and quality in their cooking.
The estimated price range for the AEG KM3000 Kitchen Machine is £200–£300, with availability in major appliance retailers and online stores. It is suitable for both home and light commercial use, making it a smart investment for anyone looking to elevate their kitchen experience.
Specifications of the AEG KM3000 Kitchen Machine
- Motor Power: 1200W for powerful mixing and kneading
- Bowl Capacity: 5.5 litres, suitable for large batches
- Speed Settings: 10 variable speeds for precise control
- Attachments Included: Dough hook, whisk, and flat beater
- Material: Stainless steel bowl, durable plastic housing
- Dimensions: 35 x 25 x 40 cm (H x W x D)
- Weight: 8.5 kg
- Energy Efficiency: A-rated for energy consumption
- Noise Level: 75 dB (quiet operation for a kitchen machine)
- Special Features: Splash guard, tilt-head design, planetary mixing action
Compared to similar models like the KitchenAid Artisan and Kenwood Major, the AEG KM3000 Kitchen Machine offers a competitive price, robust build quality, and a wide range of attachments, making it a top choice for versatile kitchen tasks.
Components
- Motor head (tiltable)
- Speed selector
- Housing
- Tilt head locking button
- Front attachment hub
- Front attachment hub release button
- Rear attachment hub cover
- Attachment shaft
- Stainless steel bowl
- Bowl clamping plate
- Non-slip feet
- Power cord
- Wire whip
- Coated flat beater
- Coated dough hook
- Slicer/Shredder
- Meat grinder
- Blender
- Blender lid with measuring cup
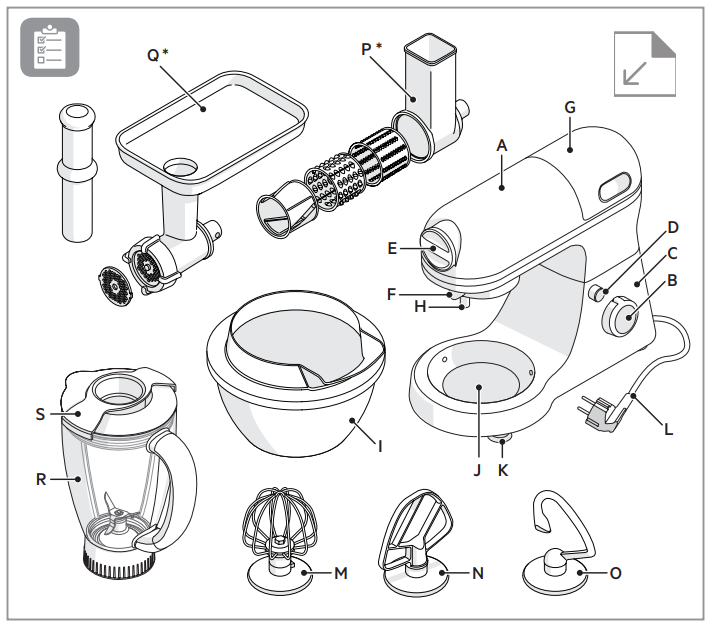
Certain models only
Getting Started
- Before using your appliance for the first time: Remove all packing material such as plastics, labels, stickers or tags that may be attached to the housing, bowls or attachments.
Clean the appliance and accessories, see instructions: “Cleaning and Care”. - Place the appliance on a flat surface. Push the tilt head locking button with one hand and tilt the motor head up with the other hand. Once in up position it locks.
Caution! Ensure that the power cord is unplugged. Set the speed selector to “OFF”. Place the stainless steel bowl on the bowl clamping plate. Rotate the bowl clock-wise to lock it into position.
Warning: Never operate the appliance with the wire whip, flat beater or dough hook unless the bowl is in place.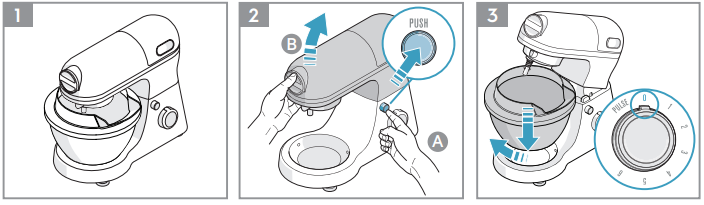
- Place an attachment on the attachment shaft: Align the slot at the top of the attachment with the pin on the at-tachment shaft. Push attachment up and turn it counterclockwise until the pin is locked into position.
To remove attachment, move it clockwise and pull off. - Tilting the motor head down: Push the tilt head locking button with one hand and tilt the motor head down with the other hand. Insert the plug in the main socket.
Warning: Keep fingers and hands away from areas with movable parts. Move the speed selector from “OFF” to desired speed (1-6). Once mixing is complete, turn the speed selector to “OFF” and unplug the appliance.
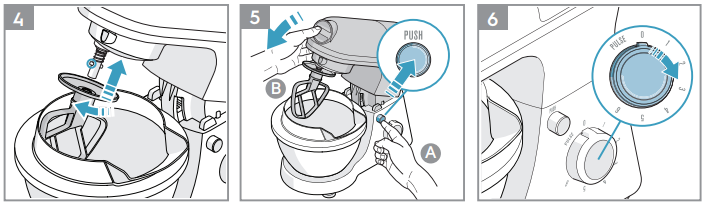
- If the appliance is unplugged and the speed selector is left in speed mode (1-6):
The appliance will not start automatically. Turn the speed selector to “OFF”, then turn it to the desired speed.
Other Function - Attachment hub: The appliance has with two built in multi-purpose attachment hubs, one in the front (A) and one in the back (B). Read and carefully follow the instructions that comes with each attachment for correct and safe use.
How To Use The Meat Grinder Insert the grind screw (B) into the grinder housing (A). Place the knife (C) over the square shaft at the end of the grind screw. Place the grinding plate (D) (medium or coarse) over the knife. Tighten the ring (E) by hand until the meat grinder is secured.
Note: Do not over tighten the ring.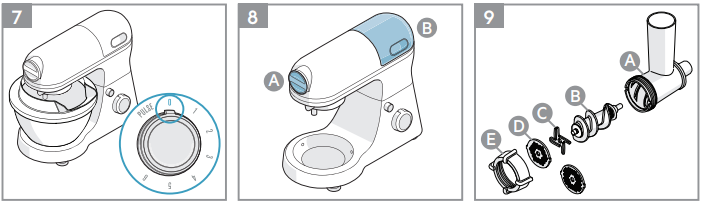
- Push down the release button for the front attachment hub to the right and remove the attachment hub cover.
Fit the power shaft of the attachment in the front attachment hub socket, using the attachment hub release button. The attachment release button will click into position once the meat grinder is securely attached. Place a container under the attachment
Caution: Before attaching accessories turn off the appliance and unplug it. - Place the food tray over the grinder housing. Cut raw meat into small pieces and place it on the food tray. Plug in the appliance and turn the speed selector to desired speed (recommended speed: 3-4). Feed the meat into the feed chute by using the pusher.
Caution: Do not put your fingers or other utensils in the feed chute.
Note: Meat should not contain bones, muscles or skin.
How to Use The Slicer/Shredder Choose a cylindrical slicer (medium or course) or a shredder knife. Insert the attachment by turning it clockwise into the slicer/shredder housing. Make sure the attachment is fully inserted.
Caution: The blades and inserts are very sharp!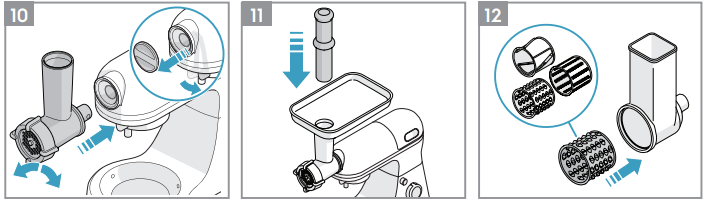
- Push down the release button for the front attachment hub to the right and remove the attachment hub cover.
Fit the power shaft of the attachment in the front attachment hub socket, using the attachment hub release button. Assemble the slicer/shredder in the attachment hub. The attachment release button will click into position once the slicer/shedder is securely attached. Place a container under the attachment.
Cut the food into small pieces. Plug in the appliance and turn the speed selector to desired speed (recommended speed: 5). - Feed the food into the feed chute by using the pusher. When finished using your attachment, turn off the appliance and unplug it. Place the front attachment hub cover using the attachment hub release button.
How To Use The Blender Remove the rear attachment hub cover by pulling it straight backwards. Place the bottom of the blender on the three rubber rings. Align the arrows on the blender to the arrows on the main body.
Caution: Turn off and unplug the appliance before attaching any accessories.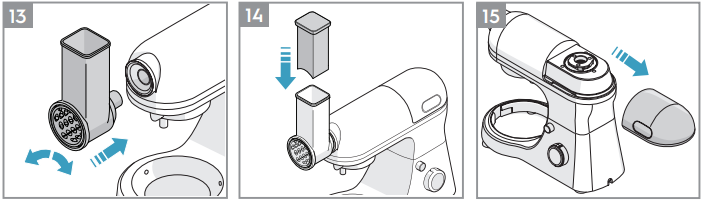
Rotate the blender clockwise to lock it in position. The blender handle should point towards the back of the machine when properly fixed. Place the blender lid and measuring cup. Insert the plug in the main socket.
Adjust the speed selector to the desired speed (recommended speed: 6), mix until the right consistency of the blend is reached.
Caution: Never operate blender without ingredients.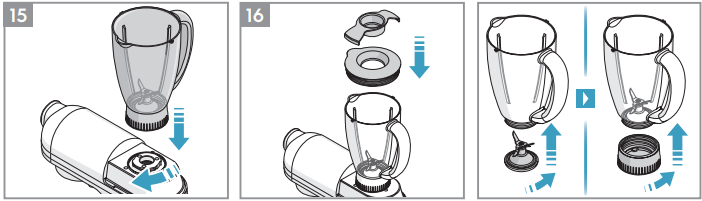
Cleaning and Care
- Unplug the appliance. The wire whip, meat grinder* and slicer/shredder* should only be washed by hand in warm soapy water.
The bowl, flat beater and dough hook are dishwasher-proof. Only place parts on the top rack if using a dish-washer.
Caution! The blades and inserts are very sharp and can cause injury.
Warning! Never immerse the housing, plug, or cord in water or any other fluid.
Dry each part thoroughly before use. - Cleaning the blender:
Rotate the blender counter-clockwise and remove. Take off the lid. Pour out the mixture from the blender. Add a drop of dishwashing soap and one litre of warm water. Fix the blender on the appliance.
Run the machine on speed 6 for half a minute, then pour out the water. Rinse the blender and let it dry.
Caution! The blades and inserts are very sharp and can cause injury. The housing should only be cleaned with a soft damp cloth, then dried with a cloth.
Note: Do not use abrasive cleansers or scouring pads to clean the surfaces of your appliance.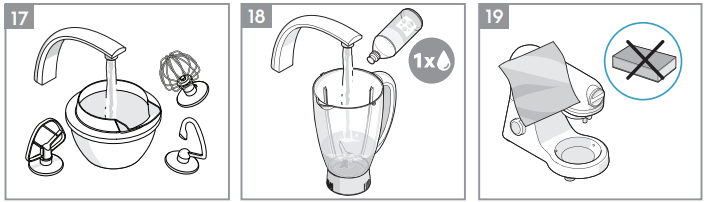
Enjoy your new AEG product!
Setup Guide for the AEG KM3000 Kitchen Machine
Setting up the AEG KM3000 Kitchen Machine is straightforward. Begin by placing the machine on a stable, level surface. Attach the desired mixing tool (dough hook, whisk, or flat beater) to the power hub, ensuring it clicks into place. Place the mixing bowl onto the base and lock it securely. Plug in the machine and select your desired speed using the control dial.
For optimal performance, always start at a low speed and gradually increase as needed. The tilt-head design allows easy access to the bowl for adding ingredients. Clean the attachments and bowl after each use for best results.
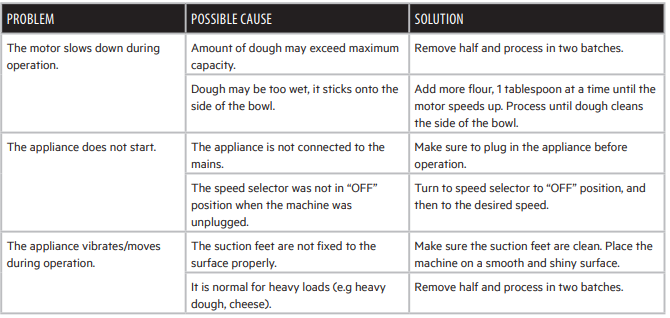
Troubleshooting tips: If the machine does not start, check the power connection and ensure the bowl is properly locked. If the motor is noisy, verify that the attachments are correctly installed. Always unplug the machine before cleaning or changing attachments.
Safety warnings: Do not operate the machine without the bowl or attachments, and keep your hands and utensils away from moving parts during operation.
Troubleshooting Common Issues
Common problems with the AEG KM3000 Kitchen Machine include the machine not starting, unusual noises, or attachments not fitting properly. If the machine does not start, ensure it is plugged in and the bowl is securely locked. For unusual noises, check that the attachments are correctly installed and the bowl is not overfilled.
Error codes are rare, but if the machine displays an error, consult the user manual or contact customer support. Preventive measures include regular cleaning, proper storage of attachments, and avoiding overloading the bowl.
The AEG KM3000 Kitchen Machine comes with a 2-year warranty. For support, contact AEG customer service at 0800 250 0858 or visit the official AEG website for online resources and troubleshooting guides.
Pros & Cons of the AEG KM3000 Kitchen Machine
Pros
- Powerful 1200W motor for efficient mixing
- Large 5.5-litre bowl capacity for big batches
- 10 speed settings for precise control
- Durable stainless steel bowl and housing
- Easy to clean and maintain
- Competitive price compared to similar models
Cons
- Slightly heavier than some competitors
- Limited attachment options compared to premium brands
- Noisier than some high-end models
The AEG KM3000 Kitchen Machine offers excellent value for money, making it a solid choice for home cooks and bakers seeking reliable performance and versatility.
Customer Reviews of the AEG KM3000 Kitchen Machine
Customers consistently praise the AEG KM3000 Kitchen Machine for its power, ease of use, and durability. Many users highlight its ability to handle tough doughs and large batches, with a 4.5-star average rating on major retail sites. Common praises include the sturdy build, quiet operation, and easy cleaning. Some users mention the machine is heavier than expected, but appreciate the stability it provides during mixing.
Typical complaints include the limited range of attachments and occasional noise at higher speeds. Overall, the AEG KM3000 Kitchen Machine is highly recommended for anyone seeking a reliable, versatile kitchen machine at a competitive price.
Tags
More aeg manuals
- Setup: Aeg LA-10 Air and Energy Station User Manual
- Setup: Aeg EasyCompact Food Processor FPSXX User Manual
- Setup & Usage: Aeg Handmixer HM6000 User Manual
- Setup: Aeg KM4xx UltraMix Stand Mixer User Manual
- Setup: Aeg UltraMix Stand Mixer KM4xxx User Manual
- Setup: Aeg HM-4200 EasyCompact Hand Mixer User Manual
Leave a Comment