Aluratek Digital Photo Frame ADMPF512F Instruction Manual
Content
Introduction
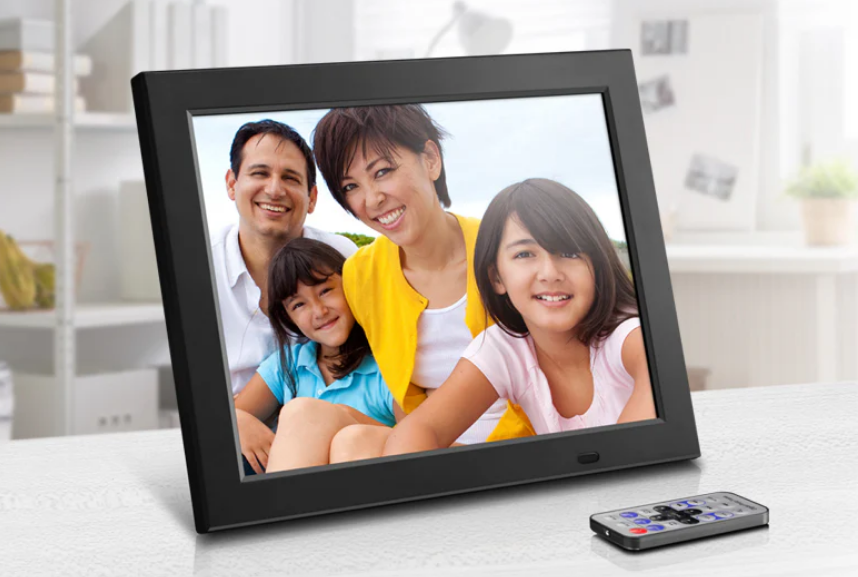
This Aluratek Digital Photo Frame ADMPF512F is both sleek and attractive, and it boasts a brilliant 12-inch LCD display that gives you the ability to exhibit your most treasured memories in high resolution. You can bring your favorite photographs to life with the Aluratek ADMPF512F, which features controls that are simple to operate and many viewing options. This device is the ideal addition to any home or workplace.
Package Contents
Your order has been carefully packaged and inspected. The following should be included in your package. Please inspect the contents of the package to ensure that you have received all items and that nothing has been damaged. If you discover a problem, please contact us immediately for assistance.
- Digital Photo Frame
- Remote Control
- USB 2.0 Cable (Type A to mini-B)
- Power Adapter
- Instructional Manual
- Warranty / Registration Card
Detailed Specifications
The aluratek Digital Photo Frame ADMPF512F comes with the following key features:
- Compatible with standard 12x18 photo prints
- Modern and sleek design
- Easy to assemble and install
- Durable and long-lasting materials
- Adjustable width for a perfect fit
Aluratek Frame Close-Up
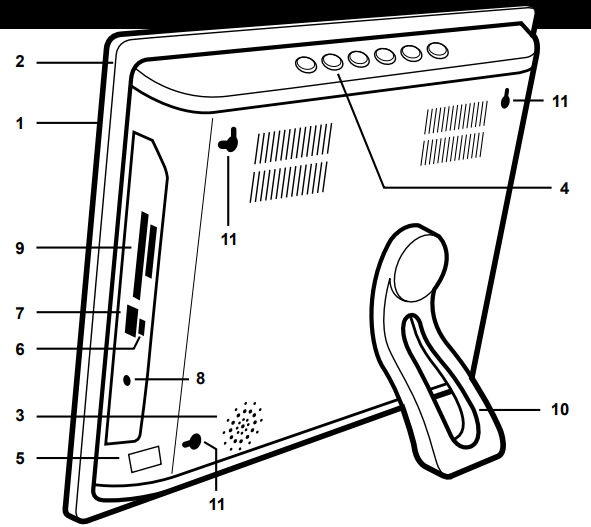
- 12” viewing area
- Quality black frame
- Built-in speakers
- Menu selection buttons
- Power On / Off switch
- USB port (mini-B)
- USB port
- Power adapter port
- Memory card slots
- Frame stand
- Wall mount holes
Remote Control Close-Up
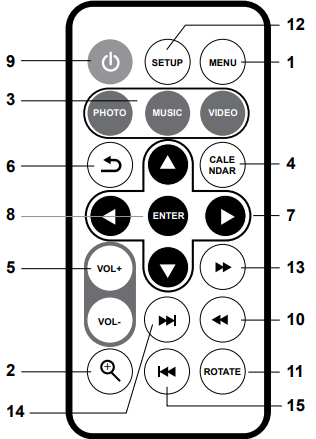
- Menu - Takes you to the main menu
- Zoom In
- Mode - Select between photo, music and video modes
- Calendar
- Volume + / Volume -
- Exit - Returns to the previous menu
- Up, Down, Left, Right Arrows - Use arrow keys to navigate your way through various menus
- Enter
- Power
- Rewind
- Rotate
- Setup
- Fast Forward
- Advance to Next
- Advance to Previous
Description
Anyone searching for a fashionable and practical way to showcase their artwork and images must own the aluratek Digital Photo Frame ADMPF512F. This frame guide can fit a broad variety of photo sizes and styles thanks to its contemporary design and adjustable width. With the frame guide's long-lasting and high-quality construction, your pictures and artwork will always be safe and secure. The frame guide is a great option for usage in both the office and at home because it is simple to install and build.
Getting Started
- Remove the protective film covering the LCD.
- Remove the plastic insulator from the battery on the remote control.
Digital Photo Frame ADMPF512F Operating Instructions
Main Menu
- Turn on the digital frame by pressing and holding the power button
 until the Aluratek startup screen is displayed.
 - The On-screen Display (OSD) will show the Main Menu. Each icon represents the various functions available on the device: Photo, Video, Music, Calendar, File and Settings.
- Browse the different functions using the ◄ or ► arrow buttons and select a function by pressing the Enter button.
- Press the ▲ or ▼ arrow to browse the various storage options, use the ◄ or ► arrow buttons to select the storage media and select the functions such as photo or video by pressing the Enter button.
Transferring Files from your PC/Mac to the Frame’s Internal Memory
- A USB cable is included with your digital frame to connect it to your PC/ MAC. Connect the small connector to your digital frame and the larger connector to your PC / MAC.
- Once connected, the frame will display Connected to Computer. On a PC, the frame’s internal memory will appear as a removable drive when viewed in My Computer. On a Mac, the frame will appear as a drive icon on the desktop.
- Copy your photo, video and music files from your PC / MAC into the icon representing the frame’s internal memory. When finished disconnect the USB cable from the PC or MAC. (Note: For a Mac, eject the drive icon before disconnecting the USB cable.)
- The frame will return to normal operation once it is disconnected from your PC / MAC.
Managing Files in the Digital Frame’s Internal Memory
- Select either the memory card or the USB device from the main menu.
- Select File and press Enter.
- A list of the files or folders contained on the storage source will be displayed. Browse the files using the arrow buttons. To select a file, press the ► button to select.
- Select Copy to Internal to copy.
To delete a file, repeat steps 1-3 and select Delete to remove the selected file.
Photo Function
Setup a Photo Slideshow
- Select the source of the photos you wish to present in the slideshow by selecting NAND (Internal Memory), SD or USB storage options and pressing the ► button.
- Navigate to the Photo function using the ◄ or ► arrow buttons and press the Enter button to start the slideshow.
- During slideshow, press Setup button and select Photo Setup. This will provide you with the various options to customize your slideshow. Browse the options using the ▲ or ▼ arrow buttons and Enter button to confirm.
Photo Setup
- In Slideshow mode, you can enter the Photo menu by pressing the Setup button to set the slide, duration, background music, display rate and slide effect.
- To exit, press the Menu button.
Video Function
Playing Videos
- Select the source of the videos you wish to play by selecting NAND (Internal Memory), SD or USB storage options and pressing the ► button.
- Navigate to the Video function using the ◄ or ►arrow buttons and press the Enter button.
- Select the video that you wish to view and press the Enter button.
- Adjust the volume of the video playing using the VOL+ or VOL- buttons.
- To exit, press the Menu button.
Video Setup
- To customize how videos are played back, press the Setup button while a video is playing. You may also access the Video menu by selecting Settings in the Main Menu. Browse options Display Mode and Play Mode using the ▲ or ▼ arrow buttons, Play and ◄ or ► to make the selection.
- To exit, press the Menu button.
Music Function
Playing Music
- Select the source of the music files you wish to play by selecting Memory (Internal Memory), SD or USB storage options and pressing the ► button.
- Navigate to the Music function using the ◄ or ► arrow buttons and press the Enter button.
- Select the song using ▲ or ▼ arrow buttons that you wish to play and press the Enter button.
- Adjust the volume of the song playing using the Vol+ or Vol- buttons.
- To exit, press the Menu button.
Music Setup
- To customize how music played back, press the Setup button while the music is playing. You may select / change the Play Mode or Show Spectrum by using the arrow buttons.
- To exit, press the Menu button.
Calendar Function
Calendar Setup
- To configure custom settings for the Calendar, select the Settings function in the Main Menu and press the Enter button. Navigate to Calendar Setup using the ▲ or ▼ arrow buttons and press the Enter button.
- Use the arrow buttons to set the correct date and time.
- To exit, press the Menu button.
Auto On / Off Function
Auto On / Off Setup
- To configure Auto On / Off feature, select the Settings function in the Main Menu and press the Enter button. Then navigate to System Setup using the ▲ or ▼ arrow buttons and press the Enter button.
- Select Power On and press ► to change between ON / OFF.
- Select Auto Boot Time and set the power on time.
- Select Power Off and press ► to change between ON / OFF.
- Select Auto Shut Time and set the power off time.
- To exit, press the Menu button.
Alarm Setup
- To set the Alarm, select the Settings function in the Main Menu and press the Enter button. Navigate to Calendar using the ▲ or ▼ arrow buttons and press the Enter button.
- Use the ▲ and ▼ to navigate to alarm ON / OFF, time of the alarm and the day for the alarm and use ◄ and ► to change the settings.
- To exit, press the Menu button.
Setup Guide
The Aluratek Digital Photo Frame ADMPF512F is easy to set up and requires little effort. The actions to take are as follows:
- Decide where you want your frame guide to be. Make sure it is out of direct sunlight and heat sources, in a safe and secure location.
- Follow the directions in the user manual to assemble the frame guide. Verify that every part is correctly positioned and firmly secured.
- Place your photo prints inside the frame reference. For a tidy and expert appearance, make sure they are centered and appropriately aligned.
- As necessary, change the frame guide's width. This will guarantee that your photo prints fit perfectly.
Troubleshooting
Here are some common problems and solutions that may arise with the Aluratek Digital Photo Frame ADMPF512F:
- Problem: The frame guide is not sturdy or stable.
Solution: Make sure all components are properly aligned and securely fastened. If necessary, add additional support or weight to the frame guide to ensure stability. - Problem: The photo prints are not securely held in place.
Solution: Make sure the photo prints are properly aligned and centered. If necessary, adjust the width of the frame guide to ensure a snug and secure fit.
Warranty
Aluratek warrants this product against defect in material or workmanship for 1 Year from the date of purchase.
Aluratek Pros & Cons
Pros
- Modern and sleek design
- Compatible with standard 12x18 photo prints
- Adjustable width for a perfect fit
- Easy to assemble and install
- Durable and long-lasting materials
Cons
- May not be suitable for larger or non-standard photo prints
- May require additional support or weight for stability
Customer Reviews
Customers have praised the Aluratek Digital Photo Frame ADMPF512F for its sleek design, easy setup, and versatile compatibility. However, some have noted that it may not be suitable for larger or non-standard photo prints, and may require additional support or weight for stability. Overall, the frame guide has received positive reviews for its high-quality materials and long-lasting durability.
Faqs
What is the Aluratek Digital Photo Frame ADMPF512F?
What are the key features of the Aluratek?
Are videos playable on the Photo Frame ADMPF512F?
Does the picture frame have a memory built in?
In what way can I add movies and pictures to the frame?
What are the pros and cons of the Aluratek Digital Photo Frame?
Does the frame contain a calendar and clock feature?
What kind of guarantee does Aluratek offer for this digital picture frame?
What is the price range of the Aluratek Frame?
When is the expected launching date of the ADMPF512F?
Leave a Comment