Amcrest 2MP Wi-Fi Pan Tilt Camera User Manual | App Settings
Content
Introduction
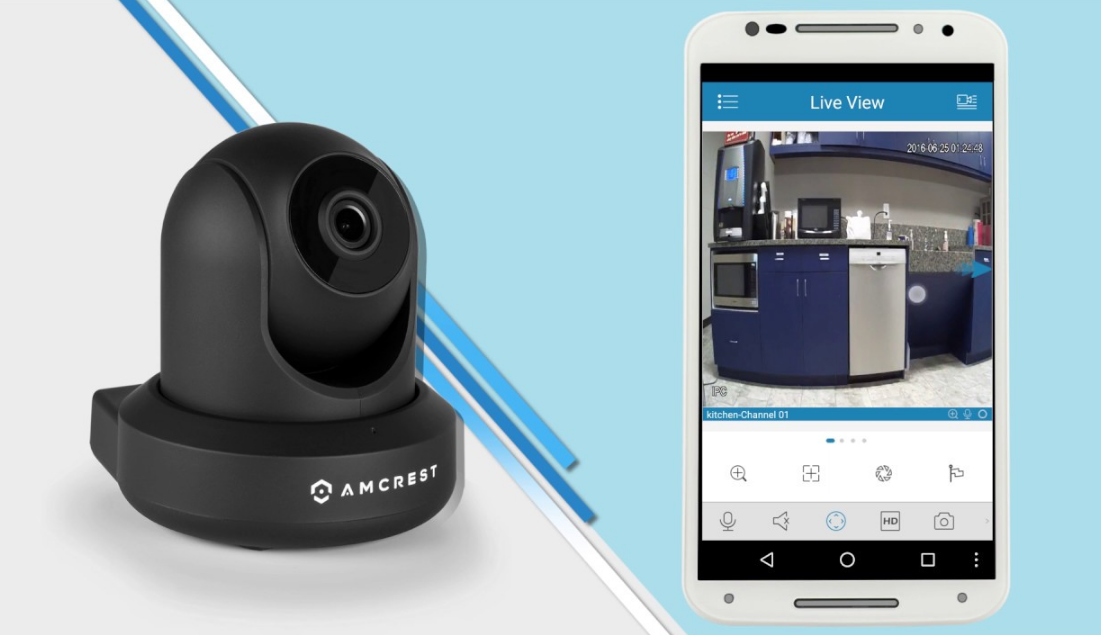
The Amcrest 2MP Wi-Fi Pan Tilt Camera is a high-performance security solution designed for comprehensive home monitoring. With full HD 1080P video quality and a wide 90° viewing angle, it allows users to pan and tilt remotely for complete coverage of any area. Equipped with night vision capabilities and two-way audio, this camera ensures you can see and communicate clearly, day or night. The Amcrest 2MP Wi-Fi Pan Tilt Camera is priced at approximately $47.99.
Device Overview
.png)
Technical Specifications
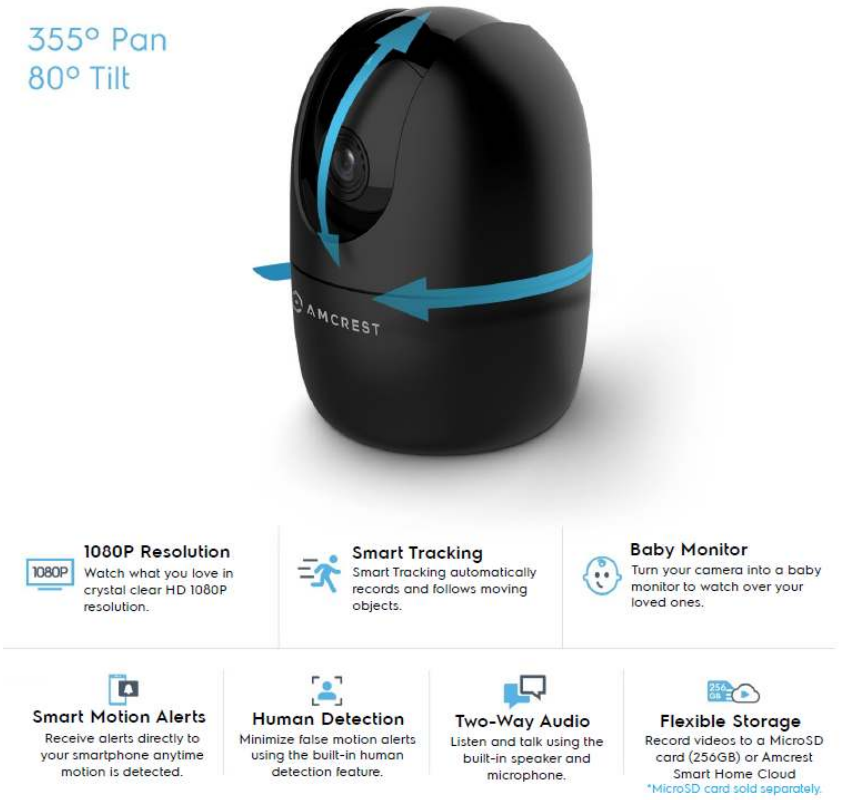
Camera
- Image Sensor: 1/2.7” 2MP CMOS
- Resolution: 1080P Full HD (1920x1080)
- Night Vision: Up to 33ft
Lens
- Lens Type: 3.6mm (Fixed)
- Field of View: 93°
- Pan/Tilt: 355° Pan, 80° Tilt
Video
- Compression: H.265 / H.264
- Frame Rate: Main Stream: 1080P (1~30fps)
Audio
- Built-in Mic and Speaker
Storage
- MicroSD Card (Up to 256GB)
- Amcrest Smart Home Cloud
- Amcrest NVR/DVR
Connectivity
- Wi-Fi: IEEE802.11b/g/n (2.4GHz)
- Ethernet: RJ45 (10/100Base-T)
Construction
- Operating Temp: -14°F ~ 113°F
- Dimensions: 4.17” x 3” x 3”
Mobile Viewing
- iOS and Android Smartphones via the Amcrest Smart Home app.
Device Features
Inserting a MicroSD Card
A microSD card is required to store events outside of the Amcrest Smart Home Cloud. The camera is compatible with up to 256GB and requires a Class 10 or higher microSD card to function. It is highly recommended to ensure the microSD card is properly formatted to FAT32 before proceeding.
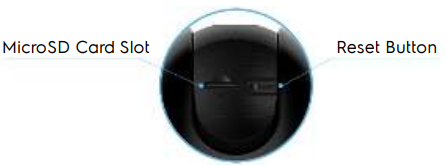
To insert a microSD card, lift the front of the camera to access the microSD card slot, insert the microSD card with the gold pins down, and press in to secure.
Note: Be sure not to touch the lens when manually raising the camera. Touching the lens may smudge or degrade it. Do not force the camera upward as any additional pressure could damage the camera.
Physical Installation
This device operates on either a Wi-Fi connection or direct connection to your network with an Ethernet cable. This is not a power over ethernet (PoE) device and will require a 5V, 1.0A microUSB power connection to function. Please use only applicable voltage when powering the camera. Any excessive voltage could damage the camera's integrity. It is highly recommended to use the included power cable and adapter to power the camera.
The ASH21 camera is not waterproof. Please avoid installing the camera in areas of high humidity or moisture, as this may cause water damage. It is recommended not to install the camera in outdoor environments.
If using a microSD card for local storage, ensure the card is properly installed before physically installing the camera. Before you begin, ensure the installation surface can support at least 3x the weight of the device.
Included with your ASH21 camera:
- 3 Mounting Screws
- 3 Wall Anchors
- Installation Mounting Plate
- Installation Map Sticker
The physical installation will require the following tools (not included):
- A drill (optional)
- Phillips head screwdriver
Installation Instructions
- Peel and place the installation map sticker onto the mounting surface.
- Using a drill, drill the installation holes on the installation map sticker, then insert the included wall anchors into the 2 drilled holes. The third wall anchor can be used as a spare if needed.
- Place the installation mounting plate (face down) on the installation map sticker and use a Phillips head screwdriver to secure the installation mounting plate to the mounting surface.
- On the base of the camera, you will notice 2 slots for the installation plate.
- Place the camera perpendicular and flush onto the installation mounting plate, and twist the base to secure the camera. The camera will click and lock into place, completing the physical installation.
Description
The Amcrest 2MP Wi-Fi Pan Tilt Camera boasts an impressive array of features that make it a standout in its class. The camera’s 2MP resolution ensures that you get clear and detailed video footage, while the IR LEDs provide night vision capabilities up to 32 feet. The pan-tilt functionality allows for smooth and quiet movement, enabling you to adjust the camera’s view remotely. Additionally, the camera supports motion detection, which can trigger alerts and recordings when movement is detected.
The camera also includes a microSD card slot for local storage, allowing you to store footage directly on the device. With Wi-Fi connectivity, you can easily stream live video or view recorded footage from your smartphone or tablet using the Amcrest View app.
Amcrest Smart Home App Setup
The Amcrest Smart Home app connects your Amcrest Smart Home device to your Android or iOS mobile device, ensuring you stay connected to what matters most.
To get the app:
Search for “Amcrest Smart Home” in the Google Play Store or App Store and download it.

Connecting to the App
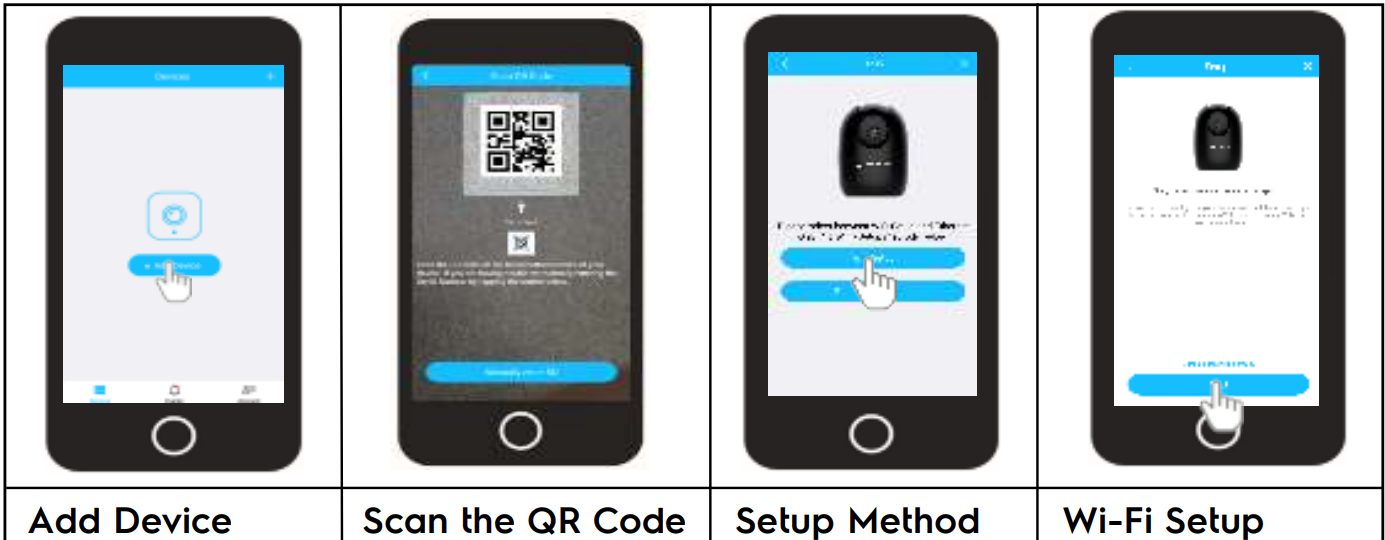
Add Device
- Open the Amcrest Smart Home app and tap on “Register” to register an account.
- Log in and click on “Add Device”.
Scan the QR Code
- Scan the QR code on your device, or manually enter the serial number for the device by tapping on “Manually enter S/N”.
- The serial number can be found on the serial tag located on the camera.
Setup Method
- To setup a WiFi connection (recom-mended) Tap “WiFi Setup” to continue.
Wi-Fi Setup
- Tap “WiFi Setup” to continue.
- Ensure the green LED on the front of your camera is blinking, indicating the camera is ready to be connected.
- Tap “Next” to continue.
Note:
Wi-Fi setup will only allow your camera to connect via a 2.4GHz Wi-Fi connection. If you prefer an Ethernet connection, tap on “Ethernet Only Setup” and follow the on-screen prompts.
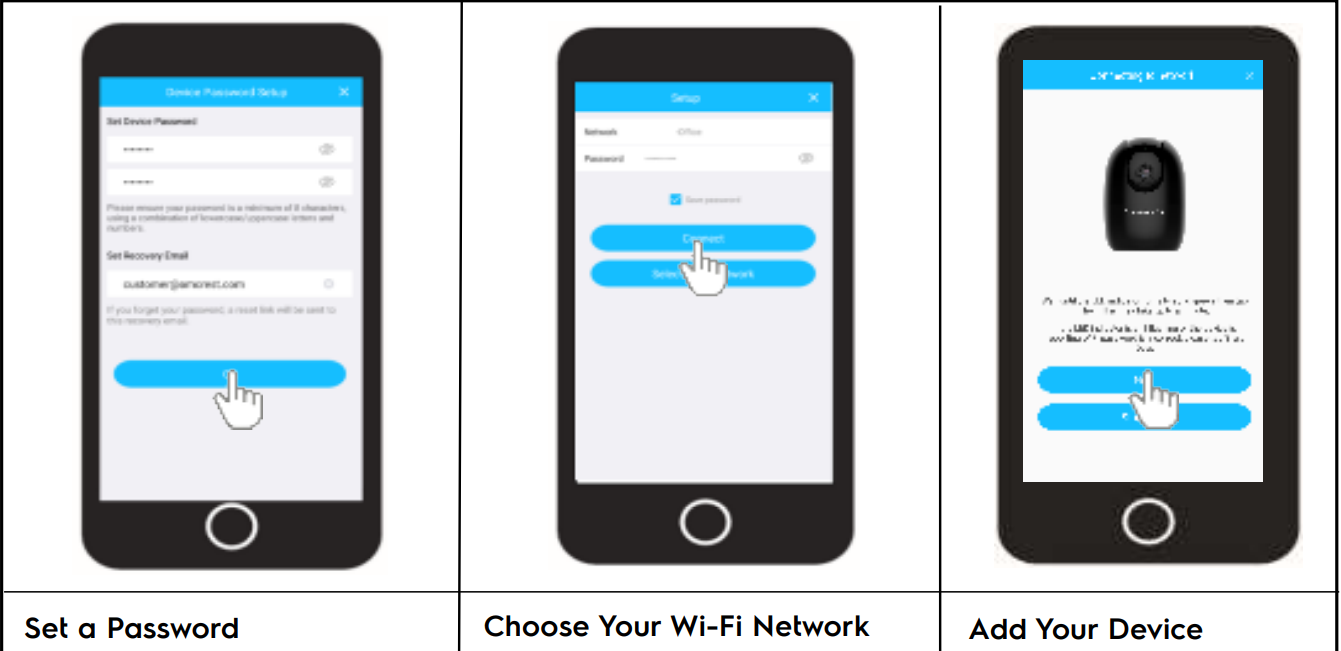
Set a Password
- Type in a password you would like to use and confirm it.
- Use a combination of letters, numbers, and symbols between 8-32 characters long when setting up a password.
- Tap “OK” to continue.
Choose Your Wi-Fi Network
- Select your Wi-Fi network from the list of available networks.
- Enter the password for your home Wi-Fi network.
- If you would like to save this password to the app, tap on “Save Password”.
- Tap “Connect” to continue.
Add Your Device
- The LED on the front of the camera will turn solid green when connected.
- If it does not turn solid, tap “Start Over” to try again.
- Tap “Next” to continue.
Name Your Device
- Rename your device with a relevant label (e.g., Front Door, Storage Room, Office, etc.).
- Tap “Save” to continue.
Set the Time and Date
- Set the “Time Zone” to your current time zone.
- Adjust “DST” (Daylight Savings Time) settings if applicable.
- Tap “Next” to continue.
Start Live View
- Tap “Start Live View” to view the live feed from your camera.

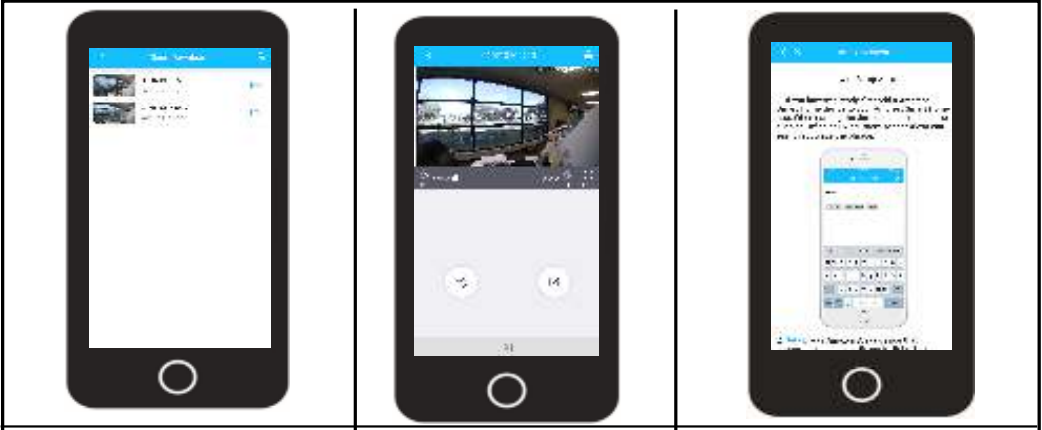
Devices Menu
The devices menu displays all connected devices on your Amcrest Smart Home account as well as direct access to event notifications and account settings.
.png)
- Motion Detection
Tap on the “running man” icon to enable or disable motion detection. This will also enable or disable push notifications for your camera. - Privacy Mode
Tap on the “eyeball” icon to set your camera into privacy mode. Privacy mode will automatically hide the lens of your camera to block out any unwanted viewing of your camera.
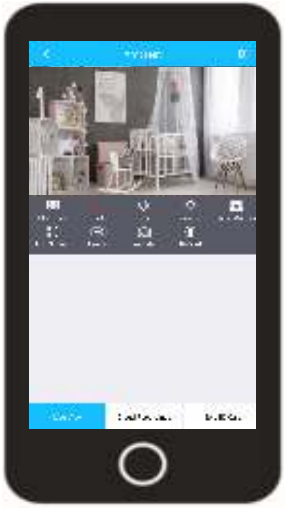
Live View
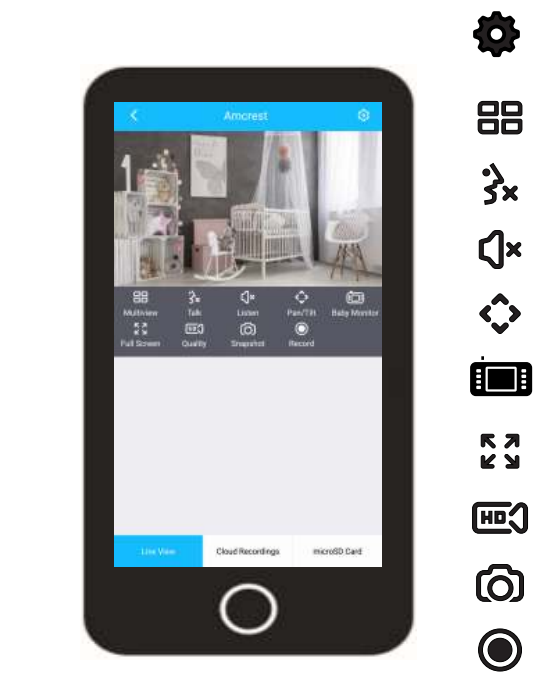
- SETTINGS
Provides access to settings such as motion detection, video, firmware updates, etc. - MULTIVIEW
View multiple devices on one screen. - TALK
This device does not have 2-way audio capabilities. - LISTEN
Enables the speaker for two-way communication. - PAN/TILT
Enables pan/tilt options. - BABY MONITOR
Enables baby monitor mode. - FULLSCREEN
View your feed in full-screen mode. - SD/HD
Set the device to standard or high-definition resolution. - SNAPSHOT
Manually take a photo. - RECORD
Manually record a video.
Multiview
The multiview option is used to view up to 4 devices simultaneously on the live view screen. To access the multiview menu, tap on the Multiview icon located on the live view interface.
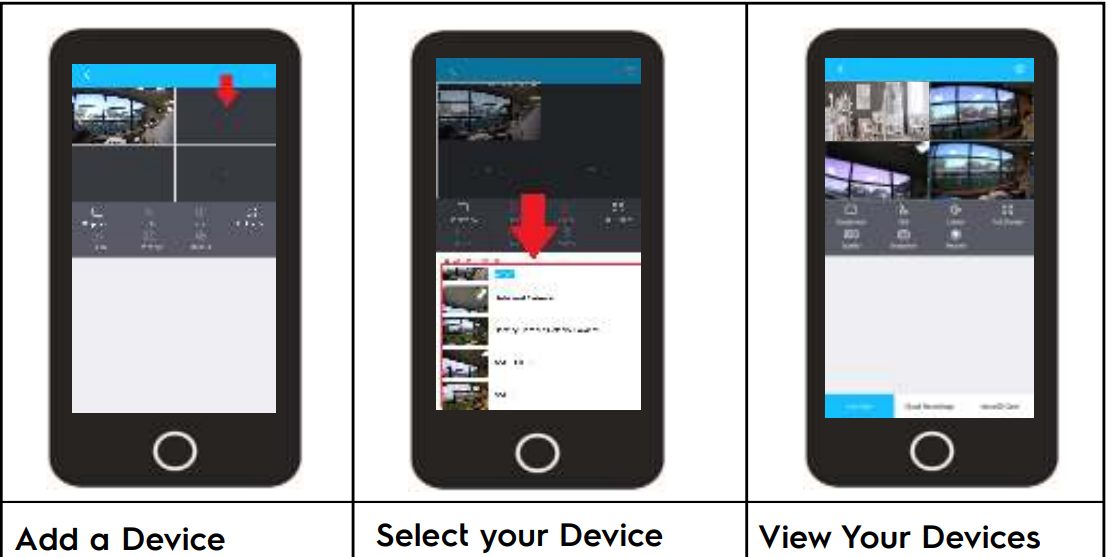
- Add a Device
Tap on the ( + ) icon to begin adding optional devices to the live view screen. - Select your Device
Select your device from the optional channels menu. The interface can view up to 4 devices simultaneously. Once added, a blue “Added” display will be shown next to the newly added device. - View Your Devices
The added devices can now be viewed simultaneously on the live view screen. To exit multiview, tap on the “Single View” option located on the live view interface.
Talk/Listen
The talk button allows you to activate the microphone on your smartphone device to talk to your camera. The talk button can be used together with the listen button to enable two-way audio.
Tap the talk button to activate the microphone on your smartphone. You will hear audio from the device on your smartphone.
Tap on the listen button to activate the speaker on your device. This will enable two-way audio when activated with the talk button.
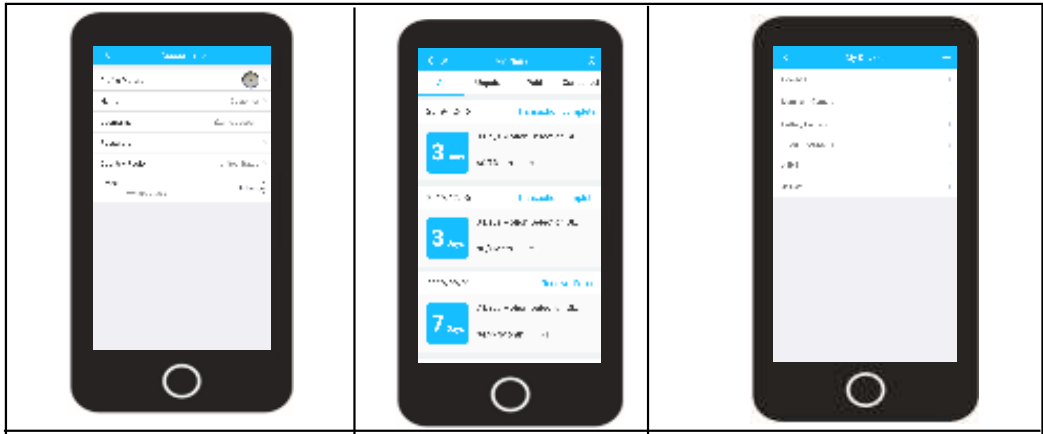
Events Menu of Amcrest 2MP Wi-Fi Pan Tilt Camera
The events menu provides quick access to system and device-related security and system alerts. The security alerts menu provides information on how many push notifications were sent, per device, per day and allows viewing each notification that was sent within a 7-day period. The system notification menu retains notifications provided by the developer, which can range from system maintenance messages to firmware update reminders for your device.
Security Alert
The security alerts menu provides information on how many push notifications were sent, per device, per day and provides a way to view each notification that was sent within a 7-day period.
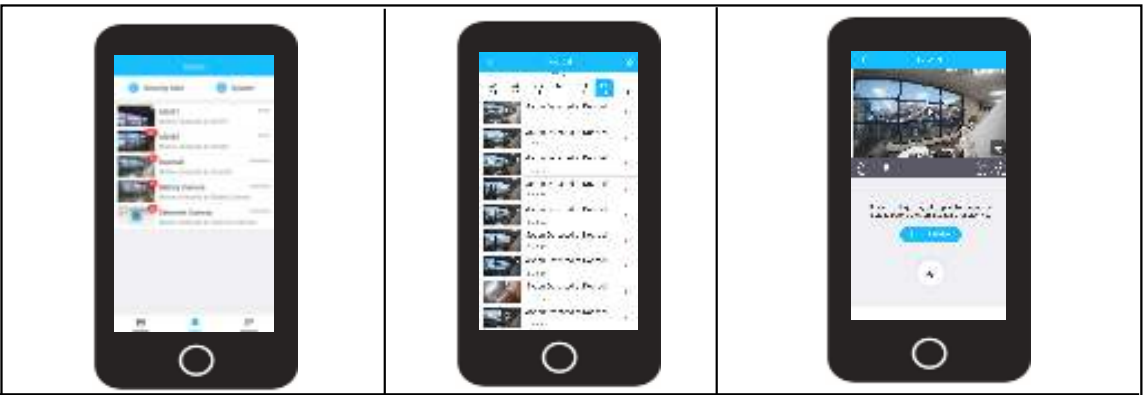
- To access the events menu, log into your account and tap on the Events tab at the bottom of the screen. Select your device from the interface.
- A list of events will be displayed. Use the calendar to select which day’s worth of events you would like to view.
- Tap the play button to play the event. Tap “Go to Live View” to view the live feed. Tap the full screen icon ( ) to view a fullscreen view of the event. Tap the share button ( ) to share the event. Tap the download button ( ) to download the event to your smartphone.
System Alerts
The system notification menu retains notifications provided by the developer. This can range from system maintenance messages to firmware update reminders for your device.
- To access the system alerts menu, access the events menu and tap on System Alerts. All system alert information will be displayed in this menu.
- Tap on a system alert to view the information provided in the alert.

Account Menu
The accounts menu allows you to view and update general account information as well as customize and adjust specific settings for your device. For more information on the options available in the account menu, please refer to the information provided below.
To access the Account menu, open the Amcrest Smart Home app and log into your account. Tap on the Account menu option located at the bottom of the interface. All account-based options for your account will be displayed in this menu. Use your finger to scroll up and down the menu for more options.
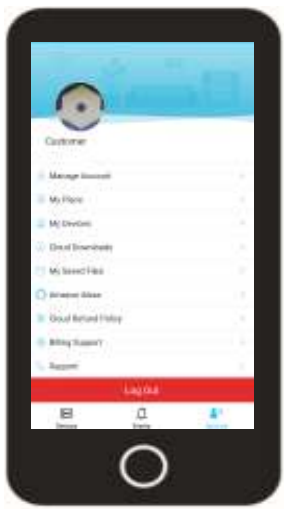
Manage Account
The Manage Account menu allows you to edit a profile picture, update the name on your account, password, as well as the email address used for your account. To exit the manage account menu, tap on the back arrow ( < ).
My Plans
The My Plans menu allows you to view all unpaid, paid, and canceled cloud storage plan transactions associated with your Amcrest Smart Home account. To exit the My Plans menu, tap on the back arrow ( < ).
My Devices
The My Devices menu allows you to view all connected devices as well as add devices to your Amcrest Smart Home account. To add a device, tap on the ( + ) icon and follow the in-app instructions. Tap on an already connected device to access and adjust device settings.
Cloud Downloads
The Cloud Downloads menu allows you to view, delete, or download cloud recordings that were downloaded from the cloud recordings interface. Tap on a clip to view the recording, use the trash can icon to delete it, or tap on the download button to download the recording to your mobile device.
My Saved Files
The My Saved Files menu allows you to view, delete, rename, share, and export manually recorded snapshots or videos. Use the video/snapshot icons to view the manually recorded files. Tap the share icon (![]() ) or export icon (
) or export icon ( ![]() ) to export the file.
) to export the file.
Amazon Alexa
The Amazon Alexa option provides a step-by-step breakdown on how to add your Amcrest Smart Home device into Alexa. This is possible by implementing the Amcrest Smart Home skill into your device. Please refer to the information in this menu for a detailed description of the process.
Amcrest Smart Home Cloud
Amcrest Smart Home Cloud provides a 7-day no questions asked, money-back guarantee. There are no refunds after 7 days of the charge date. For any inquiry on cloud billing, please visit: https://amcrest.com/billing-support
Billing Support
The Billing Support tab points you directly to the Amcrest Smart Home Cloud billing form. Use this form for any questions regarding cloud billing or other related billing questions for your Amcrest Smart Home cloud account.
Support
The Support tab points you directly to Amcrest's knowledge base. Use the knowledge base to access important support articles and online documentation for your device. To access the support knowledge base directly, please visit: https://amcrest.com/support

Leave Feedback
The Leave Feedback option allows you to leave feedback to improve the overall experience of the Amcrest Smart Home app. We take this feedback seriously and are always looking for new ways to improve your experience.
About
The About tab allows you to view the current app version you are using as well as a link to our privacy policy.

Setup Guide
To set up your Amcrest 2MP Wi-Fi Pan Tilt Camera, start by connecting it to a power source using the provided DC 5V/2A power adapter.
- Download and install the Amcrest View app on your smartphone or tablet. Open the app and follow the in-app instructions to connect the camera to your Wi-Fi network.
- Once connected, you can configure various settings such as motion detection alerts and video recording options.
- For assembly, simply place the camera in your desired location. If you need to wall-mount it, use the included mounting bracket and screws.
- The pan-tilt feature can be adjusted manually or remotely through the app.
App Settings
The settings menu for your device allows you to configure specific settings such as device information, motion detection, time zone, Wi-Fi and other related settings. All settings are based on the capbilities of the device and may differ between certain models. Please refer to the information below for more information on the settings available for your device.
Accessing the Settings Menu
The settings menu for your device can be accessed via the live view menu. Tap on the settings icon ( ![]() ) to display the settings menu. The settings menu for your device is displayed below.
) to display the settings menu. The settings menu for your device is displayed below.
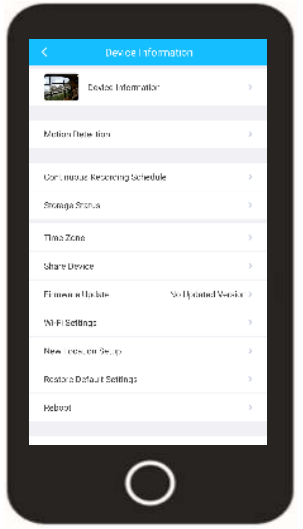
- Device Information
This menu allows you to update the thumbnail image, name, and password for your device. The model number, serial number, and other useful information can be accessed via this menu. - Motion Detection
This menu allows you to customize, adjust, and set motion detection schedules for your device. When motion detection is enabled, your device will record video whenever motion is detected. - Continuous Recording Schedule
This menu allows you to set your device to continuously record video to a microSD card. Note: Once the microSD card is full, old footage will be overwritten on the card. - Storage Status
Displays any current cloud or microSD card storage options applicable for your device. This option also allows you to format a microSD card directly from your device. - Time Zone
This menu allows you to adjust and set any time zone-related information for your device. You can also enable DST (daylight savings time) settings if needed. - Share Device
This menu allows you to share your device with other people who have established Amcrest Smart Home accounts. You can share up to a maximum of 6 people. - Firmware Update
This menu allows you to update the firmware for your device. If a firmware update is available, a red dot will be displayed in this field. - Wi-Fi Settings
This menu allows you to change Wi-Fi networks for your device. - New Location Setup
Provides information on how to set up your device in a new location. - Restore Default Settings
Restores your device to its original default settings. - Reboot
This option allows you to restart your device from the Amcrest Smart Home app. - Video Settings
This menu provides access to general video settings related to your device. - Email Alerts
This menu allows you to set up email notifications, enabling you to receive an email if an event is detected by your camera. - Delete Device
This option unbinds your device from your Amcrest Smart Home account.
Adding to Blue Iris
Amcrest Smart Home devices, such as the ASH21, can connect and record to Blue Iris. This is possible by obtaining the IP address of the camera and entering the applicable RTSP information into the software. The device must be set up first using the Amcrest Smart Home app before adding it to any additional software. The camera and the computer you are using must be on the same network during setup. For more information on adding your camera into Blue Iris, please refer to the information provided below.
- Step 1:
Open the Blue Iris Software. Right-click on the main interface to display the New camera interface. - Step 2:
Enter a Full name and Short name for the camera. Make sure to also click on the "Enable audio" checkbox to enable audio. Click OK. Step 3:
Use the Amcrest IP Config tool to locate the IP address for your doorbell from the network. To download the Amcrest IP Config tool, please visit https://amcrest.com/downloads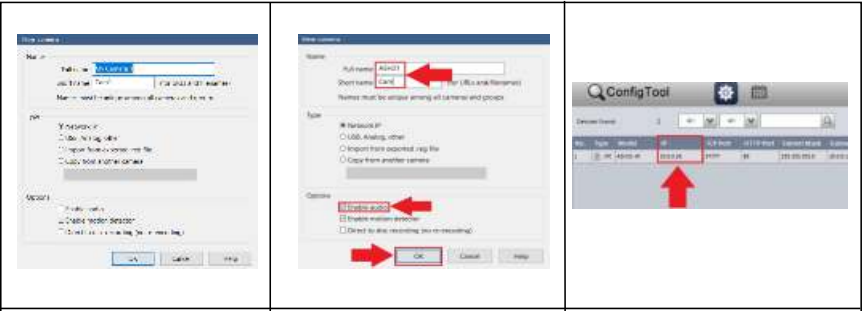
- Step 4:
Enter the IP address of the camera in the Address field. Enter the username and password for the camera into the User and Password fields. - Step 5:
Click on the Make drop-down menu and select Amcrest. In the Params field, enter the following RTSP information: https://channel=1&subtype=0&authbasic=64/ . Click OK. Step 6:
Click OK to add the camera into the software.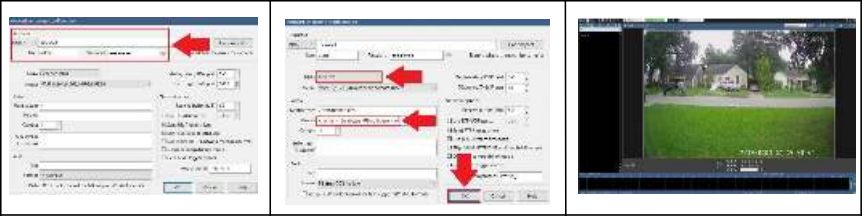
Adding to Amcrest Surveillance Pro
Amcrest Smart Home devices, such as the ASH21 camera, can be added into Amcrest Surveillance Pro software. Amcrest Surveillance Pro is a free software provided by Amcrest, allowing you to access all your Amcrest devices in one central location on your PC or Mac. For more information on how to download this free software, please visit: amcrest.com/downloads. The device must be set up first using the Amcrest Smart Home app before adding it to any additional software. The camera and the computer you are using must be on the same network during setup. For more information on adding your camera into Amcrest Surveillance Pro, please refer to the information provided below.
- Step 1:
Open and log into your Amcrest Surveillance Pro software. - Step 2:
Click on the Add button to begin adding your device. Step 3:
Use the Amcrest IP Config tool to locate the IP address for your device from the network. To download the Amcrest IP Config tool, please go to https://amcrest.com/downloads
- Step 4:
Enter a name for your camera and use the IP/Domain protocol. Enter the IP address, then enter the username and password for your camera. Click OK to continue. - Step 5:
The status of the device will be displayed as green in the status menu. - Step 6:
Navigate to the Live View option and locate the newly added device in the assigned Group menu. Double-click the camera to view the live feed.

Important Safeguards and Warnings
- Electrical Safety
All installation and operation of this device should conform to your local electrical safety codes. We assume no liability or responsibility for any fires or electrical shock caused by improper handling or installation. - Transportation Security
Heavy stress, violent vibrations, and excess moisture should not occur during transportation, storage, and installation of the device. - Installation
Handle the device with care. This device operates on either a Wi-Fi connection or a direct connection to your network with an Ethernet cable. This is not a power over Ethernet (PoE) device and requires a 5V, 1.0A microUSB power connection to function. Please use only applicable voltage when installing. Ensure the installation surface can support at least 3x the weight of the device before installing the device. This device is not waterproof, do not install it in areas of high humidity or moisture. - Additional Software
This device is designed to be used on the Amcrest Smart Home platform. Since Amcrest Smart Home products operate on a cloud-based system, adding the device to any additional software may result in the degradation or loss of certain features. - Repair Professionals
All the examination and repair work should be done by qualified service engineers. We are not liable for any problems caused by unauthorized modifications or user-attempted repair. - Environment
The camera should be kept in a cool, dry place away from direct sunlight, flammable materials, explosive substances, etc. This product should be transported, stored, and used only in the specified environments as stated above. Do not aim the camera at a strong light source, as it may cause over-exposure of the picture, which may affect the longevity of the camera. Ensure that the camera is in a well-ventilated area to prevent overheating. - Operation and Maintenance
Do not touch the camera sensor or lens directly. To clean dust or dirt from the lens, use an air blower or a microfiber cloth. - Accessories
Be sure to use only the accessories recommended by the manufacturer. Before installation, please open the package and check to ensure that all the components are present. Contact the retailer that you purchased from, or Amcrest directly if anything is broken or missing in the package.
Amcrest 2MP Wi-Fi Pan Tilt Camera Troubleshooting
Unable to Locate an SSID?
If you are having issues obtaining an SSID when adding your device into the Amcrest Smart Home app, there may be a miscommunication between the app and your mobile device. This issue appears to be more common among iOS users, and we are currently working with Apple to devise a solution. There is an easy fix you can use to resolve the issue. For more information on how to resolve this issue, please refer to the instructions below.
If the SSID for your Wi-Fi network is not appearing in the app when attempting to add your Amcrest Smart Home device:
- Close the app completely.
- Power your mobile device off and back on again, allowing it to restart.
- Once your mobile device has restarted, ensure it is connected to the proper Wi-Fi network.
- Open the Amcrest Smart Home app and continue adding your device as normal. The SSID for your network should now appear, allowing you to complete the setup process.
How Do I Verify/Update Firmware?
All firmware verification and updates are available using the Amcrest Smart Home app. For more information on how to verify or update the firmware for your camera, please follow the steps below.
- Log into your Amcrest Smart Home account and select your device from the Devices menu.
- Tap on the settings (
 ) icon.
 - In the settings menu, locate the "Firmware Update" tab. If a firmware update is necessary, there will be a red identifier prompting you that a firmware upgrade is ready. If there is no red dot, you are operating on the most up-to-date firmware.
Note: If you need to update the firmware, tap on the "Firmware Update" tab to proceed with the update.
- In the firmware update menu, you will see the current version of the firmware on your camera and the latest firmware file that will be downloaded to your camera. To proceed, click "Update."
- You will be prompted to upgrade the firmware. Tap Cloud Upgrade to begin, or tap Cancel to stop the process.
- The firmware file will begin to download. Please wait for the download and upload of the file to complete. Once the process is complete, a prompt will confirm that the firmware has successfully updated, and the current version is now up-to-date on your device.
How Do I Download Recordings?
Recordings can only be downloaded via the Cloud Recordings download interface. Recordings stored on a microSD card must be downloaded via a microSD card adapter (sold separately) on a computer. For more information on downloading cloud recordings, please follow the steps below.
- Log into your Amcrest Smart Home account and select your device from the Devices menu.
- Tap on Cloud Recordings.
- Tap on the File List icon located in the Cloud playback interface.
- Select the recording you wish to download from the file list.
- Tap the download icon to download the recording.
- The recording will begin to download to your smartphone. A blue check mark will appear next to the download icon once the recording has finished downloading. You can also share your recordings directly to other services on your smartphone via the share icon located in the middle of the download menu.
Pros & Cons
Pros
- High-Quality Video: 2MP resolution provides clear video footage.
- Remote Viewing: Stream live video from anywhere using the Amcrest View app.
- Pan-Tilt Functionality: 360-degree coverage for comprehensive surveillance.
- Affordable Price: Budget-friendly option without compromising on quality.
Cons
- Wi-Fi Dependence: Requires a stable Wi-Fi connection for operation.
- IR LED Limitations: Night vision range limited to 32 feet.
- No Battery Option: Must be plugged into a power source at all times.
Customer Reviews
Customers have praised the Amcrest 2MP Wi-Fi Pan Tilt Camera for its ease of setup and high-quality video feed. Many have noted its reliability in capturing clear footage both during the day and night. However, some users have reported occasional connectivity issues with their Wi-Fi networks.
Faqs
How do I connect my Amcrest 2MP Wi-Fi Pan Tilt Camera to my Wi-Fi network?
Can I view live footage from multiple cameras at once?
What is the maximum storage capacity supported by the microSD card slot?
Is motion detection customizable?
Can I use this camera outdoors?
How do I update the firmware of my Amcrest camera?
Is there a warranty provided with this product?
Can I share access to my camera with other users?
What are some common causes of connectivity issues with the Amcrest 2MP Wi-Fi Pan Tilt Camera?
Leave a Comment