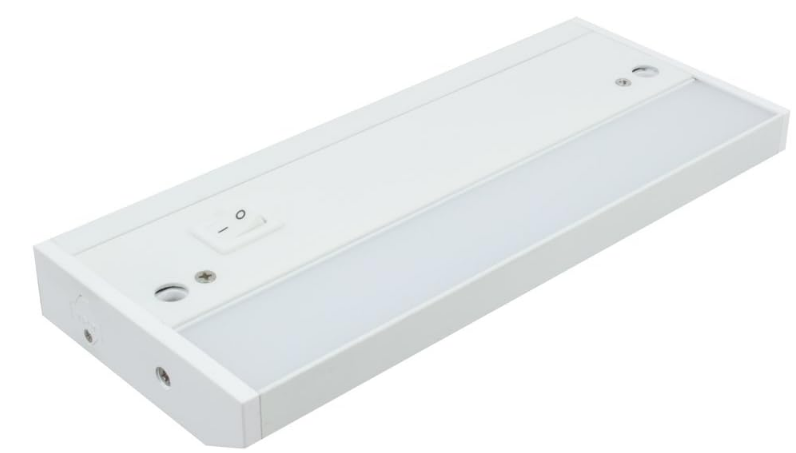
American Lighting LED Undercabinet Light ALC2 User Guide

Content
Introduction
American Lighting Light ALC2 is a sleek and efficient lighting solution designed to enhance your kitchen or workspace. This undercabinet light features energy-efficient LED technology that provides bright, even illumination while saving on electricity costs. Its low-profile design ensures a seamless fit beneath cabinets, making it perfect for any modern decor. Priced at approximately $50, this lighting fixture combines functionality with style to brighten up your home.
Specifications
The American Lighting LED Complete 2 Undercabinet Light ALC2 comes with several key features that make it a standout in its category:
- Energy-Efficient LED Technology: Consumes significantly less energy compared to traditional lighting options.
- Dimmable Capability: Compatible with most dimmer switches, allowing adjustable brightness levels.
- Long Lifespan: Rated for up to 25,000 hours of operation.
- Compact Design: Measuring 24 inches in length, it fits seamlessly under most standard kitchen cabinets.
- Easy Installation: Includes clips and screws for a hassle-free mounting process.
- Color Temperature: Available in warm white (3000K) and cool white (5000K) options.
Description
LED Complete 2 Undercabinet Light ALC2 features a sleek, modern design that complements any kitchen décor. The LED strip is encased in a durable aluminum housing, ensuring longevity and resistance to heat. The light emits a bright, consistent glow that reduces shadows and enhances the overall lighting in your kitchen. It is also designed with safety in mind, featuring a cool-to-the-touch exterior even after extended use.
Installation Instructions for ALC2 Series
WARNING: These products may represent a possible shock or fire hazard if improperly installed or attached in any way. Products should be installed in accordance with these instructions, current electrical codes and/or the current National Electric Code (NEC).
Warning: To avoid electric shock, disconnect power prior to installation.
Caution: Injury to persons and damage to the fixture and/or mounting surface may result if the fixture is pulled from the surface. To reduce the likelihood of such injury or damage, mount on a surface that is mechanically sound.
Select a knockout location on the fixture that is best suited for the installation. Knockouts are located along the back and top of housing. The rear access door that is located in the middle of the back of housing also has its own knockout for quick connection to supply wires, foregoing the need to remove the lens cover and open the wiring compartment. See Figure 1, then proceed to the corresponding section below.

Suitable for indoor dry locations only.
Supply wires connection via rear access door
Remove knockout using a hammer or punch; then loosen screw that secures rear access door using a Philips screwdriver or driver bit. See Figure 2.

Install cable connecter that is appropriate for the supply wire following National Electric Code and local codes through this knockout on the access door. See Figure 3.

(Use 14 or 12AWG wires. AC should be protected by circuit breaker or fuse).
Strip back jacket on supply wires 3/8“ and use push-in wire connectors inside housing to connect wires (Black to Black/Hot, White to White/Neutral and Yellow/Green stripe [Ground] to bare wire) through knockout so that push-in connectors are positioned on the housing side of the access door. See Figure 4.

Replace rear access door and secure with screw. Note: Be sure that the wires are not pinched or damaged by any part of the housing or the cover. See Figure 5.

Mounting fixture:
- Position fixture in desired location and use Philips screwdriver or driver bit to tighten captive mounting screws and secure fixture to an appropriate mounting surface. Use decorative covers to hide the screw heads.
Interconnecting fixtures:
- Use 6” or 12” flexible jumpers (sold separately) to interconnect nearby fixtures. See Figure 6.
Use inline connector supplied with each fixture to connect fixtures directly to each other end-to-end. See Figure 7.

Note: The maximum number of fixtures that can be interconnected in either manner is 40.
Available Accessories
(sold separately)
- Interconnect cables: 6" and 12" flexible jumper cables; Black or White
- Inline connector: one is included with each fixture
- Power cord: 6' length, grounded (3-prong) plug; Black or White
- Direct wire junction box: Bronze or White
WARNING! CAUTION - RISK OF FIRE: Keep fixtures away from curtains and other combustible materials.
Setup Guide
To set up the American Lighting LED Complete 2 Undercabinet Light ALC2, follow these steps:
- Turn off the power to the circuit at the main electrical panel.
- Locate the desired mounting position under your kitchen cabinet.
- Use the provided clips and screws to secure the light to the underside of the cabinet.
- Connect the light to a power source. If using a dimmer switch, ensure it is compatible with LED lights.
- Turn on the power and test the light.
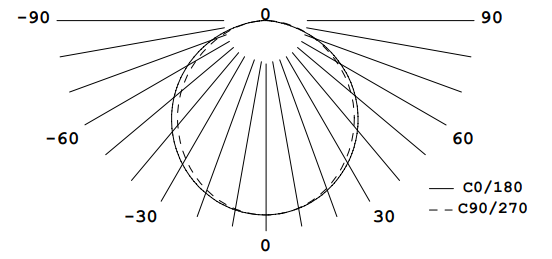
Light Distribution
See below for photometric distribution for the 3LC fixtures.

Supply wires connection via housing knockouts
Note: This type of installation is less common - only done when access door cannot be used.
- Open wiring compartment by removing screws at each end and lifting cover from housing body. See Figure 8.
Punch out whichever knockout is best suited for connection to 120V supply wires. Knockouts are located along back and top of housing. See Figure 9.

- Install cable connnector and connect fixture wires following National Electric Code and/or local building code requirements. Use minimum 18AWG solid copper wires. AC supply should be 120V protected by circuit breaker or fuse.
- Attach line voltage AC supply wires to fixture lead wires: Black to Black/Hot, White to White/Neutral and Yellow/Green (Ground) to Green or bare wire inside the fixture. Secure each connection using push-in wire connectors provided on the fixture lead wire. If your system has no ground wire, consult a qualified electrician before proceeding with the installation.
Note: Electric shock, overheating, low or no light output and shortened fixture life can result if proper grounding is not done. - Replace the wiring compartment cover, securing with the existing retaining screws.
Note: Be sure that the wires are not pinched or damaged by any part of the housing or the cover.
Additional Safety Measures
- Do not look directly at the LED light source.
- Do not touch the LEDs.
- To avoid electrical shock, do not turn on fixture with missing or damaged lens or wiring compartment cover.
- Do not operate without end connector cover(s) in place for any molex ports/ connectors not in use.
- There are no serviceable parts inside the LED module.
- WARNING! CAUTION - RISK OF FIRE: Keep fixtures away from curtains and other combustible materials.
- Suitable for indoor dry locations only.
- This product is suitable for use in dimming circuits. For best results (5-100% lighting control), use Lutron DVCL-153P, DVELEV-300P https://www.lutron.com or Leviton 6613 https://www.leviton.com
Troubleshooting
If you encounter issues with your American Lighting LED Complete 2 Undercabinet Light ALC2, here are some common problems and solutions:
- No Light Output: Check if the power is turned off or if there is a loose connection. Ensure the dimmer switch is set correctly.
- Flickering Light: This could be due to an incompatible dimmer switch or a faulty connection. Replace the dimmer switch or check wiring connections.
- Overheating: Although rare, ensure proper ventilation around the light. Avoid covering the light with objects that could trap heat.
Instructions and Warnings: Always turn off the power before starting installation. Avoid touching electrical components. Follow all safety guidelines provided in the user manual.
5- YEARS WARRANTY
This product is warranted to be free from defects in material and workmanship for a period of five years from the date of purchase.
Undercabinet Light ALC2 Pros & Cons
Pros
- Energy-efficient and cost-effective.
- Long-lasting LED technology.
- Easy to install with included mounting hardware.
- Dimmable for adjustable brightness.
- Sleek design that fits well under most kitchen cabinets.
Cons
- May not be compatible with all dimmer switches.
- Some users find the installation clips somewhat flimsy.
- Limited color temperature options compared to other models.
Customer Reviews
Customers generally praise the American Lighting LED Complete 2 Undercabinet Light ALC2 for its bright illumination and energy efficiency. Many appreciate the easy installation process and the slim design that doesn't obstruct kitchen space. However, some users have noted issues with compatibility with certain dimmer switches and the quality of the mounting clips.
Most Common Complaints
Incompatibility with some dimmer switches and the perceived flimsiness of the installation clips.
Faqs
What is the estimated lifespan of the American Lighting LED?
Is the American Lighting ALC2 dimmable?
What are the available color temperatures for the American Lighting?
How do I install the Lighting Undercabinet Light?
Why is my American Lighting Light ALC2 not turning on?
Is the Undercabinet Light ALC2 energy-efficient?
What are the dimensions of the American Lighting LED?
Can I adjust the brightness of the American Light?
Does the Undercabinet Light ALC2 come with a warranty?
Leave a Comment
