How to Use: Aqualife RO Buddie 540019 User Manual
Content
Introduction of Aqualife RO Buddie 540019
The Aqualife RO Buddie is a reverse osmosis water filtration system designed for residential use. This system can produce up to 50 gallons of pure, great-tasting water every day, making it ideal for families. It has an estimated price range of $180 to $220 and was launched in 2021.
Detailed Specifications of Aqualife 540019
The Aqualife RO Buddie 540019 has the following key features
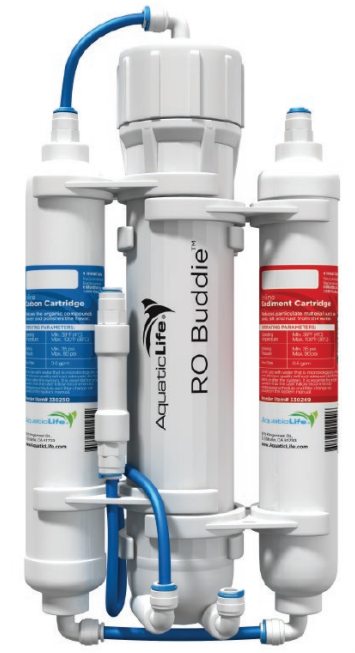
- 5-stage filtration process, including sediment, carbon block, reverse osmosis, and remineralization filters
- Produces up to 50 gallons of pure water per day
- Filters out over 1,000 contaminants, including lead, fluoride, chlorine, pesticides, and heavy metals
- Automatic shut-off valve to conserve water
- Easy-to-change filters
- Compact design for easy installation under the sink
Description of Aqualife RO Buddie
The RO Buddie 540019 is a reliable and efficient reverse osmosis water filtration system that can provide your family with clean, pure drinking water. Its 5-stage filtration process ensures that over 1,000 contaminants are removed, leaving you with water that tastes great and is safe to drink. The system is easy to install and maintain, with easy-to-change filters and an automatic shut-off valve to conserve water. Its compact design makes it a great choice for small kitchens or apartments.
OVERVIEW OF Aqualife 540019
- Reverse osmosis is the process of removing contaminants from tap water using a special semi-permeable membrane. By applying water pressure across the membrane, contaminants are concentrated on one side of the membrane and filtered water on the other side of the membrane. Therefore, reverse osmosis units have a waste water line as well as a filtered line.
- n addition to the membrane, water is filtered prior to the membrane with a sediment cartridge to remove larger particulates, and a carbon block to remove chlorine and other materials.
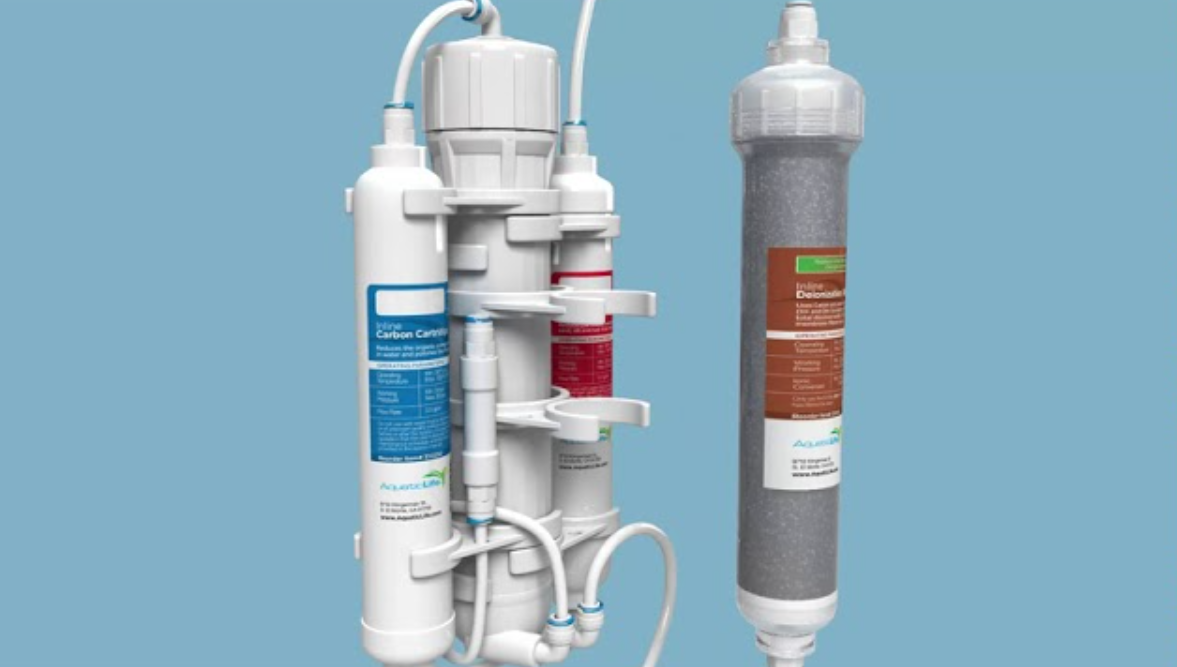
- With the RO Buddie +DI (Model # 540019), after water is filtered by the membrane,
it passes through a color-changing resin cartridge where additional total dissolved solids (TDS) are removed from the water.
WARNING
- Please read carefully before proceeding with installation. Your failure to follow any attached instructions and operating parameters may lead to the product’s failure.
- Do not drink water that has been filtered with a DI resin cartridge.
- STAGE 1 – SEDIMENT FILTER
Recommended change 3-6 months or 1,500 gallons total or 400 gallons of filtered water
The first stage of your RO unit is a five-micron sediment filter that traps sediment and other particulate matter like dirt, silt and rust which will affect the taste and appearance of your water. - STAGE 2 – CARBON BLOCK FILTER
Recommended change 3-6 months or 1,500 gallons total or 400 gallons of filtered water (at 1 ppm Chlorine)
The second stage of your RO unit is a carbon block filter. The activated carbon in the filter reduces chlorine and conditions the water prior to the RO membrane. - STAGE 3 – RO MEMBRANE Recommended change 1-2 years
The RO membrane reduces impurities known as total dissolved solids (TDS) from the water down to 1/10,000 of a micron, reducing arsenic, lead, parasitic cysts, copper and more. Because the process of filtering the high-quality water takes time, it is common to use a storage tank to collect filtered water, making it available on demand. - STAGE 4 – COLOR CHANGING RESIN (DEIONIZATION) Model 540019 only
Replace filter when resin changes color
After the water is filtered by the membrane, there is usually a small amount of total dissolved solids (TDS) left in the water. In certain non-drinking water applications, it is important to remove the remaining TDS from the water. This is accomplished by filtering the water through a resin that is charged with cation and anion resins (H+ and OH-). As the resin absorbs the TDS, it will change color. When all resin has changed color, it is time to replace the DI filter.
WARNING: The RO Buddie will remove chlorine, but NOT chloramines. Test your water and/or check with your local water company to find out if you have chloramines in your water.
| Contents | #540016 RO Buddie 50 GPD | #540017 RO Buddie 100 GPD | #540019 RO Buddie +DI 50 GPD |
|---|---|---|---|
| Micron Cartridge | 1 | 1 | 1 |
| Carbon Cartridge | 1 | 1 | 1 |
| RO Unit Housing w/Mounting Brackets and Screws | 1 | 1 | 1 |
| Reverse Osmosis Membrane | 1 – 50 GPD | 1 – 100 GPD | 1 – 50 GPD |
| Canister Cap Wrench | 1 | 1 | 1 |
| Color Changing Resin (DI) Cartridge | N/A | N/A | 1 |
| Common Size Kitchen/Bathroom Sink Faucet Adapter | 1 | 1 | 1 |
| Garden Hose/ Laundry Faucet Adapter | 1 | 1 | 1 |
| 1/4" Tubing | 1 | 1 | 1 |
| Installation & Maintenance Guide | 1 | 1 | 1 |
Setup Guide of Aqualife
To set up theAqualife RO Buddie, follow these steps
- Locate a suitable spot under your sink for the filtration system.
- Turn off the cold water supply to the sink and remove the existing faucet.
- Install the new faucet provided with the RO Buddie system.
- Connect the cold water supply line to the inlet valve on the RO Buddie system.
- Connect the drain saddle to the drainpipe.
- Connect the tubing from the RO Buddie system to the faucet.
- Turn on the cold water supply and check for leaks.
- Flush the system for 5 minutes to remove any air bubbles.
- Replace the filters as needed.
OPERATING GUIDELINES OF Aqualife RO Buddie 540019
- DO NOT use with water that is micro-biologically unsafe or of unknown quality without adequate disinfection before or after the unit.
- The optimal water pressure is 40-65 PSI. The supply water pressure should range between 40-65 PSI. If the pressure is more than 80 PSI, a pressure regulator is required. If the water pressure is less than 40 PSI, a booster pump is needed. The rated 50 or 100 GPD output of the RO unit is calculated using 65 PSI.
- The optimal water temperature is 77°F. Using other water temperatures will diminish the effectiveness of the filtration and can accelerate the degradation of the membrane.
- Water hardness should not exceed 10 grains per gallon or 170 parts per million.
- Operating above this may shorten the membrane life.
- Reverse osmosis-filtered water should not be run through a copper tube.
- The pure RO water can leach copper from the pipe, eventually leading to holes in the pipe.
- DO NOT operate the unit unattended.
WATER SUPPLY INSTALLATION
This Aquatic Life RO Buddie includes two options for easy connection to a water supply.
Option 1
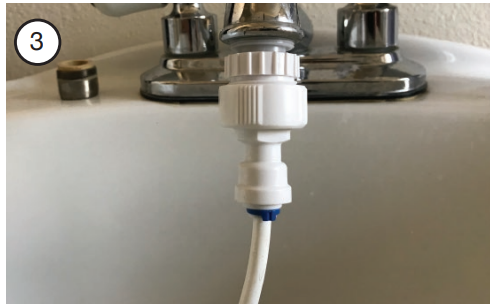
Connect to a standard water faucet (often found on the exterior of houses, utility sinks, and washing machines) with the hose bib connection.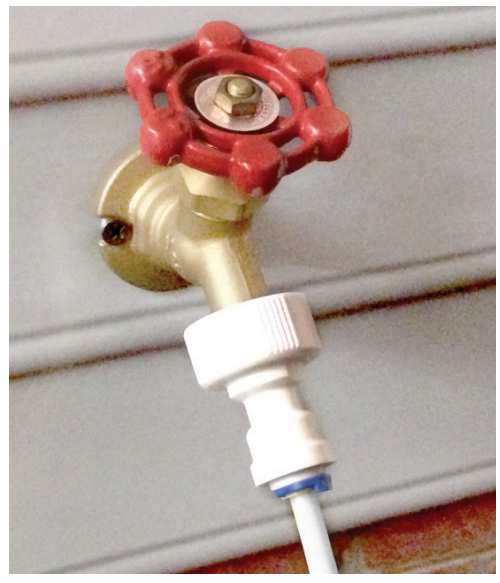
- Option 2
Your RO Buddie includes a special adapter that will connect to most kitchen and bathroom faucets.
To installRemove the existing aerator on the sink faucet.
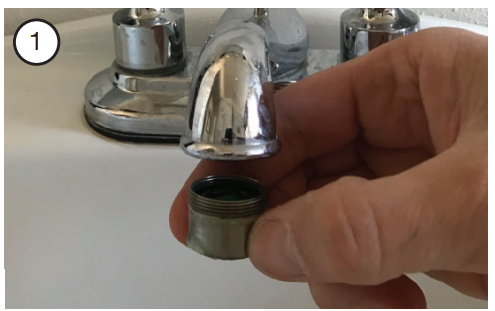
Thread in the two-piece sink faucet adapter.
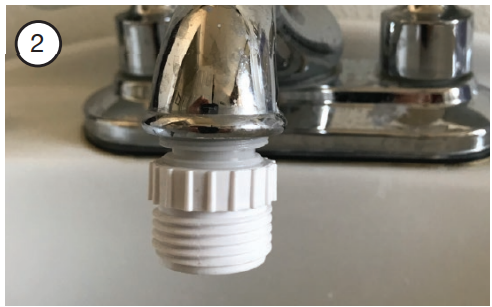
Attach the hose bib connection to the other end of the sink faucet adapter.
MOUNTING THE RO BUDDIE
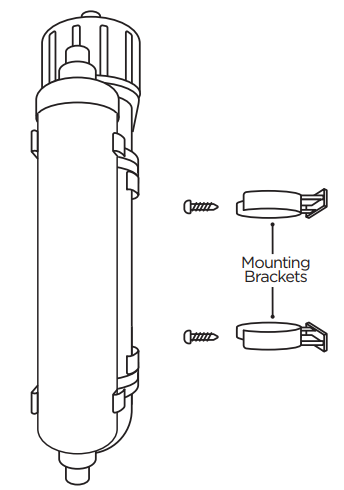
The Aquatic Life RO Buddie unit can be mounted to a secure surface. Plastic brackets with screw holes are provided. Use screws designed for the type of surface that the RO unit will hang on.
TIP: The RO Buddie can operate in a vertical or horizontal position.
USING THE BUDDIE FIT™ PRESS FITTINGS
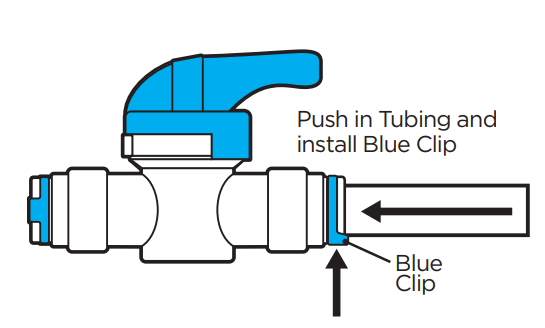
- Remove the blue clip from the press fitting.
Cut tubing evenly and not at an angle.

Push the tubing into the fitting. You will hit the first stop. The tubing is still not secured properly. Push the tubing a second time and you will feel the tubing insert completely (5/8") into the press fitting.
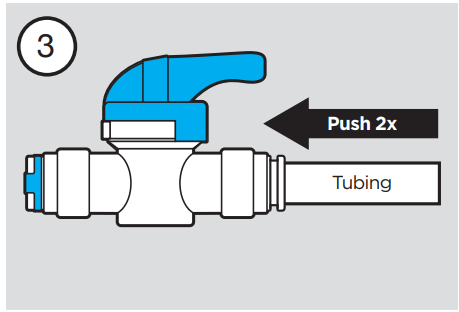
- Pull back on the tubing to ensure it is secure.
Insert the locking blue clip back onto the press fitting.
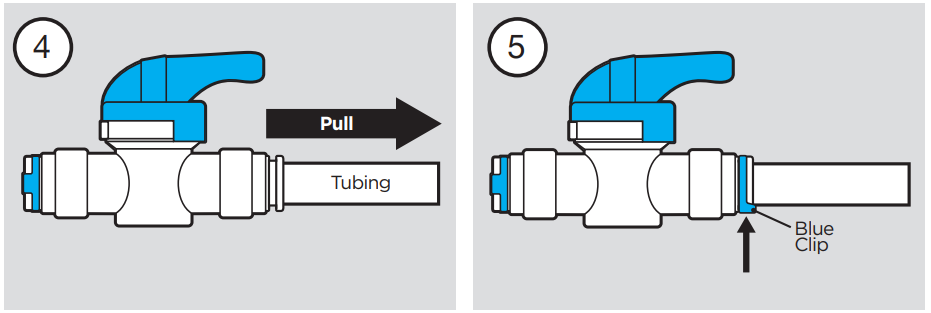
NOTE: To remove a piece of tubing, remove the blue clip and press down on the collet where the tubing enters the fitting. While the collet is depressed, remove the tubing from the fitting.
CONNECTING TUBING
IMPORTANT: Review the section titled “Using the Buddie Fit™ Press Fittings (previous page) before continuing installation.
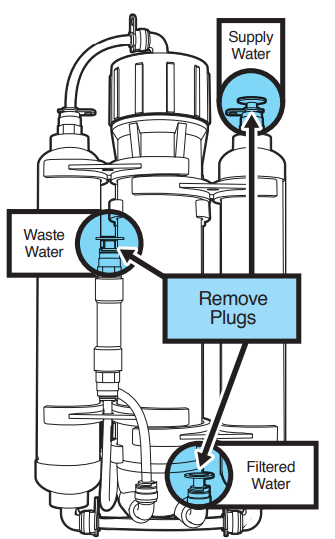
- Remove the shipping plugs from the supply water, filtered water and wastewater connectors.
- Remove the blue clips from the press fittings.
- Connect a piece of the ¼" tubing between the faucet adapter and the supply water connection on the top of the sediment cartridge.
- Connect a piece of the ¼" tubing to where the water exists the flow restrictor. This is the wastewater to be discarded.
- Connect a piece of the ¼" tubing to the remaining port at the bottom of the RO membrane housing. This is the filtered water. This line should be run to your water collection container.
- Install the blue clips on all press fittings when finished.
NOTE: We recommend cutting the tubing with a razor blade or something similar, so the tubing is not pinched. If the tubing is pinched, it will not seal properly. All tubing connections will have a “double push” into the connectors. You should feel a two-step insert to verify the tubing is inserted completely into the connectors.
FLUSHING THE CARBON CARTRIDGE
- With both filtered water and wastewater lines in the drain, turn on the water supply.
- This will flush the filter cartridges prior to installing the membrane and extend the membrane's life. Flush for 5 minutes or until the water is clear coming from the filtered
water line and the wastewater line. After the water runs clear, turn off the water supply
and allow the RO Buddie to drain.
INSTALLING THE RO MEMBRANE
- Remove the tubing attached to the elbow fitting on top of the RO membrane, remove the blue clip, depress the collet around the tubing and remove the tubing.
- Unscrew the membrane housing lid from the membrane housing. Remove the membrane from the plastic bag and insert the membrane into the membrane housing.
- The membrane should be inserted so that the top of the plastic pipe in the membrane is flush with the top of the membrane housing.
Replace the membrane housing lid and tighten with the supplied wrench. Reattach the tubing and replace the blue clip to secure the tubing to the elbow connection on the membrane housing.
IMPORTANT: All RO membranes contain a preservative to keep them sterile. It is important to flush the preservative out of the membrane prior to using the filtered water.
FLUSHING THE RO MEMBRANE
All RO membranes contain a preservative to keep them sterile. IT IS IMPORTANT TO FLUSH THE PRESERVATIVE OUT OF THE MEMBRANE PRIOR TO USING THE FILTERED WATER. Turn on the water to the RO Buddie and allow the unit to run 30 minutes. Discard all the water from the first 30 minutes of operation. IF YOU ARE USING THE RO BUDDIE WITH THE DEIONIZATION RESIN, DO NOT CONNECT THE RESIN CARTRIDGE UNTIL THE MEMBRANE HAS BEEN FLUSHED.
INSTALLING THE DEIONIZATION CARTRIDGE (MODEL # 540019)
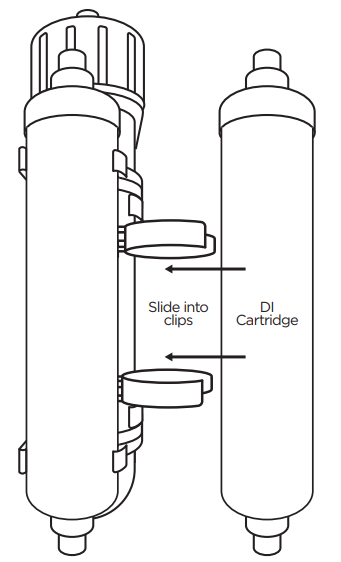
- The color-changing mixed bed resin DI cartridge will absorb the remaining TDS not filtered by the membrane. By adding a DI cartridge to the RO Buddie, you can produce zero TDS water. When mixed bed resin is new, it is a blue-green color. When it gets wet it will change a dark blue color. When the medium is spent it will change to a light brownish tan color.
- With the preservative flushed from the new Membrane, it is now OK to connect the filtered water line to the bottom of the DI Cartridge.
- Use the included clips to connect the DI cartridge to the front of the RO membrane housing.
RO BUDDIE FILTER BASICS
- The membrane does most of the work by removing up to 95% of the TDS from your water. The other two included filters protect the membrane from the many malicious elements that shorten its life. The sediment cartridge removes suspended particles larger than 1 micron (15 times smaller than a mold spore). The carbon block removes chlorine. Timely replacement of the cartridges will increase the membrane’s life.
- The carbon cartridge is the most important cartridge to change frequently. The carbon cartridge can filter about 1,500 gallons of water before being replaced IF your chlorine level is 1 ppm. With a 2 ppm you should get 750 gallons of filtered water before needing to change, with a 3 ppm you should get 500 gallons, and so on. Any chlorine not absorbed by a spent carbon cartridge will break down your Membrane, thus greatly shortening its life.
- The 1,500-gallon threshold is TOTAL water that passes through the unit. The RO Buddie has an average rejection ratio of 1:3.5. That means for every 1 gallon of good water produced you will reject 3.5 gallons for a total of 4.5 gallons of water passed through the unit. At 1 ppm of chlorine, you can make about 400 gallons of good water before changing the carbon cartridge, 2 ppm you can make about 200 gallons, 3 ppm you can make about 133 gallons, and so on.
- When the sediment cartridge needs to be changed, the production of water will be reduced. Even with reduced water production, the cartridge will not allow anything larger than one micron to pass through the chamber. On average the sediment cartridge should be changed at every other carbon change.
- With proper filter changes, the membrane could last up to two years. The membrane’s water production rating is based on 77°F water at 65 PSI. Any deviation from this will affect the water production. Reference the conversion table at right. You will notice that the warmer the water, the better the production. It is not advised that you introduce water from your water heater to increase water temperature. The membrane cannot handle temps over 100°F.
Temperature Correction
| Temperature F/C | Correction Factor |
|---|---|
| 50/10 | 0.58 |
| 60/16 | 0.73 |
| 70/21 | 0.87 |
| 77/25 | 1.00 |
| 80/27 | 1.06 |
| 90/32 | 1.23 |
| 100/38 | 1.45 |
Pressure Correction
| Pressure PSI | Correction Factor |
|---|---|
| 10 | 0.17 |
| 20 | 0.33 |
| 30 | 0.5 |
| 40 | 0.67 |
| 50 | 0.83 |
| 65 | 1 |
| 70 | 1.17 |
| 80 | 1.33 |
TIP: To make more water with your 50 GPD RO Buddie, you can install a 100 GPD Membrane, but you also need to change the 450cc Flow Restrictor to a 800cc Flow Restrictor. (800cc Flow Restrictor Part #9000704)
UNIT MAINTENANCE
- Recommended change 3-6 months or 2,500 gallons total or 650 gallons of filtered water
- Sediment Filter Cartridge (Item # 330249)
- Carbon Block Cartridge (Item # 330250)
- 12-24 Month Maintenance
- RO 50 GPD Membrane Cartridge (Item # 330084)
- RO 100 GPD Membrane Cartridge (Item # 330093)
- As Required – By Visible Color Change
Deionization Color Changing Resin Cartridge (Item # 330242)
NOTE: The life span of the filter cartridges, including the membrane, are dependent on multiple factors. These include the quality of the incoming water supply (TDS levels, chlorine, etc.) as well as the amount of use. Our recommended replacement intervals are based on average usage.
Troubleshooting of Aqualife 540019
Common problems with the Aqualife 540019 include leaks, low water pressure, and a lack of water flow. To troubleshoot these issues, follow these steps:
- Check for loose connections and tighten as needed.
- Check the filters and replace them if they are clogged or dirty.
- Check the automatic shut-off valve and make sure it is functioning properly. Check the drain saddle and make sure it is properly secured.
Warnings: Do not use the RO Buddie system for anything other than drinking water. - Do not modify the system in any way. * Do not use harsh chemicals to clean the system.
- Leaks at the threaded connection
If once installed the unit should leak, use plumbers tape on the threaded fitting. Typically, no more than three wraps will be required to seal the connection. - Leaks at the tubing connections
The fittings on the RO Buddie use an
o-ring inside of them. This will require the tubing to be inserted past the o-ring. You will want to make sure that when inserting the tubing you feel the initial stop when the tubing first meets the o-ring and a second stop when you push past the o-ring and meet the end inside the fitting. This is what we call the “double push”. Also, make sure to cut the tubing with a razor or similar object so that the tubing is not pinched and causes the tubing to not seal properly. - No water production
Make sure the water supply is turned OFF. Remove the tubing from the elbow on top of the membrane housing, direct the tubing into a container and turn on the water. Does the water flow quickly through the cartridges? If not, the cartridges likely need to be changed.
• Low-filtered water production
The RO membrane is rated to produce the stated volume of water based on 65 PSI and a 77° F water supply. If you have one or both specifications out of tolerance, use the Temperature and Pressure correction factors from charts on the previous page.
TIP: Tubing should insert 5/8" inside the Press Fitting when property is installed.
WARRANTY OF Aqualife 540019
Lifetime Products LLC warrants that this Reverse Osmosis/ Deionization Unit (excluding cartridges and membrane) shall be free from defective components and leaks or cracks due to defects in materials or workmanship for a period of one (1) year from the date of purchase.
Pros & Cons of Aqualife 540019
Pros
- 5-stage filtration process
- Compact design
- Easy to install and maintain
- Automatic shut-off valve
- Filters out over 1,000 contaminants
Cons
- May not fit in all under-sink spaces
- Filters may need to be replaced frequently
Faqs
What is the RO Buddie 540019 Aqualife product?
How should the Aqualife RO Buddie 540019 be installed?
How much upkeep is necessary for the RO Buddie 540019?
Can I drink water from the Aqualife RO Buddie?
How much water does the Aqualife RO Buddie 540019 produce?
How can I file a claim under warranty for my Aqualife RO Buddy?
If the RO Buddie 540019 isn't generating clean water, what should I do?
How can I tell when to replace my RO Buddie's filters?
What is the best place to purchase the Aqualife RO Buddie 540019?
Exists a warranty for the Aqualife RO Buddie 540019?
Leave a Comment