
Setup: Ariete Air Fryer+Oven 4629/1 User Manual
Content
Ariete Air Fryer+Oven 4629/1
Introduction
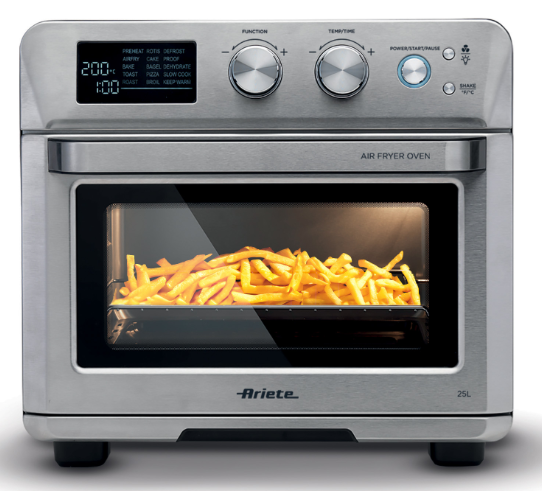
The Ariete Air Fryer+Oven 4629/1 is a versatile kitchen appliance designed to combine the convenience of an air fryer with the functionality of a spacious oven. With a large 25-liter cooking chamber, it enables you to prepare a wide variety of dishes, including fried fish, meats, croquettes, pizzas, chips, and breaded foods, using minimal oil, making meals healthier without sacrificing taste. This appliance is ideal for families and those who enjoy hosting gatherings, thanks to its generous capacity that supports cooking for multiple people at once.
Equipped with a digital display and a range of 15 pre-set cooking programs, this air fryer oven offers precision and ease of use, from preheating and air frying to roasting, grilling, and rotisserie functions. Its maximum temperature reaches up to 230°C, ensuring even heat distribution and a crispy finish with the help of high-speed 360° hot air circulation. The product typically falls within a price range of approximately $265 to $420, depending on the retailer and region, and is widely available through online platforms and specialized kitchen appliance outlets.
Whether you're a busy professional, a health-conscious cook, or a culinary enthusiast, the Ariete Air Fryer+Oven 4629/1 caters to diverse cooking styles and offers a multifunctional solution that replaces several kitchen devices, optimizing space and efficiency.
Specifications of the Ariete Air Fryer+Oven 4629/1
- Capacity: 25 liters, suitable for large batches and family meals
- Power: 1700 watts for efficient and fast cooking
- Temperature Range: Adjustable up to 230°C for versatile cooking
- Cooking Functions: 15 automatic programs including air frying, baking, roasting, grilling, rotisserie, defrosting, proving, drying, slow cooking, pizza function, and more
- Heating Methods: Grill, hot air convection, top and bottom heat
- Controls: Digital display with buttons and rotary knobs for timer, temperature, and program selection
- Accessories Included: Rotisserie set, rotating basket, baking tray, grill grid, roasting rack, crumb tray
- Dimensions: 43 cm width × 40.5 cm depth × 39.5 cm height
- Weight: Approximately 9.5 kg
- Unique Features: Interior light for monitoring cooking progress, multiple cooking modes for diverse meal preparation
- Comparison: Compared to similar air fryer ovens, the Ariete 4629/1 stands out for its large 25L capacity and 15 cooking presets, whereas many competitors offer smaller capacities and fewer presets
Setup Guide for the Ariete Air Fryer+Oven 4629/1
Setting up your Ariete Air Fryer+Oven 4629/1 is straightforward, allowing you to start cooking with minimal delay.
- Unpack all components carefully, including the main unit, baking tray, grill grid, roasting rack, rotisserie set, rotating basket, and crumb tray.
- Place the appliance on a flat, heat-resistant surface with adequate ventilation around it.
- Connect the power cord to a compatible electrical outlet (230V recommended).
- Familiarize yourself with the control panel: use the rotary knobs and buttons to set temperature, timer, and select one of the 15 presets or manual modes.
- Insert the desired accessory (e.g., basket for air frying or baking tray for roasting) into the oven chamber.
- For rotisserie cooking, securely attach the rotisserie set and ensure it is properly locked in place.
- Use the digital display to preheat the oven if required; the appliance signals when the set temperature is reached.
- Start cooking by selecting the appropriate function and adjusting time and temperature as needed.
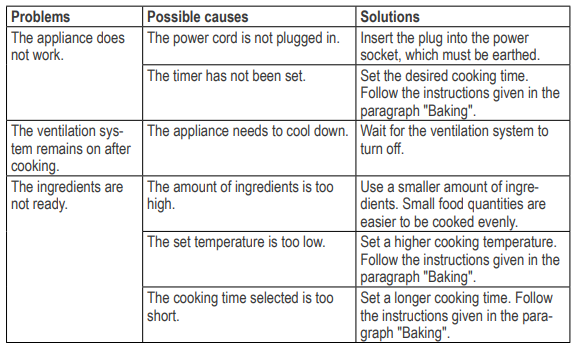
Troubleshooting Tips: If the appliance does not power on, verify the power connection and outlet. For uneven cooking, ensure accessories are properly positioned and not overloaded.
Safety Precautions: Avoid placing the unit near water or flammable materials. Allow the oven to cool before cleaning. Use oven mitts when handling hot accessories. Never immerse the appliance in water.
DESCRIPTION OF THE APPLIANCE
- Body of the appliance
- Door
- Handle
- Power cord
- Cooking compartment
- Air intake
- Crumb tray
- Left motorized support
- Right support
DESCRIPTION OF THE ACCESSORIES (FIG. 1)
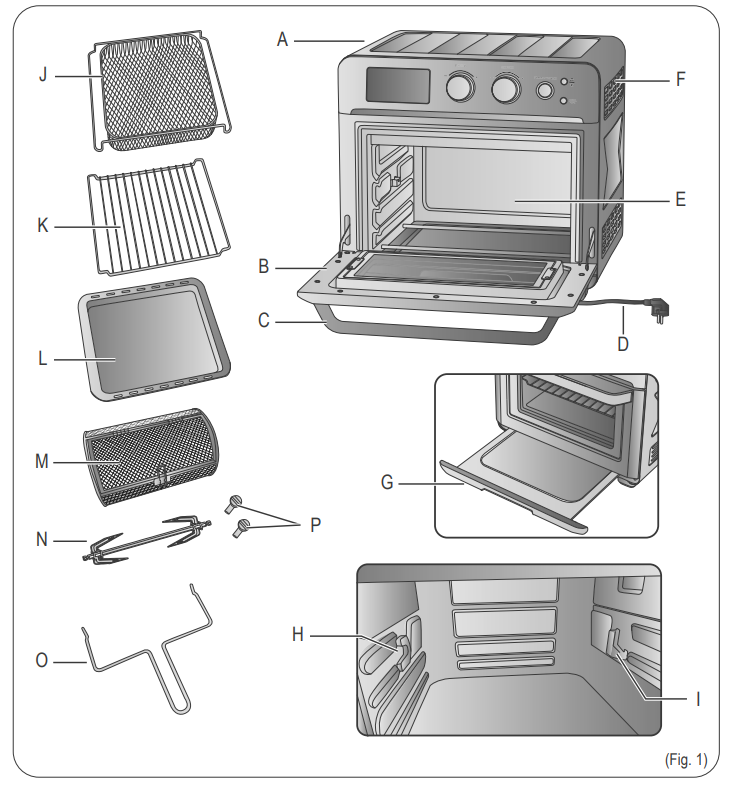
- Grid pan
- Grill
- Drip pan
- Basket
- Spit with rotisserie forks
- Removal fork
DESCRIPTION OF THE CONTROL PANEL (FIG. 2)
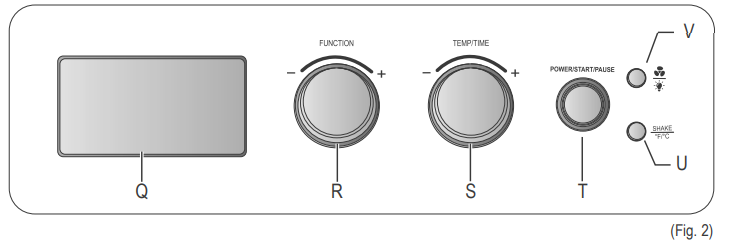
- Display
- FUNCTION knob
- TEMP/TIME knob
- POWER/START/PAUSE button with indicator light
- SHAKE/OF-OC button
- Ventilation and interior light activation button
Setting the unit of measurement
The appliance allows you to choose the temperature unit of measurement between °F and oc. The unit of measure in oc is active by default.
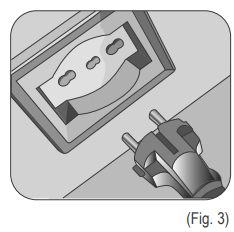
Plug the appliance into the power outlet (Fig. 3).
Press the POWER/START/PAUSE button (T) to turn on the appliance (Fig. 4)
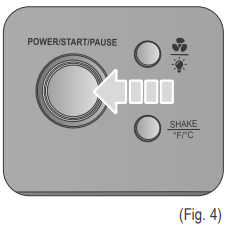
The indicator light of the POWER/START/PAUSE button (T) turns on.
Press and hold the SHAKE/OF-OC button (U) for 2 seconds (Fig. 5).
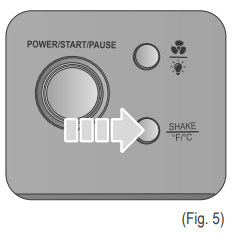
The appliance changes the default unit of measurement.
Repeat the procedure the change the setting.
INSTRUCTIONS FOR USE
Before cooking
When using the appliance for the first time, you may notice the release of a slight smell and a little smoke: this is to be considered perfectly normal because some parts have been slightly lubricated, and it will stop occurring after a short time. This will have no effect on the operation of the appliance.
Warning!
- Danger of breaking the door glass. Do not pour water or other liquids on the door glass when it is hot.
- Do not place objects on the appliance door when it is open.
- Before putting the appliance into operation, check that the accessories and the cooking compartment are free from foreign objects.
- Before cooking food, always remove any containers or packages (for example, bottles, boxes).
Insert the crumb tray (G) into the specific compartment (Fig. 6).
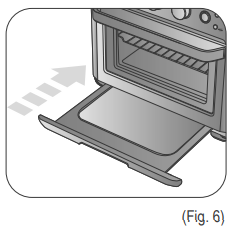
Check the correct insertion.
Baking
Place the food to be cooked into the chosen accessory.
To choose the most suitable accessory according to the food to be cooked, refer to the paragraph "Pre-set cooking programs". More than one accessory can be placed in the compartment at the same time to cook more food (Fig. 7).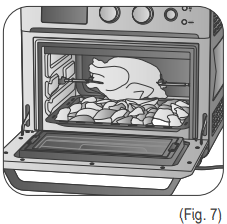
Do not overload the accessories with an excessive quantity of food. Follow the instructions on the maximum quantities given in the paragraph "Pre-set cooking programs".
Warning!
Never add liquid ingredients to the drip pan. If necessary for cooking needs, add small quantities of liquid. Always check that the liquid has been absorbed by the solid ingredients before adding more.
If you need to add cooking oil, place an aluminium foil on the chosen accessory and another aluminium foil to cover the food to be cooked. This will prevent hot oil from splashing on the resistance of the cooking compartment.
If you are using the grill or the grid pan for cooking food, also insert the drip pan on the lowest level of the cooking compartment to collect the fat. To avoid fumes, bad smells, and encrustations, pour a little water into the drip pan.Open the door (B) (Fig. 8).
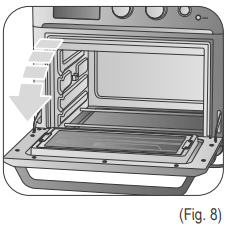
Insen the chosen accessory into the compartment (E) (Fig. 9).
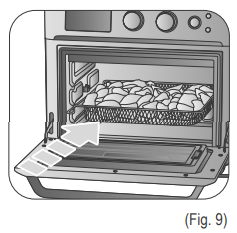
Place the chosen accessory so that the food is at a distance of at least 2 cm from the resistances located in the upper part of the cooking compartment.
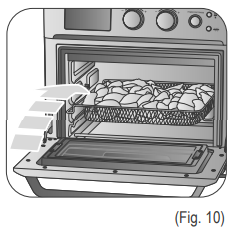
Close door (B) (Fig. 10)
- Plug the appliance into the power outlet (Fig. 3).
- Press the POWER/START/PAUSE button (T) to turn on the appliance (Fig. 4). The indicator light of the POWER/START/PAUSE button (T) starts flashing.
Turn the FUNCTION knob (R). Select a pre-set cooking program, depending on the type of food to cook (read the paragraph "Pre-set cooking programs" for program details). Press the FUNCTION knob (R) to confirm the selection (Fig. 11).
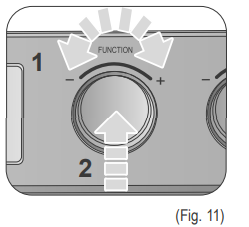
The chosen cooking program lights up on the display.
Each preset program has a default cooking time, but it is possible to manually set the temperature and time:
Press the TEMP/TIME knob (S) once. TIME starts flashing. Turn the TEMPITIME knob (S) to set the cooking time (Fig. 12).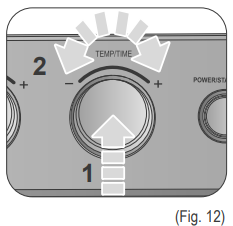
Press the TEMPITIME knob (S) a second time. TEMP starts flashing. Turn the TEMP/TIME knob (S) to set the cooking temperature.
Press the TEMPITIME knob (S) one last time to confirm the selection.Press the POWER/START/PAUSE button (T) (Fig. 4). The appliance starts to cook food. The indicator light of the POWER/START/PAUSE button (T) turns on steadily.
While cooking, the display (Q) shows the decreasing time and the set temperature.
If not present, ventilation can be activated during the cooking process. Press the ventilation and interior light activation button (V) (Fig. 13).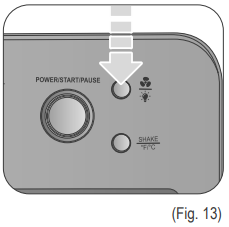
Press the button again to deactivate the ventilation.
Using the rotisserie (N)
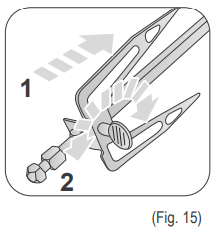
Place one of the forks on the spit of the rotisserie. Check that the two tips of the fork are pointing inwards. Screw the locking screw (P) to secure the fork to the spit (Fig. 15).
- Tie the meat to be cooked with twine and stick it on the fork on the spit. Check that the meat is well-centred.
- Place the other fork on the spit. Check that the two tips of the fork are pointing inwards. Screw the locking screw (P) to secure the fork to the spit (Fig. 15). If necessary, slightly unscrew the locking screws to properly centre the meat on the spit. Screw back the locking screws.
Insert one end of the spit into the seat located in line with the left motorized support (H) (Fig. 16).
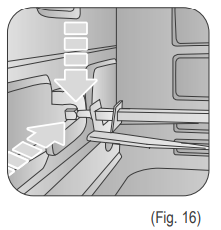
Insert the opposite end into the seat located on the right support (l) (Fig. 17).
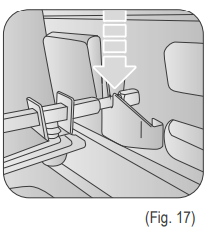
- Proceed with cooking the food as described in the paragraph "Baking".
After cooking, use the removal fork (O) to remove the spit from the cooking compartment (E) (Fig. 18).
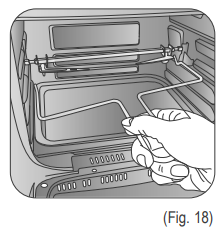
Using the basket (M)
Unscrew the locking screws (P) of the rotisserie. Remove the forks from the rotisserie spit (N) (Fig. 19)
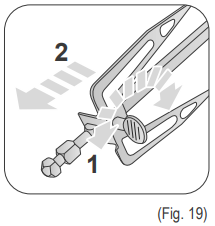
Insen the basket (M) on the rotisserie spit (N). Screw the locking screws (P) to the two ends of the basket (M) to secure the basket to the spit (Fig. 20).
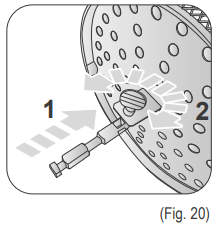
Lift the hook to open the basket (Fig. 21).
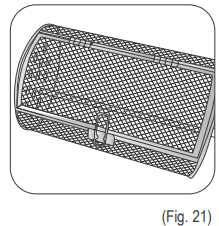
Place the food into the basket (Fig. 22).
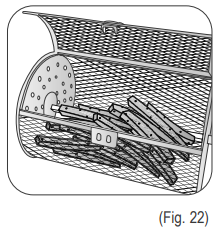
- Close the basket hook (Fig. 21).
- Proceed with cooking the food as described in the paragraph “Baking.” The basket (M) rotates automatically during cooking only if one of the preset cooking programs , AIR FRY, ROTIS, or DEHYDRATE, has been selected. Basket rotation is not available for the other preset cooking programs.
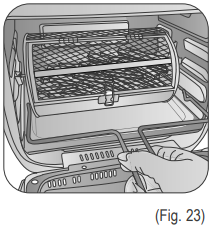
After cooking, use the removal fork (O) to remove the spit from the cooking compartment (E) (Fig. 23)
After cooking
- When cooking is complete, the appliance beeps once and turns off after 5 minutes. If the ingredients are not ready, place the accessory containing the ingredients back into the cooking compartment and set the timer to a few more minutes. Alternatively, you can manually stop the cooking process. Press and hold the POWER/START/ PAUSE button (T) (Fig. 4) for 3 seconds. The appliance stops the cooking process.
- Disconnect the power cord from the power outlet.
- Open the door (B) (Fig. 8).
Warning!
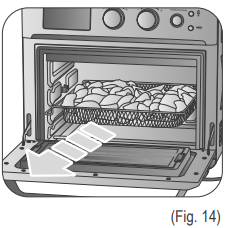
Always grasp the handle to open the appliance door. Remove the chosen accessory from the cooking compartment (E) (Fig. 14).
Warning!
When you open the door, or when you remove the accessories from the cooking compartment, hot air and steam also come out. Keep your hands and face away from the cooking compartment.
Use pot holders or tea towels to remove the crumb tray or the accessories. Do not touch the cooking compartment, the crumb tray, the accessories, and the internal metal pans of the appliance when the appliance is operational or in the minutes following its shutdown. Wait for the cooling of the hot parts.- Put the food on a plate. Serve out.
Warning!
Do not use metal utensils to remove food from the accessories. Remove the crumb tray (G) (Fig. 24).
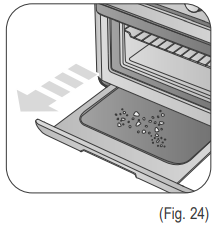
Empty and clean the crumb tray (G ofm any food residue or crumbs.
PREPARATION TIPS
- Pre-heating the appliance before cooking food optimizes the final result.
- The smaller ingredients require a shorter cooking time compared to the bigger ingredients.
- A larger amount of ingredients requires a slightly longer preparation , time,e while a smaller amount requires a slightly shorter time.
- Stirring the smaller ingredients while optimizing the final result and helps to distribute the ingredients evenly
For a crunchy result, add a tablespoon of oil to fresh or frozen potatoes (Fig. 25).
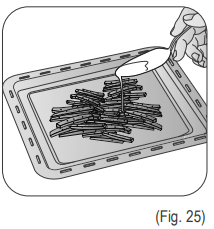
- The optimal quantity to obtain crunchy fries is about 700 g.
- Use ready-made doughs to prepare stuffed snacks quickly and easily. Moreover, ready-made doughs are faster than the homemade ones.
- Do not cook too fatty foods.
- You can use the appliance to reheat cooked food. Set the temperature to 150 '°C for 10 minutes.
- To air fry food using the AIRFRY pre-set cooking program, set higher temperatures for foods that cook faster (for example, bacon and fries). Set lower temperatures for foods that cook more slowly (for example, breaded chicken).
CLEANING AND MAINTENANCE
Regular and daily cleaning maintains the appliance's efficiency and extends its life of the appliance
Warning
Danger of electric shock. Never immerse the appliance, the plug, or the power cord in water or other liquids.
Warning!
Unplug the applianæ from the power outlet and wait for the hot parts to cool down before carrying out any cleaning and maintenance operations.
Warning!
- Do not use abrasive cleansers or metal tools to avoid scratching and damaging the coating.
- Never use solvents that damage plastic parts.
- Danger of material damage. Do not leave acidic substances on metal surfaæs_ Acid substances such as lemon juice, tomato purée, vinegar , and the like, if left on for a long time, affect the enamel, making it opaque.
Cleaning the appliance
- Clean the fixed parts of the appliance using a non-abrasive damp cloth to prevent damaging the wating_ Dry using a dry cloth.
- Clean the cmking compartment (E) of the applianæ using a non-abrasive cloth, soaked in warm water. Dry using a dry cloth.
- Clean the resistances with a dry cloth to remove residual of fod
- Remove the crumb tray (G) (Fig. 24). Empty and clean the crumb tray (G) of any food residues or crumbs.
Cleaning the accessories
The accessories are dishwasher-safe. Or use a common dish detergent and a soft non- non-abrasive sponge.
Troubleshooting Common Issues with Ariete Air Fryer+Oven 4629/1
- Appliance Not Powering On: Check the electrical connection and fuse; ensure the power button is pressed properly.
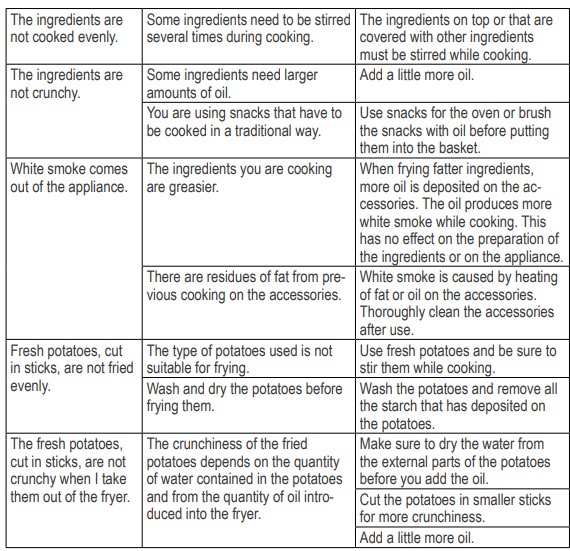
- Uneven Cooking or Undercooked Food: Avoid overcrowding the basket or tray; use recommended recipes and preset programs to optimize results.
- Display or Control Panel Malfunctions: Reset the appliance by unplugging it for a few minutes; if errors persist, contact customer support.
- Unusual Odors or Smoke: Clean crumb trays and accessories regularly; avoid cooking greasy or sugary residues without cleaning in between.
- Error Codes: Refer to the user manual for specific codes; common errors include overheating warnings or door-not-properly-closed alerts.
- Preventive Measures: Regular cleaning, proper placement, and use of only recommended accessories extend the appliance’s lifespan.
- Warranty & Support: Standard manufacturer warranty applies, typically covering one year; contact Ariete’s official customer service for repairs or replacements.
- Contact Information: For technical support, call Ariete customer service or visit their official website for assistance and authorized service centers.
Pros & Cons of the Ariete Air Fryer+Oven 4629/1
Pros
- Large 25L Capacity: Ideal for family-sized meals and entertaining guests.
- Multifunctionality: Offers 15 cooking modes, including air fry, bake, roast, grill, rotisserie, and more, replacing several kitchen appliances.
- Healthier Cooking: Requires minimal oil due to rapid air circulation technology for crispy, flavorful results.
- User-Friendly Controls: Digital display combined with rotary knobs simplifies program selection and precise cooking management.
- Accessories Included: Provides a rotisserie set, rotating basket, grill, and trays, enhancing cooking versatility.
Cons
- Size and Weight: At approximately 9.5 kg and sizable dimensions, it may require ample counter space, and is not suited for small kitchens.
- Price Point: Slightly higher priced compared to some compact air fryers, which may not suit all budgets.
- Limited Keep Warm and Reheat Functions: Unlike some competitors, it lacks dedicated keep warm or reheat programs.
- Learning Curve: New users may need time to familiarize themselves with 15 cooking presets and accessories.
Customer Reviews and Feedback on Ariete Air Fryer+Oven 4629/1
Customers praise the Ariete Air Fryer+Oven 4629/1 for its excellent cooking capacity and the ability to deliver crispy, well-cooked meals with less oil. The wide range of cooking functions and included accessories receive positive remarks for versatility and value. Many users appreciate the bright digital display and ease of temperature adjustments, making it convenient for everyday use.
Common complaints include the appliance’s size, which some find bulky for smaller kitchens, and a steeper learning curve when first using multiple preset functions. A few users note the absence of a keep warm feature as a minor drawback. Overall, it retains a strong star rating, averaging around 4 to 4.5 out of 5, with frequent recommendations for families and cooking enthusiasts seeking a multifunctional air fryer oven.
Faqs
How do I set up the Ariete Air Fryer+Oven 4629/1 for the first time?
Why is my Ariete Air Fryer+Oven 4629/1 not heating up properly?
Can I use the rotating basket and rotisserie at the same time in the Ariete Air Fryer+Oven 4629/1?
What are the best practices for cleaning the Ariete Air Fryer+Oven 4629/1 after use?
How do I achieve crispy results with the Ariete Air Fryer+Oven 4629/1?
Is the Ariete Air Fryer+Oven 4629/1 suitable for cooking frozen foods?
What accessories come with the Ariete Air Fryer+Oven 4629/1?
How can I prevent smoke and odors when using the Ariete Air Fryer+Oven 4629/1?
More ariete manuals
Leave a Comment