
How to Use: Ariete Easy Fry Air Fryer 4611 User Manual
Content
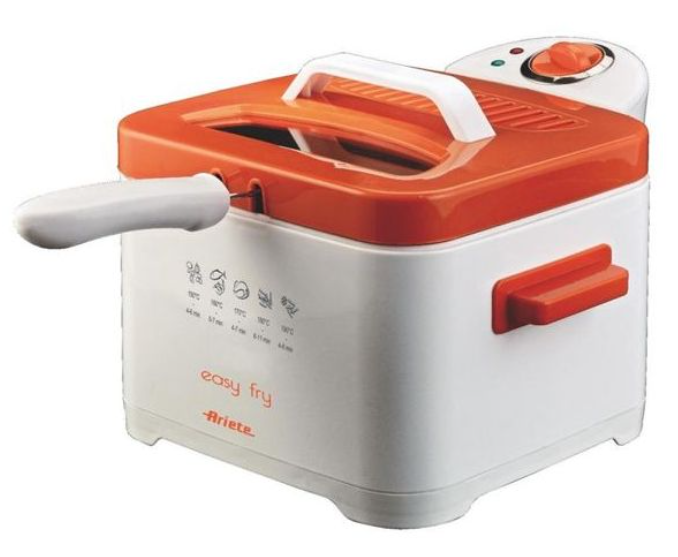
ariete Easy Fry Air Fryer 4611
Introduction
The ariete Easy Fry Air Fryer 4611 is a versatile kitchen appliance designed to make healthy, oil-free cooking effortless and fast. Utilizing rapid hot air technology, it crisps and cooks food evenly without the need for excessive oil, offering a healthier alternative to traditional frying methods. This air fryer is perfect for busy individuals and families who want quick, delicious meals without compromising on taste or quality.
Key benefits of the ariete Easy Fry Air Fryer 4611 include its large capacity suitable for cooking meals for 3-5 people, user-friendly digital controls with multiple presets, and an energy-efficient design that reduces cooking time. Its compact, sleek design fits well in modern kitchens, making it ideal for everyday use as well as for entertaining guests.
Targeted at health-conscious users and cooking enthusiasts looking for convenience, this air fryer excels in preparing a wide range of dishes—from crispy fries and roasted vegetables to grilled meats and baked goods. The estimated price range typically falls between €80 to €120, making it an affordable option compared to higher-end models, and it is widely available through major online retailers and kitchen appliance stores across Europe.
Specifications of ariete Easy Fry Air Fryer 4611
- Capacity: 4 liters, ideal for medium-sized families
- Power: 1400 Watts for quick and efficient cooking
- Temperature Range: 80°C to 200°C, adjustable for various recipes
- Timer: Up to 60 minutes with auto shut-off feature
- Control Panel: Digital touchscreen with multiple cooking presets
- Cooking Functions: Fry, bake, grill, and roast capabilities
- Safety Features: Cool-touch handle, non-slip feet, and overheat protection
- Accessories: Removable non-stick basket and drip tray for easy cleaning
Compared to similar air fryers in its class, the ariete Easy Fry Air Fryer 4611 offers a competitive capacity and power rating, balancing performance and space efficiency. It stands out with its intuitive digital interface and a range of preset cooking modes that simplify meal preparation.
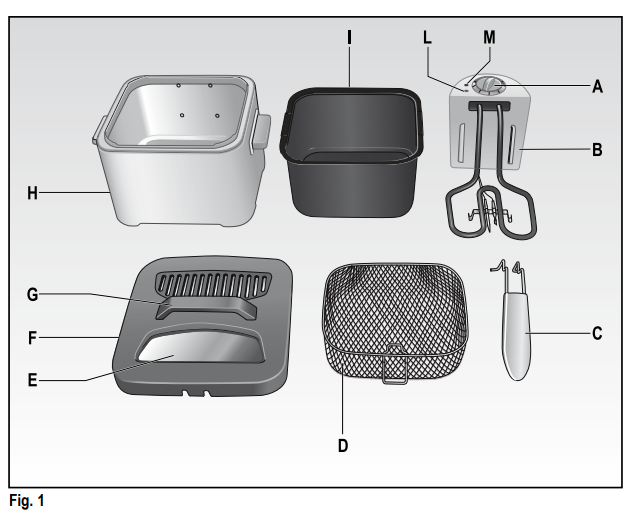
DESCRIPTION OF THE APPLIANCE (Fig. 1)
- Temperature selector
- Power unit
- Handle
- Basket
- Viewing window
- Lid with filter
- Lid handgrip
- Appliance body
- Tank
- Temperature light
- On/off light
INSTRUCTIONS FOR USE
- Before use, clean the basket (D), lid (F) and container (I) using a cloth with hot water and a mild detergent. Wipe the heating element on the power unit (B) clean with a damp cloth. Dry thor-oughly, making sure that no parts have any water residues.
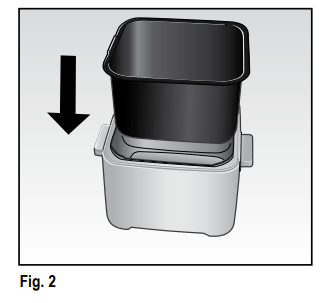
Insert the tank (I) into the appliance body (H), positioning the part with the references “MIN” (2 litres) and “MAX” (2.5 litres) so that it is at the back (Fig. 2).
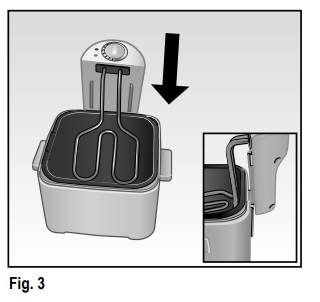
Position the power unit (B) in its housing inside the appliance body (H) so that the tabs slide into the relevant slots; press the unit down gently until it is locked into place (M) (Fig. 3).
- Fill the tank (I) with cooking oil, making sure that the oil level is between the “MIN” and “MAX” references.
- NOTE: Only use olive, corn or peanut oil, or a good quality lard. Never mix different types of oil or lard together or use butter or margarine, as this could cause smoke and also overspill from the appli-ance. If using lard, melt it beforehand over a low flame and in a different container and then pour it into the tank (I) in the fryer. Never melt fat directly inside the tank (I).
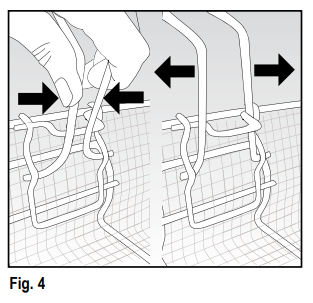
Fit the handle (C) to the basket (D), inserting the two handle pins into the housing on the basket (Fig. 4).
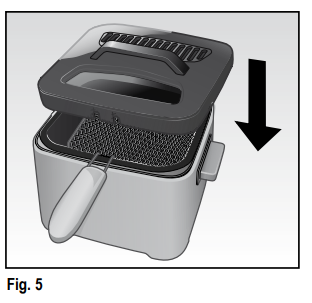
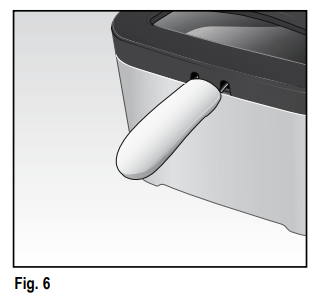
Immerse the basket (D) into the oil, resting the handle (C) on the appliance body (H) and then cover with the lid (F) (Fig. 5), using the relevant handgrip (G) and resting the slots over the handle (Fig. 6).
- Plug the appliance into the mains power. The On/Off light (M) will switch on.
- Set the required temperature according to the food being fried, using the special selector dial (A). The temperature light (L) will switch on.
- When the oil reaches the correct temperature and it is ready for frying, the temperature light (L) will switch off. The light may switch on and off during use to indicate that the fryer is maintaining the correct temperature.
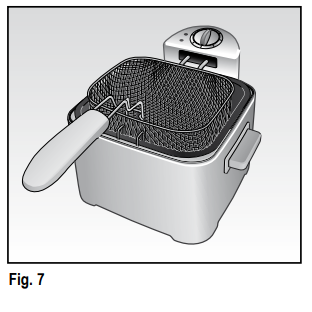
Remove the lid (F) using the special handgrip (G) and take out the basket (D), resting it on the edge of the appliance body (H) with the relevant hook (Fig. 7).
- Place the food for frying inside the basket (D) without overloading it and referring to the table below. Lower the basket and close the lid (F) as described previously.
- Look at the cooking time, which varies according to the food, in the table on the appliance body. Always check the cooking through the viewing window (E) on the lid (F).
- When the food is cooked, move the temperature selector (A) to “0”, unplug the appliance from the mains power and repeat the steps described above to raise the basket (D). Leave the oil to drain into the tank (I) before taking out the fried food.
IMPORTANT
- Before using the appliance, always make sure that all parts have been correctly assembled.
- Dry off any excessively wet foods before immersing them in the oil. Remove any excess ice from frozen foods before immersing them in oil by tapping the basket (D) on a sink bowl. Ice and/or water can cause boiling oil to splash.
- Take care not to come into contact with boiling oil.
CARING FOR YOUR APPLIANCE
IMPORTANT:
Before removing the parts from the appliance for cleaning, switch off the appliance, unplug it from the mains power and wait for the oil inside it to cool down.
Never place the power unit (B) in water or under running water from the tap.
- Take out the parts from the appliance body (H), and remove the handle (C) from the basket (D).
- Empty the oil from the tank (I) and dispose of it.
- Remove any residues from inside the tank (I) using a cloth or some kitchen towel.
- All parts, except the power unit (B), can be washed in hot water and are also dishwasher safe. Do not use abrasive sponges or detergents.
- Wipe the power unit (B) clean with a damp cloth.
- Dry all parts with great care.
- The permanent filter, which is part of the lid (F), is washable and will not need replacing.
HELPFUL HINTS FOR USE
CHOICE AND DURATION OF FATS
- We recommend using oil or fat that is able to withstand high temperatures.
- The fat must never be below the “MIN” level. If this happens while cooking, then top up with more.
- Filter the oil, when it is cold, after each use.
- The duration of the oil depends on its quality and on how often it is used. Coated foods, for exam-ple, make the oil dirtier than plain foods do.
- Oil that has been heated and reheated will deteriorate and therefore, we recommend replacing it completely on a frequent basis. Replace it if it smells unpleasant, if it gives off smoke when hot or when it is dark in colour.
THE RIGHT WAY TO FRY
- Cut foods into small pieces of the same size, so that they cook evenly.
- Dry foods perfectly. This will prevent oil spillage as well as helping oil to last longer.
- Coat water-rich foods with breadcrumbs or flour, making sure to shake off any excess before add-ing the foods to the fryer.
- Rinse potatoes in cold water and dry thoroughly before frying. This removes starch and prevents potatoes from sticking together while cooking.
- Drain any excess batter from coated foods before frying.
- Do not overfill the basket and if possible, fry half of the maximum recommended amount (see table below), otherwise the oil temperature will drop suddenly, making the foods very greasy.
- Fry foods at the right temperature (see table below). If too low, the food will absorb the oil and if too high, it will burn on the outside and remain uncooked in the centre.
- Only immerse foods when the oil has reached the right temperature.
- Do not leave fried foods to drain for too long as the steam from the fryer will make them lose their crispness.
- Only add salt to fried foods just before serving. Salt softens the outer coating.
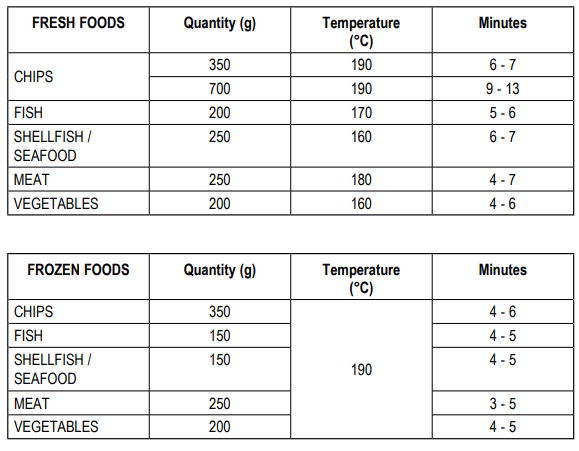
Cooking times and temperatures are intended as a guide. They will vary according to the amount of food and to personal taste. For frozen foods, follow the manufacturer’s instructions.
Troubleshooting for ariete Easy Fry Air Fryer 4611
- Air fryer won’t start: Confirm the basket is securely inserted and the unit is plugged in. Reset power if necessary.
- Uneven cooking: Avoid overcrowding the basket; shake or turn food halfway through cooking for best results.
- Error codes: If the device displays an error, power off and unplug for 10 minutes to reset. Consult the manual for specific codes.
- Unusual odors or smoke: Ensure no residual oils or food particles are inside. Clean the basket and tray thoroughly after each use.
Preventive measures include regular cleaning, avoiding metal utensils on non-stick surfaces, and not exceeding recommended cooking times and temperatures.
The ariete Easy Fry Air Fryer 4611 comes with a standard 2-year warranty covering manufacturing defects. For support, contact ariete customer service via their official website or authorized retailers.
Pros & Cons of ariete Easy Fry Air Fryer 4611
- Pros:
- Efficient 1400W power ensures fast cooking and crisp results
- User-friendly touchscreen with multiple presets simplifies operation
- Generous 4L capacity accommodates family-sized meals
- Easy to clean with removable, dishwasher-safe parts
- Compact design fits most kitchen counters without clutter
- Cons:
- Does not include advanced connectivity features like app control
- Some users report a learning curve with preset functions
- Temperature range might be limited for specialized cooking needs
- Value for Money: Offers strong performance for its price segment, making it a practical choice for everyday use compared to more expensive models with similar specs.
Customer Reviews of ariete Easy Fry Air Fryer 4611
Users consistently praise the ariete Easy Fry Air Fryer 4611 for its reliable cooking performance and healthy results. Many highlight the ease of use with preset programs and the even crispiness achieved without oil. Star ratings average around 4.3 out of 5, reflecting strong overall satisfaction.
Common complaints include occasional confusion with digital controls and the desire for a larger basket size. However, customers appreciate the prompt customer service and clear manual guidance. Many recommend it for those seeking an affordable, user-friendly air fryer for everyday meals.
Faqs
How do I set up the ariete Easy Fry Air Fryer 4611 for first-time use?
What should I do if the ariete Easy Fry Air Fryer 4611 is not heating properly?
Can I cook frozen foods directly in the ariete Easy Fry Air Fryer 4611?
What are the key features of the ariete Easy Fry Air Fryer 4611 that improve cooking performance?
Is the basket of the ariete Easy Fry Air Fryer 4611 dishwasher safe, and how do I maintain it?
Does the ariete Easy Fry Air Fryer 4611 require any special electrical requirements or voltages?
How can I optimize cooking times and temperatures when using the ariete Easy Fry Air Fryer 4611 for different foods?
What are the common problems users face with the ariete Easy Fry Air Fryer 4611 and their solutions?
More ariete manuals
Leave a Comment