
How to Use: Ariete Coffee Maker 1388A User Manual
Content
Ariete Coffee Maker 1388A
Introduction
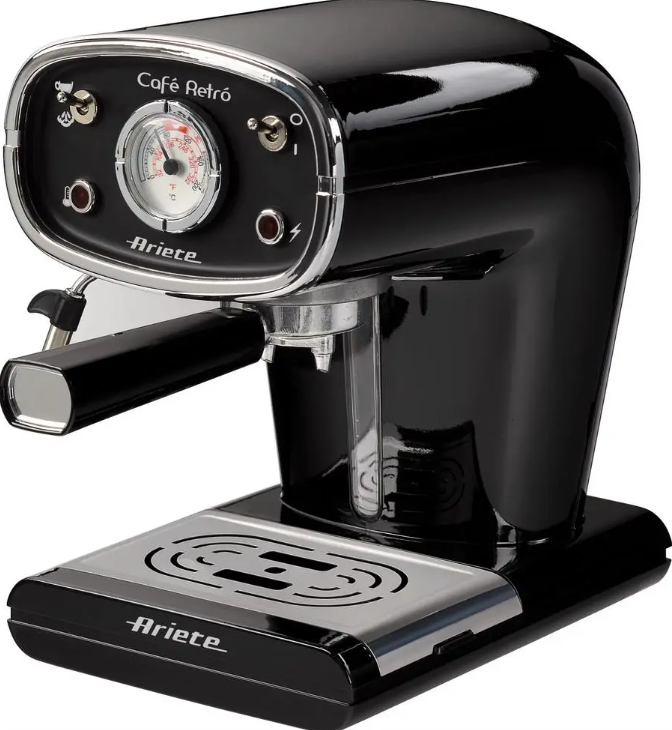
The Ariete Coffee Maker 1388A combines vintage aesthetics with modern espresso technology, making it an excellent choice for coffee enthusiasts who appreciate style and functionality. With its retro design and bold red finish, this machine adds a splash of elegance to any kitchen while delivering professional-quality coffee. It is engineered for users who want to enjoy authentic espresso-based beverages such as cappuccinos and lattes at home without the complexity of commercial machines.
Key benefits include a powerful 15-bar pressure pump that ensures optimal extraction of coffee flavours and an integrated milk frother for creamy, café-style drinks. Its intuitive control panel with dedicated buttons for coffee, steam, and power simplifies operation, making it ideal for both beginners and seasoned coffee lovers. The removable water tank and reusable filter enhance convenience and sustainability.
Targeted at home baristas, small offices, and casual coffee drinkers, the Ariete 1388A is suited for daily use, offering fast brewing with its 850-watt power consumption. Available through select retailers and online stores, its price range is typically moderate, making it a cost-effective entry into quality espresso brewing without sacrificing style or performance.
Specifications of the Ariete Coffee Maker 1388A
- Model: Ariete Coffee Maker 1388A
- Power Consumption: 850 Watts
- Pressure Pump: 15-bar pressure for optimal espresso extraction
- Water Tank Capacity: 1litrer, removable for easy filling and cleaning
- Material: Stainless steel with retro red finish
- Milk Frother: Built-in steam wand for frothing milk and creating cappuccinos
- Control Panel: Three-button interface for power, coffee brewing, and steam
- Filter Type: Reusable coffee filter suitable for ground coffee and pods
- Cup Capacity: Brews up to two cups simultaneously
- Dimensions: Compact size ideal for kitchen counters
Compared to similar espresso makers in its class, the Ariete 1388A offers a competitive balance between power and portability. Its 15-bar pump pressure matches that of many higher-end machines, while its retro aesthetics set it apart from more utilitarian models. This coffee maker's reusable filter and removable tank provide increased user-friendliness compared to machines with fixed components or single-use pods.
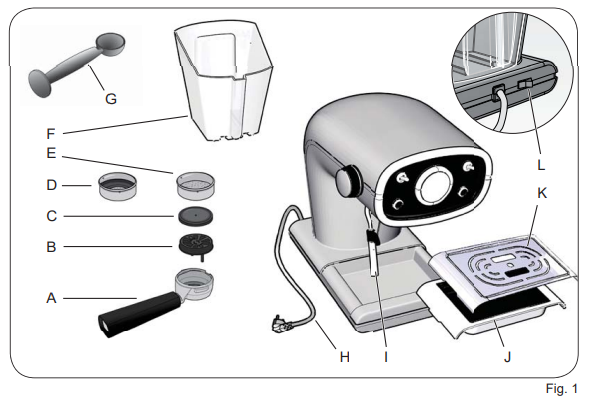
DESCRIPTION OF THE APPLIANCE
- Filter holder
- Drain pan
- Perforated silicone disc (Thermocream ®)
- 1 cup filter/pod
- 2 cup filter
- Removable water tank
- Coffee measure/presser
- Power cord + Plug
- Maxi Cappuccino attachment and wand for water and steam supply
- Drip basin
- Removable cups grill
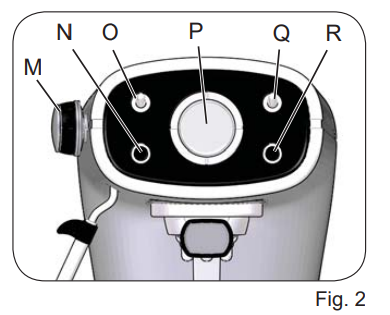
- On/Off button
- Steam dispensing knob
- Boiler temperature light
- Steam function switch
- Boiler temperature thermometer (C° and F°)
- Coffee dispensing switch
- On light
PRELIMINARY PHASES FOR USE
Starting the appliance
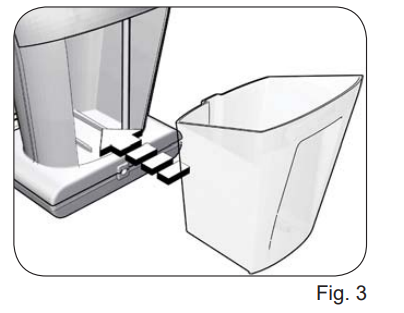
Check that the domestic mains voltage is the same as the voltage indicated on the label of the device. Then place the machine on a flat surface. Wash the tank when used for the first time and fill it with cool tap water (MAX 1 litre), and then carefully push it into its seat (Fig. 3). The suction tube must be inside the tank.
First start-up
- After filling the tank with cool tap water, plug it into the electrical outlet, which must be equipped with a grounding unit. Switch on the machine by pressing the button (L). Fig. 1. The light (R) will turn on to indicate that the machine is on.
- If you are starting the machine for the first time or after a period of time during which it has not been used, it is recommended that at least one cup of water be allowed to pass through the boiler's hydraulic circuit.
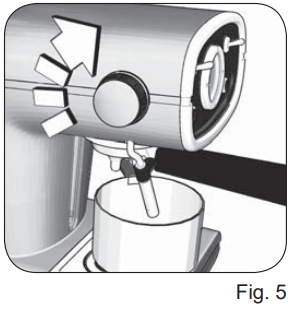
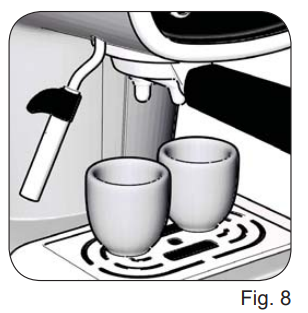
- Place a container with a capacity of at least half a litre under the coffee spout and the MaxiCappuccinoo device (Fig. 5). Put the switch (Q) on the coffee position (
 ). Wait for the water to come out from the coupling seat of the filter holder. Open the steam knob (M) and make water come out of the Maxi Cappuccino device.
 - Stop dispensing and setting the switch (Q) in the upper position. Close the steam knob. Wait for the light (N) to turn on. At this point, the coffee maker is ready to brew coffee.
HOW TO MAKE COFFEE
With powder coffee
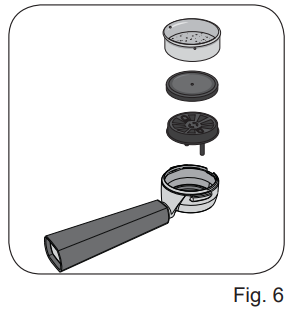
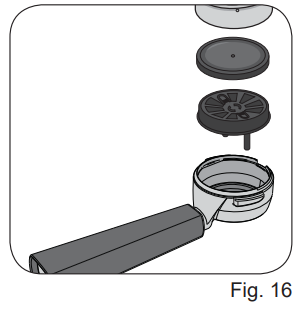
Insert the dripper (B), the perforated silicone disc (C) and the 2 cup (E) or 1 cup (D) filter, in the filter holder (A) (Fig. 6).
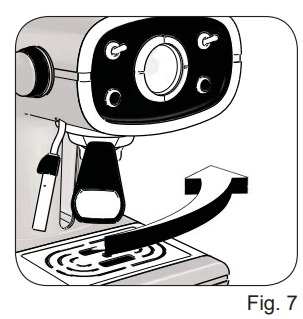
The perforated silicone disc can be inserted only in one direction on the dripper. Measure out the coffee in the filter and lightly press with the specially provided presser: for two coffees, completely fill two measuring units, while for one coffee,e fill only one. Insert the filter holder into its seat. Tighten it securely by turning it from left to right, making sure it is correctly fitted to the flange (Fig. 7).
- If too much ground coffee is put inside the filter, turning the filter holder may prove difficult and/or you may get leaks from the filter holder when the coffee is being dispensed.
- The filter ring should be preheated for a few minutes to ensure a nice, hot cup of coffee. This will not be necessary for the following coffees.
- Wait for the light (N) to turn on. Position the switch (Q) to coffee brewing (): coffee will flow from the spouts of the filter holder. Stop dispensing and setting the switch (Q) in the upper position. The minimum serving of coffee is 50 ml..
- When warming up, your appliance may release small puffs of steam from the filter holder; this is perfectly normal.
- The indicator light (N) will switch off and on periodically, showing the intervention of the boiler thermostat, which serves to maintain the best water temperature (around 100 °C / 210 °F for making coffee, and about 150 °C / 300 °F to dispense steam).
- When using the coffee maker for the first time and thereafter, it is best to begin brewing coffee only when the light (N) is on.
How to make coffee with pods
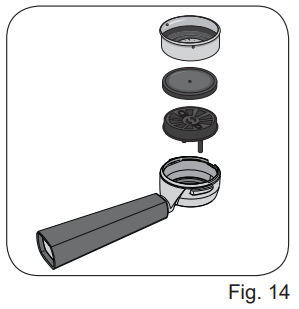
To make coffee with pods, it is necessary to install the 1 cup/pod filter (D), Fig. 14, supplied with the machine, as follows:
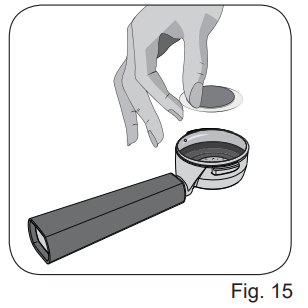
- Place the pod in the filter ring (Fig. 15).
- Push the pod with your fingers inward. The pod must be well-centred and placed inside the filter.
- Now it is possible to put the filter holder in its seat. Tighten the filter holder, making sure it is securely fitted to the flange (Fig. 7).
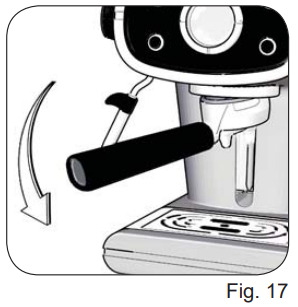
- The pod could remain stuck in the upper part of the machine after making the coffee, even when removing the filter holder. To remove it, tilt the filter holder (Fig. 17) so the pod can fall onto it.
- To always have a good coffee, you must purchase pods that show the E.S.E. compatibility mark. If the pod is not inserted well, or if the filter holder is not tightened firmly, a few drops of water could leak from the filter holder.
Auto-off function
- If the machine is turned on but not in use, the auto-off function operates after about 30 minutes.
- This function puts the machine in standby. The ON indicator light (R) is off. To restart the machine, press again the power button (L) again.
- Fill the water tank during use. No special operation is necessary when the water in the tank runs out, as the machine is equipped with a special self-priming device. Just unplug the machine, pull out the tank and fill it with fresh cool water again.
HOW TO MAKE CAPPUCCINO
- To prepare cappuccino, hot chocolate, or heat any other beverage, turn the switch (O) to the steam position () and wait that the indicator light (N) turns on to indicate that the boiler has reached the right temperature to dispense steam (about 150 °C / 300 °F).
- When warming up, your appliance may release small puffs of steam from the filter holder; this is perfectly normal.
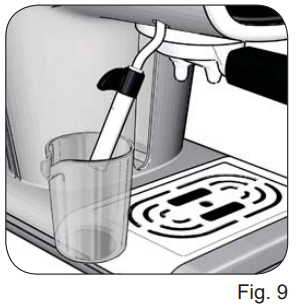
- Place a glass under the Maxi Cappuccino device (I). Turn the steam knob (M): at first, a little water will come out, immediately followed by a strong jet of steam.
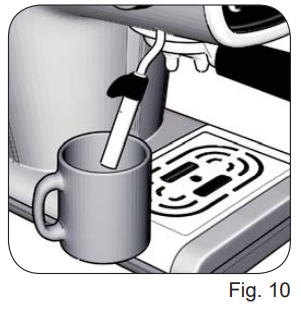
- Close the dispensing knob (M) to stop the jet of steam and put the pot of milk to be whipped under the Maxi Cappuccino device (Fig. 10). Plunge the wand all the way into the pot of milk and again open the steam dispensing knob (M) until you get the result you want. During these operations, you will see that the indicator light (N) turns on and off periodically, indicating the action of the thermostat, which maintains the proper temperature of the boiler for steam dispensing.
- It is opportune that you start dispensing the steam only when the lamp is on. After each use, dispense the steam for a few seconds to clear the outlet from any milk residue.
- Close the steam knob (M). After preparing the cappuccino, return the switch (O)ton the upper position to exclude the steam function.
MAKING FURTHER CUPS OF COFFEE
To prepare a cup of coffee right after making cappuccino, it is necessary to bring the boiler back to the coffee preparation temperature by performing these operations: return the switch (O) in the upper position to cool the boiler and wait that the light (N) goes out and comes on again. To cool the heating unit more quickly, proceed as follows: place a glass under the Maxi Cappuccino device (I). Turn the switch (Q) to position (); turn the steam knob (M): this will cause water to flow out, until the warning light (N) turns back off. Now close the steam dispensing knob (M) and return the switch (Q) in the upper position. Wait for the light (N) to turn on. The coffee maker is now ready to brew coffee again.
HOW TO MAKE TEA OR TISANES
After the steps described in chapter "Preliminary phase prior to use", place a cup under the Maxi Cappuccino device (1). Put the coffee switch (Q) in position (). Tum the steam knob (M); in this way, hot water will come out of the Maxi Cappuccino device. The maximum quantity for two cups is 200 ml.
TIPS TO ACHIEVE A GOOD ITALIAN ESPRESSO
The ground coffee in the filter holder must be pressed slightly. A stronger or weaker coffee depends on the coffee grinding level, on the quantity put into the filter holder and the pressing. A few seconds are required for the coffee to be dispensed into the cups. If the dispensing time is longer, this means that the coffee is ground too fine or that the coffee put into the filter holder has been pressed too much.
CLEANING THE APPLIANCE
Warning!
- All cleaning operations described below must be carried out with the machine off and with the plug disconnected from the outlet.
Warning!
- Regular maintenance and cleaning preserve and keep the machine efficient for a longer period of time. Never wash machine components in the dishwasher. Do not use direct jets of water.
Warning!
- Any intervention must be carried out with a cold machine.
Cleaning the coffee filters
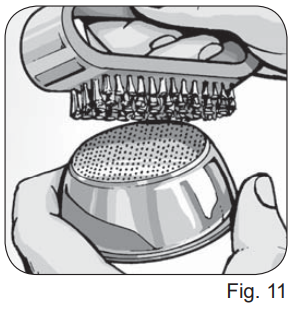
- Check that the holes are not clogged and, if so, clean them with a small brush (Fig. 11). Let boiling water flow from the filter holder with the filter inserted without the powder to dissolve or remove any coffee residue or impurities.
Warning!
- Remove and disconnect the filter holder slowly because any remaining pressure could cause splashes or sprays.
- It is advisable to thoroughly clean the filter about every 3 months using Ariete COFFEE CLEAN detergent tabs, which can be found at retail stores and the Authorized Service Centres, following the instructions inside the package. As an alternative, you can use a simple dishwasher detergent tab (without added rinse aid or other chemical additives as follows:
- Place a tablet of dishwasher detergent into the filter (without coffee) when the machine is very hot (at least 5 minutes after heating).
- Connect the filter holder to the machine and place a container under the filter holder.
- Put the switch (Q) in the coffee position ( ) to start dispensing water, then dispense water for 15-20 seconds.
- Stop the dispensing and let the tablet work for at least 15 minutes, keeping the filter holder inserted in the machine.
- Repeat the water dispensing operation, making the pump run for about 15-20 seconds,s and then let it rest for another 15-20 seconds until two tanks of water have been used.
- Remove the filter holder from the machine, remove the filter and rinse well under running water.
- Switch off the machine, unplug the power cord from the power outlet and wipe the filter holder hooking seat with a sponge to remove any detergent residue from the spray.
- Restart the machine, attaching the filter holder again and still dispensing at least 2 cups of water to complete rinsing.
- If the coffee machine is used daily, it is recommended to carry out the cleaning operation at least every three months.
Cleaning the silicone disc
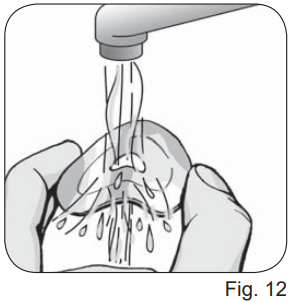
- Wash the silicone disc (C) under running water, bending it slightly on the sides in order to free the centre hole of any residue of coffee grounds that could clog it (Fig. 12).
Cleaning the filter holder seat
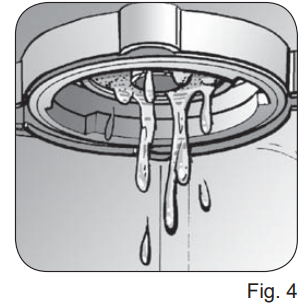
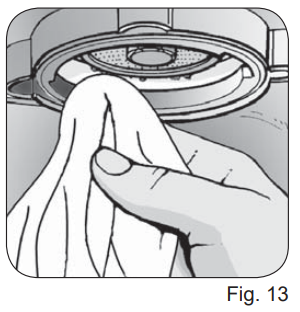
- With use, it may occur that in the filter holder seat there is a sedimentation of coffee grounds, which can be removed with a toothpick, a sponge (Fig. 13), or letting water run through without fitting the filter holder (Fig. 4).
Cleaning the Maxi Cappuccino device
WarningOperateon when the chrome-plated tube is cool to avoid burns. Unscrew the device (l) from the small pipe and wash it with running water. The small pipe can be cleaned with a non-abrasive cloth. Screw the cappuccino maker back on as far as it will go. If necessary, clean the small steam outlet hole again with a pin. After each use, dispense steam for a few seconds to clear the outlet of any residues.
Tank cleaning
- It is advisable to periodically clean inside the tank with a sponge or a damp cloth.
Cleaning the grill and the drip tray
- Remember to empty the drip tray from time to time (J).
- Remove the grill (K) and wash it under running water; remove the tray (J) from the machine, empty it and wash it under running water.
- Cleaning the machine body
Warning!
- Clean the fixed parts of the machine using a damp, non-abrasive cloth to avoid damaging the body.
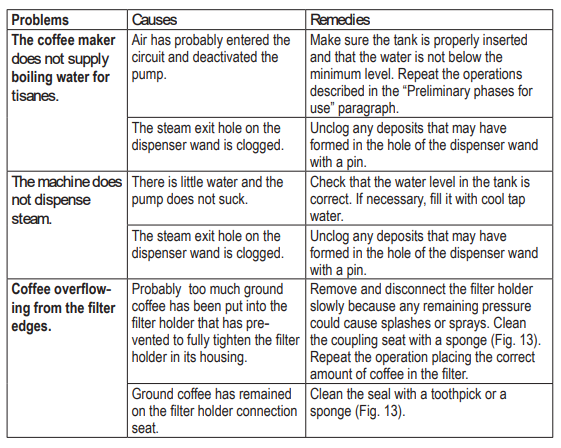
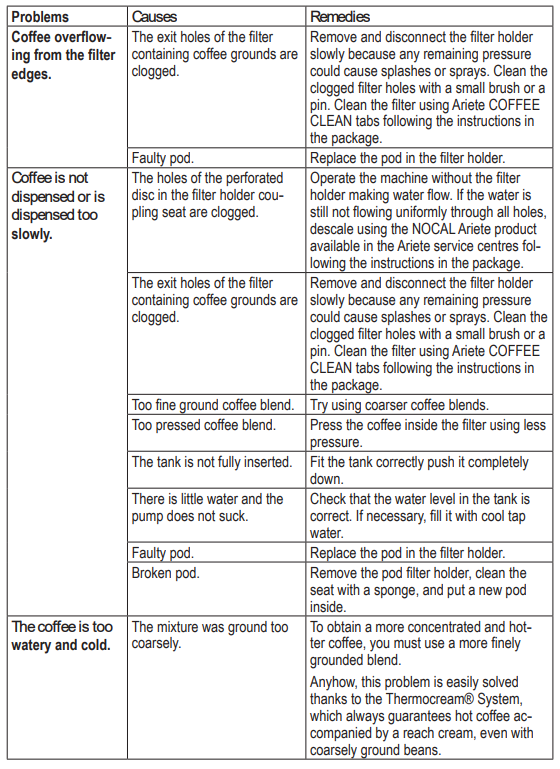
Troubleshooting the Ariete Coffee Maker 1388A
Pros & Cons of the Ariete Coffee Maker 1388A
- Pros:
- Stylish retro design enhances kitchen aesthetics.
- Powerful 15-bar pressure pump for rich espresso extraction.
- Built-in milk frother enables café-quality drinks at home.
- Removable water tank and reusable filter offer convenience and eco-friendliness.
- Simple control panel with dedicated buttons for ease of use.
- Competitive price for features provided.
- Cons:
- Limited to two cups per brewing cycle, which may not suit larger families.
- Some users report that the milk frother requires practice to achieve optimal foam quality.
- Absence of digital interface or programmable settings found in higher-end models.
- Cleaning requires regular attention to maintain performance.
Customer Reviews of the Ariete Coffee Maker 1388A
Users frequently praise the Ariette Coffee Maker 1388A for its attractive design and reliable espresso quality. Many reviewers highlight the ease of use and fast heating time as strong points, giving the machine an average rating of 4 out of 5 stars. The built-in milk frother receives mixed feedback; while some appreciate the convenience, others mention a learning curve to perfect the frothing technique.
Common complaints include the limited water tank size and occasional difficulty in cleaning the milk frother nozzle. However, most customers recommend the machine for home use due to its excellent value for money, especially for those who appreciate a retro aesthetic combined with functional espresso brewing.
Faqs
How do I set up the Ariete Coffee Maker 1388A for the first time?
Why is my Ariete Coffee Maker 1388A not producing enough pressure for espresso?
Can I use ESE pods with the Ariete Coffee Maker 1388A?
How do I clean and descale the Ariete Coffee Maker 1388A?
What should I do if the steam wand on my Ariete Coffee Maker 1388A isn't working?
Is the water tank on the Ariete Coffee Maker 1388A removable for easy filling?
How do I use the milk frother on the Ariete Coffee Maker 1388A?
What are the key differences between the Ariete Coffee Maker 1388A and other models?
More ariete manuals
Leave a Comment