
Setup: Ariete Coffee Maker 1337/1337A User Manual
Content
Ariete Coffee Maker 1337/1337A
Introduction
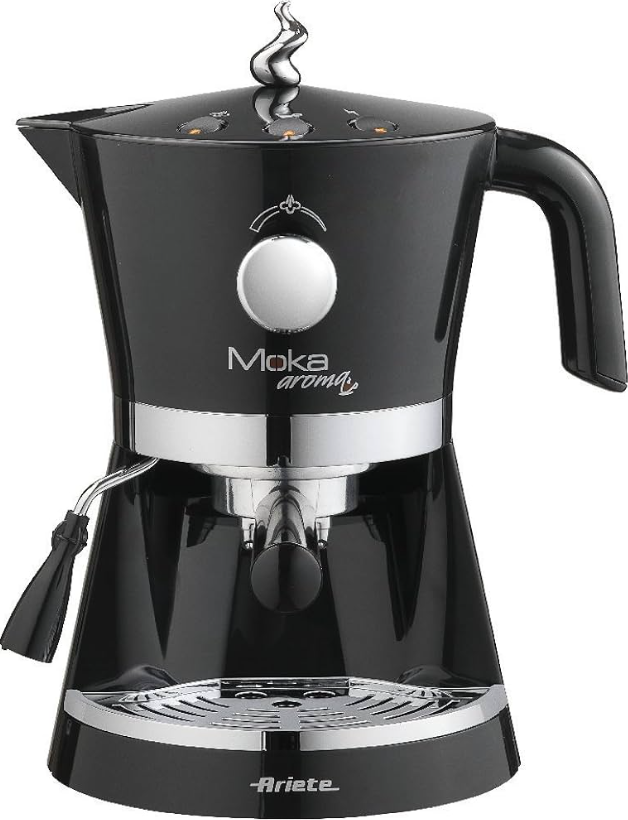
The Ariete Coffee Maker 1337/1337A is a versatile and stylish coffee machine designed for coffee lovers who appreciate both convenience and quality. This model blends classic Italian moka pot design with modern features, making it ideal for preparing espresso, cappuccino, and latte at home. With its compact size and easy-to-use interface, the Ariete Coffee Maker 1337/1337A is perfect for small kitchens, offices, or anyone seeking a reliable coffee solution without the complexity of professional machines.
Key benefits include a wide temperature range for optimal extraction, a durable build, and the ability to brew multiple coffee styles. The machine is suitable for both beginners and experienced coffee enthusiasts, offering consistent results and a rich aroma with every cup. Whether you're starting your day or enjoying a mid-afternoon break, this coffee maker delivers a satisfying experience.
The Ariete Coffee Maker 1337/1337A is typically available for purchase online and in select retail stores, with an estimated price range of $50–$80. It is widely available in Europe and can be found through major appliance retailers and online marketplaces.
Specifications of the Ariete Coffee Maker 1337/1337A
- Model: Ariete Coffee Maker 1337/1337A
- Capacity: 6–12 cups (depending on cup size)
- Power: 900W
- Dimensions: 20 x 15 x 25 cm
- Weight: 1.5 kg
- Material: Stainless steel and plastic
- Brewing Temperature: 195°F–205°F (90°C–96°C)
- Features: Removable filter, anti-drip system, warming plate
- Compatibility: Ground coffee, espresso, cappuccino, latte
- Warranty: 2 years (varies by region)
The Ariete Coffee Maker 1337/1337A stands out for its efficient brewing process, compact design, and ability to handle various coffee types. Compared to similar models, it offers a balanced combination of performance, durability, and ease of use.
DESCRIPTION OF THE APPLIANCE
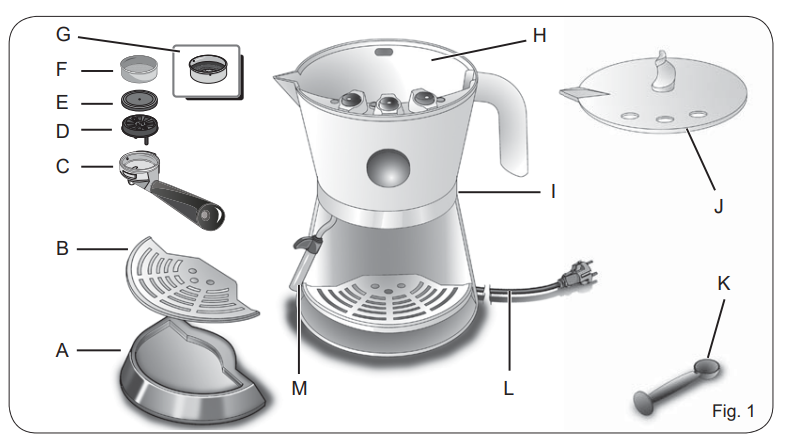
- Drip tray
- Cup-resting grill
- Filter holder
- Drain pan
- Perforated silicone disc (Thermocream ®)
- 2 cup filter
- 1 cup filter/pod
- Water tank
- Machine body
- Tank lid
- Coffee measure/presser
- Power cord + Plug
- Maxi Cappuccino attachment and wand for water and steam supply
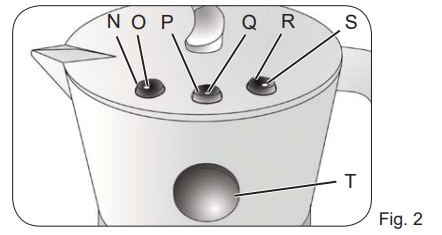
- Steam function switch
- Boiler temperature light
- Coffee dispensing switch
- Coffee dispensing indicator lamp
- On/Off button
- On light
- Steam dispensing cock
PRELIMINARY PHASES FOR USE
- Using the appliance for the first time
- Check that the voltage of the domestic network is the same as that indicated on the technical information plate of the appliance. Place the appliance on a stable surface.
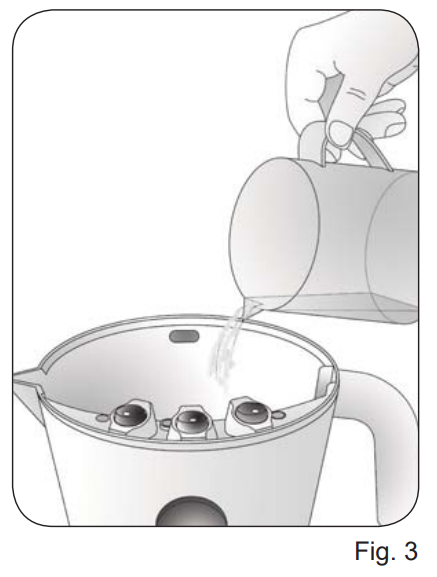
- Open the tank lid (J). Fill the tank up to the level marked MAX (Fig. 3).
- While filling, pay close attention that the water does not dampen the switch area to prevent infiltrations inside the electrical parts.
- Insert the plug into the socket, which must be earthed.
Starting the first time
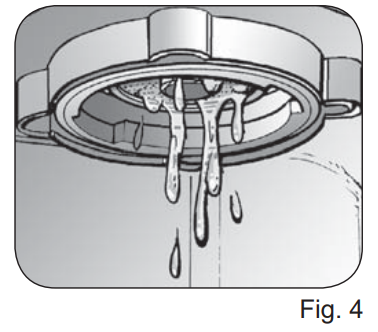
- After having filled the tank with cool tap water, start the machine by pressing the button (R). The light (S) will tum on to indicate that the machine is on. Wait for the light (O) to turn off. Press the coffee dispensing switch (P) until you see water come out of the filter holder seat (Fig. 4).
- Dispense water from the filter holder seat for two minutes. Press the coffee dispensing switch (P) to stop coffee dispensing. Leave the appliance in standy for one minute. Dispense at least one tank full of water to clean the internal circuit of the boiler. Respect the recommended dispensing and standby times.
- Also open the cock (T) by slightly turning it anti-clockwise after having placed a container underneath the Maxi Cappuccino device wand (M).
- Then close the cock (T) by turning it clockwise, and press the coffee dispensing switch (P) to make the water stop coming out. Wait for the light (O) to turn off. The machine is ready to make coffee.
HOW TO MAKE COFFEE
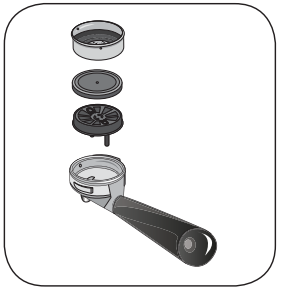
- Insert the dripper (D), the perforated silicone disc (E) and the 2 cup (F) or 1 cup (G) filter, in the filter holder (C) (Fig 5). The perforated silicone disc can be inserted only in one direction on the dripper. Measure out the coffee in the filter and lightly press with the specially provided presser: completely fill two measures for two cups of coffee, and fill only one for one cup. Insert the filter holder into its seat.
Warning!
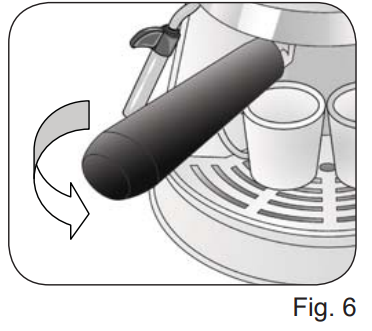
- Tighten well by turning it from left to right while making sure you have hooked it properly onto the flange (Fig. 6).
- If too much ground coffee is put inside the filter, turning the filter holder may prove difficult and/or you may get leaks from the filter holder when the coffee is being dispensed
- Check that the steam function button (N) has not been unintentionally pressed.
- It is advisable to let the filter holder heat up a few minutes in its seat before making a cup of coffee so that the first cup is piping hot, too. This will not be necessary for the cups of coffee that follow.
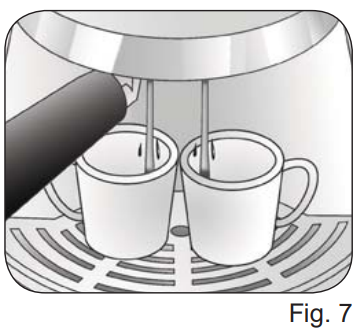
- To start dispensing, press the switch (P): the coffee will start coming out of the spouts of the filter holder. Press
the switch (P) again to stop it. The minimum serving of coffee is 50 ml.
Warning!
- Like in professional coffee machines, do not remove the filter holder when the dispensing switch (P) is on; danger of burns!
Warning!
- Wait about ten seconds after the coffee has been dispensed before removing the filter holder; To remove it, turn it slowly from right to left so as to prevent splashes or spurts of water or coffee.
- When the machine is in stand-by, the lamp (0) will turn on and off periodically. This shows that the boiler thermostat is tripping, which serves to keep the water temperature optimum.
- When warming up, your appliance may release small puffs of steam from the filter holder; this is perfectly normal.
- It is appropriate, for the first coffee and for the next ones, to start the coffee brewing, only when the indicator light (O) is off.
Filling the water tank during use
- No special operation is necessary when the water in the tank runs out because the machine has a special self-priming valve. All you have to do is fill the tank with cool tap water up to the MAX level after unplugging it from the socket-outlet. Pay close attention that the water does not dampen the switch area to prevent infiltrations in the electrical nartc Auto-off function (MOD.1337A)
- If the machine is turned on but not in use, the auto-off function operates after about 30 minutes. This function puts the machine in standby. The ON indicator light (S) is off. To restart the machine press again the power button (R).
How to make coffee with a pod
To make coffee with pods you must use the specific pod filter (G) that came with the coffee maker as described below:
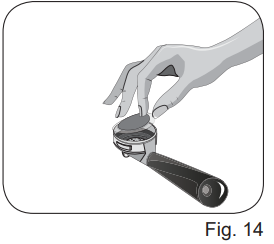
- Place the pod in the filter ring (Fig. 14).
- Push the pod with your fingers inward. The pod must be well centred and placed inside the filter.
- Now it is possible to put the filter holder in its seat. Tighten the filter holder making sure it is securely fitted to the flange (Fig 6).
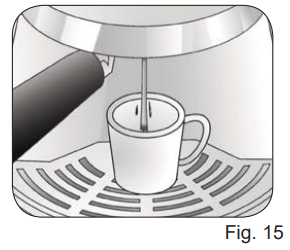
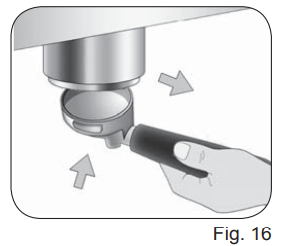
- The pod could remain stuck in the upper part of the machine after making the coffee and when removing filter holder. To remove it, tilt the filter holder (Fig. 15) so the pod can fall onto it.
- In order to always get an excellent cup of coffee, buy the pod that bears the E.S.E. compatibility mark.
- If the pod is not inserted well, or if the filter holder is not tightened firmly, a few drops of water could leak from the filter holder.
HOW TO MAKE CAPPUCCINO
- To prepare a cappuccino or hot chocolate or to heat any other beverage, press the switch (N); the indicator lamp (0) turns on. When the lamp (O) turns off the machine is ready to generate steam.
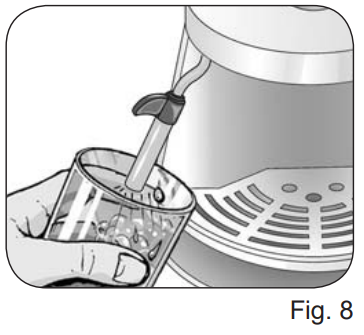
- When warming up, your appliance may release small puffs of steam from the filter holder; this is perfectly normal. Now open the steam dispensing cock T) anti-clockwise, having the foresight to position a cup underneaththe Maxi Cappuccino device (M) (Fig. 8): at first a little water will come out, immediately followed by a strong jet of steam.
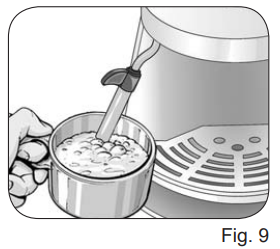
- Plunge the wand all the way into the pot of milk (Fig. 9) and open the dispensing cock (T). During these op- erations you may notice that the warning light (0) goes on and off from time to time, indicating that the boiler thermostat is keeping the water required for the steam supply at the right temperature.
- It is opportune you start dispensing the steam only when this indicator lamp is off. Dispense the steam for a few seconds after every use in order to free the hole of any milk residue.
- After the cappuccino is prepared, press the switch (N) to cut out the steam function.
MAKING FURTHER CUPS OF COFFEE
- To prepare a cup of coffee right after making cappuccino, it is necessary to bring the boiler back to the coffee preparation temperature by performing these operations: to speed up the boiler cooling, place a container under the cappuccino maker, press the switch (P) and at the same time keep the tap (T) open. Make water come out of the cappuccino maker. Close the cock (T) and turn the switch (P) off. Wait for the lamp (O) to turn off before making another cup of coffee.
HOW TO MAKE TEA OR TISANES
- When the machine is in the ready coffee position, i.e. when the indicator light (O) is off, place a cup under the dispensing nozzle (M) and press the coffee brewing switch (P). Open the steam dispensing cock (T) immedi- ately afterwards; in this way hot water will come out of the spout. The maximum quantity for two cups is 200 ml.
USEFUL TIPS FOR OBTAINING A GOOD ITALIAN ESPRESSO
- The ground coffee in the filter holder has to be pressed lightly. Whether the coffee is stronger or weaker depends on the degree the coffee is ground, the quantity put into the filter holder and the pressing. Just a few seconds are needed for the coffee to flow down into the cups. If the dispensing time is longer, this means that the coffee is ground too fine or that the coffee put into the filter holder has been pressed too much.
CLEANING THE APPLIANCE
Warning!
All cleaning operations described below must be performed with the machine off and with the electric plug disconnected from the socket-outlet.
Warning!
Regular maintenance and cleaning preserve and keep the machine efficient for a longer amount of time. Never wash machine components in the dishwasher. Do not use direct jets of water.
Cleaning the coffee filters
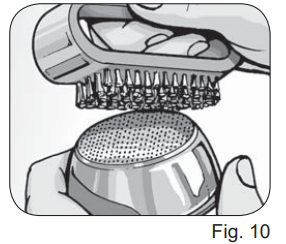
Check that the holes are not clogged and if so, clean them with a small brush (Fig. 10). Dispense boiling water from the filter holder with the filter inside, without coffee grounds, after placing a glass underneath the dispenser in order to dissolve or remove any coffee residue or impurities.
Warning!
- Slowly remove and disconnect the filter holder because any remaining pressure could cause splashes or squirts.
- It is recommended to clean the filters about every 3 months, using the COFFEE CLEAN detergent tablets available at the point of sales and Authorized Service Centers following the instructions on the packaging or, alternatively, using simple detergent tablets (with no added rinse aid or other chemical additives) for dishwashers as follows:
- Put a dishwasher detergent tab into the filter (without coffee when the machine is hot (after heating for atleast five minutes).
- Couple the filter holder to the machine and put a container underneath the filter holder.
- Press the coffee button to start dispensing water, and dispense the water for 15-20 seconds.
- Stop the water supply and let the tab act for at least 15 minutes while keeping the filter holder coupled on the machine.
- Repeat the water dispensing operation by operating the pump for about 15-20 seconds, and then letting it rest for another 15-20 seconds, until two tanks of water are used up.
- Remove the filter holder from the machine, remove the filter and rinse it well under running tap water.
- Turn off the machine, disconnect the power cable from the socket-outlet and clean the coupling seat of the filter holder with a sponge in order to remove any detergent residue from the shower disc.
- Turn the machine back on, couple the filter holder once again and dispense at least 2 cups of water again to complete the rinsing.
- If the coffee machine is used daily, it is advisable to carry out the cleaning operation at least every three months.
Cleaning the silicone disc
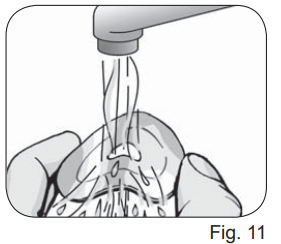
- Wash the silicone disc (E) under running water, bending it slightly on the sides in order to free the centre hole of any residue of coffee grounds that could clog it (Fig. 11).
Cleaning the filter holder seat
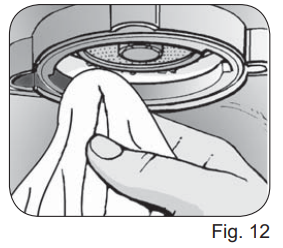
- With time, coffee residue may accumulate on the filter holder seat. It can be removed with a toothpick, a sponge (Fig. 12), or by letting water run through without fitting the filter holder (Fig. 4).
Cleaning the Maxi Cappuccino device
Warning!
- Perform this operation when the chrome-plated pipe is cold so as to prevent burns.
- Unscrew the device (M) from the small pipe and wash it with running water. The small pipe can be cleaned with a non-abrasive cloth. Screw the cappuccino maker back on as far as it will go. If necessary, clean the small steam outlet hole again with a pin. After use, always let the steam nozzle run for a few seconds so to free the outlet from any possible residue.
Cleaning the tank
- Periodically clean the inside of the tank with a sponge or damp cloth.
Cleaning the grill and drip tray
- Remember to empty the drip tray from time to time (A).
- Remove the grill (B) and wash it under running water; remove the drip tray (A) from the machine, empty it and wash it under running water.
Cleaning the machine body
Warning!
Clean the fixed parts of the machine using only a damp, non-abrasive cloth so as to not damage the body.
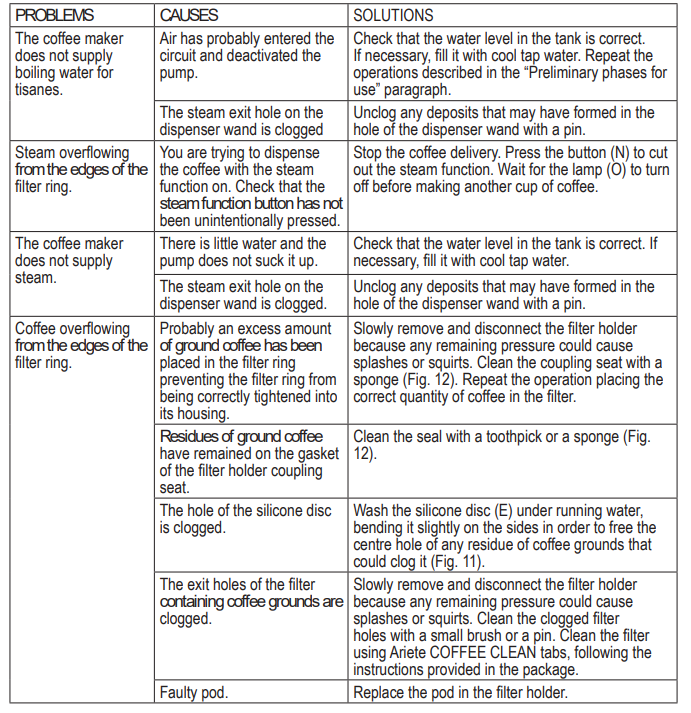
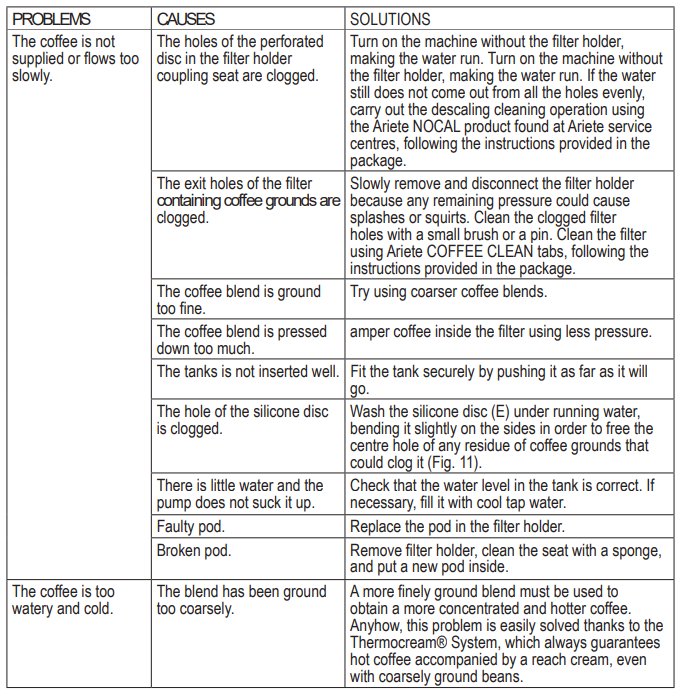
Troubleshooting Common Issues with the Ariete Coffee Maker 1337/1337A
Pros & Cons of the Ariete Coffee Maker 1337/1337A
- Pros:
- Compact and stylish design
- Easy to use and clean
- Versatile brewing options
- Consistent coffee quality
- Good value for money
- Cons:
- Limited capacity for large groups
- Basic features compared to high-end models
- Plastic components may feel less premium
The Ariete Coffee Maker 1337/1337A offers excellent value for those seeking a reliable, easy-to-use coffee machine. While it may lack some advanced features, its performance and affordability make it a strong choice for everyday use.
Customer Reviews for the Ariete Coffee Maker 1337/1337A
Customers consistently praise the Ariete Coffee Maker 1337/1337A for its ease of use, consistent results, and attractive design. Many users highlight the machine's ability to brew a variety of coffee styles and its durability. Common complaints include the limited capacity and the need for regular cleaning. The average star rating is 4.5 out of 5, with most reviewers recommending it for home use. Frequent mentions include the machine's reliability and the quality of the coffee produced.
Faqs
How do I set up my ariete Coffee Maker 1337/1337A for the first time?
What should I do if my ariete Coffee Maker 1337/1337A is brewing very slowly or not at all?
How can I maintain and clean the ariete Coffee Maker 1337/1337A to ensure long-lasting performance?
Can I use different types of coffee grounds with the ariete Coffee Maker 1337/1337A?
Why is the coffee from my ariete Coffee Maker 1337/1337A tasting weak or watery, and how can I fix it?
What are the key features of the ariete Coffee Maker 1337/1337A that improve coffee brewing?
How do I troubleshoot leaking issues around the filter holder area on the ariete Coffee Maker 1337/1337A?
Is it necessary to descale the ariete Coffee Maker 1337/1337A, and how often should I do it?
More ariete manuals
Leave a Comment