
Setup: Asrock H81M-DGS R2.0 Motherboard User Manual
Content
Asrock H81M-DGS R2.0 Motherboard
Introduction
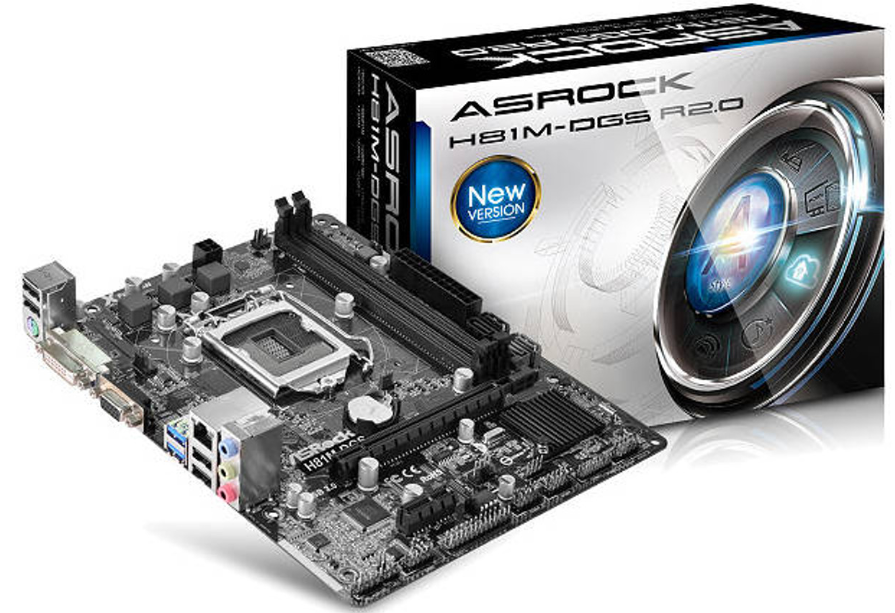
The ASRockk H81M-DGS R2.0 Motherboard is a reliable and budget-friendly micro ATX motherboard designed for Intel’s 4th generation Core processors using the LGA1150 socket. It offers a solid foundation for building or upgrading desktop PCs aimed at everyday computing, office productivity, and light gaming. Equipped with Intel H81 chipset support, this motherboard ensures compatibility with Intel Core i7, i5, i3, Pentium, and Celeron processors, making it a versatile choice for users seeking solid performance without premium pricing.
Key benefits include dual-channel DDR3 memory support up to 1600 MHz, multiple USB 3.0 ports for fast data transfer, and integrated graphics output options via D-Sub and DVI-D for flexible display connectivity. It's 100% all solid capacitor design enhances durability and stability, while features like Realtek Gigabit LAN and 5.1 channel HD audio improve connectivity and multimedia experience.
Ideal for home users, students, and small office setups, the ASRock H81M-DGS R2.0 motherboard offers a dependable platform for building cost-effective PCs. It supports essential features without overwhelming complexity, making it beginner-friendly and suitable for straightforward PC builds.
Currently, the motherboard is available through major online retailers, typically priced in the affordable range of $50 to $70, delivering excellent value for its feature set and performance reliability.
Package Contents
- ASRock H81M-DGS R2.0 Motherboard (Micro ATX Form Factor)
- ASRock H81M-DGS R2.0 Quick Installation Guide
- ASRock H81M-DGS R2.0 Support CD
- 2 x Serial ATA (SATA) Data Cables (Optional)
- 1 x I/O Panel Shield
Specifications
Platform
- Micro ATX Form Factor
- All Solid Capacitor design
CPU
- Supports 4th generation Intel® CoreTM i7 / i5 / i3 / Xeon® / Pentium® / Celeron® in LGA1150 Package
- Supports Intel® Turbo Boost 2.0 Technology
Chipset
- Intel® H81
Memory
- Dual Channel DDR3 Memory Technology
- 2 x DDR3 DIMM Slots
- Supports DDR3 1600/1333/1066 non-ECC, un-buffered memory
- Max. capacity of system memory: 16GB(see CAUTION)
- Supports Intel® Extreme Memory Profile (XMP)1.3/1.2
Expansion Slot
- 1 x PCI Express 2.0 x16 Slot (PCIE1: x16 mode)
- 1 x PCI Express 2.0 x1 Slot
Graphics
- Intel® HD Graphics Built-in Visuals and the VGA outputs can be supported only with processors which are GPU integrated.
- Supports Intel® HD Graphics Built-in Visuals : Intel® Quick Sync Video with AVC, MVC (S3D) and MPEG-2 Full HW Encode1, Intel® InTruTM 3D, Intel® Clear Video HD Technology, Intel® InsiderTM, Intel® HD Graphics 4400/4600
- Pixel Shader 5.0, DirectX 11.1
- Max. shared memory 1792MB
- Dual VGA output: support DVI-D and D-Sub Ports by independent display controllers
- Supports DVI-D with max. resolution up to 1920x1200 @ 60Hz
- Supports D-Sub with max. resolution up to 1920x1200 @ 60Hz
- Supports HDCP function with DVI-D Port
- Supports Full HD 1080p Blu-ray (BD) playback with DVI-D Port
Audio
- 5.1 CH HD Audio (Realtek ALC662 Audio Codec)
LAN
- PCIE x1 Gigabit LAN 10/100/1000 Mb/s
- Realtek RTL8111G
- Supports Wake-On-LAN
- Supports LAN Cable Detection
- Supports Energy Efficient Ethernet 802.3az
- Supports PXE
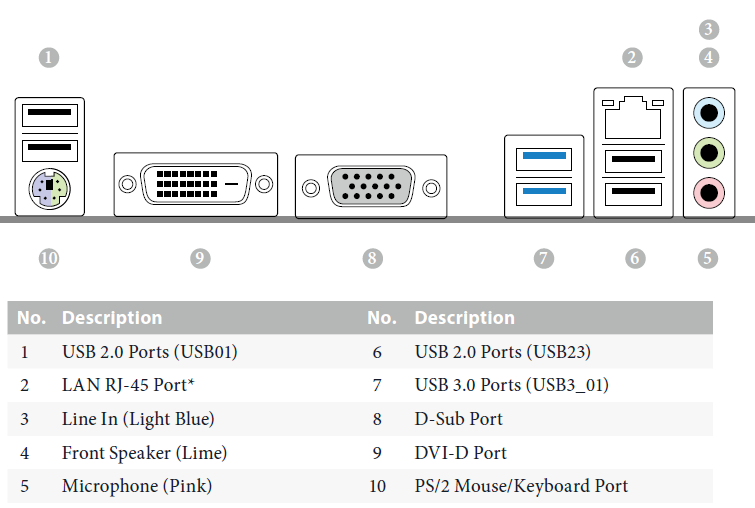
Rear Panel I/O
- 1 x PS/2 Mouse/Keyboard Port
- 1 x D-Sub Port
- 1 x DVI-D Port
- 4 x USB 2.0 Ports
- 2 x USB 3.0 Ports
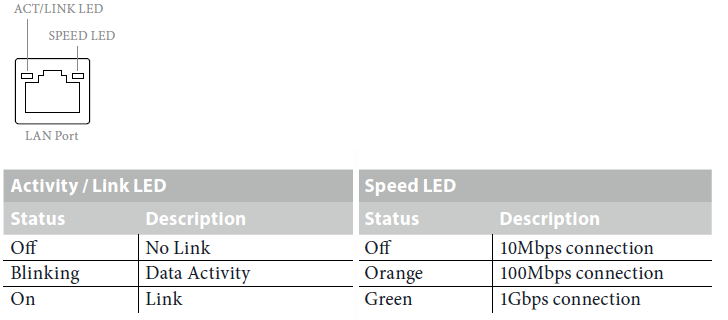
- 1 x RJ-45 LAN Port with LED (ACT/LINK LED and SPEED LED)
- HD Audio Jack: Line in / Front Speaker / Microphone
Storage
- 2 x SATA3 6.0 Gb/s Connectors, support NCQ, AHCI and Hot Plug
- 2 x SATA2 3.0 Gb/s Connectors, support NCQ, AHCI and Hot Plug
Connector
- 1 x IR Header
- 1 x Print Port Header
- 1 x COM Port Header
- 1 x Chassis Intrusion Header
- 1 x TPM Header
- 1 x CPU Fan Connector (4-pin)
- 1 x Chassis Fan Connector (4-pin)
- 1 x Power Fan Connector (3-pin)
- 1 x 24 pin ATX Power Connector
- 1 x 4 pin 12V Power Connector
- 1 x Front Panel Audio Connector
- 2 x USB 2.0 Headers (Support 4 USB 2.0 ports)
BIOS Feature
- 32Mb AMI UEFI Legal BIOS with Multilingual GUI support
- ACPI 1.1 Compliance Wake Up Events
- SMBIOS 2.3.1 Support
- CPU, DRAM, PCH 1.05V, PCH 1.5V Voltage Multi-adjust-ment
Support CD
- Drivers, Utilities, AntiVirus Software (Trial Version), Google Chrome Browser and Toolbar, Start8
Hardware Monitor
- CPU/Chassis temperature sensing
- CPU/Chassis/Power Fan Tachometer
- CPU Quiet Fan (Auto adjust chassis fan speed by CPU tem-perature)
- CPU/Chassis Fan multi-speed control
- CASE OPEN detection
- Voltage monitoring: +12V, +5V, +3.3V, CPU Vcore
OS
- Microsoft® Windows® 8.1 32-bit / 8.1 64-bit / 8 32-bit / 8 64-bit / 7 32-bit / 7 64-bit
Certifications
- FCC, CE, WHQL
- ErP/EuP Ready (ErP/EuP ready power supply is required)
Unique Features
ASRock A-Tuning
- A-Tuning is ASRock’s multi purpose software suite with a new interface, more new features and improved utilities, including XFast RAM, Dehumidifier, Good Night LED, FAN-Tastic Tuning, OC Tweaker and a whole lot more.
ASRock Instant Flash
- ASRock Instant Flash is a BIOS flash utility embedded in Flash ROM. This conve-nient BIOS update tool allows you to update the system BIOS in a few clicks without preparing an additional floppy diskette or other complicated flash utility. Just save the new BIOS file to your USB storage and launch this tool by pressing <F6> or <F2> during POST to enter the BIOS setup menu to access ASRock Instant Flash. Please be noted that the USB flash drive or hard drive must use FAT32/16/12 file system.
ASRock APP Charger
- Simply by installing the ASRock APP Charger makes your iPhone/iPad/iPod Touch charge up to 40% faster than before on your computer. ASRock APP Charger allows you to quickly charge many Apple devices simultaneously and even supports continuous charging when your PC enters into Suspend to RAM (S3), hibernation mode (S4) or power off (S5).
ASRock XFast USB
- ASRock XFast USB can boost the performance of your USB storage devices. The performance may depend on the properties of the device.
ASRock XFast LAN
- ASRock XFast LAN provides faster internet access, which includes the benefits listed below. LAN Application Prioritization: You can configure your application’s priority ideally and add new programs to the list. Lower Latency in Game: After setting online game’s priority higher, it can lower the latency in games. Traffic Shaping: You can watch Youtube HD videos and download simultaneously. Real-Time Analysis of Your Data: With the status window, you can easily recognize which data streams you are currently transferring.
ASRock XFast RAM
- ASRock XFast RAM is included in A-Tuning. It fully utilizes the memory space that cannot be used under Windows® 32-bit operating systems. ASRock XFast RAM shortens the loading time of previously visited websites, making web surfing faster than ever. And it also boosts the speed of Adobe Photoshop 5 times faster. Another advantage of ASRock XFast RAM is that it reduces the frequency of accessing your SSDs or HDDs in order to extend their lifespan.
ASRock Crashless BIOS
- ASRock Crashless BIOS allows users to update their BIOS without fear of failing. If power loss occurs during the BIOS updating process, ASRock Crashless BIOS will automatically finish the BIOS update procedure after regaining power. Please note that BIOS files need to be placed in the root directory of your USB disk. Only USB 2.0 ports support this feature.
ASRock OMG (Online Management Guard)
- Administrators are able to establish an internet curfew or restrict internet access at specified times via OMG. You may schedule the starting and ending hours of internet access granted to other users. In order to prevent users from bypassing OMG, guest accounts without permission to modify the system time are required.
ASRock Internet Flash
- ASRock Internet Flash downloads and updates the latest UEFI firmware version from our servers for you without entering Windows® OS. Please setup network configuration before using Internet Flash.
ASRock System Browser
- ASRock System Browser shows the overview of your current PC and the devices connected.
ASRock Dehumidifier Function
- Users may prevent motherboard damages due to dampness by enabling “Dehumidifier Function”. When enabling Dehumidifier Function, the computer will power on automatically to dehumidify the system after entering S4/S5 state.
ASRock Easy Driver Installer
- For users that don’t have an optical disk drive to install the drivers from our support CD, Easy Driver Installer is a handy tool in the UEFI that installs the LAN driver to your system via an USB storage device, then downloads and installs the other required drivers automatically.
ASRock Interactive UEFI
- ASRock Interactive UEFI is a blend of system configuration tools, cool sound effects and stunning visuals. The unprecedented UEFI provides a more attractive interface and more amusment.
ASRock Fast Boot
- With ASRock’s exclusive Fast Boot technology, it takes less than 1.5 seconds to logon to Windows 8 from a cold boot. No more waiting! The speedy boot will completely change your user experience and behavior.
ASRock Restart to UEFI
- Windows® 8 brings the ultimate boot up experience. The lightning boot up speed makes it hard to access the UEFI setup. ASRock Restart to UEFI allows users to enter the UEFI automatically when turning on the PC. By enabling this function, the PC will enter the UEFI directly after you restart.
ASRock USB Key
- In a world where time is money, why waste precious time everyday typing usernames to log in to Windows? Why should we even bother memorizing those foot long passwords? Just plug in the USB Key and let your computer log in to windows automatically!
ASRock FAN-Tastic Tuning
- ASRock FAN-Tastic Tuning is included in A-Tuning. Configure up to five different fan speeds using the graph. The fans will automatically shift to the next speed level when the assigned temperature is met.
ASRock Good Night LED
- ASRock Good Night LED technology offers you a better sleeping environment by extinguishing the unessential LEDs. By enabling Good Night LED in the BIOS, the Power/LAN LEDs will be switched off when the system is powered on. Good Night LED will automatically switch off the Power and Keyboard LEDs when the system enters into Standby/Hibernation mode as well.
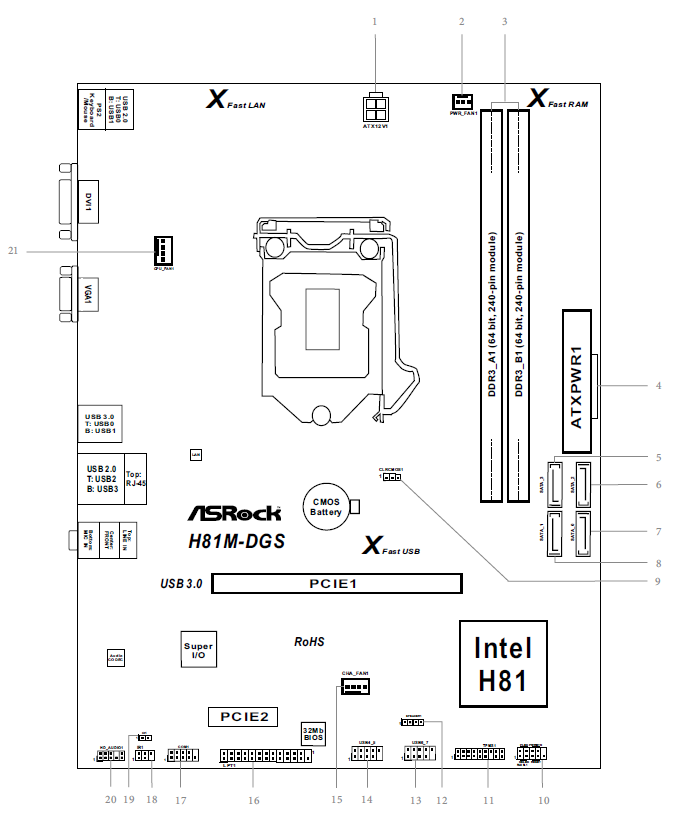
Motherboard Layout
Description
- ATX 12V Power Connector (ATX12V1)
- Power Fan Connector (PWR_FAN1)
- 2 x 240-pin DDR3 DIMM Slots (DDR3_A1, DDR3_B1)
- ATX Power Connector (ATXPWR1)
- SATA2 Connector (SATA_3)
- SATA2 Connector (SATA_2)
- SATA3 Connector (SATA_0)
- SATA3 Connector (SATA_1)
- Clear CMOS Jumper (CLRCMOS1)
- System Panel Header (PANEL1)
- TPM Header (TPMS1)
- Chassis Speaker Header (SPEAKER1)
- USB 2.0 Header (USB6_7)
- USB 2.0 Header (USB4_5)
- Chassis Fan Connector (CHA_FAN1)
- Print Port Header (LPT1)
- COM Port Header (COM1)
- Infrared Module Header (IR1)
- Chassis Intrusion Header (CI1)
- Front Panel Audio Header (HD_AUDIO1)
- CPU Fan Connector (CPU_FAN1)
I/O Panel
There are two LEDs on each LAN port. Please refer to the table below for the LAN port LED indications.
Installation
This is a Micro ATX form factor motherboard. Before you install the motherboard, study the configuration of your chassis to ensure that the motherboard fits into it.
Pre-installation Precautions
Take note of the following precautions before you install motherboard components or change any motherboard settings.
- Make sure to unplug the power cord before installing or removing the motherboard. Failure to do so may cause physical injuries to you and damages to motherboard components.
- In order to avoid damage from static electricity to the motherboard’s components, NEVER place your motherboard directly on a carpet. Also remember to use a grounded wrist strap or touch a safety grounded object before you handle the components.
- Hold components by the edges and do not touch the ICs.
- Whenever you uninstall any components, place them on a grounded anti-static pad or in the bag that comes with the components.
- When placing screws to secure the motherboard to the chassis, please do not over-tighten the screws! Doing so may damage the motherboard.
Installing the CPU
- Before you insert the 1150-Pin CPU into the socket, please check if the PnP cap is on the socket, if the CPU surface is unclean, or if there are any bent pins in the socket. Do not force to insert the CPU into the socket if above situation is found. Otherwise, the CPU will be seriously damaged.
- Unplug all power cables before installing the CPU.
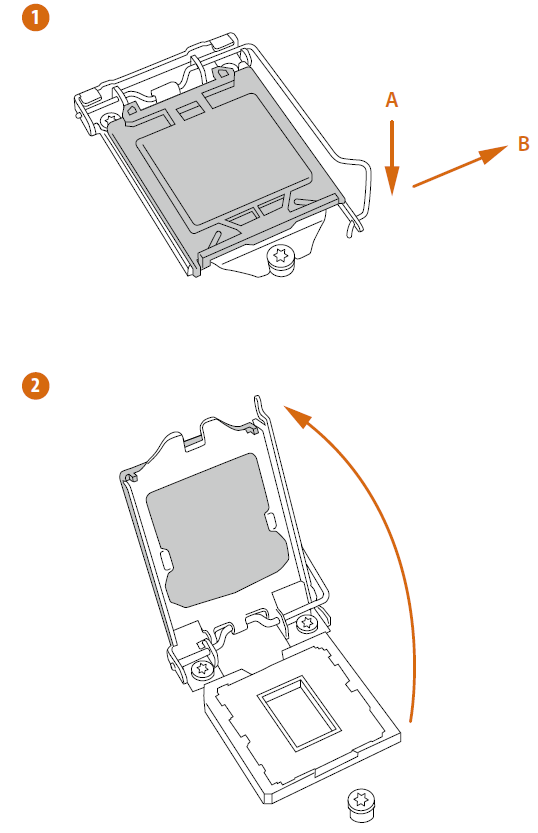
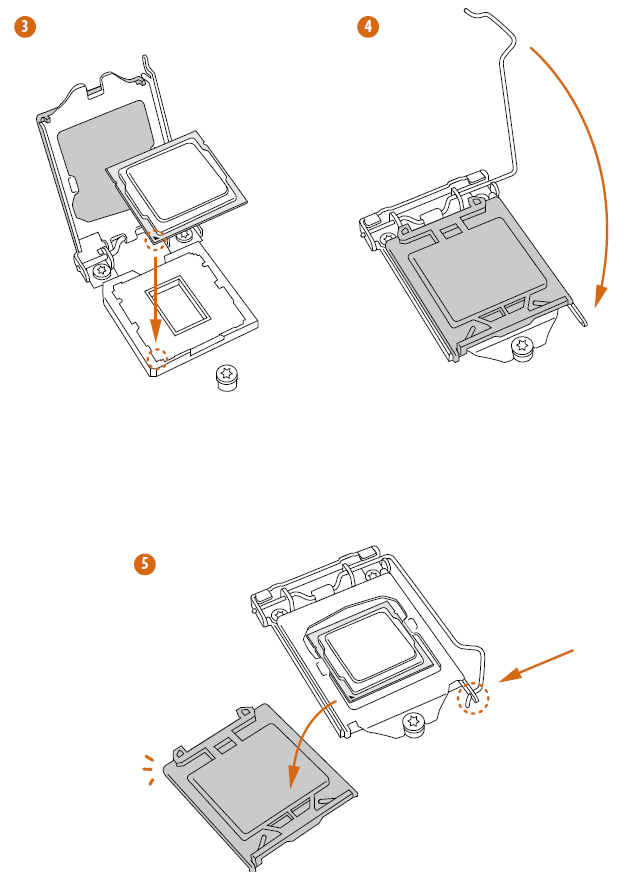
Installing the CPU Fan and Heatsink
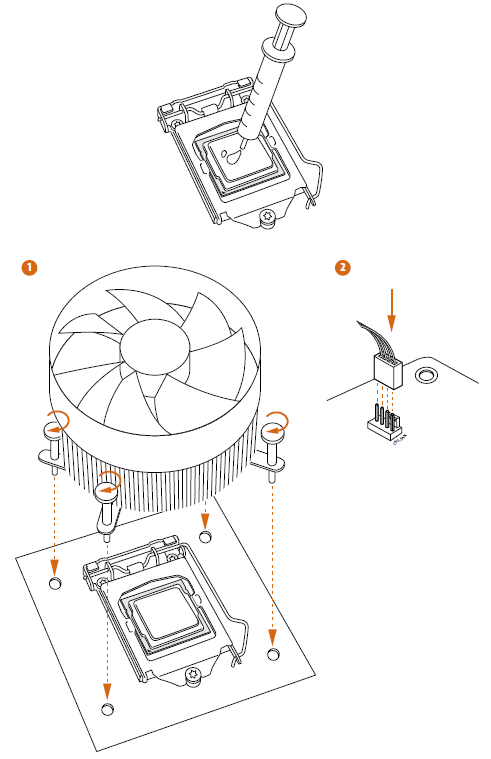
Installing Memory Modules (DIMM)
This motherboard provides two 240-pin DDR3 (Double Data Rate 3) DIMM slots, and supports Dual Channel Memory Technology.
- For dual channel configuration, you always need to install identical (the same brand, speed, size and chip-type) DDR3 DIMM pairs.
- It is unable to activate Dual Channel Memory Technology with only one memory module installed.
- It is not allowed to install a DDR or DDR2 memory module into a DDR3 slot; otherwise, this motherboard and DIMM may be damaged.
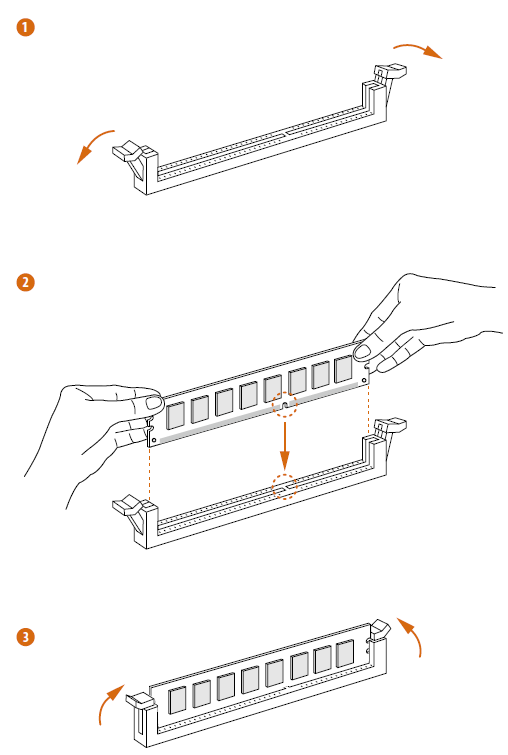
The DIMM only fits in one correct orientation. It will cause permanent damage to the motherboard and the DIMM if you force the DIMM into the slot at incorrect orientation.
Expansion Slots (PCI Express Slots)
There are 2 PCI Express slots on the motherboard.
Before installing an expansion card, please make sure that the power supply is switched off or the power cord is unplugged. Please read the documentation of the expansion card and make necessary hardware settings for the card before you start the installation.
PCIe slots:
PCIE1 (PCIe 2.0 x16 slot) is used for PCI Express x16 lane width graphics cards. PCIE2 (PCIe 2.0 x1 slot) is used for PCI Express x1 lane width graphics cards.
Onboard Headers and Connectors
Onboard headers and connectors are NOT jumpers. Do NOT place jumper caps over these headers and connectors. Placing jumper caps over the headers and connectors will cause permanent damage to the motherboard.
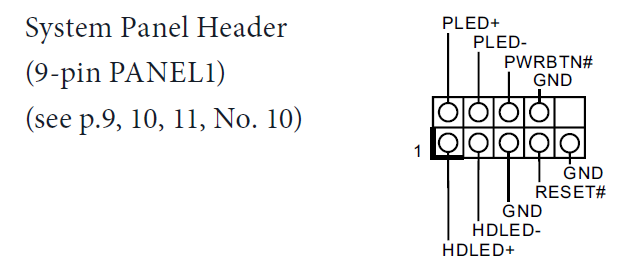
Connect the power switch, reset switch, and system status indicator on the chassis to this header according to the pin assignments below. Note the positive and negative pins before connecting the cables.
PWRBTN (Power Switch):
Connect to the power switch on the chassis front panel. You may configure the way to turn off your system using the power switch.
RESET (Reset Switch):
Connect to the reset switch on the chassis front panel. Press the reset switch to restart the computer if the computer freezes and fails to perform a normal restart.
PLED (System Power LED):
Connect to the power status indicator on the chassis front panel. The LED is on when the system is operating. The LED keeps blinking when the system is in S3 sleep state. The LED is off when the system is in S4 sleep state or powered off (S5).
HDLED (Hard Drive Activity LED):
Connect to the hard drive activity LED on the chassis front panel. The LED is on when the hard drive is reading or writing data.
The front panel design may differ by chassis. A front panel module mainly consists of a power switch, a reset switch, a power LED, a hard drive activity LED, a speaker, etc. When connecting your chassis front panel module to this header, make sure the wire assignments and the pin assignments are matched correctly.
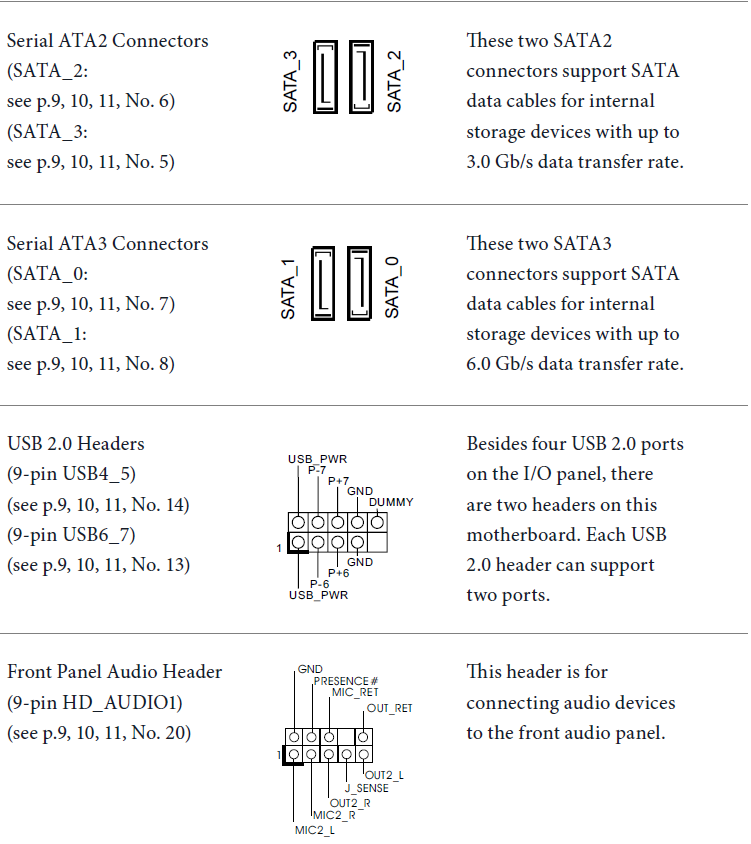
Software and Utilities Operation
Installing Drivers
The Support CD that comes with the motherboard contains the necessary drivers and useful utilities that enhance the motherboard’s features.
Running The Support CD
To begin using the support CD, insert the CD into your CD-ROM drive. The CD automatically displays the Main Menu if “AUTORUN” is enabled in your computer. If the Main Menu does not appear automatically, locate and double-click on the file “ASRSETUP.EXE” in the Support CD to display the menu.
Drivers Menu
The drivers compatible with your system will be auto-detected and listed on the support CD driver page. Please click Install All or follow the order from top to bottom to install those required drivers. Therefore, the drivers you install can work properly.
Utilities Menu
The Utilities Menu shows the application software that the motherboard supports. Click on a specific item, then follow the installation wizard to install it.
To improve Windows 7 compatibility, please download and install the following hot fix provided by Microsoft. “KB2720599”: http://support.microsoft.com/kb/2720599/en-us
Pros & Cons of the asrock H81M-DGS R2.0 Motherboard
Pros
- Affordability and Value: Offers a competitive price point for users needing basic but reliable Intel LGA1150 motherboard functionality.
- Compatibility: Supports a wide range of 4th-gen Intel processors, including Core i7, i5, i3, Pentium, and Celeron CPUs, providing flexibility in CPU choice.
- Durability: Features all-solid capacitors that improve lifespan and system stability, ideal for long-term usage.
- Connectivity Options: Includes USB 3.0 ports, dual SATA3 and SATA2 slots, Realtek Gigabit LAN, and multiple video outputs (D-Sub, DVI-D), enabling versatile peripheral support.
- Compact Micro ATX Form Factor: Suitable for small to mid-sized PC cases without sacrificing essential expansion slots.
Cons
- Outdated Chipset: The H81 chipset lacks advanced features found in newer chipsets,s such as USB-C, M.2 slots, or native support for DDR4 memory.
- Limited Expansion: Only one PCIe 2.0 x16 slot and one additional PCIe 2.0 slot, limiting multi-GPU or extensive expansion card configurations.
- DDR3 Memory Only: Supports DDR3 RAM up to 1600 MHz — slower and less power-efficient compared to modern DDR4 or DDR5 memory.
- Minimal Fan Headers: Comes with only two fan headers (CPU and chassis), necessitating alternative power for additional cooling fans.
- Basic Audio Codec: Utilizes Realtek ALC662, which is sufficient for general use but lacks high-end audio features for audiophiles.
When compared to newer motherboards, the ASRock H81M-DGS R2.0 delivers great value for budget builds but falls short in future-proofing and expansion capabilities.
Customer Reviews and Feedback on the ASRock H81M-DGS R2.0 Motherboard
Users generally praise the ASRock H81M-DGS R2.0 motherboard for its solid build quality and dependable performance for entry-level computing tasks. Many highlight its straightforward installation process and compatibility with a wide range of Intel 4th-gen CPUs.
Star ratings average around 4 out of 5, reflecting satisfaction with value for money. Customers appreciate the inclusion of USB 3.0 ports and multiple video output options, which enhance connectivity for everyday use.
Common complaints include the limited number of fan headers and lack of modern features such as M.2 slots and DDR4 support. Some users also note that the motherboard’s chipset is dated, making it less ideal for high-performance gaming or intensive multitasking.
Overall, most users recommend this motherboard for budget-conscious buyers building office PCs, media centers, or general-purpose desktops that do not require cutting-edge hardware.
Faqs
How do I properly set up the asrock H81M-DGS R2.0 Motherboard for first-time use?
What should I check if the asrock H81M-DGS R2.0 Motherboard fails to boot?
Can I upgrade my storage to SSD on the asrock H81M-DGS R2.0 Motherboard, and what types are supported?
What are the key features of the asrock H81M-DGS R2.0 Motherboard that enhance system performance?
Is the asrock H81M-DGS R2.0 Motherboard compatible with Windows 10 and modern operating systems?
How can I optimize cooling and fan control on the asrock H81M-DGS R2.0 Motherboard?
What maintenance steps are recommended to prolong the life of the asrock H81M-DGS R2.0 Motherboard?
Why is the asrock H81M-DGS R2.0 Motherboard not recognizing my DDR3 RAM at full speed, and how can I fix it?
More asrock manuals
Leave a Comment