Black Decker Electric Screwdriver BDCS50 User Manual
Content
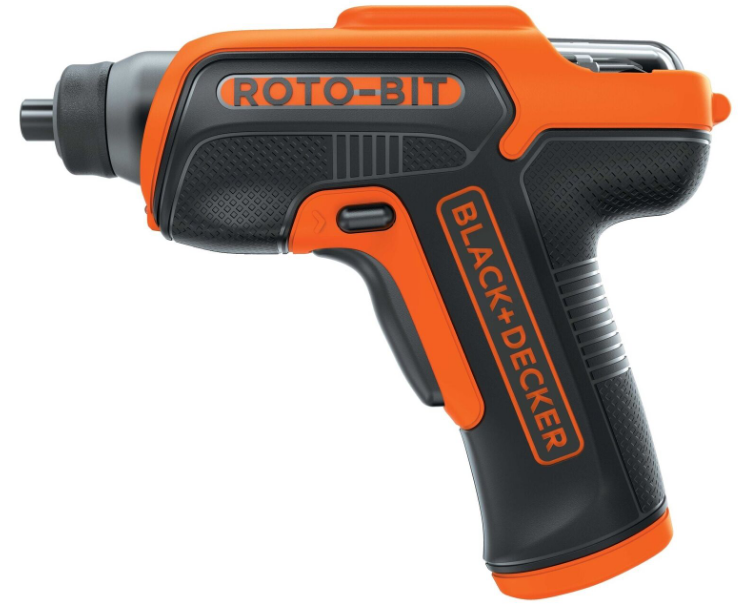
Black & Decker Electric Screwdriver BDCS50 Introduction
The Glen 230V Electric Slow Juicer GL-4018 is an innovative kitchen appliance designed to maximize juice extraction while retaining vital nutrients. Utilizing slow juicing technology, it minimizes oxidation and enhances flavor, making it perfect for health-conscious consumers. The juicer is easy to operate and clean, featuring a compact design that fits seamlessly into any kitchen. Priced at approximately $120, it offers excellent value for those looking to enjoy fresh, nutritious juices daily.
Detailed Specifications
- Motor Power: 4V Max
- Battery Type: Rechargeable Lithium-Ion Battery
- Speed: 180 RPM
- Torque: 35 in-lbs
- Chuck Type: Keyless Chuck
- LED Light: Yes, for improved visibility
- Compact Design: Lightweight and ergonomic
- Accessories Included: Battery, Charger, Screwdriver Bits
SYMBOLS
The label on your tool may include the following symbols. The symbols and their definitions are as follows:
- V...................volts
- A...................amperes
- Hz.................hertz
- W..................watts
- min...............minutes
 or AC.......alternating current
 or DC....direct current
- no.................no load speed
 .................Class I Construction (grounded)
 .................earthing terminal
 ................safety alert symbol
 ............Class II Construction (double insulated)
- .../min or rpm...revolutions or reciprocation per minute
 ............ Read instruction manual before use
 ................. Use proper respiratory protection
 ................Use proper eye protection
 ................. Use proper hearing protection
FUNCTIONAL DESCRIPTION
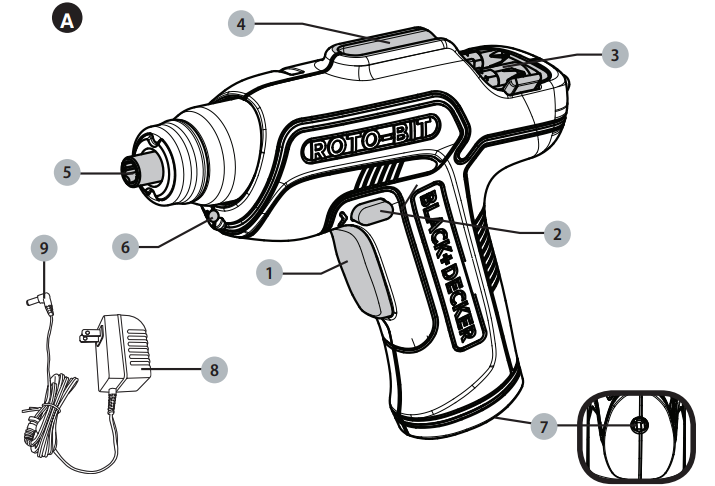
- Trigger switch
- Forward/Reverse/Lock-off slider
- Roto bit holder
- Magnetic screw holder
- Hex spindle
- LED light
- Charger port
- Charger
- Charger jack
SAFETY WARNINGS AND INSTRUCTIONS
BATTERIES
- Do not disassemble or open, drop (mechanical abuse), crush, bend or deform, puncture, or shred.
- Do not modify or remanufacture, attempt to insert foreign objects into the battery, immerse or expose to water or other liquids, or expose to fire, excessive heat including soldering irons, or put in microwave oven.
- Only use the battery with a charging system specified by the manufacturer/supplier.
- Do not short-circuit a battery or allow metallic or conductive objects to contact bothbattery terminals simultaneously.
- Dispose of used batteries promptly according to the manufacturer/supplier’s instructions.
- Improper battery use may result in a fire, explosion, or other hazard.
- Battery usage by children should be supervised.
WARNING: Never attempt to open the battery for any reason. If battery case is cracked or damaged, do not insert into charger. Do not crush, drop or damage battery. Do not use a battery or charger that has received a sharp blow, been dropped, run over or damaged in any way (i.e., pierced with a nail, hit with a hammer, stepped on). Damaged batteries should be returned to service center for recycling.
CHARGING
- This manual contains important safety and operating instructions.
- Before using battery charger, read all instructions and cautionary warnings on battery charger and product using battery.
CAUTION: To reduce the risk of injury, use charger only with this product. Batteries in other products may burst causing personal injury or damage. - Do not expose charger to rain or snow.
- Use of an attachment not recommended or sold by BLACK+DECKER may result in a risk of fire, electric shock, or injury to persons.
- To reduce risk of damage to electric plug and cord, pull by plug rather than cord when disconnecting charger.
- Make sure cord is located so that it will not be stepped on, tripped over, or otherwise subjected to damage or stress.
An extension cord should not be used unless absolutely necessary. Use of improper extension cord could result in a risk of fire, electric shock or electrocution.
- Two-wire cords can be used with 2-wire or 3-wire extension cords. Only round jacketed extension cords should be used, and we recommend that they be listed by Underwriters Laboratories (U.L.). If the extension is to be used outside, the cord must be suitable for outdoor use. Any cord marked for outdoor use can also be used for indoor work. The letters “W” or “WA” on the cord jacket indicate that the cord is suitable for outdoor use.
- An extension cord must have adequate wire size (AWG or American Wire Gauge) for safety, and to prevent loss of power and overheating. The smaller the gauge number of the wire, the greater the capacity of the cable; that is, 16 gauge has more capacity than 18 gauge. When using more than one extension to make up the total length, be sure each extension contains at least the minimum wire size.
Chart for minimum wire size (AWG) of Extension Cords Nameplate rating AMPS – 0 – 10.
Total Extension Cord Length (ft) 0-25 (0-7,6m) 26-50 (7,6-15,2m) 51-100 (15,2-30,4m) 101-150 (30,4-45,7m) Wire Gauge 18 16 16 14 - Use only the supplied charger when charging your tool. The use of any other charger could damage the tool or create a hazardous condition.
- Use only one charger when charging.
- Do not attempt to open the charger. There are no customer serviceable parts inside. Return to any authorized BLACK+DECKER service center.
- DO NOT incinerate the tool or batteries even if they are severely damaged or completely worn out. The batteries can explode in a fire.
- Do not incinerate the battery even if it is severely damaged or is completely worn out. The batteries can explode in a fire. Toxic fumes and materials are created when lithium ion batteries are burned.
- Do not charge or use battery in explosive atmospheres, such as in the presence offlammable liquids, gases or dust. Inserting or removing the drill from the charger mayignite the dust or fumes.
- If battery contents come into contact with the skin, immediately wash area with mild soap and water. If battery liquid gets into the eye, rinse water over the open eye for three minutes or until irritation ceases. If medical attention is needed, the battery electrolyte is composed of a mixture of liquid organic carbonates and lithium salts.
WARNING: Burn hazard. Battery liquid may be flammable if exposed to spark or flame.
Description
The Black & Decker BDCS50 Electric Screwdriver is built with durability and performance in mind. Its 4V Max motor delivers consistent power for driving screws efficiently. The keyless chuck allows for quick bit changes, making it versatile for various tasks. The integrated LED light illuminates the work area, reducing eye strain and improving accuracy. The ergonomic grip ensures comfort during use, while the rechargeable lithium-ion battery provides reliable power on the go.
CHARGING PROCEDURE
THE BATTERIES IN YOUR TOOL ARE NOT FULLY CHARGED AT THE FACTORY. BEFORE ATTEMPTING TO CHARGE THEM, THOROUGHLY READ ALL OF THE SAFETY INSTRUCTIONS.
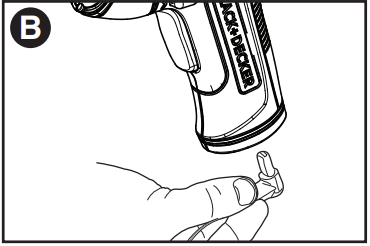
- The charger port (7) is keyed to lock out other chargers. Align the tab in the charger plug (9) with the key in the charging port.
- Plug the charger plug into the charger port of the tool as shown in Figure B.
- Plug the charger (8) into any standard 120 Volt 60 Hz electrical outlet.
- Let the tool charge initially for at least 23 hours. After the initial charge, your tool should be fully charged in 23 hours from a fully discharged condition. Recharge discharged batteries as soon as possible after use or battery life may be greatly diminished. For longest battery life, do not discharge batteries fully. It is recommended that the batteries be recharged after each use.
NOTE: The red LED on the charger indicates the unit is charging, when the LED is off the unit is charged. NOTE: If your tool has been deeply discharged it may take several minutes for the charger LED to illuminate after connection to the tool.
WARNING: Do not use tool while it is connected to the charger.
WARNING: Fire Hazard. When disconnecting the charger from the tool, be sure to unplug the charger from the outlet first, then disconnect the chager cord from the tool.
IMPORTANT CHARGING NOTES
- After normal usage, your tool should be fully charged in 8 - 10 hours. Your tool was sent from the factory in an uncharged condition. Before attempting to use it, it must be charged for at least 9 hours.
- DO NOT charge the batteries in an air temperature below 40°F (4,5° C) or above 105°F (40,5 °C). This is important and will prevent serious damage to the batteries. Longest life and best performance can be obtained if batteries are charged when air temperature is about 75°F (23,8° C).
- While charging, the charger may hum and become warm to touch. This is a normal condition and does not indicate a problem.
- If the batteries do not charge properly—(1) Check current at receptacle by plugging in a lamp or other appliance. (2) Check to see if receptacle is connected to a light switch which turns power off when you turn out the lights. (3) Move charger and tool to a surrounding air temperature of 40°F (4,5° C) to 105°F (40,5° C). (4) If the receptacle and temperature are OK, and you do not get proper charging, take or send the tool and charger to your local BLACK+DECKER service center.
- The tool should be recharged when it fails to produce sufficient power on jobs which were easily done previously. DO NOT CONTINUE using product with its batteries in a depleted condition
DRILLING AND FASTENING
- Hold tool firmly to control its twisting action.
WARNING: Tool may stall (if overloaded or improperly used) causing a twist. To reduce the risk of injury always expect the stall. Grip the tool firmly to control the twisting action and prevent loss of control which could cause personal injury. If a stall does occur, release the trigger immediately and determine the reason for the stall before re-starting.
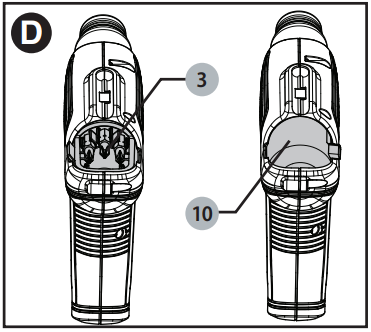
ASSEMBLY AND ADJUSTMENT ROTO BIT HOLDER (FIGURE C - D)
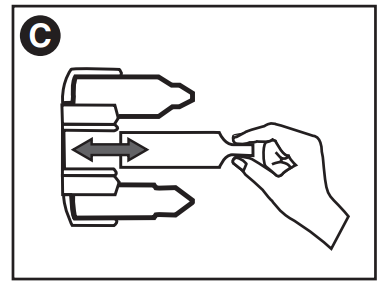
The tool can store eight 1” (25mm) long fastening bits in the roto bit holder (3).
CAUTION: Do not attempt to store longer bits or drill bits in the holder.
Pull the bits straight out toward the back of the screwdriver as shown in Figure C. Snapping them in and out from the top can damage the holder.
The tool is also equipped with a rotating door (10) to coe the bits (Figure D).
INSERTING AND REMOVING BITS
To install a bit, insert it into the cavity in the hex spindle as shown in Figure E.
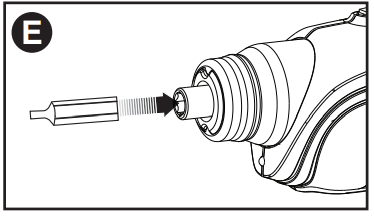
- To remove the bit, pull it straight out.
- For bit tips, use a bit tip extender.
NOTE: Only hex end bits will fit in the spindle
WARNING
- Do not use a screwdriver as a pry bar in any position.
- To avoid the screwdriver being turned on accidentally, do not carry in your pocket.
OPERATING INSTRUCTIONS
TRIGGER SWITCH & REVERSING BUTTON
- The drill is turned ON and OFF by pulling and releasing the trigger (1).
- The forward/reverse control button (2) determines the direction of the tool and also serves as a lock off button.
- To select forward rotation, release the trigger switch and depress the forward/reverse control button to the left.
- To select reverse, depress the forward/reverse control button the opposite direction.
NOTE: When changing the position of the control button, be sure the trigger is released.
LED LIGHT
When the screwdriver is activated by pulling the trigger switch (1), the LED light (5) will automatically come on. The light will go off when the trigger is released.
MAGNETIC SCREW HOLDER
Place a few screws in the magnetic screw holder (4), so your screws are right there to help make the job easier.
SCREW DRIVING
For driving fasteners, the foward/reverse button should be pushed to the left. Use reverse (button pushed to the right) for removing fasteners. When moving from forward to reverse, or vice versa, always release the trigger switch first. Release trigger when the fastener is at the desired depth.
NOTE: For best performance, #8, 2” fasteners are recommended, or screw into pre-drilled holes (1/16 - 5/32 bit recommended).
DRILLING
- Insert the appropriate hex shank drill bit.
- Select forward rotation.
GENERAL DRILLING TIPS
- This tool is not recommended for drilling in masonry.
- Use sharp drill bits only
- Drill bits for metal can be used for drilling holes in wood. These bits must be sharp and should be pulled out frequently when drilling to clear chips from the flutes. Support and secure work properly, as instructed in the safety Instructions.
- Use appropriate and required safety equipment, as instructed in the safety instructions.
- Secure and maintain work area, as instructed in the safety instructions.
- Use light pressure until the hole is started enough to keep the drill bit from slipping out of it.
- Apply pressure in a straight line with the bit.
- Use enough pressure to keep the bit biting but not so much as to stall the motor or deflect the bit.
- Hold the tool firmly to control its twisting action.
- DO NOT CLICK THE TRIGGER OF A STALLED TOOL OFF AND ON IN AN ATTEMPT TO START IT. DAMAGE TO THE TOOL CAN RESULT. To remove:
- Put tool in reverse and back drill bit out.
- Turn tool off and back bit out by hand.
- Remove bit with pliers.
- Minimize stalling on breakthrough by reducing pressure and slowly drilling through last part of hole.
- Put tool in reverse while pulling the bit out of a drilled hole. This will help reduce jamming.
- Make sure switch turns tool on and off.
WARNING: It is important to support work properly and to hold the tool firmly to prevent loss of control which could cause personal injury.
Setup Guide
To operate the BDCS50,
- Start by charging the battery using the provided charger.
- Once charged, insert the battery into the screwdriver and ensure it is securely locked in place.
- Choose the appropriate screwdriver bit for your task and attach it to the keyless chuck by twisting it in until it clicks.
- Turn on the screwdriver by pressing the trigger switch. For assembly or configuration, refer to the user manual for specific instructions on adjusting torque settings or other customization options.
MAINTENANCE
Use only mild soap and damp cloth to clean the tool. Never let any liquid get inside the tool; never immerse any part of the tool into a liquid.
IMPORTANT: To assure product SAFETY and RELIABILITY, repairs, maintenance and adjustment (other than those listed in this manual) should be performed by authorized service centers or other qualified service personnel, always using identical replacement parts.
BATTERY REMOVAL AND DISPOSAL
This product uses lithium-ion rechargeable and recyclable batteries. When the batteries no longer hold a charge, they should be removed from the product and recycled. They must not be incinerated or compacted.
The batteries can be taken for disposal to a BLACK+DECKER, Company-Owned or Authorized Service Center. Some local retailers are also participating in a national recycling program (see “RBRCTM Seal”). Call your local retailer for details. If you bring the batteries to a BLACK+DECKER Company-Owned or Authorized Service Center, the Center will arrange to recycle old batteries. Or, contact your local municipality for proper disposal instructions in your city/town.
TO REMOVE THE BATTERY PACK FOR DISPOSAL:
- First, before attempting to disassemble the product, turn it on and run it in either direction until it stops to ensure a complete discharge of the batteries.
- Remove the screws in the product housing and lift the housing half from the tool.
- Disconnect the terminal clips from the batteries and lift the batteries out.
- Place the battery in suitable packaging to prevent a short circuit of the battery terminals.
- Dispose of batteries as per recommended guidelines.
Troubleshooting
| Problem | Possible Cause | Possible Solution |
|---|---|---|
| Tool will not charge. | • Charger not plugged into a working outlet. | • Plug charger into a working outlet. Refer to "Important Charging Notes" for more details. |
| • Check current at receptacle by plugging in a lamp or other appliance. | ||
| • Check to see if receptacle is connected to a light switch which turns power off when you turn out the lights. | ||
| • Surrounding air temperature too hot or too cold. | • Move charger and tool to a surrounding air temperature of above 40°F (4,5°C) or below 105°F (40,5°C). |
TWO-YEAR LIMITED WARRANTY
Black & Decker (U.S.) Inc. warranties this product to be free from defects in material or workmanship for a period of two (2) years following the date of purchase, provided that the product is used in a home environment
Black+Decker BDCS50 Electric Screwdriver Pros & Cons
Pros
- Compact & Lightweight: Easy to maneuver in tight spaces.
- Ergonomic Design: Reduces fatigue during extended use.
- LED Light: Improves visibility in dark work areas.
- Keyless Chuck: Quick bit changes enhance efficiency.
- Affordable Price: Great value for its features and performance.
Cons
- Limited Torque: May struggle with heavier-duty tasks.
- No Battery Level Indicator: Requires regular checks on battery life.
- Small Battery Capacity: May require frequent recharging.
Customer Reviews
Customers praise the BDCS50 for its ease of use, lightweight design, and affordability. Many appreciate the LED light feature which helps in low-light conditions. However, some users have noted that it might not be as effective for heavy-duty tasks due to its limited torque. Overall, it's a great tool for light to medium-duty applications.
Faqs
What is the voltage of the Black & Decker?
Is the battery rechargeable?
What type of chuck does the Electric Screwdriver have?
Does this screwdriver come with any accessories?
Why isn't my BDCS50 turning on?
Can I use this screwdriver for heavy-duty tasks?
How do I assemble/dismantle bits on this screwdriver?
Is there an LED light on this model?
How long does it take to fully charge the battery?
What safety precautions should I take when using this tool?
Leave a Comment
