Features & Controls: Bosch Dishwasher SGE53B56UC User Guide
Content
Bosch Dishwasher SGE53B56UC Introduction
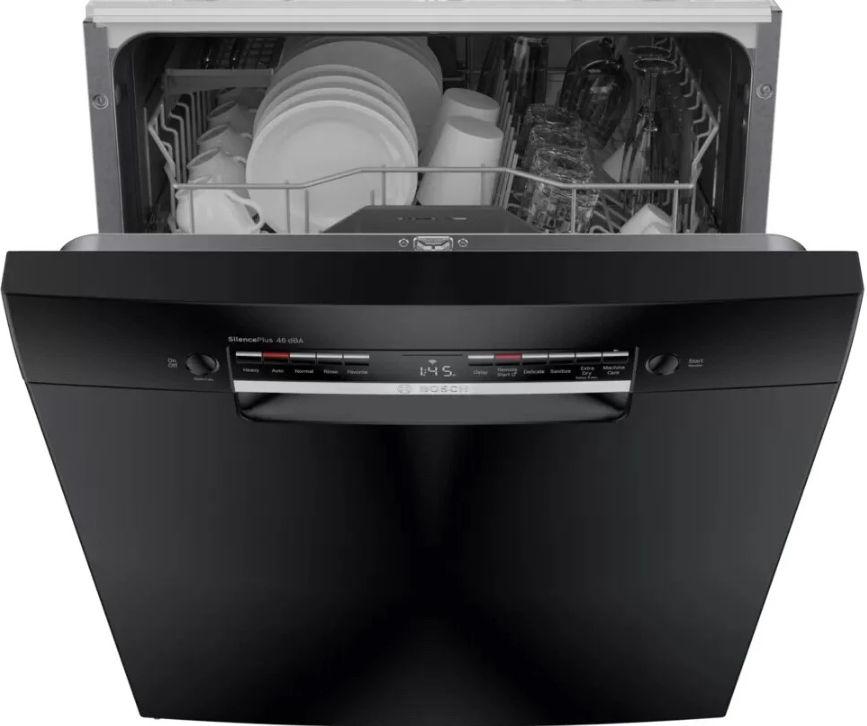
A cutting-edge appliance that combines advanced cleaning technology with a stylish appearance. This dishwasher is designed to provide excellent cleaning performance, energy efficiency, and whisper-quiet operation. With its roomy interior and configurable features, the SGE53B56UC is ideal for all of your dishwashing needs, making it an excellent addition to any modern kitchen.
Technical specifications
- Weight
Max.: 60 kg - Voltage
120 V, 50 Hz or 60 Hz - Power rating
1440 W - Fuse
12 A - Water pressure
- Min. 7.25 psi (50 kPa)
- Max. 145 psi (1000 kPa)
- Inlet rate: Min. 2.6 gal/min
- Water temperature
Cold water.
Hot water max.: 140 °F/ (60 °C) - Load capacity
13 place settings
Familiarizing yourself with your appliance
Appliance
Here you can find an overview of the parts of your appliance.
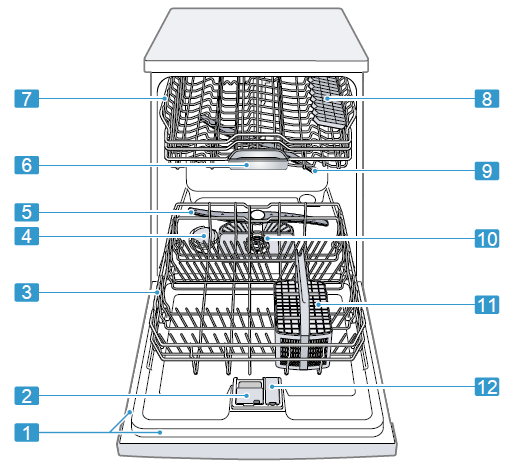
| No. | Item | Description |
|---|---|---|
| 1 | Dispenser for special salt | Special salt is added to the dispenser for special salt. |
| 2 | Lower spray arm | The lower spray arm washes the dishware in the lower rack. |
| 3 | Detergent tab collecting tray | During the wash cycle, detergent tabs automatically drop out into the tab collecting tray where they can dissolve fully. |
| 4 | Upper rack | Upper rack |
| 5 | Cup shelf | Cup shelf |
| 6 | Upper spray arm | The upper spray arm washes the dishware in the upper rack. |
| 7 | Filter system | Filter system |
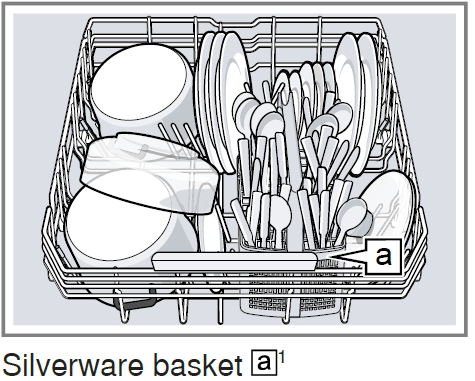
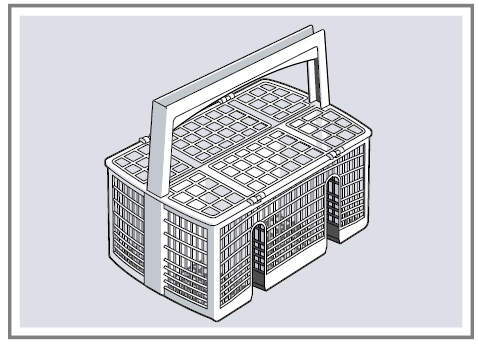
| 8 | Silverware basket | Silverware basket |
| 9 | Dispenser for rinse aid | Rinse aid is added to the dispenser for rinse aid. |
| 10 | Rating plate | Rating plate with E number and FD number. You will need this data to contact Customer service. |
| 11 | Detergent dispenser | Detergent is added to the detergent dispenser. |
| 12 | Lower rack | Lower rack |
Depending on the appliance specifications
Controls
You can use the control panel to configure all functions of your appliance and to obtain information about the operating status.
With some buttons, you can perform different functions.

| No. | Control or Indicator | Description |
|---|---|---|
| 1 | ON/OFF button and reset button | Switching on the appliance, Switching off the appliance, Terminating the wash cycle |
| 2 | Cycle buttons | Cycles |
| 3 | Special salt refill indicator | Water softening system |
| 4 | Rinse aid refill indicator | Rinse aid system |
| 5 | WLAN display | Home Connect |
| 6 | Water supply display | Display for water supply |
| 7 | Setup 3 sec. button | Press Setup 3 sec. for approx. 3 seconds to open the basic settings |
| 8 | Start button | Starting the wash cycle |
| 9 | Cycle buttons and options | Cycles, Options |
| 10 | Remote Start | Remote Start |
| 11 | Electronic delay time | Setting the electronic delay time |
| 12 | Display | Shows information about the remaining run time or basic settings. You can change the basic settings via the display and the setting buttons. |
| 13 | Handle | Open the appliance door. |
- Depending on the appliance specifications
Description
The Bosch Dishwasher SGE53B56UC is a versatile and reliable appliance that can handle even the toughest cleaning jobs. Its stainless steel tub is both durable and easy to clean, while the adjustable racks allow for maximum flexibility when loading dishes. The touch control panel is user-friendly and allows you to choose from six different wash cycles, including a quick wash option for when you're short on time. The interior LED lighting illuminates the dishwasher, making it easy to load and unload dishes even in low-light conditions.
Features
You can find an overview of the possible features of your appli-ance and how to use them here. These features depend on your appliance model.
Upper rack
Arrange cups and glasses in the upper rack.

You can adjust the height of the upper rack to make room for larger items.
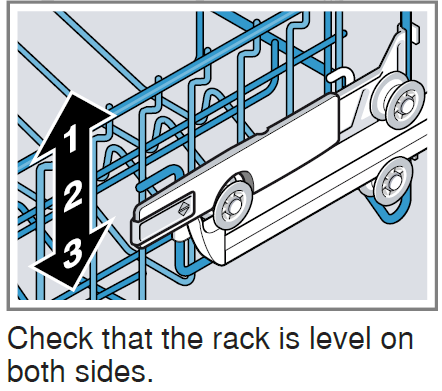
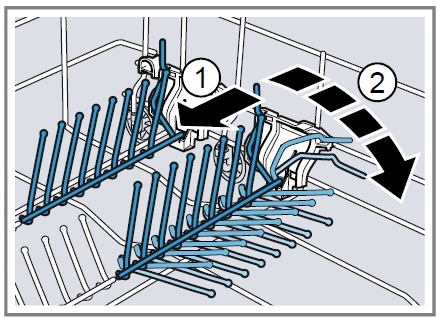
Adjusting the upper rack with the side levers
To wash large items in the racks, adjust the shelf height of the up-per rack.
- Pull out the upper rack.
- To prevent the rack from suddenly dropping down, hold the side of the rack by the top edge.
Press in the right- and left-hand levers on the outside of the rack.
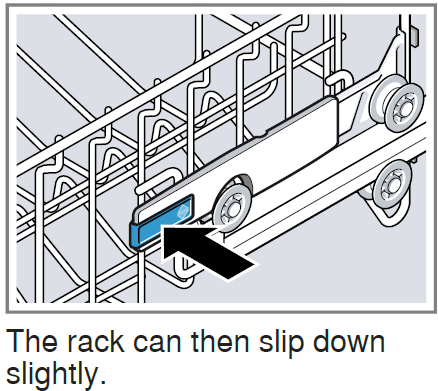
Raise or lower the rack evenly to the right level.
- Slide the rack in.
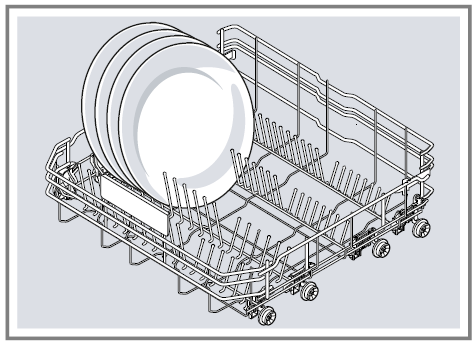
Lower rack
Arrange pans and plates in the lower rack.
Large plates up to a diameter of 12 inches can be arranged in the lower rack as shown.
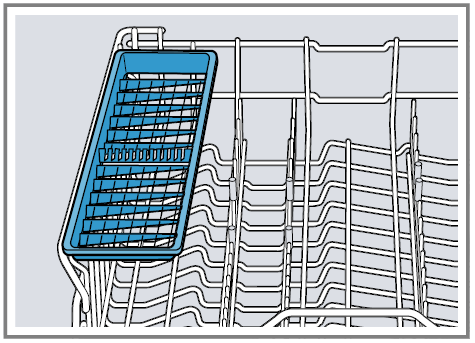
Silverware Basket
Arrange the silverware in the silverware basket, ensuring that the items are not nestled together and with the sharp points down.
WARNING: The sharp points and edges of knives and other sharp utensils can cause serious injury.
Load knives and other sharp utensils with edges down. Do not allow children to handle or play near knives and sharp utensils
Cup shelf
Use the cup shelf and the space underneath for small cups and glasses or for large items of silver-ware, e.g. cooking spoons or serving cutlery.
If you do not need the cup shelf, you can fold it up.
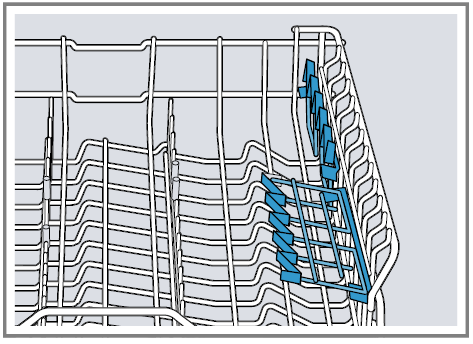
Flip tines
Use the flip tines to position dishware securely, e.g. plates.
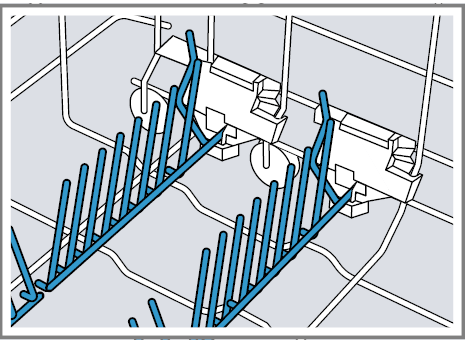
You can fold the tines down to ar-range pans, bowls, and glasses better.1
Folding down the tines
If you do not need the tines, fold them down.
Push the lever forward and fold down the tines .
- To use the tines again, fold them back up.
- The tines click into position.
Rack heights
Set the racks at the right height.
Appliance height 32 inches with silverware basket
Knife Shelf
Use the shelf for knives or other long utensils.
Rack heights
Set the racks at the right height.
Appliance height 32 inches with silverware basket
| Level | Upper rack | Lower rack |
|---|---|---|
| 1 max. ø | 8.5" | 12" |
| 2 max. ø | 9.5" | 11" |
| 3 max. ø | 10.5" | 10" |
Cleaning and maintenance
To keep your appliance working efficiently for a long time, it is important to clean and maintain it carefully.
Cleaning the tub
WARNING
Using detergents containing chlorine may result in harm to health.
Never use detergents containing chlorine.
- Remove any heavy soiling in the interior with a damp cloth.
- Add detergent to the detergent dispenser.
- Select the program with the highest temperature.
- Start the program without dishware.
Machine Care
Deposits, e.g. from food remnants and limescale, can cause your ap-pliance to malfunction. To avoid these problems and reduce odors, we recommend cleaning your ap-pliance at regular intervals. Machine Care combined with machine cleaning products will provide the right care for your appliance.
Tip: You can buy our tested and approved Dishwasher Care and Machine Cleaner for Dishwashers online or from customer service. USA:
Cleaning agent
Only use suitable cleaning agents to clean your appliance.
Tips on appliance care
Follow the tips on appliance care to make sure your appliance functions properly at all times.
| Action | Benefit |
|---|---|
| Regularly wipe the door seals, the front of the dishwasher, and the control panel using a damp cloth and dishwashing liquid. | This ensures the parts of the appliance will remain clean and hygienic. |
| If the appliance is not going to be used for a while, leave the door slightly ajar. | This will prevent unpleasant odors. |
https://www.bosch-home.com/us/shop-productlist/dishwashing/cleaning-and-care
https://www.bosch-home.ca/en/service/cleaners-and-accessories
Machine Care is a program that removes various deposits in one wash cycle.
Cleaning takes place in two phases:
| Phase | Removal of | Cleaner | Placement |
|---|---|---|---|
| 1 | Grease and limescale | Liquid machine care product or machine descaler in powder form. | Appliance interior, e.g., bottle hung in the silverware basket or powder in the interior. |
| 2 | Food remnants and deposits | Machine cleaner | Detergent dispenser |
To ensure optimal cleaning performance, the program does the cleaners independently of each other during the relevant cleaning phase. Therefore, it's important to place the cleaners correctly.
Run Machine Care without dish-ware if the indicator for Machine Care lights up on the control panel or if advised to do so by the display. The indicator will go out after you have run Machine Care. If your appliance does not have a reminder function, we recommend performing Machine Care every 2 months.
Run Machine Care
Run the Machine Care program if the indicator for Machine Care lights up on the control panel or if advised to do so by the display.
Notes
- Run the Machine Care program without any dishes in the dishwasher.
- Only use machine care products and machine cleaners specially designed for dishwashers.
- Make sure that there are no aluminum items, e.g. vent hood grease filters or aluminum pans, in the interior of the appli-ance.
- If you have not run Machine Care after 3 wash cycles, the indicator for Machine Care will go out automatically.
- For optimal cleaning performance, ensure the correct placement of cleaners.
- Follow the safety instructions given on the packaging of the machine care products and machine cleaners.
- Remove any heavy soiling in the interior with a damp cloth.
- Clean the filters.
- Place the machine care product in the appliance interior.
Only use machine care prod-ucts specially designed for dishwashers. - Pour the machine cleaner into the detergent dispenser until it is filled completely.
Do not place any additional ma-chine cleaner in the appliance interior. - Press .
- Press .
- Machine Care is run.
- Once the wash cycle has ended, the indicator for Ma-chine Care goes out.
Filter system
The filter system removes coarse soiling from the dishwashing cycle.
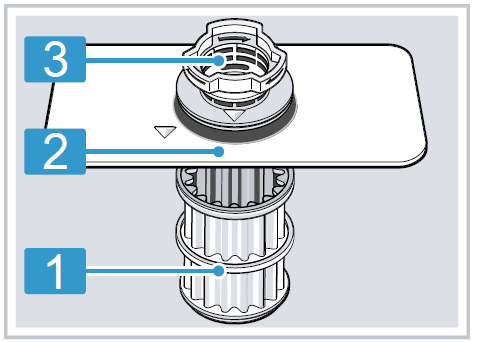
- Microfilter
- Fine filter
- Coarse filter
Cleaning filters
Soiling in the dishwashing water may block the filters.
- Check the filters for residue after each wash.
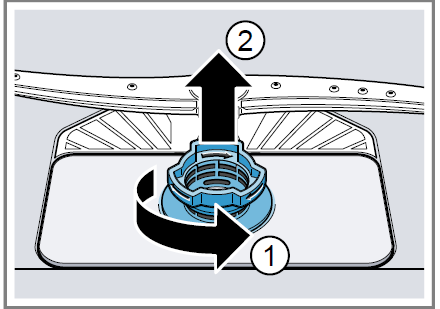
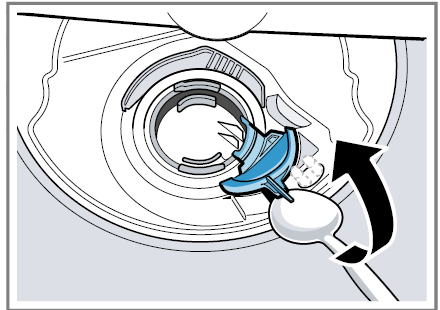
- Turn the coarse filter anticlockwise 1 and remove the filter system 2.
Make sure that no foreign objects fall into the sump.
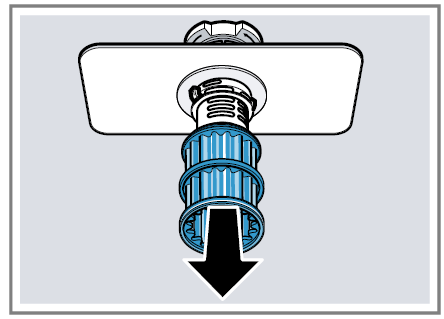
Pull down the microfilter to remove it.
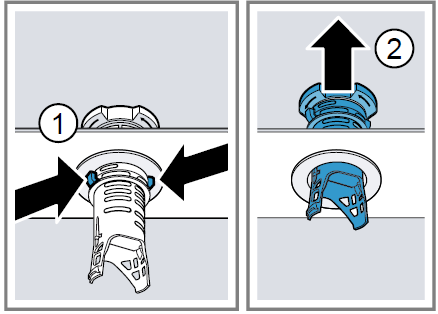
Press the locking catches 1 to- gather and lift the coarse filter out 2.
- Clean the filter elements under running water.
- Carefully clean the rim of dirt between the coarse and fine filter.
- Reassemble the filter system. Make sure that the locking catches on the coarse filter click into position.
- Insert the filter system into the appliance and turn the coarse filter clockwise.
- Make sure that the arrow mark-ings match up.
Cleaning the spray arms
Limescale and soiling in the dishwashing water may block the nozzles and bearings on the spray arms. Clean the spray arms regularly.
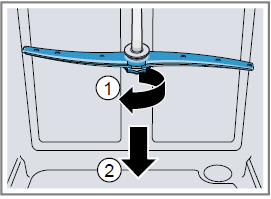
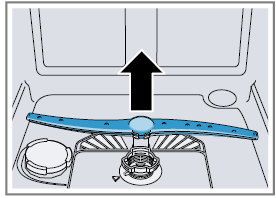
Unscrew the upper spray arm 1 and pull down to remove it 2.
Pull up the lower spray arm to remove it.
- Check the outlet nozzles on the spray arms for blockages under running water and remove any foreign objects.
Insert the lower spray arm.- The spray arm clicks into position.
- Insert the upper spray arm and screw firmly in place.
IMPORTANT SAFETY INSTRUCTIONS
READ AND SAVE THESE INSTRUCTIONS
Read all instructions carefully before use. These precautions will reduce the risk of electrical shock, fire, and injury to persons. When using kitchen appliances, basic safety precautions must be followed including those in the following pages.
Safety definitions
Here you can find explanations of the safety signal words used in this manual.
- WARNING
This indicates that death or serious injuries may occur as a result of non-observance of this warning. - CAUTION
This indicates that minor or moderate injuries may occur as a result of non-observance of this warning. - NOTICE
This indicates that damage to the appliance or property may occur as a result of non-compliance with this advisory.
Note: This alerts you to important information and/or tips.
General information
To reduce the risk of fire, electrical shock, or serious injury, observe the following.
- This appliance is provided with installation instructions and this use and care manual. Read and understand all instructions before using the appliance.
- Keep the manual and the product information in a safe place for future reference or for the next owner.
- Do not connect the appliance if it has been damaged in transit.
- Severe product damage and/or injury could result from the use of unqualified service technicians or non-original parts. All repairs must be performed by an authorized service provider using only original equip-ment factory replacement parts.
- NSF/ANSI 184 Certified residential dishwashers are not intended for licensed food establishments.
Intended use
Only use this appliance:
- for cleaning household dishware.
- In private households and in enclosed spaces in a residential environment.
- Up to an altitude of max. 13,100 ft (4000 m) above sea level.
Restrictive Use
This appliance is not intended for use by persons (including children) with reduced physical, sensory, or mental capabilities, or lack of experience and knowledge, unless they have been given supervision or instruction concerning the use of the appliance by a person responsible for their safety.
Bosch Dishwasher SGE53B56UC Troubleshooting
You can eliminate minor issues on your appliance yourself. Please read the information on eliminating issues before contacting Cus-tomer Service. This may avoid unnecessary repair costs.
Issue | Cause and troubleshooting |
E:20-60 lights up al- ternately. | Appliance has detected that the heatingelement is calcified.
|
E:30-00 lights up al- ternately. | Water protection system is activated.
|
E:31-00 lights up al- ternately. | Water protection system is activated.
|
E:34-00 lights up al- ternately. | Water is continuously running into the appliance.
|
E:32-00 lights up al- ternately or indicator for water supply lights up. | Inlet hose is kinked. ▶ Install theinlet hose withoutkinks. |
Water faucet is turned off. ▶ Turn on the faucet. | |
Water faucet is clogged or calcified. ▶ Turn on the faucet. The flow rate must be at least10 l/min when the water supply is open. | |
Filters in the water connection of the supplyor AquaStop hose are blocked.
|
E:32-00 lights up al- ternately or indicator for water supply lights up. |

|
E:92-40 lights up al- ternately. | Filters are soiled or blocked. ▶ Clean the filters. |
E:61-03 lights up al- ternately. Water is not draining. | Wastewater hose is blocked or kinked.
|
| Siphon connection is still sealed. ▶ Check the connection to the siphonand open if necessary. |
| Cover of wastewater pumpis loose. ▶ Secure the cover of the Wastewater pump →so it clicks into position. |
E:61-02 lights up al- ternately. | Wastewater pump is blocked. ▶ Clean the wastewater pump. |
| Cover of wastewater pumpis loose. ▶ Secure the cover of the Wastewater pump →so it clicks into position. |
E:90-01 lights up al- ternately. | Power voltage is too low. There is no problem with the appliance.
|
A different error code appears in the display window. E:01-00 to E:90-10 | There is a technical issue.
‒Press . ‒Turn off the water faucet. ‒Pull out the power cord plug. ‒Contact customer service and give the error code. |
Dishware is not dry. | No rinseaid used or dosage set too low.
|
| Cycle or cycleoption has no drying phase,or dry- ing phase is too short. ▶ Select a wash cyclewith drying. Some option buttons decrease the dryingre- sult. |
| Water collects in recesses of dishware or silver- ware. ▶ Position dishware at an anglewhere possible. |
|  |
|
|
| The combined detergent used has a poor drying performance.
|
| Extra Dry not activated to improve dryingperfor- mance. ▶ Activate ExtraDry. |
Dishware is not dry. | Dishware removed tooearly or dryingprocess not yet ended.
|
| Rinse aid used has a limiteddrying performance. ▶ Use a name-brand rinseaid. Ecoproducts may havelimited effectiveness. |
Silverware is not dry. | Silverware not arranged properly in the silverware basket or silverware drawer. Droplets can formon the contact points of silver- ware.
|
Appliance interior stillwet after wash cycle. | Not an error. Condensation drying creates water droplets in the tub. This is normal. Moisture in the air condenses on the inside walls of the appli- ance, runs off, and is pumped out. No actionrequired. |
Food remnants on dishware. | Dishware was placedtoo close together or rack is overfilled.
The spray jetsmust reach thesurfaces of the dishware.
|
| Spray arm rotation is blocked. ▶ Arrange dishware so it does not obstruct spray arm rotation. |
| Spray arm nozzles areblocked. ▶ Clean the Spray arms→ |
| Filters are dirty. ▶ Clean the filters. |
| Filters are inserted incorrectly and/or noten- gaged.
|
| Selected wash cycle is too light. ▶ Select a more intensive cycle. |
Food remnants on dishware. | Dishware has been precleaned too intensively. Then the sensors choose a lighter cycle.Stub- born remnants cannot be entirely removed. ▶ Only remove largeremnants of foodand do not pre-rinse dishware. |
| Tall narrow containers in corner areasare not rinsed out adequately. ▶ Do not position tallnarrow containers at too great an angle or in corner areas. |
| Upper rack on right and left notset to same height. ▶ Set theupper rack on the rightand left to the same height. |
Detergent residue in the appliance | Lid of the detergent dispenser is blocked by items of dishware and will not open.
Items of dishware are blocking the dispenser lid.
|
| The lid of the detergent dispenser is blockedby the tab and will not open. ▶ Position thetab in the detergent dispenser crosswise, not vertically. |
| Tabs are usedin the quickor short cycle.There is not enough time for the tab to dissolve. ▶ Select a more intensive Wash cycle or use Powder detergent. |
| Detergent may lose its cleaning or dissolving abil- ity after being storeda long time,or the detergent is clumped together. ▶ Change your Detergent. |
Water spots on plastic parts. | Droplet formation on plastic surfaces is unavoid- able due to the laws of physics. Waterspots are visible after drying. ▶ Select a more intensive program. ▶ Position dishware at an angle. ▶ Userinse aid. ▶ Setthe water softening system higher. |
Wipeable or water- soluble coatings in- side the appliance or on the door. | There is detergent residue. These coatings can- not generally be removed with chemicals. ▶ Change your Detergent. ▶ Scrub the appliance by hand. |
White coating is deposited inside the appliance.
In most casesyou will need to increase the setting.
| |
Special salt dispenser is not screwed tight. ▶ Screw the special saltdispenser tight. | |
There are stubborn white coatings on the dishware, inside the appliance or on the door. | There is detergent residue. These coatings can- not generally be removed with chemicals. ▶ Change your Detergent. ▶ Scrub the appliance by hand. |
The hardness rangeis set incorrectly, or the wa- ter hardness is greater than 62 °E (8.9 mmol/l). ▶ Set the Water softening system to the water hardness or add special salt. | |
3in1/organic/eco detergent is not effective enough. ▶ Set the Water softening system to the water hardness and use separate detergents (name brand, special salt, rinse aid). | |
Toolittle detergent is being used. ▶ Increase theamount of detergent used or change Detergent . | |
Selected wash cycle is too light. ▶ Select a more intensive cycle. | |
Tea residue or lip- stickmarks on dish- ware. | Dishwashing temperature is too low. ▶ Select a program witha higher dishwashing temperature. |
Toolittle detergent is being used or is unsuitable. ▶ Use a suitable Detergent and follow themanu- facturer's instructions for the amount to be used. | |
Dishware has been precleaned too intensively. Then the sensors choose a lighter cycle.Stub- born remnants cannot be entirely removed. ▶ Only remove largeremnants of foodand do not pre-rinse dishware. |
There are colored coatings (blue, yel- low, brown) inside the appliance or on stainless steel dish- ware that are diffi- cult or impossible to remove. | Theformation of filmsis due to substances con- tained in vegetables (cabbage, celery, potatoes, noodles, etc.) or tap water (manganese). ▶ Clean the appliance. Youcan remove coatings with Mechanical cleaning →Page 34 or a machine cleaning product. It may not always be possible to com- pletely remove coatings but they are harmless to health. |
| The formation of films is due to metal components on silver or aluminum dishware. ▶ Clean the appliance. Youcan remove coatings with Mechanical cleaning → or a machine cleaning product. It may not always be possible to com- pletely remove coatings but they are harmless to health. |
There are colored deposits (yellow, or- ange, brown) that are ey to remove in- side the appliance (mainly at the bot- tom). | The formation of films is due to ingredients of food remnants and tap water(limescale), "soap- like".
Follow theinformation on detergents. |
Plastic parts inside the appliance are discolored. | Plastic parts insidethe appliance may become discolored over the life of the dishwasher. ▶ Discoloration may come aboutand will not im- pair functioning of the appliance. |
Plastic parts aredis- colored. | Dishwashing temperature is too low. ▶ Select a program witha higher dishwashing temperature. |
| Dishware has been precleaned too intensively. The sensors then choose a weaker program. Stubborn soiling cannot be entirely removed. ▶ Only removelarge remnants of food and do not prerinse dishware. |
There are remov- able streaks on glasses, glassware with a metallic ap- pearance and silver- ware. | Amount of rinseaid to be dispensed is set too high. ▶ Set therinse aid systemto a lower setting. |
Norinse aid has been added. |
There are remov- able streaks on glasses, glassware with a metallic ap- pearance and silver- ware. | There is detergent residue in the final rinse.Lid of detergent dispenser is blocked by dishware and will not open fully.
Items of dishware are blocking the dispenser lid.
|
| Dishware has been precleaned too intensively. Then the sensors choose a lighter cycle.Stub- born remnants cannot be entirely removed. ▶ Only remove largeremnants of foodand do not pre-rinse dishware. |
Irreversible clouding of glassware. | Glasses are not dishwasher-proof, only suitable for dishwashers. ▶ Use dishwasher-proof glasses. Glasses are usually only suitable for cleaning in a dishwasher, i.e. long-term wear or long- term changes must be expected. ▶ Avoid a lengthy steamphase (standing timeaf- ter wash cycle ends). ▶ Use a program witha lower temperature. ▶ Set the softening systemto the waterhard- ness. ▶ Use detergent with a glassprotection compo- nent. |
Detergent residue is present in the deter- gent dispenser or the tab collecting tray. | Spray arms were blocked by dishware so deter- gent was not rinsed out. ▶ Check thatthe spray armsare not blocked and can rotate freely. |
Detergent dispenser was damp when detergent was added. ▶ Only add detergent to the detergent dispenser when dry. | |
Excessive formation of foam occurs. | Hand soap got in the rinseaid dispenser. ▶ Immediately addrinse aid to the dispenser. |
| Rinse aid has beenspilled. ▶ Remove the rinse aidwith a cloth. |
| Detergent or machine care product usedcauses excessive foaming. ▶ Change thebrand of detergent. |
Connection to home network is not es- tablished. | WLAN on router is not active. ▶ Check the wireless networkconnection of your router. |
WLAN display is flashing. | Connection to home networkis not available. ▶ Activate the wireless network connection on your router. |
HomeConnect can- not be implemented correctly. | Home Connect set incorrectly. ▶ Please consultthe documents supplied for Home Connect. |
There is a technical error. ▶ Please consult the information on support in the documents supplied for Home Connect. | |
Special salt refillin- dicator lights up. | Insufficient special salt. ▶ Add Specialsalt. |
Sensor does not detectspecial salt tablets. ▶ Do notuse special salt tablets. | |
Refill indicator for special salt does not light up. | Water softening system is switched off. ▶ Adjust watersoftening system |
Refill indicator for rinse aid lights up. | No rinse aid.
|
Refillindicator for rinse aid does not light up. | Rinse aid system is switched off. ▶ Set the amount of rinse aid. |
Display flashes. | Appliance door is not closed properly. ▶ Close the appliance door. ‒ Arrange the dishware so that no parts project beyondthe rack and prevent the ap- pliance door from closing properly. |
Water is left in the appliance at the end of the program. | Filter systemor area underthe filters is blocked.
|
Program has not yet ended. ▶ Wait untilthe program ends or terminate the program with Reset. | |
Appliance cannot be switched on or oper- ated. | Software update is takingplace. ▶ Wait untilthe software updatehas finished. |
| Appliance functions have failed. |
Appliance cannot be switched on or oper- ated. |
|
Appliance does not start. | Thebreaker has tripped. ▶ Check the relevant breaker. |
| Power cord is not inserted.
|
| Appliance door is not closed properly. ▶ Close the appliance door. |
Wash cycle starts up automatically. | Youdid not waituntil the cycleended. |
Appliance stops dur- ing the cycle or cuts out. | Appliance door is not closed properly. ▶ Close the appliance door. |
Power and/or water supplyhas been interrupted.
| |
| Upper rack is pressing against inner door and preventing appliance door from beingclosed se- curely. ▶ Check whether the rear panelof the appliance is being pressed in by a power outletor a hose holder that has not been removed. ▶ Arrange the dishware so that no parts project beyond the rack and prevent the appliance door from closing properly. |
Appliance door can- not be closed. | Door lock has beenactivated. ▶ Close the appliance door with greaterforce. |
| Door cannot be closeddue to installation method. ▶ Check whetherthe appliance has been in- stalled properly. Whenclosed, the appliance door, its decoror attached parts shouldnot knock againstadja- cent cabinets or the worktop. |
Lid on the detergent dispenser cannot be closed. | Detergent dispenser or lid are blocked by sticky detergent residue. ▶ Remove detergent residue. |
Filling valves mak- ingknocking noises. | Caused by the domestic installation. No fault present in the appliance. Does not affectfunction- ing of the appliance. ▶ Can onlybe remedied in the homeinstallation. |
Knocking or rattling noise. | Spray arm is striking dishes. ▶ Arrange dishware so the sprayarms do not strike dishware. |
With a smallload the waterjets directly strike against the tub. ▶ Distribute the dishware evenly. ▶ Load the appliance with more dishware. | |
Light items of dishware moveabout during the wash cycle. ▶ Position lightitems of dishware securely. |
Clean wastewater pump
Large food remnants or foreign objects can block the wastewater pump. As soon as the dishwashing water no longer drains properly, the wastewater pump must be cleaned.
CAUTION: There may be some sharp debris, such as glass fragments, blocking the wastewater pump.
Use caution when removing parts for cleaning.
- Disconnect the appliance from the power supply.
- Remove the upper and lower rack.
- Remove the filter system.
- Scoop out any water.
Use a sponge if necessary. Prise off the pump cover using a spoon and grip it by the crosspiece.
- Lift the pump cover inwards at an angle and remove it.
- Remove any food remnants or foreign objects in the area of the impeller.
Warranty
BSH warrants that the Product is free from defects in materials and workmanship for a period of three hundred sixty-five (365) days from the date of the original purchase.
This Product is also warranted to be free from cosmetic defects in material and workmanship (such as scratches of stainless steel, paint/porcelain blemishes, chips, dents, or other damage to the finish) of the Product, for a period of thirty (30) days from the date of pur-chase or closing date for new construction.
Pros & Cons
Pros
- Large capacity
- PrecisionWash technology
- AquaStop leak protection
- Adjustable racks
- Interior LED lighting
Cons
- May be too expensive for some budgets
- Some users may find the touch control panel difficult to use
Customer Reviews
Customers generally have positive things to say about the Bosch Dishwasher SGE53B56UC. Many praise its quiet operation and thorough cleaning capabilities. However, some users have reported issues with the touch control panel and the racks not aligning properly.
Faqs
What is the capacity of the Bosch Dishwasher SGE53B56UC?
What is PrecisionWash technology?
Does the Bosch Dishwasher have a leak protection system?
Can the racks on the Bosch Dishwasher SGE53B56UC be adjusted?
What wash cycles does the Bosch Dishwasher have?
Does the Bosch Dishwasher SGE53B56UC have a delay start feature?
What material is the tub of the Bosch Dishwasher made of?
Leave a Comment