
Setup & Usage: Bosch OBD1300 Enhanced OBD I & OBD II Scan Tool User Manual
Content
Bosch OBD1300 Enhanced OBD I & OBD II Scan Tool

Introduction
The bosch OBD1300 Enhanced OBD I & OBD II Scan Tool is a versatile and powerful automotive diagnostic device designed for both professional mechanics and automotive enthusiasts. This handheld scanner supports a wide range of vehicles, including all 1996 and newer import and domestic cars with OBD II or CAN protocols, 1994-95 OBD II compliant models, and select 1984-95 OBD I vehicles from manufacturers like GM, Ford, Chrysler, and Toyota. Its comprehensive compatibility makes it ideal for workshops, service writers, and DIY users seeking a reliable tool to efficiently diagnose engine and system issues.
Key benefits include the ability to read and erase diagnostic trouble codes (DTCs), view freeze frame data, and perform Inspection/Maintenance (I/M) readiness tests. Unique selling points such as a 3.5-inch color display with live data graphing, multilingual menus in English, Spanish, and French, and advanced features like oil light and battery resets set this scanner apart. Its rugged, compact design with soft rubber grips and an intuitive eight-button interface ensures ease of use in busy automotive environments.
The bosch OBD1300 is available through select automotive retailers and online stores, typically priced around $249, offering a mid-range option that balances advanced functionality with affordability compared to basic or premium diagnostic tools. This scan tool stands out as an excellent investment for those needing enhanced OBD I and OBD II vehicle diagnostics with professional-grade features accessible in a portable format.
Specifications of the bosch OBD1300 Enhanced OBD I & OBD II Scan Tool
- Compatibility: Works with all 1996+ OBD II & CAN vehicles, 1994-95 OBD II compliant, and select 1984-95 OBD I GM, Ford, Chrysler, Toyota models
- Functions: Reads and erases DTCs, provides freeze frame data, VIN info, I/M readiness testing, oil light, and battery resets..
- Live Data: View, record, and playback live sensor data such as RPM, coolant temperature, and more
- Languages: English, Spanish, and French trilingual menus and code definitions
- Connectivity: USB port for software updates; includes multiple OBD I cables (GM ALDL, Ford EEC-IV, Chrysler SCI, Toyota rectangular/round) and OBD II cables with 8-foot extension
- Power: Operates on four AAA batteries or a cigarette lighter adapter (batteries not included)
- Size & Weight: Measures 6.8 x 2.6 x 1 inches; weighs approximately 10.5 ounces (1.4 lbs with cables)
- Additional Features: 26 million+ CodeConnect top-reported fixes database, ABS & Airbag/SRS code coverage (model dependent)
- Included Accessories: Soft carrying case, quick start guide, cigarette lighter adapter
- Benchmark: Offers a larger display and more vehicle compatibility than many competing scanners, such as Innova CarScan Inspector 5310, but at a competitive price point
- Display: Color, backlit, QVGA resolution
- Operating Temperature: 0 to 50°C (32 to 122°F)
- Storage Temperature: -20 to 70°C (-4 to 158°F)
- Internal Power: 4-AAA Batteries
- External Power: 7 to 16 Volts
A minimum of 8.0 V is required for most control modules to operate properly in a vehicle.
Dimensions

Accessories

Optional Accessories

SAE Publications
SAE has published hundreds of pages of text defining a standard communication protocol that establishes hardware, software, and circuit parameters of OBD II systems. Unfortunately, vehicle manufacturers have different interpretations of this standard communications protocol. As a result, the generic OBD II communications scheme varies, depending on the vehicle. SAE publishes recommendations, not laws, but the Environmental Protection Agency (EPA) and California Air Resources Board (CARB) made many of SAE’s recommendations legal requirements that vehicle manufacturers were required to phase in over three years. Beginning in 1994, vehicles with a new engine management computer (about 10% of each manufacturer's fleet) were supposed to comply with OBD II standards. In 19955, OBD II systems were to appeared on about 40% of the new vehicles sold in the United States. Some of the 1994-1995 OBD II systems were not fully compliant, so the Government granted waivers to give manufacturers time to fine-tune their systems. Beginning in 1996, most of the new vehicles sold in the United States were fully OBD II compliant.
Data Link Connector (DLC)
The data link connector (DLC) allows the scan tool to communicate with the vehicle’s computer(s). Before OBD II, manufacturers used different DLCs to communicate with the vehicle. Use the proper DLC
adapter cable to connect the scan tool to the vehicle. Also, the vehicle’s DLC may be found in several different places and have many different configurations. The scan tool supports OBD I DLCs used by Ford, GM, Chrysler, and Toyota.
OBD II (J1962)
Beginning in 1996, vehicles sold in the United States use the J1962 (OBD II) DLC, a term taken from a physical and electrical specification number assigned by the SAE (J1962). The DLC should be located under the dashboard on the driver’s side of the vehicle. If the DLC is not located under the dashboard as stated, a decal describing its location should be attached to the dashboard in the area where the DLC should have been located. For more information on OBD II connectors, go to http://www.obdclearinghouse.com/oemdb.
Because the OBD II J1962 connector has power and ground, you only need a single cable connection to the tool for both power and vehicle communications. Attach the OBD II adapter cable (7-0138) to the extender cable (7-0137) (both supplied with the scan tool), to connect the tool. Certain pins in the connector are reserved.
.png)
OBD II Data Link Connector (DLC) Pins
- Manufacturer reserved
- J1850 bus+
- Manufacturer reserved
- Chassis ground
- Signal ground
- CAN high, J-2284
- K line, ISO 9141-2 & ISO/DIS 14230-4
- Manufacturer reserved
- Manufacturer reserved
- J1850 Bus-
- Manufacturer reserved
- Manufacturer reserved
- Manufacturer reserved
- CAN low, J-2284
- L line, ISO 9141-2 & ISO/DIS 14230-4
- Battery power
_pins.png)
Ford (OBD I)
Ford used three types of DLCs with their OBD I systems. After vehicle selection, the scan tool will indicate which cable is required.
IMPORTANT
Use the included cigarette lighter cable (7-0135) to provide power to the scan tool for all systems.
EEC-IV
The EEC-IV DLC is a large 6-sided connector with a pigtail connector. The EEC-IV cable adapter (7-0140) is included with the scan tool.
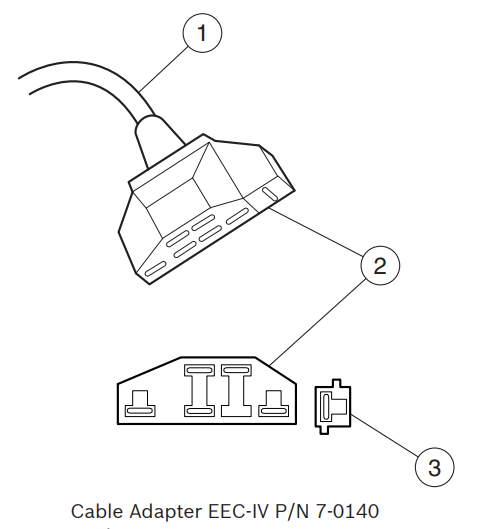
- To scan the tool
- Vehicle DLC EEC-IV
- STI Pigtail (EEC-IV only)
MECS
MECS vehicles (1988 –1995) use either a 6-pin (with pigtail) or a 17-pin DLC. Use the MECS 6-pin adapter cable kit (7-0143) for both configurations. The MECS adapter cable kit includes jumper wires to connect to the MECS 17-pin DLC. The MECS adapter cable kit is not included with this tool. It is available through your dealer. Use the following diagrams to connect the adapter cable.
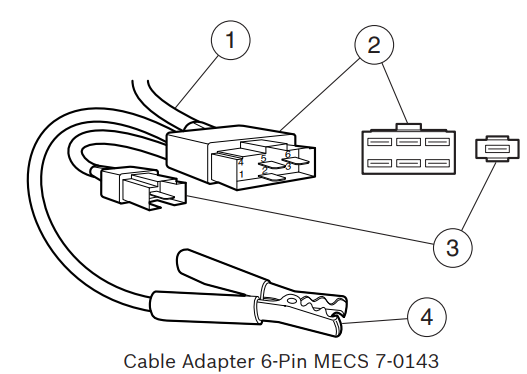
- To scan tool
- Vehicle DLC 6-Pin MECS
- STI Pigtail
- Clip to a good vehicle ground

- To scan the tool
- STI Pigtail
- STO
- Clip to a good vehicle ground
IMPORTANT
Certain Ford Probes have a WHITE TACH CONNECTOR located very close to the 6-pin self-test connector and bundled in the same wiring harness. This is not the Self-Test Input (STI) pigtail.
Connect the pigtail to the black STI connector located farther back on the wire harness. If the tool is connected to the white tach connector, serious damage may result and may void the warranty. Refer to the illustration.
GM (OBD I)
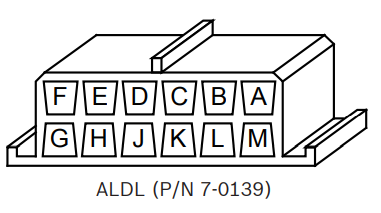
Before 1996, most GM vehicles used the 12-pin AssemblyLine Diagnostic Link (ALDL) DLC. In 1994 and 1995, certain GM vehicles used the J1962 (OBD II) DLC, but were not OBD II compliant. After vehicle selection, the scan tool will indicate which cable is required.
IMPORTANT
Use the included cigarette lighter cable (7-0135) to provide 12V to the tool only on vehicles requiring the OBD I DLC.
The ALDL DLCs are usually located under the dashboard on the driver’s side. On Corvettes and Fieros, the DLC may be located in the center console behind the ashtray. Refer to the service manual for the exact location. It may be in full view, or it may be recessed behind a panel. An opening in the panel should allow access to the recessed connector.
Chrysler (OBD I)
Before 1996, most Chrysler vehicles used either the serial communications interface (SCI) or LH DLC. After vehicle selection, the scan tool will indicate which cable is required.
IMPORTANT
Use the included cigarette lighter cable (7-0135) to provide 12V to the tool when using the SCI adapter cable.
Serial Communication Interface (SCI)
The SCI DLC is a 6-pin connector located in the engine compartment. The adapter cable to be used on these vehicles is supplied with the tool. This cable is labeled CHRY SCI on the vehicle end and is included with the scan tool.
.png)
LH
This DLC is used on LH platform vehicles. The LH style DLC is a small, blue, rectangular 6-pin connector located in the passenger compartment below the dashboard to the right of the steering column. The LH Adapter Cable (7-0142) is optional and must be purchased separately.
Toyota (OBD I)
Before 1996, most Toyota vehicles used either a round or rectangular DLC. After vehicle selection, the scan tool will indicate which cable is required.
The Toyota round DLC is a 17-pin connector located in the passenger compartment. This cable is labeled Toyota 2 on the vehicle end. The adapter cable (7-0146) is included with the scan tool.
.png)
The Toyota rectangular DLC is a 20-pin connector located in the engine compartment. This cable is labeled Toyota 1 on the vehicle end. The adapter cable (7-0145) is included with the scan tool.

IMPORTANT
Use the included cigarette lighter cable (7-0135) to provide 12V to the tool when using either the Toyota round adapter cable or the Toyota rectangular adapter cable.
OBD II Diagnostic Trouble Codes (DTCs)
J2012 and ISO 15031-6 are standards for all DTCs, established by the SAE, International Organization for Standardization (ISO),, and other governing bodies.
- Codes and definitions assigned by these specifications are known as Generic OBD II codes.
- OBD II requires compliance with these standards for all cars, light trucks, APVs, MPVs, and SUVs sold in the United States.
- Codes not reserved by the SAE are reserved for the manufacturer and referred to as Manufacturer-Specific Codes.
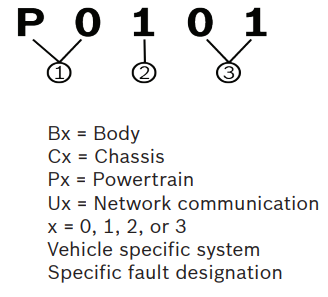
DTCs are used to help determine the cause of a problem or problems with a vehicle. - DTCs consist of a five-digit alphanumeric code.
- The DTCs format and general code types are shown below.
Using the Scan Tool
The Scan Tool
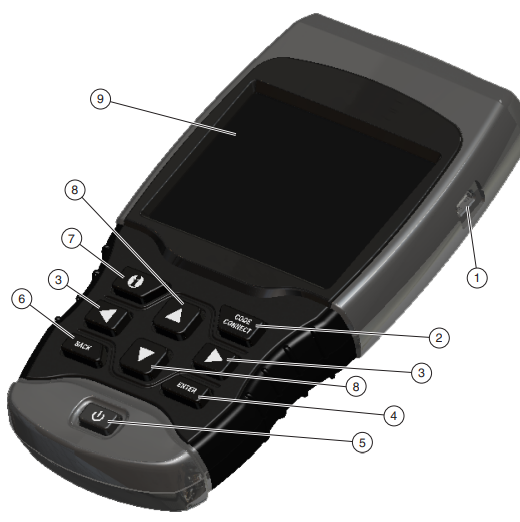
- USB port - provides a USB connection for the computer.
- CodeConnect® allows the operator to access vehicle-specific repair information.
- LEFT and RIGHT arrow keys - select YES or NO and select dataparameters for the customdata list.
- ENTER key - selects displayed items.
- ON/OFF key - turns power ON or OFF.
- BACK key - goes to the previous screen or level.
- MORE INFO key - displays the Diagnostic Trouble Code (DTC) definition when viewing Freeze Frame Data. It will display the code setting criteria when viewing the DTC definition.
- UP and DOWN arrow keys - the election up or down.
- LCD (color, backlit, QVGA resolution)
- DLC cable (not shown) - provides connection for vehicle interface.
- SerNumber Plate inside the batterympartment the serial number tool.
- Battery Compartment (on back; not shown) - provides power to the scan tool when reprogramming from a personal computer or off-vehicle reviewing of codes and printing.
- 12V Power Jack (not shown) - provides power to the scan tool when the scan tool is connected to certain OBD I vehicles.
Troubleshooting Common Issues with the bosch OBD1300 Scan Tool
Many users encounter typical challenges when using the bosch OBD1300 Enhanced OBD I & OBD II Scan Tool. Below are common problems and recommended solutions:
- Scanner does not power on: Verify batteries are installed correctly or use the cigarette lighter adapter. Replace batteries if depleted.
- No communication with vehicle: Ensure proper cable connection to the vehicle’s OBD port. Confirm vehicle ignition is ON. Check compatibility with vehicle make and model (especially for OBD I vehicles).
- Error codes not clearing: Some codes require specific repair actions before clearing. Consult the CodeConnect database for reported fixes and retry after repairs.
- Live data graphing issues: Restart the unit or reconnect cables. Make sure vehicle sensors are operational.
Preventive measures include regularly updating the scan tool software via USB and handling the unit and cables carefully to avoid damage. The bosch OBD1300 comes with a limited warranty; for support, users can contact Bosch Automotive Service Solutions or consult authorized service centers. Additional help, manuals, and software updates are available on Bosch’s official diagnostics website.
Pros and Cons of the bosch OBD1300 Enhanced OBD I & OBD II Scan Tool
Pros
- Wide vehicle compatibility: Supports OBD I and OBD II vehicles,,e s including older domestic and import models.
- Large color display: 3.5-inch screen with graphing capability offers clear data visualization, uncommon in this price range.
- Comprehensive diagnostics: Reads, clears codes, performs I/M readiness tests, and provides live data recording and playback.
- Multi-language support: English, Spanish, and French menus broaden user accessibility.
- Robust accessory kit: Includes multiple OBD I cables and extension cords for versatile use.
- Durable, portable design: Compact size with rubber grips, ideal for professional and DIY use.
Cons
- Price point: At around $249, it is more expensive than basic OBD-II scanners, which may deter casual users.
- Stiff buttons: Some users report that the eight-button interface requires firm presses and occasional multiple attempts.
- No AC power input: Operates only on batteries or a 12V adapter, limiting power options.
- Discontinued model: Bosch has discontinued this scanner line, potentially limiting future software updates and support.
- Learning curve: Advanced features may require reading the manual for effective use compared to simpler scanners.
Customer Reviews and Feedback on the bosch OBD1300 Enhanced OBD I & OBD II Scan Tool
Users generally praise the bosch OBD1300 for its extensive vehicle coverage and the clarity of its color display, often rating it 4 out of 5 stars. Many highlight the value of being able to graph live engine data and the convenience of a multilingual interface. Professionals appreciate the inclusion of multiple OBD I cables, making it a flexible tool for older vehicles.
Common complaints include the stiffness of the buttons and the relatively high price compared to simpler code readers. Some users note that since Bosch discontinued this model, updates are less frequent. Nonetheless, buyers frequently recommend this tool for serious DIYers and small repair shops seeking a reliable all-in-one scanner, especially for mixed vehicle fleets.
Overall, the scanner receives positive testimonials for durability, ease of use once familiar, and diagnostic depth, with repeated endorsements for use in diagnosing both OBD I and II systems effectively.
Faqs
How do I set up my bosch OBD1300 Enhanced OBD I & OBD II Scan Tool for the first time?
What should I do if my bosch OBD1300 Enhanced OBD I & OBD II Scan Tool won't connect to my car?
How do I interpret and use the 'Top Reported Fixes' feature on the bosch OBD1300 Enhanced OBD I & OBD II Scan Tool?
Can I reset oil and battery lights with the bosch OBD1300 Enhanced OBD I & OBD II Scan Tool?
How do I update the software on my bosch OBD1300 Enhanced OBD I & OBD II Scan Tool?
What are the main differences between using the bosch OBD1300 Enhanced OBD I & OBD II Scan Tool on OBD I vs. OBD II vehicles?
How can I record and playback live sensor data with the bosch OBD1300 Enhanced OBD I & OBD II Scan Tool?
How do I maintain and care for my bosch OBD1300 Enhanced OBD I & OBD II Scan Tool to ensure longevity?
Tags
More bosch manuals
Leave a Comment