Brother Computerized Sewing Machine CS7000X Instruction Manual
Content
Introduction
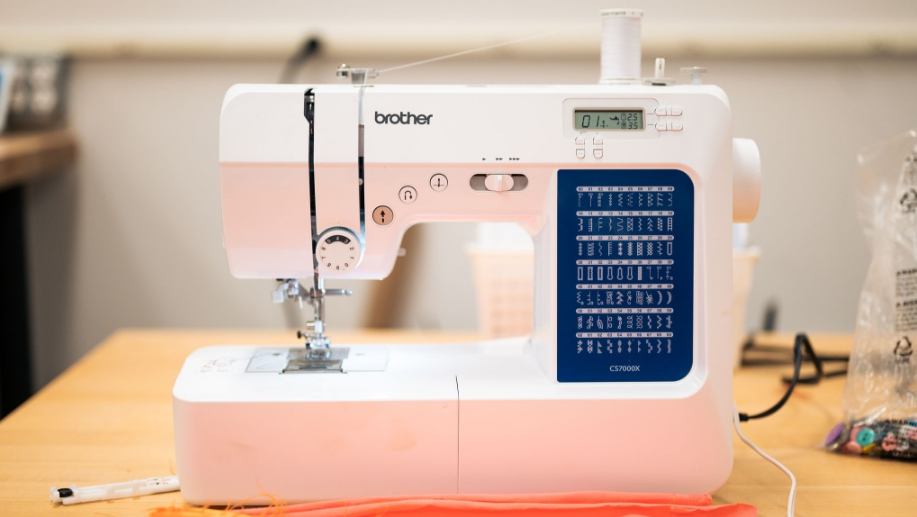
The Brother Computerized Sewing Machine CS7000X is a versatile and easy-to-use sewing machine that is perfect for both beginners and experienced sewers. With a wide range of built-in stitches, an automatic needle threader, and a large LCD display, this sewing machine is designed to make your sewing projects faster, easier, and more enjoyable. The estimated price of the Brother Computerized Sewing Machine is around $200 to $300, and it is available for purchase online and in-store.
KNOWING YOUR SEWING MACHINE
The main parts
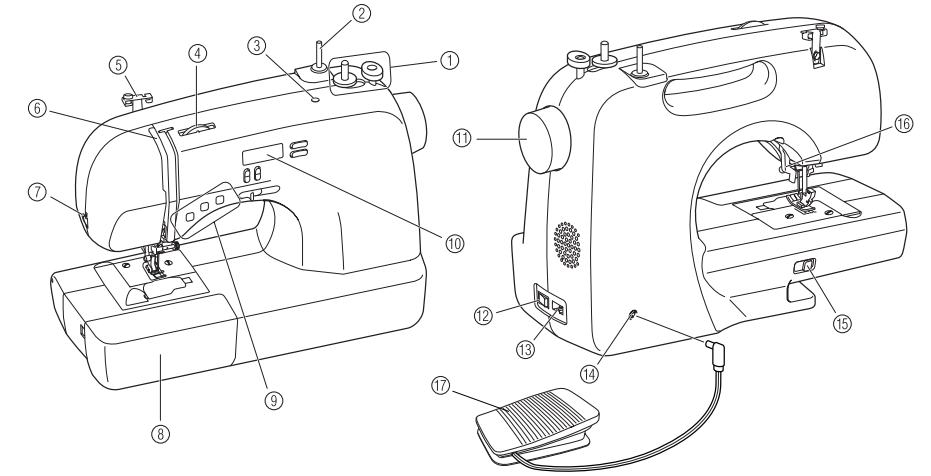
- Bobbin winder
This winds the thread onto the bobbin for use as the lower thread. - Spool pin
This holds the spool of thread. - Hole for extra spool pin
This holds a second spool of thread for sewing with two needles. - Upper tension-control dial
This controls the tension of the upper thread. - Thread guide
This is used when winding the thread onto the bobbin and then threading the machine. - Thread take-up lever
- Thread cutter
Pass the threads through the thread cutter to cut them. - Flat bed attachment with accessory compartment
- Operation buttons
The operation buttons differ depending on the sewing machine model. - Operation panel
This is used to select the stitch and specify the various settings. - Handwheel
Used to manually raise and lower the needle. - Main power and sewing light switch
You can turn the main power and sewing light switch on and off. - Jack/socket connector
Insert the plug on the power supply cord into the jack/ socket connector. - Foot controller jack/socket
Plug in the foot controller plug. - Feed dog position lever
Use the feed dog position lever to lower the feed dogs. - Presser foot lever
Used to raise and lower the presser foot. - Foot controller
You can use this to control the sewing speed, and to start and stop sewing.
Needle and presser foot section
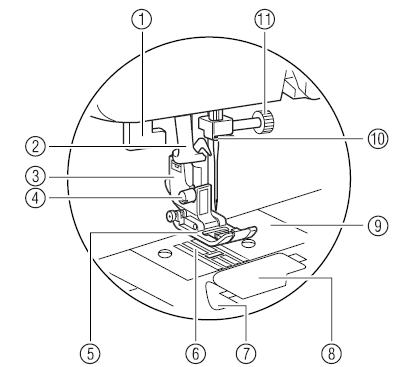
- Buttonhole lever
Lower the buttonhole lever when sewing buttonholes and bar tacks. - Needle threader
(for models equipped with the needle threader) - Presser footholder
The presser foot is installed onto the presser foot holder. - Presser foot holder screw
Use the presser foot holder screw to hold the presser foot holder in place. - Presser's foot
The presser foot applies pressure consistently on the fabric as the sewing takes place. Attach the appropriate presser foot for the selected stitching. - Feed dogs
The feed dogs feed the fabric in the sewing direction. - Quick-set bobbin (for models equipped with the quick- set bobbin)
You can start sewing without pulling up the bobbin thread. - Bobbin cover
Open the bobbin cover to set the bobbin. - Needle plate
The needle plate is marked with guides for sewing straight seams. - Needle bar thread guide
Pass the upper thread through the needle bar thread guide. - Needle clamp screw
Use the needle clamp screw to hold the needle in place.
Detailed Specifications
The Computerized Sewing Machine CS7000X comes with the following key features:
- 240 built-in stitches, including decorative, quilting, and heirloom stitches
- 8 one-step buttonholes
- Wide table for large sewing projects
- Bright LED lighting for better visibility
- Automatic needle threader and drop-in bobbin
- Adjustable stitch length and width
- Free arm for sewing cuffs and sleeves
- Top-load bobbin with clear cover
- LCD display with easy-to-use stitch selector
- 10 built-in presser feet and an easy-to-change system
- Hard cover included for storage and portability
Operation buttons
The operation buttons help you to easily perform various basic sewing machine operations. The operation buttons differ depending on the sewing machine model.
- Presser foot lever
Raise and lower the presser foot lever to raise and lower the presser foot. Reverse/reinforcement stitch button

Press the reverse/reinforcement stitch button to sew reverse stitches. Reverse stitches are sewn by keeping the button pressed down to sew in the opposite direction.
Buttons provided on some models- Start/stop button
 (for models equipped with the start/stop button)
Press the start/stop button to start or stop sewing. The machine sews at a slow speed at the beginning of sewing while the button is depressed. When sewing is stopped, the needle is lowered in the fabric. - Needle position button
 (for models equipped with the needle position button)
Press the needle position button to raise or lower the needle. Pressing the button twice sews one stitch. Sewing speed controller (for models equipped with the sewing speed controller)
Slide the sewing speed controller to adjust the sewing speed.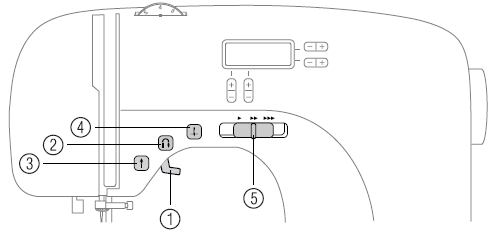
Operation panel
The operation panel, located on the front of the sewing machine, allows you to select a stitch and specify how the stitch will be sewn.
- LCD (Liquid crystal display)
The selected stitch (1), presser foot that should be used (2), stitch length in millimeters (3), and stitch width in millimeters (4) are displayed. - Stitch selection keys
Press the stitch selection keys, and then select the number for the stitch that you wish to use. - Stitch length adjustment key
Press this key to adjust the stitch length. (Press the “–” side to reduce the stitch length; press the “+” side to increase the stitch length.) Stitch width adjustment key
Press this key to adjust the stitch width. (Press the “–” side to reduce the stitch width; press the “+” side to increase the stitch width.)
Description
The Computerized Sewing Machine CS7000X is a powerful and user-friendly sewing machine that is perfect for a wide range of sewing projects. With 240 built-in stitches, you can choose the perfect stitch for any project, whether you're making clothing, quilting, or crafting. The automatic needle threader and drop-in bobbin make threading the machine quick and easy, even for beginners. The LCD display and stitch selector make it easy to choose your stitch and adjust the length and width. The wide table provides plenty of space for large projects, and the free arm makes sewing cuffs and sleeves a breeze. The machine is also lightweight and portable, making it easy to take with you to classes or workshops. The hard cover that is included provides protection during storage and transportation.
USING YOUR SEWING MACHINE
Power supply precautions
Be sure to observe the following precautions concerning the power supply.
WARNING
- Use only regular household electricity for the power source. Using other power sources may result in fire, electric shock, or damage to the machine.
- Turn off the main power and remove the plug in the following circumstances:
- When you are away from the machine
- After using the machine
- When the power fails during use
- When the machine does not operate correctly due to a bad connection or a disconnection
- During electrical storms
CAUTION
- Do not use extension cords or multi-plug adapters with many other appliances plugged in to them. Fire or electric shock may result.
- Do not touch the plug with wet hands. Electric shock may result.
- When unplugging the machine, always turn off the main power first. Always grasp the plug to remove it from the outlet. Pulling on the cord may damage the cord, or lead to fire or electric shock.
- Do not allow the power cord to be cut, damaged, modified, forcefully bent, pulled, twisted, or bundled. Do not place heavy objects on the cord. Do not subject the cord to heat. These things may damage the cord and cause fire or electric shock. If the cord or plug is damaged, take the machine to your authorized dealer for repairs before continuing use.
- Unplug the power cord if the machine is not to be used for a long period of time. Otherwise a fire may result.
Power supply
Insert the plug into a wall outlet.
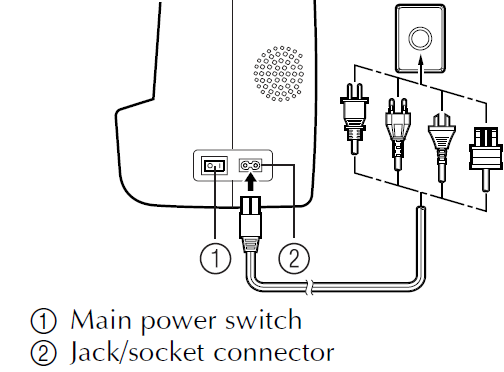
Set the main power switch to “I”.
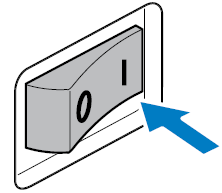
- To turn off the machine, set the main power switch to “
 ”
”- The sewing lamp goes off when the machine is turned off.
Note
- If a power outage occurs while the sewing machine is being operated, turn off the sewing machine and unplug the power supply cord. When restarting the sewing machine, follow the necessary procedure to correctly operate the machine. (For U.S.A. only)
- This appliance has a polarized plug (one blade wider than the other). To reduce the risk of electric shock, this plug is intended to fit in a polarized outlet only one way. If the plug does not fit fully in the outlet, reverse the plug.
- If it still does not fit, contact a qualified electrician to install the proper outlet. Do not modify the plug in any way.
Brother Computerized Sewing Machine CS7000X SEWING BASICS
CAUTION
- While the machine is in operation, pay special attention to the needle location. In addition, keep your hands away from all moving parts such as the needle and handwheel, otherwise injuries may occur.
- Do not pull or push the fabric too hard while sewing, otherwise injuries may occur or the needle may break.
- Never use bent needles. Bent needles can easily break, possibly resulting in injuries.
- Make sure that the needle does not strike basting pins, otherwise the needle may break or bend.
General sewing procedure
- Turn on the machine
Turn on the sewing machine.
↓ - Select the stitch
Select the stitch appropriate for the area to be sewn.
↓ - Attach the presser foot
Attach the presser foot appropriate for the stitch.
↓ - Start sewing
Position the fabric, and then start sewing. When sewing is finished, cut the threads.
UTILITY STITCHES
OVERCASTING STITCHES
You can use the overcasting stitches to join together seams and finish them in one operation. They are also useful for sewing stretch materials.
Stitch Name | Pattern | Presser Foot | Pattern No. |
Application | Stitch Width [mm (inch.)] | Stitch Length [mm (inch.)] | Twin Needle | Walking Foot | Reverse/ Reinforcement Stitching | |||||
70 stitches model | 60 stitches model | 50 stitches model | 40 stitches model |
Auto |
Manual |
Auto |
Manual | |||||||
Zigzag stitch |
|
J |
04 |
04 |
04 |
04 | Overcasting and attach- ing appliqués | 3.5 (1/8) | 0.0–7.0 (0–1/4) | 1.4 (1/16) | 0.0–4.0 (0–3/16) | Yes ( J ) | Ye*s** | Rev.* |
3-point zig-zag stitch |
|
J |
05 |
05 |
05 |
05 | Overcasting on medium weight or stretchfabrics, attaching elastic, darn- ing, etc. | 5.0 (3/16) | 1.5–7.0 (1/16–1/4) | 1.0 (1/16) | 0.2–4.0 (1/64–3/16) | Yes ( J ) |
No | Rfc.** |
Overcasting stitch |
|
G |
06 |
06 |
06 |
06 | Overcasting on thinor medium weight fabrics | 3.5 (1/8) | 2.5–5.0 (3/32–3/16) | 2.0 (1/16) | 1.0–4.0 (1/16–3/16) |
No |
No | Rfc.** |
|
G |
07 |
07 |
07 |
07 |
Overcasting on thickfab- rics |
5.0 (3/16) |
2.5–5.0 (3/32–3/16) |
2.5 (3/32) |
1.0–4.0 (1/16–3/16) |
No |
No | Rfc.** | |
|
J |
08 |
08 |
08 |
08 |
Overcasting on stretch fabrics |
5.0 (3/16) | 0.0–7.0 (0–1/4) |
2.5 (3/32) |
0.5–4.0 (1/32–3/16) |
Yes ( J ) |
No | Rfc.** | |
- Attach overcasting foot “G” or zigzag foot “J”.
- Select a stitch.
Position the fabric with the edge of the fabric against the guide of the presser foot, and then lower the presser foot lever.
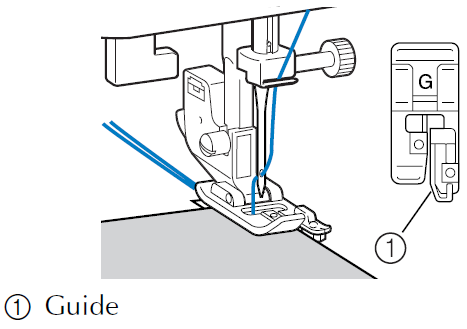
Sew with the edge of the fabric against the presser foot guide.
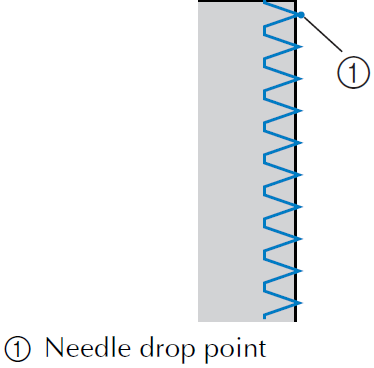
CAUTION: After adjusting the stitch width, slowly turn the handwheel toward you (counterclockwise) and check that the needle does not touch the presser foot. If the needle hits the presser foot, the needle may bend or break.
Setup Guide
Setting up the Brother Computerized Sewing Machine is easy and straightforward. Here are the steps to get started:
- Install the included presser feet and gather your sewing supplies.
- Plug in the machine and turn it on using the power switch.
- Load the bobbin by removing the bobbin case, placing the bobbin in the case, and then replacing the case in the machine.
- Thread the machine by following the numbered diagrams on the machine and using the automatic needle threader.
- Select your stitch using the LCD display and adjust the stitch length and width as needed.
- Place your fabric under the presser foot and lower the foot using the lever.
- Press the foot pedal to start sewing.
MAINTENANCE
Simple sewing machine maintenance operations are described below.
Cleaning the machine surface
If the surface of the machine is dirty, lightly soak a cloth in neutral detergent, squeeze it out firmly, and then wipe the surface of the machine. After cleaning it once with a wet cloth, wipe it again with a dry cloth.
CAUTION: Unplug the power supply cord before cleaning the machine, otherwise injuries or an electric shock may occur.
Cleaning the bobbin case
Sewing performance will suffer if dust collects in the bobbin case; therefore, it should be cleaned periodically.
CAUTION: Make sure you unplug the machine before you clean it. Otherwise, you may get an electric shock or be injured.
- Switch the machine off and unplug it.
- Raise the needle and the presser foot.
- Loosen the presser-foot screw and the needle clamp screw to remove the presser-foot holder and the needle.
Grasp both sides of the needle plate cover, and then slide it toward you to remove the needle plate cover.
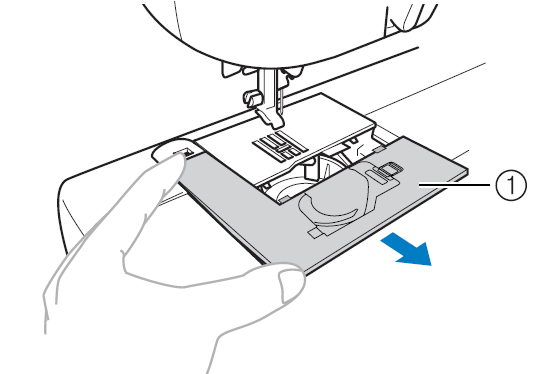
- Needle plate cover
Remove the bobbin case.
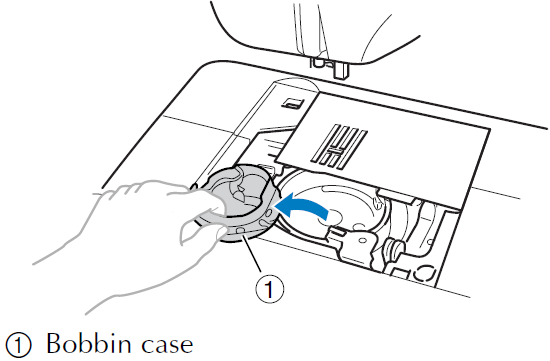
Grasp the bobbin case, and then pull it out.
Use a cleaning brush or a vacuum cleaner to remove any dust from the race and its surrounding area.
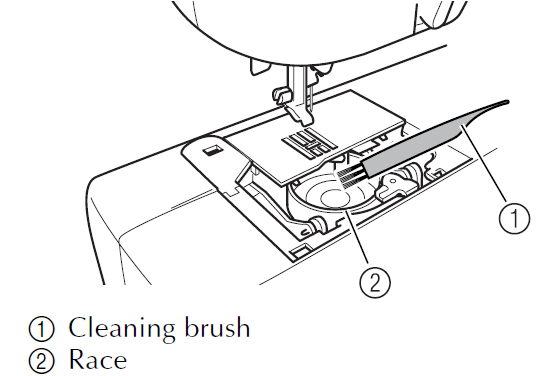
Do not put oil on the bobbin case.
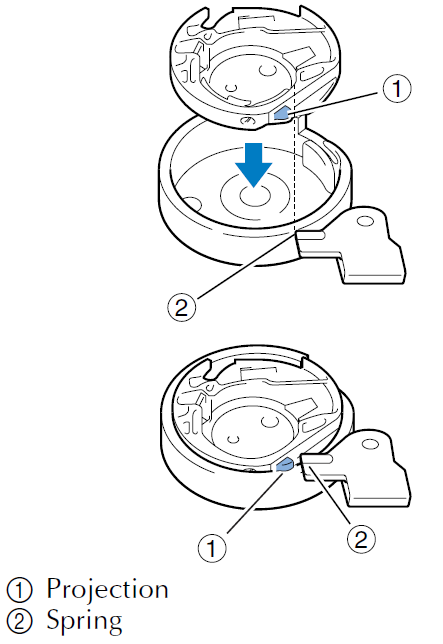
Insert the bobbin case so that the projection on the bobbin case aligns with the spring.
Put the tabs on the needle plate cover into the needle plate, and then slide the cover back on.

CAUTION
- Never use a bobbin case that is scratched, otherwise the upper thread may become tangled, the needle may break or sewing performance may suffer. For a new bobbin case (part code: XC3152-021), contact your nearest authorized service center.
- Make sure that you fit the bobbin case properly, otherwise the needle may break.
TROUBLESHOOTING
If the machine stops working properly, check the following possible problems.
If the problem it still there, contact your retailer or the nearest authorised service center.
Symptom | Possible cause | How to put it right |
The sewing machine does not work. | The machine is not plugged in. | Plug the machine in. |
The main power switchis turned off. | Turn on the mainpower switch. | |
The bobbin windershaft is pushedto the right. | Move the bobbinwinder shaft to the left. | |
You have notused the footcontrol- ler properly. | Use the foot controller properly. | |
The needle breaks. | The needle is not fitted properly. | Fit the needle properly. |
The needle clamp screw is loose. | Use the screwdriver to firmly tighten the screw. | |
The needle is bentor blunt. | Replace the needle. | |
You have not used theright combi- nation of fabric, thread and needle. | Choose a threadand needle thatare appropriate for the type of fabric. | |
The presser footyou are usingis not appropriate for the type of stitch that you want to sew. | Attach the presserfoot that is correct for the type of stitch that you want to sew. | |
The upper thread tensionis too tight. | Loosen the upper thread tension. | |
You are pulling the fabric too much. | Lightly guide the fabric. | |
The area aroundthe hole in the nee- dle plate is scratched. | Replace the needle plate. Contact your retailer or the nearest authorized service center. | |
The area aroundthe hole in the presser foot is scratched. | Replace the presser foot. Contact your retailer or the nearest authorized service center. | |
The bobbin case is scratched. | Replace the bobbincase. Contact your retailer or the nearest authorized service center. | |
You have not used a bobbin that has been designed for this machine. | Incorrect bobbins will not work properly. Only use a bobbin thathas been designed for this machine. | |
The upper thread breaks. | You have not threaded the upper thread properly. (for example, you have not fitted thespool properly, or thethread has comeout of theguide above the needle.) |
Correct the upperthreading. |
There are knotsor tangles in the thread. | Remove any knots or tangles. | |
The needle is not appropriate for the thread you are using. | Choose a needlethat is appropriate for the type of stitch. | |
The upper thread tensionis too tight. | Loosen the upper thread tension. | |
The thread is tangled, for example, in the bobbin case. | Remove the tangle thread. If the thread is tangled in the bobbin case, clean the bobbin case. | |
The needle is bentor blunt. | Replace the needle. |
The upper thread breaks. | You have notinserted the needle properly. | Insert the needle properly. |
The area aroundthe hole in the nee- dle plate is scratched. | Replace the needle plate. Contact your retailer or the nearest authorised service center. | |
The area aroundthe hole in the presser foot is scratched. | Replace the presser foot. Contact your retailer or the nearest authorised service center. | |
The bobbin case is scratched, or has a burr on it. | Replace the bobbincase. Contact your retailer or the nearest authorised service center. | |
You have not used a bobbin that has been designed for this machine. | Incorrect bobbins will not work properly. Only use a bobbin thathas been designed for this machine. | |
The lower thread is tangled or breaks. | You have not wound the bobbin thread properly. | Wind the bobbin threadproperly. |
The bobbin is scratched or does not turn smoothly. | Replace the bobbin. | |
The thread is tangled. | Remove the tangledthread and clean the bobbin case. | |
You have not used a bobbin that has been designed for this machine. | Incorrect bobbins will not work properly. Only use a bobbin thathas been designed for this machine. | |
Bobbin is set incorrectly. | Reset the bobbin thread correctly. | |
The thread ten- sion is incorrect. | You have notthreaded the upper thread properly. | Correct the upperthreading. |
You have not wound the bobbin thread properly. | Wind the bobbin threadproperly. | |
You have not threaded the right combination of thread and needle for the fabric you are using. | Choose a threadand needle thatare appropriate for the type of fabric. | |
You have notattached the presser- foot holder properly. | Attach the presser-foot holder prop- erly. | |
The thread tension is incorrect. | Adjust the tension of the upper thread. | |
You have not used a bobbin that has been designed for this machine. | Incorrect bobbins will not work properly. Only use a bobbin thathas been designed for this machine. | |
Bobbin is set incorrectly. | Reset the bobbin thread correctly. | |
The fabricis wrinkled. | You have not threaded the upper threadproperly or fittedthe bobbin properly. | Thread the upperthread and wind the bobbin thread properly. |
You have notfitted the spoolprop- erly. | Fit the spool properly. | |
You have not used the right combination of fabric, thread and needle. | Choose a threadand needle thatare appropriate for the type of fabric. | |
The needle is bentor blunt. | Replace the needle. | |
If you are sewing thin fabric, the stitch is too thick. | Sew with stabiliser material under the fabric. | |
The thread tension is incorrect. | Adjust the tension of the upper thread. |
Stitches are skipped. | You have notthreaded the upper thread properly. | Correct the upperthreading. |
You have not used theright combi- nation of fabric, thread and needle. | Choose a threadand needle thatare appropriate for the type of fabric. | |
The needle is bentor blunt. | Replace the needle. | |
You have notinserted the needle properly. | Insert the needle properly. | |
Dust has accumulated under the needle plate or in the bobbin case. | Remove the needleplate cover and clean the plate and the bobbincase. | |
There is a high- pitched noise while sewing. | Dust has builtup in the feed dogs or in the bobbin case. | Clean the bobbin case. |
You have notthreaded the upper thread properly. | Correct the upperthreading. | |
The bobbincase is scratched. | Replace the bobbincase. Contact your retailer or the nearest authorized service center. | |
You have not used bobbinthat has been designed for this machine. | Incorrect bobbins will not work properly. Only use a bobbin thathas been designed for this machine. | |
The needle threader can not be used. |
You have notmoved the needle holder to its highest position. | Raise the needleeither by turning the handwheel toward you (counterclockwise) so that the mark on the wheel points up or by pressing
|
You have notinserted the needle properly. | Insert the needle properly. | |
The stitchis not sewn correctly. | The presser foot that you are using is not correct for the type of stitch. | Attach the presserfoot that is correct for the type of stitch that you want to sew. |
The thread tension is incorrect. | Adjust the tension of the upper thread. | |
The thread is tangled, for example, in the bobbin case. | Remove the tangle thread. If the thread is tangled in the bobbin case, clean the bobbin case. | |
The fabricdoes not feed. | The feed dogs are lowered. | Slide the feed dog position lever to |
The stitch is too fine. | Lengthen the stitch length. | |
You have not used theright combi- nation of fabric, thread and needle. | Choose a threadand needle thatare appropriate for the type of fabric. | |
The thread is tangled, for example, in the bobbin case. | Remove the tangle thread. If the thread is tangled in the bobbin case, clean the bobbin case. | |
The sewing light bulb does not come on. |
The sewinglamp is damaged. | Contact your retailer or the nearest authorized service center. |
Brother Computerized Sewing Machine CS7000X Pros & Cons
Pros
- User-friendly design with easy-to-use stitch selector
- Wide range of built-in stitches and presser feet
- Automatic needle threader and drop-in bobbin
- Bright LED lighting and adjustable stitch length and width
- Lightweight and portable with included hard cover
Cons
- May be too advanced for beginners
- The machine is not compatible with all types of thread
- Some users have reported issues with the bobbin winding mechanism
Customer Reviews
Customers have praised the Computerized Sewing Machine CS7000X for its wide range of stitches, automatic needle threader, and easy-to-use design. Many have noted that the machine is perfect for both beginners and experienced sewers, and that it is a great value for the price. However, some have reported issues with the bobbin winding mechanism and have noted that the machine is not compatible with all types of thread. Overall, the Brother Computerized Sewing Machine is a highly-rated and popular sewing machine for both hobbyists and professionals.
Faqs
What is the weight of the Sewing Machine?
What is the maximum stitch width of the CS7000X?
Does the Brother have a built-in needle threader?
Can the Brother Computerized Sewing Machine CS7000X be used for quilting?
What is the warranty on the Machine?
How many built-in stitches does theSewing Machine have?
Leave a Comment