Cadco Convection Ovens OV-003 Instruction Manual
Content
Introduction
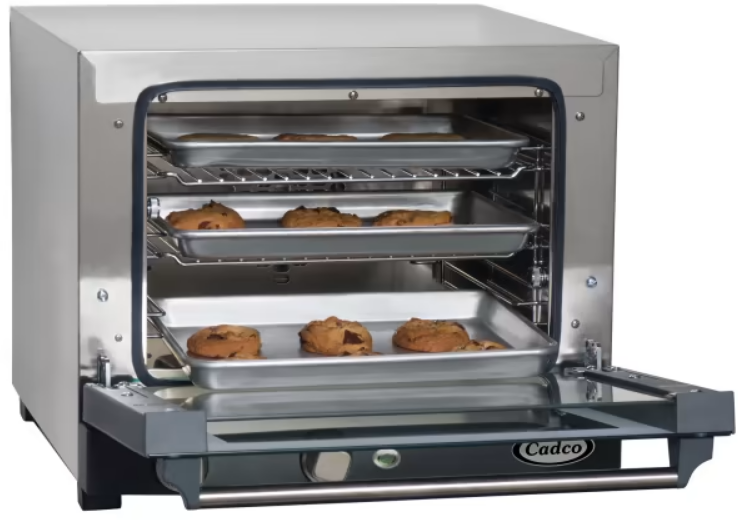
For use in both commercial and residential kitchens, the compact and multipurpose Cadco Convection Oven OV-003 is a countertop oven. Its sophisticated convection technology guarantees even baking, roasting, and cooking, which makes it perfect for cooking a broad range of foods. The oven is a dependable and effective addition to any kitchen setup thanks to its sturdy stainless steel structure, intuitive controls, and roomy interior that can hold many trays.
OPTIONAL MANUAL CONVECTION OVENS ACCESSORIES
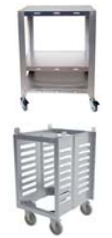
- OV-HDS Heavy-Duty 2-Oven Stand with Wheels (half +/or quarter size size)
- Accommodates two half or quarter size Cadco Convection Ovens
- OST-34A-C Heavy-Duty Oven Stand with Wheels (half size)
- Accommodates oven models: OV-013, OV-023
Handles 8 half-size sheet pans (not included)
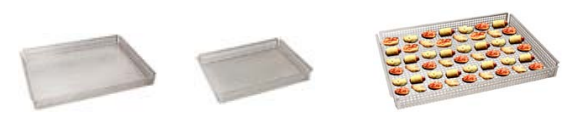
- Oven Baskets: Stainless steel oven baskets enhance even airflow around food for quicker, crisper results
- COB-H Oven Basket (Half Size)
COB-Q Oven Basket (Quarter Size)
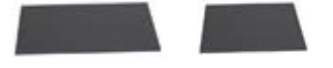
Aluminized Steel Pizza Heat Plates provide very fast baking times, up to 50% faster than traditional baking pans. It takes as little as 4-5 minutes to bake a fresh Pizza on the aluminum heat plate! The plates are manufactured from alloys which provide superior heat storage and produce fast, even cooking of both top and bottom of the food product simultaneously. These plates also help maintain better temperature stability under normal door opening/closing conditions. Great for pizza, breads & other baked goods.
- CAP-H Pizza Heat Plate (Half Size)
CAP-Q Pizza Heat Plate (Quarter Size)
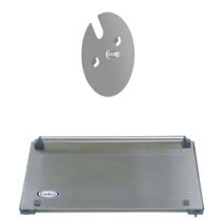
- XC605 Air Deflector Plate
- Deflects the strong airflow in the oven cavity; for baking delicate foods like puff pastry
- Attaches quickly to the fan grid; no tools required.
- ZW013SS Stainless Door for OV-013 Series Ovens
- Designed to fit OV-013/OV-013SS Convection Ovens
Stainless door avoids door glass breakage in transit - great for catering!
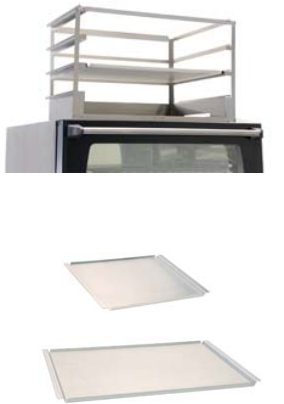
- Cooling Racks for Sheet Pans
- Stainless steel
- Holds 4 standard sheet pans
- 3” between pans/shelves
- May be attached to the front or rear of the oven top
- OCR-Q Quarter Size Cooling Rack
- OCR-H Half Size Cooling Rack
- Flat Sheet Pans
- Fit an extra row of cookies vs. standard sheet pans
- Lower sides for easier removal of cookies & more
- Aluminum
- OQFSP Quarter Size Flat Sheet Pan
OHFSP Half Size Flat Sheet Pan
Detailed Specifications
A robust fan that guarantees uniform heat distribution, a roomy interior that fits full-size sheet pans, and accurate temperature control with 5-degree temperature adjustments characterize the Cadco Convection Ovens OV-003. Along with its sturdy design, this oven has an easy-to-clean interior and an exterior made of stainless steel. Other features include an easy-to-clean removable crumb tray, an insulated door, and an oven cavity made of premium stainless steel. For extra convenience, this oven also features a 60-minute timer and an adjustable thermostat that can reach up to 500 degrees Fahrenheit.
INSTALLATION
PRELIMINARY OPERATIONS
All electrical connections and installation operations must be done by qualified personnel and comply with all existing codes.
- CHECK THE LOCATION OF INSTALLATION
- Verify the overall measurements and the exact position of the electrical connections before installing the oven. Refer to the illustrations in the separate “technical data” document for your model.
- FEET ASSEMBLY
You will find the feet packed inside your oven’s cooking cavity. The feet must be used when your oven is in operation. Never use your oven without its feet properly installed. Assemble the feet as shown. Feet pop into place.
- POSITIONING
- Place your oven so the back and sides can be easily reached. This will make the electrical connections and any servicing points easily accessible.
- Your oven is not designed for built-in applications or for side-by-side positioning. Cadco suggests you leave a minimum distance of 4” between the back of the oven and the wall to allow for the escape of moisture.
- The oven must be placed upon a support, a stand, or on top of a counter made of non-combustible material. Never install the oven directly on the floor.
- If the oven is placed near walls, dividers, kitchen cabinets, decorated edges, or drapes, they must be made of non-combustible material. The ovens cannot be stacked.
- REMOVE THE PROTECTIVE FILM
- Carefully remove all the protective film from the external walls of your oven. Be sure to remove any residual glue left on the outside of the oven with an appropriate solvent.
ELECTRICAL CONNECTION
- Connection to the electrical power source must be done according to all state and local codes. Before connecting your oven, make sure that the voltage and the amps comply with those stated on the data plate of your oven. Avoid using patch cords and multiple jacks.
- The appliance must be placed so that the connection plug to the outlet can be easily reached.
- When the appliance is in operation, the power supply voltage must not diverge from the value of the nominal voltage, written on the technical data plate, by more than + or – 10%.
- Ovens are equipped with cord set and NEMA plug (single phase; 120V or 208-240V, depending on oven model.) Insert the plug in the proper outlet (the outlet must be suitable for the plug assembled on the oven.)
EXHAUST CHIMNEY
On the back side of the oven is an exhaust chimney from which the exhaust that comes from the oven cavity is ejected. During each cooking cycle, you may have hot air and/or humidity coming out from this chimney (temperature and humidity of the exhaust depend on the cooking parameters set on the oven and on the type and quantity of food put inside the oven).
INSTRUCTIONS FOR THE USER
Never allow grease to collect on the inside walls, floor, or ceiling of your oven. A simple cleaning with soap and water is usually enough to keep your oven spotless and in “like new” condition for years. Your oven should never be cleaned with a water hose or anything more powerful than a spritz bottle. For tougher cleaning and built-up grease, we suggest using Foam Plus® from Discovery Products Corporation (Tel. 877.822.8500).
INSTRUCTIONS FOR THE OPERATOR
You will find important information about maintaining and operating your new oven in this manual. Please read the manual and become familiar with your new oven before you begin to operate it. Keep the manual in a safe place and make sure everyone reads it before operating the oven. Please use only Cadco-authorized service centers and always require quality UNOX-OEM parts. Failure to comply with these standards can compromise safety and will void your warranty.
NOTES FOR USE
- These are medium-duty ovens. They are not designed for continuous operating temperatures of 475-500º F. We recommend Cadco XAF/XAFT series heavy-duty ovens for this range of operation.
- Your Cadco oven was designed to cook food and must be used only for that specific purpose. Any other use may void your warranty. The oven allows you to work between 175ºF and 500ºF. It is suggested that you allow about 2” between trays for proper air circulation during the cooking process. Use your Cadco oven for:
- Baking all types of bread and pastry, both fresh and frozen.
- Cooking any meat, fish, or fowl.
- Rethermalizing any cooled or frozen cooked foods.
- Cooking (not steaming) any kinds of vegetables.
- Please avoid salting your food products while they are inside the cooking cavity. Salt is very corrosive and may, over time, damage the interior of your oven.
Description
High-performance and perfect for cooking a wide range of foods, including roasted meats and vegetables, pastries, and bread, is the Cadco Convection Ovens OV-003. This oven guarantees consistent cooking results every time thanks to its accurate temperature control and uniform heat distribution. huge sheet pans may fit inside the roomy interior, which makes it ideal for baking huge batches of food. While the premium stainless steel oven cavity and insulated door retain heat and minimize energy loss, the heavy-duty design assures lifetime and durability. The 60-minute timer and adjustable thermostat provide convenience, and the detachable crumb tray makes cleaning a breeze.
CONTROL PANEL
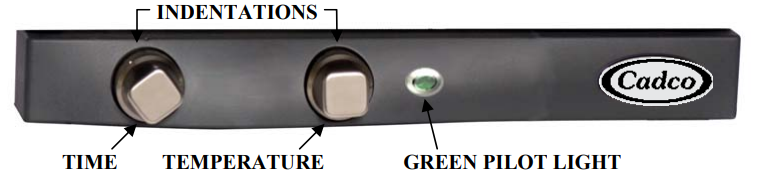
TIME DIAL
- To operate your oven for a set time, you must first turn the time dial clockwise to the time you choose, from 0 to 60 minutes (if you’re facing the oven, it is the dial on the left side of the control panel). Line up your desired time (on the dial) with the indentation in the control panel above the time dial.
- When the set cooking time is over, the dial turns to the “0” position, the oven turns off, and a buzzer sounds.
- To operate the oven continuously instead of for a set time, turn the time dial counterclockwise until the hand icon (
 ) on the dial lines up with the indentation in the control panel above the time dial. The oven will operate continuously until you manually turn the dial back to “0”.
 - Whether you have chosen to set an actual time, or have set the time dial for continuous “on”, the fan will begin spinning.
TEMPERATURE DIAL
- The temperature inside the cooking chamber is set by the temperature dial (if you’re facing the oven, it is the dial on the right side of the control panel).
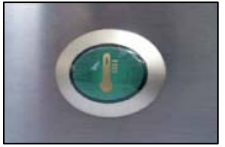
- Turn the dial clockwise and set your desired temperature. At this time the green pilot light, located just to the right of the temperature dial, will turn on. This indicates that the oven is preheating.
Please note: the green pilot light will fluctuate on and off throughout the cooking cycle. This indicates that the heating element is turning on and off to help keep the actual temperature within 5-10 degrees of the set temperature.
- Always preheat the oven before placing food into it.
Setup Guide
It is simple and easy to set up the Cadco Convection Ovens OV-003. First, ensure that the oven is level and positioned correctly on a sturdy surface. After that, flip on the power switch and plug the oven into a dedicated 20-amp circuit. Before using, give the oven a few minutes to warm. Turn the thermostat to the desired setting to modify the temperature. To set the timer, press the "Timer" button and use the "+" and "-" buttons to set the desired time. When the timer hits zero, the oven will shut off on its own.
CLEANING YOUR NEW OVEN
WARNING: Before starting any maintenance or cleaning operation, it is necessary to disconnect the electrical power supply and wait for your oven to cool down.
BEFORE USING YOUR NEW OVEN
- Clean the metal parts with hot soapy water and rinse thoroughly.
- With the cooking cavity empty, heat the oven for about 30 minutes at a temperature of 350°F to “burn it in”.
- Never wash the cooking chamber with acids, abrasives, or aggressive detergents.
- The oven should never be cleaned with direct water from a hose. Never use anything more powerful than a spritz bottle to clean your oven, to avoid damaging the electrical components and voiding your warranty.
NOTE: Using a Cadco oven without a gasket or with one in disrepair may cause the hinges to seize, as well as limit the oven’s ability to maintain the proper temperature. Doing so will void the warranty on the hinges. Please inspect and clean the door gaskets daily.
CLEANING THE COOKING CAVITY
- Make sure to wipe up any and all spills as they occur.
- At the end of the day (or as needed), clean the cavity using only proper products.
- Never clean the stainless steel with acids, caustic detergents, abrasives, or any products containing chlorine.
- The appliance should never be cleaned with direct water from a hose. Never use anything more powerful than a spritz bottle to clean your oven, to avoid damaging the electrical components and voiding your warranty.
CLEANING THE OUTSIDE OF YOUR OVEN
- Wipe up spills, as they occur, with a damp cloth.
- Never use a spray of water to clean the outside of your oven. This may damage the electrical components and void your warranty.
- Periodic inspections of the exhaust tube in the back of the oven should be made to ensure it is clear for ventilation. If any residue is present, clean it with a simple bottle brush.
TURNING OFF IN CASE OF BREAKDOWN
If you encounter any kind of problem while your oven is in operation, or if you notice anything out of the ordinary, follow these steps:
- Unplug your oven immediately.
- Consult Cadco, Ltd. at 877-603-7393 (Toll-Free).
Failure to do so may result in a hazardous condition and void your warranty.
COOKING PRINCIPLES
COOKING MODES
- CONVECTION COOKING Food products bake in hot, moving air. This moving air removes the cool air barrier between the cool food being cooked and the heat of the oven chamber. It also helps your food products to cook evenly and quickly. Foods cook faster with convection.
- UNIFORM BAKING This oven is designed to bake evenly on all levels. Please be sure that the oven is preheated to the proper temperature and the baking recipe has been adjusted to the lower temperature required for convection oven baking.
COOKING VARIABLES
TEMPERATURE
- The exact setting of your oven temperature assures proper cooking of your food, both inside and outside:
- Too low – your food cooks too slowly and will dry out.
- Too High – your food burns and cooks unevenly.
- If you are new to convection cooking, Cadco suggests setting your Convection Oven to a temperature of about 30ºF - 50ºF lower than what you would have set it at in a conventional oven. Let the food tell you what it needs; if it browns too fast, turn the oven temperature down.
- If you experience uneven cooking, the solution is usually as simple as turning the oven temperature down a few degrees (10ºF – 25ºF).
TIME
- The higher the temperature, the quicker your foods will get done and the more shrinkage you will realize.
- The quicker foods cook, the more moisture they tend to lose (especially protein products).
- Most bakery products can withstand higher temperatures better than protein products.
HUMIDITY
- The more humidity in the cooking cavity, the harder it will be for your food products to brown.
QUANTITY OF FOOD
- One piece of chicken will take less time to cook than 2 or 3 pans of chicken. That’s “Mother Nature” pure and simple. Convection cooking is fantastic, but it’s NOT magic.
- Overloading the oven can result in uneven cooking.
- Avoid placing baked goods touching each other on the pan before baking.
USE OF WIRE GRIDS AND SHEET PANS
It is recommended to use wire grids for meat items. This will elevate your food items and allow air to circulate all around during the cooking process. Place your wire rack in a sheet pan to collect the juice. This also reduces clean-up time. Use sheet pans for bakery items such as pastries, bread and rolls, and cookies. Shallow sides on a pan or bake sheet will enhance the air flow to your foods.
MAINTENANCE
ORDINARY MAINTENANCE
- All maintenance operations must be done only by trained qualified personnel.
- Before starting any maintenance operation, disconnect your oven from the electrical power supply and wait for it to cool down.
- The parts that need ordinary maintenance can be reached by removing the front control panel and the back of the oven.
SPECIAL MAINTENANCE
All maintenance operations must be done only by trained qualified personnel. Before starting any maintenance operation, disconnect your oven from the electrical power supply and wait for it to cool down.
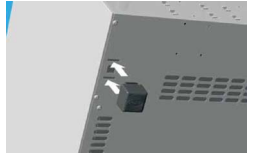
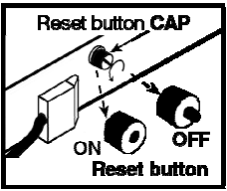
- This oven is equipped with a manually resettable safety thermostat designed to protect the oven against overheating. If this occurs, it completely deactivates the oven to avoid permanent damage.
- To reset the safety thermostat, remove the black cap positioned at the bottom of the back of the oven by unscrewing it counterclockwise, push the reset button under the cap, and replace the black cap.
If the safety thermostat shuts your oven off, before turning your oven back on, be sure to check your entire circuit to verify that the total amps being drawn by all the appliances, lights, etc. on that circuit do not exceed the amps available on that circuit.
REMOVE & REATTACH OVEN DOOR
Take extra care when removing the oven door so as not to damage the inner or outer glass – this includes allowing the glass to completely cool down before any maintenance and/or cleaning is performed.
Open the door completely as in Fig. 1.
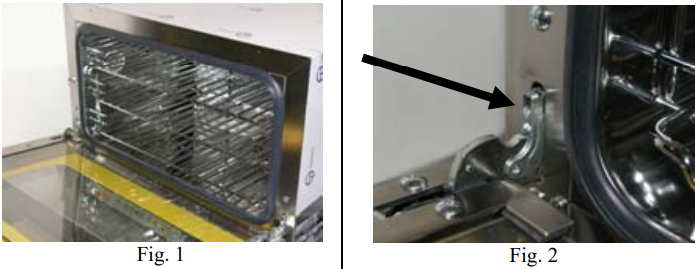
Using a screwdriver or other object, swing the door safety lock down as shown in Figs 2 – 3 – 4.
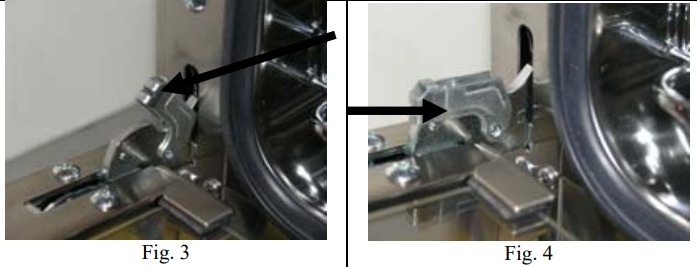
- With the door completely down and the door safety lock in its down position, move the door in a closing direction until the door safety lock stops the closing action as in Fig. 5.
Hold the door as shown in Fig. 6.
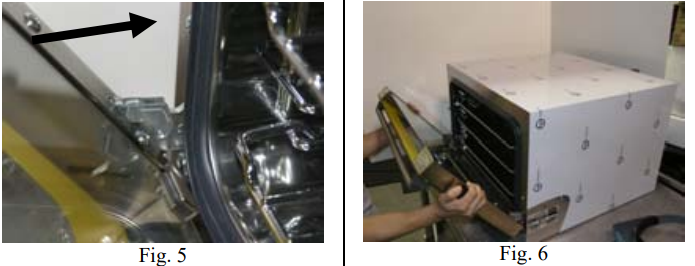
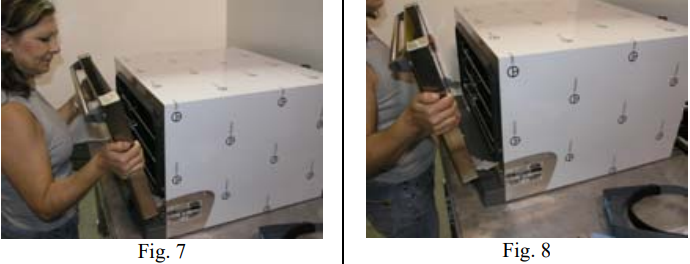
Slightly lift and swing the door out of the unit as shown in Figs. 7 & 8.
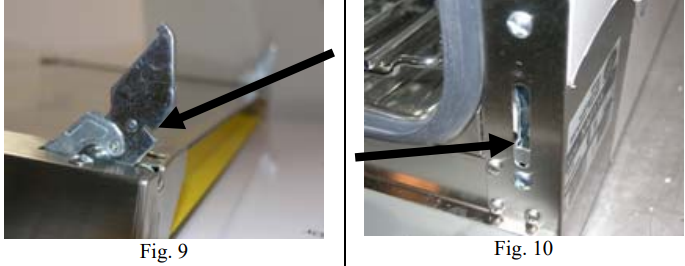
For the door to be properly installed, the notch on the bottom of the hinge finger (Fig. 9) must be seated in the inner door hinge frame (Fig. 10).
- Reverse the above procedure to attach the door to the oven - see Figs. 7 & 8.
Cadco Convection Oven OV-003 Cooking Guide
The first and most important step will be: Have your new oven connected to the proper power source. If there is any doubt about the proper power or the connections, have the oven installed by a qualified electrician according to your local codes. Use this cooking guide to help determine which time and temperature work best for your specific food items. If your specific product isn’t addressed, you will probably find something similar. You’ll find many helpful hints in this cooking guide. Our aim is to help you use your Cadco Manual Convection Oven to its fullest, rather than teach you how to cook.
The Cadco Manual Convection Ovens work on the principle of moving air. This air movement removes the “Hot Spots” so we get very even browning, rapid preheats (10 minutes), and faster cooking.
Here are some basic do’s and don’ts and guidelines for convection cooking:
- Use pans that have sides no higher than a common sheet pan.
- Preheat the oven to approximately 40º-50ºF above your baking temperature.
- After loading your product, remember to reset the oven to the desired baking temperature.
- If you notice uneven cooking, set the oven temperature down 25º-30ºF. Let the product tell you if it needs more or less heat.
- Aluminum foil can get pulled into the fan and cause damage.
- Don’t overload the oven.
- Maintain a minimum 2” between the product being cooked and the next shelf. Remove shelves if necessary.
- Your Cadco Convection Oven is a powerful tool, so don’t hesitate to utilize its full capacity.
- Keep your oven clean. Wipe up spills as they occur. Never allow grease to build up on the interior of the oven, or collect on the bottom of the cooking cavity.
- Frozen products draw more heat from the oven and may require a longer recovery time.
- When roasting meats, we suggest using a cooking rack to elevate the product and facilitate even roasting. Smaller cuts such as boneless chicken breasts, or seafood portions may be baked directly on the pan if desired.
- Lower temperatures will reduce shrinkage and save money with all of your roasted meat products.
- Higher geographical elevations will often affect cooking time and temperature parameters.
Have fun and experiment with your new Cadco Convection Oven. Your times and temperatures will vary with the different products you prepare. Refer to this Cadco Cooking Guide for direction or contact Cadco (877.603.7393) or the Cadco, Ltd. website (www.cadco-ltd.com), for specific answers to your cooking needs. We look forward to hearing from you.
COOKIES
Baking Temperature
One of the most common items baked in your Cadco Convection Oven will be cookies. There are dozens of cookie manufacturers, and their products all have different baking characteristics. Most of the cookie recipes suggest a baking temperature of 325º - 350ºF. We have found that “lower is better”. Over the years we have found that cookies bake best in a preheated oven at about 285º - 300ºF, assuming a 1.5-ounce cookie from refrigerated/frozen dough. By baking at a lower temperature, they tend to remain higher after cooling and produce a more eye-appealing finished product. Bake for about 12-18 minutes, depending on what you think is the perfect cookie.
Variables
- Lower the temperature for larger cookies.
- Cookies bake from the outside in...so to make picture-perfect cookies we have to consider two variables before we begin baking, in any oven, or we may not be happy with our results. These two factors come into play mostly when we make cookies from "scratch", (but they apply to all cookies):
The temperature of the dough
- Room temperature dough will spread out more than frozen or refrigerated dough.
- The colder the dough, the less the cookie will spread/flatten out during baking.
- Dough baked from frozen produces a thicker, better-looking cookie than ones that are baked from refrigerated, or room temperature, which will spread out and therefore, have less height.
The fat content of the dough
- A higher ratio of fat to flour will make the cookie spread out more during baking.
INSTRUCTION FOR THE INSTALLER
DATA PLATE
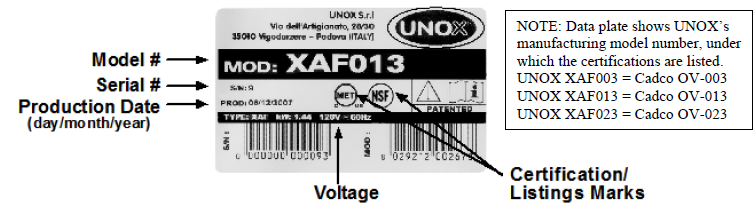
CERTIFICATION
- The “MET” mark on our data labels and on our user manual refers to the MET Product Safety Listing.
- The “NSF” mark refers to listing including XAF series oven models under UNOX SPA for NSF/ANSI STANDARD 4: Commercial Cooking, Rethermalization and Powered Hot Food Holding and Transport Equipment.
Troubleshooting
- If the oven is not heating properly, check to make sure the power cord is properly plugged in and the power switch is turned on.
- Verify that the circuit has not tripped by checking the fuse box or circuit breaker if the oven is still not heating.
- Reduce the temperature on the thermostat if the oven is overheating. Verify the door's alignment and latch engagement if it isn't closing appropriately.
- Make sure the food is placed correctly in the oven and that the fan is operating if the food isn't cooking evenly.
Pros & Cons
Pros
- Spacious interior can accommodate full-size sheet pans
- Precise temperature control and even heat distribution
- Heavy-duty construction with a stainless steel exterior
- Insulated door and top-quality stainless steel oven cavity
- Removable crumb tray for easy cleaning
- Adjustable thermostat and 60-minute timer
Cons
- Expensive for some small businesses
- Requires a dedicated 20-amp circuit
- May be too large for some kitchens
- Can be noisy when the fan is running
Cadco Convection Ovens OV-003 WARRANTY
Period of two years from the date of purchase, unless otherwise noted below.
- Warranty does not apply in cases of misuse, abuse, or damage from external service or repair attempts by unauthorized personnel.
WARRANTY PERIODS
- OV SERIES COMPACT MANUAL CONVECTION OVENS:
- 120 Volt Models (OV-003, OV-013): Two Year Limited Warranty (One year Carry-in service & parts, 2nd-year parts only)***
- 208-240 Volt Model (OV-023): Two Year Limited Warranty (One year On-site service & parts, 2nd-year parts only)***
- ALL OVENS:
- 90-day warranty on all light bulbs and gaskets. NOTE: These items are easily changeable on-site by the user and do not qualify for service center warranty assistance.
- NOTE: Using a Cadco oven without a gasket or with one in disrepair may cause the hinges to seize, as well as limit the oven’s ability to maintain the proper temperature. Doing so will void the warranty on the hinges. Please inspect and clean the door gaskets daily.
- 30-day warranty on glass.
- If required, call Cadco directly for warranty replacement of these items within the first 90 days.
Customer Reviews
Customers adore the OV-003 Cadco Convection Ovens because of its uniform heat distribution, roomy interior, and accurate temperature control. Numerous consumers have praised the oven's robustness and ease of cleaning, pointing out that it has performed admirably in a commercial kitchen setting. However, some customers have noted that the oven is expensive and requires a dedicated 20-amp circuit. For any serious foodservice expert, the Cadco Convection Ovens OV-003 is a strong, dependable, and high-quality oven that is well worth the investment.
Faqs
What components make up the Cadco Convection Ovens OV-003 construction?
How does cooking benefit from the convection fan?
Are there any particular upkeep needs?
What type of door is on the oven?
What is the warranty on the Cadco Convection Ovens OV-003?
Is it possible to roast beef in the oven?
What is the oven's method for handling various rack positions?
How soon is the Cadco Convection Ovens OV-003 ready to bake?
Is there a timer on the oven?
Which type of power source is necessary for the oven?
Leave a Comment