Casio Key Portable Keyboard CT-X870IN Instruction Manual
Content
Introduction Casio Key Portable Keyboard CT-X870IN
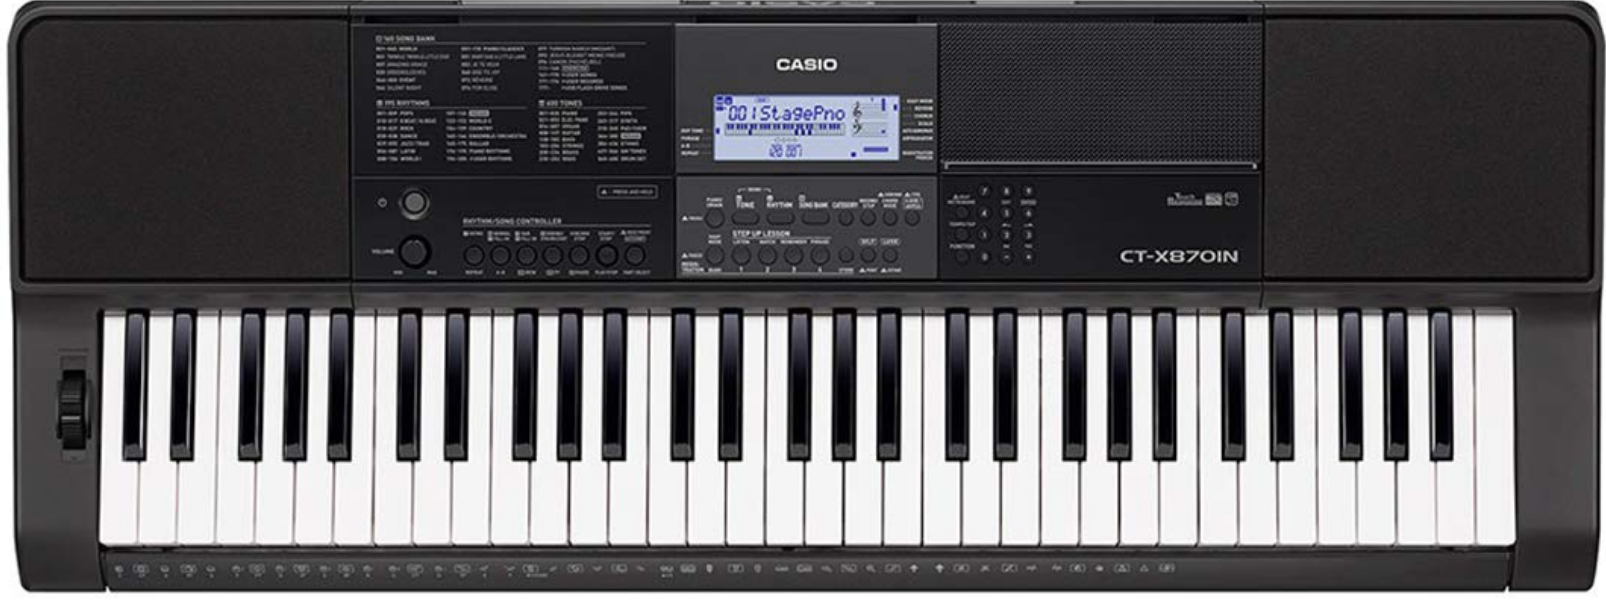
The Casio Key Portable Keyboard CT-X870IN is designed for musicians seeking a versatile and expressive instrument. Featuring 61 touch-sensitive keys, it incorporates the advanced AiX Sound Source technology, offering 600 tones and 195 rhythms, including a rich selection of Indian sounds. The keyboard also supports features like auto-accompaniment and an easy-to-read LCD screen, making it user-friendly for both practice and performance. The CT-X870IN is priced at approximately $299.
Specifications
Model | CT-X870IN |
Keyboard Touch Response | 61 standard size keys 3 types, Off |
Maximum Polyphony | 48 notes (24 for certain tones) |
Tones Built-in Tones Functions |
600 Layer, Split, Piano/Organ button |
Reverb | 1 to 20, Off |
Chorus | 1 to 10, Tone |
Metronome Beats per Measure Tempo Range |
0 to 9 20 to 255 |
Song Bank |
|
Demo Song | 1 |
Built-in Songs | 160 |
User Songs | 10*1 |
User-recorded songs | 6 (See “Recorder” below.)*1 |
Step Up Lesson |
|
Lessons | 3 (Listen, Watch, Remember), Easy Mode |
Lesson Part | L, R, LR |
Functions | Repeat, Voice Fingering Guide, Note Guide, Performance Evaluation |
Auto Accompaniment |
|
Built-in Rhythms | 195 |
User Rhythms | 10*2 |
Chord Book Function | Chord guide |
Registration | 32 (4 setups × 8 banks) |
Recorder | Real-time recording, playback |
Keyboard Play | 5 songs, 6 tracks |
Playing Along with a Built-in Songs |
1 song (L, R, LR) |
Memory Capacity | Approximately 40,000 notes (1 song) |
Other Functions |
|
Transpose | ±1 octaves (–12 to +12 semitones) |
Octave Shift | Upper 1/Upper 2/Lower, ±3 octaves |
Tuning | A4 = 415.5 to 465.9 Hz (Initial Default: 440.0 Hz) |
Preset Scales | 17 |
Music Preset | 310 |
One Touch Preset | 195 |
Auto Harmonize | 12 types |
Arpeggiator | 100 types |
MIDI | 16 multi-timbre received, GM Level 1 standard |
Musical Information Function | Tone, Rhythm, Song Bank numbers and names, staff notation, fingering, pedal operation, tempo, measure and beat number, chord name, etc. |
Pitch Bend Wheel | Pitch Bend Range 0 to 24 semitones |
USB Flash Drive | SMF direct playback, data storage, data loading, data deleting, USB flash drive format |
Inputs/Outputs USB port PEDAL jack Phones/Output jack
Audio In jack |
TYPE B Standard jack (6.3mm): sustain, sostenuto, soft, rhythm Stereo standard jack (6.3mm) Output Impedance: 167Ù, Output Voltage: 4.5V (RMS) MAX Stereo mini jack (3.5mm) Input Impedance: 10kÙ, Input Sensitivity: 200mV |
Power Jack | DC9.5V |
Power Supply | 2-way |
Batteries | 6 AA-size alkaline batteries |
Battery Life | Approximately 3 hours continuous operation on alkaline batteries |
AC Adaptor | AD-E95100L |
Auto Power Off | Approximately 30 minutes after last operation; Can be disabled. |
Speakers | 12cm × 2 (Output: 2.5W + 2.5W) |
Power Consumption | 9.5V = 7.5W |
Dimensions | 94.8 × 35.0 × 10.9 cm (37 5/16 × 13 3/4 × 4 5/16 inch) |
Weight | Approximately 4.4kg (9.7 lbs) (without batteries) |
- Maximum capacity per song: Approximately 320 kilobytes
- Maximum capacity per rhythm: Approximately 64 kilobytes (1 kilobyte = 1,024 bytes)
Design and specifications are subject to change without notice
General Guide
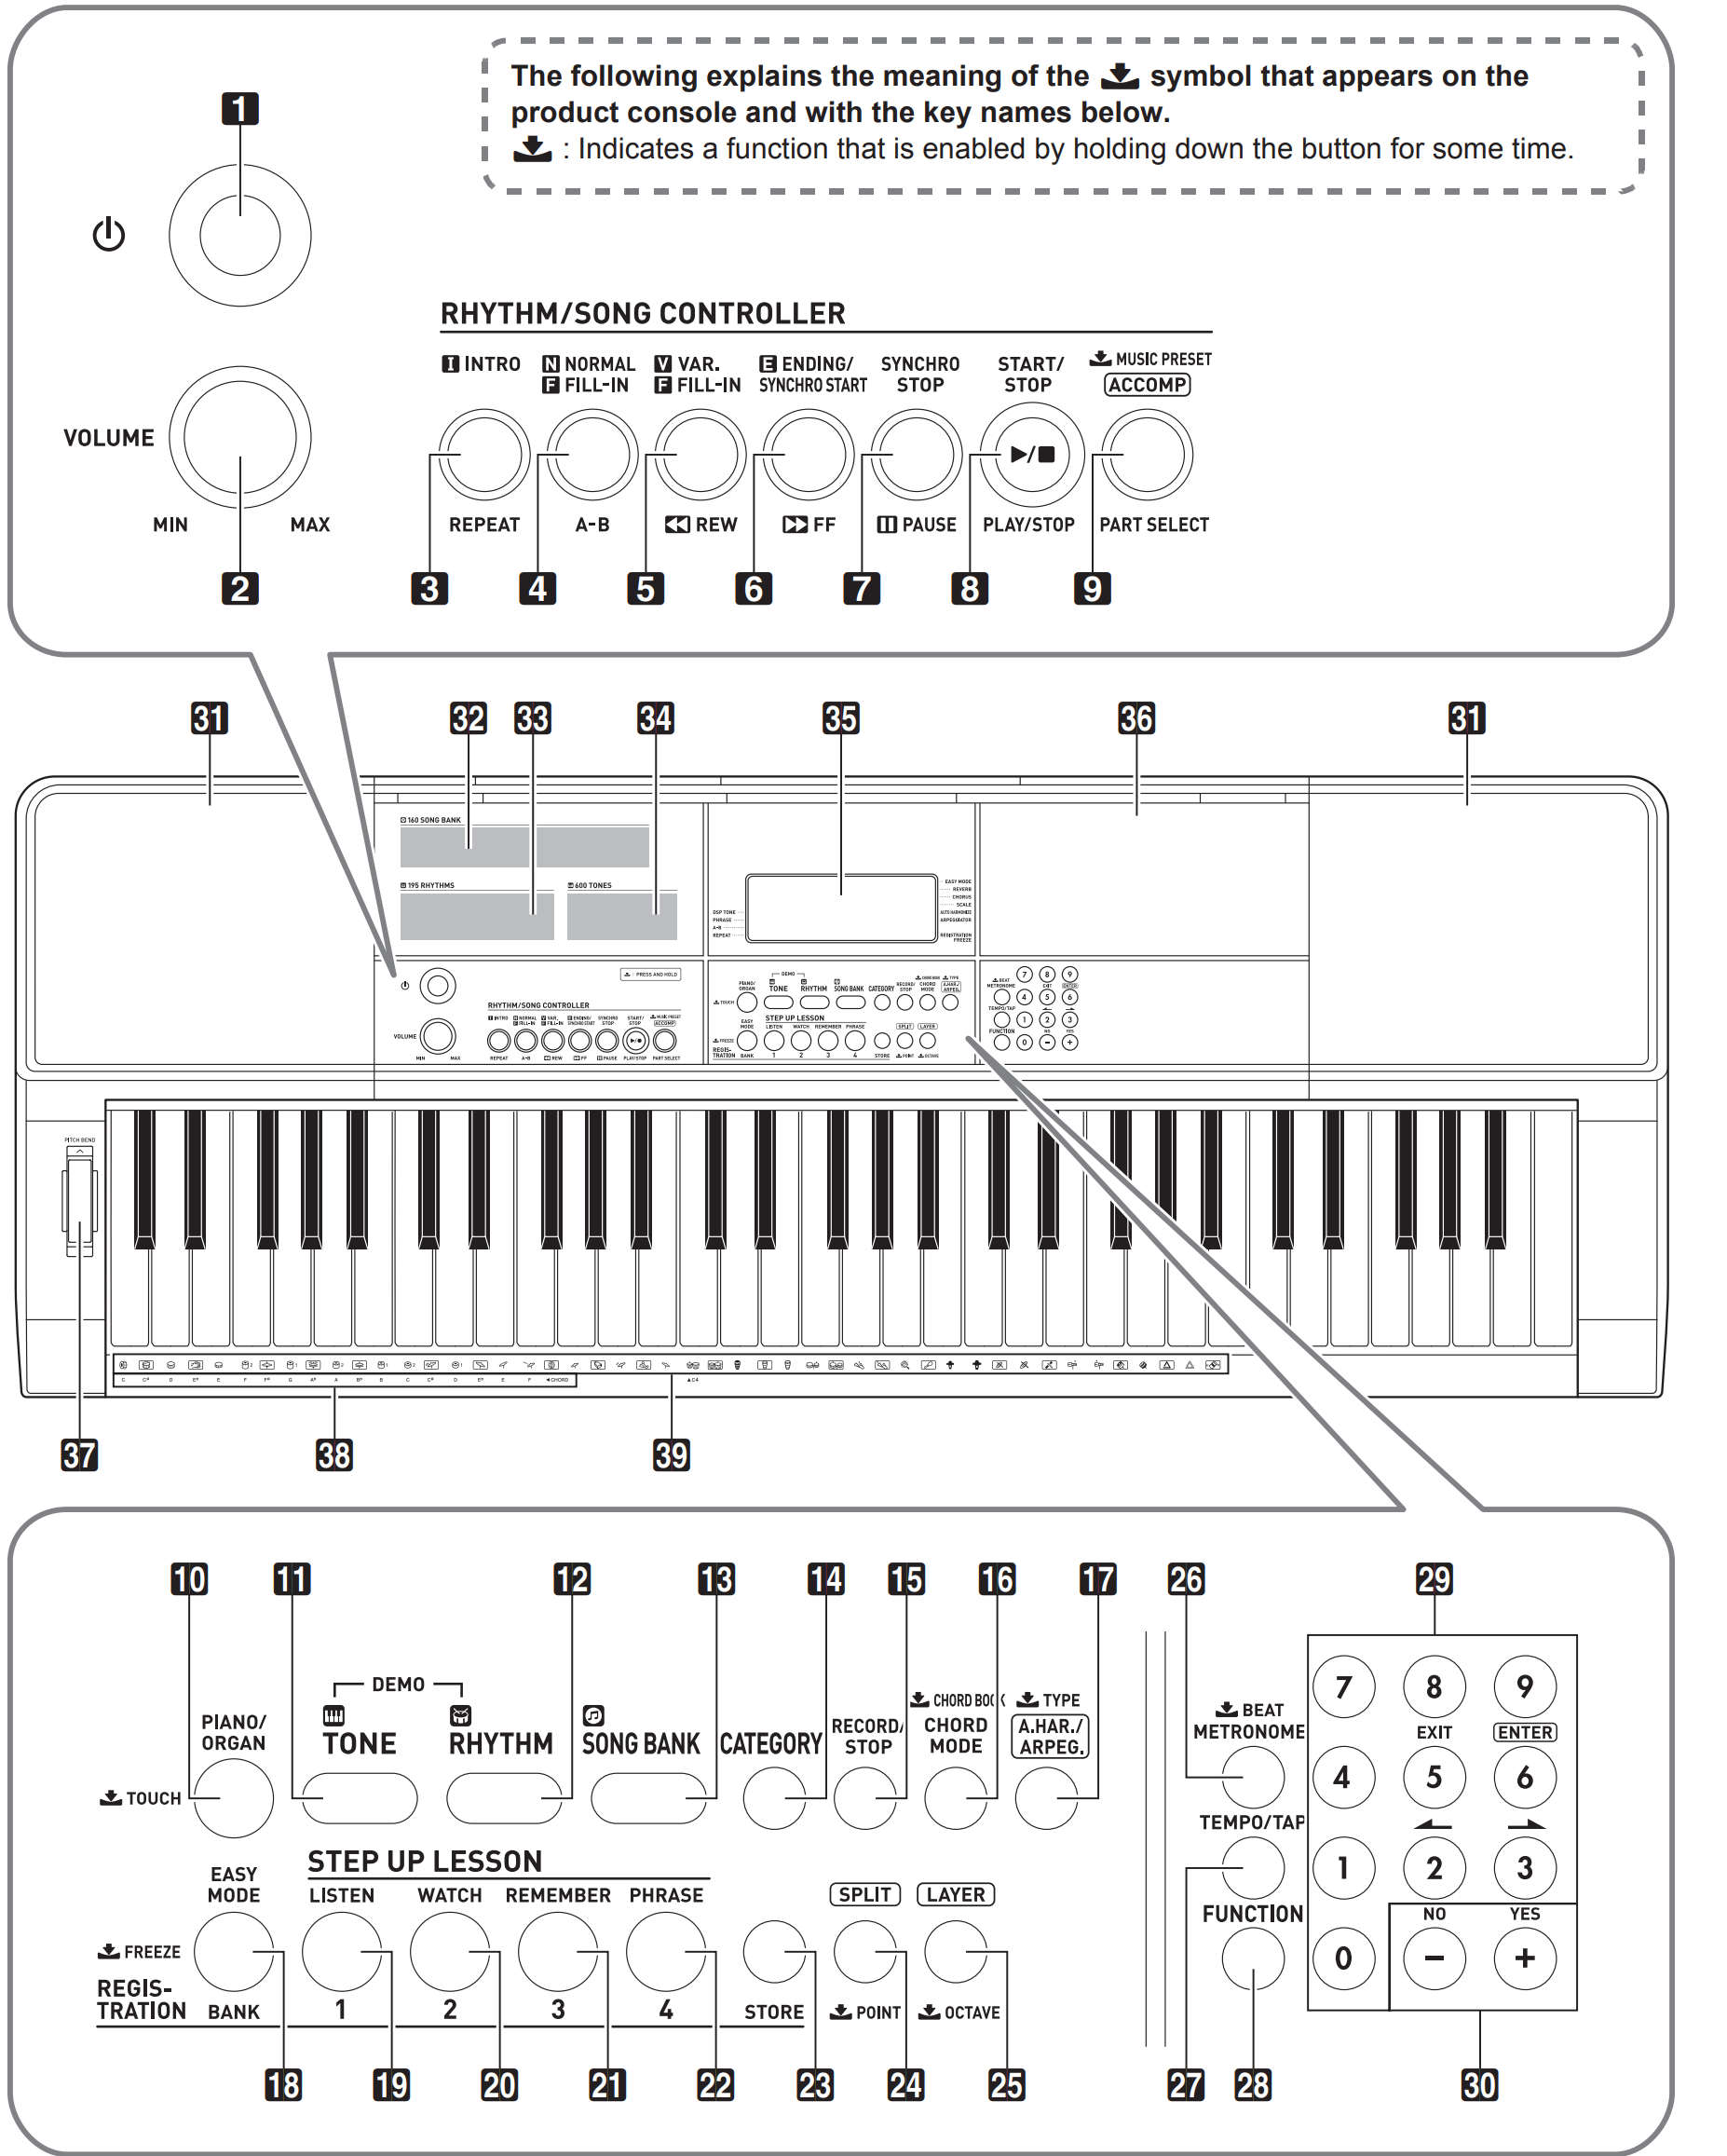
 (Power) button
 - VOLUME knob
- INTRO, REPEAT button
- 4NORMAL FILL-IN, A-B button
- VAR. FILL-IN,
 REW button
 - ENDING/SYNCHRO START,
 FF button
 - SYNCHRO STOP,
 pause button
 - START/STOP, PLAY/STOP button
- [ACCOMP], PART SELECT,
 MUSIC PRESET button
 - PIANO/ORGAN,
 TOUCH button
 - TONE button
- RHYTHM button
- SONG BANK button
- CATEGORY button
- RECORD/STOP button
- CHORD MODE,
 CHORD BOOK button
 - A.HAR./ARPEG.,
 TYPE button
 - EASY MODE, BANK, $FREEZE button
- Area1, LISTEN button
- Area2, WATCH button
- Area3, REMEMBER button
- Area4, PHRASE button
- STORE button
- SPLIT,
 POINT button
 - LAYER,
 OCTAVE button
 - METRONOME,
 BEAT button
 - TEMPO/TAP button
- FUNCTION button
- Number keys
- [–] and [+] keys
- Speakers
- Song Bank list
- Rhythm list
- Tone list
- Display
- Tray
- The tray is angled slightly. Take care so items placed on it do not slide off.
- Do not place cups or any other liquid containers on the tray.
- PITCH BEND wheel
- CHORD root names
- Percussion instrument list
Back - USB flash drive
- USB port
- PEDAL jack
- AUDIO IN jack
DC 9.5V terminal

- PHONES/OUTPUT jack
Casio Key Portable Keyboard CT-X870IN Display
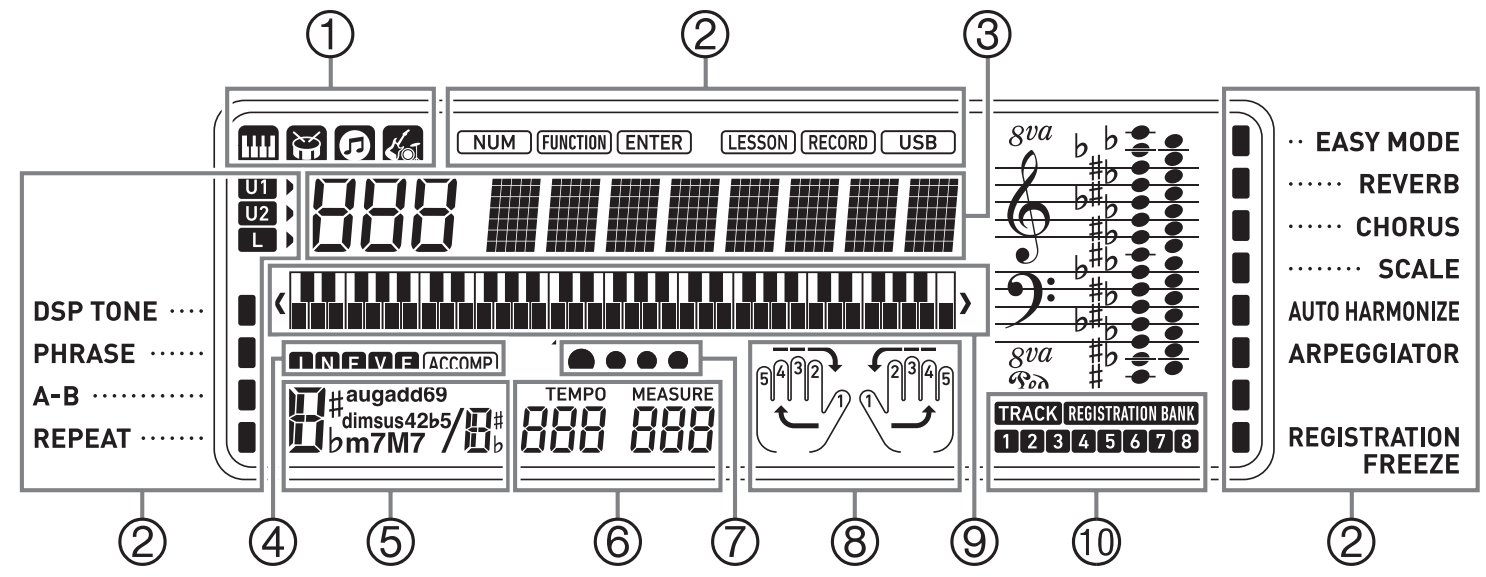
- Tone, rhythm, song bank, Music Preset indicators
- Indicators
- Number, setting name/status display
- I N F V E (Auto Accompaniment Types) indicators*, ACCOMP (Auto Accompaniment) indicator
- Chord name
- Tempo, measure
- Beat display
- Part, fingering display
- Keyboard display
- Registration bank indicator/Track Indicator
I:Intro, N:Normal, F:Fill-in, V:Variation, E:Ending
Using the (29) Number Keys and the (30) [–] and [+] Keys
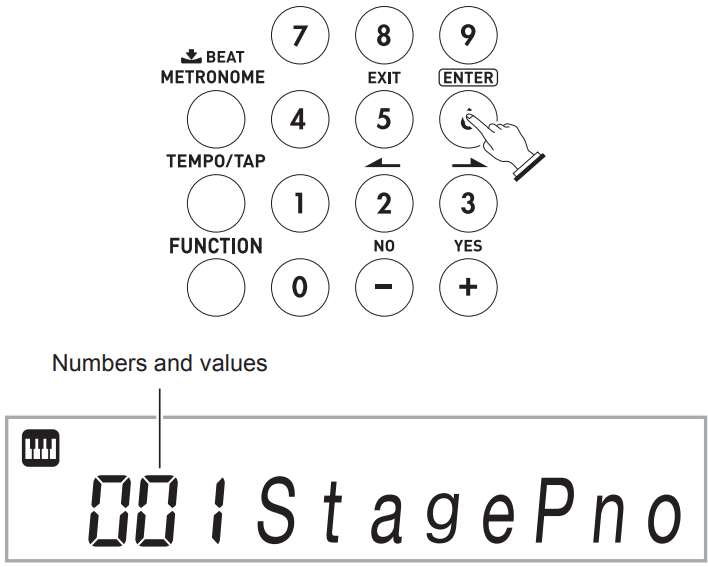
Number Keys
Use the number keys to enter numbers and values.
Use the number keys to enter the same number of digits as the displayed value.
Example: To enter tone number 001, input 03 03 1.
While entering a value, you can apply your input by pressing 28 FUNCTION.
Example: To enter and apply tone number 010, input 1⇒0⇒ 28 FUNCTION.
To cancel input, long-press the [5] (EXIT) key.
If the NUM indicator is not shown on the display, press the [0] number key to display it and then input the value you want.
[–] and [+] Keys
Pressing [–] reduces the currently displayed number or value by one, while [+] increases it by one. Holding down either button will sequentially increase or decrease the displayed number or value until you release the button. Pressing both buttons at the same time will return the number or value to its initial default or recommended setting.
If input of a negative value is allowed, pressing [–] while the value is flashing on the display will add a minus sign (–) to the left of the value. Pressing [+] while the value is flashing on the display changes back to a positive value.
[2] (o), [3] (p), [5] (EXIT), and [6] (ENTER) Keys
Depending on the operation being performed, [2] (o), [3] (p), [5] (EXIT), and [6] (ENTER) key operations are enabled while the NUM indicator is not shown on the display.
[5] (EXIT) Key Long-press
After configuring function settings with the Function (28) button, you can exit the setting screen by long-pressing [5] (EXIT). For details, see “FUNCTION Button (28) Functions” (page EN-43).
Categories
In the modes listed below the category (group) of the currently selected type will be shown on the display. You can change the category, if you want.
- Tones
- Rhythms
- Songs
- Music Presets
To check the current category

- Press 14 CATEGORY.
- Each press of 14 CATEGORY selects the first number of the next sequential category.
- After pressing 14 CATEGORY, you can also scroll forward and back between category names using the 30 [–] and [+] keys.
- If you do not perform any operation for a while after displaying a category, the display will automatically return to the previous screen.
- To return to the previous screen, press 28 FUNCTION.
NOTE
- For information about the categories available in each mode, refer to the “Category” column of the lists.
- You can directly scroll between top entries of categories by holding down 14 CATEGORY as you use the 30 [–] and [+] keys to scroll.
Returning the Digital Keyboard to Its Factory Default Settings
Perform the following procedure when you want to return the Digital Keyboard’s stored data and settings to their initial factory defaults.
Connecting to Audio Equipment
This Digital Keyboard can be connected to commercially available stereo, amplifier, or recording equipment, to a portable audio player or other equipment.
Outputting Keyboard Notes to Audio Equipment
Connection requires commercially available connecting cords, supplied by you.
The connecting cords should have a stereo standard plug on one end and a plug that matches the configuration of the external device on the other end.
IMPORTANT
- Turn off the external device when making connections. After connecting, turn down the Digital Keyboard and external device volume levels whenever turning power on or off.
- After connecting, turn on the Digital Keyboard and then the external device.
- If keyboard notes sound distorted when they are sounded from external audio equipment, lower the Digital Keyboard’s volume setting.
Playing an External Device from the Digital Keyboard
Connection requires commercially available connecting cords, supplied by you.
- The connecting cords should have a stereo mini plug on one end and a plug that matches the configuration of the external device on the other end.
- Turn off the Digital Keyboard when making connections. After connecting, turn down the Digital Keyboard and external device volume levels whenever turning power on or off.
- After connecting, turn on the external device and then the Digital Keyboard.
- If notes are distorted when they are sounded on the external device, lower the volume setting of the external device.
Digital Keyboard en AUDIO IN jack
Center Cancel (Vocal Cut)
Enabling Vocal Cut cuts (mutes or minimizes) the vocal in the sound being input from the en AUDIO IN jack. Note that this function cancels the sound in the center position of the audio, which may (depending on how the original audio was mixed) end up canceling something else other than the vocal part. How vocal cut is performed depends on the sound being input.
For information about configuring settings, “FUNCTION Button (cs) Functions” (page EN-43).
Getting Ready to Play
Preparing the Music Stand
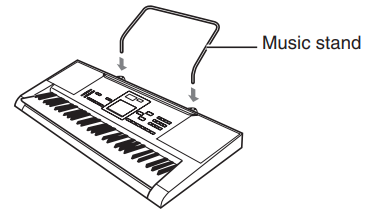
Power Supply
Either an AC adaptor or batteries can be used to power this Digital Keyboard. Normally, use of AC adaptor power is recommended.
- The AC adaptor does not come with this Digital Keyboard. Purchase it separately from your retailer. See page EN-1 for information about options.
Using the AC Adaptor
Make sure that you use only the AC adaptor specified for this Digital Keyboard. Use of a different type of AC adaptor can cause malfunction.

- Be sure to turn off Digital Keyboard power before connecting or disconnecting the AC adaptor.
- The AC adaptor will become warm to the touch after very long use. This is normal and does not indicate malfunction.
To prevent breaking of the wire, take care to avoid putting any type of load on the power cord.
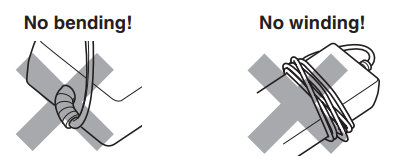
- Never insert metal, pencils, or any other objects into the product’s 9.5V DC terminal. Doing so creates the risk of accident.
Using Batteries
IMPORTANT
- Be sure to turn off power before loading batteries.
- It is up to you to prepare six commercially available AA-size batteries. Do not use oxyride batteries or any other nickel based batteries
- Open the battery cover on the bottom of the Digital Keyboard.
- Load six AA-size batteries into the battery compartment.
Make sure the positive + and negative - ends of the batteries are facing as shown in the illustration. Insert the tabs of the battery cover into the holes on the side of the battery compartment, and close the cover.

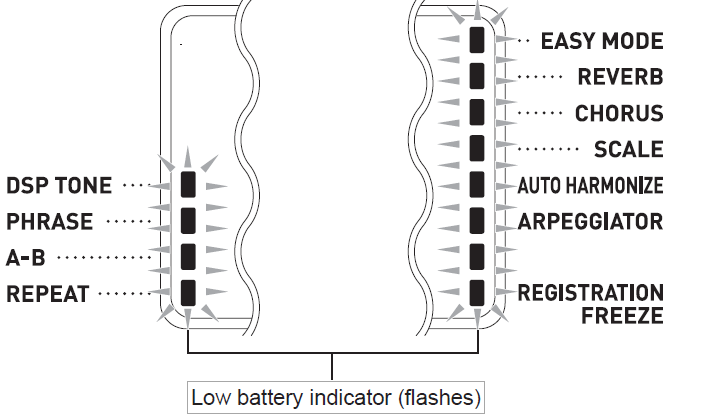
Low Battery Indication
The indicator shown below starts to flash to let you know when battery power is low. Replace the batteries with new ones.
Description
Convenience and longevity were considered in the construction of the CT-X870IN. The full-size keys offer a pleasant playing experience, and its small size makes it portable. A backlit LCD display on the keyboard facilitates navigating through the many settings and operations. Users may experiment with a variety of musical styles, from classical to modern genres, thanks to its vast collection of sounds and rhythms.
A fun and imaginative touch to the keyboard is the Dance Music Mode, a special function that lets users compose and play along with dance music tracks. It is an excellent tool for recording and producing music because of its USB-MIDI and audio interface, which also allow for smooth communication with computers and other musical instruments.
Setup Guide
It is simple to set up the Casio Key Portable Keyboard CT-X870IN. Here is a detailed guide:
- Unbox the keyboard and ensure all components are included (keyboard, power adapter, music stand, etc.).
- Insert batteries or connect the AC adapter to power the keyboard.
- Adjust the music stand to your preferred height.
- Connect the keyboard to a computer or other devices via USB-MIDI or audio interface if necessary.
- Familiarize yourself with the interface by navigating through the menus and settings using the buttons and controls.
Important!
Please note the following important information before using this product.
- Before using the optional AC Adaptor to power the unit, be sure to check the AC Adaptor for any damage first. Carefully check the power cord for breakage, cuts, exposed wire and other serious damage. Never let children use an AC adaptor that is seriously damaged.
- Never attempt to recharge batteries.
- Do not use rechargeable batteries.
- Never mix old batteries with new ones.
- Use recommended batteries or equivalent types.
- Always make sure that positive (+) and negative (–) poles are facing correctly as indicated near the battery compartment.
- Replace batteries as soon as possible after any sign they are getting weak.
- Do not short-circuit the battery terminals.
- The product is not intended for children under 3 years.
- Use only a CASIO AD-E95100L adaptor.
- The AC adaptor is not a toy.
- Be sure to disconnect the AC adaptor before cleaning the product.
Troubleshooting
| Symptom | Action |
Included Accessories | ||
| I can’t find something that should be here. | Carefully check inside all of the packing materials. |
Power Requirements | ||
| Power will not turned on. |
|
The display lightsup momentarily but power does not turn on whenI press the 1P (power) button. | Press 1P (power) firmly and completely to turn on power. | |
The Digital Keyboard outputs a loud sound and then suddenly powers down. | Replace the batteries with new ones or switch over to AC adaptor power (page EN-8). | |
The Digital Keyboard suddenly powers down after about 30 minutes. | This happens when Auto Power Off (page EN-9) is triggered. | |
Display | ||
| The display keeps going out or are flashing. | Replace the batteries with new ones or switch over to AC adaptor power (page EN-8). |
On-screen keyboard keys or notes remain on the display. | A Step Up Lesson is in progress and the Digital Keyboard is waiting for you to play the next note in the song. To stop this from happening, cancel the lesson (page EN-23). | |
Screen contents are visible only from straight ahead. | This is dues to production limitations. It does not indicate malfunction. | |
Sound | ||
| Nothing happens when I press any keyboard key. |
|
Nothing happens or notes do not play normally when I play notes on the left side of the keyboard. | Press 9 to disable chordinput in the accompaniment keyboard area (page EN-27). | |
Nothing happens when I start an Auto Accompaniment. |
| |
Nothing happens when I start playback of a built-in song. |
| |
The metronome does not sound. |
| |
| Symptom | Action |
| Notes keep sounding, without stopping. |
|
Some notes are cut off while they are playing. | Notes are cut off whenever the number of notes being sounded exceeds the maximum polyphony value of 48 (24 for some tones). This does not indicate malfunction. | |
The volume or tone setting I made has changed. |
| |
Output volume does not change even though is change my keyboard touch. |
| |
In certain keyboard ranges, the volume and tone quality sound are slightly different from those in other keyboard ranges. | This is due to system limitations. It does not indicate malfunction. | |
With some tones, octaves do not change at the far ends of the keyboard. | This is due to system limitations. It does not indicate malfunction. | |
The pitch of the notes does not match other accompanying instruments or sounds strange when played long with other instruments. |
| |
The reverb of notes seems to change suddenly. |
| |
Operation | ||
| When I perform a skip forward or skip back operation, the skip operation moves multiple song measures instead of only a single measure. | While song playback is stopped or a Step Up Lesson is in progress, skip forward and skip back operations are performed in phrase units (page EN-19). |
Tone, rhythm, and other settings revert to their initial defaults whenever you turn on the Digital Keyboard. | Though Digital Keyboard settings reset when you turn off the Digital Keyboard (page EN-9), you can save setups to registration memory for instant recall whenever you need them (page EN-37). | |
Computer Connection | ||
| I can’t exchange data between the Digital Keyboard and a computer. |
|
Error Indicators
Display | Cause | Action |
Err Limit | You are attempting to record more than 999 measures. | Make your recordings up to 999 measures long. |
Err Mem Full | You are attempting a recording that exceeds the allowable per song limit. | Keep song recordings with the allowable per song limit. |
Err DataFull | You are attempting to record more than five songs. | Delete some of the songs in memory. |
Err No Media |
|
|
Err No File | There is no loadable file or no playable file in the “MUSICDAT” folder. | Move the file you want to load or play into the appropriate location (page EN-50) in the “MUSICDAT” folder. |
Err No Data | You are attempting to save user data when there is no data to save. | Select a user data item for which there is data to save. |
Err ReadOnly | A read-only file with the same name you are trying to use is already stored on USB flash drive. |
|
Err MediaFul | There is not enough space available on the USB flash drive. | Delete some of the files on the USB flash drive to make room for new data (page EN-51) or use a different USB flash drive. |
Err ManyFile | There are too many files on the USB flash drive. | Delete some of the files on the USB flash drive to make room for new data. |
Err NotSMF01 | You are attempting to play back SMF Format 2 song data. | This Digital Keyboard supports playback of SMF Format 0 or Format 1 only. |
Err Large Sz |
|
|
Err WrongDat |
| — |
Err Format |
|
|
Pros & Cons
Pros
- Extensive library of tones and rhythms
- Portable and lightweight design
- Touch-sensitive keys for expressive playing
- Dance Music Mode for creative music-making
- USB-MIDI and audio interface for connectivity
Cons
- No weighted keys; may not be ideal for pianists looking for an authentic piano feel
- Some users find the menu navigation complex
- Battery life may vary depending on usage
Customer Reviews
The Casio Key Portable Keyboard CT-X870IN has received high marks from customers for both its sound quality and adaptability. Numerous customers value the extensive feature set and user-friendliness, particularly for novices. Some have pointed out that the menu system might initially be a little daunting, too.
The absence of weighted keys and a few minor battery life concerns are frequent grievances. Because of its performance and value, the CT-X870IN is generally well rated.
Faqs
What is the number of built-in tones in the Casio?
Does the Casio Key Portable Keyboard have touch-sensitive keys?
Can the Casio Key Portable Keyboard CT-X870IN be powered by batteries?
What is the Dance Music Mode in the Casio Key Portable Keyboard CT-X870IN?
Is the Casio KeyX870IN compatible with computers?
How many rhythms does the Portable Keyboard feature?
Does thePortable Keyboard have an SD card slot?
Is the Casio Key Portable Keyboard suitable for live performances?
Can I use the Casio Key Portable Keyboard for music education?
How do I navigate through the menus on the Key Portable?
Leave a Comment
