How to Operate: Casio ProTrek PRG-650 Watch User Manual
Content
Casio ProTrek PRG-650 Watch Introduction
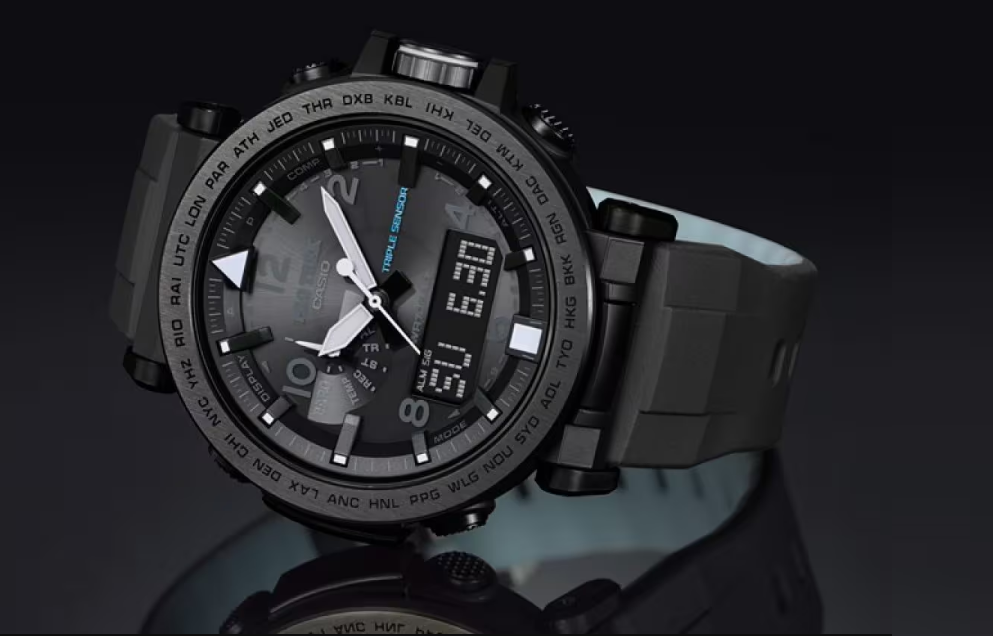
The Casio ProTrek PRG-650 is a rugged and versatile outdoor watch designed for adventurers. It features a smart access electronic crown switch and independent multi-motor drive for smooth operation of the hour, minute, and second hands. The PRG-650 is equipped with a triple sensor (bearing, altitude/barometric pressure, temperature), Tough Solar power, and a luminescent band and hour markers for visibility in low light conditions. Water-resistant up to 10 bar, this watch is priced at approximately $299.99 and offers essential tools for outdoor exploration.
Applications
The built-in sensors of this watch measure direction, barometric pressure, temperature and altitude. Measured values are then shown on the display. Such features make this watch useful when hiking, mountain climbing, or when engaging in other such outdoor activities.
Warning!
- The measurement functions built into this watch are not intended for taking measurements that require professional or industrial precision. Values produced by this watch should be considered as reasonable representations only.
- When engaging in mountain climbing or other activities in which losing your way can create a dangerous or life-threatening situation, always use a second compass to confi rm direction readings.
- Note that CASIO COMPUTER CO., LTD. assumes no responsibility for any damage or loss suffered by you or any third party arising through the use of your watch or its malfunction.
Important!
- The watch’s Altimeter Mode calculates and displays relative altitude based on barometric pressure readings produced by its pressure sensor. This means that readings taken at different times at the same location may produce different altitude values due to changes in barometric pressure. Also note that the value displayed by the watch may be different from the actual elevation and/or sea level elevation indicated for the area where you are located.
- When using the watch’s altimeter while mountain climbing, be sure to perform regular calibration in accordance with the local altitude (elevation) indications. For more information, see “To specify a reference altitude value”.
- Whenever you use the digital compass of this watch for serious trekking, mountain climbing, or other activities, be sure always to take along another compass to confi rm readings. If the readings produced by the digital compass of this watch are different from those of the other compass, perform bidirectional calibration of the digital compass to ensure more accurate readings.
- Direction readings and digital compass calibration will not be possible if the watch is in the vicinity of a permanent magnet (magnetic accessory, etc.), metal objects, high-voltage wires, aerial wires, or electrical household appliances (TV, computer, cellphone, etc.)
Specifications
Accuracy at Normal Temperature
- ±15 seconds a month
Digital Timekeeping
- Hour, minutes, seconds, a.m. (A) / p.m. (P), month, day, day of the week, barometric pressure change indication
- Time format: 12-hour and 24-hour
- Calendar system: Full Auto-calendar pre-programmed from the year 2000 to 2099
- Other: Three display formats (day of the week, month, day; barometric pressure change, month day; hour, minute, second); Home City code (can be assigned one of 29 city codes); standard time / daylight saving time (summer time)
Analog Timekeeping
- Hour, minutes (hand moves every 10 seconds), seconds
Digital Compass
- 60 seconds continuous reading; 16 directions
- Angle value: 0° to 359°
- Measurement unit: 1° (digital display) / 6° (hand)
- North indicated by second hand
- Compass calibration (bidirectional, magnetic declination angle)
Altimeter
- Measurement range: –700 to 10,000 m (or –2,300 to 32,800 ft.) without reference altitude
- Display range: –3,000 to 10,000 m (or –9,840 to 32,800 ft.)
- Negative values can be caused by readings produced based on a reference altitude or due to atmospheric conditions.
- Measurement Unit: 1 m (or 5 ft.)
- Current Altitude Data: Every second for the first 3 minutes, followed by every 5 seconds for approximately 1 hour (0'05); every second for the first 3 minutes, followed by every 2 minutes for approximately 12 hours (2'00)
Altitude Memory Data
- Manually saved records: 30 (altitude, date, time)
- Auto saved values: One set of high altitude and its reading date and time, low altitude and its reading date and time, total ascent and its save start date and time, total descent and its save start date and time
- Other: Reference altitude setting; Altitude differential (–100 to +100m / –1,000 to +1,000m); Altitude auto measurement interval (0'05 or 2'00)
Barometer
- Measurement and display range: 260 to 1,100 hPa (or 7.65 to 32.45 inHg)
- Display unit: 1 hPa (or 0.05 inHg)
- Other: Calibration; Barometric pressure graph; Barometric pressure differential pointer; Barometric pressure change indicator
Thermometer
- Measurement and display range: –10.0 to 60.0°C (or 14.0 to 140.0°F)
- Display unit: 0.1°C (or 0.2°F)
- Other: Calibration
Bearing Sensor Precision
- Direction: Within ±10°
- Values are guaranteed for a temperature range of 10°C to 40°C (50°F to 104°F).
- North indicated by second hand: Within ±2 segments
Pressure Sensor Precision
- Measurement accuracy: Within ±3 hPa (0.1 inHg)
- Altimeter accuracy: Within ±75m (246 ft.)
- Values are guaranteed for a temperature range of –10°C to 40°C (14°F to 104°F).
- Precision is lessened by strong impact to either the watch or the sensor, and by temperature extremes.
Temperature Sensor Precision
- ±2°C (±3.6°F) in the range of –10°C to 60°C (14.0°F to 140.0°F)
Stopwatch
- Measuring unit: 1/100 second
- Measuring capacity: 23:59' 59.99"
- Measuring modes: Elapsed time, split time, two finishes
Countdown Timer
- Measuring unit: 1 second
- Countdown range: 60 minutes
- Setting unit: 1 minute
Alarms
- 5 Daily alarms
- Hourly time signal
World Time
- 29 cities (29 time zones), UTC (Universal Time Coordinated)
- Home City/World Time City switching; one-touch UTC zone access
- Other: Daylight Saving Time/Standard Time
Illumination
- LED light (LCD), ultraviolet LED light (analog hand area)
- Selectable illumination duration (approximately 1.5 seconds or 3 seconds)
- Auto Light Switch (Full Auto Light operates only in the dark)
Other
- Battery power indicator
- Power Saving
- Button operation tone on/off
- Alarm test
- Auto hand position adjustment
- Hand shift feature (to view digital info)
Power Supply
- Solar panel and one rechargeable battery
Approximate battery operating time
- 7 months (from full charge to Level 4) under the following conditions:
- Light: 1.5 seconds/day
- Beeper: 10 seconds/day
- Direction readings: 20 times/month
- Climbs: Once (approximately 1 hour of altitude readings)/month
- Barometric pressure change indicator readings: Approximately 24 hours/month
- Barometric pressure graph: Readings every 2 hours
- Display: 18 hours/day
Frequent use of illumination runs down the battery. Particular care is required when using the auto light switch
About This Manual
- Depending on the model of your watch, digital display text appears either as dark fi gures on a light background, or light fi gures on a dark background. All examples in this manual are shown using dark fi gures on a light background.
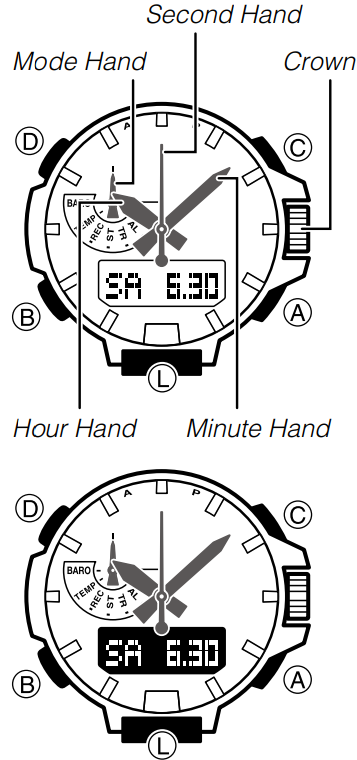
- Button operations are indicated using the letters shown in the illustration.
- Note that the product illustrations in this manual are intended for reference only, and so the actual product may appear somewhat different than depicted by an illustration.
Description
The Casio ProTrek PRG-650 is a versatile and reliable outdoor watch that is perfect for hiking, camping, and other outdoor activities. The watch is designed with a rugged and durable resin case and band, and features a digital display that is easy to read in any lighting conditions. The triple sensor technology provides accurate measurements of altitude, barometric pressure, and direction, and the sunrise and sunset data is a useful feature for planning your outdoor adventures. The watch is also low-temperature resistant, making it an ideal choice for extreme weather conditions. The PRG-650 is also equipped with a stopwatch, countdown timer, and multiple alarms, making it a versatile and functional watch for everyday use.
Using the Crown
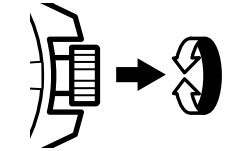
The crown of this watch is a screw in lock crown. Before using the crown, you must fi rst rotate it towards you to loosen it. After performing crown operations, be sure to press the crown in lightly as you screw it back in.
Important! To maintain water resistance and avoid impact damage to the crown, be sure to screw it back in when you are not using it.
The illustrations below show the different crown operations.

High-speed Movement
You can use either of the crown operations described below to move watch hands or indicators at high speed.
HS1: Can be used to move both hands and display indicators.
HS2: Can be used when setting the hour and minute manually to move the hands at high speed.
- To start HS1 high-speed movement
While the crown is pulled out, rotate it rapidly away from you (forward) or towards you (reverse) until the desired HS1 high-speed movement starts.

- To start HS2 high-speed movement
While HS1 high-speed movement is in progress, again rotate the crown rapidly, away from you (forward) or towards you (reverse) in the same direction as the HS1 movement until HS2 high-speed movement starts.

- To stop high-speed movement
Rotate the crown in the direction that is opposite that of the current high-speed movement or press any button.
Note
- If you do not perform any operation for more than two minutes after pulling out the crown, the indicator shown below will appear and crown operations will become disabled. If this happens, push the crown back in and then pull it out again to re-enable crown operations.
- Pulling out the crown while the watch is in a mode that does not allow confi guration of any settings will cause the indicator shown below to appear. If this happens, push the crown back in and lock it.
- The indicator shown below also appears when performing hand home position adjustment. See “Hand Home Position Adjustment” for more information.
- You can use high-speed movement in the following cases: when changing the time and/or date setting in the Timekeeping Mode, World Time Mode, Countdown Timer Mode, or Alarm Mode, or when performing magnetic declination angle calibration, altitude calibration, barometric pressure calibration, or temperature calibration operations.

Things to check before using the watch
- Check the battery power level.
Hold down B for at least two seconds to enter the Timekeeping Mode and display the battery power level.
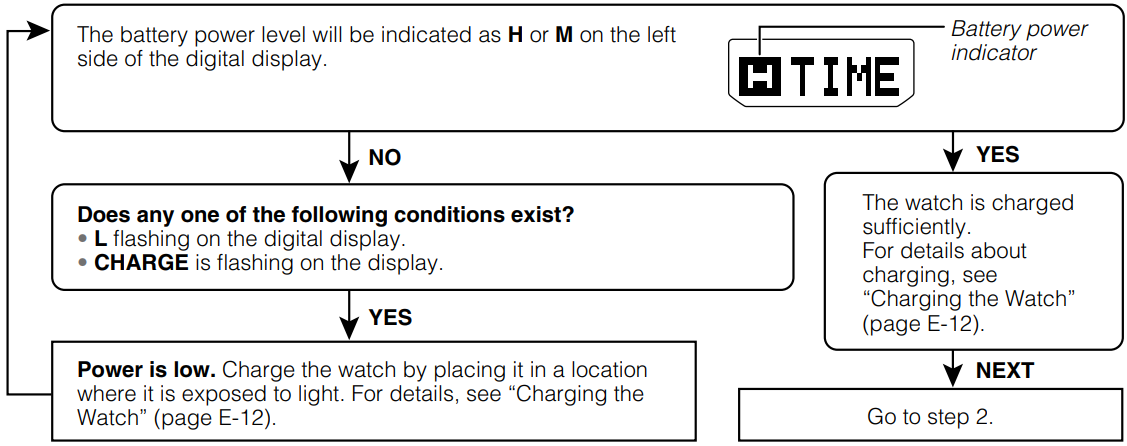
- When L is flashing, the second hand will jump at two-second intervals.
- When CHARGE is fl ashing, all hands will move to and stop at 12 o’clock.
- Check the Home City and the daylight saving time (DST) setting
- Use the procedure under “To confi gure Home City and summer time settings” to configure your Home City and daylight saving time settings.
Important! Proper World Time Mode data depends on correct Home City, time, and date settings in the Timekeeping Mode. Make sure you confi gure these settings correctly.
- Use the procedure under “To confi gure Home City and summer time settings” to configure your Home City and daylight saving time settings.
- Set the current time.
- The watch is now ready for use.
Using the Altimeter Mode
The watch takes altitude readings and displays results based on air pressure measurements taken by a built-in pressure sensor. It also saves various types of altitude records and data.
- The displayed altitude reading is a relative altitude that is calculated based on the measurement of changes in barometric pressure by the watch’s pressure sensor. This means that barometric pressure changes can cause readings taken at different times at the same location to vary.
- Note that the value displayed by the watch may be different from the actual elevation and/or sea level elevation indicated for the area where you are located. When using the watch’s altimeter while mountain climbing, it is recommended that you perform regular calibration in accordance with local altitude (elevation) indications.
Important! See “To specify a reference altitude value” and “Altimeter Precautions”for information about how to minimize differences between readings produced by the watch and values provided by local altitude (elevation) indications.
Getting Ready Casio ProTrek PRG-650 Watch
Before actually taking an altitude reading, you need to select an altitude reading interval.
Selecting the Altitude Auto Reading Interval
You can select either of the following two altitude auto reading intervals:
- 0'05: Readings at one-second intervals for the first three minutes, and then every five seconds for approximately the next hour.
- 2'00: Readings at one-second intervals for the first three minutes, and then every two minutes for approximately the next 12 hours.
Note: If no button is pressed while in Altimeter Mode, the watch will automatically return to the Timekeeping Mode after:
- 12 hours (altitude auto reading interval: 2'00), or
- 1 hour (altitude auto reading interval: 0'05).
To Specify the Altitude Auto Reading Interval
- In the Altimeter Mode, pull out the crown. This will cause the current altitude reading value to appear.
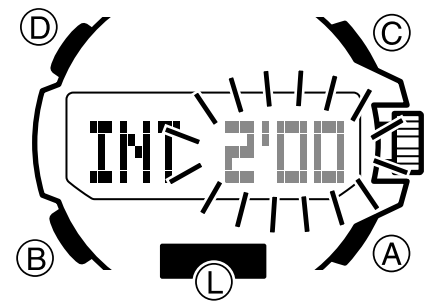
- Press B. This will cause INT to appear on the digital display, along with the flashing current auto reading interval setting.
- Rotate the crown to select either five seconds (0'05) or two minutes (2'00) as the interval setting.
- After the setting is the way you want, push the crown back in to exit the setting screen.
Taking Altitude Readings
Use the procedure below to take basic altitude readings.
- See “Using Reference Altitude Values” for information about how to make altimeter readings more accurate.
- See “How does the altimeter work?” for information about how the watch measures altitude.
To Take Altitude Readings
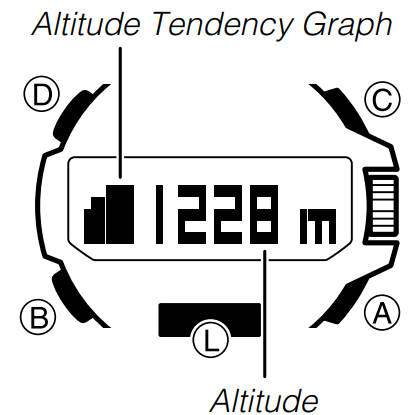
- Make sure the watch is in the Timekeeping, Digital Compass, or Altimeter Mode.
- Press A to start auto altimeter readings.
- The current altitude value is displayed in units of 1 meter (5 feet).
- For details on the measurement interval
Note
- When you press A, the second hand may indicate seconds (of the current time) or the altitude differential. The initial second hand function will be the same as what was selected the last time you took an altitude reading.
- To toggle between the two second hand functions (indicating seconds or indicating the altitude differential), press D.
- To restart a reading operation from the beginning, press A.
- After you're finished, press B to return to the Timekeeping Mode and stop auto altimeter readings.
- The watch will return to the Timekeeping Mode automatically if no operation is performed.
- The measurement range for altitude is –700 to 10,000 meters (–2,300 to 32,800 feet).
- The displayed altitude value changes to "----" if an altitude reading falls outside the measurement range. An altitude value will reappear as soon as the reading is within the allowable range.
- You can change the unit for displayed altitude values to either meters (m) or feet (ft). See “To specify altitude, barometric pressure, and temperature units”
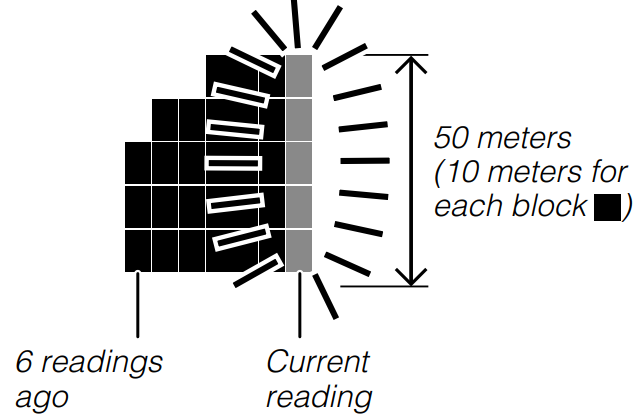
The altitude tendency graph shows changes in altitude over the past six readings while readings are being taken automatically.
Using Reference Altitude Values
To minimize the chance of reading error, you should update the reference altitude value before setting off on a trek or any other activity where you plan to take altitude readings. During a trek, keep checking the readings produced by the watch against altitude information provided by markers and other information, and update the reference altitude value as required.
- Reading error can be caused by changes in barometric pressure, atmospheric conditions, and elevation.
- Before performing the procedure below, look up the altitude of your current location on a map, the Internet, etc.
To Specify a Reference Altitude Value
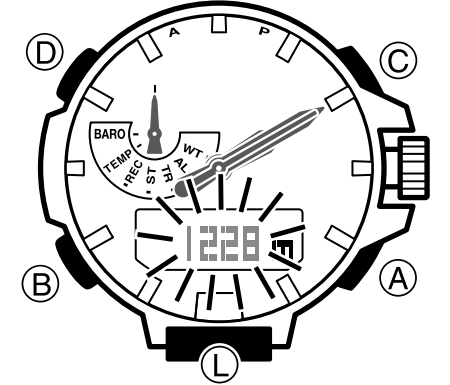
- In the Altimeter Mode, pull out the crown.
- This will cause the current altitude reading value to flash on the digital display.
- Rotate the crown to change the altitude value in one-meter (five-foot) increments.
- Change the reference altitude value to an accurate altitude reading that you get from a map or other source.
- You can set the reference altitude value within the range of –3,000 to 10,000 meters (–9,840 to 32,800 feet).
- Pressing A and C at the same time returns to OFF (no reference altitude value), so the watch performs air pressure to altitude conversions based on preset data only.
- After the setting is the way you want, push the crown back in to exit the setting screen.
Advanced Altimeter Mode Operations
Use the information in this section to obtain more accurate altimeter readings, especially while mountain climbing or trekking.
Using an Altitude Differential Value
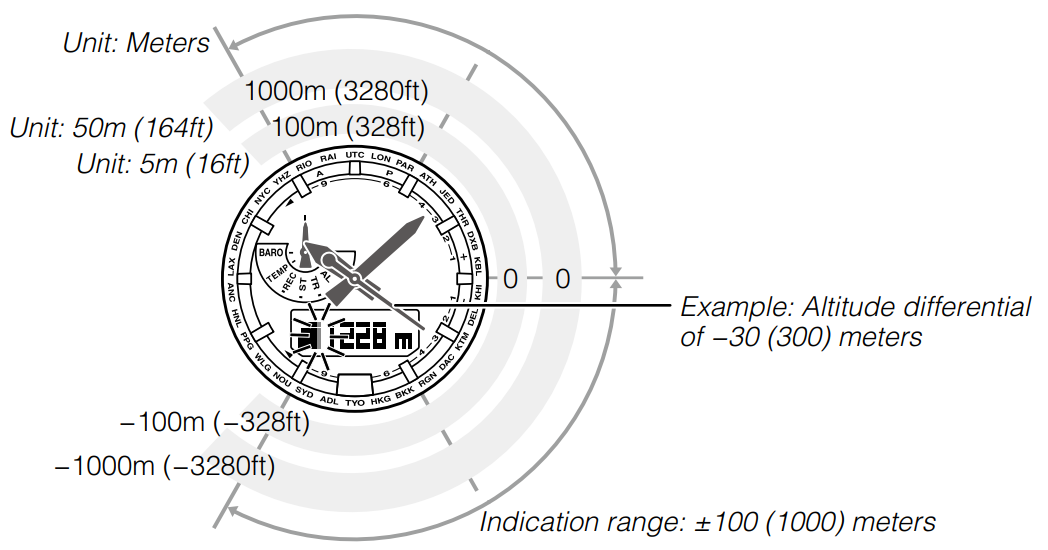
If you specify a reference altitude, the second hand of the watch will indicate the difference between the current altitude and the reference altitude. The displayed altitude differential value is updated each time the watch obtains a new altitude reading value.
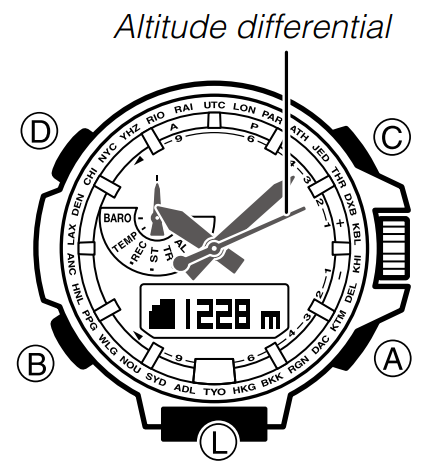
- Depending on the currently selected display range, the allowable range for the altitude differential value is 100 meters to –100 meters (100 meters = 328 feet), or 1,000 meters to –1,000 meters (1,000 meters = 3,280 feet).
- If a reading value is outside the allowable range, either OVER (
 ) or UNDER (
 ) appears on the digital display.
 - The second hand will move to 9 o’clock if a sensor reading could not be taken for some reason or if the reading is outside the allowable range.
- See “Using the Altitude Differential Value While Mountain Climbing or Hiking” for some real-life examples of how to use this feature.
Specifying the Altitude Differential Measurement Range
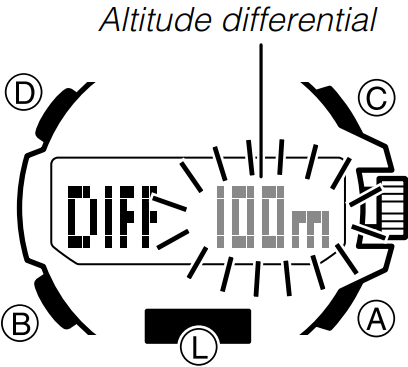
You can use the procedure below to select either ±100 meters or ±1,000 meters as the altitude differential measurement range.
| Relative Altitude Measurement Range | Display Unit |
|---|---|
| ±100 meters (±328 feet) | 5 meters (16 feet) |
| ±1,000 meters (±3,280 feet) | 50 meters (164 feet) |
To Specify the Altitude Differential Measurement Range
- In the Altimeter Mode, pull out the crown.
- This will cause the current altitude reading value to appear.
- Press B twice.
- This will cause DIFF to appear on the digital display, along with the flashing current altitude differential measurement range setting.
- Rotate the crown to select either 100 meters (100m) or 1,000 meters (1000m) as the altitude differential measurement range.
- After the setting is the way you want, push the crown back in to exit the setting screen.
Using the Altitude Differential Value While Mountain Climbing or Hiking
After you specify the altitude differential start point while mountain climbing or hiking, you can easily measure the change in altitude between that point and other points along the way.
To Use the Altitude Differential Value
- In the Altimeter Mode, check to make sure that an altitude reading is on the display.
- If an altitude reading is not displayed, press A to take one.
- Use the contour lines on your map to determine the difference in altitude between your current location and your destination.
- In the Altimeter Mode, hold down D for at least two seconds to specify your current location as the altitude differential start point.
- DIFF RESET and then RESET will appear. The watch will take an altitude reading, and the second hand will indicate the altitude differential. ±0 (±0 meters) will be displayed as the altitude differential at the reference point.
While comparing the altitude difference you determined on the map and the watch’s altitude differential value, advance towards your destination.
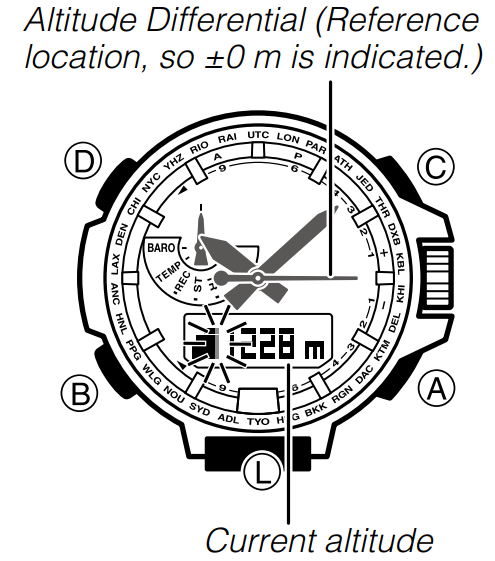
- If the map shows that the difference in altitude between your location and your destination is +80 meters, you know you will be nearing your destination when the displayed altitude differential value shows +80 meters.
The altitude differential with the reference location is indicated by the second hand (altitude differential indicator) as shown in the illustration below.
Setup Guide
To set up the Casio ProTrek PRG-650, follow these steps:
- Press and hold the "C" button to enter the setup mode.
- Use the "A" and "B" buttons to scroll through the various settings, such as time, date, and sensor calibration.
- Use the "C" button to adjust the settings as needed.
- Press the "D" button to exit the setup mode.
Types of Altitude Data
Your watch can record two types of altitude data in its memory: manually saved data and auto save values.
- Use the Data Recall Mode to view data stored in memory.
Manually Saved Records
Any time you perform the procedure below in the Altimeter Mode, the watch will create and store a record with the currently displayed altitude reading, along with the date and time the reading was taken. There is enough memory to store up to 30 manually saved records, which are numbered from -01- through -30-.
To Save a Reading Manually
- In the Altimeter Mode, check to make sure that an altitude reading is on the display.
- If an altitude reading is not displayed, press A to take one.
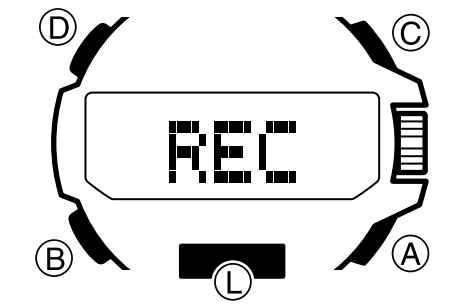
- Hold down A until REC flashes and then stops flashing.
- This will save the currently displayed altitude reading in a manually saved record, along with the time and date of the reading.
- The watch will return to the Altimeter Mode screen automatically after the save operation is complete.
- There is enough memory to store up to 30 manually saved records. If there are already 30 manually saved records in memory, the above operation will cause the oldest record to be deleted automatically to make room for the new one.
Auto Save Values
Auto save values are one type of data stored in the memory of your watch.
Auto Save Values
- High Altitude (MAX)
- Low Altitude (MIN)
- Total Ascent (ASC)
- Total Descent (DSC)
- These values are checked and updated automatically by the watch as altitude auto measurements are taken.
- Auto save is performed only while the watch is in the Altimeter Mode.
- Cumulative ascent and cumulative descent values are updated whenever there is a difference of at least ±15 meters (±49 feet) from one reading to the next.
- Auto save values also include the date and time each value was recorded.
How High and Low Altitude Values are Updated

With each auto save reading, the watch compares the current reading against the MAX (high altitude) and MIN (low altitude) values. It will replace the MAX value if the current reading is at least 15 meters (±49 feet) greater than MAX, or the MIN value if the current reading is at least 15 meters (±49 feet) less than MIN.
How Cumulative Ascent and Cumulative Descent Values Are Updated
The total ascent and total descent values produced by an Altimeter Mode reading operation session during the example climb illustrated above are calculated as follows:
- Total Ascent: q (300 m) + e (620 m) = 920 m
- Total Descent: w (320 m) + r (500 m) = 820 m
Entering the Altimeter Mode starts a new altitude auto reading session, but it does not reset the current ASC and DSC values or change them in any way. This means that the starting ASC and DSC values for a new Altimeter Mode auto reading session are the values that currently are in memory. Each time you complete an altitude auto reading session by exiting the Altimeter Mode, the total ascent value of the current session (920 meters in the above example) is added to the session’s starting ASC value. Also, the total descent value of the current auto reading session (–820 meters in the above example) is added to the session’s starting DSC value.
Note: The high altitude, low altitude, total ascent, and total descent values are retained in memory when you exit the Altimeter Mode. To clear values, perform the procedure under “To delete a specific record”
How Does the Altimeter Work?
Generally, air pressure decreases as altitude increases. This watch bases its altitude readings on International Standard Atmosphere (ISA) values stipulated by the International Civil Aviation Organization (ICAO). These values define relationships between altitude and air pressure.
- Note that the following conditions will prevent you from obtaining accurate readings:
- When air pressure changes because of changes in the weather
- Extreme temperature changes
- When the watch itself is subjected to strong impact
There are two standard methods of expressing altitude: absolute altitude, which expresses an absolute height above sea level, and relative altitude, which expresses the difference between the altitudes of two different places. This watch expresses altitudes as relative altitude.
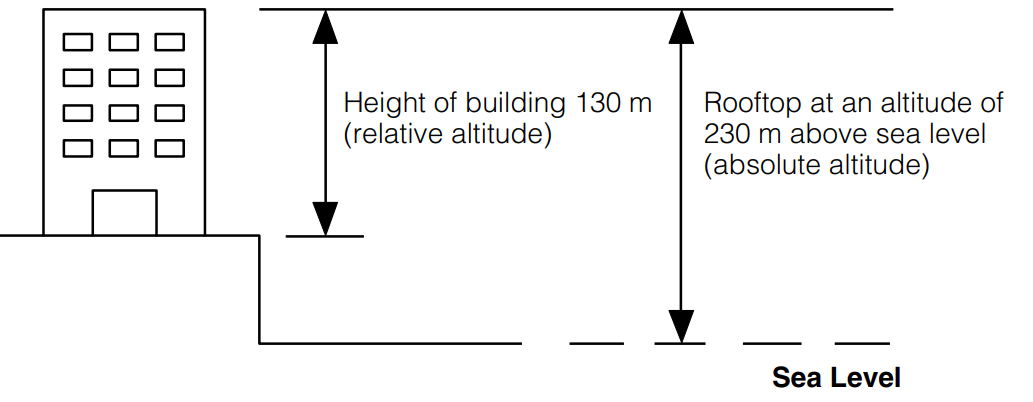
Regular calibration of the watch in accordance with values provided by local altitude (elevation) indications is recommended before taking readings in order to maximize reading accuracy
Altimeter Precautions
- This watch estimates altitude based on air pressure. This means that altitude readings for the same location may vary if air pressure changes.
- Do not use this watch for altitude reading or perform button operations while skydiving, hang gliding, or paragliding, while riding a gyrocopter, glider, or any other aircraft, or while engaging in any other activity where there is the chance of sudden altitude changes.
- Do not use this watch for measuring altitude in applications that demand professional or industrial-level precision.
- Remember that the air inside a commercial aircraft is pressurized. Because of this, the readings produced by this watch will not match the altitude readings announced or indicated by the flight crew.
City Code Table
| Code | City | UTC Offset / GMT Differential |
|---|---|---|
| PPG | Pago Pago | –11 |
| HNL | Honolulu | –10 |
| ANC | Anchorage | –9 |
| LAX | Los Angeles | –8 |
| DEN | Denver | –7 |
| CHI | Chicago | –6 |
| NYC | New York | –5 |
| YHZ | Halifax | –4 |
| RIO | Rio De Janeiro | –3 |
| RAI | Praia | –1 |
| UTC | 0 | |
| LON | London | 0 |
| PAR | Paris | +1 |
| ATH | Athens | +2 |
| JED | Jeddah | +3 |
| THR | Tehran | +3.5 |
| DXB | Dubai | +4 |
| KBL | Kabul | +4.5 |
| KHI | Karachi | +5 |
| DEL | Delhi | +5.5 |
| KTM | Kathmandu | +5.75 |
| DAC | Dhaka | +6 |
| RGN | Yangon | +6.5 |
| BKK | Bangkok | +7 |
| HKG | Hong Kong | +8 |
| TYO | Tokyo | +9 |
| ADL | Adelaide | +9.5 |
| SYD | Sydney | +10 |
| NOU | Noumea | +11 |
| WLG | Wellington | +12 |
- Based on data as of January 2017.
- The rules governing global times (GMT differential and UTC offset) and summer time are determined by each individual country.
Troubleshooting
Time Setting
The current time setting is off by hours.
Your Home City setting may be wrong. Check your Home City setting and correct it if necessary.
The current time setting is off by one hour.
You may need to change your Home City’s standard time/daylight saving time (DST) setting. Use the procedure under “To change the current time and date settings” to change the standard time/daylight saving time (DST) setting.
Altitude Readings
Altitude readings produce different results at the same location.
Readings produced by the watch are different from the elevation and/or sea level altitude indications in my area.
- Relative altitude is calculated based on changes in barometric pressure measurement by its pressure sensor. Barometric pressure changes can cause readings taken at different times at the same location to vary. The watch’s displayed value may differ from the actual elevation and/or sea level altitude for the area. When using the watch’s altimeter during activities like mountain climbing, perform regular calibration according to the local altitude (elevation) indications.
- For more information, see “To specify a reference altitude value”.
Following a relative altitude reading, the watch’s second hand points to 9 o’clock.
- The reading value is outside the allowable measurement range
- This could indicate a sensor error. If ERR (error) appears on the digital display, refer to “Direction, Altitude, Barometric Pressure, and Temperature Readings” for more information.
Taking Direction Readings
Abnormal magnetism detection is indicated.
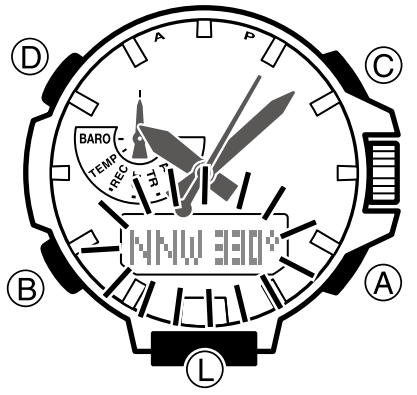
- Move away from any potential source of strong magnetism and try taking a reading again.
- If abnormal magnetism is detected again, it could mean the watch has become magnetized. Perform bidirectional calibration and try again. For more information, see “To perform bidirectional calibration” and “Location”.
ERR appears on the digital display during sensor reading operations.
There is something wrong with the sensor, possibly due to nearby strong magnetism. Move to a location without magnetism and try again. If ERR persists, contact your original retailer or CASIO service center.
ERR appears following bidirectional calibration.
If the screen shows hyphens (- - -) followed by ERR, there may be a sensor issue. Wait for the ERR indicator to disappear and try calibration again. If the problem continues, contact your retailer or CASIO service center.
The direction information indicated by the watch is different from a backup compass.
Move away from sources of strong magnetism, perform bidirectional calibration, and try again. Refer to “To perform bidirectional calibration” and “Location”.
Direction readings produce different results at the same location.
Move away from potential sources of strong magnetism and try again.
I am having problems taking direction readings indoors.
Move away from potential sources of strong magnetism and try again.
Whenever there is a sensor malfunction, take the watch to your original retailer or the nearest authorized CASIO distributor.
Barometric Pressure Readings
Following a relative barometric pressure reading, the watch’s second hand points to 9 o’clock.
The reading value is outside the allowable measurement range. There may be a sensor issue. If ERR is on the digital display, refer to “Direction, Altitude, Barometric Pressure, and Temperature Readings” for more information.
Direction, Altitude, Barometric Pressure, and Temperature Readings
ERR appears on the digital display during sensor reading operations.
This indicates a sensor problem, making readings impossible. If ERR appears during a reading, restart the operation. If the problem persists, it could mean the sensor is faulty. Contact your retailer or CASIO service center.
I can’t change the temperature, barometric pressure, and altitude display units.
When TYO (Tokyo) is selected as the Home City, the altitude unit is set to meters (m), the barometric pressure unit to hectopascals (hPa), and the temperature unit to Celsius (°C). These settings cannot be changed.
World Time Mode
The time for my World Time City is off in the World Time Mode.
This could be due to incorrect switching between standard time and daylight saving time.
Charging
The watch does not resume operation after I expose it to light.
This can happen when the power level drops to Level 5. Keep the watch exposed to light until it recharges sufficiently.
RECOVER is flashing on the digital display.
The watch is in charge recovery mode. Wait until recovery is complete (about 15 minutes). The watch will recover more quickly in a brightly lit location.
Note
- Repeated illumination and/or sensor reading operations over a short time period can cause a sudden drop in the watch’s charge, triggering the charge recovery mode. Access to some functions is limited while the watch is in recovery mode.
- A flashing CHARGE indicator means that the charge level has dropped suddenly. Immediately expose the watch to light to charge it.
Casio ProTrek PRG-650 Watch Pros & Cons
Pros
- Rugged and durable design
- Triple sensor technology for accurate measurements
- Sunrise and sunset data
- Low-temperature resistance
- Stopwatch, countdown timer, and multiple alarms
Cons
- Large case diameter may not be suitable for all wrist sizes
- Digital display may not be as aesthetically pleasing as analog display
- Short battery life compared to other outdoor watches
Customer Reviews
Customers love the rugged and durable design of the Casio ProTrek PRG-650, as well as the accurate sensor measurements and sunrise/sunset data. However, some customers find the large case diameter to be uncomfortable and the digital display to be less aesthetically pleasing than analog display. Some customers also report short battery life compared to other outdoor watches.
Faqs
What are the Casio ProTrek PRG-650 Watch's primary features?
How does the PRG-650's Tough Solar power function?
Is there water resistance on the Casio watch?
How precise is the PRG-650's altimeter?
Is it possible to change the altitude reading by hand?
What kind of compass is included with the PRG-650?
Leave a Comment
