How to Use: Champion Remote Inverter Generator 200987 Instruction Manual
Content
INTRODUCTION
With proper product knowledge, safe use, and regular maintenance, this product should bring years of satisfying service. Every effort has been made to ensure the accuracy and completeness of the information in this manual at the time of publication, and we reserve the right to change, alter and/or improve the product and this document at any time without prior notice.
CPE highly values how our products are designed, manufactured, operated, and serviced as well as providing safety to the operator and those around the generator. Therefore, it is IMPORTANT to review this product manual and other product materials thoroughly and be fully aware and knowledgeable of the assembly, operation, dangers, and maintenance of the product before use. Fully familiarize yourself, and make sure others who plan on operating the product fully familiarize themselves too, with the proper safety and operation procedures before each use. Please always exercise common sense and always err on the side of caution when operating the product to ensure no accident, property damage, or injury occurs. We want you to continue to use and be satisfied with your CPE product for years to come.
Parts Included
Accessories
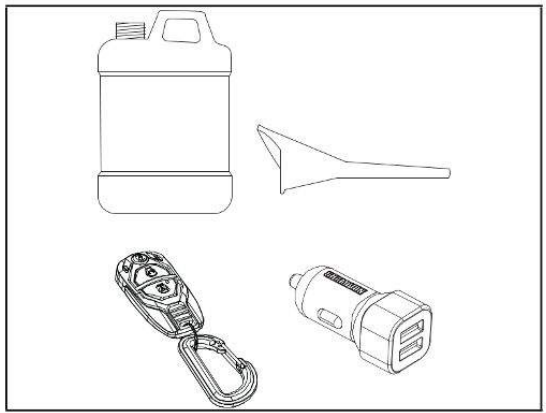
- Engine Oil: 16.9 fl. oz. (500 ml)
- Oil Funnel: 1
- Remote Key Fob: 1
- Dual Port USB Adapter (5v/2.4A): 1
Tools Included

- 8/10 mm Wrench: 1
- Spark Plug Socket: 1
- Reversible Phillips/Flathead Screwdriver: 1
SPECIFICATIONS OF Champion Remote Inverter Generator 200987
Generator Specifications
Here is the table formatted with the provided information:
| Generator Model | 200987 |
|---|---|
| Start Type | Wireless, Electric, Manual |
| Watts (Starting/Running) | 4500/3500 |
| Volts AC | 120 |
| AC Amps @ 120V | 29.2 |
| Volts DC | 12 |
| DC Amps | 8 |
| Frequency | 60 Hz |
| Phase | Single |
| Grounding Type | Neutral Floating |
| Weight | 101 lb. (45.6 kg) |
| Length | 23.2 in. (59 cm) |
| Width | 17.7 in. (45 cm) |
| Height | 20.1 in. (51 cm) |
Engine Specifications
| Model | Displacement | Type |
|---|---|---|
| R210-VP | 212 cc | 4-Stroke OHV |
Spark Plug
| OEM Type | Replacement Type | Gap |
|---|---|---|
| F6RTC | NGK BPR6ES or equivalent | 0.028-0.031 in. (0.7-0.8 mm) |
Valve
| Intake Clearance | Exhaust Clearance |
|---|---|
| 0.002-0.006 in. (0.05-0.15 mm) | 0.002-0.006 in. (0.05-0.15 mm) |
Oil Specifications
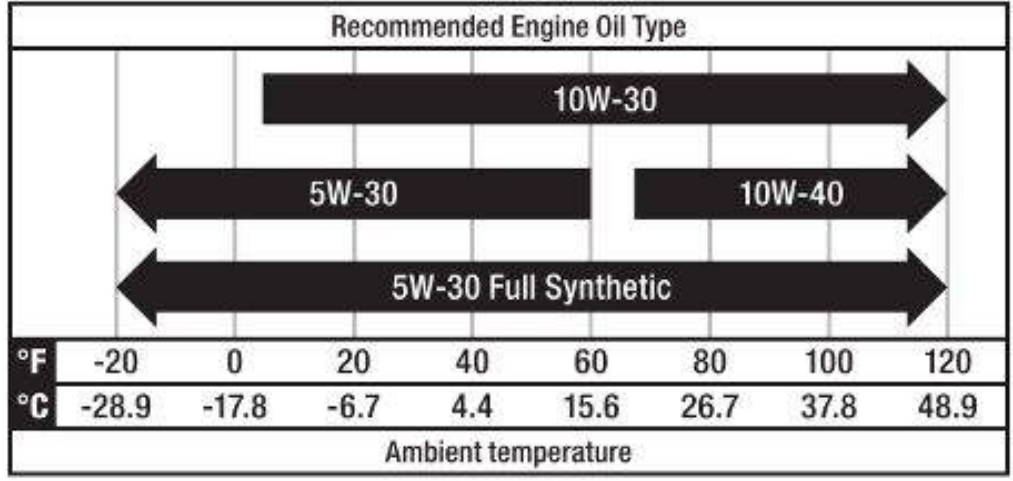
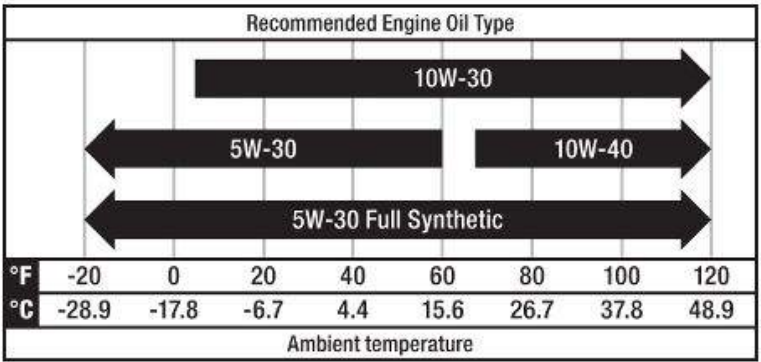
- Type: See following chart
- Capacity: 16.9 fl. oz. (500 ml)
NOTICE
Temperature will affect engine oil and engine performance. Change the type of engine oil used based on the temperature shown in the "Recommended Engine Oil Type" table.
Fuel Specifications
Use unleaded gasoline with a minimum octane rating of 87 and an ethanol content of 10% or less by volume. DO NOT USE E15 or E85. DO NOT OVERFILL.
- Gasoline Capacity: 2.3 gal. (8.5 L)
Battery Specifications
| Type | Volts DC | Capacity | Replacement |
|---|---|---|---|
| Rechargeable, Lithium lon | 12 | 1.6 Ah | Contact Customer Service |
Temperature Specifications
| Manual Starting Temperature Range (°F/°C) | Remote and Electric Starting Temperature Range (°F/°C) |
|---|---|
| 5 to 104 / -15 to 40 | 23 to 104 / -5 to 40 |
NOTICE
An important message about temperature: Your product is designed and rated for continuous operation at ambient temperatures up to 104°F (40°C). When needed, it may be operated at temperatures ranging from 5°F (-15°C) to 122°F (50°C) for short periods of time. If exposed to temperatures outside this range during storage, it should be brought back within this range before operation. In any event, the product must always be operated outdoors, in a well-ventilated area, and away from doors, windows, and vents.
CONTROLS AND FEATURES
Read this operator's manual before operating your generator. Familiarize yourself with the location and function of the controls and features. Save this manual for future reference.
Generator
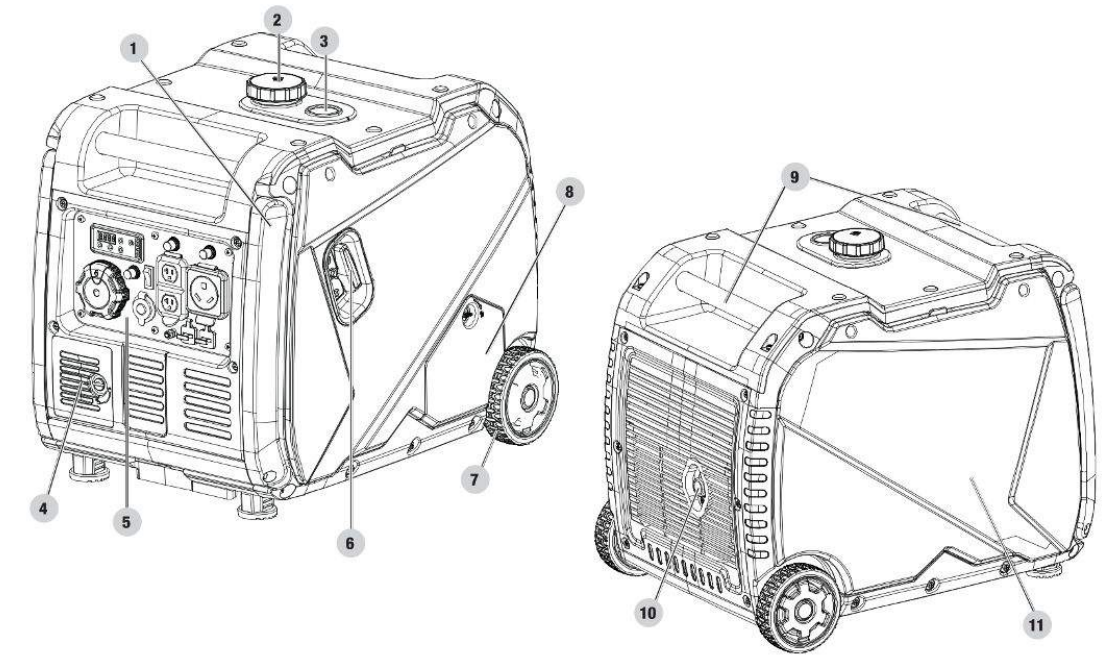
- Folding Handle - Used to move unit by lifting and rolling on wheels. Do not use to lift or carry the unit.
- Fuel Cap - Remove to add fuel.
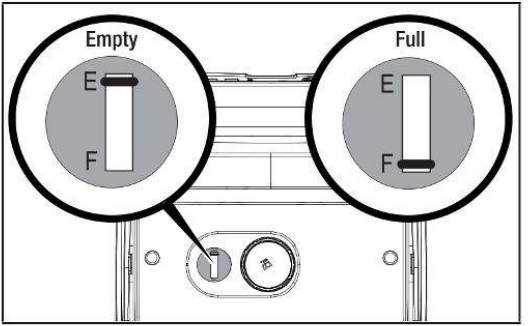
- Fuel Gauge
- Battery Access Cover
- Control Panel - See Control Panel section.
- Recoil Starter - Used to manually start the engine.
- Never Flat Wheels - 5 in. (12.7 cm)
- Oil Fill Access Cover
- Carrying Handle(s) - Used to lift or carry the unit.
- Muffler
- Maintenance Cover
Control Panel
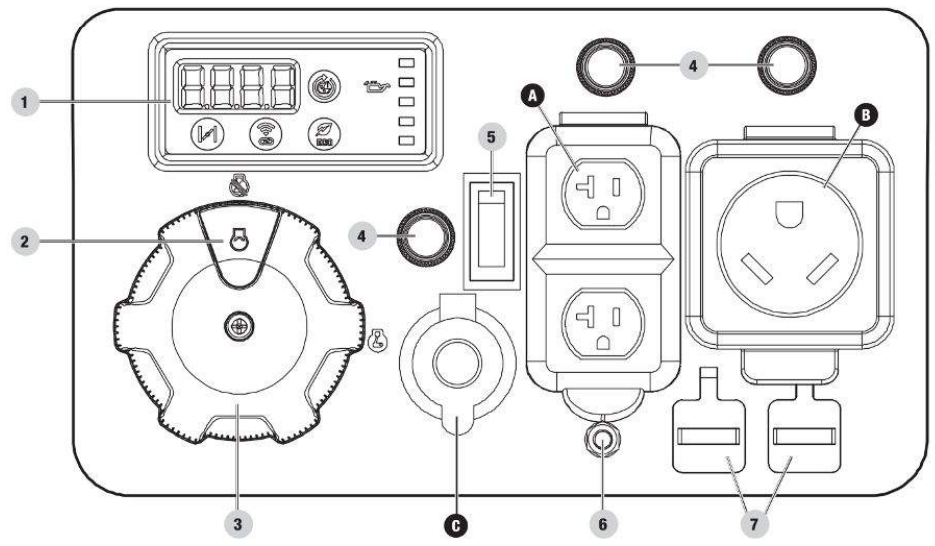
- Intelligauge with Power Meter - See Intelligauge with Power Meter section.
- Ignition Switch - Used to START the generator.
- EZ Start Dial - Used to start and stop.
- Circuit Breakers (Push Reset) - Protects the generator against electrical overloads.
- Battery Switch - Enables/disables power supply from the battery for remote and electric start.
- Ground Terminal - Consult an electrician for local grounding regulations.
- Parallel Outlets - Used to parallel two inverters together for increased power output. (parallel kit sold separately).
RECEPTACLES
 (2x) 120V AC, 20A (NEMA 5-20R)
May be used to supply electrical power for operation of 120 Volt AC, 20 Amp, single phase, 60 Hz electrical loads. 120V AC, 30A RV (NEMA TT-30R)
May be used to supply electrical power for operation of 120 Volt AC, 30 Amp, single phase, 60 Hz electrical loads. 12V DC, 8A (Automotive)
May be used to supply electrical power for operation of 12 Volt DC, 8 Amp electrical loads.
WARNING
Do not operate a device while it is plugged into the 12V DC outlet. When charging a device, do not place it on the exhaust side of the generator. Extreme heat caused by exhaust can damage the device and cause a potential fire hazard. Prolonged exposure to engine exhaust can cause serious injury or death.
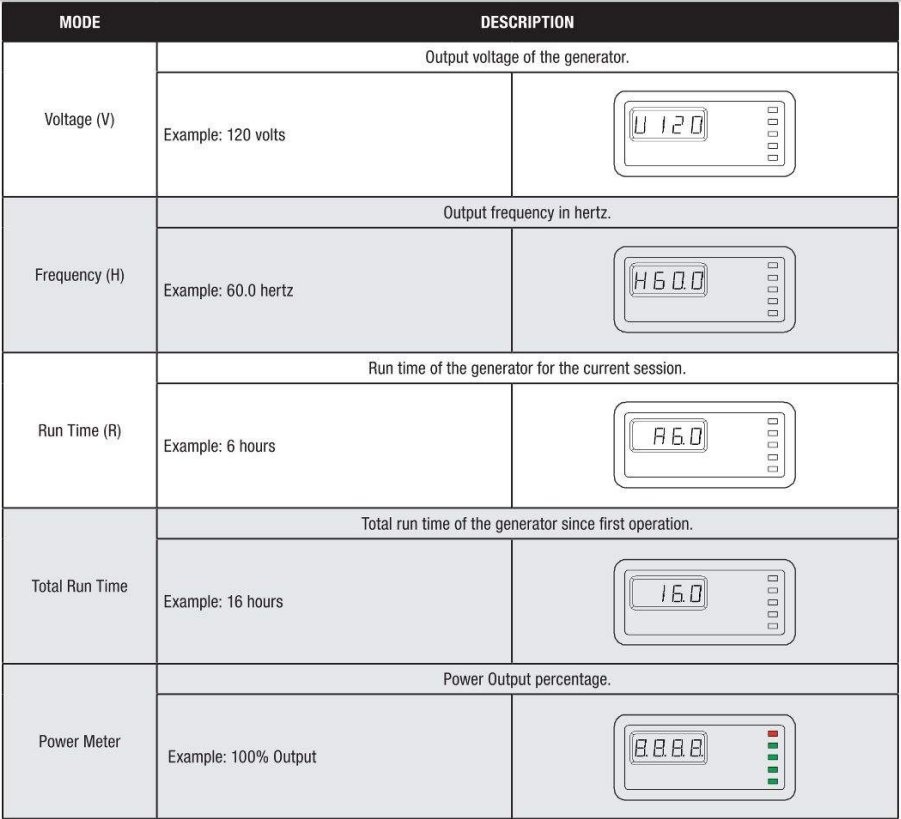
Intelligence with Power Meter
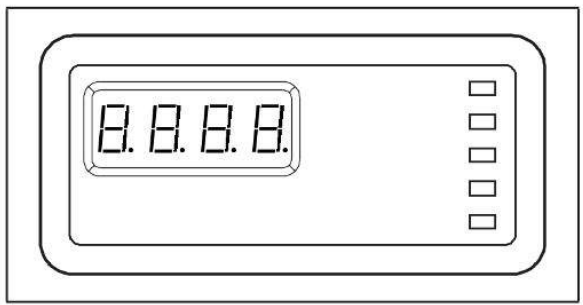
The meter is divided into two separate displays. The LCD displays each mode for several seconds and then automatically cycles through. The Power Meter LED displays output in percent(%) with 100% at the top.
Wireless Remote Control
This generator is equipped with a wireless remote control system for starting and stopping. The system consists of five main components:
- Receiver Control Module (RCM)
- Remote Control
- Battery Switch
- EZ Start Dial
- Auto-Choke
The Remote Control functions are enabled when:
- The EZ Start Dial is in the "ON" position, AND
- The Battery Switch is in the "ON" position.
The Remote Control functions are disabled if either of the above conditions is not met. To start the generator wirelessly, press the "START" button on the Remote Control one time. The engine will attempt to start six times. The RCM controls the Auto-Choke during each attempt to start. If the generator does not start, call the Champion Customer Care team for assistance at 1-877-338-0999. To stop the generator wirelessly, press the "STOP" button on the Remote Control one time.
Remote Control Power Consumption
While the EZ Start Dial is in the "ON" position, the RCM is active and waiting for a remote signal. This function requires electrical current from the battery. If the EZ Start Dial is left in the "ON" position for extended periods (several weeks), the battery can be completely drained. Moving the EZ Start Dial to the "OFF" position disables the Remote functions, but the RCM still consumes approximately 2 mA from the battery. To prevent battery drain, press the Battery Switch to the "OFF" position. This disconnects power to the RCM so there is no current draw on the battery.
Description
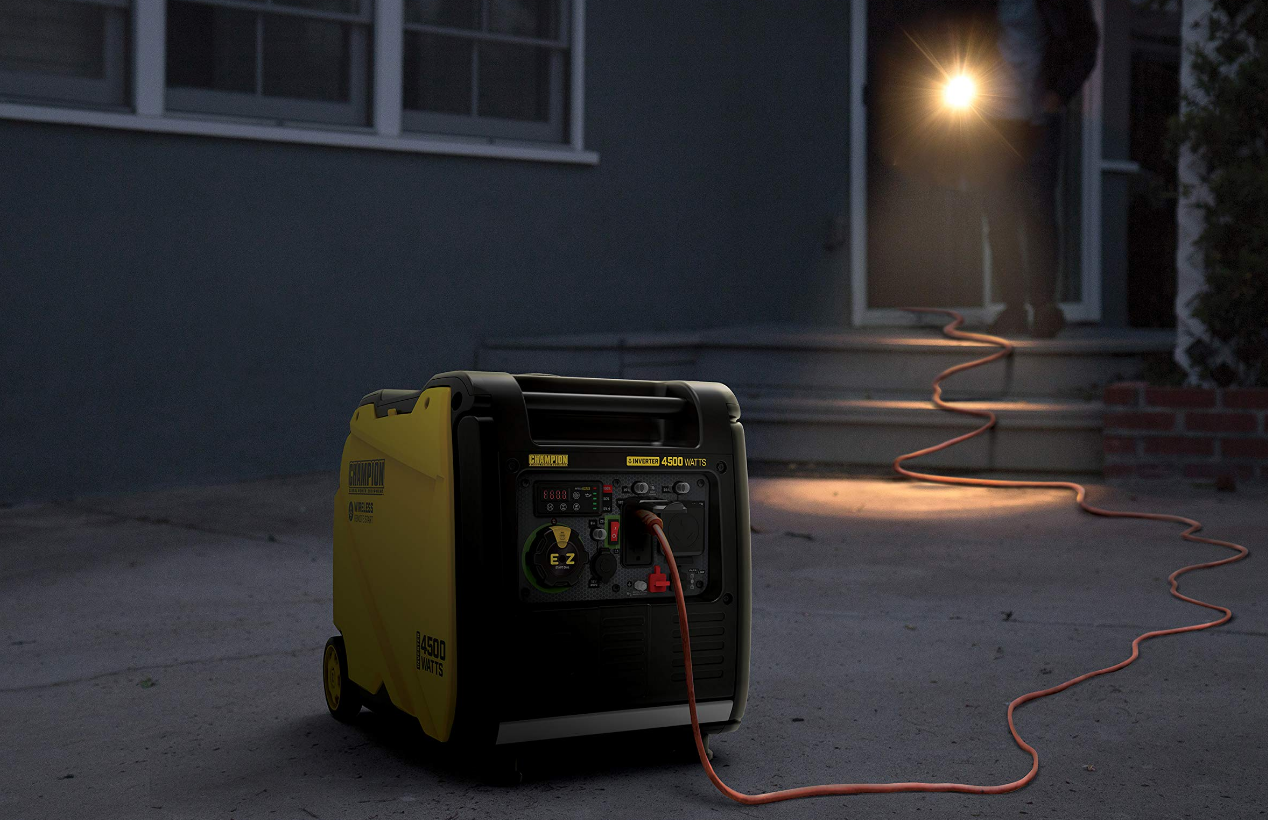
The Champion Remote Inverter Generator 200987 is designed for those who need a reliable power source while on the job site, camping, or during an emergency. With its remote start feature, you can start and stop the generator from up to 80 feet away, making it easy and convenient to use. The generator is also equipped with a digital hybrid muffler, which reduces noise and emissions. Additionally, it has a low-oil shut-off sensor that automatically turns off the generator when the oil level is low, protecting the engine from damage.
ASSEMBLY
Your generator requires some assembly. It must be properly serviced with fuel and oil before operation. If you have any questions regarding the assembly of your generator, call our Technical Support Team at 1-877-338-0999. Please have your serial number and model number available.
Unpacking
- Set the shipping carton on a solid, flat surface.
- Remove everything from the carton except the generator.
- By lifting up on the carrying handles, carefully remove the generator from the box (two people lifting is recommended).
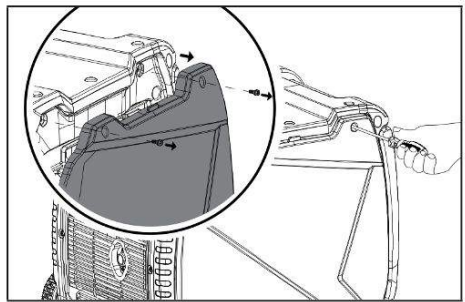
Remove Shipping Support Hardware
To protect the generator during shipping, support hardware has been installed between the engine and frame. This hardware MUST BE REMOVED BEFORE adding oil or gasoline to the generator.
NOTICE
DO NOT attempt to run the generator without first removing the shipping support hardware. Damage to the generator as a result of not removing the hardware will void the warranty.
- BEFORE filling the engine with oil or gasoline, tip the generator onto the muffler side. Tip onto the flattened cardboard box the generator came in or other protective surface so as to not scratch the enclosure.
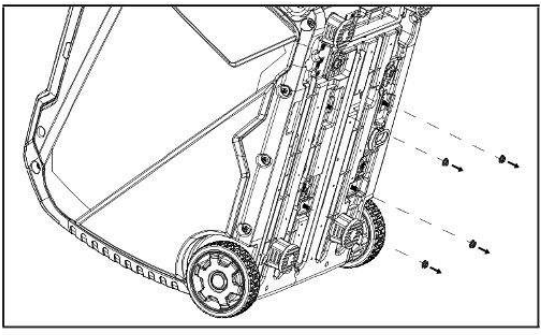
- Remove the four nuts and mounting plates from the bottom side of the generator using the included 8/10 mm wrench. Nuts and spacers can be discarded.
- Tip the generator upright.
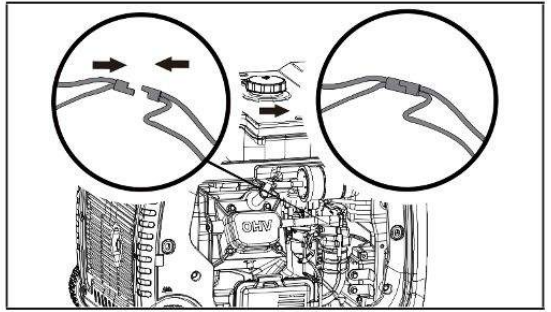
Connect the Battery
- Remove the non-recoil side maintenance cover by removing the two screws with a Phillips head screwdriver (not included).
- Push two halves of the battery connector together tightly.
Add Engine Oil
CAUTION
DO NOT attempt to crank or start the engine before it has been properly filled with the recommended type and amount of oil. Damage to the generator as a result of failing to follow these instructions will void your warranty.
NOTICE
The generator rotor has a sealed, pre-lubricated ball bearing that requires no additional lubrication for the life of the bearing.
NOTICE
The recommended oil type for typical use is 10W-30 automotive oil. However, using the listed conventional oils shown in the "Recommended Engine Oil Type" chart may be used for typical use including the first 5 hours of the break-in run time period of the engine. If running the generator in extreme temperatures, refer to the "Recommended Engine Oil Type" chart.
- Place the generator on a flat, level surface.
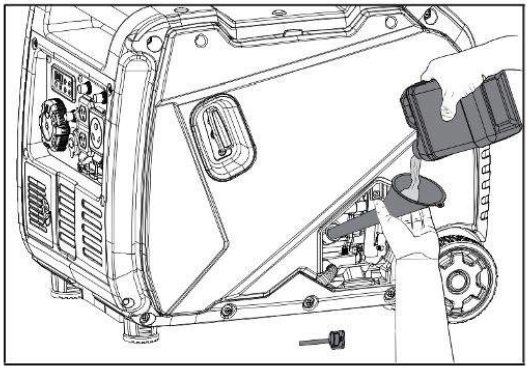
Turn the oil access cover fastener to the unlocked position and remove the cover.
- Remove oil fill cap/dipstick to add oil.
Using a funnel, add up to 16.9 fl. oz. (500 ml) of oil (included). DO NOT OVERFILL. Replace the oil fill cap/dipstick and secure the maintenance cover.
Check engine oil level before each use and add as needed.
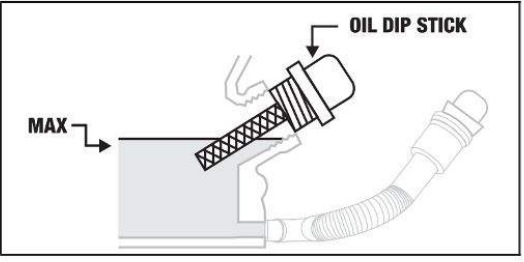
NOTICE
Once oil has been added, a visual check should show oil about 1-2 threads from running out of the fill hole. When using the dipstick to check the oil level, DO NOT screw in the dipstick while checking.
NOTICE
Check oil level often during the break-in period. Refer to the Maintenance section for recommended service intervals.
CAUTION
This engine is equipped with a low oil shut-off and will stop when the oil level in the crankcase falls below the threshold level.
NOTICE
The first 5 hours of run time are the break-in period for the unit. During the break-in period, stay at or below 50% of the running watt rating and vary the load occasionally to allow stator windings to heat and cool. Adjusting the load will also cause engine speed to vary slightly and help seat piston rings. After the 5-hour break-in period, change the oil.
NOTICE
Synthetic oil may be used after the 5-hour initial break-in period. Using synthetic oil does not decrease the recommended oil change interval. Full synthetic 5W-30 oil will aid in starting in cold ambient < 41°F (5°C) temperatures.
Add Fuel
DANGER
Gasoline vapors are highly flammable and extremely explosive.
- DO NOT light or smoke cigarettes. Fire or explosion can cause severe burns or death.
- Only fill or drain fuel outdoors in a well-ventilated area.
- DO NOT pump gasoline directly into the generator. Use an approved container to transfer the fuel to the generator.
- Never use a gasoline container, gasoline tank, or any other fuel item that is broken, cut, torn, or damaged.
- DO NOT overfill the gasoline tank. Always keep fuel away from sparks, open flames, pilot lights, heat, and other sources of ignition.
- Use clean, fresh, regular unleaded gasoline with a minimum octane rating of 87 and an ethanol content of 10% or less by volume.
- DO NOT mix oil with gasoline.
- Remove the gasoline cap.
Slowly add gasoline to the tank. The tank is full when gasoline reaches the red circle on the screen. DO NOT OVERFILL. Gasoline can expand after filling. A minimum of 1/4 in. (6.4 mm) of space left in the tank is required for gasoline expansion, although more than 1/4 in. (6.4 mm) is recommended. Gasoline can be forced out of the tank as a result of expansion if overfilled, and can affect the stable running condition of the generator.
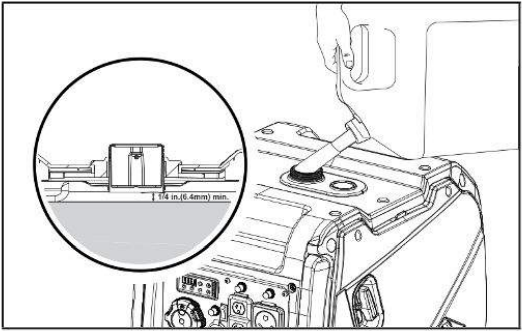
- The approximate fuel level is shown on the fuel gauge on top of the fuel tank.
Screw on the gasoline cap and wipe away any spilled fuel.
CAUTION
- Use unleaded gasoline with a minimum octane rating of 87 and an ethanol content of 10% or less by volume.
- DO NOT light cigarettes or smoke when filling the tank.
- DO NOT mix oil and gasoline.
- DO NOT overfill the tank. Fill tank to approximately 1/4 in. (6.4 mm) below the top of the tank to allow for gasoline expansion.
- DO NOT pump gasoline directly into the generator at the pump. Use an approved fuel container to transfer the gasoline to the generator.
- DO NOT fill the tank indoors.
- DO NOT fill the tank when the engine is running or hot.
WARNING
Pouring gasoline too fast through the fuel screen may result in gasoline splashing over the generator and operator while filling.
NOTICE
The generator engine works well with 10% or less ethanol blend gasoline. When using ethanol-gasoline blends there are some issues worth noting:
- Ethanol-gasoline blends can absorb more water than gasoline alone.
- These blends can eventually separate, leaving water or a watery goo in the tank, fuel valve, and carburetor. The compromised gasoline can be drawn into the carburetor and cause damage to the engine and/or potential hazards.
- If a fuel stabilizer is used, confirm that it is formulated to work with ethanol-gasoline blends.
- Any damages or hazards caused by using improper gasoline, improperly stored gasoline, and/or improperly formulated stabilizers, are not covered by the manufacturer's warranty.
It is advisable to always shut off the gasoline supply and run the engine to starvation after each use. See Storage instructions for extended non-use.
Grounding
Your generator must be properly connected to an appropriate ground to help prevent electric shock. Failure to properly ground the generator can result in electric shock. A ground terminal connected to the frame of the generator has been provided (see Controls and Features for terminal location). For remote grounding, connect a length of heavy gauge (12 AWG minimum) copper wire between the generator ground terminal and a copper rod driven into the ground. We strongly recommend that you consult with a qualified electrician to ensure compliance with local electrical codes.
Neutral Floating
- Neutral circuit IS NOT electrically connected to the frame/ground of the generator.
- The generator (stator winding) is isolated from the frame and from the AC receptacle ground pin.
- Electrical devices that require a grounded receptacle pin connection will not function if the receptacle ground pin is not functional.
Neutral Bonded to Frame
- Neutral circuit IS electrically connected to the frame/ground of the generator.
- The generator system ground connects the lower frame cross-member below the alternator. The system ground is connected to the AC neutral wire.
Setup Guide
To set up the Champion Remote Inverter Generator 200987, follow these steps:
- Check the oil level and add oil if necessary.
- Fill the fuel tank with gasoline.
- Connect the generator to your appliances or devices using the appropriate power cords or adapters.
- Start the generator by pressing the remote start button or turning the key on the generator.
- Adjust the engine speed to meet your power needs.
MAINTENANCE
Make certain that the generator is kept clean and stored properly. Only operate the unit on a flat, level surface in a clean, dry operating environment. DO NOT expose the unit to extreme conditions, excessive dust, dirt, moisture, or corrosive vapors.
WARNING
Never operate a damaged or defective generator.
WARNING
Improper maintenance will void your warranty.
NOTICE
For Emission control devices and systems, read and understand your responsibilities for service as stated in the Emission Control Warranty Statement of this manual. The owner/operator is responsible for all periodic maintenance. Complete all scheduled maintenance in a timely manner. Correct any issue before operating the generator. For service or parts assistance, contact our Technical Support Team at 1-877-338-0999.
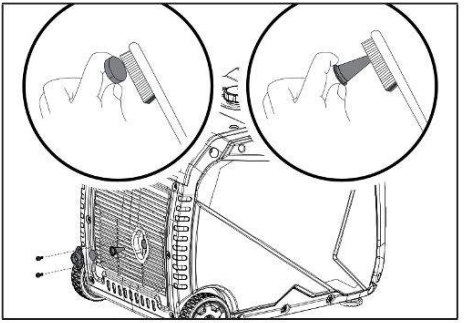
Cleaning the Generator
CAUTION
DO NOT spray the generator directly with water. Water can enter the generator through the cooling slots and damage the generator windings. It can also contaminate the fuel system.
- Use a damp cloth to clean exterior surfaces of the generator.
- Use a soft bristle brush to remove dirt and oil.
- Use an air compressor (25 PSI) to clear dirt and debris from the generator.
- Inspect all air vents and cooling slots to ensure that they are clean and unobstructed.
To prevent accidental starting, remove and ground the spark plug wire before performing any service.
Changing the Engine Oil
Change oil when the engine is warm. Refer to the oil specification to select the proper grade for your operating environment.
- Place the generator on a flat level surface.
- Turn the oil access cover fastener to the unlocked position and remove the cover.
Remove the oil drain plug by turning it counterclockwise.
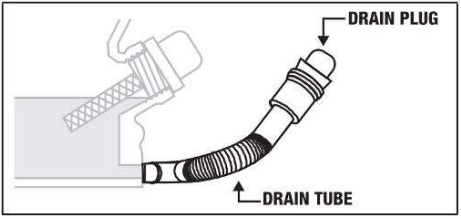
Ensure the oil drain hose is lower than the engine and allow the oil to drain completely into an appropriate container.
- Replace the oil drain plug.
- Add oil according to the Add Engine Oil in the Assembly section. DO NOT OVERFILL. Oil not included for routine maintenance.
- Dispose of used oil at an approved waste management facility.
NOTICE
Once oil has been added, a visual check should show oil about 1-2 threads from running out of the fill hole. If using the dipstick to check the oil level, DO NOT screw in the dipstick while checking.
Cleaning and Adjusting the Spark Plug
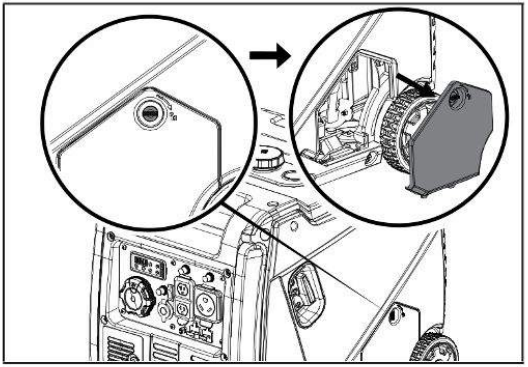
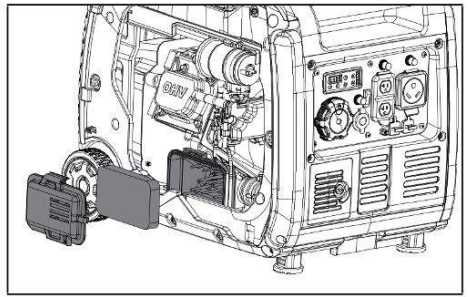
- Remove the non-recoil side maintenance cover by removing the two screws with a Phillips head screwdriver (included).
- Remove the spark plug cable from the spark plug.
- Use a spark plug socket tool (included), or a 13/16 in. (21 mm) socket (not included) to remove the plug.
- Inspect the electrode on the plug. It must be clean and not worn to produce the spark required for ignition.
Make certain the spark plug gap is 0.028-0.031 in. (0.7-0.8 mm).
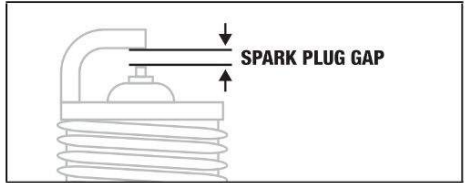
- Refer to the spark plug types in Specifications when replacing the plug.
- Firmly re-install the plug.
- Attach the spark plug cable to the spark plug.
- Reinstall the maintenance cover.
Cleaning the Air Filter
Remove the non-recoil side maintenance cover by removing the two screws with a Phillips head screwdriver (included).
Locate the air filter plastic cover and remove it by pinching the clips together and pulling the cover off.
- Remove the foam element.
- Wash in liquid detergent and water. Squeeze thoroughly dry in a clean cloth.
- Saturate in clean engine oil.
- Squeeze in a clean, absorbent cloth to remove all excess oil.
- Place the filter in the assembly.
- Reattach the air filter cover.
- Reinstall the maintenance cover and tighten the cover screw securely.
Cleaning the Spark Arrestor
- Allow the engine to cool completely before servicing the spark arrestor.
- Remove the two screws holding the cover plate which retains the spark arrestor to the muffler.
- Remove the spark arrestor and spark arrestor screen.
Carefully remove the carbon deposits from the spark arrestor and spark arrestor screen with a wire brush.
- Replace the spark arrestor and spark arrestor screen if they are damaged.
- Position the spark arrestor and spark arrestor screen on the muffler and cover plate and screws removed in step 2.
CAUTION
Failure to clean the spark arrestor will result in poor engine performance.
NOTICE
Federal and local laws and administrative requirements indicate when and where spark arrestors are required. When ordered, spark arrestors are required for the operation of this generator in National Forest lands. In California, this generator must not be used on any forest-covered land, brush-covered land, or grass-covered land unless the engine is equipped with a spark arrestor.
Generator Battery
Your generator is equipped with an automatic battery charging circuit that charges the battery while the engine is running. The battery will maintain a proper charge if the unit is used at least once every 180 days for 2 hours with ECO mode off. If it is used less frequently, the battery should be connected to a trickle charger or battery maintainer (not included) to keep the battery properly charged. The maximum charging rate should not exceed 1.6 amps. Follow the instructions included with the battery charger. The battery should be fully charged at least twice per year. If the battery is not able to start the engine, it can be started by manually pulling the engine recoil cord. If the battery voltage is extremely low, the charging circuit may not be able to re-charge the battery. In this case, the battery must be connected to a standard automotive style battery charger for re-charging before it can be used.
Disconnect the Battery
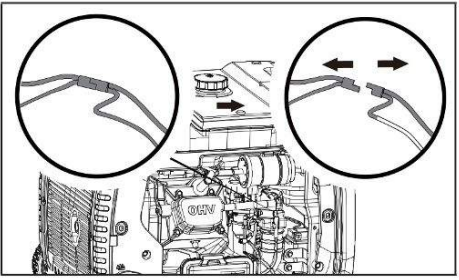
- Pull two halves of the battery connector apart.
Charge the Battery
For a generator equipped with batteries for electric starting, proper battery maintenance and storage should be followed. A trickle charger or battery maintainer should be used to charge the battery while the generator is in storage. The maximum charging rate should not exceed 1.6 amps. Follow the instructions included with the trickle charger or battery maintainer. The battery should be fully charged at least once per month.
- Remove the battery from the generator.
- Charge the battery following the battery charger's instructions.
- After charging, leave the battery for 0.5 to 1 hour before checking the voltage. If the voltage is less than 12.8 volts, additional charging is necessary.
NOTICE
Electrolyte inside the battery is harmful to skin and eyes. If the battery leaks and electrolyte gets in your eyes, do not rub them. Instead, rinse them with clean running water and immediately seek medical attention. If left untreated, the electrolyte can cause permanent eye injury.
- Do not charge the battery with charging voltage over 15.0V and charging current over 1.6A.
- Do not charge the battery below 32°F (0°C) or above 113°F (45°C).
- If the battery becomes hot to the touch, stop charging. Allow the battery to cool before resuming.
Remote Key Fob Battery
NOTICE
- Always purchase the correct size and grade of battery most suitable for the intended use.
- Clean the battery contacts and also those of the device prior to battery installation.
- Remove batteries from equipment that is not to be used for an extended period of time.
- Remove batteries if consumed or if the product is to be left unused for a long time.
Adjusting the Governor
WARNING
Tampering with the factory-set governor will void your warranty.
The air-fuel mixture is not adjustable. Tampering with the governor can damage your generator and your electrical devices and will void your warranty. Contact our Technical Support Team at 1-877-338-0999 for all other service and/or adjustment needs.
Maintenance Schedule
Follow the service intervals indicated in the following maintenance schedule. Service your generator more frequently when operating in adverse conditions. Contact our Technical Support Team at 1-877-338-0999 to locate the nearest CPE certified service dealer for your generator or engine maintenance needs.
- EVERY 8 HOURS OR PRIOR TO EACH USE
- Check oil level
- Clean around air intake and muffler
- FIRST 5 HOURS (BREAK-IN)
- Change oil
- EVERY 50 HOURS OR ANNUALLY
- Clean air filter
- Change oil if operating under heavy load or in hot environments
- EVERY 100 HOURS OR ANNUALLY
- Change oil
- Clean/adjust spark plug
- Clean spark arrestor
- Clean fuel valve filter*
- EVERY 250 HOURS
- Clean combustion chamber*
- Check/adjust valve clearance*
- EVERY 3 YEARS
- Replace fuel line*
To be performed by knowledgeable, experienced owners or CPE certified service centers.
STORAGE
WARNING
To avoid accidental or unintended ignition of your generator during periods of storage, the following precautions should be followed:
- When storing the generator, make sure the EZ Start dial is set to the "OFF" position.
Short Term Storage (up to 30 days)
Gasoline in the gasoline tank has a maximum shelf life of up to 1 year with the addition of properly formulated fuel stabilizers and if stored in a cool, dry place. Gasoline in the carburetor, however, may gum up and clog the carburetor if it isn't used or drained within 2-4 weeks. If using the generator within 2 weeks, follow the steps according to the Stopping the Engine section.
- If not using the generator for 2-4 weeks, begin by making sure all appliances are disconnected from the generator.
- Start the generator as instructed in the Starting the Engine section.
- Let the engine run until fuel starvation has stopped the engine.
- After the engine stops, turn the EZ Start dial counterclockwise to the "STOP" position.
Mid Term Storage (30 days - 1 year)
Gasoline in the tank has a maximum shelf life of up to 1 year with the addition of a properly formulated fuel stabilizer and stored in a cool, dry place.
- Be sure all appliances are disconnected from the generator.
- Add a properly formulated fuel stabilizer to the gasoline tank.
- Start the engine by following directions in the Starting the Engine section.
- Run the generator for 10 minutes so the treated gasoline cycles through the fuel system and carburetor.
- Let the engine run until fuel starvation has stopped the engine.
- After the engine stops, turn the EZ Start dial counterclockwise to the "STOP" position.
- After fuel has run out and the engine has stopped, allow the engine to cool.
- Remove the non-recoil side maintenance cover by removing the two screws with a Phillips head screwdriver (included).
- Remove the spark plug and pour about a tablespoon of oil into the cylinder.
- SLOWLY pull the recoil to rotate the engine to distribute and lubricate the cylinder.
- Re-install the spark plug and spark plug wire.
- Re-install the maintenance cover.
- Clean the generator according to Cleaning the Generator.
- Store the generator in a cool, dry place out of direct sunlight.
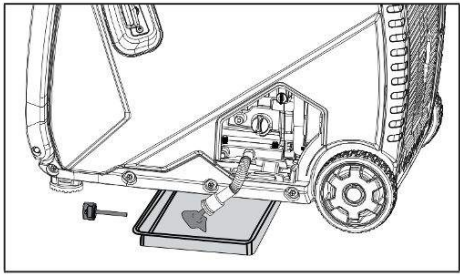
Long Term Storage (more than 1 year)
For storage over 1 year, the gasoline tank and carburetor must be completely drained of gasoline.
- Be sure all appliances are disconnected from the generator.
- Place the inverter on blocks to allow an appropriate gasoline container or pan to slide under the inverter.
- Remove the non-recoil side maintenance cover by removing the two screws with a Phillips head screwdriver (included).
- Disconnect the battery by pulling the two halves of the battery connector apart.
- Turn the EZ Start dial clockwise to the full "ON" position.
Using a flathead screwdriver, rotate the drain screw counterclockwise three full turns. Gasoline will drain through clear tubing out underneath the inverter. Make sure draining gasoline empties into an appropriate container.
_champion_remote_inverter_generator_200987.png)
- When gasoline stops flowing from the clear tube, rotate the drain screw clockwise until tight. Properly dispose of the drained gasoline according to local regulations or guidelines.
- Turn the EZ Start dial to the "STOP" position.
- Follow steps 8-12 according to Short Term Storage.
Removing from Storage
If the generator has been improperly stored for a period longer than 30 days with ethanol-blended gasoline in the gasoline tank and/or carburetor, all fuel must be drained, and the carburetor must be thoroughly cleaned of ethanol build-up. This process involves technically advanced tasks. For assistance, please call our Technical Support Team at 1-877-338-0999. If the gasoline tank and carburetor were properly emptied of all ethanol-blended gasoline prior to the generator being stored, follow the below steps when removing from storage.
- Be sure the EZ Start dial is in the "STOP" position.
- Add gasoline to the generator according to Add Fuel.
- Move the EZ Start dial to the "ON" position.
- After 5 minutes check the carburetor and air filter areas for any leaking gasoline. If any leaks are found, the carburetor will need to be disassembled and cleaned or replaced. If no gasoline leaks are found, turn the EZ Start dial to the "STOP" position.
- Check engine oil level and add clean, fresh oil if needed. See Oil Specifications for the proper oil type.
- Check and clear the air filter of any obstructions such as bugs or cobwebs. If necessary, clean the air filter according to Cleaning the Air Filter.
- If disconnected, connect the battery by pushing the two halves of the battery connector together tightly.
- Start the generator according to Starting the Engine.
SAFETY DEFINITIONS
The purpose of safety symbols is to attract your attention to possible dangers. The safety symbols and their explanations deserve your careful attention and understanding. The safety warnings do not by themselves eliminate any danger. The instructions or warnings they give are not substitutes for proper accident prevention measures.
DANGER indicates a hazardous situation which, if not avoided, will result in death or serious injury.
WARNING indicates a hazardous situation which, if not avoided, could result in death or serious injury.
CAUTION indicates a hazardous situation which, if not avoided, could result in minor or moderate injury.
NOTICE indicates information considered important, but not hazard-related (e.g., messages relating to property damage).
CAUTION
Improper treatment or use of the generator can damage it, shorten its life or void the warranty.
- Use the generator only for intended uses.
- Operate only on level surfaces.
- DO NOT expose generator to excessive moisture, dust, or dirt.
- DO NOT allow any material to block the cooling slots.
- If connected devices overheat, turn them off and disconnect them from the generator.
- DO NOT use the generator if:
- Electrical output is lost
- Equipment sparks, smokes, or emits flames
- Equipment vibrates excessively
Troubleshooting
| Problem | Cause | Solution |
|---|---|---|
| Engine will not start. | No fuel. | Add fuel. |
| Faulty spark plug. | Clean and adjust spark plug or replace. | |
| Low oil level. | Fill crankcase to the proper level. | |
| Spark plug wire loose. | Attach wire to spark plug. | |
| EZ Start dial is in "STOP" position. | See "Starting the Engine" section. | |
| Old fuel or water in fuel. | Drain fuel and replace with fresh fuel. | |
| Flooded with fuel. | Let unit stand for 10 mins. | |
| Engine starts but runs roughly. | Choke in the wrong position. | Press choke button until no longer illuminated green. If battery dead, turn choke lever to "RUN" position. |
| Dirty air filter. | Clean or replace air filter. | |
| Dirty fuel valve. | Clean the fuel valve. | |
| Clogged spark arrestor. | Clean spark arrestor. | |
| Engine will not start wirelessly. | Remote control battery is dead. | Replace remote control battery. |
| Generator battery is dead. | Start manually and allow battery to recharge or see "Charge the Battery Section". | |
| Battery switch is in the OFF position. | Turn battery switch to ON position. | |
| Generator out of range of remote signal. | Remote must be within 80 feet of generator. | |
| Obstructions in between generator and remote. | Clear line of sight between generator and remote. | |
| Engine will not start electrically. | Generator battery is dead. | Start manually and allow battery to recharge or see "Charge the Battery Section". |
| Battery switch is in the OFF position. | Turn battery switch to ON position. | |
| Engine shuts down during operation. | Out of fuel. | Fill fuel tank. |
| Low oil level. | Fill crankcase to the proper level. Place generator on a flat, level surface. | |
| Clogged spark arrestor. | Clean spark arrestor. | |
| Generator cannot supply enough power or overheating. | Generator is overloaded. | Review load and adjust. See "Connecting Electrical Loads". |
| Dirty air filter. | Clean or replace air filter. | |
| Choke in wrong position. | Press choke button until no longer illuminated green. If battery dead, turn choke lever to "RUN" position. | |
| Engine is running but no AC output. | Poor cord connection. | Check all connections. |
| Circuit breaker is open. | Reset circuit breaker. | |
| AC Overload: Button illuminated red. | Reduce AC load and press Overload Reset Button until illuminated green. | |
| Loose wiring. | Inspect and tighten wiring connections. | |
| Other. | Contact the help line. | |
| Engine hunts or falters. | Engine governor defective. | Contact the help line. |
| Dirty fuel valve. | Clean the fuel valve. | |
| Carburetor is dirty and running lean. | Contact the help line. | |
| EZ Start dial in wrong position. | Press choke button until no longer illuminated green. If battery is dead, turn choke lever to the "RUN" position. | |
| Repeated circuit breaker tripping. | Overload. | Review load and adjust. See "Connecting Electrical Loads". |
| Faulty power cords or device. | Check for damaged, bare or frayed wires. Replace defective device. | |
| Circuit breaker still too hot. | Let unit sit for 5 mins. |
Champion Remote Inverter Generator 200987 WARRANTY
3-YEAR LIMITED WARRANTY
Repair/Replacement Warranty
CPE warrants to the original purchaser that the mechanical and electrical components will be free of defects in material and workmanship for a period of three years (parts and labor) from the original date of purchase and 270 days (parts and labor) for commercial and industrial use. Transportation charges on products submitted for repair or replacement under this warranty are the sole responsibility of the purchaser. This warranty only applies to the original purchaser and is not transferable.
Pros & Cons
Pros
- Remote start feature
- Quiet operation
- Efficient and reliable engine
- Low-oil shut-off sensor
- Easy to use and transport
Cons
- Expensive compared to other generators
- May be too large for some users
- Requires regular maintenance
Customer Reviews
Customers have praised the Champion Remote Inverter Generator 200987 for its powerful and reliable performance. They have also appreciated its remote start feature, quiet operation, and easy-to-use design. However, some customers have noted that the generator is expensive compared to other generators. Some have also reported issues with the remote control, but these issues have been resolved by resetting the remote control or checking the batteries.
Faqs
What is the starting wattage of the Champion?
How long can the generator run on a full tank of gasoline?
What is the noise level of the Champion 200987 ?
What is the warranty on the generator?
How do I reset the circuit breakers on the generator?
Leave a Comment