How to Dry & Steam: Chi Steam Iron 13109 User Manual

Content
Introduction: Chi Steam Iron
The Chi Steam Iron is a state-of-the-art garment steamer that promises to deliver professional-grade results right in the comfort of your own home. With its powerful steam output, this iron can help you achieve wrinkle-free clothes in no time. The Chi Steam Iron 13109 is expected to be launched in the market soon, and its estimated price range is between $80 to $100.
Detailed Specifications
The Chi Steam Iron 13109 boasts several key features that make it stand out from its competitors. Here are some of its specifications:
- 360-degree swivel cord for ease of use
- Variable steam control for different fabrics
- Digital temperature display
- Self-cleaning system for easy maintenance
- Large water tank capacity for continuous steaming
- Anti-drip system to prevent messy leaks
- Retractable cord for easy storage
- LED indicator lights for power and temperature settings
- Non-stick soleplate for smooth gliding on fabrics
- Vertical steaming capability for drapes and hanging garments
Description
The Chi Steam Iron 13109 is a versatile and powerful iron that can handle various types of fabrics, from delicate silk to heavy denim. Its digital temperature display ensures accurate and consistent heat settings, while its variable steam control allows you to adjust the steam output depending on the fabric type. The self-cleaning system is a convenient feature that helps maintain the iron's performance and longevity, while the anti-drip system prevents leaks and stains on your clothes. The retractable cord and non-stick soleplate make it easy to use and maneuver, while the vertical steaming capability is perfect for refreshing curtains and other hanging garments. Overall, the Chi Steam Iron 13109 is a reliable and high-performing iron that can deliver professional-grade results at home.
Setup Guide
Setting up the Chi Steam Iron 13109 is easy and straightforward. Here are the steps to follow
- Fill the water tank with distilled or demineralized water.
- Plug in the iron and wait for it to heat up.
- Select the appropriate temperature and steam setting for your fabric.
- Iron your clothes using smooth and steady movements.
- Turn off and unplug the iron when not in use.
IMPORTANT SAFEGUARDS
When using Dry and Steam Iron, basic safety precautions should always be followed to reduce the risk of fire, electric shock, and/or injury to persons, including the following:
- Read all instructions.
- This appliance is not intended for use by persons (including children) with reduced physical, sensory, or mental capabilities, or lack of experience and knowledge, unless they are closely supervised and instructed concerning use of the appliance by a person responsible for their safety.
- Close supervision is necessary when any appliance is used by or near children. Children should be supervised to ensure that they do not play with the appliance.
- Only use an iron for its intended use.
- To avoid the risk of electric shock, do not immerse the iron in water or other liquids.
- Always turn the iron to OFF (0) before plugging or unplugging the iron from the electrical outlet. To unplug, grasp the plug and pull from the outlet. Never pull from the power cord.
- Do not let the cord touch hot surfaces. Let the iron cool completely before putting the iron away. Coil the cord into the provided cord reel for storing.
- Always disconnect the iron from the electrical outlet before filling the iron with water, emptying the water from the iron, and when the iron is not in use.
- Do not operate the iron with a damaged cord or in the event the iron has been dropped or damaged or there are visible signs of damage or it is leaking. To avoid the risk of electric shock, do not disassemble the iron. Supply cord replacement and iron repairs must be conducted by a qualified serviceman or the manufacturer. Incorrect assembly might result in a risk of electric shock when the iron is used after reassembly.
- The iron must be used and rested on a stable surface.
- When placing the iron on its stand, ensure that the surface on which the stand is placed is stable.
- Do not leave the iron unattended while the iron is connected or on an ironing board.
- Burns can occur from touching hot metal parts, hot water, or steam. Use caution when you turn a steam iron upside down—there might be hot water in the reservoir.
- To avoid a circuit overload, do not operate an iron on the same circuit with another high-wattage appliance.
- If an extension cord is absolutely necessary, a cord with an ampere rating equal to or greater than the maximum rating of the iron shall be used. A cord rated for less amperage can result in a risk of fire or electric shock due to overheating. Care shall be taken to arrange the cord so that it cannot be pulled or be tripped over.
- Always hold the plug with one hand while pushing the cord retraction button with your other hand to retract the cord.
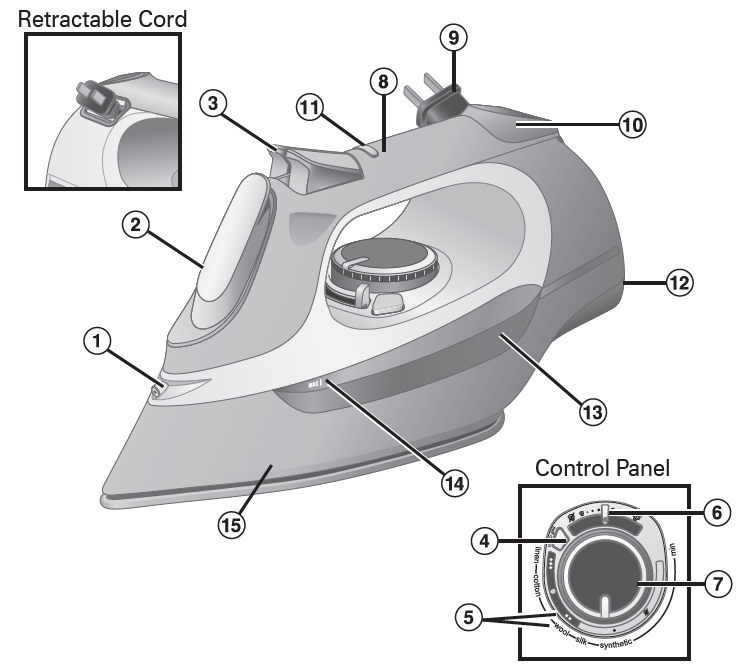
Parts and Features of Dry and Steam Iron

- Spray Nozzle
- Water Fill Door
- Spray
 and Steam
  Buttons
 - Self-Clean Button
- Fabric Temperature Indicators
- Adjustable Steam Lever
- Temperature Setting Dial
- Handle
- Retractable Cord
- Retractable Cord Button
- Power Indicator Light
- Heel Rest
- Water Window
- MAX Fill Line
- Titanium Ceramic Soleplate
Other Consumer Safety Information
Dry and Steam Iron is intended for household use only.
WARNING Electrical Shock Hazard: This appliance is provided with a polarized plug (one wide blade) to reduce the risk of electric shock. The plug fits only one way into a polarized outlet. Do not defeat the safety purpose of the plug by modifying the plug in any way or by using an adapter. If the plug does not fit fully into the outlet, reverse the plug. If it still does not fit, have an electrician replace the outlet.
How to Dry and Steam Iron
CAUTION: Burn Hazard. Attempting to steam iron on a lower temperature setting or failing to allow the iron to preheat for 2 minutes can result in hot water dripping from the soleplate.
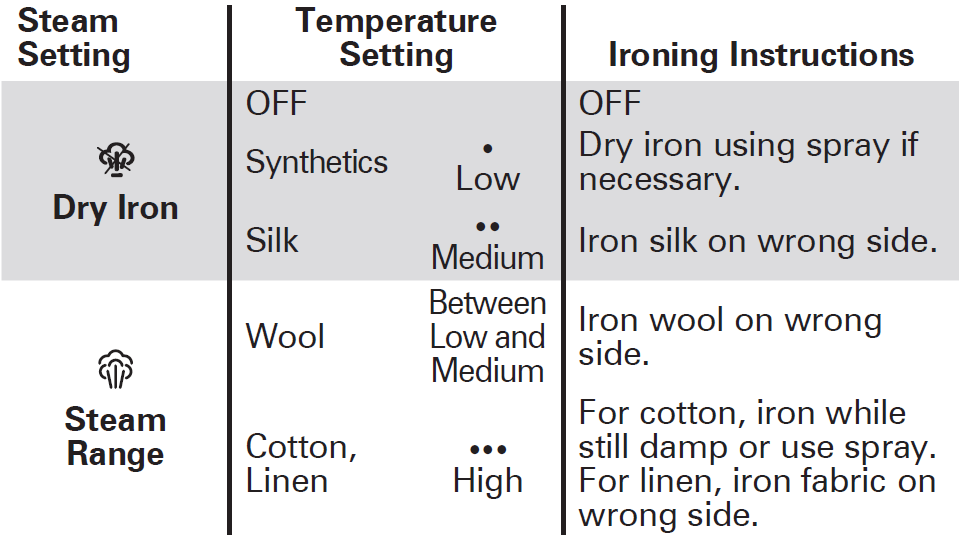
- To Steam Iron: Make sure iron is unplugged. Lift Water Fill Door and add untreated tap water to the MAX Fill Line through the opening. If you have extremely hard water, mix 50% untreated tap water with 50% distilled or demineralized water for use in the iron. Press to snap cover closed. Plug into outlet and the red Power Indicator Light comes on. Turn Temperature Setting Dial to select temperature setting. Linen, cotton, or wool are recommended for steaming. Move Adjustable Steam Lever to desired amount of steam.
To Dry Iron: Plug into outlet. Turn Temperature Setting Dial to select temperature setting. - Preheat 2 minutes to reach desired temperature. You are now ready to iron.
- To turn iron off, move Adjustable Steam Lever to
 (Dry Iron) and turn Temperature Setting Dial to min. Unplug.
POSITION SENSING/AUTO SHUTOFF
The iron will turn off automatically when left in the following positions. The Auto Shutoff time varies based on the iron’s position.

NOTE: Iron will beep for a few seconds and power light will flash continuously in Auto Shutoff sensor. Tilting the iron more than 30 degrees will reset the sensor.
PREPARE TO IRON
NOTE: To avoid garment damage, check garment label for fabric composition and ironing instructions.

Tips for Best Ironing Results
FABRIC FACTS AND LABELS
Every fabric is different and should be treated accordingly. The label inside clothing or linens should recommend fabric care instructions that include ironing treatment. As a general rule, these instructions should be followed. If the fabric is a blend, use a low temperature setting. If you do not know what the content of the fabric is, use the lowest temperature first and test on an inside seam.
PREPARE TO IRON
- Cover your ironing board with a padded, heat-resistant cover. Brush or wipe off any dust, dirt, or debris so it doesn’t transfer to clothing.
- To set the height of the ironing board, stand with your elbows bent at right angles; then drop your hands slightly so that your arms are in a comfortable position. Set the height of your ironing board to this height.
- Check the soleplate for mineral deposits or scorched material before you begin ironing. Follow “Soleplate Care” instructions on page 10.
FAST FACTS
- Always iron with a lengthwise motion. Ironing in a circular motion may stretch fabric.
- Natural fibers such as cotton and linen should be ironed slightly damp for faster, easier ironing. If they are completely dry, use maximum steam while ironing or mist them with water prior to ironing.
- Any portion of a garment that has two layers of fabric such as pockets, seams, collars, and cuffs should be ironed inside out first.
- To press a collar, iron from the points in using small strokes of the iron. After wrinkles are removed, crease the collar into place by hand. Treat French cuffs similarly, gently creasing by hand after ironing.
IRONING VERSUS PRESSING
- You may have heard the terms “ironing” and “pressing” used interchangeably, but they are actually quite different. When ironing, you slide the iron back and forth over fabric. When pressing, the iron is placed and held on the fabric in one spot, lifted up, and this process is repeated until the areas that need attention are smooth. A “pressing” technique is helpful to avoid stretching fabrics.
- A pressing cloth can help reduce unwanted “shine” on fabrics. You can purchase a pressing cloth in the laundry care section, or a clean white dish towel or 100% cotton pillowcase works equally well. You do not need to increase the recommended iron temperature when using a pressing cloth.
Care and Cleaning
- Unplug and allow iron to cool.
- To empty water from iron, swivel Water Fill Door and slowly tilt pointed end of iron over a sink until all the water has poured out.
- Store iron on the Heel Rest.
NOTE: Use the Self-Clean function following each use of the steam function to keep the steam vents clear of any mineral buildup. Add water to the iron. Turn the Temperature Setting Dial to linen (...) and preheat for 2 minutes. Then, turn the Temperature Setting Dial to min and unplug. Hold the iron over a sink. Press and hold the Self-Clean Button until steam no longer comes from the vents on the soleplate. Allow iron to cool before storing.
CAUTION: Eye Hazard. Hold the plug with one hand while pushing the Cord Retraction Button with your other hand to retract the cord.
Soleplate Care
The Self-Clean function cleans the steam holes, but will not remove residue from the flat surface of the soleplate. To clean an iron’s soleplate, preheat the iron to the linen setting and iron over a damp, 100% cotton cloth. This creates heavy steam that transfers residue from the soleplate to the cloth.
NOTES
- Care should be used while cleaning; steam can burn.
- Never iron over zippers, pins, metal rivets, or snaps since these may scratch the soleplate.
- Do not use abrasive cleansers or metal scouring pads.
- Do not use chemical cleaners or hot cleaners, as this will damage the soleplate finish.
Troubleshooting Iron won’t heat
- Plug iron into a working outlet.
- Select a temperature.
- Move or tilt the iron to reset.
Water is leaking
- Too much water is in the Water Tank.
- Adjust steam to a lower setting.
- Steam button
 has been pressed while the iron was cold. Select a temperature and let iron preheat for 2 minutes.
 - If dry ironing, make sure the Adjustable Steam Lever is in the
 (Dry Iron) position.
Iron won’t steam
- Ensure there is water in the Water Tank.
- Move the Adjustable Steam Lever to the
 (Steam) position.
 - Preheat for 2 minutes.
- Anti-drip feature will not allow steam when temperature setting is in the dry range.
Warranty of Chi Steam Iron
This product is warranted to be free from defects in material and workmanship for a period of two (2) years from the date of original purchase. During this period, your exclusive remedy is repair or replacement of this product or any component found to be defective, at our option; however, you are responsible for all costs associated with returning the product to us and our returning a product or component under this warranty to you. If the product or component is no longer available, we will replace with a similar one of equal or greater value.
Pros & Cons of Chi Steam Iron 13109
Pros
- Powerful steam output
- Digital temperature display
- Self-cleaning system
- Vertical steaming capability
- Non-stick soleplate
Cons
- May be more expensive than other iron models
- Water tank capacity may not be enough for large ironing tasks
- May take longer to heat up compared to other irons
Customer Reviews
Customers who have used the Chi Steam Iron have praised its powerful steam output and professional-grade results. However, some have noted that it may take longer to heat up compared to other irons, and its water tank capacity may not be enough for large ironing tasks. Overall, the Chi Steam Iron has received positive feedback for its versatility and high-performing features.
Faqs
Which characteristics make up the CHI Steam Iron 13109?
How can I use the CHI 13109's steam function effectively?
Can I use the CHI Steam Iron 13109 with tap water?
Which materials can I use the CHI 13109 to iron?
How should my CHI Steam Iron 13109 be maintained and cleaned?
The CHI 13109 iron has what kinds of safety features?
What controls are available for the CHI 13109's temperature?
My CHI 13109 iron is dripping water; what should I do?
Is there a warranty on the CHI 13109 Steam Iron?
If the CHI 13109 isn't heating up, what should I do?
Leave a Comment
