Chicco Fit2 Child Restraint Car Seat User Guide
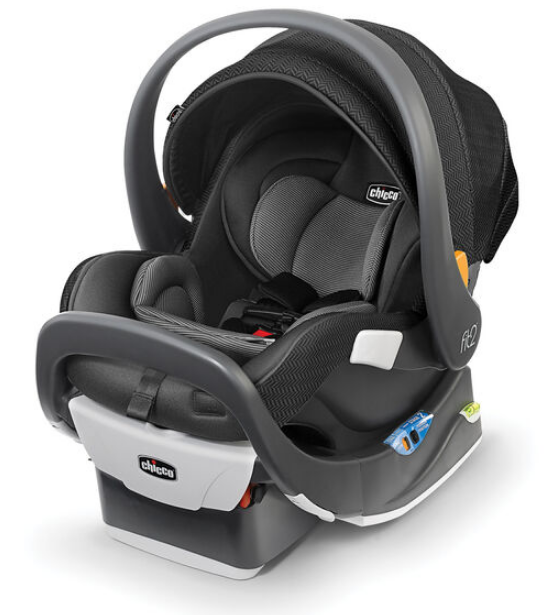
Content
Introduction
The Chicco Fit2 Child Restraint Car Seat is a versatile and innovative car seat designed to accommodate infants and toddlers in a safe and comfortable manner. With its unique two-stage design, it easily transitions from a rear-facing infant seat for babies weighing 4-35 pounds to a toddler seat for children up to 35 pounds, ensuring extended use for up to two years. The Fit2 features a no-rethread harness and a removable, machine-washable seat pad for convenience. Priced at approximately $299.99, it combines safety with style for modern parents.
Specifications
- Weight Range: 4-35 pounds
- Age Range: 0-2 years
- Positions: Infant and Toddler positions
- Installation: One-hand leveler for proper installation angle
- Material: Durable and washable fabrics
- Dimensions: 28.5 x 17 x 16.75 inches
- Weight: Approximately 12 pounds
- Certifications: Meets or exceeds all applicable Federal Motor Vehicle Safety Standards (FMVSS 213)
CHILD RESTRAINT OVERVIEW
CARRIER COMPONENTS
Front View
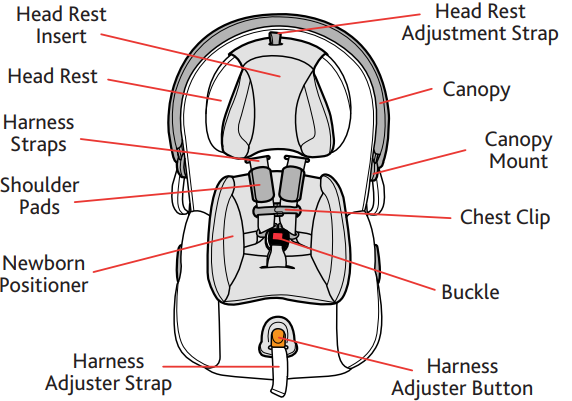
Back View
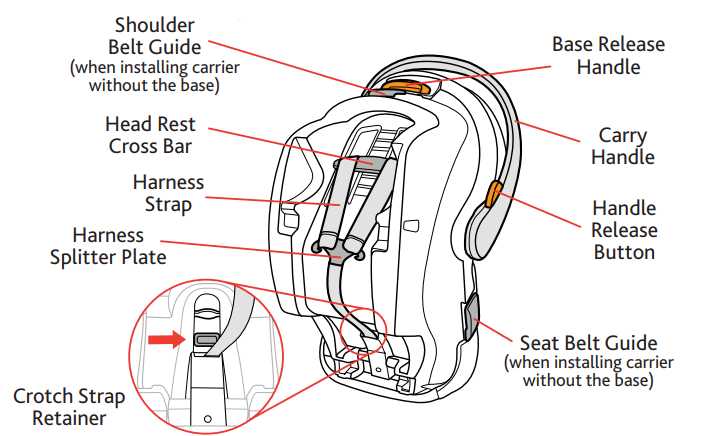
Side View
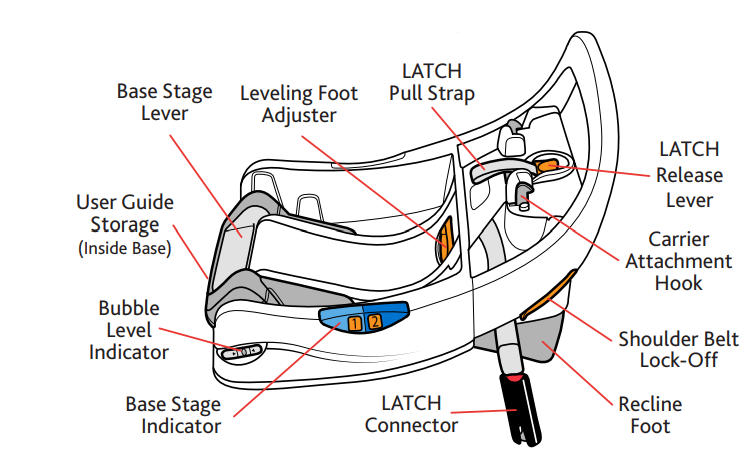
CHILD RESTRAINT OVERVIEW
BASE STAGE 1
Choose the Stage that best fits your child: Stage 1 allows for a more reclined install and riding position for a child that meets the weight and height requirement for this restraint.
Use with children:
- Who weigh between 4 and 35 lbs (2 –16 kg).
- And height is less than 35 inches (89 cm).
- And top of head is at least 1 inch below top of Head Rest.
- When Harness Straps can be positioned at or just below the child’s shoulders.
To install this Child Restraint in Stage 1, rotate the Base Stage Lever over into Stage 1 on the Base. The Base Stage Indicator '1' icon will turn orange.

BASE STAGE 2
Choose the Stage that best fits your child: Stage 2 is an upright install for a child that meets the developmental requirement for this restraint. This allows for more leg room and a more upright riding position for your child.
Use with children:
- Who are able to crawl or walk.
- Who are between 9-24 months of age.
- Who weigh between 15 and 35 lbs (7 –16 kg).
- And height is less than 35 inches (89 cm).
- And top of head is at least 1 inch below top of Head Rest.
- When Harness Straps can be positioned at or just below the child’s shoulders*.
WARNING: Infants may have difficulties breathing in a more upright seating position. ONLY use base Stage 2 with children that can crawl or walk. Approximately 9 months old.
To install this Child Restraint in Stage 2, rotate the Base Stage Lever over into Stage 2 on the Base. The Base Stage Indicator '2' icon will turn orange.

Description
The Chicco Fit2 Child Restraint Car Seat is engineered with safety and convenience in mind. Its unique one-hand leveler ensures that the seat is installed at the correct angle, reducing the risk of improper installation. The seat features a removable and washable cover, making maintenance easy. The Fit2 also includes a breathable 3D AirMesh fabric to keep your child cool during long car rides.
The car seat transitions seamlessly from an infant position to a toddler position, eliminating the need for multiple car seats as your child grows. It also comes with a built-in canopy for sun protection and a push-button LATCH system for secure installation.
Chicco Fit2 Child Restraint Car Seat Base Installation
INSTALL WITH BASE SETUP
WARNING: Infants may have difficulty breathing when in a sitting position. Make sure the seat is reclined properly so that your child’s head does not fall forward. Failure to properly recline the Child Restraint could increase the child’s risk of serious injury or death.
 Make sure the vehicle is on a level surface. Place Base on selected vehicle seat. Make sure it is not blocking the vehicle seat belt buckle.
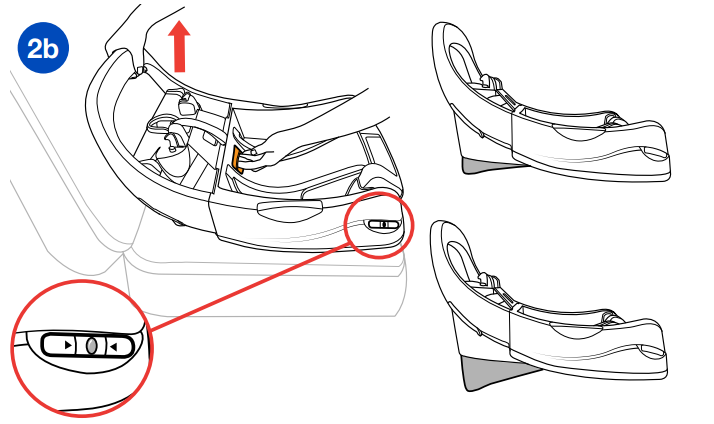
Set Base Stage Lever to the correct Stage, depending on your child. See pages 26-29 for more information (2a). Locate the Bubble Level Indicator and adjust the seat recline by pulling up on the center Leveling Foot Adjuster until the Bubble falls between the arrows on the Bubble Level Indicator (2b).
INSTALL USING LATCH
WARNING: Store LATCH Connectors properly in the compartments when not using for installation.
WARNING: When installing with LATCH, the unused seat belt should not be buckled behind the Child Restraint System as this will engage the inflatable portion of the belt.
- Pull up on the LATCH Release Lever and loosen LATCH straps to their full length.
Locate the LATCH Connector storage compartments. Remove both LATCH Connectors.
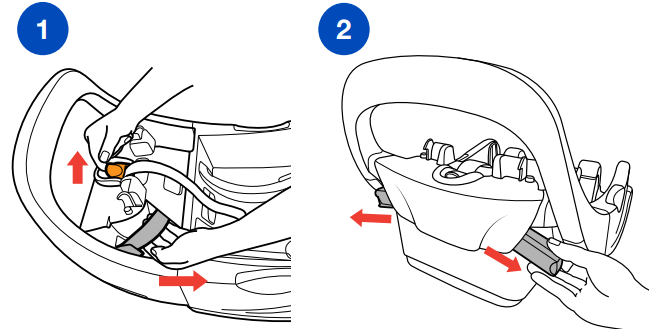
- Locate the LATCH anchor bars in your vehicle. Attach both LATCH Connectors to the vehicle LATCH anchor bars.
Tighten LATCH straps by pulling up on LATCH Pull Strap while pressing Base firmly into vehicle seat
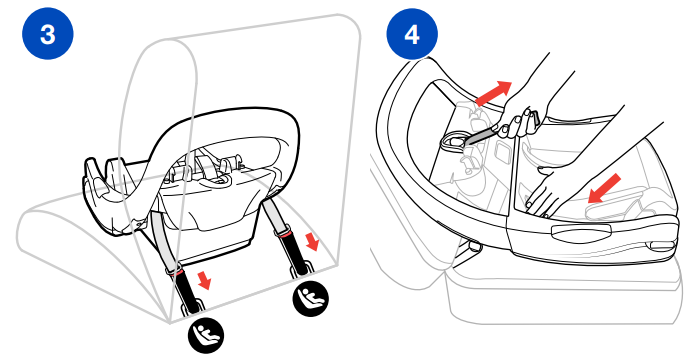
Roll LATCH Release Strap and store in Release Strap Storage Compartment.
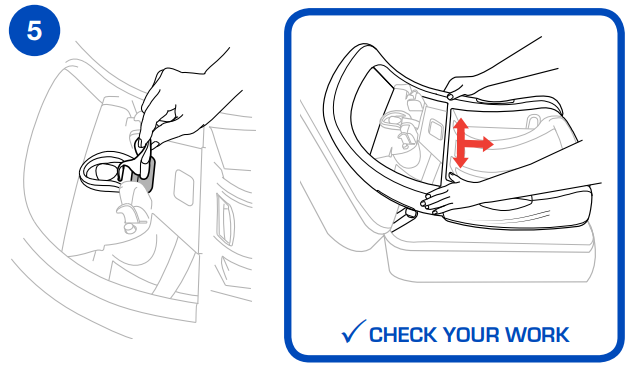
CHECK YOUR WORK
- Hold Base at each side and pull side to side and forward. Base should not move more than 1” (25 mm) from vehicle seat back or side-to-side.
- Check installation before every use!
INSTALL USING LAP-SHOULDER BELT
- Thread vehicle seat belt up through the belt path on the side of the Base.
Pull vehicle seat belt down through the vehicle seat belt path on opposite side of the Base. Buckle the vehicle seat belt.
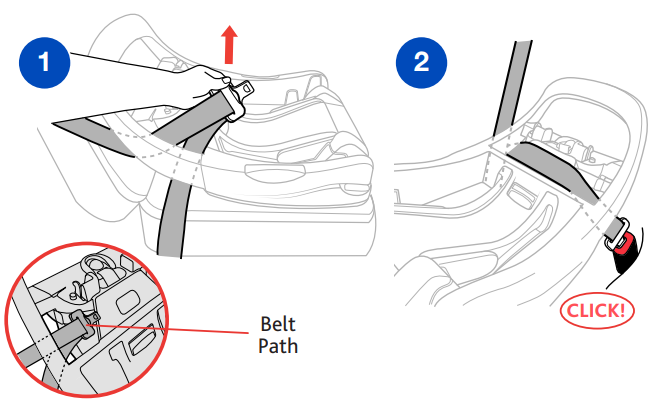
While pushing down on the Base, pull up on the vehicle shoulder belt to remove all slack from the vehicle lap belt.
While holding the shoulder belt tight, slide the shoulder belt strap firmly into Shoulder Belt Lock-Off. Always use the Lock-Off on the opposite side of where the vehicle seat belt is buckled.

Do NOT pull on shoulder belt after it is positioned in Lock-Off. This could damage the Lock-Off and/or the vehicle belt
CHECK YOUR WORK
- Hold Base at each side and pull side to side and forward. Base should not move more than 1” (25 mm) from vehicle seat back or side-to-side.
- Check installation before every use!
INSTALL USING LAP BELT ONLY
- Thread vehicle seat belt up through the belt path on the side of the Base.
Pull vehicle seat belt down through the vehicle seat belt path on opposite side of the Base. Buckle the vehicle seat belt.
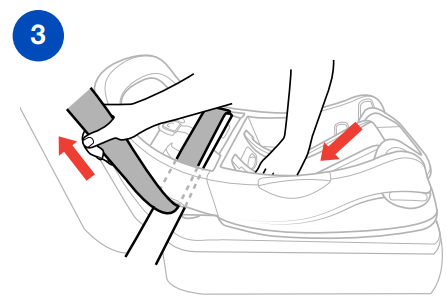
While pushing down on the Base, pull up on the loose end of the vehicle lap belt to remove all slack.

CHECK YOUR WORK
Hold Base at each side and pull side to side and forward. Base should not move more than 1” (25 mm) from vehicle seat back or side-to-side.
Check installation before every use!
INSTALL CARRIER TO BASE
IMPORTANT: Before installing Child Restraint to determine the best Base Stage for your child.
- Insert the Carrier into the Base.
Push down on the Carrier to make sure it locks onto the Carrier Attachment Hooks on the Base.
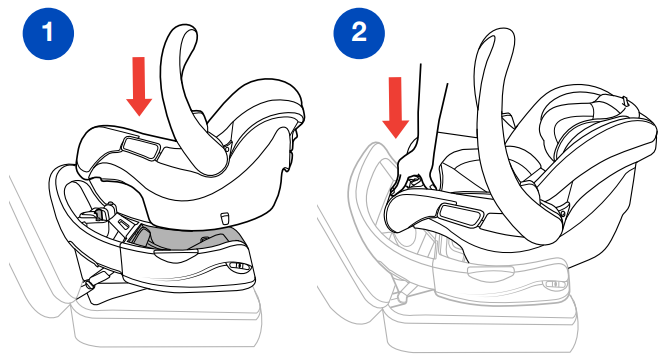
- Check to make sure the Carrier is securely attached to the Base.
STAGE 2 ONLY: Rotate Carry Handle behind the Child Restraint when using Stage 2. It is recommended to leave the installed Base and Carrier in your vehicle when using Stage 2.
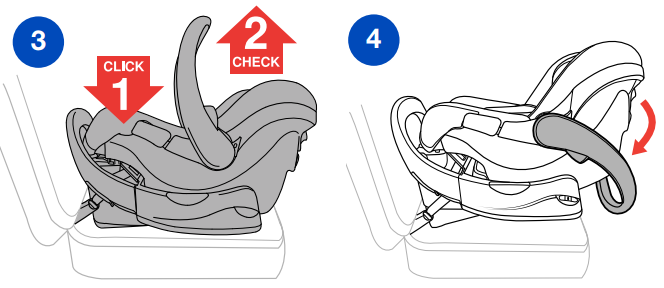
WARNING: ALWAYS lift up on Carrier to verify it is properly attached to the Base.
CHECK YOUR WORK
- Hold Base at each side and pull side to side and forward. Child Restraint should not move more than 1” (25 mm) from vehicle seat back or side-to-side.
- Make sure Child Restraint is level by confirming that the bubble on the level indicator is between the level lines. Make sure infant’s head does not fall forward. If necessary, re-adjust recline and repeat installation steps to make sure Child Restraint is installed properly.
- Check installation before every use!
Setup Guide
To set up the Chicco Fit2,
- Start by ensuring your vehicle is compatible with the LATCH system or seatbelt installation.
- For LATCH installation, locate the LATCH anchors in your vehicle and attach the car seat's LATCH connectors.
- Use the one-hand leveler to adjust the seat to the correct angle.
- If using a seatbelt, thread the belt through the designated path and tighten it securely.
- Adjust the harness straps to fit your child snugly.
- Finally, ensure all parts are securely locked into place according to the manufacturer's instructions.
SECURING CHILD WITH HARNESS
For a better fit in the Carrier with smaller infants, the provided Newborn Positioner may be needed.
- Loosen harness by pressing the Adjuster Button and pulling out on both Harness Straps.
- Press the button on the buckle and release both buckle tongues.
Separate chest clip and spread Harness Straps apart. Place child in carrier in seated position.
Child must be resting against back and bottom of carrier. Make sure child is not slouched.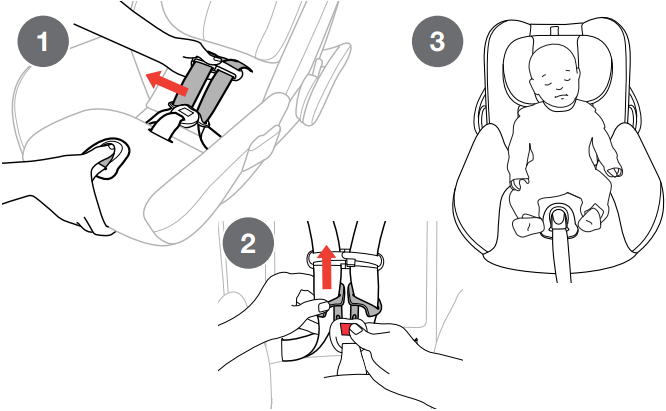
- Pull up on the Headrest Adjustment Strap and adjust the Head Rest up or down until the harness slots are AT or JUST BELOW top of child's shoulders. Pull up and push down on the Head Rest to make sure the Head Rest locks into position before tightening Harness.
NEVER use clothing or blankets that interfere with fastening or tightening the harness. An unsecured child could be ejected in a sharp turn, sudden stop or crash! Pull Harness Straps over child's shoulders and pull waist straps around their waist.
Never secure child in Carrier with child dressed in bulky garments or heavy clothing. Heavy clothing can prevent harness from being properly tightened around child.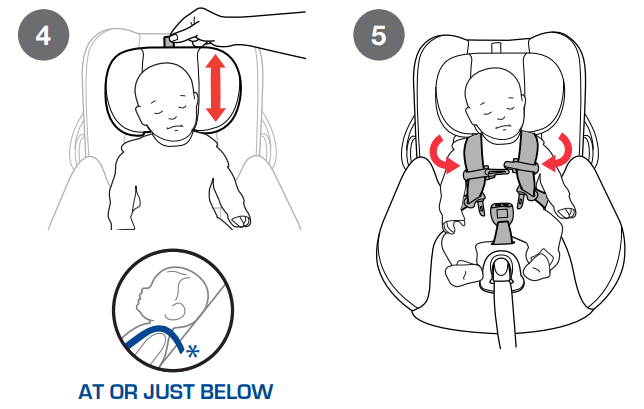
- Insert each Buckle Tongue into Harness Buckle; listen for a click (6a). Pull up firmly on both Buckle Tongues to make sure that they are securely latched (6b).
Fasten Chest Clip by snapping both sides together.
Pull excess strap up through buckle tongues so that harness is snug around child's thighs.
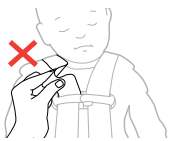
Tighten the harness by pulling slowly on Harness Adjuster Strap while pulling up on both shoulder straps to remove all slack from below (8a). Make sure the Harness Straps are snug on child. If you can pinch a fold in the Harness Strap at the child’s shoulders, harness is too loose (8b). If the Harness Straps are too loose pull the Harness Adjuster Strap more.

- Move the Shoulder Pads up to the child’s shoulders. Slide Chest Clip up to center of child’s chest, level with the armpits.
WARNING - If harness is not snug around your child, child could be ejected in a sharp turn, sudden stop or crash resulting in serious injury or death.
SECURING CHILD CHECKLIST
Harness Straps must be snug. If you can pinch a fold in the strap at the shoulders, the harness is too loose. A snug strap should not allow any slack. It lies in a relatively straight line without sagging. It does not press on the child’s flesh or push the child’s body into an unnatural position.
- To ensure a better fit for smaller infants, the Newborn Positioner may be needed. Never place extra padding under or behind the child. Only use the Newborn Positioner. Never use Newborn Positioner if child weighs more than 11 pounds.
- Straps must lay flat, free of twists and centered on top of the child’s shoulders.
- Check the height of the Harness Straps: Position the Harness Straps at or just below the child’s shoulders.
Check the position of Chest Clip: Chest Clip should be centered on the child’s chest, level with the armpits.

- Never secure child in Carrier with child dressed in bulky garments or heavy clothing. Heavy clothing can prevent harness from being properly tightened around child.
Never secure child in Carrier with child wrapped in a blanket. To keep child warm, place a blanket over child AFTER you have properly secured and tightened harness around child.

Troubleshooting
If you encounter issues with proper installation,
- Check that the one-hand leveler is correctly adjusted and that the LATCH connectors are securely attached.
For harness strap tightness,
- Ensure that there is no slack but also that it is not too tight.
- Common problems include incorrect angle installation and loose harness straps.
- Always refer to the user manual for specific troubleshooting steps and warnings.
- Never use a car seat that has been involved in an accident or shows signs of wear and tear.
Chicco Fit2 Pros & Cons
Pros:
- Easy Installation: One-hand leveler ensures correct angle every time.
- Adaptable: Transitions from infant to toddler position without needing a new seat.
- Comfortable: Breathable 3D AirMesh fabric keeps child cool.
- Secure: Meets or exceeds all applicable FMVSS standards.
- Convenient Maintenance: Removable and washable cover.
Cons:
- Price: Mid-to-high-end price range may be out of budget for some parents.
- Weight: At approximately 12 pounds, it can be heavy to move between vehicles.
- Size: Larger dimensions may not fit in smaller vehicles or rear seats.
Customer Reviews
Parents have praised the Chicco Fit2 for its ease of installation and adaptability as their children grow. Many appreciate the breathable fabric and built-in canopy for added comfort and protection. However, some users have noted that it can be heavy and bulky, making it less convenient for frequent transfers between vehicles.
A common complaint is the higher price point compared to other car seats on the market, though many agree that the quality and safety features justify the cost.
Faqs
How do I ensure proper installation of the Chicco Fit2?
Can I use the Chicco Fit2 in any vehicle?
How do I transition the Fit2 from infant to toddler position?
Is the Chicco Fit2 easy to clean and maintain?
What safety features does the Chicco Fit2 offer?
Can I use additional accessories with the Chicco Fit2?
How long does it take to assemble and install the Chicco Fit2?
What if I encounter issues during installation?
Is there a weight limit for using the Chicco Fit2?
Can I use the Chicco Fit2 in rear-facing mode only?
Leave a Comment
