Contixo F24 Drone with Camera Instruction Manual | Features
Content

Introduction of Contixo F24 Drone
Introducing the F24 Drone with Camera, a powerful and versatile drone that's perfect for both beginners and experienced pilots. This drone is equipped with a high-quality camera that can capture stunning photos and videos from up in the sky. With a user-friendly design and a variety of advanced features, the Contixo F24 Drone is a great choice for anyone looking to take their aerial photography to the next level. The drone is estimated to be priced around $200-300 and is set to launch in the summer of 2023.
SPECIFICATIONS
Drone
- MODEL: F241
- Weight (Including Battery): 520g/18.3 oz
- Flight Time: About 26 ~ 30 minutes
- WIFI Camera Distance: 300m ~ 700m 980feet ~ 2200 feet) (Outdoors and unobstructed, depending on conditions and your mobile device)
- Motor Model: 1806
- Auto-Hovering: Enabled
- Operating Temperature Range: 32°to 104°F ( 0°to 40°C)
- Satellite Systems: GPS / GLONASS
- Dimensions: Open - 17.5" L x 15.9" W x 3.14" H Folded - 6.92" L x 4.13" W x 3.14" H
Camera
- Controllable Range: Pitch: -90°to 0
- Lens: FOV 120°/2.0
- Still Photography Mode: Single shot
- Video Recording Modes: HD 1920x1080P (Depending on conditions and mobile device)
- Photo: JPEG
- Video: MP4
- Supported External Memory: Micro SD Card up to 32GB (not included)
- Operating Temperature: 32°to 104°F ( 0°to 40°C)
App / Live View
- Mobile App: "Contixo F22" in App Store & Google Play Store Live View Working Frequency: 5 GHz ISM
- Live View Quality: 1920x1080P@20fps
- Smartphone video:1920x1080P@20fps, Photo:1920x1080P.
- TF card video:1920x1080P@20fps,
- Photo:1920x1080P (Depending on conditions and mobile device)
- Latency: Low Latency Video (depends on conditions and mobile device)
- Required Operating Systems: iOS 8.0 or later / Android 4.4.4 or later
- Recommended Devices: 4.7" to 6.5" Smartphones
Micro USB Cable
- Voltage: 5V/3A
- Rated Power: ≤15 W
Remote Control
- Operating Frequency: 2.4 GHz
- Battery Capacity: 300 mAh
- Operating Voltage: 3.7V
- Max Control Distance: 1200M (3600 feet) (Outdoor and unobstructed)
- Max Charging Time: About 60 minutes
- Battery life on control: 10 hours Max
- Mobile Device Holder: 4.7" to 6.5" Smartphones
- Operating Temperature: 32°to 104°F ( 0°to 40°C )|
Drone Battery
- Capacity: 2500 mAh
- Voltage: 11.1V
- Battery Type: Lipo Lithium-Ion Battery
- Energy: 27.75Wh
- Net Weight: 195 g / 6.8 oz
- Max Charging Power: 15W
- Max Charging Time: About 4 hours
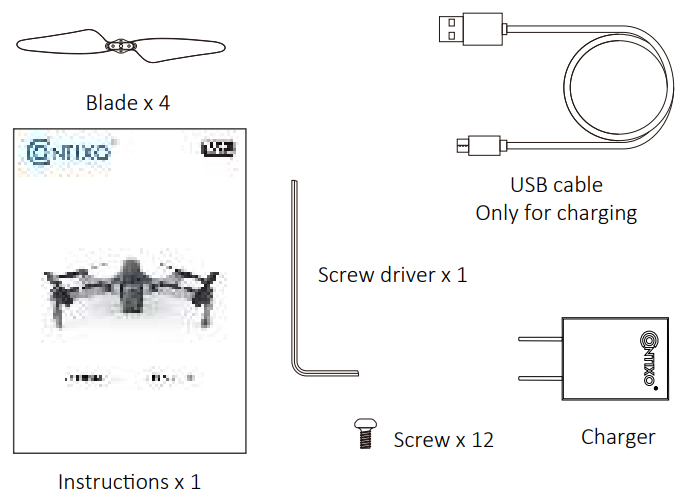
PARTS LIST (Included)
Remote Control Functions
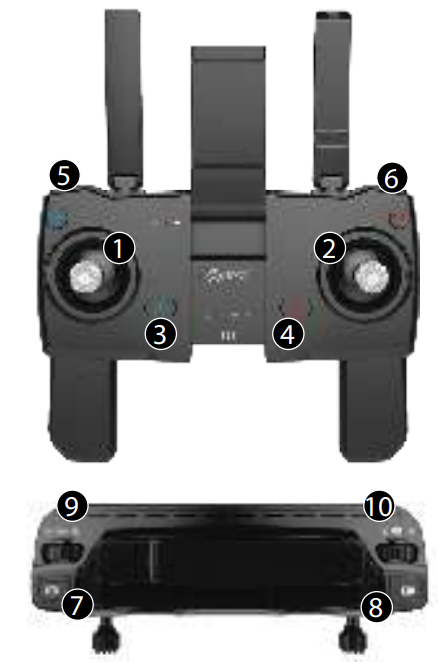
- Throttle Stick
- Direction Stick
- 1-Click Return-To-Home
- Power Button
- ON - Click Once, White Light Comes ON
- OFF - Click Once, Then Hold 2 Seconds Until the White Light Turns Off
- When there is no operation in 10 minutes, the remote controller will be automatically powered off.
- 1-Click Headless Mode (Hold the button for 3 seconds to turn off GPS mode)
- 1-Click Takeoff with Auto-Hover; 1-Click Landing (Hold the button for 3 seconds for Emergency Stop)
- 1-Click Photo Capture; Hold 3 Seconds to Enter Trim Mode
(Note: No need to trim under the GPS mode) - 1-Click Video Recording; Click Again to Stop Video
- Adjust the Speed -
- Scroll Right: + Speed
- Scroll Left: - Speed
- Adjust the Camera Angle
- Scroll Right: Camera Down
- Scroll Left: Camera Up
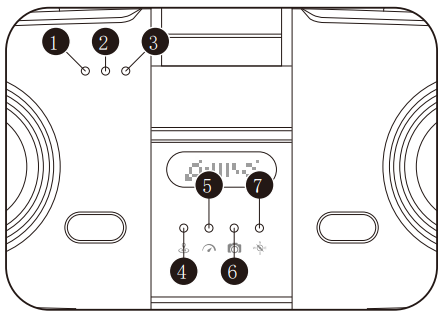
- Full Charge: Green Light
- Charging: Red Light
- Power On: White Light
- Indicates Returning To Home
- Speed
- Photo/Video
- Headless Mode/Trim

There is a snap lock on the antenna, please follow PIC.1 to open the antenna.
Drone Diagram
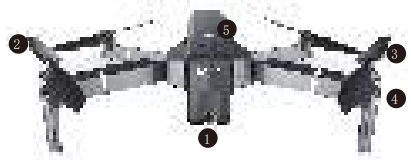
- HD Camera
- Propeller
- Propeller Motor
- LED Indicator
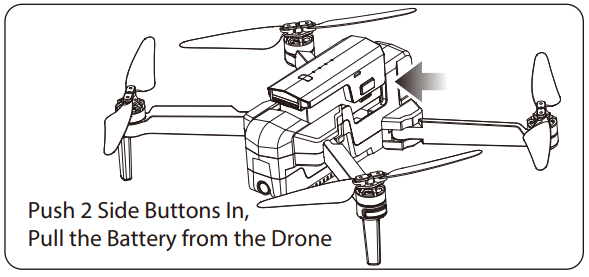
- Intelligent Battery
Drone Unfold and Fold
Drone Unfold
Unfold the front arm first, then expand the back arm.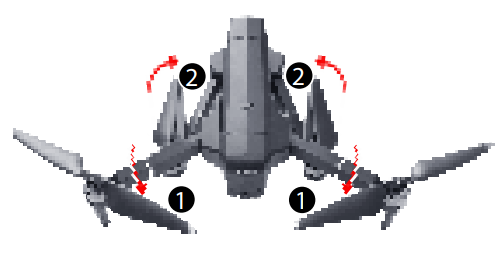
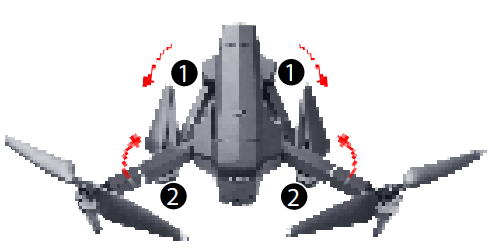
- Drone Fold
Fold the back arm first, then fold the front arm.
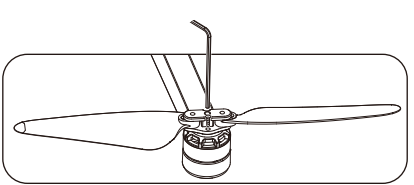
In the stall the Propellers
Please note that the letter “A” or “B” is printed on each propeller, and make sure all the propellers are attached in the correct motor position.

Intelligent Flight Battery
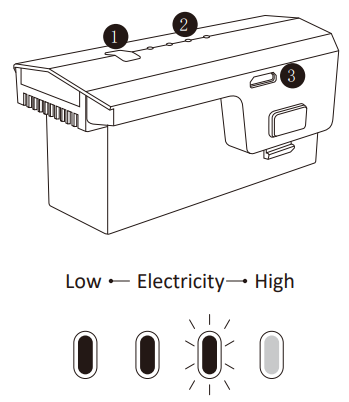
- Power Button
- Battery Power Indicator
- USB Charging Port
- To power ON, hold the button for 3 seconds.; To power OFF, hold the button for 3 seconds.
- When the battery is at low power, the blue power indicator will start flashing.
At this time, return the drone immediately and charge the battery to avoid unnecessary power failures.
Charge the Battery
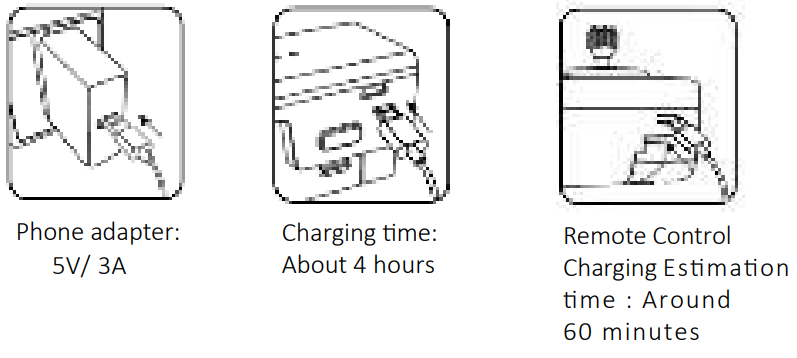
Tip: When the remote control battery is low, the power indicator light on the remote control will keep flashing. Please charge the remote control.
Lithium Battery Charging In instructions
- Balanced Charging: Turn the battery OFF before charging. Insert the USB cable into the USB port of the charger and connect to the charging port of the battery to charge. The indicator on the drone will begin blinking blue when charging. When fully charged, the indicator on the drone will turn to a solid blue.
- The drone can be charged by a travel or car charger.
- The drone battery takes about 4 hours for a full charge. Flight time vary from 26 to 30 minutes depending on how the drone is being used.
- The remote control lithium battery takes about 60 minutes for a full charge.
(While charging, the indicator on the remote control is Red. When fully charged, the indicator on the remote control will turn to solid Green).
Setup Guide of Contixo
Getting started with the F24 Drone is easy. First, charge the drone's battery and install the propellers. Then, download the Contixo app and connect your phone to the drone's Wi-Fi signal. Once you've done that, you'll be able to see a live feed from the drone's camera and control its movements using your phone. The drone is also compatible with a remote control, which can be purchased separately. To use the remote control, simply pair it with the drone using the instructions in the user manual. Once you've done that, you'll be able to fly the drone using the remote control and see a live feed from the camera on your phone.
Dual Remote Controller Mode
Press (camera) then press (power) at the same time. A beeping sound means the Right Joysck has switched to the throne stuck. When you turn off the remote control and turn it on again, the remote resets to default with the Left Joystick as the throttle stick.
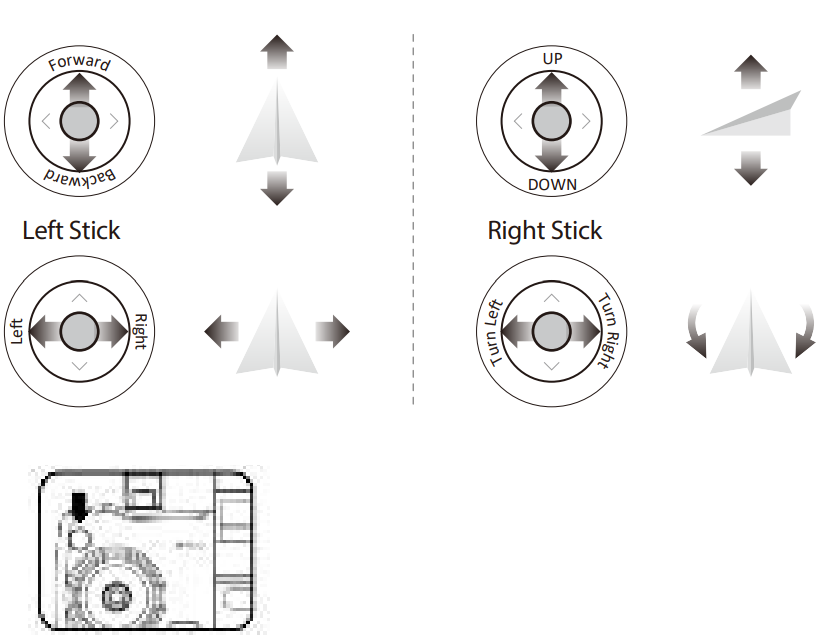
Note: When the drone is indoors with a weak GPS signal, (lights rapidly blinking Blue + White), press (compass) to turn off GPS mode and the drone can be operated under the normal mode. All GPS functions will be disabled.
REMOTE CONTROL OPERATING METHOD
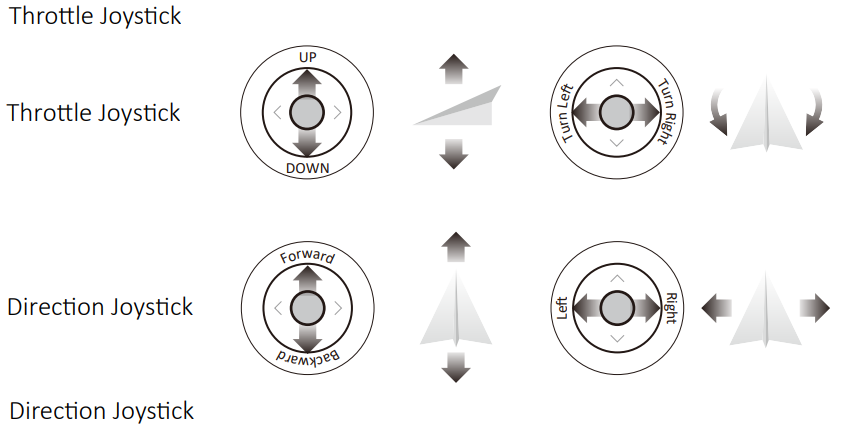
Flight
- Turn on the drone and set down on a level surface
- The drone will auto-trim to this level surface.
- All lights blinking red.
- Turn On The Remote Control & Pair With Drone
- Power on the remote control and push the left joystick up then down to pair with the drone.
- When the lights flash blue (back) and white (front), pairing was successful.
NOTE: You can connect to the drone WiFi signal at this time to view the current drone on the Contixo F22 app, or wait until after GPS is calibrated.
- Connect App
- Connect your smartphone to the WiFi of the drone and check the drone’s status on the “Contixo - F24 - XXXX ” app.
- Open the “Con xo F22” application on your smartphone to access the control interface.
First, select the drone model F24, then click the “CONTROLS” button to enter the APP interface.
APP INTRODUCTION
Wait until the Drone Status at the bottom left of the screen reads “Ready to Fly” before initiating flight. This will ensure that your GPS is synced and your drone is ready to fly.
- Compass Calibration
- Push the joy sticks into the 1 o’clock (left joystick) & 11 o’clock (right joystick) positions.
- Lights will rapidly blink Blue/Red (back) and White/Red (front).
- App Drone Status: “Compass Calibration”
- Keeping the drone level and parallel to the ground, pick it up from the back and rotate your body in one full circle (360°).
- The back lights will turn to solid blue.
NOTE: If using the app, the on-screen instructions can guide you as well. - From the bottom, hold the drone vertically so the camera is facing toward the ground. Rotate your body in one full circle (360°).
- The front lights will turn to solid white.
- App Drone Status: “Compass Calibration Okay”
- Compass Calibration
NOTE: If the compass does not calibrate quickly, tap the tap the screen on the Contixo F22 App and restart the calibration process.
- Reset to factory Setting/Calibrate Gyroscope
- Push the joysticks into the 11 o’clock (left joystick) & 1 o’clock (right joystick) position.
- Lights will rapidly blink Blue (back) and White (front).
- App Drone Status: “Gyroscope is Being Calibrated” then “Gyroscope okay”.
- GPS Searching (DO NOT use GPS Mode Indoors)
- Set the drone back down on a level surface.
- Lights will return to rapid-blinking Blue (back) and White (front). This means the drone is searching for the GPS signal.
- This process can take a few minutes.
- App Drone status: “Waiting for GPS Signal”
Starting Motors
- Push the joysticks into the 5 o'clock (left joystick) & 7 o'clock (right joystick) position.
- Motors will begin to start. Push the left joystick up to takeoff or press the
1-Key Take off button.
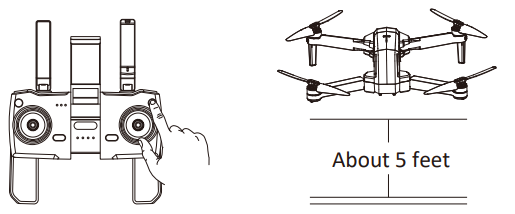
NOTE: Start the motors before drone takeoff.
Stopping Motors
- Push the joysticks back into the 5 o'clock (left joystick) & 7 o'clock (right joystick) positions and the motors will shut off.
- The motors will go idle it they are not operated after 20 seconds. Once the lights have switched to all solid, you are ready to fly
- Blue (back) and white (front) lights are all solid (no blinking).
- App Drone Status: “Ready to fly”
Take off/Landing/Emergency Stop
Rotating propellers can be dangerous. DO NOT start the motors when there are people nearby.
- 1-Key Take Off: Press t 4 and the propellers will spin and the drone will lift to an altitude of about 5 feet. (Always keep the front of the drone facing forward).
- 1-Key Landing: Press and the drone will slowly lower to the ground and land automatically. Remember to always keep your hands on the remote control as long as the motor is still spinning.)
- Emergency Stop: Hold t* for 3 seconds and the drone will immediately shut off and drop.
WARNING: When you emergency stop the motors during flying, it might cause damage to the drone and injury to the people underneath.
Follow Me Mode
When the Follow Me function is activated, the drone will follow the GPS in your smartphone wherever you go (Make sure your smartphone is connected with the drone successfully using the Contixo F22 App).
- Be sure to keep the drone about 9 feet away and 90 feet high.
- Click (running person) on the app interface.
- Wait for Drone Status on the app to display "Follow Me Ready" in the bottom left corner of the screen. The drone will then follow the phone's GPS coordinates.
- Click the 2™ (running person) on the app interface again to exit the Follow Me mode. Common Issues: Follow Me mode may not work if your phone's GPS signal is too weak. This could be due to signal loss from surrounding buildings and trees or congestion from too many mobile phones in the area. Always fly in open and clean area, the F24 drone does not have obstacle avoidance capability when the drone returns back to the assigned area.
Follow Object
Click (running person) then click : (box around person or Object ). Tap on the object or person you want to track, then tap again to confirm your selection.
NOTE: Make sure the size of the frame you mark is the same as the object or person you tap, the frame should not exceed the object or person in the capture frame.
Selfie Mode
Click (hand with two fingers) on the App, follow the "Warm Tip" on the App Screen. Hold up 2 fingers to take a picture. Wave your hand to begin recording video. There is a 3-second countdown before taking a video or picture.
NOTE: Hand gestures are based on your right hand. This function can only be used when there is adequate light. Low light or dimly lit areas may prevent the camera from detecting your hand gestures
Return-to-Home (RTH)
The Return to Home (RTH) function brings the drone back to the Take Off Point. This function can only be achieved under GPS mode.
There are 3 types of RTH: Smart RTH/Low-battery RTH/Fail connection RTH
Smart Return To Home
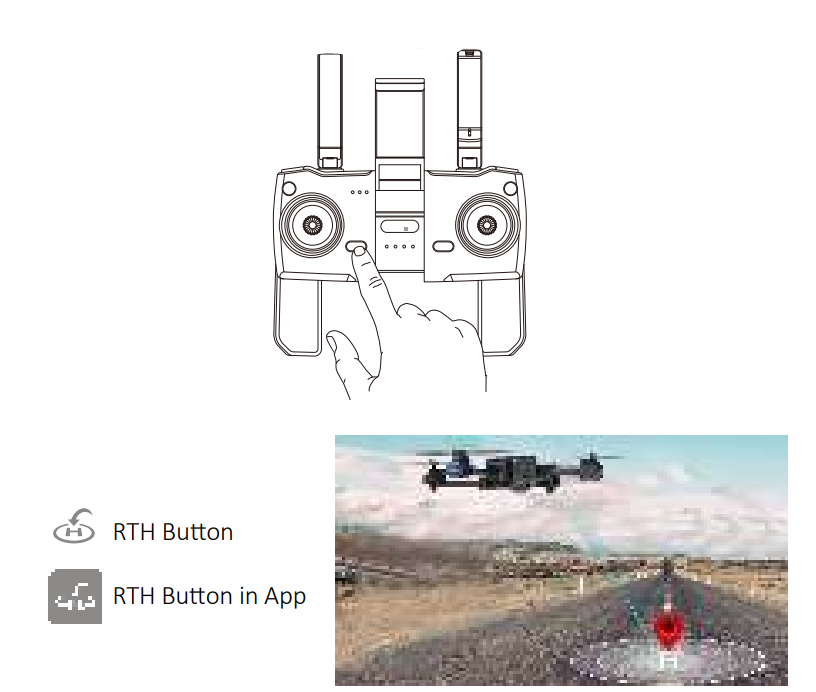
- Low-Battery Return-to-Home Low-Battery RTH is triggered when the flight battery level is low. When Low-Battery RTH is activated, the drone will fly back to about 100 feet away from you, where you can control the drone. Pull the throttle down to land the drone in a safe area. When the battery of the drone is completely empty, the drone will return to the take-off point where you set.
- Fail connection Return-to-Home (RTH) The drone will enter the Return-to-Home Mode if the signal to the remote control is lost. Re-sync the remote control to the drone if the drone flies back into your view. Pull the throttle down to land the drone at safe area.
Headless Mode
- The drone defaults to Normal Mode when the drone and remote control are matched successfully. Click (compass) to enter into Headless mode. Click @ (compass) again to exit Headless mode.
- Normal Mode: Before take off, the white lights on the drone indicate the forward-facing direction.
- Headless Mode: Before take off, the white lights on the drone indicate the forward-facing direction. When the drone rotates in flight, the flight direction is not changed.
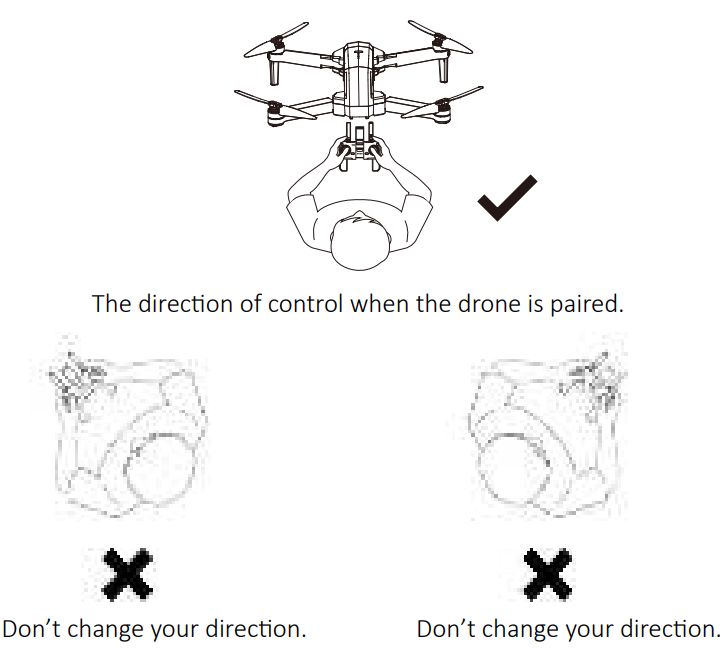
While in Headless Mode, the forward direction is the direction the pilot faces when the pilot pairs the drone with the remote control. If the pilot pushes the direction joystick forward the drone will fly forward. If the pilot pushes the direction joystick backward, the drone will fly towards him/her. If the pilot moves the right stick left or right, then the drone will also move left or right, relative to the pilot. It is very important that the pilot does not change positions or the direction he or she is facing because this will cause confusion on the drone.
Adjusting Trim in No GPS Mode
If the drone flies in None GPS Mode, you can trim the drone to obtain more balanced flight. Press and hold (the camera button) for 3 seconds, it will enter trim mode. Holding the button at the same time pushing the direction joystick to the opposite side that the drone drifts to rebalance it. For example, if the drone drifts to the left, push the joystick to the right to make the drone balanced. Release (camera button) to exit trim mode.
WayPoint Flight
- To start a WayPoint Flight, first download and save your local map in your smartphone. (On Google Maps, click "offline maps" then choose your area to download the map)
- Successfully connect the drone WiFi with your smartphone, and click (2 rectangles) on the App. Find the Red Circle (LIMITED FLIGHT RANGE) / TAKEOFF POSITION / DRONE CURRENT POSITION on the map. Mark the points (up to 16) you plan to fly within the Red Circle range on the map. If you would like to reset the points or flight path, click Peen Ants or Delsteal Click and confirm to start the WayPoint Flight. Push the right joystick at any time to cancel the WayPoint Flight function.
Orbit Mode
- Hover the drone around the center point.
- Press (camera) +(video camera) on the remote control at the same time
- Move and set the drone in the radius range you prefer (within 6ft - 30ft) using the direction joystick.
- Press (camera) + (video camera) on the remote control at the same time again. The drone will begin to fly according to the radius range you set in STEP 2 (Note: If the radius range is less than 6 ft, the drone will fly to 6 ft automatically) . Move the direction joystick to cancel the Point of Interest mode.
NOTE: Press (camera) + (video camera) on the remote control at the same time and the Point of Interest function can be activated if the drone and remote control are successfully paired and the drone flies up.
Flight
The Default GPS Mode is Beginner Mode. In Beginner Mode
- Flight Distance from remote control is limited to between 0 - 90 feet.
- Flight Altitude from remote control is limited to between 0 - 90 feet.
- Return-to-home altitude is below 75 feet. You can turn off the Beginner Mode to modify the parameters in the App on your phone.
CAMERA FUNCTIONS

Press (camera) on the remote control or tap (camera) on the App to take a picture. The red light above the camera on your remote control will flash once, indicating the camera took a photo. Press Pi (video camera) on the remote control or tap coi (video camera) on the App to record a video. The red indicator will continuously blink, indicating the camera is recording video. Press (video camera) again to save the video. DO NOT take photos while recording video.
NOTE: When using the "Contixo F22" App, the original photos and videos will be compressed and saved to your smartphone.
One-Button Media Sharing
- Open the App, and click (gallery) to access your picture and video files
- Click once or press E(checkmark list) to choose the photos you want to share Click (box with arrow) to choose the platforms to share to
Reminder: You can share up to 9 pictures at the same time, but you can only choose one video for sharing each time.
How To Find a Lost Drone
- Click the & (satellite) 3 times to open the map to search for the drone.
- The last position of the lost drone will appear on the map, and you can find the last position of the drone according to the label on the map (about 30 ft error).
Note: The APP must remain open all the time. If the APP is closed, the last position of the drone will disappear on the map.
The original images and videos are saved on the Micro SD card. Push the Micro SD card slightly in to click it out. Next, insert the card into the card reader. Insert the card reader into the USB outlet of a computer to retrieve the photos and videos from the Micro SD card. The images can be also viewed in the App.

Description
The Contixo Drone with Camera is made with durable materials and features a sleek, modern design. It has a flight time of up to 30 minutes and a range of up to 2 kilometers, making it perfect for exploring the great outdoors. The drone's camera is capable of capturing 4K videos and 12-megapixel photos, and it can be easily adjusted to capture footage from a variety of angles. The drone also has a number of advanced features, including obstacle avoidance, return-to-home functionality, and follow-me mode. These features make it easy to capture smooth, stable footage and ensure that the drone is always safe and easy to control.
Flight Safety
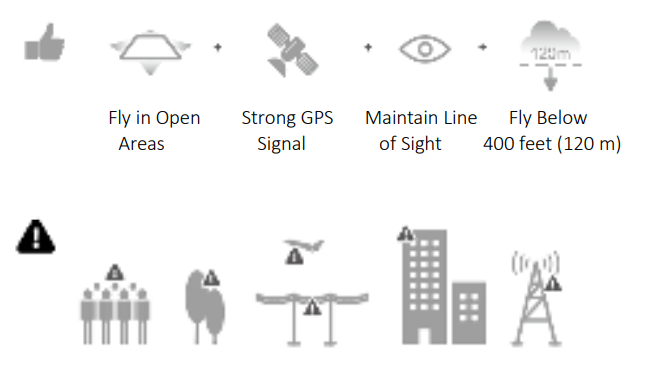
- Avoid flying over or near obstacles, crowds, high voltage power lines, trees, airports or water. DO NOT fly near strong electromagnetic sources such as power lines and base stations as it may affect the onboard compass.
- DO NOT use the drone in adverse weather conditions such as rain, snow, fog, and wind speeds exceeding 10 m/s or 22 mph.
- It’s important to understand basic flight guidelines, for the safety of both you and those around you. Don’t forget to read the safety guidelines before flight.
Troubleshooting of Contixo F24 Drone
If you experience any issues with the Contixo Drone, there are a few things you can try. First, make sure that the drone's battery is charged and that the propellers are installed correctly. If the drone is not responding to your commands, try resetting its connection to your phone or remote control. If the camera is not working, try adjusting its settings or restarting the drone. And if the drone is experiencing interference, try moving it to a different location or changing its Wi-Fi channel. As with any electronic device, it's important to follow the manufacturer's instructions and warnings to avoid damaging the drone or voiding the warranty.
SAFETY PRECAUTIONS
This R/C drone can be dangerous when in use. Please make sure you keep it a safe distance from any persons or spectators while flying. Incorrect installation, poor conditions, or users not familiar with the operation may cause damage to the drone, injure people, or cause an unexpected accident. Please pay close aenon to flight safety rules and learn to recognize more dangerous conditions that may cause an accident due to negligence.
- Keep away from any structures or crowds. This R/C drone may vary slightly in speed or sensitivity while flying and can cause potential danger. Therefore, please keep it far away from crowds, buildings, trees, structures, high-voltage wire, etc. Avoid flying in adverse weather conditions such as rain, electrical storms, and high winds to ensure the safety of the user, any spectators, and surrounding property.
- Keep away from moist environments. The inside of the drone is composed of many precision electronic and mechanical parts. Avoid any moisture or water content from entering the main body of the drone as it may cause a breakdown of the mechanical and electronic parts and thus cause an accident.
- Only operate with included parts for the intended use. Please use the original parts made by Contixo for any re-equipping or maintenance to ensure safe flying. Please operate and use only under the scope of the product function permitted. Using unapproved parts will void the warranty. DO NOT use for any illegal purpose or use beyond the scope of which your local laws and regulations have stipulated.
- Avoid controlling it independently. New users may have certain difficulties during the early stages of learning to operate this drone. Please try to avoid operating the drone alone. When available, always operate this drone under the guidance of a more experienced user.
- Do not operate under the influence of drugs or alcohol. Please operate this R/C drone according to your own state laws and flying skill. Fague, poor mental state, or incorrect opera may increase the probability of accidents.
- Please keep a safe range from drones when at high speeds. When the operator is flying at high speed, please keep the drone far from the pilot and any surrounding persons or objects to avoid causing danger or damage.
- Store it in a cool, dry place. The R/C drone is composed of materials such as metal, fiber, plastic, electronics, etc. Therefore, please keep it away from any heat source and avoid prolonged exposure to direct sunlight. Excessive heat exposure can cause distortion and damage.
NOTE: This equipment has been tested and found to comply with the limits for a class b digital device, pursuant to part 15 of the FCC rules. These limits are designed to provide reasonable protection against harmful interference in a residential installation. This equipment generates, uses, and can radiate radio frequency energy. If not installed and used in accordance with the instructions, the equipment may cause harmful interference to radio communications.
WARNING
- There is important information contained in this package and instruction manual, please keep it for future reference.
- It is your responsibility to ensure that this drone will not cause injury to others or cause any damage to property.
- Please operate strictly as shown on the instruction manual when debugging or assembling this drone. During the process of flying or landing, please keep 3-6 feet between the user and the drone to avoid colliding with the head, face or body, which may cause injury.
- Our company and distributors are not responsible for any incorrect operation that may lead to loss, damage, or injury to the body.
- Children ages 14 and up should use this product under the guidance of an adult. This product is FORBIDDEN to be used by children under 14 years old.
- Correctly assemble and use this product as shown in the instructions manual or packing instructions. Some parts should be assembled by an adult.
- Small parts are included with this product. Please place the drone and associated parts beyond the reach of children to avoid a CHOKING HAZARD or parts being mistakenly swallowed.
- Playing on the road or near high-traffic areas is strictly FORBIDDEN to help prevent accidents.
- Please dispose of the packing material in a timely manner to avoid causing injury or harming small children.
- Please DO NOT disassemble or re-equip the drone as it may cause a breakdown of the drone during flying.
- Batteries for the charger should be inserted into the designated power source with the same logo as the product.
- A Built-in rechargeable 3.7V lithium polymer battery is included in the remote control.
- Only the original charger made from our factory can be used.
- The charger is not a toy.
- When charging the battery, please do so under the surveillance of an adult. Please keep the battery far away from any combustible object when charging. Please keep this drone within eyesight when charging.
- Please DO NOT short-circuit or squeeze the battery as it may cause an explosion.
- DO NOT mix the Li-ion battery with a different type of battery.
- An intelligent lithium battery is loaded in the quad-rotor. Both built-in or external can be used for charging.
- Please DO NOT short-circuit the battery, decompose the battery, or throw the battery into the fire; DO NOT place the batteries near high temperature or heated areas (such as a fire or electric heating devices).
- The drone should be kept away from any other electric appliances, equipment, or magnetic objects, as these may cause interference with each other and your drone.
- Please keep a safe distance from the high-speed rotating rotor to prevent dangerous wounds, cuts, or twisting in the rotors.
- The engine will heat up. Please DO NOT touch it to avoid being burned or injured.
- Please DO NOT put this product close to your ears as it may cause damage to your hearing.
- The included mini USB 5V wall charger is recommended for charging. DO NOT use a charger stronger than 5V.
- To comply with the command of the magnetic environment requirement formulated by the aviaon radio bureau and the related authority, during the regulated period in certain areas please stop using the remote control of this model when such regulation command is issued.
- Keep your UAS within sight.
- Never fly over groups of people.
- Never fly over stadiums or sporting events.
- Understand airspace restrictions and requirements.
Troubleshooting
| THE PROBLEM | REASON | TROUBLESHOOT |
|---|---|---|
| Drone lights flashing and no response from the drone when operating. | 1. Remote is not synced to the drone.<br>2. Insufficient battery power. | 1. Refer to the App Quick Start and re-sync the drone.<br>2. Recharge the battery. |
| The blades spin, but the drone cannot takeoff. | 1. Insufficient battery power.<br>2. The blades distorted.<br>3. The blades Side A and Side B are reversed. | 1. Recharge the battery.<br>2. Replace the blades. |
| The drone shakes heavily. | The blades distorted. | Replace the blades. |
| Drone cannot stay balanced in flight. | 1. The blades distorted.<br>2. Motor isn’t working properly. | 1. Replace the blades.<br>2. Replace the motor. |
| Drone is unstable in flight like in Follow Me mode. | Three-axis acceleration sensor is unbalanced | Restart and re-calibrate the drone. |
Pros & Cons of F24 Drone
Pros
- High-quality camera
- Long flight time and range
- Obstacle avoidance and return-to-home functionality
- User-friendly design
Cons
- Remote control not included
- May be difficult for beginners to control
Faqs
What steps should I take if the camera on my F24 Drone is not functioning properly?
Is it possible to fly the F24 Drone inside the building?
What ways can I make sure that I am safe when I am flying the F24 Drone?
The battery on my F24 Drone is not keeping a charge. What might be the problem?
What are the steps to update the firmware on the F24 Drone?
What are the capabilities of the camera with the F24 Drone when it comes to filming videos?
During flights, what are some ways that I can extend the remaining battery life of my F24 Drone?
In the event that the F24 Drone drops its connection with the controller or the app, what should I do?
How can I adjust the altitude of the compass on the F24 Drone?
What type of warranty is included with the purchase of the F24 Drone?
Leave a Comment
