Yale Home Assure Touchscreen Lock YRD256 Instruction Manual
Content
Introduction
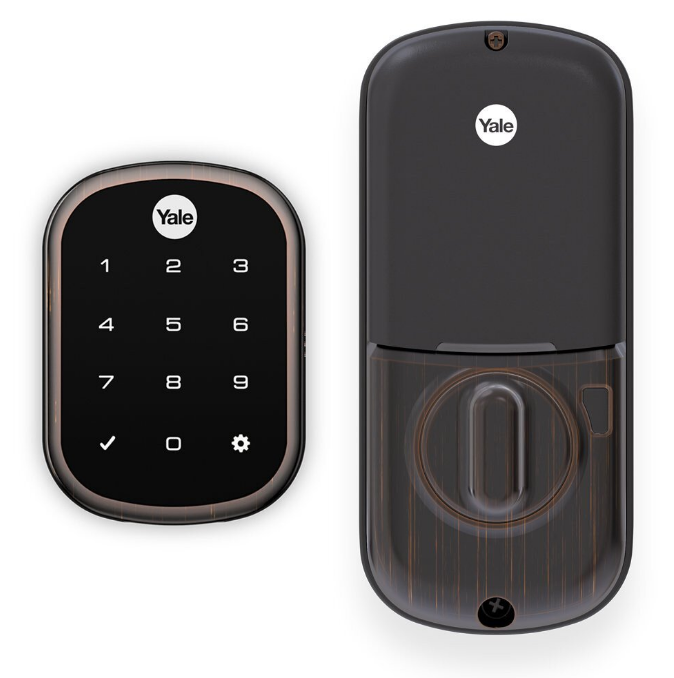
A keyless smart lock with quick and secure access to your house is the Yale Home Assure Touchscreen Lock YRD256. With the help of its elegant touchscreen interface, you can unlock your door with a unique PIN code and do away with traditional keys thanks to this lock. Through remote access and monitoring, it effortlessly interacts with a variety of smart home technologies, providing more convenience and control. With its cutting-edge security features and contemporary style, the Assure Touchscreen Lock YRD256 offers a dependable option for today's smart homes.
Tools Needed
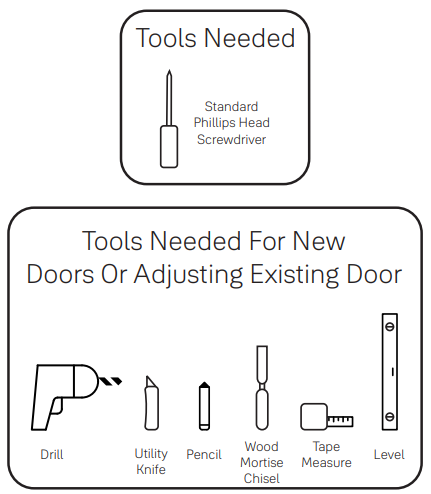
Before you begin
DOWNLOAD THE BILT APP
Using the app on your smart phone, scan this QR for step-by-step installation instructions & to register your lock
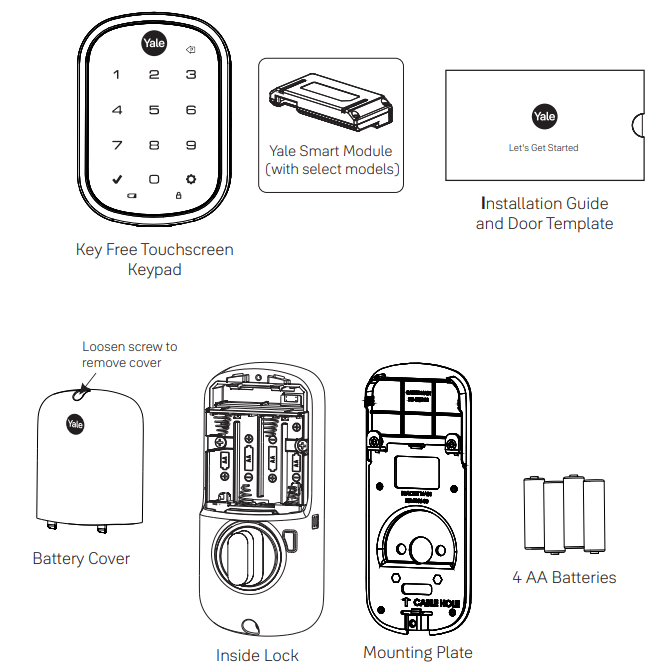
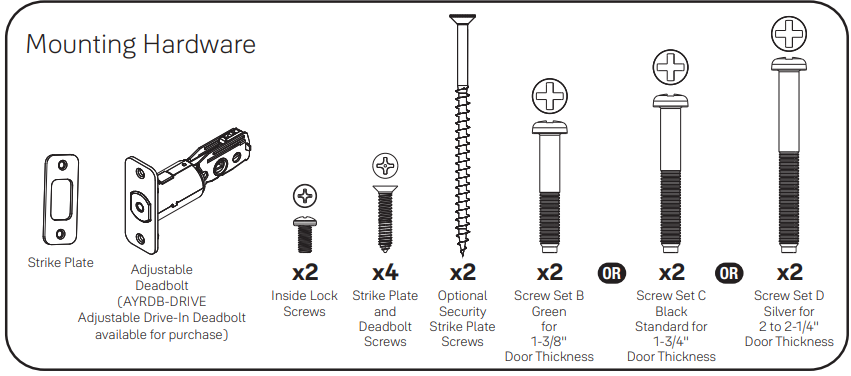
What's In The Box
Detailed Specifications
The Yale Home Assure Touchscreen Lock YRD256 comes with a variety of features that make it a top choice for home security. These features include:
- Capacitive touchscreen with backlit keypad
- Z-Wave technology for wireless connectivity
- Advanced encryption for secure communication
- Auto-lock feature for added security
- Customizable lock codes for different users
- Tamper-resistant design
- Compatible with Amazon Alexa, Google Assistant, and Samsung SmartThings
Yale Home Instructions
This manual will walk you through all the required steps to add your new Yale Assure Lock SL to your door.
- Remove existing deadbolt
- Double check door measurements
- Install your Assure Lock SL
- Program your Assure Lock SL
- Add your Assure Lock SL to your smart home system or Yale Access app if purchased with Yale Smart Module or Yale Access Upgrade Kit
Description
The Yale Home Assure Touchscreen Lock YRD256 is a high-quality smart lock system that is easy to install and operate. The touchscreen keypad is responsive and intuitive, making it easy to enter your lock code even in low light conditions. The lock is also equipped with Z-Wave technology, which allows you to connect it to your home automation system and control it remotely. The YRD256 also features advanced encryption for secure communication, ensuring that your home is protected from cyber threats. Additionally, the lock has an auto-lock feature that engages after a certain period of time, providing added security for your home.
Installation of Yale Home Assure Touchscreen Lock YRD256
Remove Existing Deadbolt
TIP: Do not discard old lock hardware until Assure Lock has been successfully installed.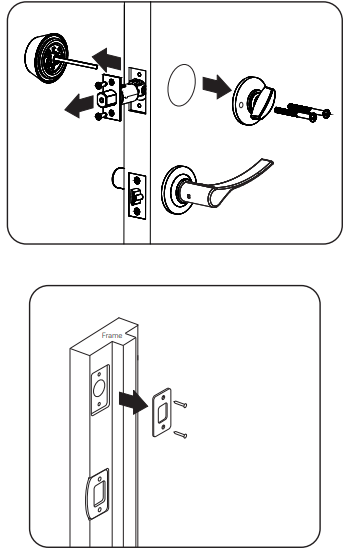
- Check Door Measurements And Make Adjustments If Needed
Door Checker
Use door checker from installation guide envelope to verify your door measurements and make any needed adjustments.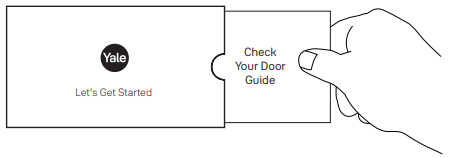
New Door Marking Template
With door checker, use template from installation guide envelope to prep a new door that has not been predrilled for hardware.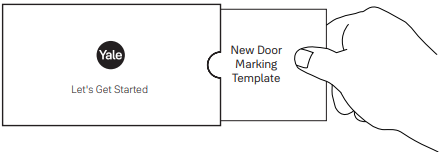
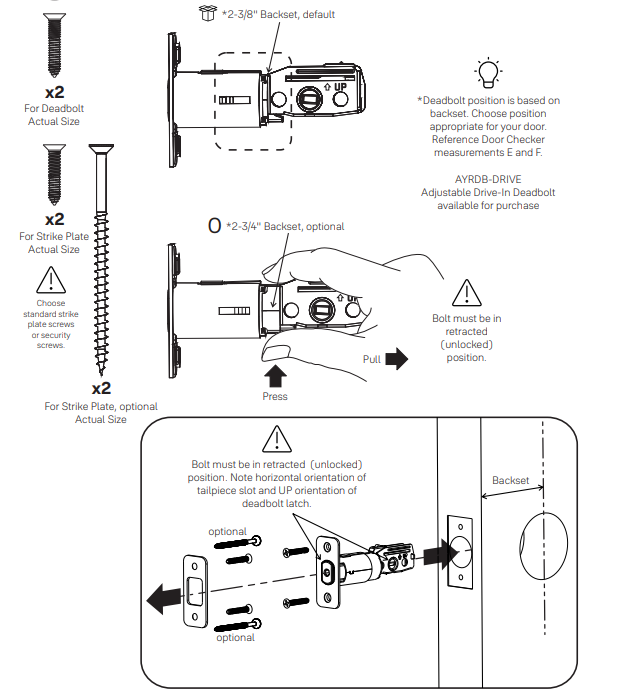
Install Deadbolt and Strike Plate
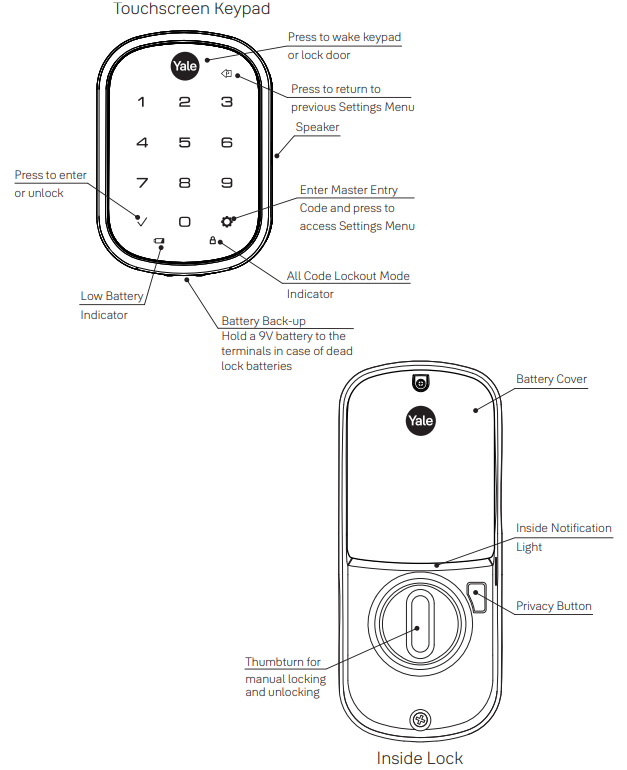
Install Touchscreen Keypad
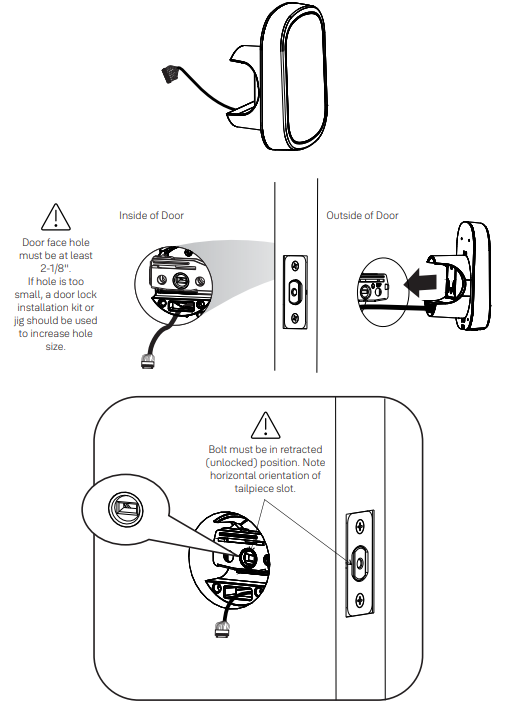
Install Inside Mounting Plate
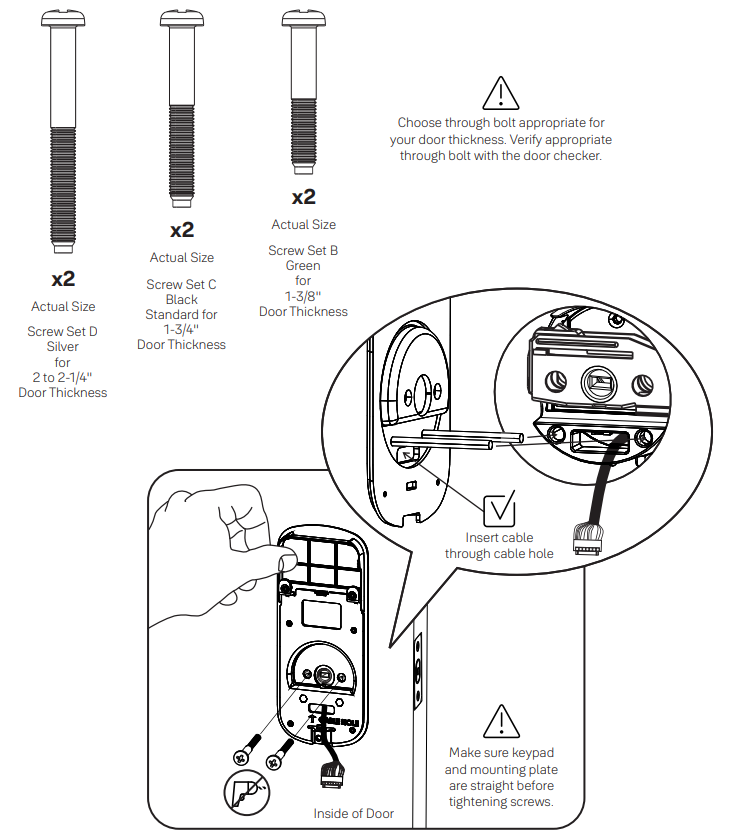
Attach Cable
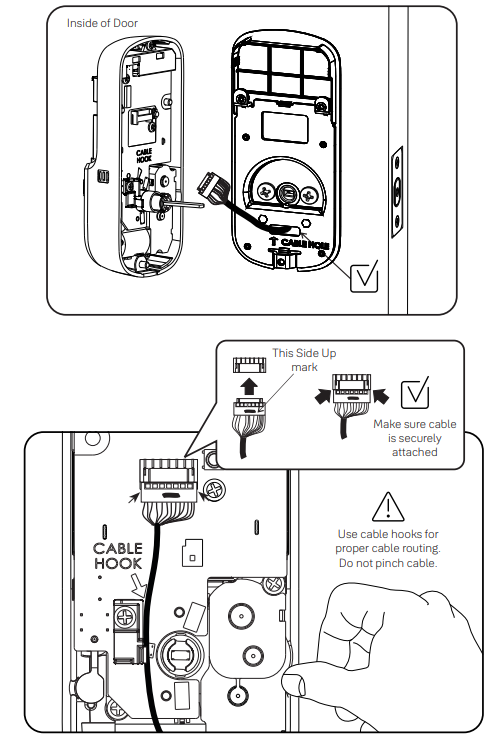
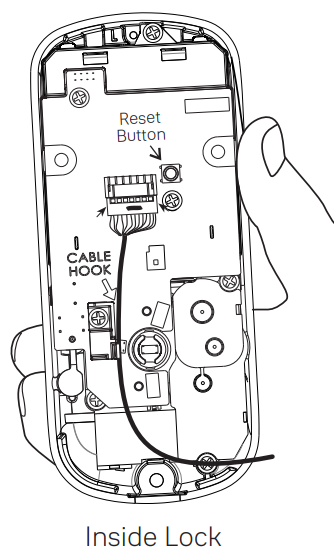
Install Inside Lock
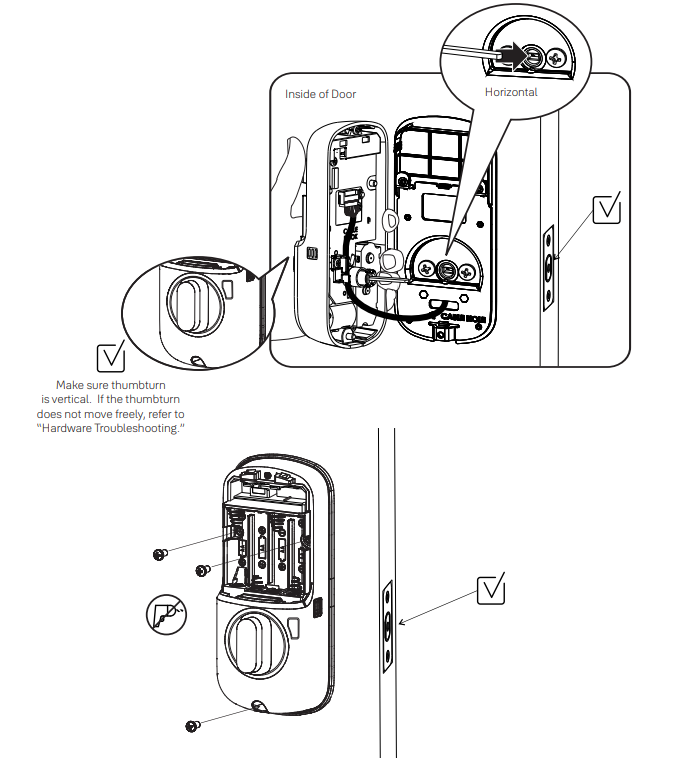
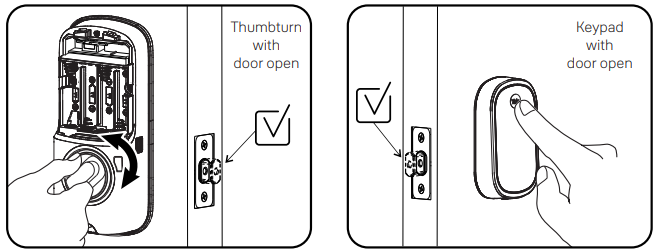
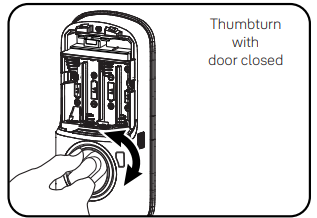
Test Mechanical Operation
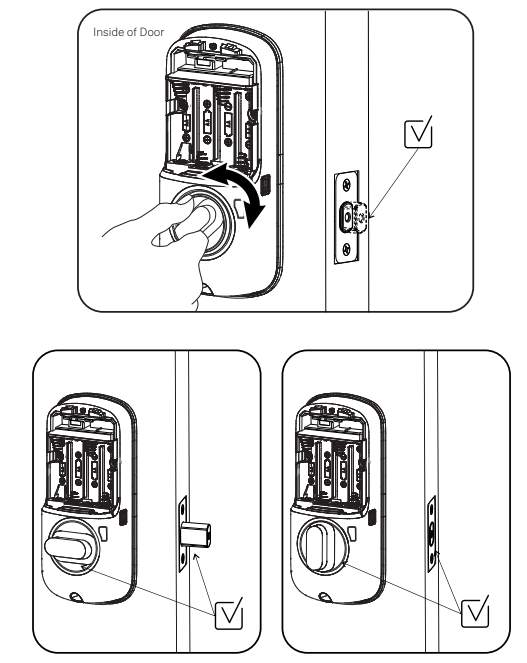
WARNING: If thumbturn operation fails, check the installation beginning with Step 3.
Install Yale Smart Module
Included with select models

For more information about Yale Smart modules and smart home features visit: https://US.YaleHome.com/Smart
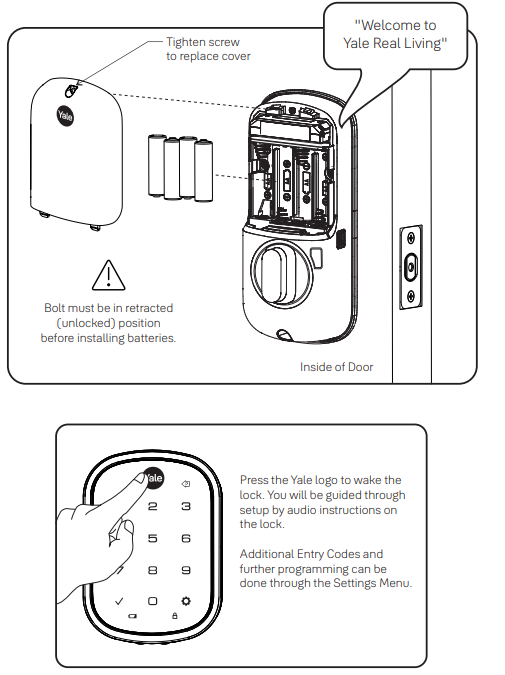
Install Batteries and Cover
Using Your Lock
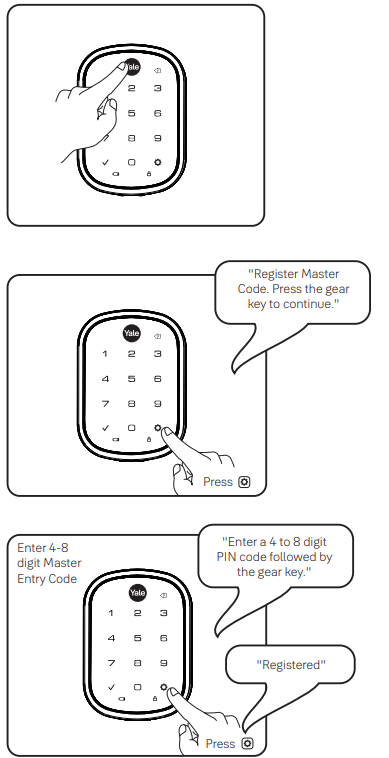
Creating Master Entry Code
The Master Entry Code is used to change the lock settings.
A security best practice is to set your Master Entry Code with 6 or more digits and create a separate code that is used daily to lock and unlock the door.
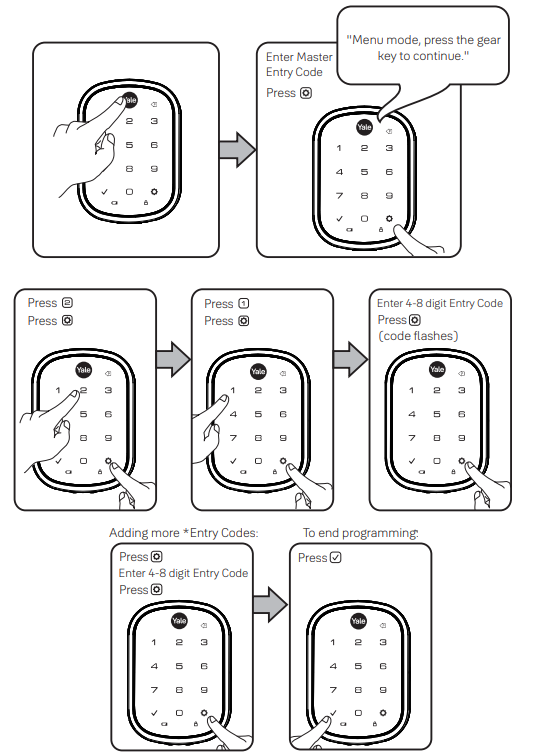
Creating Entry Codes
Master Entry Code must be created first.
*Max Entry codes = 250 with Smart Module; 25 without.
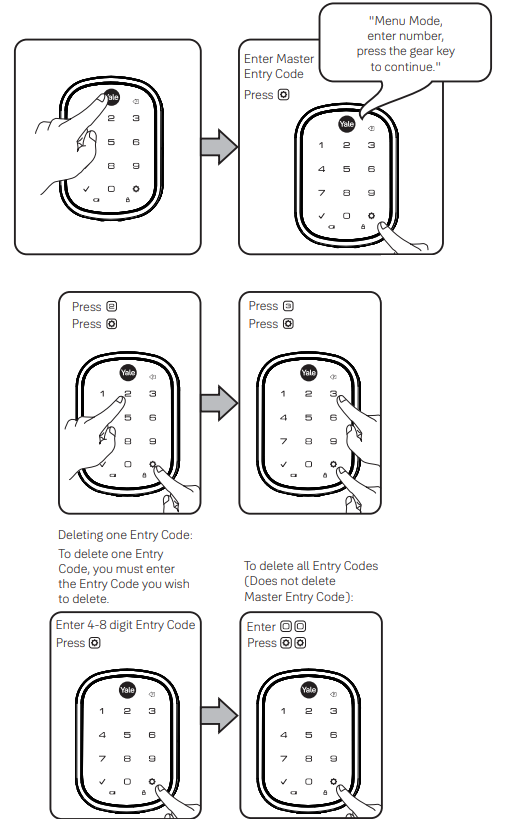
Deleting Entry Codes
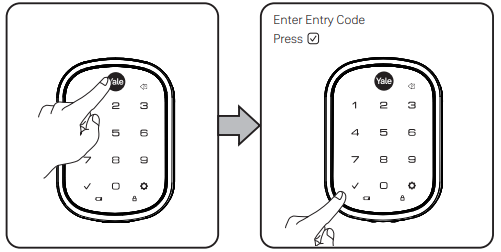
Unlocking Door with Entry Codes
Setting Definitions
Settings | Default Setting | Definition |
Master Entry Code |
Creation required* | The Master EntryCode is usedfor programming and feature settings. It must becreated prior to programming the lock.The Master EntryCode will also operate (unlock/lock) the lock. |
All Code Lockout |
Disabled | This feature isenabled by theMaster Entry Code. When enabled, it restricts all Entry Code access (except Master). When attempting to enter a code whilethe lock is in AllCode Lockout, theRED locked padlock willappear on thescreen. |
Auto Re-lock |
Disabled | After a successful code entry or manual unlock with thekey, the lock willautomatically re-lock after each unlock inan effort tokeep your homesecure. This feature isoptional, and canbe turned off. When enabled, thelock will automatically re-lock after thirty(30) seconds. |
Inside Indicator Light |
Disabled (Off) | Located on the inside lock. Shows active status (Locked) of lockand can beenabled or disabled in Advanced Lock Settings (Main Menu selection #3). |
Language |
English | Choosing English (1), Spanish (2) or French (3) becomes the (default) setting for the lockvoice prompts. |
One Touch Locking |
Enabled | When the latch is retracted, activating the keypad will extend the latch (during Auto Re-lock duration or when Auto Re-lockis disabled). When One-Touch Re-lock is not in use (disabled), any valid EntryCode will re-lock the lock. |
Privacy Button |
Disabled | Privacy mode is disabled by default. When enabled, activate Privacy mode by pressing the privacy buttonfor 4 seconds to put the lock in do-not-disturb mode (all Entry Codes aredisabled). |
Shutdown Time |
60 Seconds | The lock will shutdown (flashing RED) for sixty (60) seconds and not allow operation after the wrong codeentry limit (5 attempts) hasbeen met. |
Volume |
Enabled (Low) | The volume setting for Entry Codeverification is set to Low (2) by default; otherwise it can be set to High (1) or Silent(3) for quietareas. |
Wrong Code Entry Limit |
5 Times | After five (5)unsuccessful attempts atentering a validEntry Code, thelock will shutdown and not allow operation for sixty(60) seconds. |
Customizing Lock Using Settings Menu
*Master Entry Code required
- Press Yale logo to wake up lock
 .
. - Enter Master Entry Code* followed by
 icon.
icon.
Lock Response: “Welcome to the Settings Menu. Press each number to hear available settings and then press the settings icon to enter.”Enter digit corresponding to the function to be performed followed by the
icon. Follow the voice commands.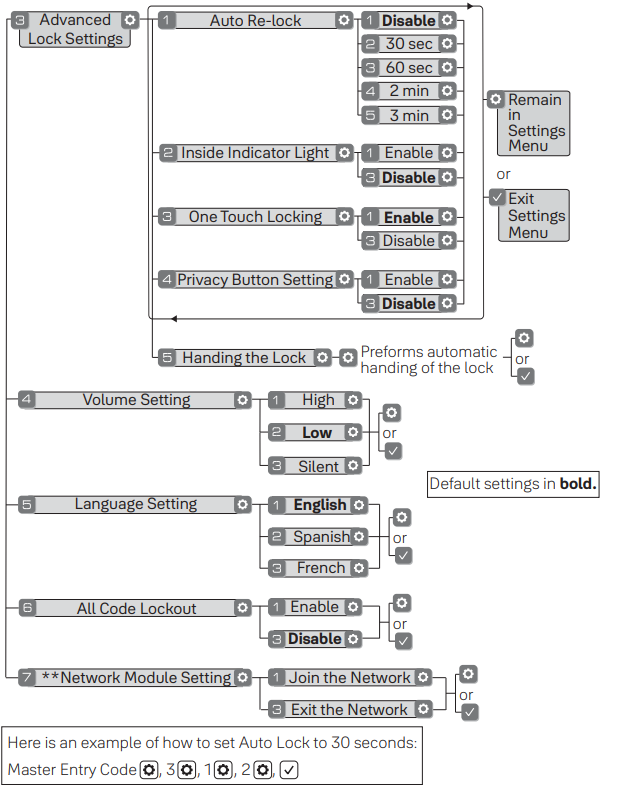
Here is an example of how to set Auto Lock to 30 seconds:
Master Entry Code: ![]()
- The Master Entry Code must be created prior to any other programming of the lock.
- Network Module Setting function appears only with Yale Smart module installed.
Setup Guide
Setting up the Yale Home Assure Touchscreen Lock YRD256 is a straightforward process. Here are the steps to follow:
- Install the lock on your door according to the instructions provided in the user manual.
- Connect the lock to your home Wi-Fi network using the Yale app.
- Create custom lock codes for different users.
- Connect the lock to your home automation system if you have one.
- Test the lock to ensure that it is working properly.
Resetting Lock to Factory Defaults
When lock is reset to factory defaults all Entry Codes (including the Master Entry Code*) are deleted and all programming features are reset to original default settings (see below).
- Remove battery cover and batteries.
- Remove inside lock to access reset button.
- Reset button (see image at right) is located beside cable adapter.
- While pressing reset button reinstall batteries. Hold reset button a minimum of 3 seconds then release.
Replace battery cover.
After reset, Master Entry Code creation is the only option available and must be performed prior to any other programming of the lock.
NOTE TO INSTALLER AND CONSUMER
While Yale has included several features to prevent lockout (9-Volt battery jumper, low battery warnings), it is still possible for a lockout situation to occur. Because this product does not have a mechanical override (a key), Yale® recommends to use this product in an environment where there are additional entry points into the dwelling.
Troubleshooting
Symptom | Suggested Action |
Lock does not respond – door isopen and accessible. |
|
Lock does not respond – door is locked and inaccessible. |
|
Lock is on for a whilethen shows no reaction. Lights dim. |
|
Lock chimes indicating code acceptance, but doorwill not open. |
|
Lock operates to allow access, but will notautomatically re-lock. |
|
Entry Codes will not register. |
|
Upon entering an Entry Codeand pressing |
|
Upon entering an Entry Code and pressing the |
|
Lock operates, but makes no sound. |
|
Lock responds "Low Battery" |
|
Upon entering an Entry Code and pressing the |
|
Lock shows an X on keypad after entering a code. |
|
Deadbolt does not extend when locking the door with keypad. |
|
Hardware Troubleshooting
- If deadbolt does not extend or retract easily when testing thumbturn and keypad operation, revisit installation steps. It is important that the bolt be in the retracted position during lock installation and that installation procedure is followed carefully.
- Attempt rehanding using Settings Menu.
Helpful Tip: Ensuring smooth deadbolt operation can enhance your battery life.
If you feel resistance, ensure deadbolt strike plate aligns with deadbolt. If deadbolt strike plate is out of alignment, please attempt to adjust knob/ lever/ handleset strike using steps below. The knob/ lever/ handleset latch engagement into the strike is the main component used for door alignment.
If deadbolt does not fully extend, consider increasing depth of deadbolt strike pocket in frame.
To adjust Knob/Lever/Handleset strike plate:
- Remove plate from door frame with a manual screwdriver. (Using an electric driver may strip screw heads or enlarge screw holes.)
Locate strike plate tab. Bend the tab towards surface of strike.
Note: A small change may be all that is required.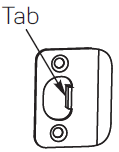
- Reinstall strike plate using a manual screw driver and test again.
- If door cannot be adjusted sufficiently with strike tab, both knob/lever/handleset latch and deadbolt latch could require adjustment – we suggest you contact alocal locksmith for assistance.
For help with misalignments, watch our door alignment video: https://www.yalehome.com/us/en/support/yale-assure-lockfaqs/electronic-lock-installation
Pros & Cons
Pros
- Keyless convenience and enhanced security
- Customizable lock codes for different users
- Compatible with home automation systems
- Advanced encryption for secure communication
- Sleek and modern design
Cons
- Higher price point compared to traditional locks
- May require professional installation
- Dependent on Wi-Fi connectivity
- Touchscreen can be unresponsive in cold weather conditions
Customer Reviews
Customers have praised the Yale Home Assure Touchscreen Lock YRD256 for its ease of use, sleek design, and advanced security features. However, some have noted issues with the touchscreen responsiveness in cold weather. Overall, the lock has received positive reviews, with an average rating of 4.5 out of 5 stars.
Faqs
What is the range of the Z-Wave technology used in the Yale Home Assure Touchscreen Lock YRD256?
Can the Yale Home Assure Touchscreen Lock YRD256 be used with a physical key?
How many custom lock codes can be created for the Yale Home Assure Touchscreen Lock YRD256?
Does the Yale Home Assure Touchscreen Lock YRD256 have a built-in alarm?
Can the Yale Home Assure Touchscreen Lock YRD256 be used with other smart home devices?
How long does the battery last in the Yale Home Assure Touchscreen Lock YRD256?
Can the Yale Home Assure Touchscreen Lock YRD256 be used with a home security system?
Is the Yale Home Assure Touchscreen Lock YRD256 weather-resistant?
Can the Yale Home Assure Touchscreen Lock YRD256 be used on any door?
How does the auto-lock feature work on the Yale Home Assure Touchscreen Lock YRD256?
Leave a Comment