Cosori Pro-Class Blender C700-PRO User Guide | Operations
Content
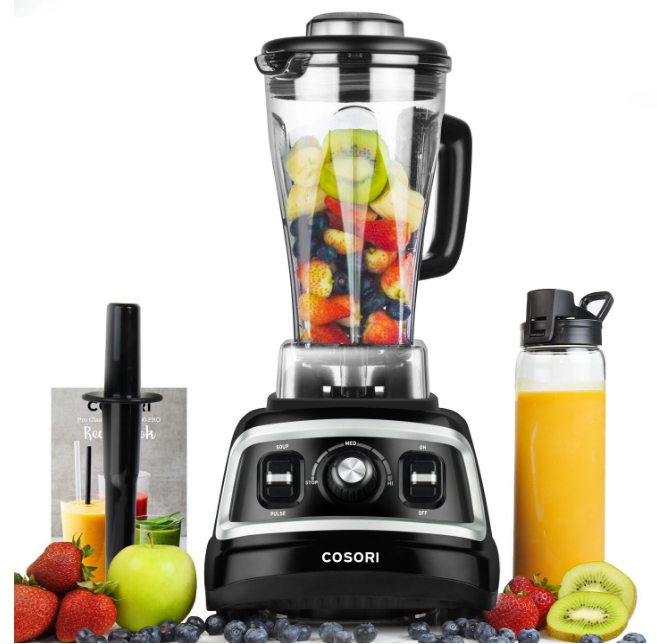
Introducing the Cosori Pro-Class Blender C700-PRO
The Cosori Pro-Class Blender C700-PRO is a powerful kitchen appliance designed to elevate your blending experience. With a robust 1,800-watt motor and six stainless-steel blades, it effortlessly blends, chops, and purees a variety of ingredients, ensuring smooth results every time. The blender features multiple speed settings and a pulse function for precise control, making it suitable for smoothies, soups, and sauces. Its sleek design and easy-to-clean components add convenience to any kitchen. The Cosori Pro-Class Blender is priced at approximately $100.
Package Contents
- 1 x Pro-Class Blender
- 1 x Tamper
- 1 x Cleaning Brush
- 1 x Travel Bottle (27 oz)
- 1 x User Manual
- 1 x Storage Lid
- 1 x Container(35 oz)
Specifications
Power Supply: | AC 120V/ 60Hz |
Rated Power: | 1500W |
Motor Speed: | 30000 RPM |
Capacity: | 0.53gal.(2 Liters) |
Function Diagram
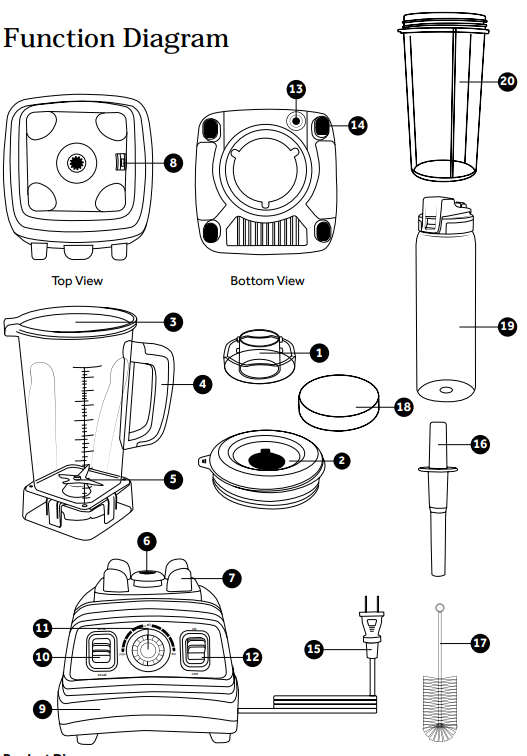
- Measuring Cap
- Lid
- Pitcher
- Handle
- Blade Assembly
- Drive Socket
- Support Pad
- Pitcher Sensor
- Motor Base
- Soup/Pulse Switch
- Variable Speed Control
- On/Off Switch
- Reset Button
- Anti-Skid Pads
- Power Cord
- Tamper
- Cleaning Brush
- Storage Lid
- 27 oz Travel Bottle
- 35 oz Container
Control Panel
Button/Dial | Cause |
On/Off Switch | Controls the power to the blender. When the blenderis plugged in,it will beepwhen turned on to indicate that it is on standby mode. |
Variable Speed Control | Use the Variable Speed Control to select a blending speed to best mix your ingredients. The blender will run until you set the dial to‘STOP.’ Please note that the Soup/Pulse Switch must be in theneutral position forthe blender to work. CAUTION: The blender can heat room temperature liquids and ingredients up to 140°F or higher when operating for extended periods of time. |
Soup/Pulse Switch | SOUP: The ‘SOUP’ function will set the blender to run on low speed for 15 seconds, then continue to run on high speed.The blender will On/Off Switch this function. NOTE: The Variable Speed Controldoes not work when the Soup function is on. |
PULSE: Press and hold down the switch to activatethe ‘PULSE’ function. The blender will run at a high speeduntil the switchis released. |
Blending Times & Temperatures
Low | Medium | High | Soup | |
3 min. | 84°F | 111°F | 121°F | 103°F |
6 min. | 96°F | 135°F | 158°F | 142°F |
NOTE
- To extend product lifetime, it is recommended to run the blender for no more than 6 minutes when blending on the ‘HI’ setting. Allow the blender to rest for at least 10 minutes before starting your next recipe.
- These temperatures are based on blending 5 cups of water at room temperature.
Description
The Cosori Pro-Class Blender C700-PRO features a 1500W motor that delivers up to 30,000 RPM, ensuring smooth and consistent blending results. The blender comes with a 64-oz BPA-free Tritan glass pitcher that is dishwasher safe and resistant to scratches. The pitcher is also designed with measurement markings for easy recipe preparation. Additionally, the blender includes multiple speed settings and a pulse function for more control over the blending process.
The blender's base is designed with an ergonomic handle and a LED display screen that shows the selected speed and timer. It also includes safety features such as overheat protection and a secure lid design to prevent accidental starts or spills.
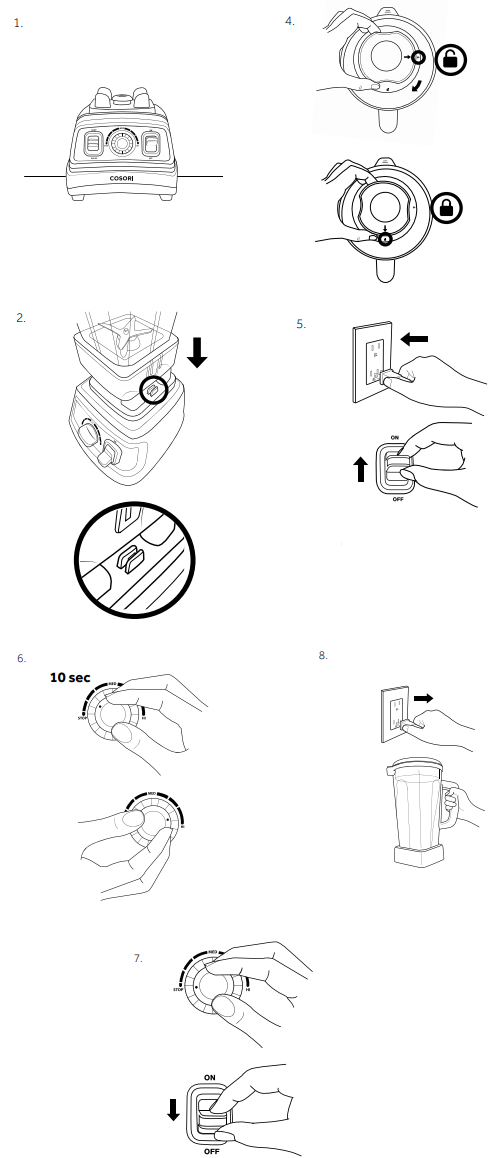
C700-PRO Operation
Blending Mixtures
WARNING: DO NOT put hands or other objects into the pitcher while the blender is operating; doing so may result in serious injury and may damage the blender.
- Place the motor base on a flat, level surface.
- Place the pitcher onto the base.
The pitcher should press down on the pitcher sensor. - Place all ingredients into the pitcher.
For best results, food should be cut into ½ inch pieces and the ingredients should not exceed the MAX level on the pitcher. - Place the lid onto the pitcher.
To completely close the pitcher, align the two slots on the measuring cap with the lid, then turn the cap clockwise. The arrows on the measuring cap should align with the lock symbols on the lid. - Plug the blender into an electrical outlet and set the On/Off Switch to the ‘ON’ position.
- Turn the Variable Speed Control dial to the first level and allow the mixture to blend for 10 seconds, then slowly move the dial to your desired level. You can also use the Soup/Pulse switch to blend your ingredients.
- When all of your ingredients have been blended to your desired consistency, turn the Variable Speed Control to ‘STOP’, and set the On/Off Switch to the ‘OFF’ position.
- Unplug the blender and remove the pitcher.
- Serve immediately, or pour your creation into the included travel bottle to take it on the go.
- Clean all parts and accessories immediately after each use.
NOTE
- The blender may emit a faint odor when being used for the first time; this is normal.
- CAUTION: Moving parts may become hot with extended use. Allow moving parts to cool down before handling.
- DO NOT remove the pitcher while the motor is on. Make sure the blender is not running before removing the pitcher.
Helpful Hints for Blending
Filling up your Pitcher
The following tips can help you effectively create blended creations with your new blender.
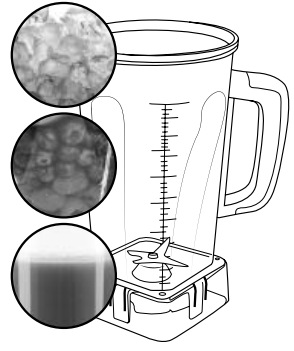
- Add liquids or yogurt first (Add liquid in small increments until you have reached your desired consistency.)
- Smaller ingredients like berries or nuts in the middle.
Place ice or larger ingredients last.
NOTE: It might seem that ice should sit on the bottom right by the blades, but the weight of ice is best utilized when it rests atop all other ingredients. For that reason, cubed ice (as opposed to crushed ice) also works better.
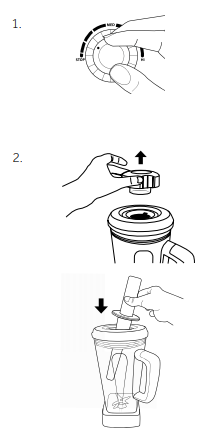
Using the Tamper
The tamper allows you to accelerate the process of blending thick and/or frozen mixtures and prevents air pockets from forming. Only insert the tamper through the lid opening as you create nut butters, fruits purée.
- While the blender is operating, set the blender to the lowest speed setting.
- Remove the measuring cap from the lid and insert the tamper through the opening.
- Use the tamper to push out any air pockets in the mixtures. Push down any unblended foods in the pitcher. If necessary, point the tamper toward the sides and corners of the pitcher.
- Remove the tamper from the pitcher and replace the measuring cap.
NOTE:
- The pitcher should not be more than two-thirds full when using the tamper.
- DO NOT use the tamper for more than 30 consecutive seconds to avoid overheating.
- DO NOT try to force the entire tamper through the lid opening. The splash guard on the tamper and the lid ensure that the tamper will not make contact with the blades.
Other Helpful Tips
- Always make sure the lid is secured to the pitcher.
- When making nut butters or oil based foods, do not process for more than one minute after the mixture starts circulating. Over-processing can cause the blender to overheat and possibly malfunction.
- For best results, blend on ‘HI’ to achieve the most uniform consistency for your mixtures.
- Blending on the lowest speed setting for too long will cause the motor to overheat.
- When blending cold drinks like margaritas or smoothies, make sure ice cubes are ½ inch with a 2:3 ratio of ice to liquid in the pitcher.
- Frozen fruit makes a great replacement for ice and adds sweetness to your mixtures.
- Always make sure ingredients are room temperature before blending. Allow hot ingredients to cool for 3-5 minutes before placing them into the pitcher. Make sure to use no more than 7 ounces (200 g) of ingredients when grinding food like coffee beans.
- If necessary, use a rubber spatula or a wooden spoon to remove food from the sides of the pitcher. Make sure blender from the electrical outlet before scraping the sides of the pitcher.
- To extend product lifetime, it is recommended to run the blender for no more than 6 minutes when blending on the ‘HI’ setting. Allow the blender to rest for at least 10 minutes before starting your next recipe.
Set-Up
Before First Use
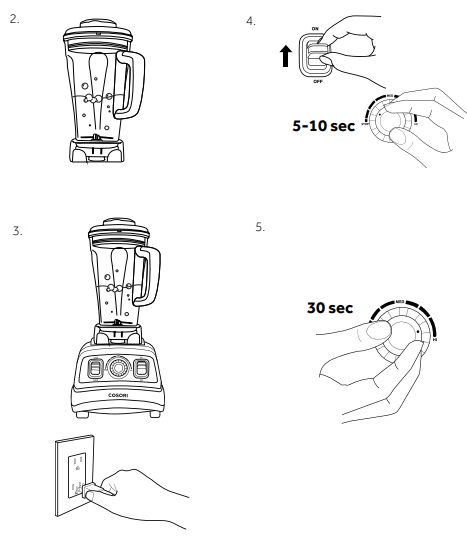
Follow the steps below to effectively clean the pitcher and break in the motor inside the blender.
- Remove all packaging and labels from the blender. Inspect the blender for damage and check to see if all parts are included.
- Fill the pitcher halfway with warm, soapy water.
- Place the pitcher on the motor base, and plug in the base.
- Set the On/Off Switch to the ‘ON’ position and turn the Variable Speed Control to the first level for 5-10 seconds.
- Slowly turn the Variable Speed Control to the ‘HI’ setting and allow the blender to run for 30 seconds.
- Rinse all parts thoroughly and allow them to dry completely.
Care & Maintenance
Cleaning the Pitcher
- After use, reassemble the blender and fill the pitcher with 2 cups of warm water along with a couple drops of dish detergent.
- Turn on the blender and turn the Variable Speed Control for low speed. Slowly increase the speed to 'HI' and allow it to run for 30 seconds. Alternatively, you can hold down the 'PULSE' switch for 30 seconds.
- Turn off the blender and remove the pitcher. Rinse the pitcher under clean running water.
- Allow the pitcher to dry before storing.
NOTE: For added convenience, the pitcher, lid, measuring cap, and tamper can all be placed on the top rack of the dishwasher for easy cleanup.
Sanitization for Long-Term Storage
- Follow the cleaning instructions above.
- Fill the pitcher halfway with clean water along with 1½ teaspoons of bleach.
- Place the lid and measuring cap on top of the pitcher; make sure the lid is secured onto the pitcher.
- Place the pitcher onto the motor base.
- Turn on the blender and turn the Variable Speed Control to the lowest speed setting. Slowly increase the speed to 'HI' and allow it to run for 30 seconds.
- 6. Turn off the blender and pour the mixture out.
7. Allow the pitcher to air dry. DO NOT rinse the pitcher after sanitizing.
Cleaning the Lid, Measuring
Cap, and Tamper:
The lid, measuring cap, and tamper can all be washed with warm soapy water. Rinse all components under clean running water and dry with a clean cloth.
NOTE: The pitcher, lid, measuring cap, and tamper can also be placed on the top rack of the dishwasher for easy cleanup.
Cleaning the Motor Base
WARNING: Always unplug the motor base before cleaning. Failure to do so may result in electrical shock or possible injury and even death. DO NOT immerse the blender base in water or liquids, doing so may damage the appliance.
- Unplug the motor base.
- Use a damp clean cloth or sponge to wipe off any excess food on the base.
- Immediately dry the base with a dry clean cloth.
- If necessary, clean the switches with a moistened cotton swab to remove any buildup in the grooves of the switches.
Safety Information
IMPORTANT SAFEGUARDS
Please read, understand, and comply with all the instructions provided in this manual before using the device. Failure to comply with the instructions given in this manual and/or using the device in ways other than the ones mentioned in this manual may result in serious injury and/or damage to the product.
Safety Use & Care
- Read all instructions before using this appliance.
- Check if the local power supply voltage matches the voltage indicated on this appliance before use.
- DO NOT place any part of this appliance on or near a hot gas or electric burner, or in a heated oven.
- DO NOT let cord hang over edge of table or counter; doing so may present a tripping hazard which can result in injury or damage to the blender.
- DO NOT operate if the appliance has a damaged cord, or if the appliance itself has malfunctioned or has been damaged. Contact customer support immediately if the appliance malfunctions.
- Avoid contact with any moving parts on the appliance.
- DO NOT leave foreign objects, such as spoons, forks, knives or the measuring cap, in the pitcher as this will damage the blades and other components when operating the appliance; doing so may cause injury.
- Handle this appliance with care; the blades are sharp.
- DO NOT use attachments from other kitchen appliances on this blender; doing so may cause fire, electric shock, or injury.
- DO NOT use any objects to block the air vent at bottom of the base while the blender is operating.
- The pitcher should not be more than two-thirds full when using the tamper. DO NOT exceed 30 seconds of continuous blending while using the tamper.
- When making nut butters or oil based foods, do not process for more than one minute after the mixture starts circulating. Over-processing can cause dangerous overheating.
- DO NOT start on speeds above the ‘MED’ setting with hot liquids; escaping steam or splashes may scald and cause injury. Always start blending on low speed, then slowly increase to ‘HI.’
- CAUTION: The blender can heat room temperature liquids and ingredients up to 140°F or higher when operating for extended periods of time. Use caution when handling hot liquids.
- Make sure all controls are turned off and the blender is unplugged before putting on or taking off parts, and before cleaning.
- Never leave the appliance unattended while it is on.
- DO NOT immerse the blender base or power cord in water or other liquids, doing so may cause electric shock or injury.
- DO NOT put hands or other objects into the pitcher while the blender is operating. Keep hands and utensils out of the pitcher while blending to avoid the risk of severe injury or damage to the blender.
- If necessary, only use a rubber spatula or wooden spoon to remove food from the sides of the pitcher. Make sure to turn blender from the electrical outlet before scraping the sides of the pitcher.
- Always operate blender with the lid in place.
- DO NOT blend non-food items in the blender.
- DO NOT open the lid until the blades come to a complete stop to avoid hazard or injury.
- To extend product lifetime, it is recommended to run the blender for no more than 6 minutes when blending on the ‘HI’ setting. Allow the blender to rest for at least 10 minutes before starting your next recipe. This appliance should not be used by children ages 8 and younger or by persons with reduced physical, sensory, or mental capabilities or lack of experience and knowledge, unless they are supervised or are given instruction concerning use of this appliance in a safe way and understand the hazards involved. Children shall not play with the appliance.
- DO NOT allow children to clean or maintain the blender.
- DO NOT use outdoors.
- DO NOT attempt to remove the blade assembly on the blender for any reason. Doing so will void the warranty for this appliance.
- DO NOT attempt to use the Pro-Class Blender blade assembly on another blender.
- DO NOT remove or replace the blade assembly from another blender to your Pro-Class Blender.
- DO NOT operate the blender if the blade assembly is not properly attached.
- DO NOT fill the pitcher above the marked maximum fill line (or rated capacity) to avoid risk of injury due to damage to the cover or pitcher.
NOTE FOR PLUG:
This appliance has a polarized plug (one blade is wider than the other). To reduce the risk of a polarized outlet only one way. outlet, reverse the plug. If it still electrician. Do not modify the plug in any way.
SAVE THESE INSTRUCTIONS HOUSEHOLD USE ONLY
Troubleshooting
Automatic Overload Protection
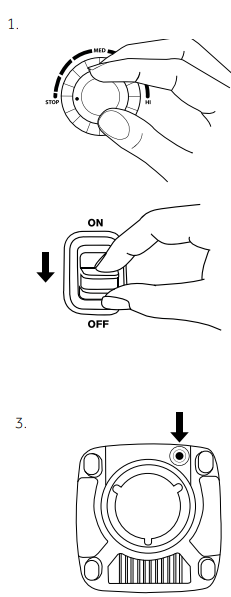
This blender is equipped with automatic overload protection to prevent the motor from overheating. If the motor suddenly shuts off while the blender is operating follow the steps below.
- Turn the Variable Speed Control to ‘STOP’, then set the On/Off switch to ‘OFF.’ Remove the pitcher and set aside.
- Unplug the blender and allow it to cool down for 5-10 minutes.
- Turn the base over to reveal the underside of the blender, then press the reset button.
General Troubleshooting
Problem | Cause | Solution |
Blender does not power on. | Power cord is not connected to a powered electrical outlet. | Connect power cord to powered electrical outlet. |
On/Off Switch the ‘ON’ position. | Turn switch to ‘ON’ position. | |
Blender stops mixingingredients, unevenly chops ingredients, On/Off Switch while operating. | Air pockets have formedin the mixture. | Use the tamper to push out any air pockets. |
| Too much food inside the pitcher. | Take out food until ingredients On/Off Switch MAX line. | |
| The motor has overheated. |
On/Off Switch blender, allow it to cool down, and press the reset button (see Automatic Overload Protection). |
| Food spillsout of pitcherwhile blending on ‘HI.’ | The lid is not secured properly or measuring cap is notplaced onto thelid. | Ensure that the lid and measuring cap are properly secured onto the pitcher.Start blending on the lowest speedsetting, then slowly increase the speed to ‘HI.’ |
| Blade assembly in pitcher is loose. | Retainer nut holding blade is loose or broken. | Discontinue use and immediately contact customer service. DO NOT attempt to |
Blender emits a strange odorwhile operating. | Motor is heating up for the | Set thevariable speed dialto low setting, then slowly turn the dial to yourdesired speed. |
| Blender continues to emit a strange odor while in operation. | Motor is starting to overheat. | Unplug theblender and allowit to cool down for 5-10 minutes. |
| Blender continuously emits a strong burningodor after multiple uses. | Blender may be brokenor defective. | Contact CustomerSupport. |
| Blender leaves a black residue on working surface after blending. |
Cosori Pro-Class Blender C700-PRO Warranty
Cosori warrants all products to be of the highest quality in material, craftsmanship and service for a minimum of 1 year, effective from the date of purchase. Under the limited warranty, Cosori will replace or refund any product found to be defective due to manufacturer flaws based on eligibility. Refunds will be issued within 30 days of the date of purchase, otherwise, Cosori will replace products determined to be defective for the remaining warranty period. T
Pros & Cons
Pros
- Powerful Motor: The 1500W motor provides high-speed blending for smooth results.
- LARGE Capacity: The 64-oz pitcher is ideal for making large batches of smoothies or soups.
- Durable Construction: BPA-free Tritan glass pitcher and stainless steel blades ensure longevity.
- Multiple Speed Settings: Offers versatility in blending different types of ingredients.
- Ergonomic Design: Easy-to-use interface with an ergonomic handle and LED display screen.
Cons
- Noice Level: Can be quite loud during operation due to its powerful motor.
- Cleaning Challenge: The blades and pitcher may require some effort to clean thoroughly.
- Weight: The blender is relatively heavy, making it less portable.
Customer Reviews
Customers have praised the Cosori Pro-Class Blender C700-PRO for its exceptional performance in handling tough ingredients like ice and frozen fruits. Many users appreciate its ease of use and the variety of speed settings available. However, some users have noted that it can be quite loud during operation and may require some effort to clean the blades and pitcher thoroughly.
Common Complaints
Some common complaints include the noise level during blending and the difficulty in cleaning certain parts. However, these issues are often outweighed by the blender's overall performance and durability.
Faqs
What is the power output of the Cosori Pro-Class?
Is the blender pitcher dishwasher safe?
How many speed settings does the Cosori offer?
What safety features does this blender include?
Can I make hot soups with this blender?
Is the blender easy to assemble and operate?
Why is my blender so loud during operation?
How do I clean the blades and pitcher effectively?
Is there any warranty available for this product?
Can I use this blender for commercial purposes?
Leave a Comment