
Setup: D-Link DCS-5000L Wi-Fi Pan & Tilt Camera User Manual
Content
d-link DCS-5000L Wi-Fi Pan & Tilt Camera
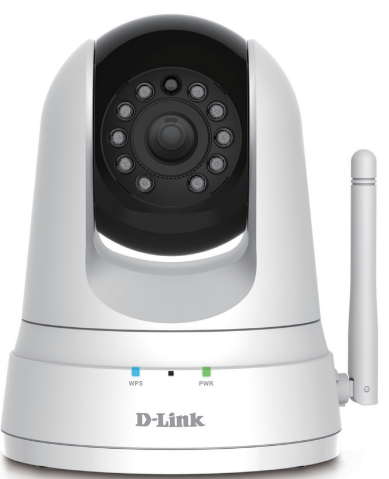
Introduction
The d-link DCS-5000L Wi-Fi Pan & Tilt Camera is a versatile indoor surveillance solution designed for home and small office security. Featuring a pan and tilt mechanism, it allows full coverage of wide areas, enabling users to remotely control the camera’s view to monitor multiple zones with ease. It's built-in infrared night vision ensures reliable 24/7 surveillance even in complete darkness, making it ideal for round-the-clock security.
This camera benefits from Wireless N technology, offering enhanced range, speed, and reliability over Wi-Fi networks without the need for additional cabling. The integration with the mydlink™ platform and mobile apps for iOS and Android enables seamless remote access, live video streaming, and motion detection alerts from anywhere with internet connectivity.
Targeted at homeowners, small business owners, and users seeking affordable yet robust security monitoring, the DCS-5000L supports flexible placement and easy setup. It is suitable for monitoring entrances, living rooms, offices, or small retail spaces. The camera typically falls within the affordable price range of approximately $70 to $100, widely available through online retailers and authorized resellers.
Technical Specifications and Key Features of the d-link DCS-5000L Wi-Fi Pan & Tilt Camera
System Requirements
- Microsoft Windows* 10'/8/7/Vista/XP, or Mac with OS X
- PC with 1.3 GHz or above and at least 128 MB RAM
- Internet Explorer 7, Firefox 12, Safari 6, or Chrome 20ª or higher version with Java installed and enabled
Networking Protocol
- IPV4, ARP, TCP, UDP, ICMP
- DHCP Client
- NTP Client (D-Link)
- DNS Client
- DDNS Client (D-Link)
- SMTP Client
- FTP Client
- HTTP Server |
- PPPoE |
- UPnP Port Forwarding
- LLTDI
Built-In Protocol
- 10/100 BASE-TX Fast Ethernet|
- 802.11n/g/b WLAN|
Wireless Connectivity
- 802.11n/g/b Wireless with WEP/WPA/WPA2 security
- WPS
Wireless Transmit Output Power (typical)
- 802.11b - 16 dBm |
- 802.11g/802.11n - 12 dbm
Reset Button
- Reset to factory default
Video Codecs
- MJPEG|
- JPEG for still images
Video Features
- Adjustable image size and quality
- Time stamp and text overlay
- Flip and Mirror
Resolution
- 640 x 480 at up to 20 fps
- 320 x 240 at up to 30 fps
- 160 x 112 at up to 30 fps
Lens
- Focal length: 2.2 mm, F2.4
Sensor
- VGA 1/5 inch CMOS sensor
IR LED
- 8-meter illumination distance with light sensor
Minimum Illumination
- Color: 1 lux @ F2.4 (Day)|
- B/W: 0 lux @ F2.4 (Night)
Viewing Angle
- Horizontal: 57° |
- Vertical: 42°
- Diagonal: 68°
Pan/tilt range
- Pan Range: +170° ~ -170° (Total 340°)
- Tilt Range: +95° ~ -25° (Total 120°)
Digital Zoom
- Up to 4x
3A Control
- AGC (Auto Gain Control)
- AWB (Auto White Balance)
- AES (Auto Electronic Shutter)
Power
- Input: 100-240 V AC, 50/60 Hz
- Output: 5 V DC, 1.5 A
Dimensions (W x D x H)
- Camera Only: 116.4 × 109.1 x 133.6 mm (4.58 x 4.30 x 5.26 inches)
- Camera Including Mounting Bracket: 116.4 x 109.1 x 230.0 mm 4.58 x 4.30 x 9.06 inches)
Weight
- Device: 292.8 grams (0.65 lbs)
- Mounting Bracket: 60.8 grams (0.13 lbs)
Max Power Consumption
- 4.8 W
Operation Temperature
- 0°C to 40°C (32 "F to 104 *F)
Storage Temperature
- -25 °C to 70 °C (-13 'F to 158 *F)
Humidity
- 20-85% RH non-condensing
Emission (EMI), Safety & Other Certifications
- FCC|
- CE|
- C-Tick
- CE LVDI
Compared to similar entry-level Wi-Fi pan & tilt cameras in its class, the DCS-5000L offers reliable night vision range and flexible pan/tilt control, though it delivers VGA resolution rather than HD. This balance suits users prioritizing coverage and wireless convenience over high-definition video quality.
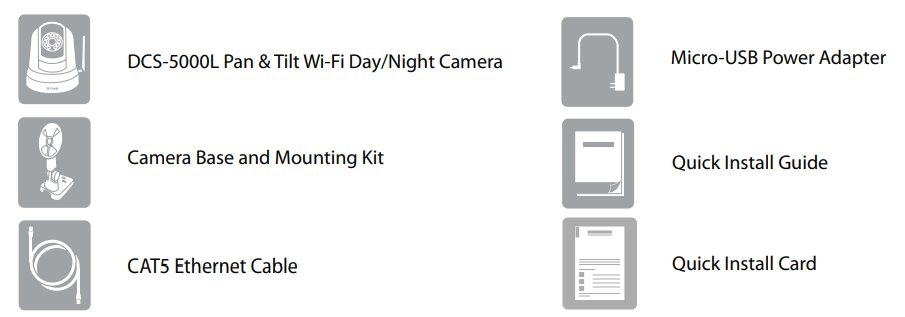
Package Contents
Features
Easy to Use and mydlink-Enabled for Easy Access and Management
- The DCS-5000L is a standalone surveillance camera that requires no special hardware or software, and can operate independently, even without a PC. This camera is also mydlink-enabled, which means you can view and manage your camera through the mydlink website, or through the mydlink mobile app for iOS and Android mobile devices.
Pan/Tilt for Wide Viewing Area
- Patrol a large area with one camera thanks to the DCS-5000L’s pan and tilt functions. You can use the web interface to manually adjust the camera lens position, or set up to 24 pre-defined preset positions, enabling you to quickly move to frequently used points of interest.
IR LEDs for Day and Night functionality
- The built-in infrared LEDs enable nighttime viewing of up to 8 meters (26 feet), giving you clear images regardless of lighting conditions.
MJPEG Codec for Smooth, Space-Efficient Video
- This camera supports the use of the MJPEG video codec, which gives you high-quality video with reduced bandwidth requirements. This means that you can enjoy smoother, more reliable video streaming over the Internet, and less disk space is required to save recordings.
Motion Triggered Notifications and Recordings
- The DCS-5000L can send email notifications with snapshots or video clips whenever motion is detected. You can customize areas of the video to monitor for motion to keep watch over specific areas of interest, and have the DCS-5000L send you an email notification or upload images to an FTP server whenever motion is detected.
802.11n/g/b Wireless or Ethernet/Fast Ethernet Support
- The DCS-5000L offers wireless 802.11n/g/b and Ethernet/Fast Ethernet connectivity, making it easy to integrate into your existing network environment. The DCS-5000L works with either a 10 Mbps Ethernet-based network or a 100 Mbps Fast Ethernet-based network for traditional wired environments, and works with 802.11n/g/b wireless routers or access points for added flexibility. The Site Survey feature also allows you to view and connect to any available wireless networks within range of the camera.
Micro-USB Powered for Convenience
- For added convenience, the DCS-5000L can be powered via any Micro-USB cable, so you don’t have to worry about looking for a matching power adapter when setting it up for use. Simply use the included or standard Micro-USB cable and plug it into any USB power adapter or powered USB port, and it’ll be powered on and ready for use.
Remote Monitoring with mydlink Lite App
- With the mydlink Lite app for mobile devices, you can easily view live streams and manage your camera from anywhere with an Internet connection.
Hardware Overview
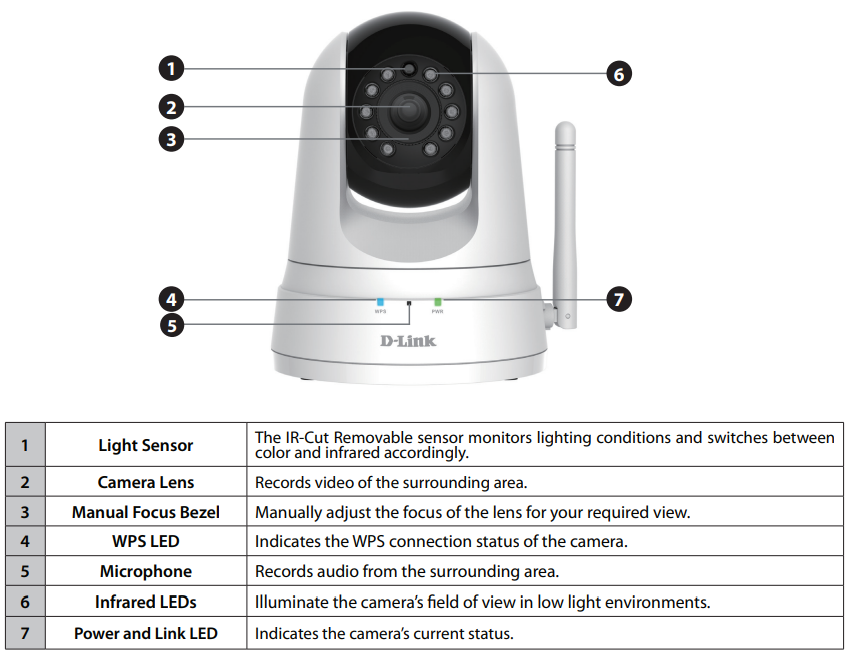
Front View
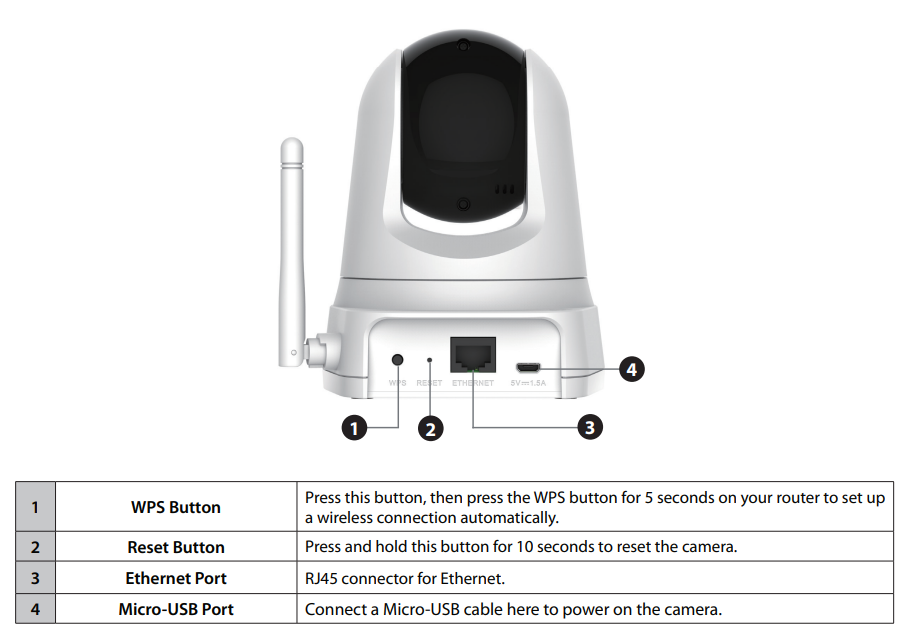
Rear View
Installation
There are three ways to set up your camera:
- Mobile App Setup: You can set up your DCS-5000L with the free mydlink Lite app. Refer to Mobile App Setup on page 13.
- Zero Configuration Setup: If you have a mydlink-enabled router (D-Link cloud router), this is the easiest way to set up your camera. Refer to Zero Configuration Setup on page 15.
- Camera Installation Wizard: If you do not have a mydlink-enabled router, use the Camera Installation Wizard to guide you through setup and initial configuration of your camera. Refer to Camera Setup Wizard on page 18.
- Manual Hardware Installation: This section shows you how to manually set up your camera;, however, in order to use the mydlink features of your camera, you will still need to run the Camera Installation Wizard. Refer to Manual Hardware Installation on page 20.
Mobile App Setup
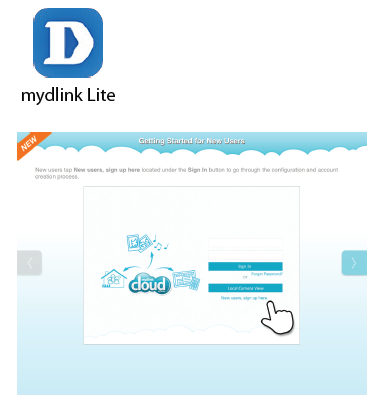
The mydlink Lite app allows you to configure your camera without a PC, and lets your camera work together with other mydlink Lite compatible devices. Search for the free mydlink Lite app on the App Store or Google Play and download it to your smartphone or tablet. You can also use a QR code reading app to scan the corresponding code for your device below.

mydlink Lite
You can monitor your camera using the mydlink Lite app either from your local network (same as the camera’s) or remotely from anywhere with an Internet connection. To use either method, follow the steps below:
To view your camera feed on a local network:
- Using your mobile, connect to the same wireless network as your camera.
- Download the mydlink Lite app using a QR code on the previous page.
- On the login page, tap Local. The app will automatically discover any D-Link cameras in your network.
- Tap the DCS-5000L icon to begin setup.
- Enter your camera’s administrator password (it will be on your Quick Install Card if you haven’t configured it). Tick the Remember Me box and tap OK. You will be taken to the Live View page of your camera.
To view your camera feed remotely:
- To enable remote monitoring, you will need to use mydlink services. Start the mydlink Lite app on your mobile device.
- If you already have an account, you can tap Sign In. If you don’t have a myd-link account and want to register for one, you can tap the New users, sign up here. Link to start the registration process.
Zero Configuration Setup
If you have a mydlink-enabled Cloud Router, you can take advantage of Zero Configuration Setup. Zero Configuration automatically configures your camera's settings,, such as Wi-Fi name/password,, rd for you, and adds the camera to your mydlink account automatically. This type of setup allows you to set up your camera by simply plugging it in and connecting it to your router.
Connect your camera to your mydlink-enabled Cloud Router, and Zero Configuration will automatically configure your DCS-5000L and add the camera to your mydlink account. After a short period of time, you will be able to remotely access your camera from the website..
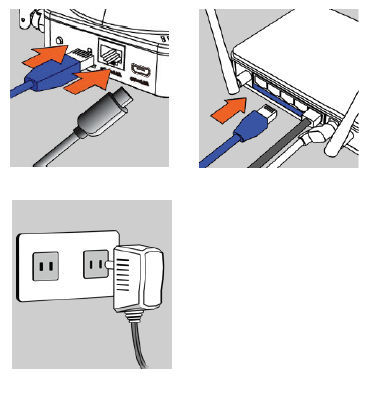
- Connect the Ethernet Cable and the Micro-USB Plug
Use the included Ethernet cable and plug it into the camera. Plug the other end into an available port on your D-Link Cloud Router. If you wish to use your camera wirelessly, you will be able to remove the cable after Zero Configuration Setup is complete. Plug one end of the included Micro-USB power adapter into the back of the camera. - Plug the Micro-USB Power Adapter into a Wall Outlet
Plug the other end of the Micro-USB power adapter into a wall outlet to power on your camera.
Check your mydlink Account.
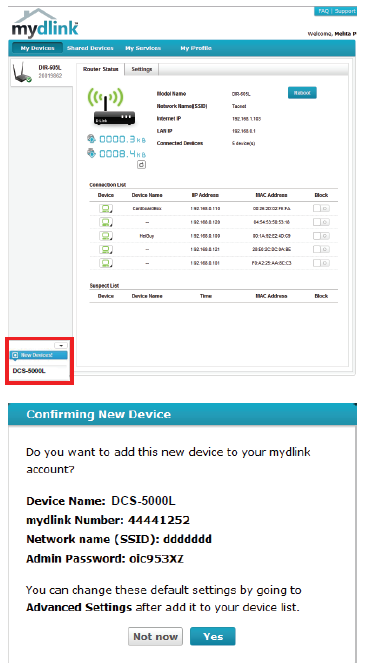
From any computer with an Internet connection, open a web browser and log in to your mydlink account. The mydlink page will check for new devices and display a New device Found! Pop-up notification in the bottom-left corner. Click the notification to continue.
A summary and confirmation notification will appear with the automatically configured details. Make a note of the details and click Yes to add the camera to your account.
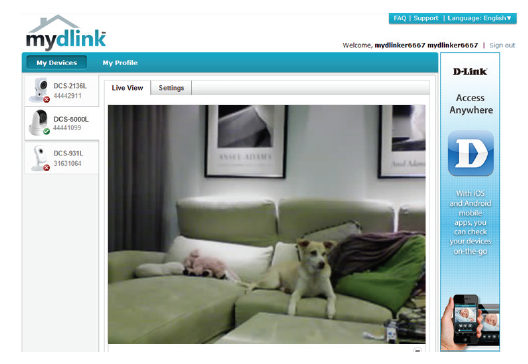
During the Zero Configuration process, you will be directed to the mydlink Live View tab for your camera, where you will see a screen similar to the following.
If you wish to connect your camera to your router wirelessly, you can simply disconnect the Ethernet cable and move the camera to its intended location; your router's wireless settings have been automatically transferred to the camera, and no further configuration is required.
Your camera is now set up, and you can skip to mydlink on page 25 to learn more about the mydlink features of this camera, or to Configuration on page 26 for advanced configuration of your camera.
Note: If the live image is blurry or out of focus, you can manually adjust the focus by rotating the manual focus bezel surrounding the camera lens.
Camera Setup Wizard
If you do not have a mydlink-enabled cloud router, you can use the Camera Setup Wizard to guide you through the process of adding your camera to the mydlink service.
Windows Users
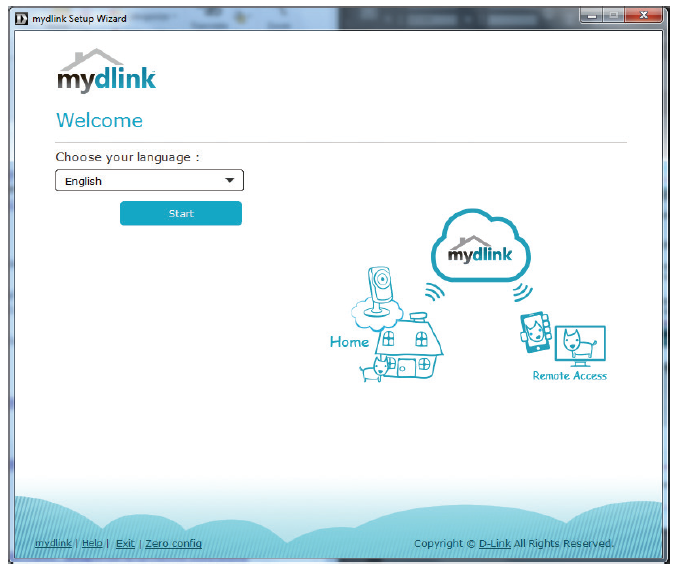
To begin the setup process to website download the Setup Wizard. Once the file has been downloaded, browse to the folder the file is in and double-click on it to start the wizard. Simply click Set up your Cloud Camera to go through the Setup Wizard, which will guide you step-by-step through the installation process from connecting your hardware to configuring your camera and registering it with your mydlink account.
Mac Users
To begin the setup process, to website download the Setup Wizard. Once the file has been downloaded, browse to the folder the file is in and double-click on the SetupWizard file to start the wizard.
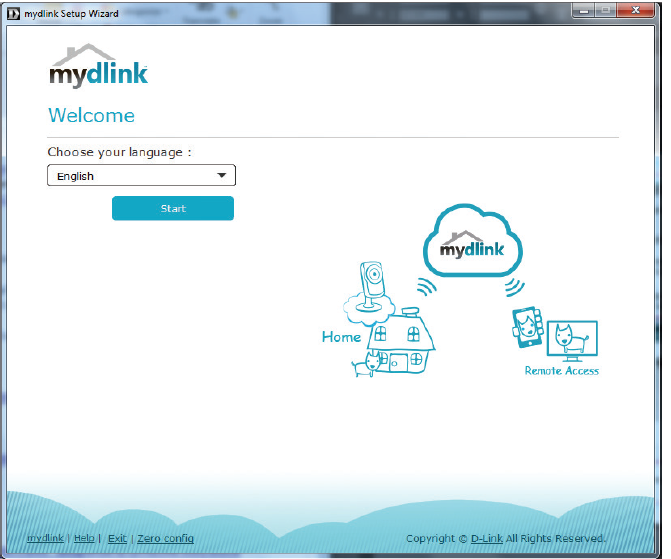
After about 20-30 seconds, the Setup Wizard will open, which will guide you step-by-step through the installation process from connecting your hardware to configuring your camera and registering it with your mydlink account.
Manual Hardware Installation
- If you wish to set up your camera without using the Camera Setup Wizard, please follow these steps.
- Note: In order to use the mydlink features of this product, you will need to go through the Camera Setup Wizard or Zero Configuration Setup.
- Connect the Ethernet Cable and the Micro-USB Plug
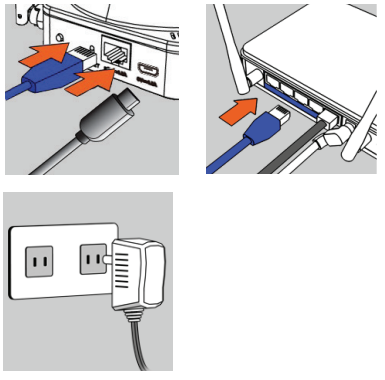
- Use the included Ethernet cable and plug it into the camera. Plug the other end into an available LAN port on your router. Plug one end of the included Micro-USB power adapter into the back of the camera.
Plug the Micro-USB Power Adapter into a Wall Outlet
- Plug the other end of the Micro-USB power adapter into a wall outlet to power on your camera.
Configure Your Camera
- Refer to Configuration on page 26 for information on how to configure your camera.
Optional: Use WPS to Connect Wirelessly
- You can use WPS to connect your camera to your network wirelessly. For more information, refer to WPS - Push Button Setup on page 22. If your router does not support WPS, you will still be able to set up your camera’s wireless settings in the camera’s web interface.
Wireless Installation Considerations
Your D-Link Wireless Network Camera lets you access your network using a wireless connection from anywhere within the operating range of your wireless network. However, the number, thickness, and location of walls, ceilings, or other objects that the wireless signals must pass through, may limit the range. Typical ranges vary depending on the types of materials and background RF (radio frequency) noise in your home or business. The key to maximizing wireless range is to follow these basic guidelines:
- Minimize the number of walls and ceilings between your adapter and other network devices (such as your Network Camera) - each wall or ceiling can reduce your adapter’s range by 1-30 meters (3-90 feet).
- Be aware of the direct line between network devices. A wall that is half a meter thick (1.5 feet), at a 45-degree angle,, appears to be almost 1 meter (3 feet) thick. At a 2-degree angle, it can appear over 14 meters (42 feet) thick. Position your devices so that the signal will travel straight through a wall or ceiling (instead of at an angle) for better reception.
- Building materials make a difference. A solid metal door or aluminum studs may weaken the wireless signal. Try to position your access points, wireless routers, and other networking devices where the signal passes through drywall or open doorways. Materials and objects such as glass, steel, metal, walls with insulation, water (fish tanks), mirrors, file cabinets, brick, and concrete will degrade your wireless signal.
- Keep your product at least or 1-2 meters (3-6 feet ) away from electrical devices or appliances that generate RF noise.
- If you are using 2.4 GHz cordless phones or other radio frequency sources (such as microwave ovens), your wireless connection may degrade dramatically or drop completely. Make sure your 2.4 GHz phone base is as far away from your wireless devices as possible. The base transmits a signal even if the phone is not in use.
WPS - Push Button Setup
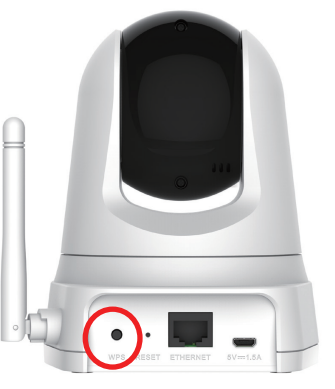
If your router supports Wi-Fi Protected Setup (WPS), you can create a secure wireless connection using the WPS Button on the back of the camera. Please note that the WPS setup only establishes a secure wireless connection, and you will still need to run the Setup Wizard to configure your camera.
To create a WPS connection:
Step 1
Make sure the camera is plugged in, then press and hold the WPS button for ten seconds. The blue WPS status LED will start blinking.
Step 2
Press the WPS button on your router within 60 seconds. The WPS button is usually on the front or side of your router. On some routers, you may need to log in to the web interface and click on an on-screen button to activate the WPS feature. If you are not sure where the WPS button is on your router, please refer to your router’s User Manual.
The DCS-5000L will automatically create a secure wireless connection to your router. While connecting, the blue LED will flash,, and your camera will reboot.
Note: You can also set up a wireless connection manually; please see Wireless Setup on page 34.
Mounting Instructions
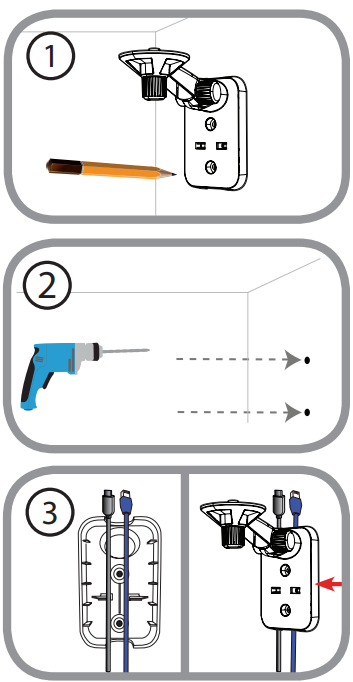
- To mount your camera on a wall or ceiling, please follow the steps below.
- It is suggested that you configure the camera before mounting.
- Place the mounting bracket where you want to position the camera and use a pencil to mark the holes.
- Use appropriate tools to drill two holes of the same diameter as the plastic anchors. After drilling the holes, insert the plastic anchors to support the screws.
- If desired, the power and Ethernet cables can be concealed behind the mounting bracket. Run the cables through the back of the mounting bracket, securing them with the built-in guides. Be sure to leave enough cable length protruding from the top to allow connection to the camera.
- Fasten the mounting bracket to the wall using the screws provided.
- Do not overtighten the screws a,,s this may crack the mounting bracket.
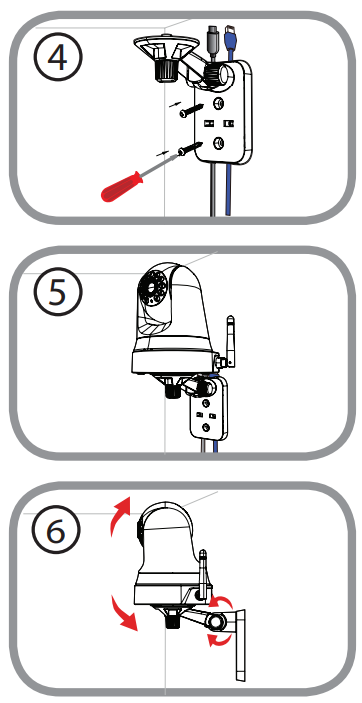
- Using the supplied thumbscrew, fasten the camera to the mounting bracket. Connect the power and Ethernet cables to the camera.
- Adjust the angle of the arm on the mounting bracket as required. Tighten the thumbscrew to lock the arm in place.
mydlink
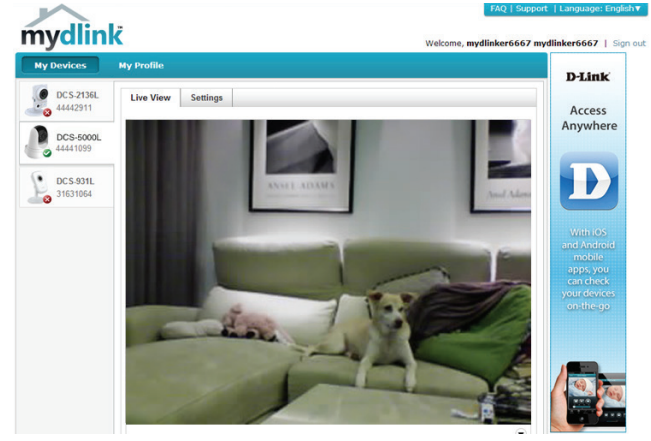
After registering your DCS-5000L camera with a mydlink account in the Camera Installation Wizard, you will be able to remotely access your camera . After signing in to your mydlink account, you will see a screen similar to the following:
Maintenance
Admin
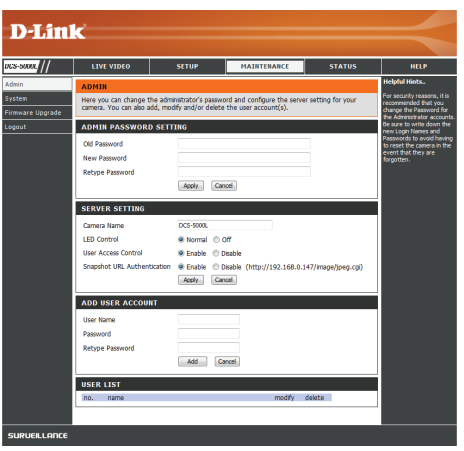
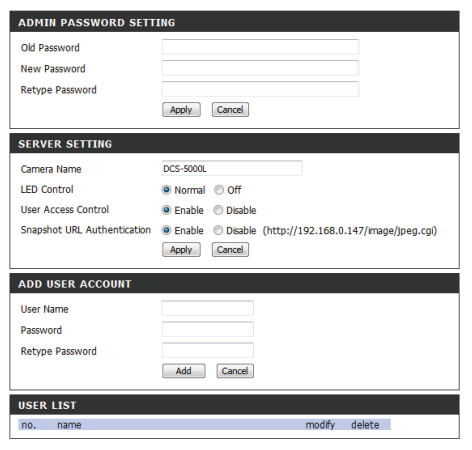
This section allows you to change the administrator’s password and configure the server settings for your camera. You can also manage the user account(s) that are allowed to access to your camera.
- Admin:: To change the admin password used to log into the web
- Password: interface, enter the old password, then enter the new password and retype it in the next text box, then click Apply.
- Camera Name: Specify a name for your camera.
LED Control: Select Normal to enable the LEDs on the front of the device, or select Off to disable the LED. Disabling the LED function may be useful if you want to make the camera less obvious.
User Access Select Enable to enable user access control or Disable to - Control: allow only the administrator account to access the camera. Snapshot URL Select Enable to allow access to the current camera
- Authentication: snapshot via the web address indicated.
Add User: You can create new users to provide viewing access for your - Account: camera video. User accounts will only be able to access the Live Video section of the web configuration interface, but cannot access any other parts or change any settings.
- To create a new user, enter a user name, password, and retype the password, then click Add. A maximum of 8 user accounts can be created.
- User List: Displays the account names of authorized users. You can modify or delete an account by clicking on its modify or delete icon.
Troubleshooting Guide for the d-link DCS-5000L Wi-Fi Pan & Tilt Camera
What is Remote Access? How do I enable it?
Remote Access allows you to access your camera from any PC connected to the Internet through a web browser. This lets you view your camera feed and manage your camera’s settings when you’re away from home.
To enable Remote Access, simply go through the Camera Installation Wizard. You can also download the wizard..
After going through the wizard, you should see “Remote Status: Enabled” on the summary page.
If you see Remote Status: Disabled, make sure that:
- The front LED on your camera is lit solid green
- Your Internet connection is working.
- Your router’s LAN & WAN connections are working properly
- Your router has UPnP enabled (if your router does not support UPnP, please refer to Appendix A)
- Your router can get a public IP address
- Your router’s firmware has been upgraded to the latest version
- You've tried rebooting your router by unplugging it, then plugging it back in
After checking the above items, you can click the Retry button to refresh the summary screen to see if Remote Access has been enabled.
What can I do if I forget the password for my camera’s web configuration interface?
If you forget your password, you will need to perform a factory reset of your camera. This process will change all your settings back to the factory defaults. It is therefore recommended that you make a record of the password for future reference.
To reset your camera, please use an unfolded paperclip to press and hold the RESET button for at least 10 seconds while your camera is plugged in.
The image on the live view is blurry or out of focus. What can I do?
You can manually adjust the focus of the lens by rotating the bezel on the front of the camera (surrounding the lens). While watching the live view, rotate the bezel until the desired level of focus is achieved.
Why don’t the LEDs light up?
The power supply might be faulty. Confirm that you are using the provided DC 12 V power supply for this network camera. Verify that the power supply is correctly connected. The WPS LED will only turn on if there is a WPS connection present; the camera may still be functioning correctly even if this LED is not lit. If the camera is functioning normally, the LEDs may have been disabled. See Admin on page 50 for information about how to enable the LEDs.
Why is the camera’s network connection unreliable?
There might be a problem with the network cable. To confirm that the cables are working, PING the address of a known device on the network. If the cabling is OK and your network is reachable, you should receive a reply similar to the following (…bytes = 32 time = 2 ms).
Another possible problem may be that the network device,, such as a hub or switch, utilized by the Network Camera is not functioning properly. Please confirm that the power for the devices is well-connected and functioning properly.
If you are using a wireless connection to connect the camera, be aware of the range limitations of the wireless N standard. Most wireless N devices have a maximum indoor range of around 70 metres (230 feet). Also be aware that obstacles such as walls, floors, doors a, nd other solid objects can affect the signal range.
Why do a series of broad vertical white lines appear throughout the image?
It could be that the image sensor has become overloaded when it has been exposed to bright light, such as direct exposure to sunlight or halogen lights. Reposition the camera into a more shaded area immediately, as prolonged exposure to bright lights will damage the sensor.
The camera is producing noisy images. How can I solve the problem?
The video images might be noisy if the camera is used in a very low-light environment. Try switching to night mode if you are consistently monitoring a low-light area.
The images are of poor quality. How can I improve the image quality?
Make sure that your computer’s display properties are set to at least 6-bit color. Using 16 or 256 colors on your computer will produce dithering artifacts in the image, making the image look as if it is of poor quality.
You may also need to check your image settings to make sure the brightness, contrast, and other settings are set properly. For more, refer to Image Setup on page 36.
Why are no images available through the Web browser?
ActiveX might be disabled. If you are viewing the images from Internet Explorer,, make sure ActiveX has been enabled in the Internet Options menu. You may also need to change the security settings on your browser to allow the ActiveX plug-in to be installed. Also, check that you have the latest version of Java installed.
If you are using Internet Explorer with a version number 6 or lower, then you will need to upgrade your Web browser software in order to view the streaming video transmitted by the Network Camera.
Pros & Cons of the d-link DCS-5000L Wi-Fi Pan & Tilt Camera
- Pros:
- Wide pan (340°) and tilt (120°) range offers comprehensive coverage of large indoor areas
- Reliable night vision up to 8 meters with an automatic IR cut filter for day/night clarity
- Wireless N connectivity allows flexible installation without network cabling
- Integrated microphone enables audio monitoring alongside video
- Easy remote access via the mydlink cloud platform and mobile app
- Affordable pricing makes it accessible for budget-conscious users
- Cons:
- Video resolution capped at VGA (640x480), lower than modern HD standards
- Digital zoom can degrade image quality compared to optical alternatives
- Limited advanced features compared to newer models (e.g., no full HD, limited frame rate)
- The setup and app interface may feel dated to some users
Overall, the D-Link DCS-5000L provides strong value for those prioritizing coverage and wireless flexibility over ultra-high resolution video. It competes well with similar budget IP cameras but lacks some modern enhancements found in newer models.
Customer Reviews of the d-link DCS-5000L Wi-Fi Pan & Tilt Camera
Users generally praise the d-link DCS-5000L Wi-Fi Pan & Tilt Camera for its simple installation, reliable pan/tilt control, and effective night vision capabilities. Common compliments highlight the convenience of wireless setup and the ability to monitor remotely via the mydlink app.
However, some customers report issues with video resolution being only VGA quality, which can limit detail when zooming in. A few mention occasional connectivity drops in environments with weak Wi-Fi signals. The motion detection feature is appreciated, but sometimes requires fine-tuning for optimal alerts.
The camera often receives a rating of around 4 out of 5 stars for balancing cost and performance. Buyers recommend it for basic home and small office surveillance,, but advise those seeking HD video to consider higher-end models.
Faqs
How do I set up the d-link DCS-5000L Wi-Fi Pan & Tilt Camera for the first time using the mydlink app?
What should I do if my d-link DCS-5000L Wi-Fi Pan & Tilt Camera is not connecting to Wi-Fi?
Can I control the pan and tilt functions of the d-link DCS-5000L Wi-Fi Pan & Tilt Camera remotely?
Why is the night vision on my d-link DCS-5000L Wi-Fi Pan & Tilt Camera blurry or hazy?
Is the d-link DCS-5000L Wi-Fi Pan & Tilt Camera compatible with cloud recording and motion detection?
How do I adjust the focus on the d-link DCS-5000L Wi-Fi Pan & Tilt Camera?
What are the recommended maintenance steps for the d-link DCS-5000L Wi-Fi Pan & Tilt Camera?
Can I use the d-link DCS-5000L Wi-Fi Pan & Tilt Camera on a wired network connection?
More d-link manuals
- Setup: D-Link 2026 EV Charging Solution Guide User Guide
- Setup: D-Link AX1500 Wi-Fi 6 AI Mesh Range Extender User Manual
- D-Link DBR-560 AX6000 Wi-Fi 6 SOHO Router User Manual
- D-Link MU-MIMO WiFi Nano USB Adapter DWA-181 User Guide
- D-Link HD Wi-Fi Spotlight Camera DCS-8627LH User Guide
- D-Link AC1900 Gigabit Wi-Fi Router DIR-1950 User Guide
Leave a Comment