Derale Performance Remote Coolers Fan 15960 User Guide
Content
Introduction
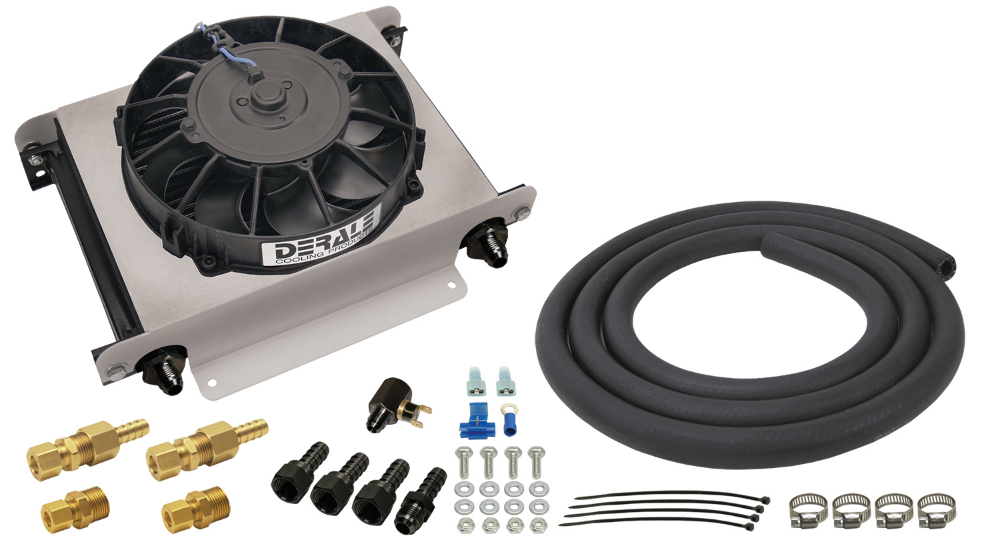
Heavy-duty and racing applications, the Derale Performance Remote Coolers Fan 15960 is a high-performance transmission cooler that offers the best cooling possible. It delivers effective heat dissipation and increased durability with a 500 CFM reversible tornado fan and a 25-row stacked plate cooler. The unit's remote mounting capability enables flexible installation in areas distant from the engine's heat. For accurate temperature control, it comes with 10 feet of high-temperature hose, -8AN inlet fittings, and an in-line thermostat that operates at 180°F. With its ability to prolong the life and boost efficiency of your engine and gearbox, the Derale 15960 is a dependable option for high-demand cooling applications.
KIT CONTENTS
| QTY. | DESCRIPTION |
|---|---|
| 1 | Oil Cooler Assembly |
| 2 | -8AN x 7/8” Male Adapter |
| 1 | -8AN Male x 1/2” Barb Fitting |
| 3 | -8AN Female x 1/2” Barb Fitting |
| 10ft | 1/2” OEM Spec Hose |
| 2 | 1/2” Compression Fitting |
| 2 | 1/2” NPT Female x 1/2” Barb Fitting |
| 1 | Thermostat Switch |
| QTY. | DESCRIPTION |
|---|---|
| 1 | In-line Thermostat Fitting |
| 4 | Hose Clamp |
| 4 | 1/4”-20 x 1” Hex Bolt |
| 8 | 1/4” Washer |
| 4 | 1/4”-20 Lock Nut |
| 4 | 6” Zip Ties |
| 1 | #10 Blue Ring Terminal |
| 2 | Blue Female Connector |
| 1 | Blue Wire Tap Connector |
TOOLS NEEDED
- Standard Screw Driver or 5/16” Nut Driver
- 7/16” Socket & Ratchet
- 15/16” Open End Wrench
- 13/16” Open End Wrench
- 3/4” Open End Wrench
- 7/8” Open End Wrench
- 1 1/8” Open End Wrench
- Thread Sealant Tape
- Razor Knife
- Marker
- Tubing Cutter
Detailed Specifications
The Derale Performance Remote Coolers Fan 15960 has a maximum airflow of 2800 CFM and a 12-inch diameter. Its S-shaped blade design lowers fan noise, and its reversible rotation makes installation simple. In order to facilitate installation and connection to your car's electrical system, the fan also comes with a wiring harness. Premium components go into making this fan, which has a long-lasting black powder-coated finish that is resistant to weathering and corrosion.
COOLER LOCATION
The purpose of a remote mount cooler is to be able to mount the cooler away from the front of the vehicle therefore not blocking airflow to the radiator/condenser. This cooler can be mounted anywhere space permits. Always keep in mind that the cooler still needs access to airflow to perform at its peak.
COOLER INSTALLATION
- Identify the two -8AN x 7/8” Male Adapters.
- Install the fittings onto the cooler with the o-ring side toward the cooler.
Note: Thread sealant is not necessary on o-ring fittings. - Using a 1 1/8” Open End Wrench, tighten fittings.
- Hold the Oil Cooler Assembly in the desired location.
- Using a marker, mark the four hole locations.
- Using a drill and 9/32” drill bit, drill the four mounting holes.
- Identify the 1/4”-20 x 1” Bolts, 1/4” Washers & 1/4” Lock Nuts supplied and attach the Oil Cooler Assembly.
IN-LINE THERMOSTAT INSTALLATION
Mounting Location
The recommended location for the In-line Thermostat Fitting is on the INLET side of the oil cooler, so the oil line that provides the cooler fluid from the transmission.
Warning: Always use two wrenches when tightening the In-line Thermostat Fitting to the oil cooler; failure to use a back up wrench could cause damage to the cooler core.
There are two options for installing the In-Line Thermostat.
Cooler inlet installation (See Diagram #2)

The In-line Thermostat Fitting is provided with a -8AN male and female threads.
- Attach the In-line Thermostat Fitting onto the INLET fitting on the oil cooler.
- Install thermostat switch into the adapter fitting, we recommend using a small dab of liquid thread sealer. DO NOT USE thread sealant tape or dielectric grease as they block heat transfer. TIGHTEN THE SENSOR BY HAND ONLY. Overtightening with any tools may break the sensor and WILL VOID THE WARRANTY.
Hose installation (See Diagram #3)
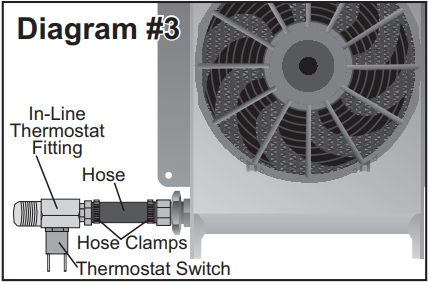
The kit provides two brass fittings that are only used with this option. They are designed to adapt the AN fittings to hose barbs.
- Using the -8AN Male x 1/2” Barb Fitting provided, attach the fitting to the female side of the In-line Thermostat Fitting.
- Using the -8AN Female x 1/2” Hose Barb Fitting provided, attach the fitting to the Male Adapter now installed on the cooler.
- Using the OEM Spec Hose and Hose Clamps provided, cut the hose to the desired length and attach one end of the hose to the oil cooler inlet and the other to the In-line Thermostat.
- Install thermostat switch into the adapter fitting, we recommend using a small dab of liquid thread sealer. DO NOT USE thread sealant tape or dielectric grease as they block heat transfer.
TIGHTEN THE SENSOR BY HAND ONLY. Overtightening with any tools may break the sensor and WILL VOID THE WARRANTY.
IN-LINE THERMOSTAT SWITCH WIRING
(See Diagram #4)
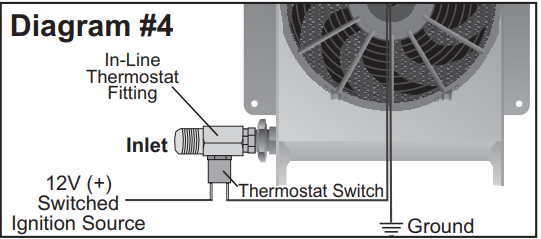
Specifications
- Electric Fan rating: 4.8 Amps
- Thermostat Switch: Maximum of 15 continuous Amps
- Using the supplied #10 Blue Ring Terminal, attach the Negative (-) wire on the Electric Fan to a good chassis Ground (-).
- Using the Blue Female Connector supplied, attach the Positive (+) wire on the Electric Fan to EITHER terminal on the Thermostat Switch.
- Using the Blue Female Connector and the Blue Wire Tap Connector supplied, attach the remaining Thermostat Switch terminal to a 12V Positive (+) Switched Ignition source.
Warning: If this wire is connected directly to the vehicle's battery the Electric Fan will run after the vehicle has been shut off.
Description
High-performance electric fans like the Derale Performance Remote Coolers Fan 15960 are ideal for street and racing use. To provide optimal airflow and cooling capacity, the fan boasts a sophisticated blade design and a robust motor. The fan is simple to install and has a reverse rotating capability that makes it useful for many different applications. In order to facilitate installation and connection to your car's electrical system, the fan also comes with a wiring harness. The fan has a long-lasting black powder-coated finish that is resistant to weathering and corrosion, guaranteeing dependability and performance.
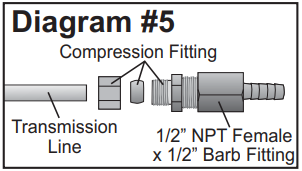
CONNECTING COOLER TO TRANSMISSION
IMPORTANT: This kit includes two fitting options to attach the cooler to the transmission cooler lines. This will allow hose to be connected to the transmission cooler line without having to flare factory line. 1/2” Compression Fittings - Designed to install onto all 1/2” Diameter transmission lines.
PRIMARY COOLING
Transmission (See Diagram #5 & 6)
- Disconnect the factory transmission lines and plug the factory transmission line fittings on the radiator. (If Applicable)
- Using a tubing cutter, cut the transmission lines to length in the desired location.
- Determine which diameter transmission lines are on the vehicle. Using a tape measure, measure the outside of the transmission line from one side to the other.
- For 1/2” lines, identify the two 1/2” Compression Fittings and two 1/2” Female NPT x 1/2” Barb Fittings.
- Using Thread Sealant Tape, attach the 1/2” Female NPT x 1/2” Barb Fittings onto the Compression Fittings & tighten.
Install the Compression Fittings onto the cooler lines and tighten. (See Diagram #5)
Cooler (See Diagram #6)- Identify the two -8AN Female x 1/2” Barb Fittings.
- Install the fittings onto the cooler/In-line Thermostat Fitting and tighten.
Note: No thread sealant is necessary for AN fittings. - Using the Hose and Hose Clamps supplied, slide one Hose Clamp over each end of the Hose.
- Using a dab of oil, lubricate each end of the hose and install onto the cooler fittings forming a loop with the hose.
Secure in place using the Hose Clamps.
Routing Hoses (See Diagram #6)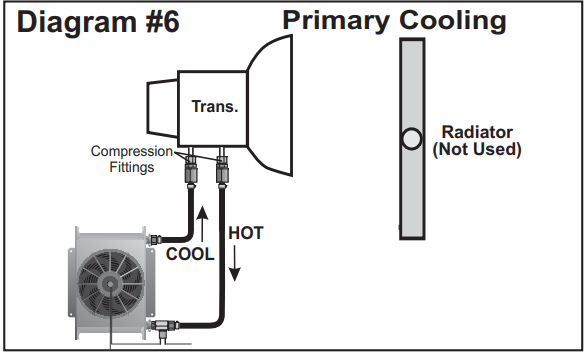
- Using the Zip Ties supplied, carefully route the looped hose now attached to the cooler toward the Compression Fittings.
Warning: When routing hoses, be sure to keep all hoses away from sharp edges, moving parts and hot engine components. Hoses should be routed carefully and should not be bent in less than a 3” radius. Important: A kinked hose will restrict flow and could cause transmission failure. - Using a supplied Hose Clamp, cut hose to desired length & attach the Inlet hose on the cooler to the feed line on the transmission.
Using a supplied Hose Clamp, cut hose to desired length and attach the remaining hose on the cooler to the return line on the transmission.
Setup Guide
Use these procedures to install the Derale Performance Remote Coolers Fan 15960:
- To avoid unintentional short circuits, disconnect the negative battery cable.
- Take off the radiator's current fan and fan shroud.
- Using the accompanying mounting gear, attach the fan to the radiator.
- Attach the fan wiring harness to the electrical system of the car.
- To make sure the fan is operating correctly, test it.
SYSTEM CHECK
- Start the vehicle and quickly check all connections for leaks.
- With the vehicle in neutral, check the transmission fluid level. Add fluid as needed.
- Drive vehicle making sure transmission is warm, then recheck fluid level.
Warning: Installation of accessories should only be undertaken by those with mechanical knowledge and are familiar with working on vehicles. Always use eye protection (goggles, safety glasses or shield). Park the vehicle in a well lit area, on level ground and apply the parking brake. Only work on a cold vehicle that has been sitting overnight, failure to do so will result in severe burns and injury. Before starting the vehicle, make sure no tools or any other items are left under hood that could interfere with or be drawn into moving parts of the engine. Failure to follow instructions can lead to severe damage and personal injury.
Troubleshooting
If the fan isn't functioning correctly, make sure to look at these:
- Verify the fan's connection to the electrical system.
- Examine the fan circuit's fuse.
- Examine the fan motor for wear or damage.
- Verify that there are no obstructions or damages to the fan blades.
Derale Performance Remote Coolers Fan 15960 Pros & Cons
Pros
- High-performance electric fan with maximum airflow and cooling power
- Reversible rotation for easy installation
- Durable black powder-coated finish that resists corrosion and weathering
- Wiring harness for easy installation and connection to the electrical system
Cons
- May be too powerful for some applications
- May be difficult to install for some users
Faqs
What kind of fan is part of the Derale Performance Remote Coolers Fan 15960 package?
How does the Derale utilize cooling technology?
What do the -8AN inlet fittings serve as?
What comes with the kit for the Derale?
Is it possible to mount the Derale Performance Remotely?
What is the Derale Performance Remote Coolers Fan 15960 operating pressure and burst strength?
What is the warranty of the fan?
What kind of materials goes into making the Derale?
What is the operation of the 180°F in-line Derale Performance Remote Coolers Fan 15960?
How is the cooling performance improved by the stacked plate design?
Leave a Comment