Dji Drone Mavic Air 2 User Manual | Specs & Features
Content
Introduction
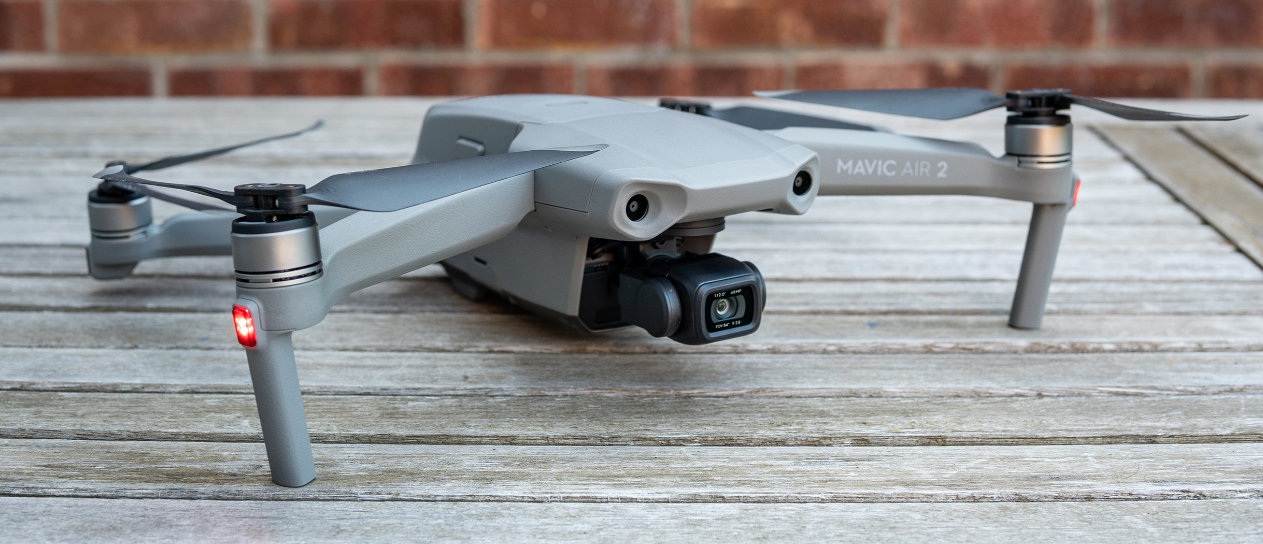
DJI Drone Mavic Air 2 features both an Infrared Sensing System and Forward, Backward, Upward, and Downward Vision Systems, allowing for hovering and flying indoors as well as outdoors and for automatic Return to Home. The aircraft has a maximum flight speed of 42 mph (68.4 kph) and a maximum flight time of 31 minutes. The remote controller displays the video transmission from the aircraft to DJI Fly on a mobile device and the aircraft and camera are easy to control using the onboard buttons. The maximum runtime of the remote controller is six hours. The cost of the DJI Mavic Air 2 is $608.97.
Aircraft Diagram
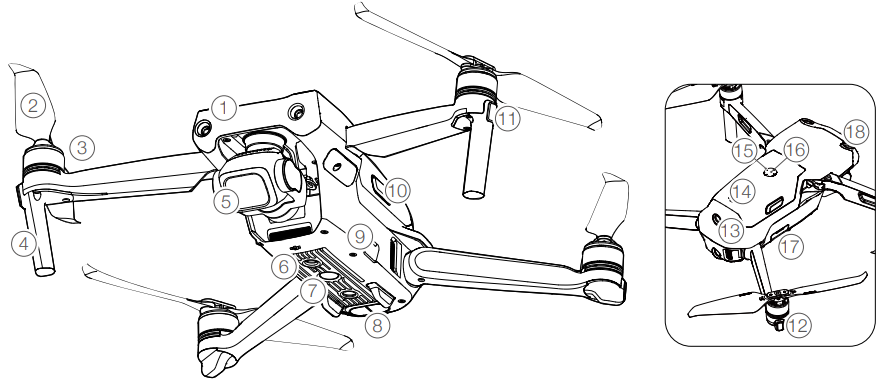
- Forward Vision System
- Propellers
- Motors
- Landing Gears (Built-in antennas)
- Gimbal and Camera
- Downward Vision System
- Auxiliary Bottom Light
- Infrared Sensing System
- USB-C Port
- Battery Buckles
- Front LEDs
- Aircraft Status Indicators
- Backward Vision System
- Intelligent Flight Battery
- Battery Level LEDs
- Power Button
- microSD Card Slot
- Upward Vision System
Remote Controller Diagram
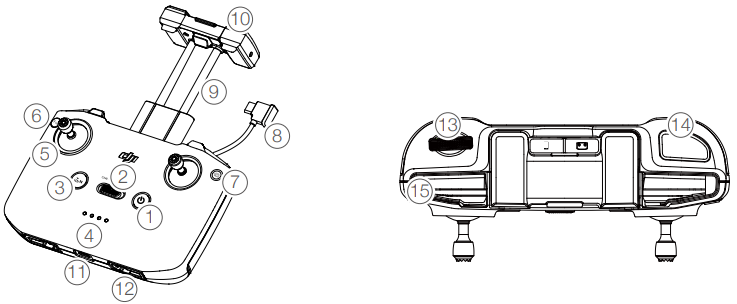
- Power Button
Press once to check the current battery level. Press once, then again, and hold to power the remote controller on or off. - Flight Mode Switch
Switch between Sport mode, Normal mode, and Cine mode. - Flight Pause/Return to Home (RTH) Button
Press once to make the aircraft brake and hover in place (only when GNSS or Vision Systems are available). Press and hold the button to initiate RTH. The aircraft returns to the last recorded Home Point. Press again to cancel RTH. - Battery Level LEDs
Displays the current battery level of the remote controller. - Control Sticks
Use the control sticks to control the aircraft movements. Set the flight control mode in DJI Fly. The control sticks are removable and easy to store. - Customizable Button
Press once to turn the Auxiliary Bottom Light on or off. Press twice to recenter the gimbal or tilt the gimbal downward (default settings). The button can be set in DJI Fly. - Photo/Video Toggle
Press once to switch between photo and video mode. - Remote Controller Cable
Connect to a mobile device for video linking via the remote controller cable. Select the cable according to the mobile device. - Mobile Device Holder
Used to securely mount the mobile device to the remote controller. - Antennas
Relay aircraft control and video wireless signals. - USB-C Port
For charging and connecting the remote controller to the computer. - Control Sticks Storage Slot
For storing the control sticks. - Gimbal Dial
Controls the tilt of the camera. Press and hold the customizable button to use the gimbal dial to adjust the zoom in video mode. - Shutter/Record Button
Press once to take photos or start or stop recording. - Mobile Device Slot
Used to secure the mobile device.
Activating DJI Air 2S
DJI Air 2S requires activation before using it for the first time. After powering on the aircraft and remote controller, follow the on-screen instructions to activate DJI Air 2S using DJI Fly. An internet connection is required for activation.
Specifications
Aircraft |
|
Takeoff Weight | 595 g |
Dimensions(L×W×H) | Folded: 180×97×77 mm Unfolded: 183×253×77 mm |
Diagonal Distance | 302 mm |
Max Ascent Speed | 6 m/s(S Mode) 6 m/s (N Mode) |
Max DescentSpeed | 6 m/s (S Mode) 6 m/s (N Mode) |
Max Speed (near sea level, no wind) | 19 m/s (S Mode) 15m/s (N Mode) 5 m/s (C Mode) |
Max Service Ceiling Above Sea Level | 5,000 m |
Max Flight Time | 31 min (measured while flying at 19.4 kph in windless conditions) |
Max Hover Time (without wind) | 30 min |
Max Flight Distance | 18.5 km |
Max Wind Speed Resistance | 10.7 m/s (Scale 5) |
Max Tilt Angle | 35° (S Mode) Front: 30°, Back: 20°,Left: 35°, Right:35° (N Mode) |
Max Angular Velocity | 250°/s (S Mode) 90°/s (N Mode) 60°/s (C Mode) |
Operating Temperature | 32° to 104° F (0° to 40° C) |
GNSS | GPS+GLONASS+GALILEO |
Operating Frequency | 2.400-2.4835 GHz, 5.725-5.850 GHz |
Transmitter Power (EIRP) | 2.400-2.4835 GHz: < 30 dBm (FCC),<20 dBm (CE/SRRC/MIC) 5.725-5.850 GHz: < 30 dBm (FCC),<14 dBm (CE),<29 dBm (SRRC) |
Hovering Accuracy Range | Vertical: ±0.1 m (withVision Positioning), ±0.5 m (withGNSS Positioning) Horizontal: ±0.1 m (withVision Positioning), ±1.5 m (withGNSS Positioning) |
Internal Storage | 8 GB (7.2 GB of available storage) |
Gimbal |
|
Mechanical Range | Tilt: -135° to +45° Roll: -45° to +45° Pan: -100°to +100° |
Controllable Range | Tilt: -90° to 0° (default setting), -90° to +24°(extended setting) |
Stabilization | 3-axis (tilt, roll, pan) |
Max Control Speed(tilt) | 100°/s |
Angular Vibration Range | ±0.01° |
| Sensing System |
|
| Forward | Precision Measurement Range: 0.38-23.8 m Effective Sensing Speed: ≤15 m/s FOV: 72° (horizontal), 58° (vertical) |
| Backward | Precision Measurement Range: 0.37-23.4 m Effective Sensing Speed: ≤12 m/s FOV: 57° (horizontal), 44° (vertical) |
| Upward | Precision Measurement Range: 0.34-28.6 m Effective Sensing Speed: ≤12 m/s FOV: 63° (horizontal), 78° (vertical) |
| Downward | Infrared Sensor Measurement Range: 0.1-8 m Hovering Range: 0.5-30 m Vision Sensor Hovering Range: 0.5-60 m |
| Operating Environment | Non-reflective, discernible surfaces with diffuse reflectivity of >20%; Adequate lighting of lux >15 |
| Camera |
|
| Sensor | 1-inch CMOS Effective Pixels: 20MP |
| Lens | FOV: 88° 35 mm Format Equivalent: 22 mm Aperture: f/2.8 Shooting Range:0.6 m to ∞ |
| ISO | Video: 100-3200 (Auto), 100-6400 (Manual) Video-10bit: 100-800 (Auto), 100-1600 (Manual) Photo: 100-3200 (Auto), 100-12800 (Manual) |
| Electronic Shutter Speed | 1/8000-8s |
| Max Image Size | 20MP (5472×3648, 3:2; 5472×3078, 16:9) |
| Still Photography Modes | Single: 20MP Burst: 20MP Automatic Exposure Bracketing (AEB): 20MP, 3/5 Frames at 0.7EV Step Timed: 20MP 2/3/5/7/10/15/20/30/60 seconds SmartPhoto: 20MP HDR Panorama: Vertical (3×1): approx. 3328×8000 pixels (W×H) Wide (3×3): approx. 8000×6144 pixels (W×H) 180° Panorama (3×7): approx. 8192×3500 pixels (W×H) Sphere (3×8+1): approx. 8192×4096 pixels (W×H) |
| VideoResolution | 5.4K: 5472×3078 24/25/30fps 4K UltraHD: 3840×2160 24/25/30/48/50/60fps 2.7K: 2688×1512 24/25/30/48/50/60fps FHD: 1920×1080 24/25/30/48/50/60/120fps |
| Max VideoBitrate | 150 Mbps |
| Supported File System | FAT32 exFAT (recommend) |
| Photo Format | JPEG/DNG (RAW) |
| VideoFormat | MP4/MOV (H.264/MPEG-4 AVC, H.265/HEVC) |
|
|
| Digital Zoom | 4K 24/25/30fps – 4x 2.7K 24/25/30fps – 6x 1080p 24/25/30fps – 8x 2.7K 48/50/60fps – 4x 1080p 48/50/60fps – 6x Note: Digital zoom is not available when recording in D-log, HLG, or slow motion at 120fps. |
| Remote Controller |
|
| Operating Frequency | 2.400-2.4835 GHz,5.725-5.850 GHz |
| Remote Controller Transmission System | OcuSync 2.0 |
Max Transmission Distance (unobstructed, free of interference) | 12 km (FCC) 8 km (CE/SRRC/MIC) |
| Operating Temperature | 32° to 104° F (0° to 40° C) |
| Transmitter Power (EIRP) | 2.400-2.4835 GHz: < 26 dBm (FCC),<20 dBm (CE/SRRC/MIC) 5.725-5.850 GHz: < 26 dBm (FCC/SRRC), <14 dBm (CE) |
| Battery Capacity | 5200 mAh |
| Operating Current/Voltage | 1200 [email protected] V (with Android device) 700 [email protected] V (with iOS device) |
| Max Supported Mobile Device Size (H×W×T) | 180×86×10 mm |
| Supported USB Port Types | Lightning, Micro USB (Type-B), USB-C |
| Video Transmission System |
|
| Video Transmission System | O3 |
| Live View Quality | 1080p@30fps |
Max Transmission Distance (unobstructed, free of interference) | 12 km (FCC) 8 km (CE/SRRC/MIC) |
| Video Coding Format | H.265/H.264 |
| MaxBitrate | 16 Mbps |
Latency (depending on environmental conditionsand mobile device) |
120-130 ms |
| Charger |
|
| Input | 100-240V, 50/60Hz, 1.3 A |
| Output | Battery: 13.2V 2.82 A USB:5V/2A |
| RatedPower | 38 W |
| Intelligent Flight Battery |
|
| Battery Capacity | 3500 mAh |
| Voltage | 11.55 V |
| MaxCharging Voltage | 13.2 V |
| Battery Type | LiPo 3S |
| Energy | 40.42 Wh |
| Weight | 198 g |
Charging Temperature | 41° to 104° F (5° to 40° C) |
Max Charging Power | 38 W |
App |
|
App | DJI Fly |
Required Operating System | iOS v11.0 or later; Android v6.0or later |
SD Cards |
|
Supported SD Cards | UHS-I Speed Grade3 rating microSDcard |
Recommended microSD Cards | SanDisk Extreme PRO64GB V30 A2 microSDXC SanDisk High Endurance 64GB V30 microSDXC SanDisk Extreme 64GB V30 A2 microSDXC SanDisk Extreme 128GB V30 A2 microSDXC SanDisk Extreme 256GB V30 A2 microSDXC Lexar 667x 64GB V30 A2 microSDXC Lexar High-Endurance 64GB V30 microSDXC Samsung EVO 64GB microSDXC Samsung EVO Plus 64GBmicroSDXC Samsung EVO Plus 256GB microSDXC Kingston 128GB V30 microSDXC Netac 256GB A1 microSDXC |
Feature Highlights
- Intelligent Flight Modes:
With ActiveTrack 4.0, Spotlight 2.0, and Point of Interest 3.0, the aircraft follows or flies around a subject automatically while sensing obstacles in its path. The user can focus on operating the aircraft while the Advanced Pilot Assistance System 4.0 enables the aircraft to avoid obstacles. - Advanced Shooting Modes:
Capture complicated shots effortlessly with features such as MasterShots, Hyperlapse, and QuickShots. With just a few taps, the aircraft will take off to record according to the preset path and generate a professional standard video automatically. - Gimbal and Camera:
DJI Air 2S uses a 1-inch CMOS sensor camera, which can shoot 20MP photos and 5.4K 30 fps, 4K 60fps, and 1080p120 fps video. 10-bit D-Log video is also supported, making it easier for users to adjust colors during editing. - Video Transmission:
DJI Air 2S boasts four built-in antennas and DJI’s long-range transmission O3 (OCUSYNCTM 3.0) technology, offering a maximum transmission range of 12 km and video quality of up to 1080p from the aircraft to the DJI Fly app on a mobile device. The remote controller works at both 2.4 and 5.8 GHz and is capable of selecting the best transmission channel automatically without latency.
Warning
- Maximum flight time was tested in an environment with no wind while flying at a consistent 12 mph (19.4 kph), and the maximum flight speed was tested at sea level altitude with no wind. These values are for reference only.
- The remote controller reaches its maximum transmission distance (FCC) in a wide-open area with no electromagnetic interference at an altitude of about 400 ft (120 m). The maximum transmission distance refers to the maximum distance that the aircraft can still send and receive transmissions. It does not refer to the maximum distance the aircraft can fly in a single flight. The maximum runtime was tested in a laboratory environment and without charging the mobile device. This value is for reference only.
- 5.8 GHz is not supported in some regions. Observe local laws and regulations.
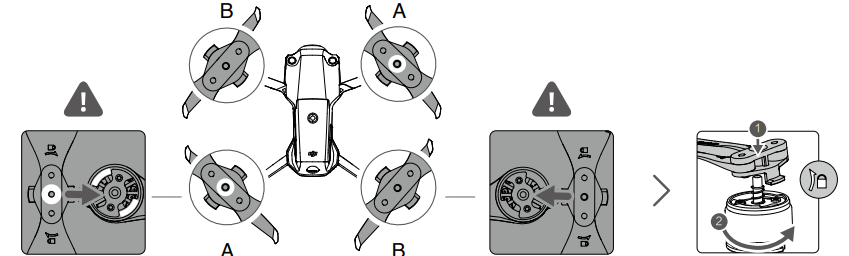
Preparing the Aircraft
All aircraft arms are folded before packaging. Follow these steps to unfold the aircraft:
- Remove the gimbal protector from the camera.
Unfold the front arms, and then unfold the rear arms.

- Note: Attach the gimbal protector when not in use.
Attach the propellers with marks to the motors with marks. Press the propeller down onto the motors and turn until it is secure. Attach the other propellers to the unmarked motors. Unfold all the propeller blades.
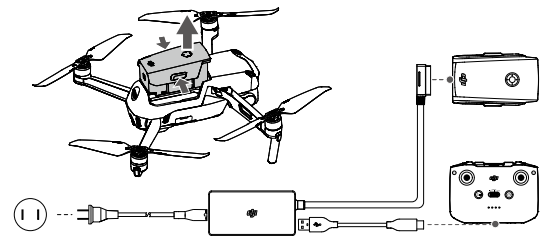
All Intelligent Flight Batteries are in hibernation mode before delivery to ensure safety. Use the provided charger to charge and activate the Intelligent Flight Batteries for the first time. It takes approximately 1 hour and 35 minutes to fully charge an Intelligent Flight Battery.
Warning:
Unfold the front arms before unfolding the rear arms. Make sure the gimbal protector is removed and all arms are unfolded before powering on the aircraft. Otherwise, it may affect the aircraft self-diagnostics.
Preparing the Remote Controller
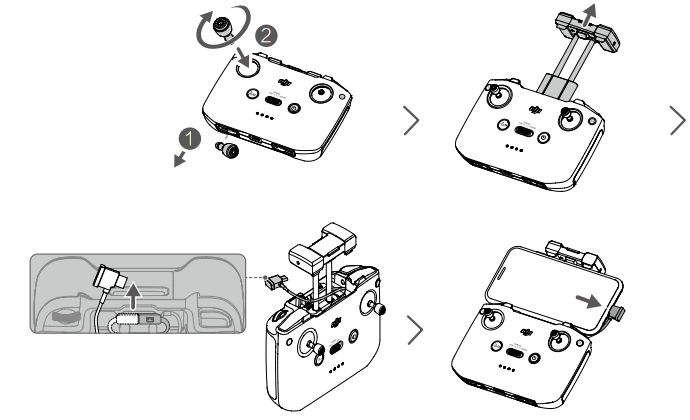
- Remove the control sticks from their storage slots on the remote controller and screw them into place.
- Pull out the mobile device holder. Choose an appropriate remote controller cable based on the type of mobile device. A Lightning connector cable, Micro USB cable, and USB-C cable are included in the packaging. Connect the end of the cable with the phone icon to your mobile device. Make sure the mobile device is secured.
Warning:
If a USB connection prompt appears when using an Android mobile device, select the option to charge only. Otherwise, it may fail to connect.
Remote Controller
Remote Controller Profile
Built into the remote controller is DJI’s long-range transmission technology OcuSync 2.0, offering a maximum transmission range of 12 km and displaying video from the aircraft to DJI Fly on a mobile device at up to 1080p. The aircraft and camera are easy to control using the onboard buttons, and the detachable control sticks make the remote controller easier to store.
In a wide-open area with no electromagnetic interference, the aircraft uses O3, and the remote controller uses OcuSync 2.0 to smoothly transmit video links at up to 1080p, no matter the change in flight attitude. The remote controller works at both 2.4 GHz and 5.8 GHz, automatically selecting the best transmission channel. The transmission system reduces the latency to 120-130 ms by improving the camera performance through its video decoding algorithm and the wireless link.
The built-in battery has a capacity of 5200 mAh and a maximum run time of 6 hours. The remote controller charges the mobile device with a charging ability of 500 mA@5V. The remote controller automatically charges Android devices. For iOS devices, first make sure that charging is enabled in DJI Fly. Charging for iOS devices is disabled by default and needs to be enabled each time the remote controller is powered on.
Compliance Version: The remote controller is compliant with local regulations.
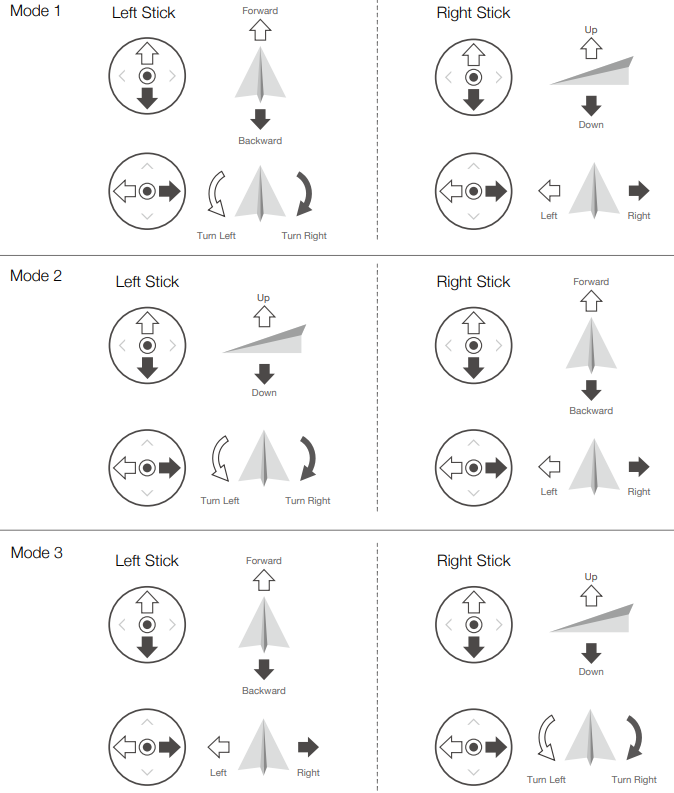
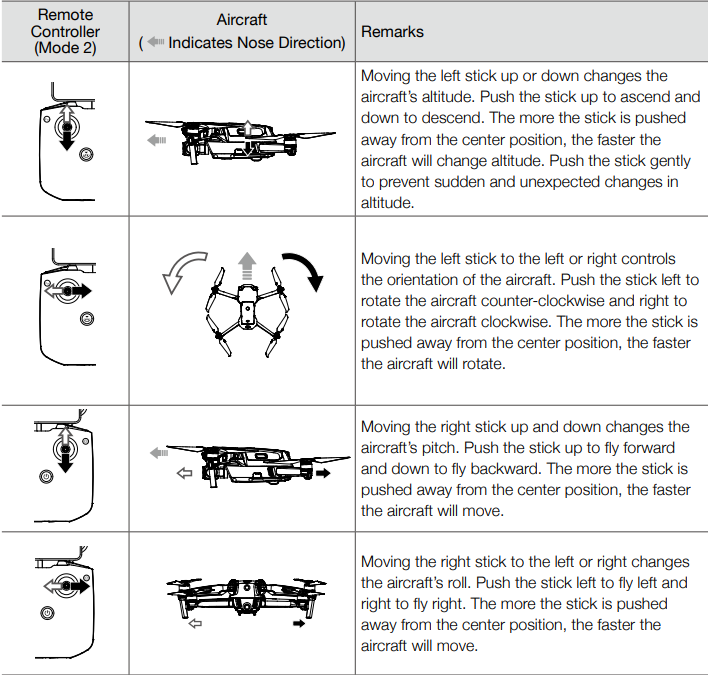
Control Stick Mode: The control stick mode determines the function of each control stick movement. Three pre-programmed modes (Mode 1, Mode 2, and Mode 3) are available, and custom modes can be configured in DJI Fly. The default mode is Mode 2.
Using the Remote Controller
Powering On/Off
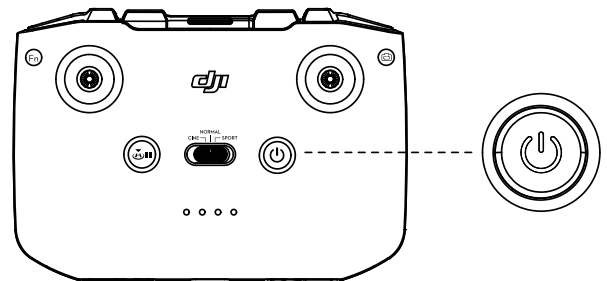
Press the power button once to check the current battery level. Press once, then again, and hold to power the remote controller on or off. If the battery level is too low, recharge before use.
Charging the Battery
Use a USB-C cable to connect an AC power charger to the USB-C port of the remote controller. It takes approximately four hours to fully charge the remote controller.

Controlling the Gimbal and Camera
- Shutter/Record Button: Press once to take a photo or to start or stop recording.
- Photo/Video Toggle: Press once to switch between photo and video mode.
- Gimbal Dial: Use to control the tilt of the gimbal.
- Press and hold the customizable button to use the gimbal dial to adjust the zoom in video mode.

Controlling the Aircraft
The control sticks control the aircraft’s orientation (pan), forward/backward movement (pitch), altitude (throttle), and left/right movement (roll). The control stick mode determines the function of each control stick movement. Three pre-programmed modes (Mode 1, Mode 2, and Mode 3) are available, and custom modes can be configured in DJI Fly. The default mode is Mode 2.
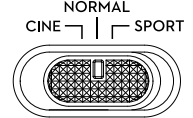
Flight Mode Switch
Toggle the switch to select the flight mode.
Position | Flight Mode |
Sport | Sport Mode |
Normal | Normal Mode |
Cine | Cine Mode |
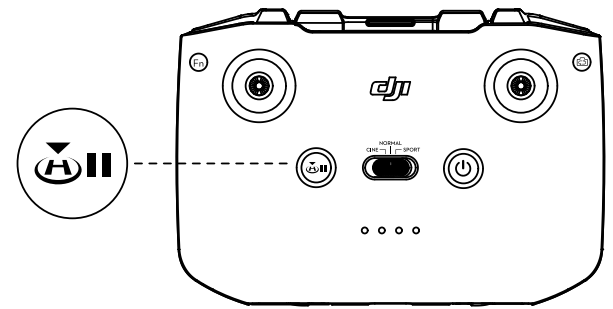
Flight Pause/RTH Button
Press once to make the aircraft brake and hover in place. If the aircraft is performing MasterShots, QuickShots, Smart RTH, or auto-landing, press once to exit the procedure and then brake. Press and hold the RTH button until the remote controller beeps to start RTH. Press this button again to cancel RTH and regain control of the aircraft. Refer to the Return to Home section for more information about RTH.
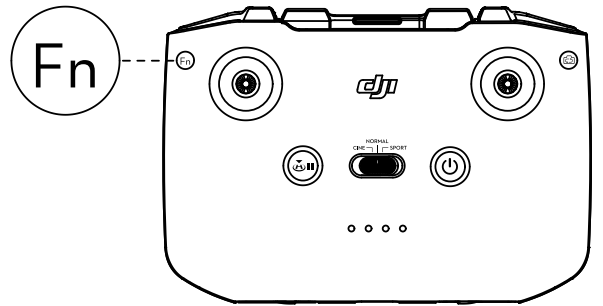
Customizable Button
Go to System Settings in DJI Fly and select Control to customize the function of the button. Functions include recentering the gimbal, switching the auxiliary LED, and toggling the map and live view.
Remote Controller Alert
The remote controller sounds an alert during RTH or when the battery level is low (6% to 15%). The low battery alert level can be canceled by pressing the power button. The critical battery level alert (less than 5%), however, cannot be canceled.
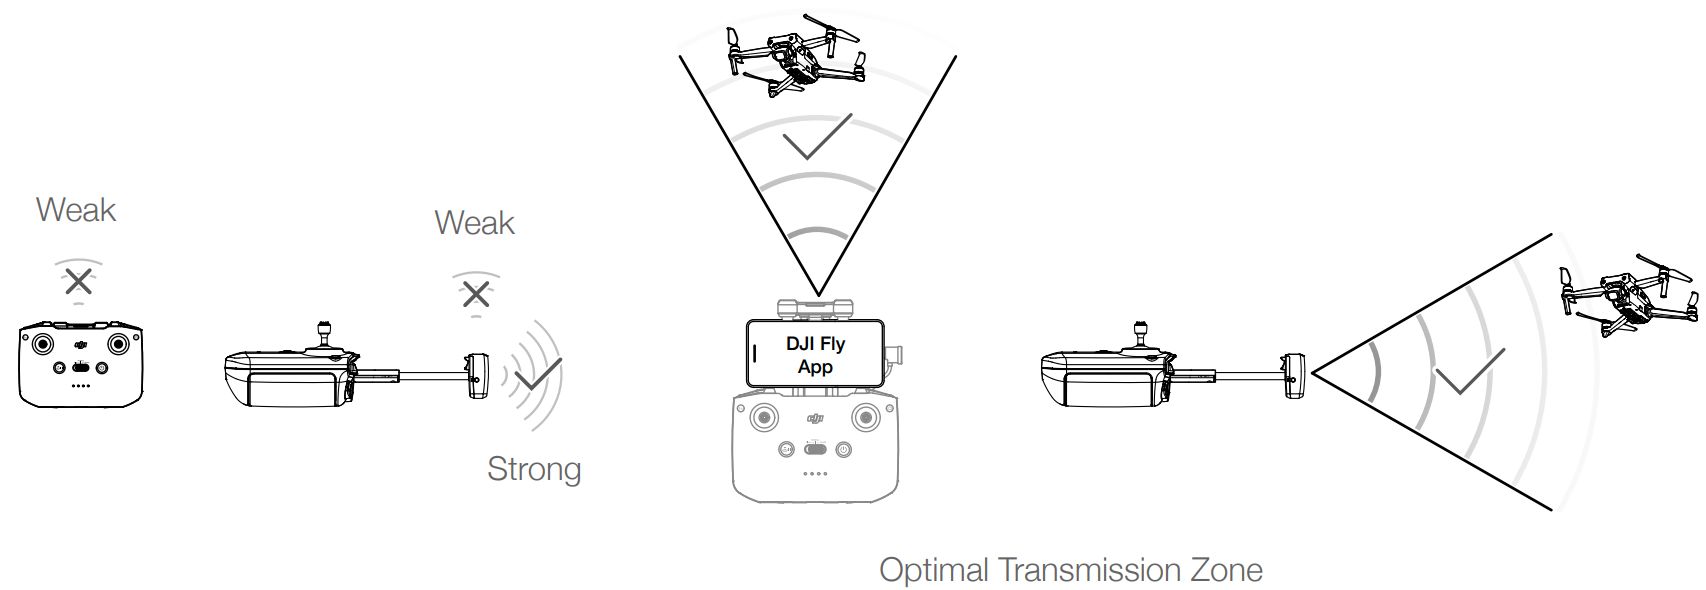
Optimal Transmission Zone
The signal between the aircraft and the remote controller is most reliable when the antennas are positioned in relation to the aircraft as depicted below.
Linking the Remote Controller
The aircraft and remote controller must be linked before use. Follow these steps to link a new remote controller:
- Power on the remote controller and the aircraft.
- Launch DJI Fly.
- In camera view, tap
 and select Control and then select Pair to Aircraft (Link).
 - Press and hold the power button of the aircraft for more than four seconds. The aircraft will beep once, indicating it is ready to link. The aircraft beeps twice, indicating the linking is successful. The battery level LEDs of the remote controller will glow solid.
TIP: Make sure the remote controller is within 0.5 meters of the aircraft during linking. The remote controller will automatically unlink from the aircraft if a new remote controller is linked to the same aircraft.
WARNING
- Fully charge the remote controller before each flight. The remote controller sounds an alert when the battery level is low.
- If the remote controller is powered on and not in use for five minutes, an alert will sound. After six minutes, the aircraft automatically powers off. Move the control sticks or press any button to cancel the alert.
- Adjust the mobile device holder to ensure the mobile device is secure.
- Fully charge the battery at least once every three months to maintain battery health.
Description
The DJI Mavic Air 2 combines powerful performance with a compact, portable design. Its camera system allows for capturing high-quality photos and videos, while the obstacle sensing system ensures safe flight operations. The drone also features DJI's Hyperlapse mode, allowing users to capture stunning time-lapse videos. The Mavic Air 2 supports both Wi-Fi and OcuSync 2.0 transmission, providing a stable and reliable connection between the drone and the remote controller.
The drone's design includes foldable arms, making it easy to store and transport. It also comes with a newly designed remote controller that offers an improved user experience. The Mavic Air 2 is compatible with DJI's Fly app, which provides additional features such as real-time video editing and sharing capabilities.
DJI Drone Mavic Air 2 Flight
Once pre-flight preparation is complete, it is recommended to practice flying safely and improve your flight skills. Ensure that all flights take place in an open area. Refer to the Remote Controller and DJI Fly sections for information on how to use the remote controller and the app to control the aircraft.
Flight Environment Requirements
- Do not use the aircraft in severe weather conditions, including wind speeds exceeding 10.7 m/s, snow, rain, and fog.
- Only fly in open areas. Tall and large metal structures may affect the accuracy of the onboard compass and GNSS system. It is recommended to keep the aircraft at least 5 meters away from such structures.
- Avoid obstacles, crowds, high-voltage power lines, trees, and bodies of water. Keep the aircraft at least 3 meters above water.
- Minimize interference by avoiding areas with high levels of electromagnetism, such as locations near power lines, base stations, electrical substations, and broadcasting towers.
- Aircraft and battery performance are subject to environmental factors such as air density and temperature. Be cautious when flying 10,464 feet (5,000 meters) or more above sea level, as battery and aircraft performance may be reduced.
- The aircraft cannot use GNSS within the polar regions. Use the Downward Vision System when flying in such areas.
- If taking off from a moving surface, such as a boat or vehicle, fly with caution.
Flight Limits and GEO Zones
Unmanned aerial vehicle (UAV) operators must adhere to the regulations set by self-regulatory organizations such as the International Civil Aviation Organization, the Federal Aviation Administration, and local aviation authorities. For safety reasons, flight limits are enabled by default to help users operate the aircraft safely and legally. Users can set flight limits on height and distance.
Altitude limits, distance limits, and GEO zones function concurrently to manage flight safety when GNSS is available. Only altitude can be limited when GNSS is unavailable.
Flight Altitude and Distance Limits
The flight altitude and distance limits can be adjusted in DJI Fly. Based on these settings, the aircraft will fly in a restricted cylinder, as illustrated below.
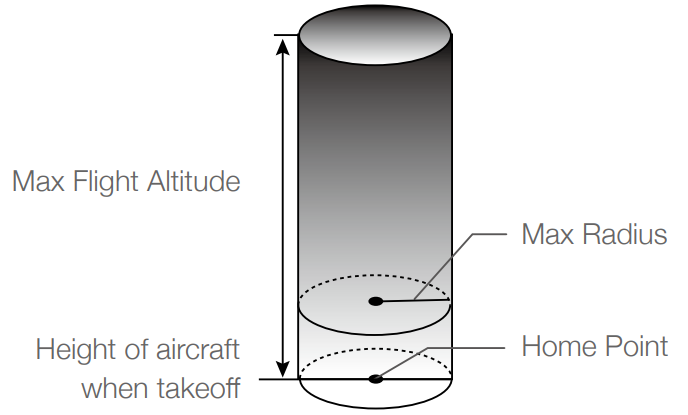
When GNSS is available
Only the Downward Vision System is available
WARNING:
The altitude limit will not be restricted when the GNSS signal weakens if there was a strong GNSS signal when the aircraft was powered on. If the aircraft reaches a limit, you can still control it, but you cannot fly it any further. If the aircraft flies out of the maximum radius, it will automatically fly back within range when the GNSS signal strengthens. For safety, avoid flying near airports, highways, railway stations, city centers, or other sensitive areas. Always keep the aircraft within your line of sight.
GEO Zones
All GEO zones are listed on the DJI official website at http://www.dji.com/flysafe. GEO zones are divided into categories, including airports, flying fields for low-altitude manned aircraft, international borders, and sensitive locations such as power plants. There will be prompts in the DJI Fly app when flying near GEO zones.
Pre-Flight Checklist
- Ensure the remote controller, mobile device, and Intelligent Flight Battery are fully charged.
- Make sure the Intelligent Flight Battery and the propellers are securely mounted.
- Ensure the aircraft arms are unfolded.
- Verify that the gimbal and camera are functioning normally.
- Check that the motors are unobstructed and functioning properly.
- Ensure that DJI Fly is successfully connected to the aircraft.
- Clean the camera lens and Vision System sensors.
- Use only genuine DJI parts or parts certified by DJI. Unauthorized parts may cause malfunctions and compromise safety.
Auto Takeoff/Landing
Auto Takeoff
Use auto takeoff when the aircraft status indicator blinks green.
- Launch DJI Fly and enter the camera view.
- Complete all steps in the pre-flight checklist.
- Tap
 the auto takeoff icon. If conditions are safe for takeoff, press and hold the button to confirm.
 - The aircraft will take off and hover 1.2 meters above the ground.
Auto Landing
To use auto landing:
- Tap
 the auto landing icon. If conditions are safe to land, press and hold the button to confirm.
 - Auto landing can be canceled by tapping
 cancel icon.
 - If the Vision System is working normally, Landing Protection will be enabled.
- The motors will stop after landing.
Starting/Stopping the Motors
Starting the Motors
A Combination Stick Command (CSC) is used to start the motors. Push both sticks to the bottom inner or outer corners to start the motors. Once the motors begin spinning, release both sticks simultaneously.

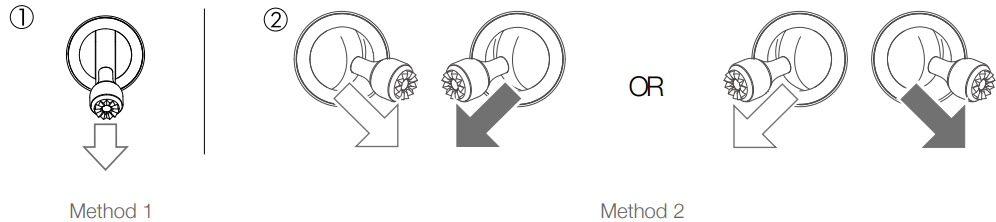
Stopping the Motors
There are two methods to stop the motors:
- Method 1: After the aircraft has landed, push and hold the left stick down. The motors will stop after three seconds.
- Method 2: After the aircraft has landed, push the left stick down and perform the same CSC (Combination Stick Command) that was used to start the motors. The motors will stop immediately. Release both sticks once the motors have stopped.
Stopping the Motors Mid-Flight
Stopping the motors mid-flight will cause the aircraft to crash. The motors should only be stopped mid-flight in emergency situations, such as after a collision or if the aircraft is out of control (e.g., rapidly ascending or descending, rolling in the air, or if a motor has stalled). To stop the motors mid-flight, use the same CSC that was used to start the motors. The default setting can be changed in DJI Fly.
Flight Test
Takeoff/Landing Procedures
- Place the aircraft in an open, flat area with the aircraft status indicator facing towards you.
- Turn on the aircraft and the remote controller.
- Launch DJI Fly and enter the camera view.
- Wait until the aircraft status indicators blink green, indicating that the Home Point has been recorded and it is now safe to fly.
- Gently push the throttle stick to take off or use auto-takeoff.
- Pull the throttle stick or use auto-landing to land the aircraft.
- After landing, push the throttle stick down and hold. The motors will stop after three seconds.
- Turn off the aircraft and remote controller.
Video Suggestions and Tips
- The pre-flight checklist is designed to help you fly safely and ensure that you can shoot video during flight. Always go through the full pre-flight checklist before each flight.
- Select the desired gimbal operation mode in DJI Fly.
- Use Normal or Cine mode to record video.
- DO NOT fly in bad weather conditions such as rain or strong wind.
- Choose the camera settings that best suit your needs.
- Perform flight tests to establish flight routes and preview scenes.
WARNING: Ensure the aircraft is placed on a flat and steady surface before takeoff. DO NOT take off from your palm or while holding the aircraft with your hand.
It is important to understand basic flight guidelines for your safety and the safety of those around you. DO NOT forget to read the disclaimer and safety guidelines. You can update the aircraft firmware using either DJI Fly or DJI Assistant 2 (Consumer Drones Series).
Setup Guide
- To set up your DJI Mavic Air 2, start by unfolding the arms and ensuring all propellers are securely attached.
- Next, charge the battery and remote controller according to the provided instructions.
- Download and install the DJI Fly app on your smartphone or tablet. Follow the in-app instructions to pair the drone with your remote controller and complete any necessary firmware updates.
- Once paired, you can configure various settings such as flight modes (e.g., Sport Mode, Tripod Mode) and enable features like obstacle sensing and tracking.
- Always ensure you are flying in an open area free from obstacles and follow local aviation regulations.
Using DJI Fly
When you connect the aircraft or remote controller to DJI Fly, you will receive a notification if a new firmware update is available. To update:
- Connect your mobile device to the internet.
- Follow the on-screen instructions to start updating.
Note: You cannot update the firmware if the remote controller is not linked to the aircraft. An internet connection is required.
Using DJI Assistant 2 (Consumer Drones Series)
You can also update the firmware separately for the aircraft and the remote controller using DJI Assistant 2 (Consumer Drones Series).
Updating the Aircraft Firmware
- Launch DJI Assistant 2 (Consumer Drones Series) and log in with your DJI account.
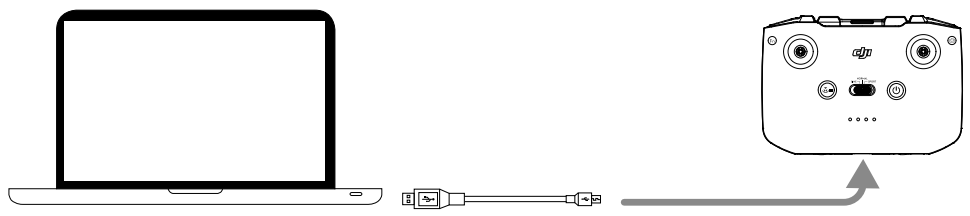
Power on the aircraft and connect it to a computer via the USB-C port.
_dji_drone_mavic_air_2.png)
- Select DJI Air 2S and click on Firmware Updates on the left panel.
- Choose the firmware version to update.
- Wait for the firmware to download; the update will start automatically.
- The aircraft will reboot once the update is complete.
Updating the Remote Controller Firmware
- Launch DJI Assistant 2 (Consumer Drones Series) and log in with your DJI account.
Power on the remote controller and connect it to the computer via a USB-C port using a Micro USB cable.
- Select DJI Air 2S Remote Controller and click on Firmware Updates on the left panel.
- Choose the firmware version to update.
- Wait for the firmware to download; the update will start automatically.
- The firmware update will be completed after a short time.
WARNING:
- Follow all steps precisely to avoid update failure.
- The firmware update process takes approximately 10 minutes. It is normal for the gimbal to go limp, the aircraft status indicators to blink, and the aircraft to reboot. Wait patiently until the update is complete.
- Ensure the computer is connected to the internet.
- Before starting the update, ensure that the Intelligent Flight Battery is at least 40% charged and the remote controller is at least 30% charged.
- Do not disconnect the aircraft from the computer during the update.
After-Sales Information
Visit https://www.dji.com/support to learn more about after-sales service policies, repair services, and support.
Troubleshooting
- If you encounter issues during flight, such as loss of signal or decreased performance, check your surroundings for potential interference sources like other drones or electronic devices.
- Ensure that your drone and remote controller are fully charged and that all software is up-to-date.
- Common problems include faulty propellers or gimbal misalignment.
- Always inspect your drone before each flight and refer to the user manual for troubleshooting steps. It's also crucial to follow safety guidelines to avoid accidents.
Pros & Cons
Pros
- High-Quality Camera: Excellent image and video quality.
- Long Flight Time: Up to 34 minutes of continuous flight.
- Advanced Safety Features: Obstacle sensing and ActiveTrack 3.0.
- Portable Design: Foldable arms for easy transport.
- Robust Construction: Durable materials and build quality.
Cons
- Cost: Pricier than some entry-level drones.
- Complexity: May require some time to master all features.
- Weight Limitations: Limited payload capacity for attachments.
- No Waterproofing: Not designed for use in wet conditions.
Customer Reviews
Customers have praised the Mavic Air 2 for its exceptional camera performance and extended flight times. Many users appreciate the drone's ease of use and robust build quality. However, some have noted that the price is slightly higher than expected for a mid-range model. A common complaint is the lack of waterproofing, which limits its use in certain weather conditions. Despite this, the overall consensus is that the Mavic Air 2 offers outstanding value for those looking to capture high-quality aerial footage.
Faqs
What is the maximum flight time of the DJI Mavic Air 2?
Does the Mavic Air 2 support 4K video recording?
What type of camera sensor does the Mavic Air 2 use?
How do I update the firmware on my Mavic Air 2?
What is ActiveTrack 3.0 on the Mavic Air 2?
Can I use the Mavic Air 2 for night flying?
How do I pair the Mavic Air 2 with my remote controller?
What are some common issues with the Mavic Air 2?
Is there a beginner mode for new users?
Leave a Comment