Dji N3 Flight Remote Controller User Manual | Specifications
Content
DJI N3 Flight Remote Controller Introduction
The N3 is a third-generation NAZATM flight control system designed for serious multi-rotor enthusiasts. It is a reliable and robust system with double IMUs and can be expanded with external high-performance sensors. It uses advanced control algorithms and sensor fusion algorithms to maintain the complete stability and integrity of the aerial system.
The N3 is fully compatible with the DJITM Onboard and Mobile SDKs and other DJI products, allowing developers to optimize the system for specific applications. When used with DJI Lightbridge 2, it provides direct access to DJI GO features including Intelligent Flight Modes.
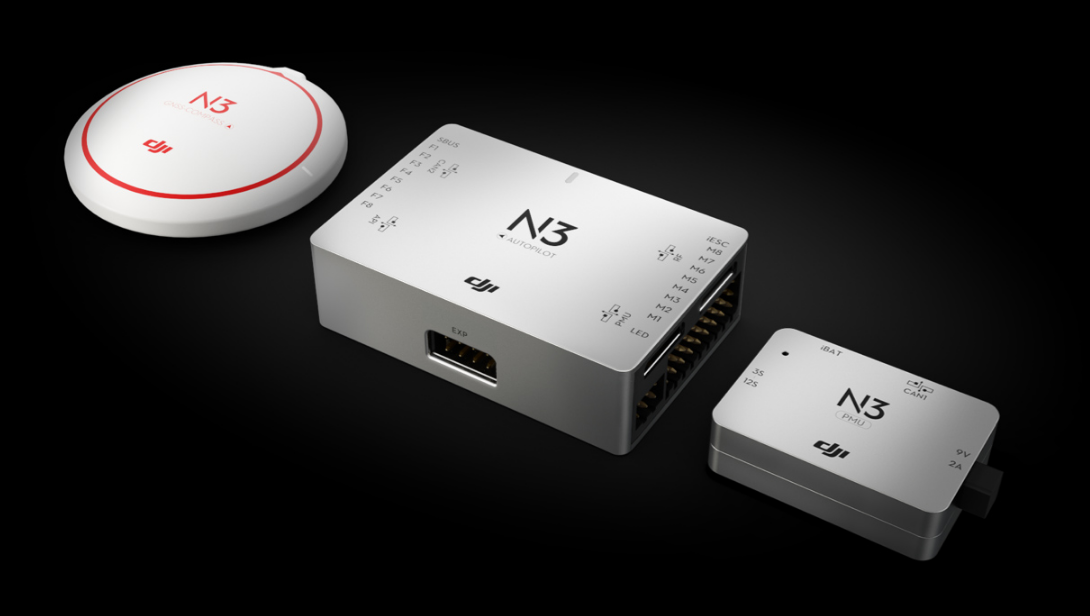
With all essential components integrated into the N3 flight controller (including double IMUs, barometer and data recorder), the device is powerful and highly compact to work together with the GNSS-Compass module (including GPS and GLONASS), PMU module and LED module.
The DJI N3 Flight Remote Controller is priced at $589.26, making it a valuable tool for aerial professionals.
Specifications
Built-in Functions | ||
Flight Modes | P-mode (Positioning) | |
A-mode (Attitude) | ||
S-mode (Sport) | ||
Manual mode | ||
Return-to-Home Modes | Smart RTH | |
Low voltage RTH | ||
Failsafe RTH | ||
Safety Features | Failsafe mode | |
Low battery voltage warning | ||
Custom flight altitude and radius limits | ||
No Fly Zones | ||
Motor redundancy (for6 and 8 rotor platforms) | ||
Motor overload detection | ||
Multi modular redundancy (with the A3 upgrade kit) | ||
DJI GO App (DJI Lightbridge 2 required) | Beginner mode | |
Auto takeoff andlanding | ||
Wireless flight controller configuration | ||
Flight dataOSD(built-in data recorder) | ||
Intelligent Flight Modes | Course Lock* | |
Home Lock* | ||
Point of Interest (POI) | ||
Waypoints | ||
SupportedDJI Equipment | DJI aerial platforms (e.g. S900, S1000, S1000+) | |
DJIgimbal systems (e.g. Zenmuse X3 / X5 / X5R/ XT /Z15 A7 / GH4 / 5D Ⅲ / BMPCC) | ||
DJI Intelligent Landing Gear | ||
DJI iOSD Mark II, DJI iOSDmini | ||
Peripheral | |
Supported Airframes | 4-rotor: I4, X4 6-rotor: I6, V6, Y6, IY6 8-rotor: X8, I8, V8, IX8 |
Supported ESC output | 400 Hz refresh frequency |
Supported Receivers | DJI Lightbridge 2 DJI DR16 S-Bus |
Recommended Batteries | 3S-12S LiPo battery |
RequiredOperation System | Windows 7, 8 or 10 (32 or 64 bit) Mac OS X 10.9 or later |
SDK | Mobile SDK Onboard SDK |
Onboard SDK Ports | API, CAN2* |
Expansion Ports | F1-F4 portsfor output F5-F8 portsfor I/O* |
Electrical &Mechanical | |
Rated Power | 3.3 W |
Rated Peak Power | 5 W |
Input Voltage Range | 10.5 – 52 V |
Static Electricity | AD: ±8 kV CD: ±4 kV |
Operating Temperature | 14° to 131° F (-10°to 55° C) |
Weight |
Flight Controller: 46 g GNSS-Compass: 37 g LED Module: 13 g PMU: 33 g |
Dimensions | Flight Controller: 58.1 mm × 39 mm × 17.05mm GNSS-Compass: 50 mm (diameter) × 12.2 mm LED Module: 25 mm × 25 mm × 6.3 mm PMU: 40 mm × 28.5mm × 11.2 mm |
Optimized Flight Performance (Subjectto airframe type and payload,most parameters can be configured in Assistant 2.) | |
Hovering Accuracy (In P-Mode) | Vertical: ± 0.5 m Horizontal: ± 1.5 m |
Max Wind Resistance | 10 m/s |
Max Yaw Angular Velocity | 150°/s |
Max Pitch Angle | 45 (Default 35°) |
Max Ascent Velocity | 5 m/s |
Max Descent Velocity | 4 m/s |
System Components
How the System Works
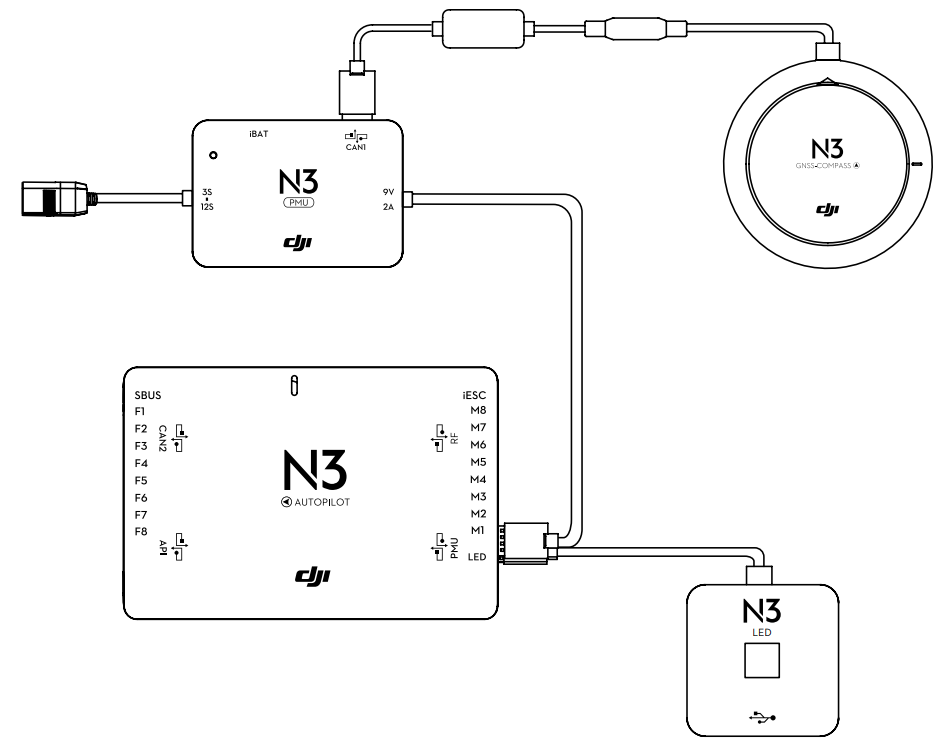
The flight controller is the core module of the N3 flight control system, utilizing the IMU, barometer, GNSS, and compass to achieve accurate attitude control and high-precision positioning for the aircraft. It provides multiple interfaces for SDK development and DJI devices, such as the Zenmuse Z15 gimbals. The DJI Assistant 2 software allows for parameter configuration for installation, flight control, and other accessed devices. A simulator is also available for simulated flight practice. When used with the DJI Lightbridge 2, the N3 has direct access to features in the DJI GO app, such as Intelligent Flight Modes.
N3 and N3 Pro Parts
Flight Controller
Feature Highlights
- Independent CAN1 and CAN2 Ports and API Serial Port
The CAN1 port is used to connect the GNSS-Compass and DJI devices, while the CAN2 port is used to connect SDK devices. - Built-in Inertial Sensors
These sensors measure the aircraft's attitude, while the built-in pressure sensor detects the aircraft's altitude. - Support for Multiple Receiver Types
If used with the DJI Lightbridge 2, the N3 has direct access to features in the DJI GO app, such as Intelligent Flight Modes. - M1 to M8 Connections
These are used to connect the ESCs of the aircraft and iESC for DJI Intelligent ESC communication. - Independent and Configurable Output and I/O Ports
The 4 independent and configurable output ports and 4 I/O ports can be customized to connect to other DJI devices (e.g., DJI Zenmuse Z15 gimbals, DJI Intelligent Landing Gear) or SDK devices.
Port Diagram
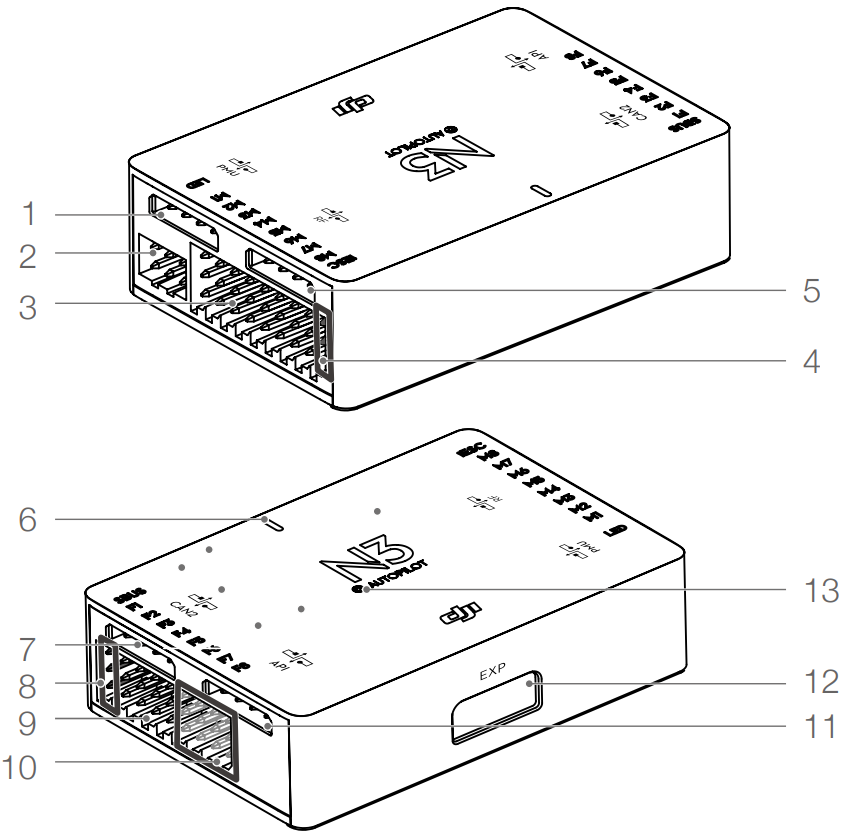
Flight Controller Ports and Indicators
- iESC Port
Communicates with the DJI Smart ESC using the Smart ESC Communication Cable. - RF Port
Communicates with the DJI Lightbridge 2 Air System. - Status Indicator
Indicates the status of the flight controller. - CAN2 Port
CAN Bus port (reserved for future use). - S-Bus Port
Communicates with a DJI DR16 or S-Bus receiver. - F1-F4 Pins
Multifunction PWM output ports. - F5-F8 Pins
Multifunction PWM I/O ports. - API Port
Communicates with an Onboard SDK device. - EXP Port
Extended port (communicates with the A3 upgrade kit). - Orientation Arrow
The flight controller orientation arrow.
GNSS-Compass Module
The GNSS-Compass module has a built-in GPS/GLONASS and compass, used for geomagnetic field measurements. Compass calibration is required before use. DO NOT use or store the compass in environments with ferromagnetic materials.
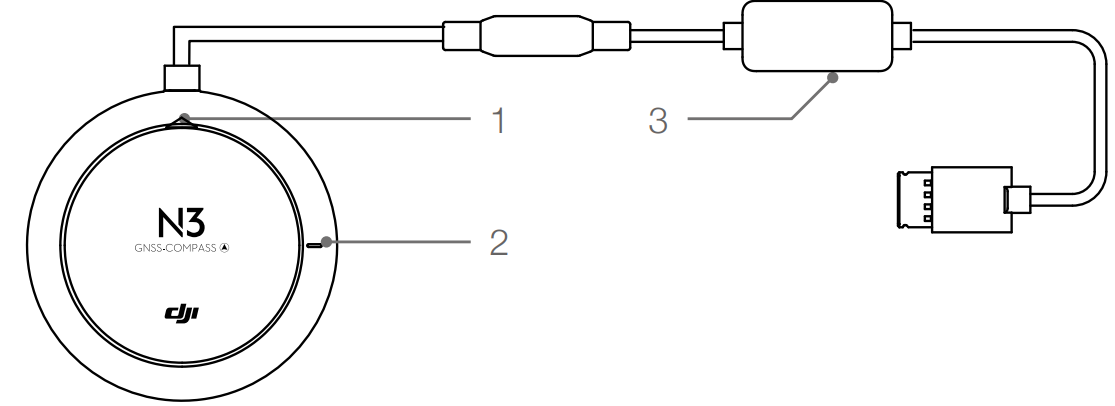
- Orientation Arrow
The GNSS-Compass module should be mounted with the arrow pointing toward the aircraft's nose. - GNSS-Compass Status Indicator
Indicates the status of the GNSS-Compass module. - Extended CAN1 Port
Dedicated DJI CAN-Bus port, communicates with a DJI device.
PMU Module
The PMU module supports LiPo batteries and provides power for the entire flight control system, with built-in low-voltage protection.
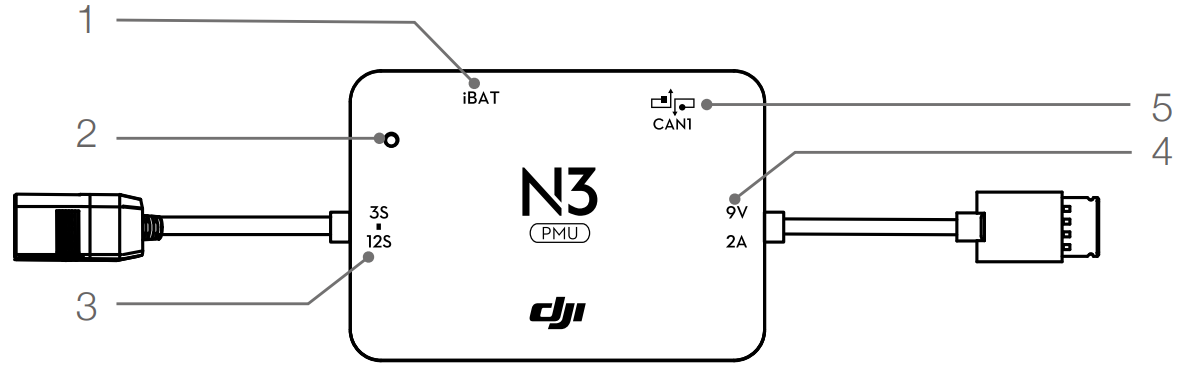
- Power Status Indicator
Indicates the power status of the flight control system. - Power Supply
Derives power from a 3S-12S LiPo battery. - 3S-12S
Derives power from LiPo battery. - Power Port (9V 2A)
Connected to the Flight Controller for power supply. - CAN1 Port
Connected to the GNSS-Compass module.
LED Module
The LED module has an integrated LED indicator and a Micro USB port.
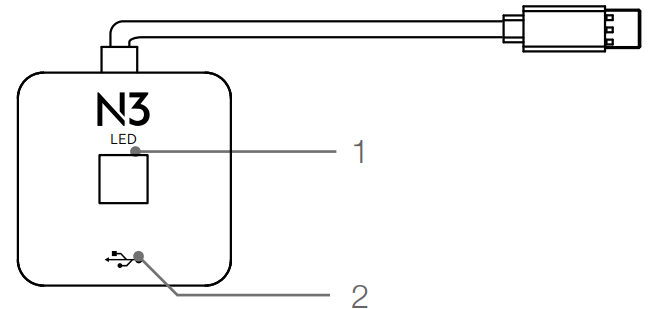
- Flight Status Indicator
Displays the status of the flight control system (e.g., Flight Mode). - Micro USB Port
Used to configure and upgrade the N3 via DJI Assistant 2.
Description
The DJI N3 Flight Remote Controller is engineered to provide a premium user experience. Its sturdy build ensures it can withstand the rigors of outdoor use, while its ergonomic design makes it comfortable to hold and operate for extended periods. The remote features a high-resolution display screen that offers a clear view of the drone's camera feed and essential telemetry data, such as altitude, speed, and battery level.
The controller also includes advanced control options like customizable buttons and dials, allowing users to tailor their flying experience to their specific needs. Additionally, it supports multiple frequency bands to ensure reliable communication between the controller and the drone, even in crowded airspace.
DJI N3 Flight Remote Controller Functions
Compass Calibration
Ensure the compass is calibrated before every flight. Failure to calibrate may lead to poor flight performance or a crash.
- DO NOT attempt to calibrate your compass where there is a chance of strong magnetic interference, such as near massive metal objects, parking structures, steel reinforcements underground, or under bridges.
- DO NOT carry ferromagnetic materials with you during calibration, such as keys or mobile phones.
- Always calibrate the compass when moving from indoor to outdoor spaces.
- After successful calibration, if the compass becomes abnormal when placed on the ground, this may be due to underground magnetic interference. Move the aircraft to another location and try again.
Calibration Procedures
Choose an open space and follow these procedures:
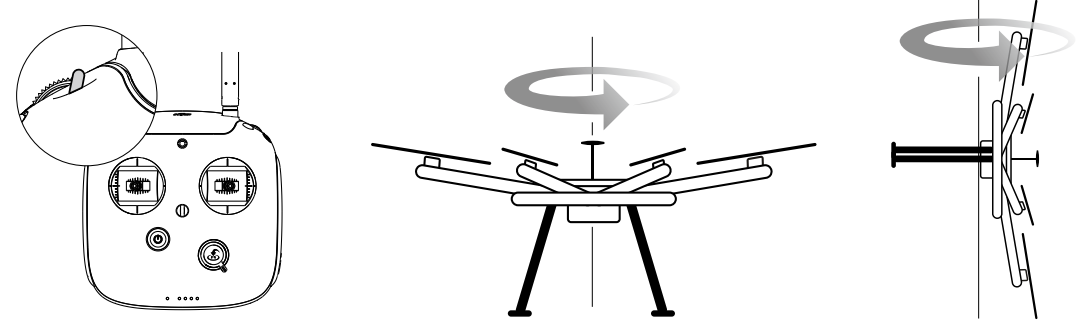
- Using the remote controller (Lightbridge 2 as an example):
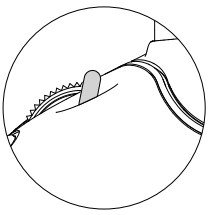
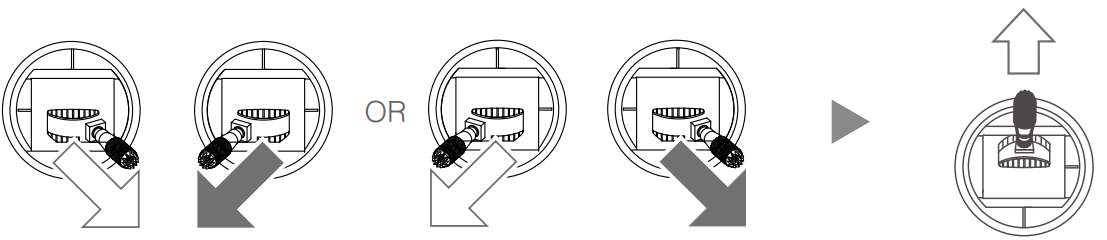
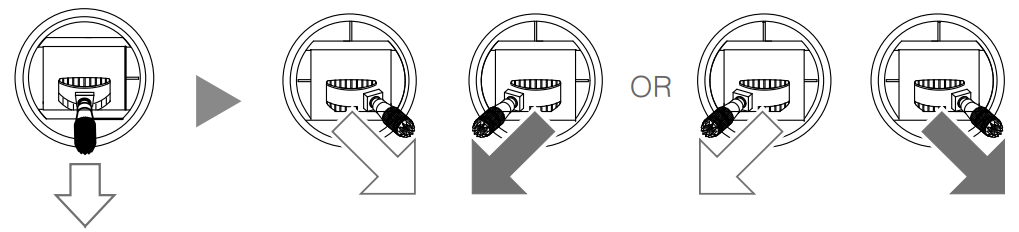
- Quickly flip the control mode switch from P-mode to A-mode and back to P-mode three times. The Aircraft Status Indicator will display a solid yellow light. When using third-party remote controllers, flip the control mode switch between position-1 and position-3.
- Hold and rotate the aircraft horizontally 360 degrees. The Aircraft Status Indicator will display a solid green light.
Hold the aircraft vertically with the nose pointing downward and rotate it 360 degrees around the center axis. If the Aircraft Status Indicator is solid red, recalibrate the compass.
- Using DJI GO (Lightbridge 2 required):
- Tap the Aircraft Status Indicator bar in the DJI GO app and select “Calibrate,” then follow the on-screen instructions.
- If the Aircraft Status Indicator blinks red and yellow after calibration, move the aircraft to a different location and try again.
Always calibrate the compass before each flight. Launch the DJI GO App and follow the on-screen instructions.
When to Recalibrate
- When compass data is abnormal, and the Aircraft Status Indicator is blinking red and yellow.
- When flying in a new location or a location different from your last flight.
- When the mechanical structure of the N3 has changed, such as a change in the compass mounting position.
- When severe drifting occurs during flight, indicating the N3 is not flying in a straight line.
Flight Functions
Flight Modes
- P-mode (Positioning):
Preferred for most flying scenarios. P-mode works best when the GNSS signal is strong. There are three states of P-mode, automatically selected by the flight control system depending on GNSS signal strength and Vision Positioning sensors:- P-GPS: GNSS and Vision Positioning are both available, and the aircraft uses GNSS for positioning.
- P-OPTI: If GNSS is unavailable, the aircraft will use the Vision Positioning System to hover accurately.
- P-ATTI: When neither GNSS nor Vision Positioning is available, the aircraft uses only its barometer for positioning, controlling only altitude.
- Atti mode (Attitude):
GNSS and Vision Positioning Systems are not used for positioning. The aircraft uses only its barometer to maintain altitude. If a GNSS signal is still available, the aircraft can return home automatically if the Remote Controller signal is lost and the Home Point has been recorded successfully. - S-mode (Sports):
S-mode is similar to P-mode, but the handling gain values are adjusted to enhance maneuverability. The aircraft’s maximum flight speed is increased in this mode. - Manual mode:
Only use this mode in emergency situations. Manual (M) mode must be enabled and set up in DJI Assistant.
Note: P-OPTI mode is only available when a DJI Vision Positioning System is used. Once the GNSS signal is recovered or the Vision Positioning System becomes available, the Flight Control System can re-enter P-GPS mode or P-OPTI mode.
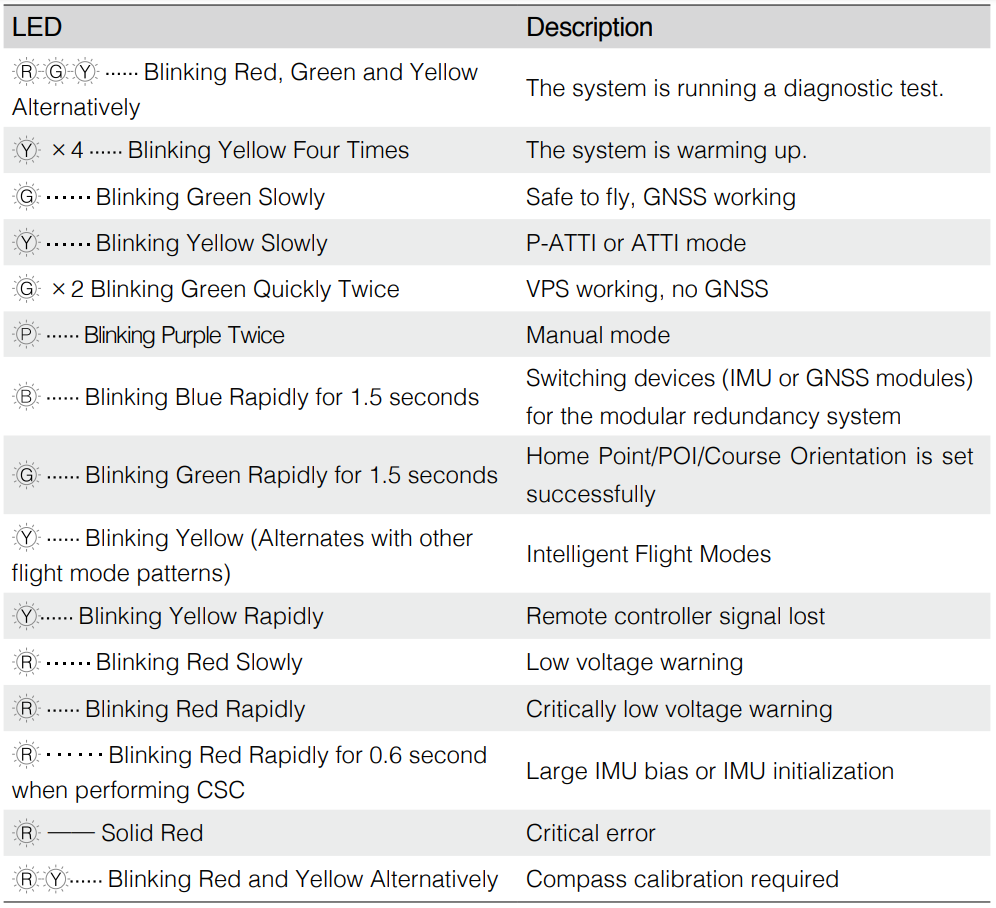
Aircraft Status Indicator Description

Flight Control
Manual Take-off
To start the motors, pull both control sticks to the bottom inside (or outside) corners. Release the sticks once the motors start. Slowly push the left stick (throttle stick) upward to take off.
Remote Controller Operation
Here are the default flight controls (Mode 2). The left stick controls altitude and rotation, while the right stick controls the forward, backward, left or right movements. The gimbal dial controls the camera’s tilt.

Manual Landing
- Standard Landing Procedure:
After landing, push the throttle down and hold it. The motors will stop after 3 seconds. - Emergency Motor Stop:
After landing, push the throttle down and then perform the CSC (Control Stick Combination). The motors will stop immediately. Release both sticks once the motors have stopped.
Intelligent Flight Modes (Using the Remote Controller)
Intelligent Flight Modes simplify aircraft operation. If you're not using a Lightbridge 2 remote controller, configure a 3-position switch on the remote controller as the Intelligent Flight Modes Switch. Each switch position corresponds to one of the following modes: Off, Course Lock, or Home Lock.
Course Lock
Course Lock locks the current nose direction as the aircraft's forward direction, allowing movement in the locked direction regardless of its orientation.
- Requirements: The compass must be working properly.
- Operation:
- Fly the aircraft in the desired direction.
- Toggle the Intelligent Flight Modes Switch to the Course Lock position to lock the current nose direction as the forward direction.
- Reset Parameters: Aircraft nose orientation cannot be reset during flight.
- Exit Mode: Toggle the Intelligent Flight Modes Switch to the Off position.
Home Lock
Home Lock allows the aircraft to move toward the recorded Home Point when the pitch stick is pulled backward.
- Requirements: Home point must be recorded, P-GPS mode enabled, and the distance between the aircraft and Home Point must be greater than 5 meters.
- Operation:
- Fly the aircraft to the desired position.
- Toggle the Intelligent Flight Modes Switch from Off to Home Lock more than three times to record the Home Point.
- Flip the Intelligent Flight Modes Switch to the Home Lock position to start the flight.
- Reset Parameters: Parameters cannot be reset during flight.
- Exit Mode: Toggle the Intelligent Flight Modes Switch to the Off position.
Intelligent Flight Modes in DJI GO App (Lightbridge 2 Required)
Lightbridge 2 allows you to use the DJI GO app for aircraft operation, including Intelligent Flight Modes such as Course Lock, Home Lock, Point of Interest (POI), and Waypoints to capture professional shots during flight.
Protection Functions
Return to Home (RTH)
Return to Home (RTH) automatically brings the aircraft back to the last recorded Home Point. There are three cases that can trigger the RTH procedure:
- Failsafe RTH
- Smart RTH
- Low Voltage RTH
Failsafe RTH
Failsafe RTH is activated automatically if the remote controller signal (including video relay signal if DJI Lightbridge 2 used) is lost for more than 3 seconds, provided that the Home Point has been successfully recorded and the compass is working normally. The RTH process may be interrupted and the operator can regain control over the aircraft if a remote controller signal is resumed.
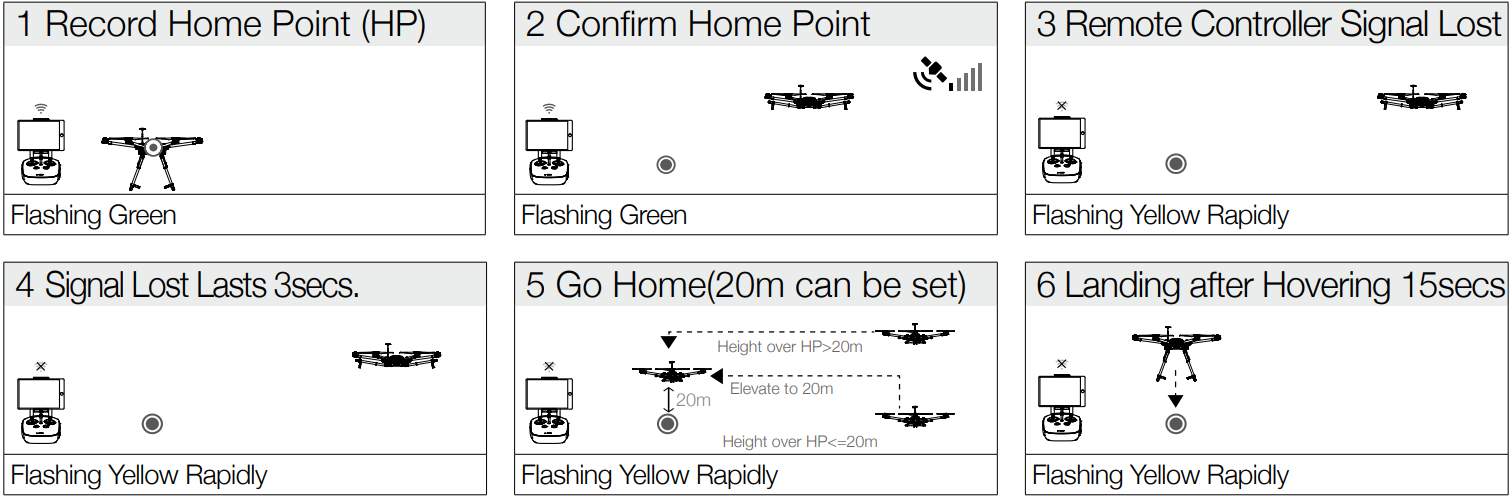
WARNING
- The aircraft automatically descends and lands if RTH is triggered within a 65-foot (20-meter) radius of the Home Point.
- The aircraft cannot return to home if the LED is slowly blinking yellow or if the GNSS is not working.
- The aircraft cannot avoid obstacles during Failsafe RTH. Therefore, it is important to set a reasonable Failsafe altitude before each flight. Launch the DJI GO app, enter "Camera" view, and select "MODE" to set the Failsafe altitude.
- The aircraft will stop ascending and immediately return to the Home Point if you move the throttle stick when the aircraft reaches an altitude of 20 meters or above during Failsafe.
Smart RTH
Smart RTH can be enabled by pressing the RTH button on the remote controller when GNSS is available. During Smart RTH, the aircraft returns to the last recorded Home Point, but you may control the aircraft’s orientation to avoid collisions. Press the Smart RTH button once to start the process. Press the Smart RTH button again to exit Smart RTH and regain control.
- If using DJI Lightbridge 2, no additional settings are required for the RTH button.
- If using another type of remote controller, configure the RTH button in DJI Assistant 2.
Low Battery RTH with LiPo Battery
The low voltage failsafe is triggered when the LiPo battery is depleted to a level that may affect the safe return of the aircraft. Users are advised to return home or land the aircraft immediately when these warnings are displayed. The aircraft will automatically return to the Home Point if no action is taken after a 10-second countdown. To cancel the RTH procedure, press the RTH button once. The thresholds for these warnings are automatically determined based on the current aircraft altitude and its distance from the Home Point.
- The aircraft will land automatically if the current voltage can support the aircraft in landing from the current altitude. Use the remote controller to control the aircraft's orientation during the landing process.
- Critical Battery Warning: When activated, the aircraft will automatically descend to land. You may push the throttle upward to hover and navigate the aircraft to a more appropriate location for landing.
Attitude Control When One Motor Output Fails
For hexa-rotors and quad-rotors, the N3 flight control system can control the aircraft's attitude when one motor fails:
- During flight, the N3 flight control system maintains attitude control even if one motor output fails.
- The motor will not start before take-off (DJI Intelligent ESCs are required for communication).
Select Course Lock or Home Lock mode to safely fly the aircraft to a landing area if the aircraft is far away or its attitude cannot be easily recognized.
Propulsion System Protection
Low voltage and overweight aircraft warnings are provided in the DJI GO app.
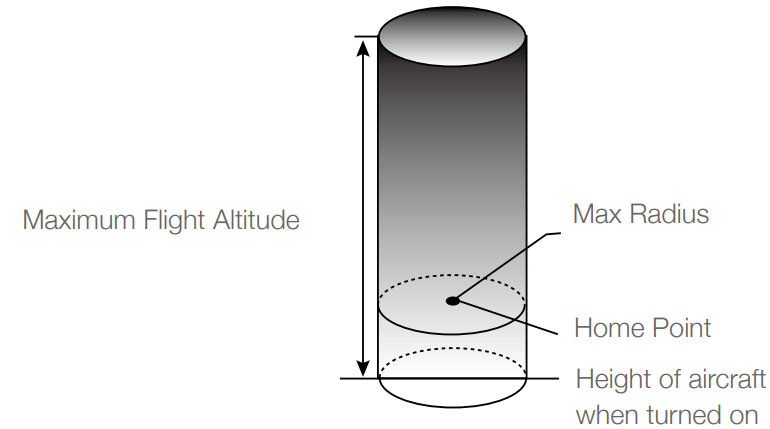
Flight Limits and Flight Restriction Areas
Flight limits on height and distance can be set, and all UAV operators must comply with regulations from organizations like ICAO, FAA, and their national airspace regulations. The flight limits function is enabled by default for safety and legal use. These functions include height limits, distance limits, and No Fly Zones.
- P Mode: Height, distance limits, and No Fly Zones work together to manage flight.
- A Mode: Only height limits are enforced, with a maximum height of 120 meters (can be increased to 500 meters in DJI Assistant or DJI GO app).
- Note: Maximum height is limited to 50 meters if GNSS level does not reach 3 during flight.
Max Height & Radius Limits
Max Height & Radius limit flying height and distance. Once complete, your aircraft will fly in a restricted cylinder that is determined by these settings. The tables below show the details of these limits.
GNSS Signal Strong | |||
Flight Limits | DJI GO app | Aircraft Status Indicator | |
Maximum Flight Altitude | Aircraft's altitude cannot exceed the specified value. | Warning: Height limit reached. |
None. |
Max Radius | Flight distance must be within the max radius. | Warning: Distance limit reached. |
None. |
GNSS SignalWeak | |||
Flight Limits | DJI GO app | Aircraft Status Indicator | |
Maximum Flight Altitude |
Height is restricted to 400 feet. (120m) and under. |
Warning: Height limit reached. |
None. |
Max Radius |
No limits | ||
- If the aircraft flies outside of the limit, you can still control it, but you cannot fly it further.
- If the aircraft flies beyond the max radius, it will automatically fly back within range when the GNSS signal is strong.
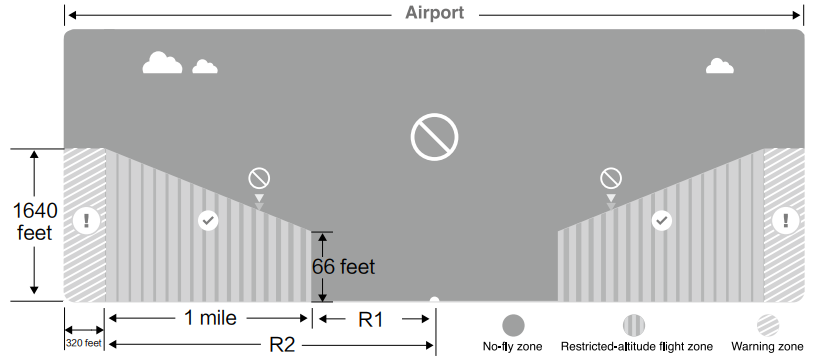
No-Fly Zones
All No-Fly Zones are listed on the DJI official website at DJI FlySafe. No-Fly Zones are divided into two categories: Airports and Restricted Areas.
Airport No-Fly Zones
- Airport No-Fly Zones are comprised of Take-off Restricted Zones and Restricted Altitude Zones.
- Take-off Restricted Zones prevent aircraft take-off within R1 miles of the airport (R1 value depends on the airport size and shape).
- From R1 mile to R1+1 mile, flight altitude is limited to a 15-degree inclination, starting at 65 feet (20 meters) and radiating outward to 1640 feet (500 meters) at R1+1 mile.
- When the aircraft enters within 320 feet (100 meters) of a No-Fly Zone, a warning message will appear on the DJI GO app..
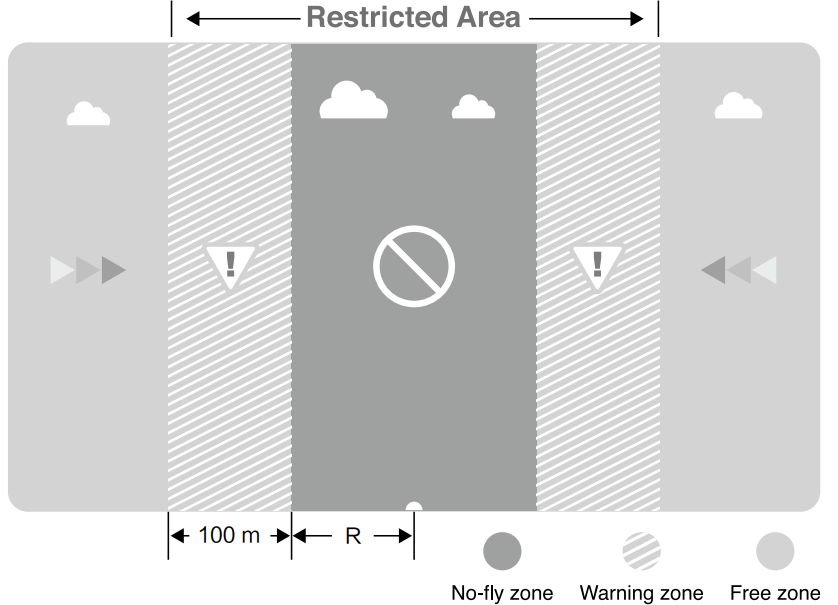
Restricted Areas
- Restricted Areas do not have flight altitude restrictions.
- R miles around the designated Restricted Area is a Take-off Restricted Area. Aircraft cannot take off within this zone (R value varies based on the definition of the Restricted Area).
- A Warning Zone is set around the Restricted Area. When the aircraft approaches within 0.062 miles (100 meters) of this zone, a warning message will appear on the DJI GO app.
Semi-Automatic Descent
During the descent and landing process, all stick commands are available except the left stick command. Motors will stop automatically after landing.
- When flying in a safety zone, the aircraft’s status indicator will blink red rapidly for 3 seconds, then switch to indicate the current flying status for 5 seconds before switching back to blinking red.
- For safety reasons, do not fly close to airports, highways, railway stations, railway lines, city centers, or other sensitive areas. Always keep the aircraft within your line of sight.
Setup Guide
To set up the DJI N3 Flight Remote Controller, follow these steps:
- Unboxing and Assembly: Carefully unpack the remote controller and any additional items like antennas or cables. Ensure all components are securely attached.
- Pairing with Drone: Turn on the drone and the remote controller. Use the DJI GO app or the controller's menu to initiate the pairing process. Follow the on-screen instructions to complete the pairing.
- Configuring Settings: Use the DJI GO app to configure settings such as transmission frequencies, control modes, and other preferences.
- Calibration: Perform a calibration of the remote controller's sticks and other controls to ensure precise control over the drone.
Flight Control System Checklist
Hardware Checklist
- Ensure all parts are mounted correctly and firmly.
- Ensure the ESCs and receiver are connected correctly and securely.
LED Status Checklist
- Ensure the mode switch corresponds to the flight status LED.
- Verify the system status LEDs on the GNSS-Compass and IMU Pro are normal.
- Ensure all sensor parameters are correct and the IMUs are calibrated properly.
DJI Assistant 2 Checklist
- Ensure the aircraft mounting parameters are correct.
- Verify the flight controller parameters are accurate.
- Ensure that low voltage level protection and Failsafe protection are set correctly.
Flight Safety
It is important to understand basic flight guidelines. Please refer to the Disclaimer and Safety Guidelines for more information
LED Indicators
Flight Status LED Indicator
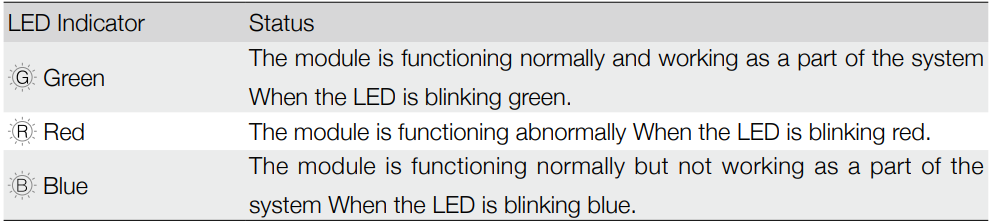
GNSS-Compass / A3 IMU Pro / A3 GPS-Compass Pro / IMU Pro / Flight Controller LED Indicator
DJI N3 Flight Remote Controller Troubleshooting
LED Status Checklist
- Ensure the mode switch corresponds to the flight status LED.
- Verify the system status LEDs on the GNSS-Compass and IMU Pro are functioning normally.
- Ensure all sensor parameters are correct and IMUs are calibrated accurately.
IMU Calibration Failure
- Ensure the aircraft remains stationary during calibration.
- Make sure the aircraft is placed on a level surface during calibration.
Voltage Detection Error
- Connect to DJI Assistant 2 to confirm the correct battery type is selected.
Compass Calibration Failure
- Restart the battery if compass calibration fails.
- Connect to DJI Assistant 2 to verify the channel mapping of the flight mode switch is correct.
- Check the compass Mod value using DJI Assistant 2 to ensure it is normal.
Failed to Exit SD Card Read Mode
- Restart the battery of the aircraft if the SD card read mode does not exit after reading successfully.
Pros & Cons
Pros
- Reliable Transmission: Advanced transmission technology ensures stable and low-latency control.
- Long Battery Life: Up to 10 hours of continuous use on a single charge.
- Ergonomic Design: Comfortable grip and operation even during extended flights.
- Customizable Controls: Tailor your flying experience with customizable buttons and dials.
Cons
- High Cost: Estimated price range of $1,000 to $1,500 may be prohibitive for some users.
- Complexity: May require time to get accustomed to its features and settings.
- Compatibility Issues: Limited compatibility with non-DJI drones or older models.
Customer Reviews
Early adopters of the DJI N3 Flight Remote Controller have praised its reliability and performance. Many users appreciate the long battery life and the ergonomic design that makes it comfortable to use for extended periods. However, some users have noted that the device can be quite expensive and may have a steep learning curve for new users.
Common complaints include compatibility issues with older drone models and the need for more detailed user manuals for beginners.
Faqs
How long does the battery of the DJI N3 Flight Remote Controller last?
Is the Flight Remote Controller compatible with all DJI drones?
How do I pair the Flight Remote Controller with my drone?
Can I customize the controls on the Flight Remote Controller?
What should I do if I encounter connection issues with my DJI N3 Flight Remote Controller?
How do I update the firmware of my DJI N3 Flight Remote Controller?
Is there a warranty available for the Flight Remote Controller?
Can I use the Flight Remote Controller with non-DJI drones?
What safety precautions should I take when using the DJI N3 Flight Remote Controller?
Leave a Comment