How to Operate: Dji RoboMaster EP Core Robot User Manual | Specifications
Content
Introduction of DJI RoboMaster EP Core Robot
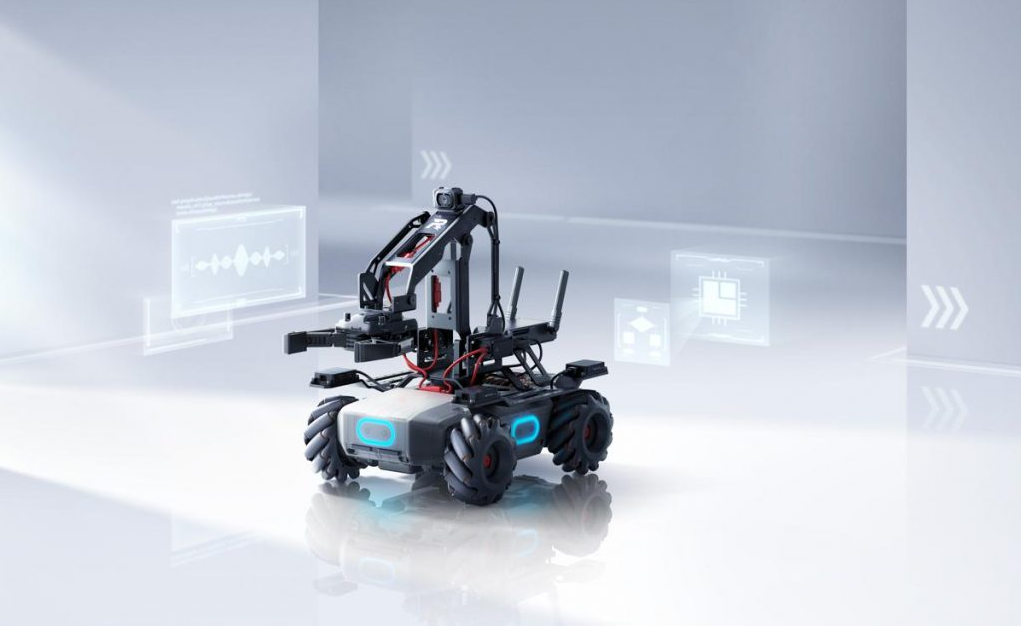
The RoboMaster S1 Education Expansion Set Core (EP Core) is an all-in-one education solution for STEAM classrooms. It provides an official SDK that can be used with powerful mechanical accessories and interfaces to expand hardware possibilities. Together with rich teaching resources and a continually updated competition database, the EP Core delivers a new classroom experience to make education easier for both teachers and students, expanding the boundaries of the future of education.
Priced at $499.00, it serves as a comprehensive tool for modern classrooms.
Robot Diagram
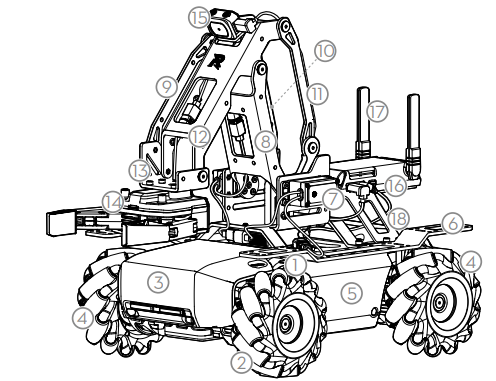
- Chassis
- Right-Threaded Mecanum Wheel
- Chassis Front Armor (built-in Hit Detector)
- Left-Threaded Mecanum Wheel
- Chassis Left Armor (built-in Hit Detector)
- Chassis Extension Platform
- Servo
- Robotic Arm (1 of 2)
- Robotic Arm Connecting Rod #1
- Robotic Arm Connecting Rod #2
- Robotic Arm Connecting Rod #3
- Robotic Arm (2 of 2)
- Robotic Arm Endpoint Bracket
- Gripper
- Camera
- Intelligent Controller
- Intelligent Controller Antenna
- Rear Extension Platform
- Motion Controller
- Speaker
- Chassis Rear Armor (built-in Hit Detector)
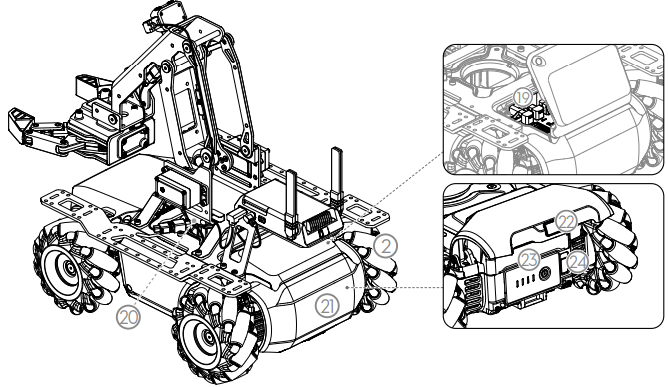
- Rear Armor Release Button
- Intelligent Battery
- Battery Eject Button
DJI RoboMaster EP Core Robot Specifications
RoboMaster EP Core
- Dimensions (LxWxH): 390x245×330 mm
- Weight: Approx. 3.3 kg
- Chassis Speed Range: 0.8 m/s
- Max Chassis Rotational Speed: 600°/s
- M35081 Brushless Motor:
- Max Rotational Speed: 1000 rpm
- Max Torque: 0.25 N-m
- Max Output Power: 19 W
- Operating Temperature Range: -10 to 40 °C (14 to 104 °F)
- Driver: Field-oriented control (FOC)
- Control Method: Closed-loop speed control
- Protection:
- Overvoltage protection
- Overheating protection
- Soft-starter
- Short-circuit protection
- Chip and sensor anomaly detection
Intelligent Controller
- Latency:
- Connection via Wi-Fi: 80-100 ms
- Connection via Router: 100-120 ms (unobstructed, free of interference)
- Live View Quality: 720p/30fps
- Max Live View Bitrate: 6 Mbps
- Operating Frequency: 2.4 GHz, 5.1 GHz, 5.8 GHz
- 2.400-2.4835 GHz
- 5.150-5.250 GHz
- Transmission Power (EIRP):
- FCC: ≤30 dBm
- SRRC: ≤20 dBm
- CE: ≤19 dBm
- 5.725-5.850 GHz
- FCC: ≤30 dBm
- SRRC: ≤30 dBm
- CE: ≤14 dBm
- MIC: ≤20 dBm
- Operating Mode: Connection via Wi-Fi, Connection via Router
- Max Transmission Distance:
- FCC, 2.4 GHz 140 m, 5.8 GHz 90 m
- CE, 2.4 GHz 130 m, 5.8 GHz 70 m
- SRRC, 2.4 GHz 130 m, 5.8 GHz 130 m
- MIC, 2.4 GHz 130 m
- Connection via Router:
- FCC, 2.4 GHz 190 m, 5.8 GHz 300 m
- CE, 2.4 GHz 180 m, 5.1 GHz 70 m
- SRRC, 2.4 GHz 180 m, 5.8 GHz 300 m
- MIC, 2.4 GHz 180 m
- Transmission Standard: IEEE802.11a/b/g/n
Camera
- Sensor: CMOS 1/4"; Effective pixels: 5MP
- FOV: 120°
- Max Still Photo Resolution: 2560x1440 pixels
- Max Video Resolution: FHD: 1080p/30fps, HD: 720p/30fps
- Max Video Bitrate: 16 Mbps
- Photo Format: JPEG
- Video Format: MP4
- Supported SD Cards: Supports microSD cards with a capacity of up to 64 GB
- Operating Temperature Range: -10 to 40 °C (14 to 104 °F)
Intelligent Battery
- Capacity: 2400 mAh
- Maximum Charging Voltage: 12.6 V
- Nominal Charging Voltage: 10.8 V
- Battery Type: LiPo 3S
- Energy: 25.92 Wh
- Battery Life (in use): Approx. 100 mins
- Battery Life (on standby): Approx. 169 g
- Operating Temperature Range: -10 to 40 °C (14 to 104 °F)
- Charging Temperature Range: 5 to 40 °C (41 to 104 °F)
- Maximum Charging Power: 29 W
- Charger:
- Input: 100-240 V, 50-60 Hz, 1 A
- Output: Port: 12.6 V=0.8 A or 12.6 V=2.2 A
- Voltage: 12.6 V
- Rated Voltage: 28 W
App
- iOS: iOS 10.0.2 or later
- Android: Android 5.0 or later
- Others:
- Recommended Routers: TP-Link TL-WDR8600; TP-Link TL-WDR5640 (China)
- TP-Link Archer C7; NETGEAR X6S (International)
- Recommended outdoor power supply solution for routers: Portable laptop charger (with the same input power of the router)
Robotic Arm
- Movement Range: 0-0.22 m (horizontal); 0-0.15 m (vertical)
- Axis Number: 2
- Gripper: Grip Distance Approx. 10 cm
- Servo Weight: Approx. 70 g
- Main Body Dimensions (LxWxH): 44.2x22.6×28.6 mm
- Transmission Ratio: 512
- Rated Torque: 1.2 N*m
- Rated Rotational Speed: Angle mode, rate mode
Infrared Distance Sensor
- Detection Range: 0.1-10 m
- Detection FOV: 20°
- Measurement Accuracy: 5%
Power Connector Module
- Communication Port: CAN bus x 5
- Input: TX30 port: 12 V, USB Type-C port: 5 V, 2 A, Pin header port: 5 V, 4 A
- Output: TX30 port: 12 V, 5 A
Sensor Adapter
- Port Type: 10 input, AD output
- Port Number: 2
Measured in an interference-free and unobstructed environment with a distance of approximately one meter between the mobile device, the router, and the robot. The iOS device used was an iPhone X. The results of testing with different Android device may be different.
- Outdoor use of the 5.1 GHz and 5.8 GHz frequency bands is prohibited in some areas. Follow all local laws and regulations in your country or region.
- Outdoor use of the 5.1 GHz and 5.8 GHz frequency bands is prohibited in some areas. Follow all local laws and regulations in your country or region.
Measured in an interference-free and unobstructed environment. For Connection via Wi-Fi, the mobile device used for testing was a sixth-generation iPad (released in 2018). For Connection via Router, several router models were used for testing. FCC: TP-Link Archer C9; SRRC: TP-Link WDR8600; CE: TP-Link Archer C7; MIC: WSR-1160DHP3.
The use of the infrared units will be affected in outdoor or infrared-intensive environments.
Tested in a lab environment using a new intelligent battery, and should be taken as a reference only.
Applied to an object surface whose reflectivity ranges from 10-90%.
Overview
RoboMaster EP Core uses an omnidirectional chassis and Mecanum wheels. The robot offers comprehensive control and an immersive driving experience thanks to the omnidirectional chassis, agile Mecanum wheels, and stable, low-latency image transmission in first-person view (FPV).
The robot uses a gripper and an agile robotic arm to grasp and move objects. The gripper and robotic arm are driven by two high-performance servos.
A customizable extension platform allows users to build and expand the robot any way they choose. The robot is also compatible with third-party building blocks, providing even more ways to learn and have fun.
Open DJI SDK is available on the robot and supports 39 programmable sensor ports. It is also compatible with third-party hardware, providing users with unlimited creative possibilities.
Preparing
Assembling the Robot
Refer to the RoboMaster EP Core Quick Start Guide.
Powering On the Robot
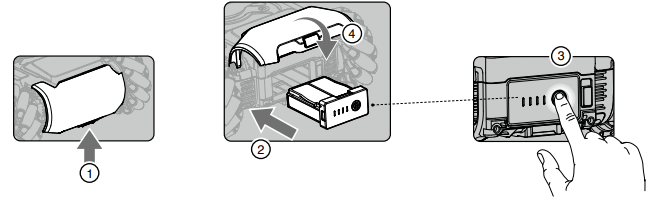
Follow the steps below to power on the robot:
- Press the rear armor release button to open the chassis rear armor.
- Install the intelligent battery into the battery compartment.
- Press and hold the power button to turn on the battery.
Close the chassis rear armor.
Downloading the RoboMaster App
- Search for the RoboMaster app in the App Store or on Google Play or scan the QR code to download the app on your mobile device.
- . Users can also download the RoboMaster software for Windows or Mac from the official DJI website to control the robot with a keyboard and mouse.
Windows: https://www.dji.com/robomaster_app
Mac: https://www.dji.com/robomaster_app

- Use your DJI account to log in to the RoboMaster app.
- The RoboMaster app supports iOS 10.0.2 or later or Android 5.0 or later.
- The RoboMaster app supports Windows 7 64Bit or later or MacOS 10.13 or later.
- Before using the RoboMaster app with cellular mobile data, contact your mobile device data provider for the latest data information.
Connecting the Robot to the RoboMaster App
The robot must be connected to the RoboMaster app before use. Users can learn how to connect via Wi-Fi or via router on the Connection Mode page. Follow the prompts to connect to the app. Refer to the Connecting section for more information.

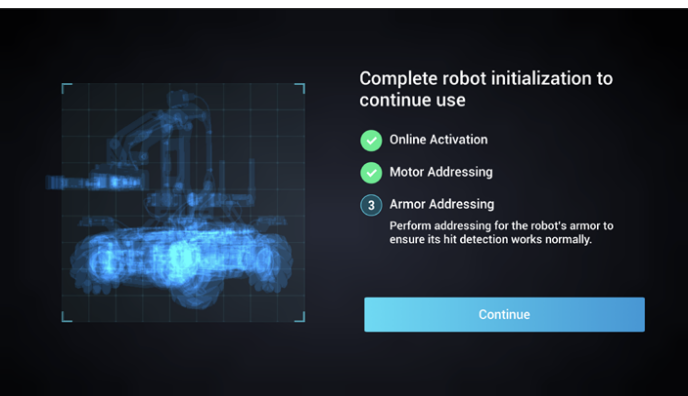
Initializing the Robot with the App
Activating the Robot
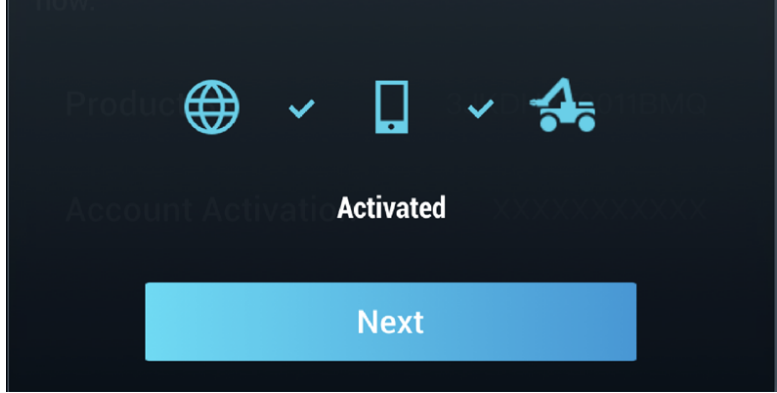
After connecting, use your DJI account to activate the robot in the RoboMaster app. Activation requires an internet connection.
Start activation.
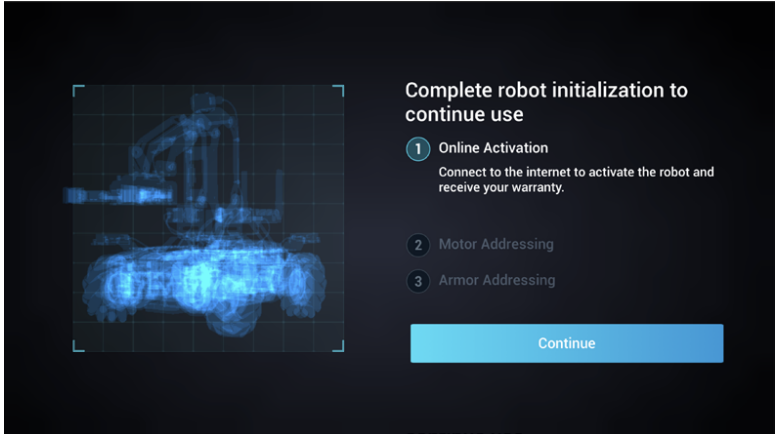
Follow the prompts to complete activation.
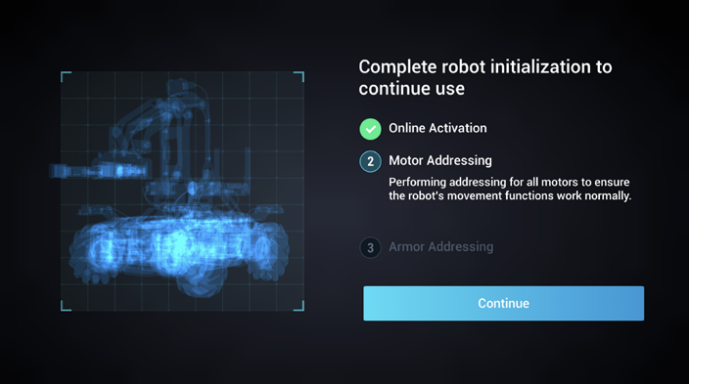
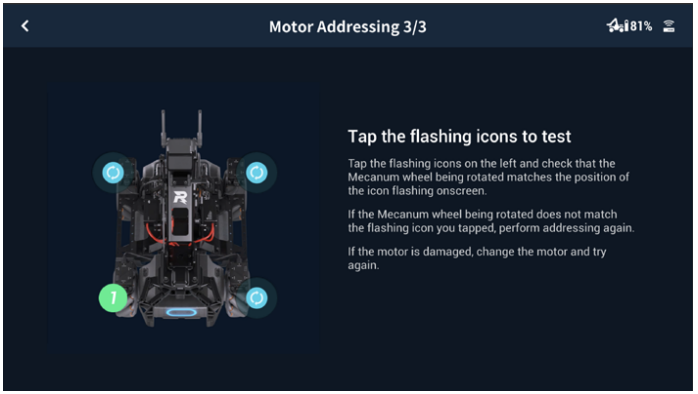
Motor Addressing
Motor addressing is required in the app before using for the first time. Follow the prompts to complete motor addressing.
Start Motor Addressing.
Lift the chassis and follow the prompts to rotate the Mecanum wheels in the order shown onscreen until all wheels have been rotated.
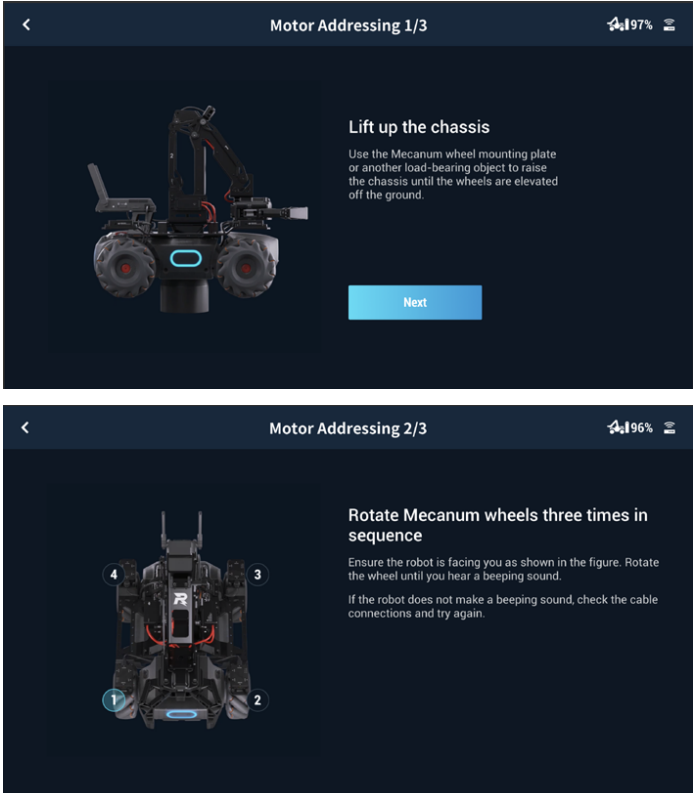
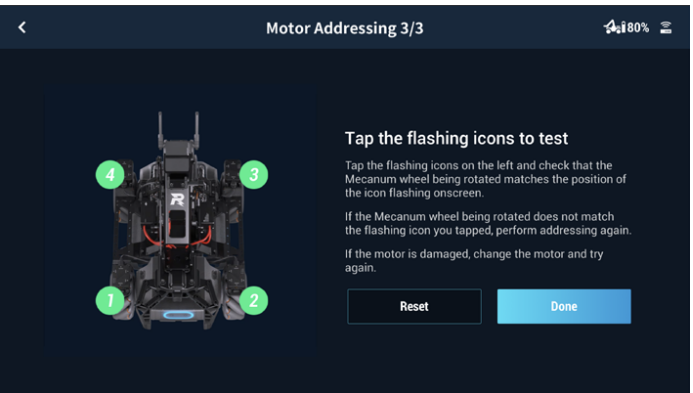
Tap Q to test the Mecanum wheels one by one until all wheels have been tested.
Motor addressing completed.
Note: Motor addressing is required when a motor is replaced. Open the RoboMaster app, click Settings then System, and select Motor Addressing.
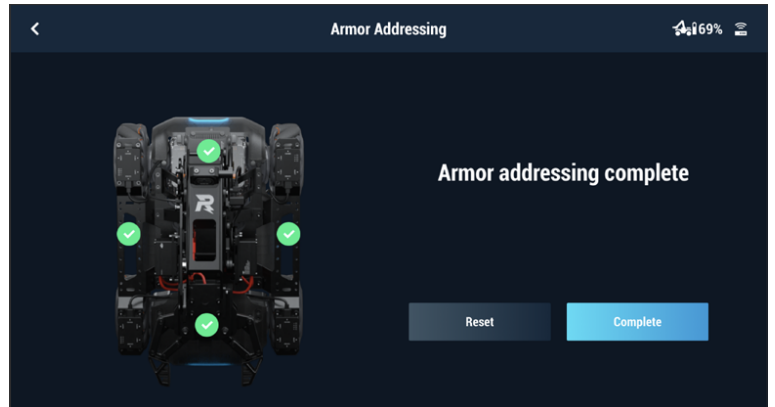
Armor Addressing
Armor addressing is required in the app when using the robot for the first time. Follow the prompts to complete armor addressing.
Start Armor Addressing.
Follow the prompts to tap on the armor plates in the order shown onscreen.
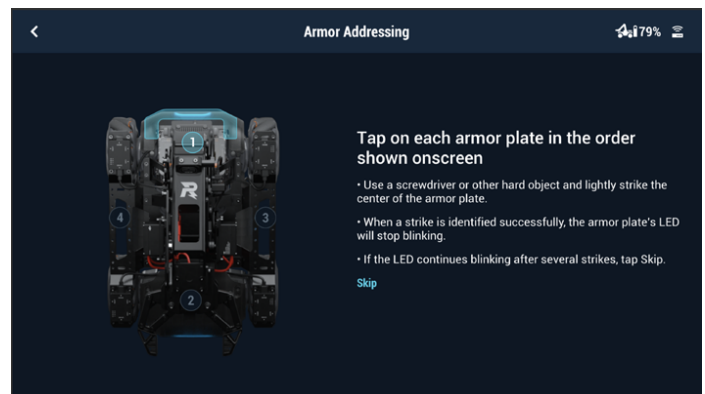
Armor addressing completed.
Note: Armor addressing is required when an armor module is replaced. Go to the RoboMaster app, click Settings, then System, and select Armor Addressing.
Robotic Arm Installation
The robotic arm must be installed in the app before using the robot for the first time.
Start Robotic Arm Installation.
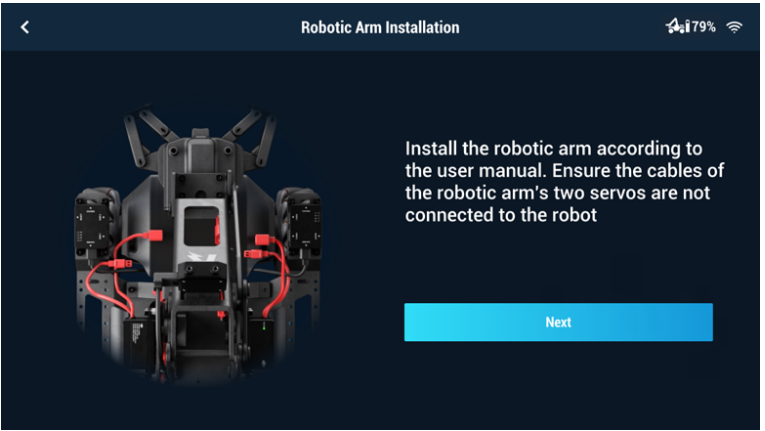
Follow the prompts to connect the left servo and right servo in turn.
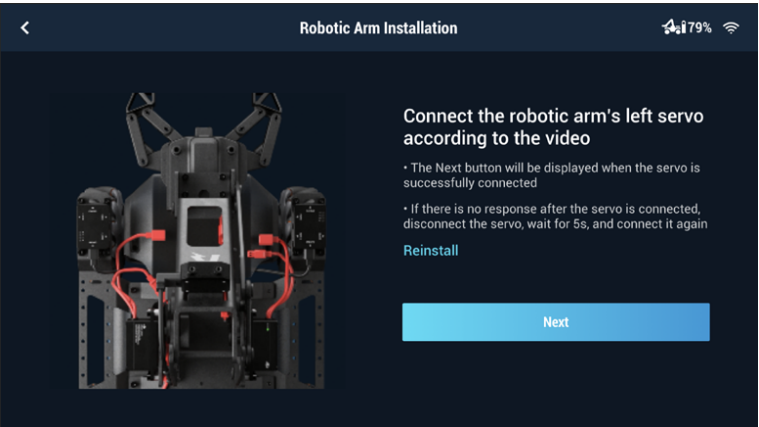
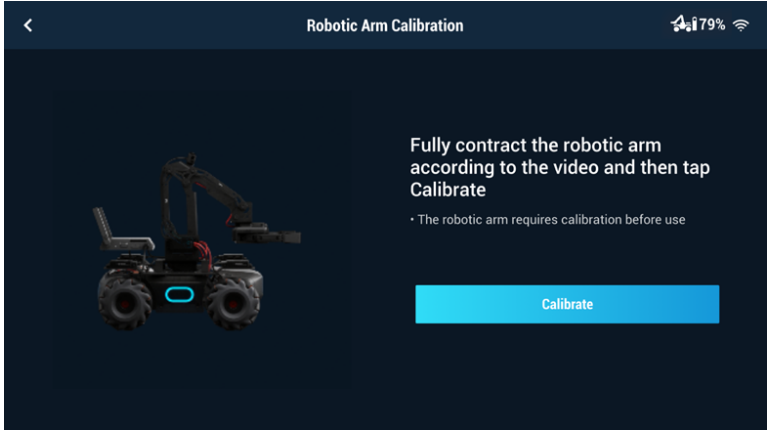
Calibrate the robotic arm.
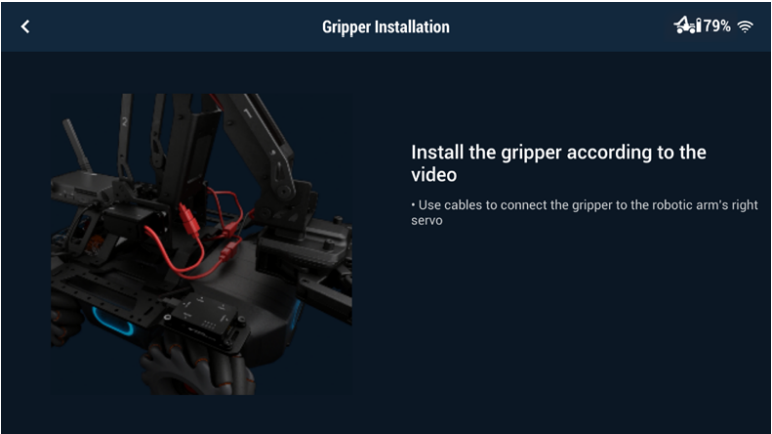
Gripper Installation
The gripper must be installed before using the robot for the first time.
Servo Installation
Make sure that the servos installed to the robot have different IDs and each ID ranges from 1 to 3. Otherwise, users must change the servo ID. Follow the prompts to complete servo installation.
Start Servo Installation.
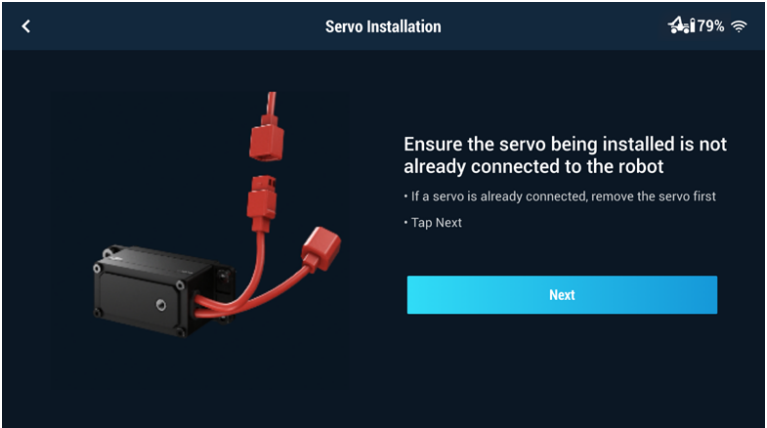
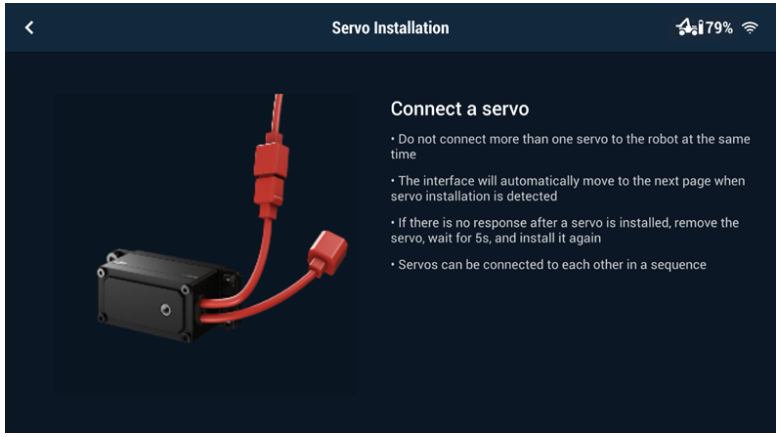
Follow the prompts to connect the servos in turn.
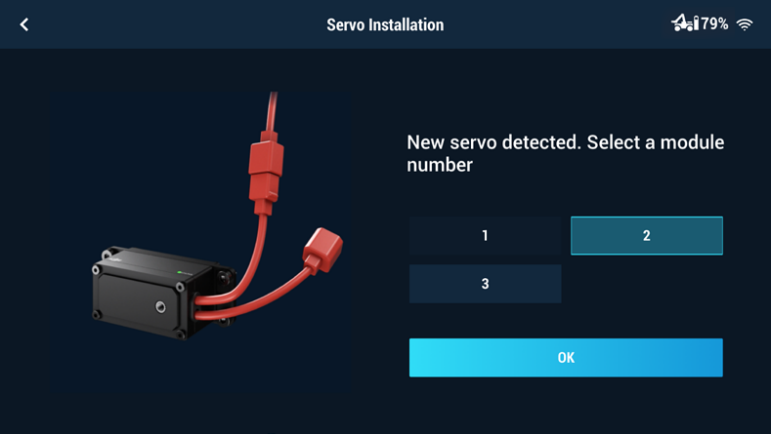
Follow the prompts to select module numbers for the servos until each servo has its unique number.
WARNING
- Servos can be connected in series.
- After removing the robotic arm, the two servos on the robotic arm can be controlled separately.
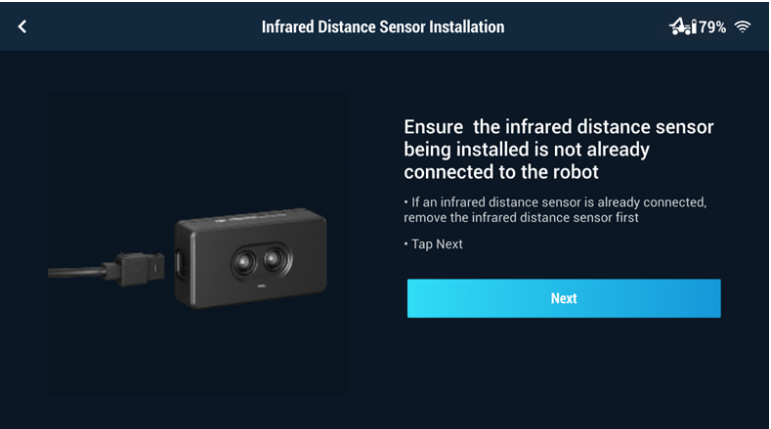
Infrared Distance Sensor Installation
Follow the prompts to complete infrared distance sensor installation. If more than one infrared distance sensor is installed on the robot, each sensor must be set with a different ID.
Start Infrared Distance Sensor Installation.
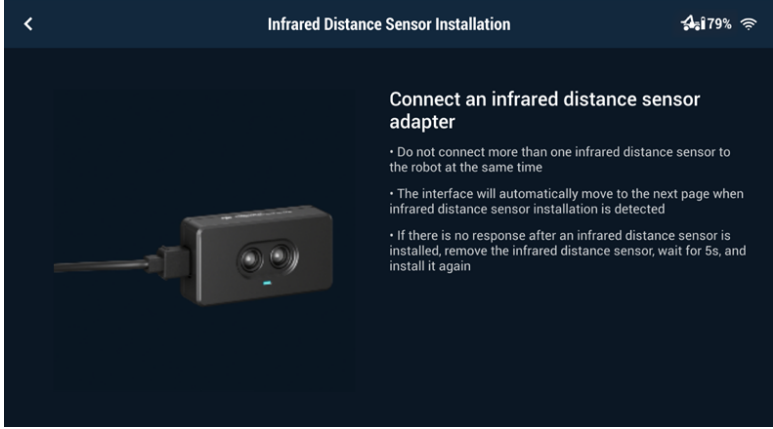
Follow the prompts to connect the infrared distance sensors in turn.
Follow the prompts to select module numbers for the infrared distance sensors until each sensor has its unique number.
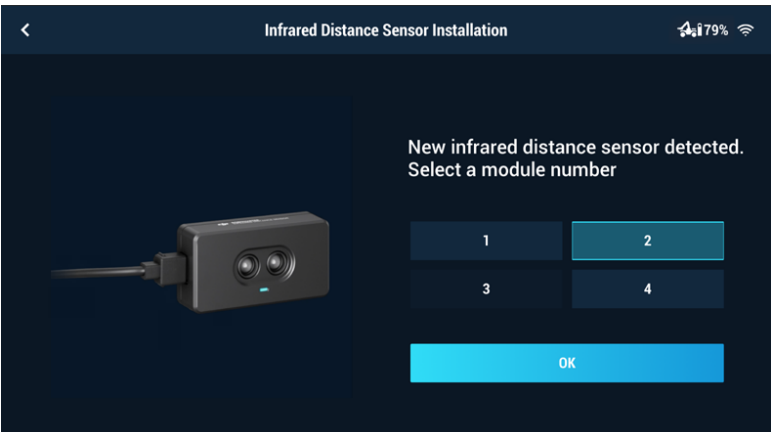
The robot supports the installation of multiple infrared distance sensors and users can select the ID accordingly.
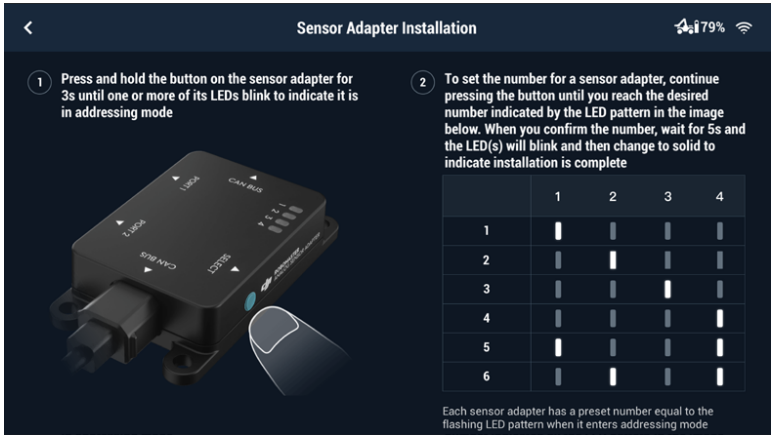
Sensor Adapter Installation
The preset number for each sensor adapter is 1. Make sure that the sensor adapters installed on the robot have different IDs. Otherwise, users must change the sensor adapter ID. Follow the prompts to complete sensor adapter installation.
Description
The RoboMaster EP Core Robot is built with durability and versatility in mind. Its modular structure allows users to easily swap out components, enabling a wide range of configurations for different projects. The robot features a robust chassis, powerful motors, and advanced sensors, including ultrasonic sensors, infrared sensors, and a high-definition camera. These components work together to provide a comprehensive learning experience that covers robotics, AI, and programming.
The robot's user-friendly interface and extensive documentation make it accessible even for those new to robotics. Additionally, the DJI RoboMaster app offers remote control capabilities, real-time data monitoring, and project management tools, further enhancing the learning experience.
Operating Your Robot
Checking Before Use
Check the following each time you use the robot:
- Make sure the motion controller is properly installed, all cables are connected, and the screws on the chassis rear cover are tightened.
- Make sure the intelligent controller, camera, and speaker are connected.
- Make sure the microSD card is inserted.
- Make sure the intelligent battery is fully charged and properly inserted.
- For optimal Wi-Fi connection, set the intelligent controller antennas at 90°.
Powering on the Battery
Press and hold the power button for more than two seconds to power on or off.

Operating the Robot Using a Mobile Device
Connecting to the App
The robot must be connected to the RoboMaster app in order to use.
Selecting a Location
It is recommended to use the robot on flat surfaces such as wooden floors and carpets. Uneven surfaces such as sand or rocks may damage the wheels or motors.
Using Solo Mode
Enter Solo mode to see the page below.
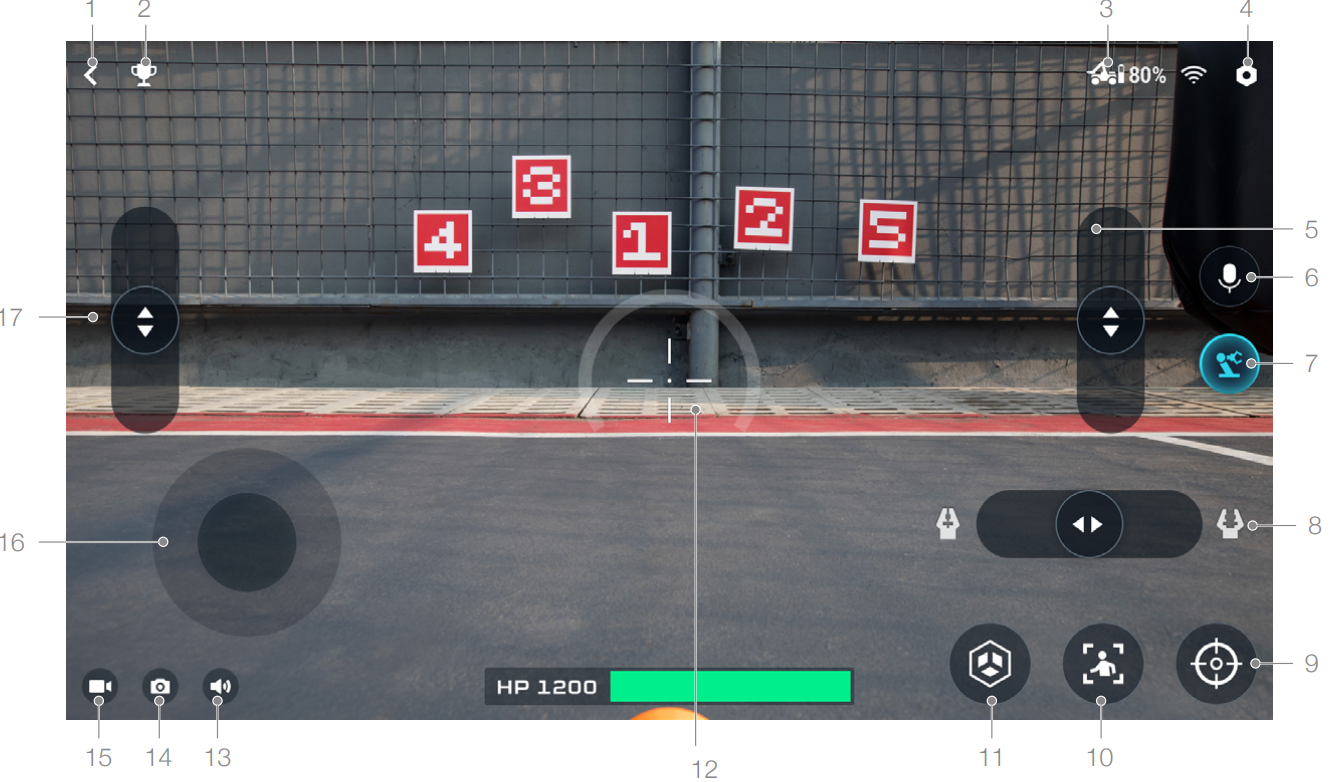
- Back button: Tap to return to the home page.
- Solo mode games button: Tap to enter Target Practice or Target Race.
- Connection status button: Tap to see how to connect the Robot and the app.
- Settings button: Tap to enter the Settings page.
- Robotic arm control slider: Tap to lift or lower the robotic arm.
- Intercom button: Tap to record and play an audio.
- Robotic arm button: Tap to switch the FPV interface.
- Gripper control slider: Tap to control the grip distance of gripper.
- Zoom button: Tap to zoom in or out 4x.
- Follow mode: Tap to enter Follow mode. Note: EP Core does not support this function.
Note: The Follow mode will be affected in the following situations:
a. The person being followed is partly or completely obstructed.
b. The person being followed suddenly changes their movement dramatically.
c. The environment suddenly changes from light to dark, or vice versa.
d. The color or pattern of the person being followed is similar to the environment. - Custom skills button: Tap to perform preprogrammed custom skills.
- Sight: Used to aim at targets.
- Mute button: Tap to mute or unmute the sound on the mobile device.
- Shutter button: Tap to capture a photo.
- Record button: Tap to record a video.
- Chassis control button: Tap to move the chassis.
- Robotic arm control slider: Tap to fold or unfold the robotic arm.
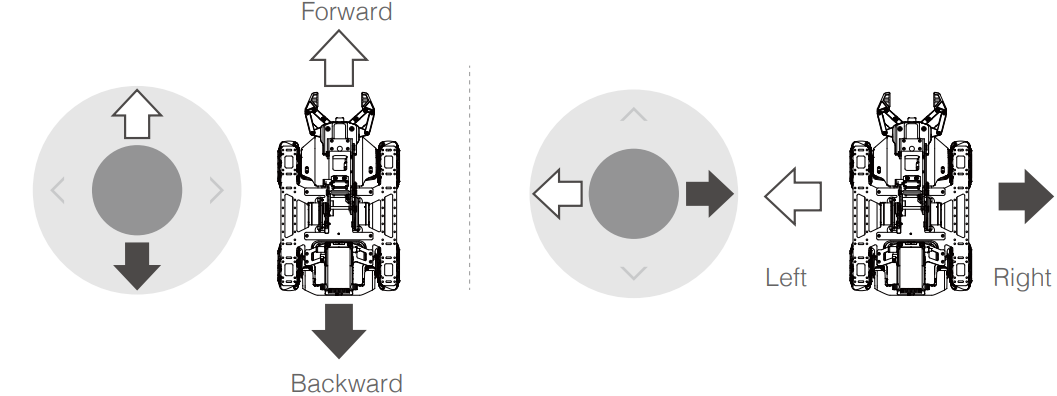
Operating the Robot
The camera view is mainly used to control the chassis, robotic arm, and gripper of the robot.
Controlling the Chassis
Tap the chassis control button to move the robot forward, backward, or sideward.
Setup Guide
To set up the DJI RoboMaster EP Core Robot, follow these steps:
- Unboxing and Assembly: Carefully unbox all components and follow the provided manual to assemble the robot. The modular design makes assembly straightforward.
- Software Installation: Download and install the DJI RoboMaster app on your computer or mobile device. Install any necessary drivers for your operating system.
- Pairing the Robot: Connect the robot to your device via Wi-Fi or USB. Follow in-app instructions to complete the pairing process.
- Initial Configuration: Configure the robot's settings through the app, including updating firmware if necessary.
Firmware Update
Check the robot firmware version in Settings, then System, and then Firmware Update. If there is a new firmware version, use the RoboMaster app to update the firmware of the robot.
- Make sure that all parts are connected, power on the robot, and check to make sure the battery level is above 50%.
- Tap App, then System, and then Firmware Update. Follow the onscreen instructions to update the firmware. Make sure the mobile device is connected to the internet when downloading the firmware.
- The robot tracks the progress of the update using audio prompts. Wait until the update is complete.
WARNING
- The battery firmware is included in the robot firmware. Make sure to update the firmware of all batteries if you have several.
- Only start a firmware update if the battery level is above 50%.
- Note that while updating the firmware, the status indicators may blink abnormally, and the robot may reboot.
- The robot and app may disconnect after updating. If this occurs, reconnect them.
- If you receive a prompt that newer firmware version is out of date, update and try again.
- When in Battle mode, make sure that all the robots are using the same firmware version.
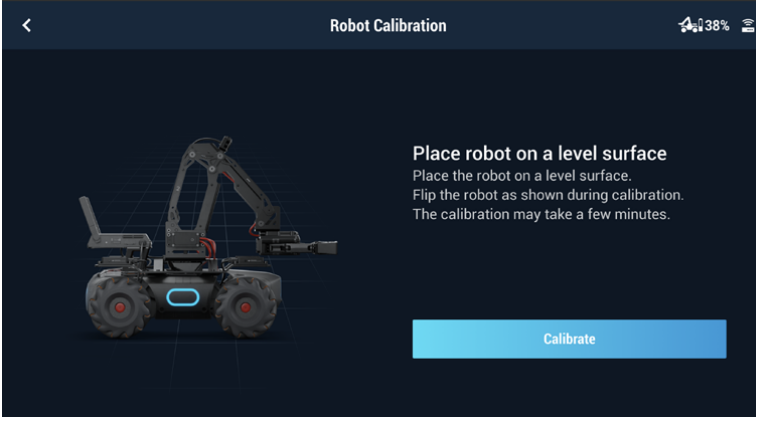
Calibrating the Robot
If any of the following scenarios occur, recalibrate the robot in the RoboMaster app:
- The robot moves involuntarily while rotating.
- The chassis cannot be controlled when warning prompts appear in the app.
- The motion controller has been installed or reinstalled.
The specific calibration steps are as below:
- Open the RoboMaster app, tap on Settings, then System, and select Calibration.
Follow the steps in the app to calibrate.
Setting the PWM Ports
PWM (pulse width modulation) controls the duration of a high level of output during a certain period, and is broadly used to control LEDs, navigation gears, and more. The PWM port has a default duty cycle of 7.5% and a fundamental frequency of 50 Hz. For LEDs, the PWM output rate ranges from 0% to 100%, with 0% corresponding to an LED's lowest brightness and 100% to its highest brightness. For navigation gears, the PWM output rate ranges from 2.5% to 12.5%. You can set the navigation gear PWM output percentage based on the rotation angles you wish to control.

Using the S-Bus Port
A remote controller that supports the S-Bus protocol can be used to control the robot by connecting to the S-Bus port of the motion controller. Users must prepare their own receiver and remote controller. It is recommended to use a Futaba R6303SB receiver.
Connection
Connect the S-Bus port of the motion controller to the S-Bus port of the receiver by using the 3-pin servo cable.

Usage
Make sure the remote controller has been linked with the receiver before use. Refer to the manual documents of the receiver for more information on linking methods. The correspondence of control channels of the S-Bus port of the motion controller are shown below. Refer to the manual documents of the remote controller to complete the channel mapping between the receiver and the remote controller.
Programming Customizable UI
The customizable Ul system expands the input and output modes of a program. Users can create Ul widgets that are used to represent the input and output processing information of a program. To code a Python program, call the related interfaces to generate a Ul widget and bind the Ul widget with an event callback. After coding and debugging in the Lab section of the RoboMaster app, users can save a program as a customizable skill and use it in Solo or Battle mode. For more information, visit www.dji.com/robomaster-ep-core/downloads or robot master-dev.rtfd.io
S-Bus Port Control Channels |
Free Mode | Recommended Remote Controller Channel | ||
Remote Controller Channel |
Offset |
Status | ||
Channel 1 |
Move the chassis sideward |
Control Stick Channel 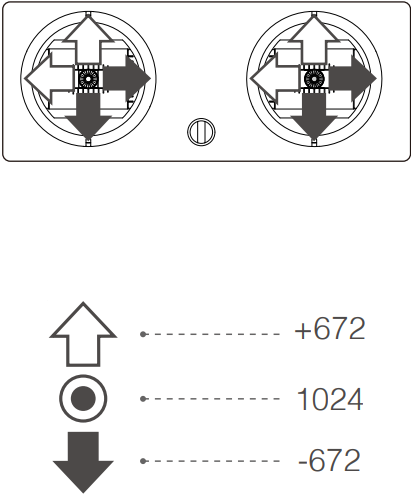 | 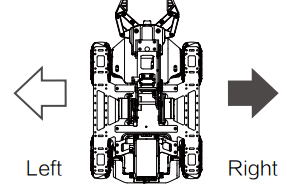 | |
Channel 2 |
Move the chassis forward and backward | 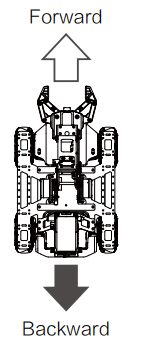 | ||
Channel 4 |
Control the yaw of the chassis | 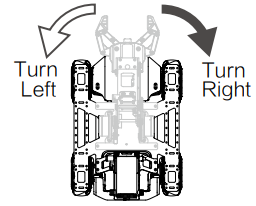 | ||
Channel 5 |
Control the movement speed of the chassis andthere are threeoptional speeds: Fast Medium Slow |
3-Position Switch Channel 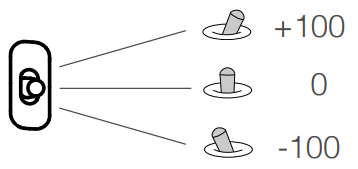 |
Fast | |
Medium | ||||
Slow | ||||
Channel 6 |
Free mode | Switch Channel  |
Free mode | |
Channel 7 |
Control the release of the chassis and there are two statuses: Chassis is set when it produces output torque Chassis is released when it not producing output torque | 2-Position Switch Channel  |
Set | |
Release | ||||
Troubleshooting
Common issues with the DJI RoboMaster EP Core Robot and their solutions include:
- Connection Issues: Ensure that the robot and your device are connected to the same Wi-Fi network. Restart both devices if connectivity issues persist.
- Motor Malfunction: Check that all motors are properly connected and that there are no obstructions. Consult the user manual for troubleshooting steps.
- Software Glitches: Update the firmware to the latest version. If issues continue, contact DJI support for further assistance.
Instructions and Warnings: Always follow safety guidelines when operating the robot. Keep it away from water and extreme temperatures. Regularly update software to ensure optimal performance.
DJI RoboMaster EP Core Robot Pros & Cons
Pros
- Comprehensive Learning Platform: Covers a wide range of topics from basic robotics to advanced AI concepts.
- Modular and Customizable: Allows for endless project possibilities with its interchangeable components.
- The DJI RoboMaster app makes it easy to control and monitor the robot remotely.
- Active community forums and extensive documentation provide ample resources for learners.
Cons
- The $1,500 price tag may be prohibitive for some users.
- While user-friendly, the robot's advanced features can be overwhelming for absolute beginners.
- The robot and its components require significant storage space when not in use.
Customer Reviews
Users have praised the DJI RoboMaster EP Core Robot for its robust build quality and comprehensive educational content. However, some have noted that the initial setup can be time-consuming and that the price is steep for individual users. Common complaints include occasional software glitches and the need for more beginner-friendly tutorials.
Faqs
What programming languages does the DJI RoboMaster EP Core Robot support?
How long does the battery of the DJI RoboMaster EP Core Robot last?
Is the DJI RoboMaster EP Core Robot suitable for beginners?
Can I use the DJI RoboMaster EP Core Robot without a computer?
What kind of sensors does the DJI RoboMaster EP Core Robot come with?
How do I update the firmware of my DJI RoboMaster EP Core Robot?
Can I customize the components of the DJI RoboMaster EP Core Robot?
Is there a community support for the DJI RoboMaster EP Core Robot?
Leave a Comment