How to Control Operations: Dji Smart Remote Controller User Manual
Content

Introduction: DJI Smart Remote Controller
The DJI Smart Controller features OCUSYNC™ 2.0 technology and is compatible with aircraft which support OcuSync 2.0. With a wide range of function buttons, the remote controller can perform a variety of tasks and control the aircraft within a maximum range of 8 km. Dual transmission frequency support makes HD video downlink stable and reliable. The estimated price for this remote controller is around $650, and it was launched in November 2018.
Overview
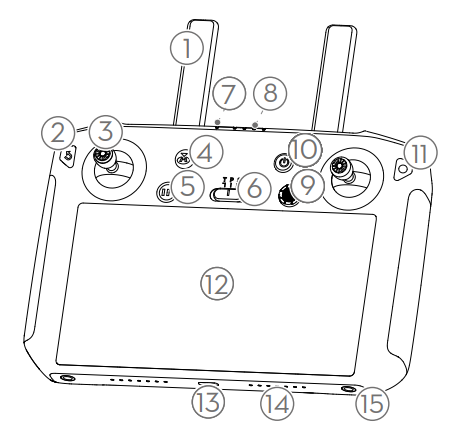
- Antennas
Relays aircraft control and video signal. - Back Button / Function Button
Press once to return to the previous page and press twice to go back to the homepage. Hold to view a guide to using button combinations. Refer to the Button Combinations section for more information. - Control Sticks
Control the orientation and movement of the aircraft when the remote controller is linked to an aircraft. Go to Settings > Control Stick Navigation, to customize the navigation settings. - RTH Button
Press and hold to initiate Return to Home (RTH). Press again to cancel RTH. Flight Pause Button
Press once to exit TapFly, ActiveTrack, and other Intelligent Flight Modes.
- Flight Mode Switch
Switch between T-mode, P-mode, and S-mode. Status LED
Indicates the linking status and warnings for the control sticks, low battery level, and high temperature.
- Battery Level LEDs
Displays the battery level of the remote controller. - 5D Button
The default configuration is listed below. The functions can be set in DJI GO 4 / DJI Pilot.
Up: Recenter gimbal/move gimbal downward Down: Focus switch/metering
Left: Decrease EV value
Right: Increase EV value
Press: Open DJI GO 4 / DJI Pilot Intelligent Flight Modes menu (not available for Mavic 2 Enterprise series).
When the remote controller is not linked to an aircraft, the 5D button can be used to navigate on the remote controller. Go to Settings > Control Stick Navigation to enable this function. - Power Button
Use to turn the remote controller on and off. When the remote controller is powered on, press the button to enter sleep mode or to wake up the controller. Confirm Button / Customizable Button C3*
When the remote controller is not linked to an aircraft, press to confirm a selection. When linked to an aircraft, the button cannot be used to confirm a selection. However, the function of the button when linked to an aircraft can be customized in DJI GO 4 / DJI Pilot.
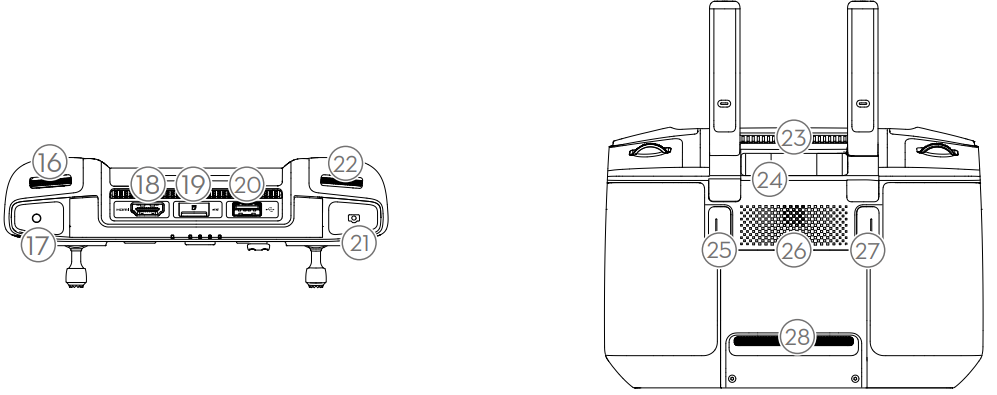
- Touchscreen
Tap to select. USB-C Port
Use to charge or update the remote controller.
- Microphone
Records audio. Screw Holes
Press to start recording video. Press again to stop recording.
- HDMI Port
For video output. microSD Card Slot
Use to insert a microSD card. - USB-A Port
Use to connect external devices. - Focus/Shutter Button
Half press to focus, and then press to take a photo. Camera Settings Dial
Mavic 2 Pro: Turn the dial to adjust the exposure compensation (when in Program mode), aperture (when in Aperture Priority and Manual mode), or shutter (when in Shutter Priority mode).
Mavic 2 Zoom/ Mavic 2 Enterprise: Turn to adjust the zoom of the Mavic 2 Zoom camera.
Mavic 2 Enterprise Dual: Turn the dial to adjust the exposure compensation.- Air Vent
Used for heat dissipation. DO NOT cover the air vent during use. - Sticks Storage Slot
Use to store a pair of control sticks. - Customizable Button C2
The default configuration is playback. The configuration can be set in DJI GO 4 / DJI Pilot. - Speaker
Outputs sound. - Customizable Button C1
The default configuration is center focus. The configuration can be set in DJI GO 4 / DJI Pilot. - Air Intake
Used for heat dissipation. DO NOT cover the air intake during use.
Specifications
- Operation Frequency Range : 2.400-2.4835 GHz; 5.725-5.850 GHz*
- Max Transmission Distance (Unobstructed, free of interference)
- 2.400-2.4835 GHz:
- 8 km (FCC); 4 km (CE); 4 km (SRRC); 4 km (MIC)
- 5.725-5.850 GHz:
- 8 km (FCC) : 2 km (CE) : 5 km (SRRC)
- Transmitter Power (EIRP)
- 2.400-2.4835 GHz:
- 25.5 dBm (FCC); 18.5 dBm (CE); 19 dBm (SRRC); 18.5 dBm (MIC)
- 5.725-5.850 GHz:
- 25.5 dBm (FCC); 12.5 dBm (CE); 18.5 dBm (SRRC)
- Wi-Fi Protocol
- Wi-Fi Direct, Wi-Fi Display, 802.11a/g/n/ac
- Wi-Fi with 2×2 MIMO is supported
- Operation Frequency Range: 2.400-2.4835 GHz; 5.150-5.250 GHz*; 5.725-5.850 GHz*
- Transmitter Power (EIRP)
- 2.400-2.4835 GHz:
- 21.5 dBm (FCC); 18.5 dBm (CE);
- 18.5 dBm (SRRC); 20.5 dBm (MIC)
- 5.150-5.250 GHz:
- 19 dBm (FCC); 19 dBm (CE);
- 19 dBm (SRRC); 19dBm (MIC)
- 5.725-5.850 GHz:
- 21 dBm (FCC); 13 dBm (CE); 21 dBm (SRRC)
- Bluetooth
- Protocol: Bluetooth 4.2
- Operation Frequency Range: 2.400-2.4835 GHz
- Transmitter Power (EIRP): 4 dBm (FCC); 4 dBm (CE), 4 dBm (SRRC); 4 dBm (MIC)
- General
- Battery: 18650 Li-ion (5000 mAh @ 7.2 V)
- Charge Type: Supports USB power adapters rated 12 V/2 A
- Rated Power: 15 W
- Storage Capacity : Rom: 16 GB + scalable (microSD**)
- Charge Time: 2 hours (Using a USB power adapter rated 12 V/2 A)
- Working Time: 2.5 hours
- Video Output Port: HDMI Port
- Power Supply Current/ Voltage (USB-A port): 5 V/ 900 mA
- Operation Temperature Range : 4° to 104° F (-20° to 40° C)
- Storage Temperature Range
- Less than one month: -22° to 140° F (-30° to 60° C)
- One month to three months: -22° to 113° F (-30° to 45° C)
- Three months to six months: -22° to 95° F (-30° to 35° C)
- More than six months: -22° to 77° F (-30° to 25° C)
- Charging Temperature Range: 5° to 40° C (41° to 104° F)
- Supported Aircraft Models***: Mavic 2 Pro, Mavic 2 Zoom, Mavic 2 Enterprise, Mavic 2 Enterprise Dual
- Recommended microSD Cards
- Sandisk Extreme 32GB UHS-3 microSDHC
- Sandisk Extreme 64GB UHS-3 microSDXC
- Panasonic 32GB UHS-3 microSDHC
- Panasonic 64GB UHS-3 microSDXC
- Samsung PRO 32GB UHS-3 microSDHC
- Samsung PRO 64GB UHS-3 microSDXC
- Samsung PRO 128GB UHS-3 microSDXC
- GNSS: GPS+GLONASS
- Dimensions: 177.5 × 121.3 × 40 mm (antennas folded, and the control sticks unmounted)
- 177.5 × 181 × 60 mm (antennas unfolded, and the control sticks mounted)
- Weight: Approx. 630 g
- Local regulations in some countries prohibit the use of the 5.8 GHz and 5.2 GHz frequencies and in some regions the 5.2 GHz frequency is only allowed for indoor use.
- The Smart Controller supports microSD cards with a maximum storage capacity of 128 GB. *** The Smart Controller will support more DJI aircraft in future. Please visit the official website for the latest information.
Preparing the Smart Controller
Charging the Battery
There are two pairs built-in 2500 mAh Li-ion batteries in the remote controller. Please charge the remote controller using the USB-C port.
Charging Time: 2 hours (using a standard USB power adapter)

ATTENTION
- Please use a DJI offical USB power adapter to charge the remote controller. If not, a USB power adapter certified FCC/CE rated 12 V/2 A is recommended.
- The battery will deplete when stored for an extended period of time. Please recharge the battery at least once every three months to prevent over discharging.
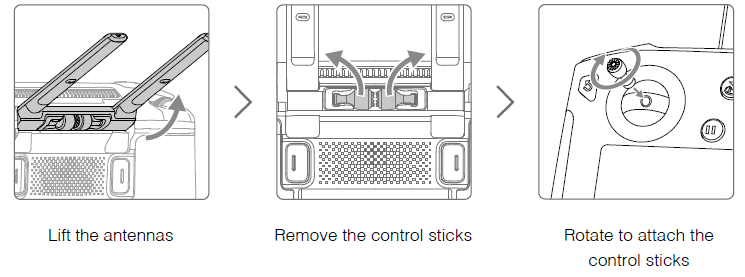
Attaching the Control Sticks
Two pairs of control sticks are included in the packaging for the Smart Controller. One pair is stored in the sticks storage slot on the back of the remote controller. Follow the steps below to attach the control sticks stored in the sticks storage slot to the remote controller.
Smart Controller Operations
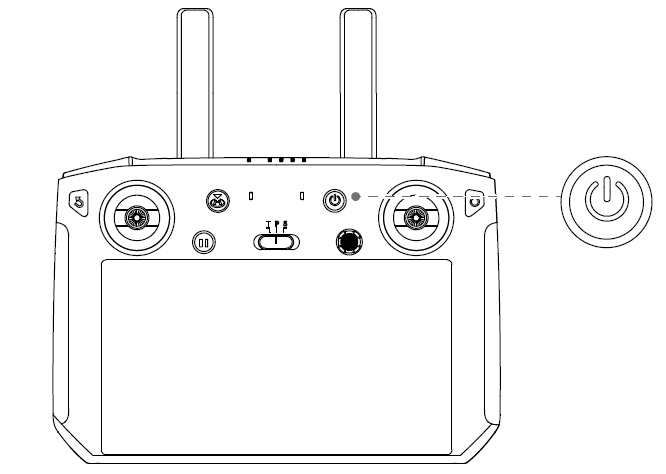
Turning the Smart Controller On and Off
Follow the steps below to turn the remote controller on and off.
- Press the power button once to check the current battery level. Charge the remote controller if the battery level is too low.
- Hold the power button or press once and then hold the power button to power on the remote controller.
Repeat Step 2 to power off the remote controller.
Activating the Smart Controller
The Smart Controller needs to be activated before using for the first time. Make sure the remote controller can connect to the internet during activation. Follow the steps below to activate the Smart Controller.
- Power on the remote controller. Select the language and tap “Next”. Carefully read the terms of use and privacy policy and tap “Agree”. After confirming, set the country/region.
- Connect the remote controller to the internet via Wi-Fi. After connecting, tap “Next” to continue and select the time zone, date, and time.
- Log in with your DJI account. If you do not have an account, create a DJI account and log in.
- Tap “Activate” on the activation page.
- After activating, please select if you would like to join the Smart Controller Improvement Project. The project helps to improve the user experience by sending diagnostic and usage data automatically every day. No personal data will be collected by DJI.
- The remote controller will check for firmware updates. If a firmware update is available, you will be prompted to download the latest version.
ATTENTION: Please check the internet connection if the activation fails. If the internet connection is normal, please try to activate the remote controller again. Contact DJI if the activation continues to fail.
Linking the Smart Controller
When the Smart Controller is purchased together with an aircraft, the remote controller has already been linked to the aircraft, and they can be directly used after activating the remote controller and aircraft. If the Smart Controller and the aircraft were purchased separately, follow the steps below to link the remote controller to the aircraft.
Method 1: Using Smart Controller Buttons
- Power on the remote controller and the aircraft.
- Press the customizable button C1, C2, and Record button simultaneously. The status LED blinks blue and the controller beeps twice to indicate the linking has started.
- Press the linking button on the aircraft. The remote controller’s status LED will be solid green if the linking is successful.
Method 2: Using DJI GO 4 / DJI Pilot
- Power on the remote controller and the aircraft. Tap “Go” on the homepage and log in using a DJI account.
- Tap “Enter Device”, select “Connect to the aircraft”, and follow the prompts to start linking.
- Select “Enter the Camera View” and tap
 in camera view. Scroll to the bottom, tap “Remote Controller Linking” and tap “OK” to confirm.
 - The status LED blinks blue and the remote controller beeps twice to indicate the linking has started.
- Press the linking button on the aircraft. The remote controller's status LED will be solid green if the linking is successful.
Method 3: Using Quick Settings
- Power on the remote controller and the aircraft.
- Swipe down from the top of the screen to open Quick Settings. Tap
 to start linking.
 - The status LED blinks blue and the remote controller beeps twice to indicate the linking has started.
- Press the linking button on the aircraft. The remote controller's status LED will be solid green if the linking is successful.
TIPS: Make sure the remote controller is within 1.6 ft (0.5 m) of the aircraft during linking. Make sure the remote controller is connected to the internet when logging in using a DJI account.
Controlling the Aircraft
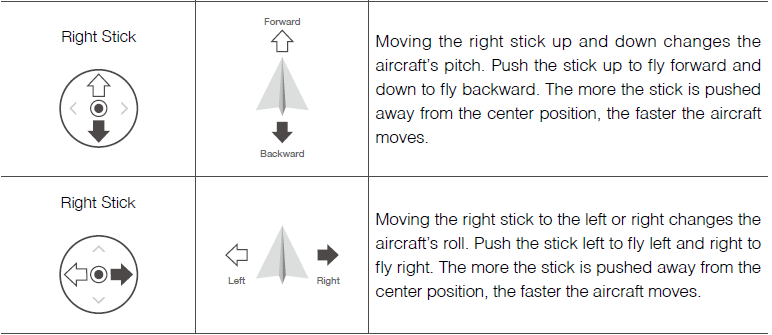
The control sticks control the aircraft’s orientation (yaw), forward and backward movement (pitch), altitude (throttle), and left and right movement (roll). The control stick mode determines the function of each control stick. Three preprogrammed modes (Mode 1, Mode 2, and Mode 3) are available and custom modes can be configured in DJI GO 4 / DJI Pilot. The default mode is Mode 2. In each of the three pre-programmed modes, the aircraft hovers in place at a constant orientation when both sticks are centered. See the figures below to see the function of each control stick in the three preprogrammed modes.
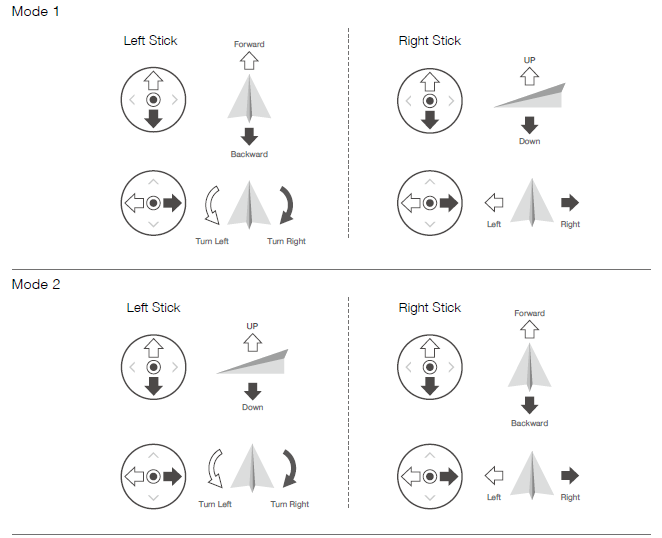
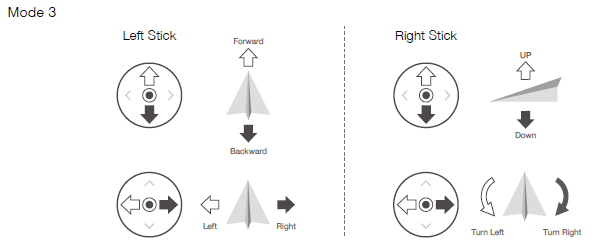
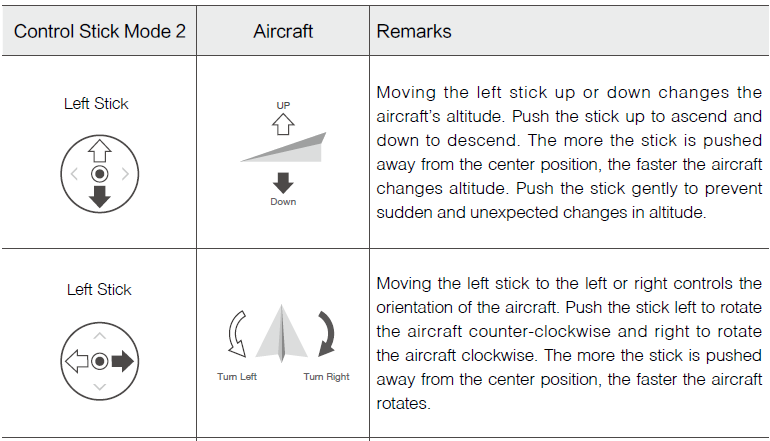
The figure below explains how to use each control stick. Mode 2 has been used as an example.
Center position: Control sticks are centered.
Moving the control stick: Control sticks are pushed away from the center.
ATTENTION
Keep the remote controller away from magnetic materials to avoid it being affected by magnetic interference.
To avoid damage, it is recommended that the control sticks are removed and stored in the storage slot on the remote controller during transportation or storage.
Flight Mode Switch
Toggle the switch to select the flight mode. Choose between T-mode, P-mode, and S-mode.

- T-mode (Tripod): The aircraft utilizes GPS and vision systems to locate itself, stabilize, and navigate between obstacles. In this mode, the maximum flight speed is limited to 2.2 mph (3.6 kph). The responsiveness to stick movements is also reduced for smoother, more controlled movement.
- P-mode (Positioning): P-mode works best when the GPS signal is strong. The aircraft utilizes GPS, Vision Systems, and an Infrared Sensing System to stabilize, avoid obstacles, and track moving subjects. Advanced features such as TapFly and ActiveTrack are available in this mode.
- S-mode (Sport): The handling gain values of the aircraft are adjusted to enhance aircraft maneuverability. Note that Vision Systems are disabled in this mode.
Regardless of the position the switch is in on the remote controller, the aircraft begins in P-mode by default. To switch flight modes, first go to camera view in DJI GO 4 / DJI Pilot, tap and enable “Multiple Flight Modes”. After enabling multiple flight modes, toggle the switch to P and then to S or T to switch flight modes.
ATTENTION: Refer to the flight modes section in the aircraft’s user manual for more information about flight mode features for different aircraft types.
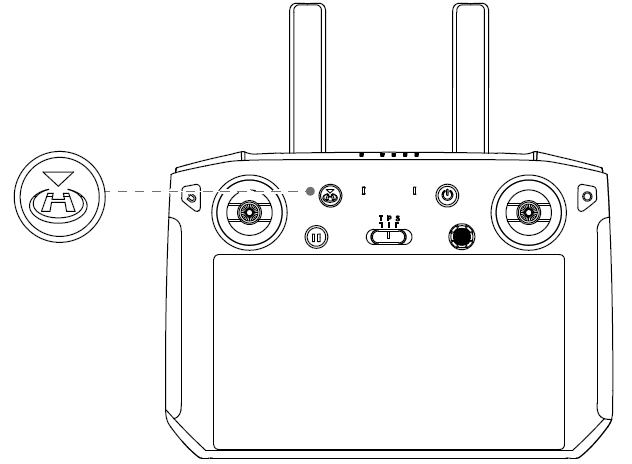
RTH Button
Press and hold the RTH button to start Return to Home (RTH) and the aircraft will return to the last recorded Home Point. Press the button again to cancel RTH and regain control of the aircraft. Refer to the Return to Home section in the aircraft’s user manual for more information about RTH.
Customizable Buttons
There are three customizable buttons on the controller: C1, C2, and the Confirm button. When the remote controller is not linked to an aircraft, press the Confirm button to confirm a selection. When the remote controller is linked to an aircraft, the button cannot be used to confirm a selection. However, the function of the button when linked to an aircraft can be customized in DJI GO 4 / DJI Pilot. The functions of the C1 and C2 buttons are set in DJI GO 4 / DJI Pilot. The default configuration for the C1 button is center focus and the default configuration for the C2 button is playback.
Optimal Transmission Range
The optimal transmission range of the Smart Controller is shown below:

Make sure the antennas are facing towards the aircraft. When the angle between the antennas and the back of the Smart Controller is 80° or 180°, the connection between the remote controller and the aircraft can reach its optimal performance. Note that the illustrations above do not reflect the actual distances between the user and aircraft and are for referene only.
ATTENTION:
DJI GO 4 / DJI Pilot will warn the user when the transmission signal is weak. Adjust the antennas to make sure that the aircraft is within the optimal transmission range.
Operating the Camera
Shoot videos and photos with the Focus/Shutter button and Record button on the remote controller.
- Focus/Shutter Button
Press to take a photo. If Burst mode is selected, multiple photos will be taken if the button is continuously pressed. - Record Button
Press once to start recording video and press again to stop. Camera Settings Dial
Mavic 2 Pro: Turn the dial to adjust the exposure compensation (when in Program mode), aperture (when in Aperture Priority and Manual mode), or shutter (when in Shutter Priority mode).
Mavic 2 Zoom/ Mavic 2 Enterprise:Turn to adjust the zoom of the Mavic 2 Zoom camera.
Mavic 2 Enterprise Dual:Turn the dial to adjust the exposure compensation.
Dual Remote Controller Mode
DJI Smart Controller supports Dual Remote Controller Mode when using with the Mavic 2 Pro/Zoom, which allows two remote controllers to connect to the same aircraft.
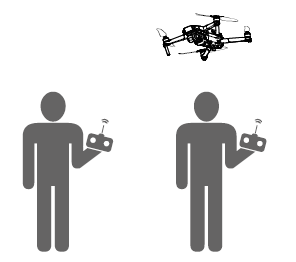
Dual Remote Controller Mode
DJI Smart Controller supports Dual Remote Controller Mode when using with the Mavic 2 Pro/Zoom, which allows two remote controllers to connect to the same aircraft.
- \Gimbal Dial
Both the Primary remote controller and the Secondary remote controller can control the gimbal dial, but the Primary remote controller has priority. For example, the Secondary remote controller is unable to control the gimbal dial when the Primary remote controller is using the gimbal dial. After the Primary remote controller has stopped controlling the gimbal dial for two seconds or more, the Secondary remote controller can control the gimbal dial. - Control Stick
Both the Primary remote controller and the Secondary remote controller can control the orientation of the aircraft using control sticks. The Primary remote controller has priority. The Secondary remote controller is unable to control the aircraft’s orientation when the Primary remote controller is operating the control sticks. After the control sticks are idle for two seconds or more, the Secondary remote controller can control the aircraft’s orientation.
If the control sticks on the Primary remote controller are pushed down and inward, the motors of the aircraft stop. If the same action is performed on the Secondary remote controller, however, the aircraft does not respond.
The control sticks on the Primary remote controller need to be released so that the Secondary remote controller can control the aircraft. - Flight Mode Switch
The flight mode can only be switched on the Primary remote controller. The Flight Mode Switch is disabled on the Secondary remote controller. - DJI GO 4 Settings
The display and parameter settings for the Primary and Secondary remote controllers in DJI GO 4 are the same. The Secondary remote controller can only configure the flight controller, vision system, video transmission, and Intelligent Flight Battery. Display and parameter settings for the Primary and Secondary remote controllers are the same in DJI GO 4.
Display Interface
Homepage
The screen displays the homepage when the Smart Controller is powered on. Example: Mavic 2 Pro
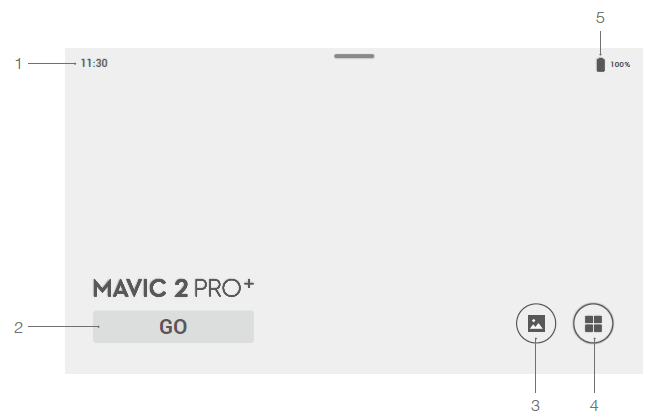
- Time
Displays local time. DJI GO 4 / DJI Pilot
Tap to enter DJI GO 4 / DJI Pilot. The button is blue if the remote controller is linked to the aircraft. Users can tap to enter camera view after logging in using a DJI account. If the remote controller is not linked to the aircraft, tap, and log in using a DJI account. Select “Enter Device” and follow the prompts to enter camera view.
- Gallery
Tap to check stored images and videos. - App Center
Tap to check all applications including DJI GO 4 / DJI Pilot, Settings, File Manager, and any third-party apps that users have downloaded and installed. Refer to the App Center section for more information. - Battery Level
Displays the battery level of the remote controller.
TIPS: Navigate on the remote controller by using the 5D button, the control sticks, or touching the screen. Confirm a selection by pressing the 5D button or touching the screen. Refer to the Control Stick Navigation section for more information.
App Center
Tap  to enter App Center. Users can find default system apps and third-party apps that have been downloaded.
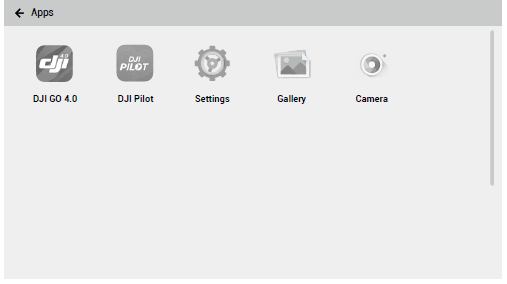
The App Center is subject to change in future
- Press the icon to enter the app.
- To move an app, hold the icon and move the app to where you wish to place it. To delete the app, hold the icon and drag it to the top of this page to remove it. Note that default system apps cannot be deleted.
- Press Settings to be able to configure settings such as button combinations, control stick navigation, date & time, languages, Wi-Fi, and Bluetooth.
WARNING: DJI bears no responsibility for the safe use of or compatibility support for third-party apps. If a third-party app is affecting the performance of the Smart Controller, try to delete the third-party apps or reset the Smart Controller to factory settings. To reset the Smart Controller to factory settings, go to Factory Data Reset under Settings.
Quick Settings
Swipe down from the top of the screen to open Quick Settings.
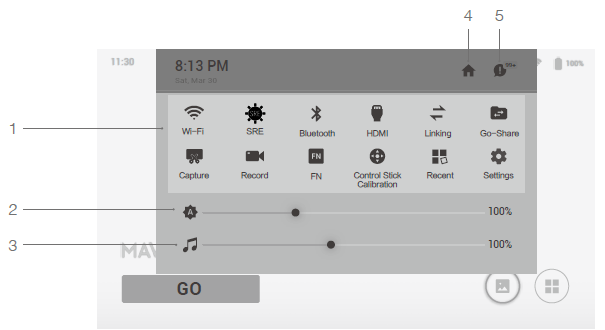
- Tap an icon to enable or disable the corresponding function. Hold the icon to enter the settings of the function (if available).
- Tap to enable or disable Wi-Fi. Hold to enter settings and connect to or add a Wi-Fi network.
 Tap to enable or disable SRE mode. Hold to enter settings and select an SRE mode.
- Tap on bluetooth button to enable or disable Bluetooth. Hold to enter settings and connect with nearby Bluetooth devices.
 Tap to enable or disable the HDMI connection. Hold to enter settings and adjust HDMI resolution, rotation, output mode, and screen zoom.
 Tap to start linking the remote controller to an aircraft.
  Tap to activate DJI GO Share. Hold to enter settings and set a GO Share Hotspot. Refer to the DJI GO Share section for more information.
  Tap to screenshot the screen.
  Tap to start recording the screen. While recording, the screen displays the recording time.
 - Tap “Stop” to stop recording.
 Tap or hold to check the button combinations.
  Tap to calibrate the sticks and wheels.
 Tap to check recently opened apps.
- Tap or hold on Settings Button to enter settings.
- Adjusting Brightness
Slide the bar to adjust brightness. The icon means auto brightness. Tap this icon or slide the bar, and the icon will turn to settings to switch it to manual brightness mode.
 - Adjusting Volume
Slide the bar to adjust the volume. Tap to mute the volume.
 - Homepage
 Tap to go back to the homepage.
  Notifications
Tap to check system notifications.
TIPS: SRE (Sunlight Readable Enhancement) allows users to bump up the highlights or shadows of an image individually or together. This helps users see particular areas of the screen more clearly when sunlight is strong. Quick Settings vary depending on the aircraft model linked and the firmware version of the Smart Controller.
DJI GO 4 App / DJI Pilot
To enter DJI GO 4 / DJI Pilot, tap “Go” on the homepage or tap on the homepage, then tap DJI GO 4 / DJI Pilot. In DJI GO 4 / DJI Pilot, you can check the flight status and set flight and camera parameters. Since the Smart Controller is compatible with multiple aircraft models, and the interface of DJI GO 4 / DJI Pilot may change based on the aircraft model, refer to the DJI GO 4 / DJI Pilot app section in the aircraft’s user manual for more information.
Specifications
- Local regulations in some countries prohibit the use of the 5.8 GHz and 5.2 GHz frequencies and in some regions the 5.2 GHz frequency is only allowed for indoor use.
- The Smart Controller supports microSD cards with a maximum storage capacity of 128 GB. *** The Smart Controller will support more DJI aircraft in future. Please visit the official website for the latest information.
Description
The DJI Smart Remote Controller is designed for professional drone pilots who require a reliable and convenient remote control for their DJI drones. The integrated display provides a clear and bright view of the drone's camera feed, making it easy to frame shots and monitor the drone's surroundings. The remote controller's dual-band Wi-Fi connection and OcuSync 2.0 compatibility ensure a stable and reliable connection, even in challenging environments. The remote controller's long battery life and compatibility with DJI's Go 4 app make it an ideal choice for professional drone pilots who require a reliable and convenient remote control for their DJI drones.
Troubleshooting
Here are some common problems and solutions for the DJI Smart Remote Controller:
- Problem: The remote controller is not connecting to the drone.
- Solution: Make sure the remote controller is charged and turned on. Check that the drone is also turned on and within range of the remote controller.
- Problem: The display is not responding to touch inputs.
- Solution: Make sure the display is clean and free of debris. Check that the remote controller is not wet or damaged. If the problem persists, try restarting the remote controller.
Pros & Cons
Pros
- Integrated display for easy viewing
- Dual-band Wi-Fi connection and OcuSync 2.0 compatibility
- Long battery life
- Compatible with DJI's Go 4 app
Cons
- Expensive
- Heavy and bulky
- Limited compatibility with DJI drones
Customer Reviews
Customers have praised the DJI Smart Remote Controller for its integrated display and reliable connection. However, some customers have criticized it for its high price and limited compatibility with DJI drones. The most common complaint is the remote controller's weight and bulkiness, which can make it difficult to transport and use for extended periods.
Faqs
How do I connect the DJI Smart Remote Controller to a drone?
Can I use the DJI Smart Remote Controller with any DJI drone?
How do I update the firmware on my DJI Smart Remote Controller?
What should I do if the DJI Smart Remote Controller's screen becomes unresponsive?
How can I extend the battery life of the DJI Smart Remote Controller?
Is it possible to use third-party apps with the DJI Smart Remote Controller?
How do I calibrate the DJI Smart Remote Controller's joysticks?
What's the maximum distance I can operate my drone with the DJI Smart Remote Controller?
Can I customize the buttons on the DJI Smart Remote Controller?
How do I connect my DJI Smart Remote Controller to a mobile device or computer?
Leave a Comment
