How to Use: Dr Browns Electric Sterilizer For Baby Bottles
Content
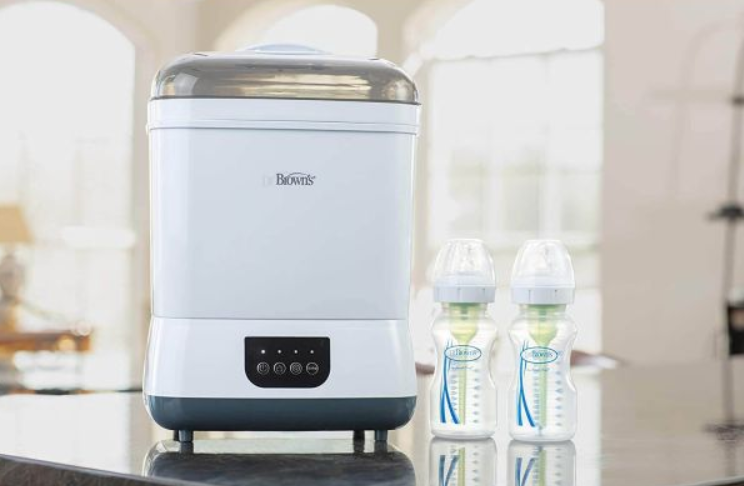
Introducing the Dr. Brown's Electric Sterilizer for Baby Bottles
Dr. Brown's Electric Sterilizer is a must-have for new parents who want to ensure their baby's bottles are completely clean and free from harmful germs and bacteria. This electric sterilizer is designed to kill 99.9% of bacteria, using steam heat to sterilize up to six bottles at once. It is easy to use, with a simple one-button operation, and features an automatic shut-off for safety. The estimated price of the product is $69.99, and it is now available for purchase.
Electric Sterilizer for Baby Bottles Parts
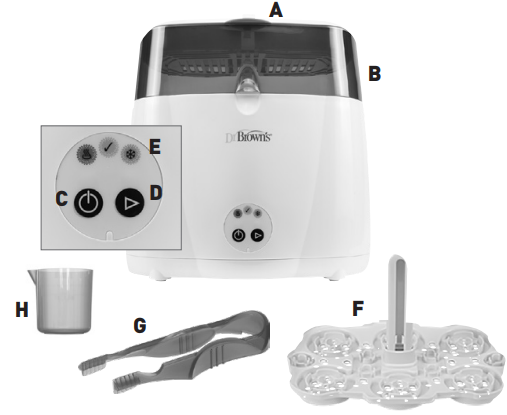
- A. Top cover
- B. Main cover
- C. ON/OFF Button
- D. Cycle Start Button
- E. Cycle Indicator Lights
- F. Tray
- G. Tongs
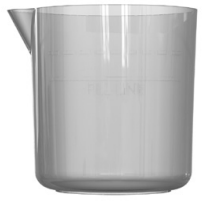
- H. Measuring Cup
Detailed Specifications
The Dr. Brown's Electric Sterilizer has the following specifications:
- Sterilizes up to six bottles at once
- Uses steam heat to kill 99.9% of bacteria
- One-button operation for ease of use
- Automatic shut-off for safety
- Compact design for space-saving
- Removable tray for easy cleaning
- Power: 120V AC, 60Hz
- Dimensions: 12.5 x 12.5 x 8.5 inches
- Weight: 4.25 pounds
How to Use
- Before running this appliance, it is important that all bottles, bottle parts and/or other accessories are clean. They must be washed, rinsed and empty.
- Position the appliance on a flat surface and out of reach of children where it cannot be knocked or moved during operation. Remove the tray.
- Remove the measuring cup and tongs from the unit.
Fill the measuring cup to the FILL LINE (3 oz/80 ml) with water and pour the water INTO THE BOTTOM OF THE HEATING CHAMBER. For best performance, use distilled water. Using tap water will require the monthly descale procedure.
NOTE: DO NOT EXCEED the recommended amount of water. Please note that hard water may increase build up or other residue on the heating plate. If you have hard water, we recommend that you use distilled water.
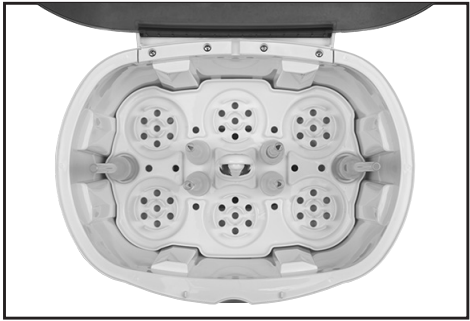
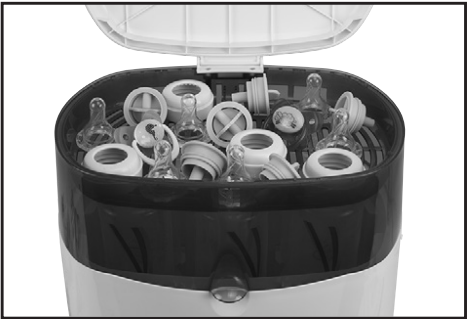
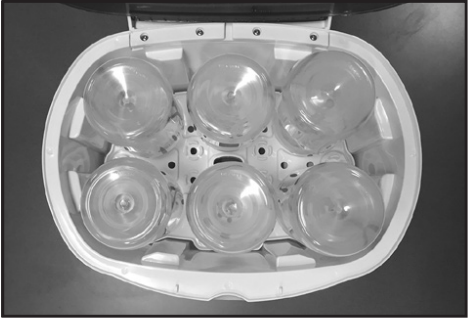
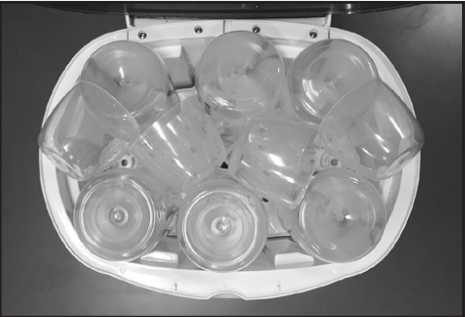
- Place the tray (part F) in the sterilizer heating chamber. Arrange the bottles and other parts in the tray. NOTE: If using Dr. Brown’s bottles and parts, see Figure A through Figure G on the next page for suggested layout options. Both narrow and wide-neck bottles are shown.
- Close the main cover (part B) and arrange the parts on the grate as shown in Figure C and Figure G.
- Close top cover (part A).
- Plug the power cord into an electrical outlet and press the On Button (C).
NOTE: When the steriliz-er is turned on, you will notice that cycle indicator lights (E) will illuminate with a cycle of RED-BLUE-GREEN colors. After this initial cycle-through of colors, the green symbol will remain lit indicating “READY” mode.- Ready Cycle: With the green “ready” symbol illuminated, press the cycle start button (D).
- Heat Cycle: The red symbol will indicate that the appliance is “HEATING” to create steam. It will remain lit until all water is consumed and the sterilization cycle is complete. This is approximately 8 minutes but may vary by the amount of water you add, the number of items to be sterilized and other environmental factors.
- Cool Down Cycle: Upon the completion of the sterilization cycle, the blue symbol will illuminate to indicate the “COOL DOWN” cycle. Note: If you forget to add water to the unit and start the heating cycle (red light on), the unit must complete the cool down cycle (blue light on) before a new “heat” cycle can be attempted.
CAUTION: DO NOT OPEN STERILIZER DURING COOL DOWN CYCLE. - READY (unload) Cycle: When the cool down cycle is complete, the green “READY” symbol will again light. You may unload your items or allow them to air dry.
- Open the main cover and remove all bottles and place on a countertop or other flat surface. Open the top cover and re-assemble the bottles with the various components.
- You may now turn the unit off by pressing the on-off button (C) or begin another sterilization cycle after again adding 3 oz/80 ml of water.
Placement of narrow reservoirs
Placement of narrow bottles
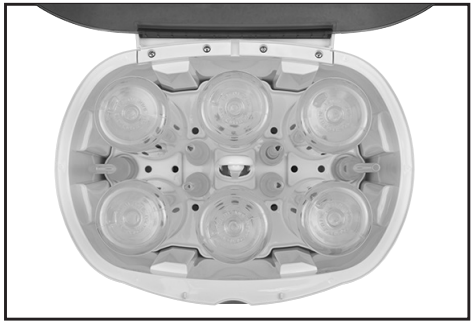
Placement of narrow parts (nipples/teats, collars, inserts) and pacifiers/soothers
Placement of wide-neck reservoirs*

Placement of wide-neck bottles
Placement of wide-neck caps (2 caps on bottom, 4 caps on top)
Placement of wide-neck parts (nipples/teats, collars, inserts) and pacifiers/soothers
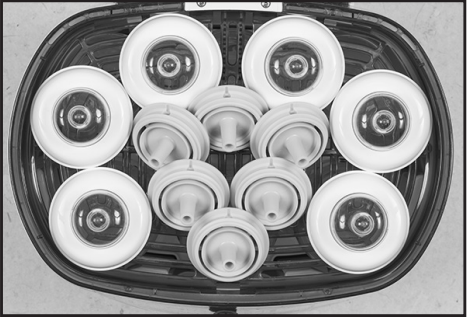
When sterilizing six (6) 9 oz/270 ml Wide-Neck Options+TM bottles, remove the detachable handle from the inner tray to make room for all six bottles, reservoirs, and caps in the main compartment. The green reservoirs should be placed inside the bottles during sterilization. Ensure that all parts are completely cool before removing from the unit.
Dr. Brown's Electric Sterilizer for Baby Bottles Description
The Dr. Brown's Electric Sterilizer is a convenient and effective way to sterilize baby bottles. It uses steam heat to kill 99.9% of bacteria, ensuring that your baby's bottles are completely clean and safe to use. The sterilizer is easy to use, with a one-button operation, and features an automatic shut-off for safety. The compact design makes it easy to store, and the removable tray makes cleaning a breeze. The sterilizer can hold up to six bottles at once, making it a great option for busy parents who need to sterilize multiple bottles at once.
Setup Guide
Setting up the Dr. Brown's Electric Sterilizer is easy. First, make sure that the sterilizer is unplugged and the tray is removed. Next, add water to the sterilizer, making sure to follow the instructions in the user manual. Once the water has been added, replace the tray and plug in the sterilizer. Press the button to start the sterilization cycle, and wait for the cycle to complete. Once the cycle is finished, the sterilizer will automatically shut off. Wait for the sterilizer to cool before removing the bottles, and be sure to handle them carefully to avoid burns.
TO CLEAN THE APPLIANCE
The Dr. Brown’s Natural Flow Deluxe Bottle Sterilizer should be cleaned at least once a week when in regular use. Wait at least 60 minutes after a sterilization cycle to allow the device to cool. Before cleaning your device ALWAYS disconnect the power plug from the outlet.
- The removable tray, tongs and measuring cup can be cleaned in hot soapy water and rinsed completely.
- The base exterior and heating chamber and two covers can be cleaned with a damp sponge or damp cloth.
CAUTION: DO NOT IMMERSE THE STERILIZER BASE IN WATER. DAMAGE TO ELECTRICAL COMPONENTS WILL RESULT.
TO CLEAN THE HEATING ELEMENT
Mineral deposits may form on the metal heating element in the bottom of the heating chamber. It is important to de-scale this appliance every 4 weeks to ensure that it continues to work properly.
- Unplug the device.
- Remove the tray.
- De-scale utilizing a 3.5 oz/100 ml mixture of vinegar/water:
- Fill measuring cup to FILL LINE (3 oz/80 ml) with white vinegar.
- Then add cold water up to the dashed line (.5 oz/20 ml), for a total of 3.5 oz/100 ml.
- Pour directly over the heating element.
- Turn the unit on and run a sterilization cycle.
- Empty any remaining solution and rinse with clean water.
NOTE: DO NOT USE BLEACH, HARSH ABRASIVES OR SOLVENTS TO CLEAN THE HEATING CHAMBER OR HEATING ELEMENTS AS THEY MAY CAUSE PERMANENT DAMAGE AND WILL VOID THE WARRANTY
Important Safeguards
This product is for household use only. When using electrical appliances, basic safety precautions should always be followed including the following:
- Read all instructions.
- Do not touch hot surfaces. Use handles or knobs.
- To protect against electrical shock, do not immerse cord or plug in water or other liquids.
- Close supervision is necessary when any appliance is used by or near children.
- This appliance shall not be used by children. Keep the appliance and its cord out of reach of children.
- Unplug from outlet when not in use and before cleaning. Allow to cool before putting on or taking off parts.
- Do not operate any appliance with a damaged cord or plug or after the appliance malfunctions or has been damaged in any manner. Return appliance to the nearest authorized service facility for examination, repair or adjustment.
- The heating element surface is subject to residual heat after use.
- The use of accessory attachments not recommended by Handi-Craft Company may cause injuries.
- Do not use outdoors.
- Do not let cord hang over edge of table or counter, or touch hot surfaces.
- Do not place on or near a hot gas or electric burner, or in a heated oven.
- Extreme caution must be used when moving an appliance containing hot liquids.
- To operate, plug cord into wall outlet. To disconnect, turn any control to “off” then remove plug from wall outlet.
- Do not use appliance for other than intended use.
- A short power-supply cord is provided to reduce the risk resulting from becoming entangled in or tripping over a longer cord.
- Longer extension cords may be used if care is exercised in their use.
- If a longer extension cord is used, the marked electrical rating of the extension cord should be at least as great as the electrical rating of the appliance, and the cord should be arranged so that it will not drape over the countertop or tabletop where it can be pulled on by children or tripped over unintentionally.
- Never immerse the sterilizer or power cord in water.
- When in use, the sterilizer contains hot water. Be careful to avoid spilling or splashing water on yourself when removing contents from the sterilizer.
- For Model AC045 only: This appliance has a polarized plug (one blade is wider than the other). To reduce the risk of electric shock, this plug is intended to fit into a polarized outlet only one way. If the plug does not fit fully into the outlet, reverse the plug. If it still does not fit, contact a qualified electrician. Do not attempt to modify the plug in any way.
- This appliance is intended for household use only.
- Appliances can be used by persons with reduced physical, sensory or mental capabilities or lack of experience and knowledge if they have been given supervision or instruction concerning use of the appliance in a safe way and understand the hazards involved.
- Children shall not play with the appliance.
- If the supply cord is damaged it must be replaced by the manufacturer, its service agent, or similarly qualified person in order to avoid hazard.
- NOT FOR SPACE HEATING PURPOSES.
Warning: Do not misuse this sterilizer for other than its intended use to avoid potential injury.
Please read through the ENTIRE INSTRUCTION BOOK including the IMPORTANT SAFEGUARDS before using your new Dr. Brown’s Natural Flow® Deluxe Bottle Sterilizer for the first time.
IMPORTANT: Pour water into device before turning on.
Troubleshooting of Dr. Brown's Electric Sterilizer for Baby Bottles
If the sterilizer is not working properly, check to make sure that it is plugged in and that the power cord is not damaged. Make sure that there is enough water in the sterilizer, and that it is at the correct level. If the sterilizer is still not working, unplug it and contact Dr. Brown's customer service for further assistance. It is important to note that the sterilizer should not be used to heat baby formula or breast milk, as this can cause harm to your baby.
Dr. Brown's Electric Sterilizer Warranty
The Dr Brown’s Natural Flow Deluxe Bottle Sterilizer includes a one year warranty against defects in material and workmanship from date of purchase. In the unlikely event of a malfunction or defect during the warranty period, Handi-Craft Company, at its option, will replace or repair the product under warranty.
Pros & Cons
Pros
- Kills 99.9% of bacteria
- Easy to use with one-button operation
- Automatic shut-off for safety
- Compact design for space-saving
- Removable tray for easy cleaning
Cons
- May be too bulky for some countertops
- Can only be used with Dr. Brown's bottles
Dr. Brown's Electric Sterilizer for Baby Bottles Customer Reviews
Customers love the Dr. Brown's Electric Sterilizer for its ease of use and effectiveness in sterilizing baby bottles. Many parents appreciate the compact design and automatic shut-off feature, which provides peace of mind and added safety. However, some customers have noted that the sterilizer is only compatible with Dr. Brown's bottles, which may be a drawback for those who use different brands.
Most Common Complaints about Dr. Brown's Electric Sterilizer for Baby Bottles
The most common complaint about the Dr. Brown's Electric Sterilizer is that it is only compatible with Dr. Brown's bottles. Some customers have also noted that the sterilizer is a bit bulky and may not fit well on some countertops. Additionally, some customers have reported issues with the automatic shut-off feature, which may not always work as intended.
Faqs
Which kinds of bottles can be sterilised with the Baby Bottle Electric Steriliser by Dr. Brown?
How does Dr. Brown's Electric Sterilizer work to sterilize bottles?
How many bottles can be held simultaneously in Dr. Brown's Electric Steriliser?
Before using Dr. Brown's Electric Steriliser for Baby Bottles, do the bottles need to be cleaned?
How long does Dr. Brown's Electric Sterilizer's sterilising cycle last?
After sterilising bottles, does Dr. Brown's Electric Steriliser for Baby Bottles allow the bottles to air dry?
How often should I descale Dr. Brown's Electric Sterilizer for Baby Bottles?
When using the Dr. Brown's Electric Steriliser for Baby Bottles, what safety measures should I take?
Does Dr. Brown's Electric Steriliser come with a warranty?
Can I use the Dr. Brown's Electric Steriliser for Baby Bottles to sterilise both plastic and glass bottles at the same time?
Leave a Comment