Dragontouch DK01 Mini Drone User Manual | Flight Operation
Content
Introduction of Dragontouch DK01 Mini Drone
The Dragontouch Mini Drone is a compact and affordable drone designed for beginners and hobbyists. This lightweight and portable drone boasts several impressive features, including altitude hold, headless mode, and one-key takeoff and landing, making it easy for users of all skill levels to operate. The Dragontouch DK01 Mini Drone is expected to launch in mid-2022 and is estimated to be priced around $50 to $60.
Detailed Specifications
Here are the detailed specifications of the Dragontouch DK01 Mini Drone
- Dimensions: 120 x 120 x 35mm
- Weight: 85g
- Flight time: 5-7 minutes
- Charging time: 40-50 minutes
- Control distance: 30-50 meters
- Camera: 720P HD camera
- Gyro: 6-axis
- Flight modes: Altitude hold, headless mode, one-key takeoff and landing, 3D flip
Drone
- Dimensions: 170mm x 170mm x 38mm Battery capacity: 3.7V/500mAh Charging time: 60 minutes
- Flight time: 6 minutes
- Remote distance: 60 meters
- Gravity Sensor Remote Control Battery capacity: 3.7V/150mAh Charging time: 30 minutes
- Usage time: 10 hours
Note
- Remote control will automatically turn off after 1 minute of inactivity.
- When the remote control is under low-voltage protection mode (as shown by the indicator light flashing slowly), please charge it before use.
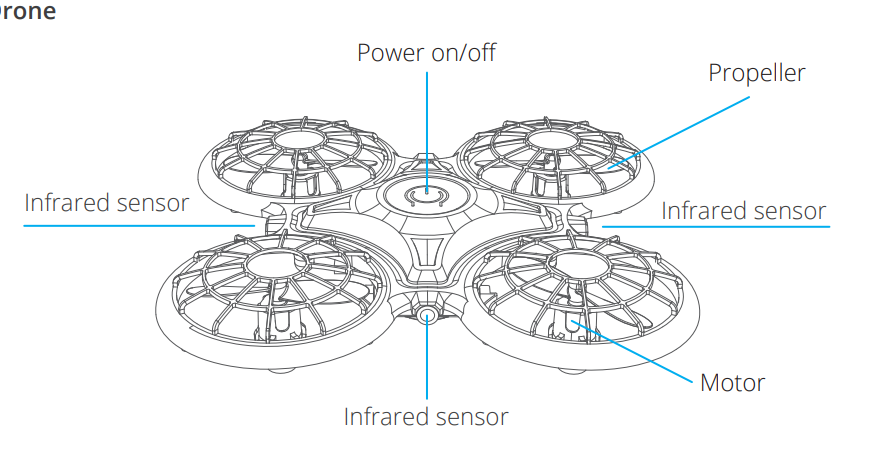
Description of DK01 Mini Drone
The DK01 Mini Drone is a compact and lightweight drone that is perfect for beginners and hobbyists. With its easy-to-use features, users can enjoy flying the drone without any hassle. The altitude hold feature allows the drone to hover at a fixed height, making it easier for users to take photos and videos. The headless mode eliminates the need to adjust the drone's orientation before flying, allowing users to control the drone more intuitively. The one-key takeoff and landing feature allows for easy takeoff and landing, making it more convenient for users. The 720P HD camera provides clear and sharp images and videos, and the 3D flip feature adds a fun element to flying the drone.
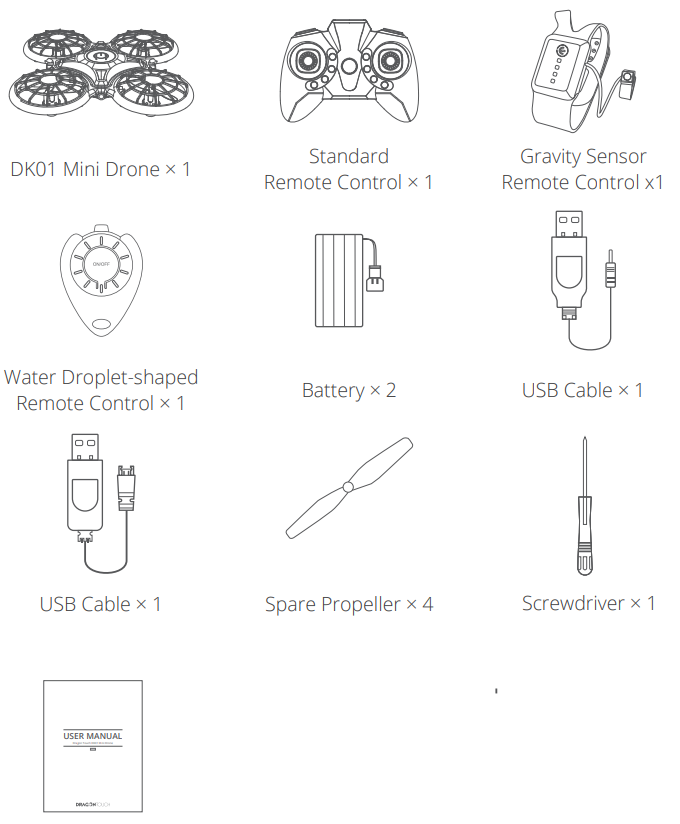
PACKAGE CONTENTS
PRODUCT FEATURES
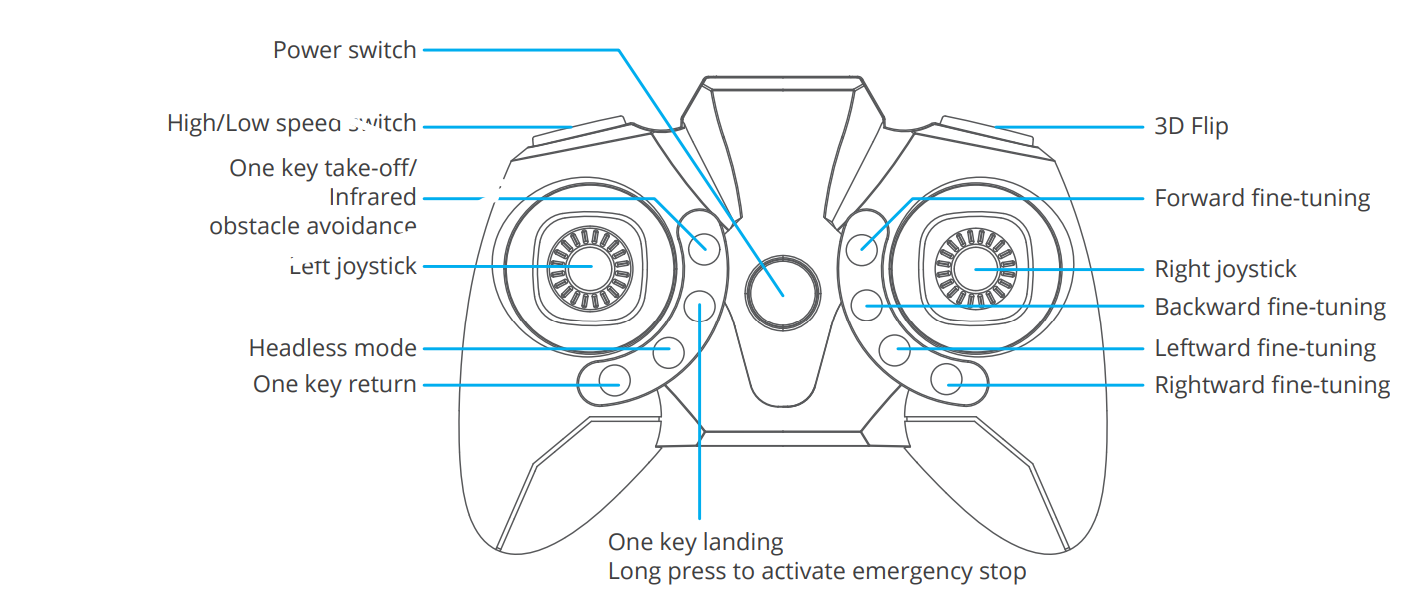
Standard Remote Control
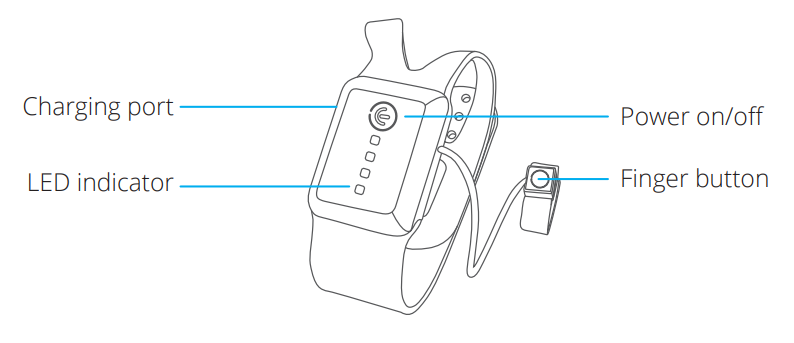
Gravity Sensor Remote Control
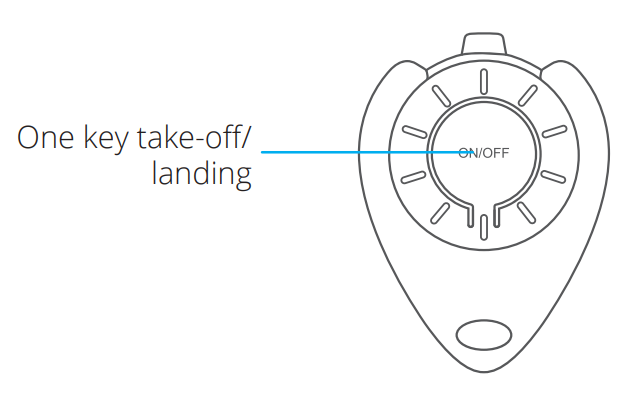
Waterdrop Remote Control
GETTING STARTED
Charging and installing the battery
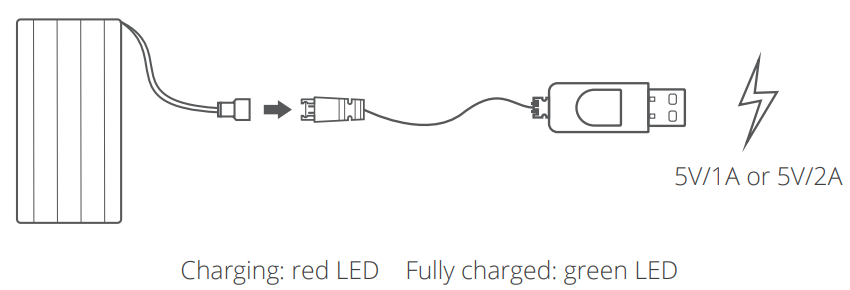
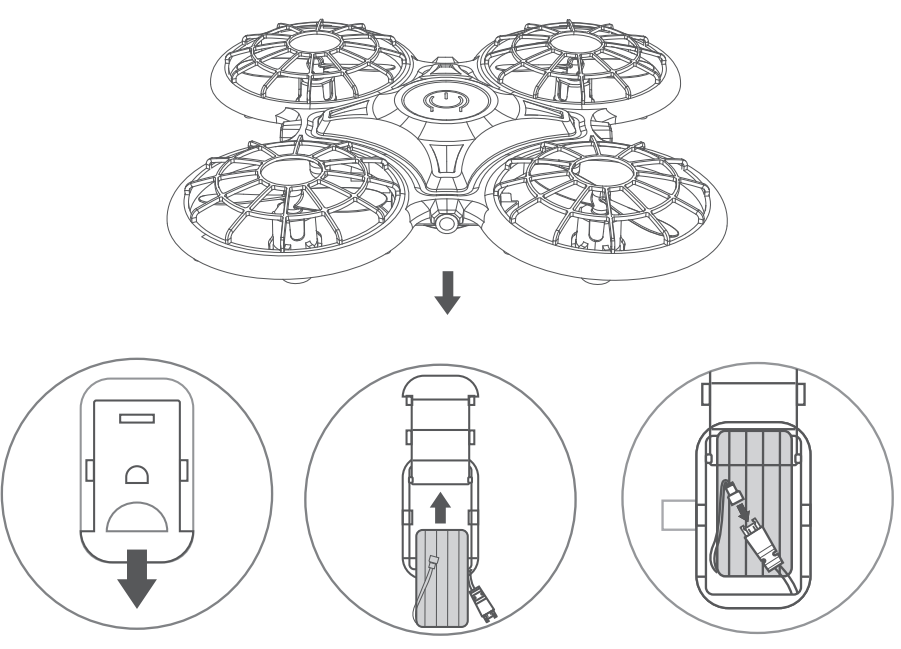
Charge the drone battery.
Install the drone battery when fully charged.
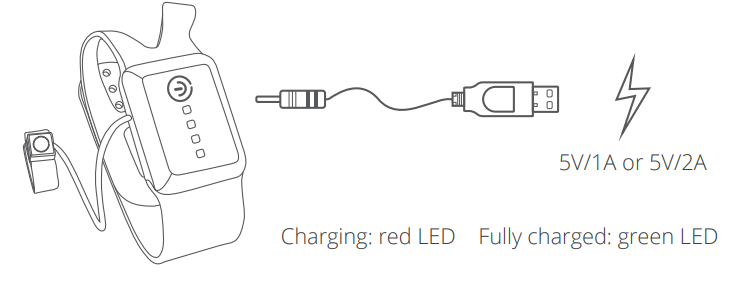
Charge the gravity sensor remote control.
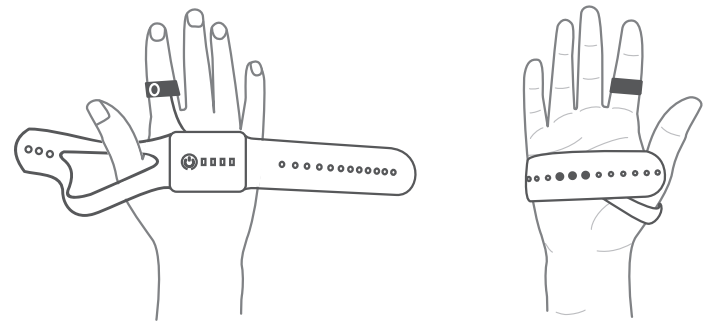
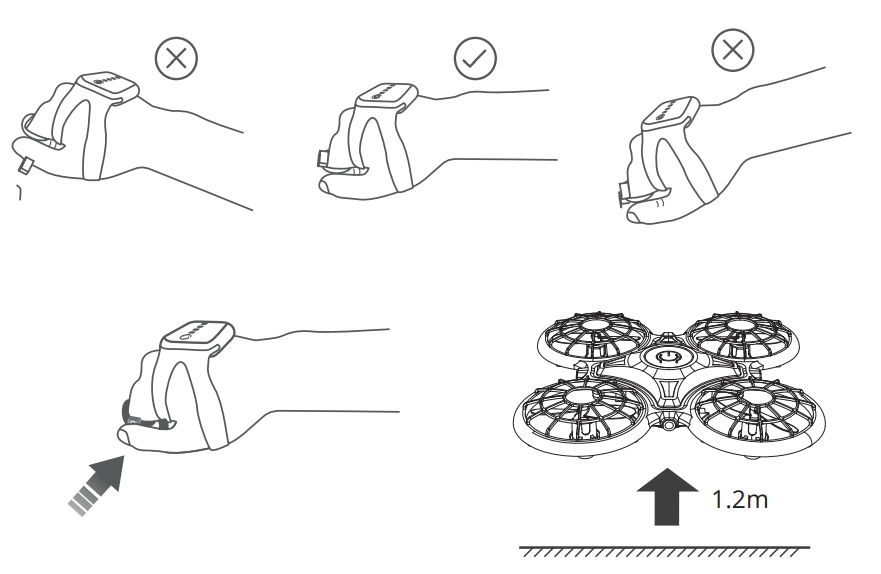
Wear the gravity sensor remote control on your palm when fully charged.
Purchase 3*AAA 1.5V batteries (not included) and install in the standard remote control.
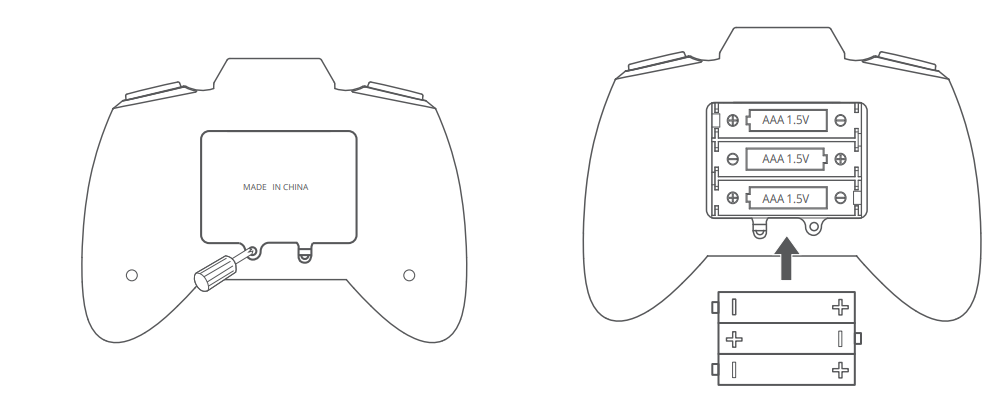
Note: Ensure batteries are installed correctly. DO NOT use old batteries and new batteries at the same time.
- The battery of the waterdrop remote control is not rechargeable.
Note- For your safety, please use the original battery and USB cables provided.
- The battery life will be reduced when it is used in cold weather.
- Please avoid exposing the battery to sunlight, heat or high temperatures.
FLIGHT OPERATION
Note
- For each flight, power on the drone first and then power on the remote.
- Please repeat the pairing procedure each time when the drone or remote is restarted.
- Calibration is a must to avoid losing your drone.
- Flying in the open air and within the control range is highly recommended for beginners.
FLIGHT WITH THE STANDARD REMOTE CONTROL
- Power on and pair the remote with the drone
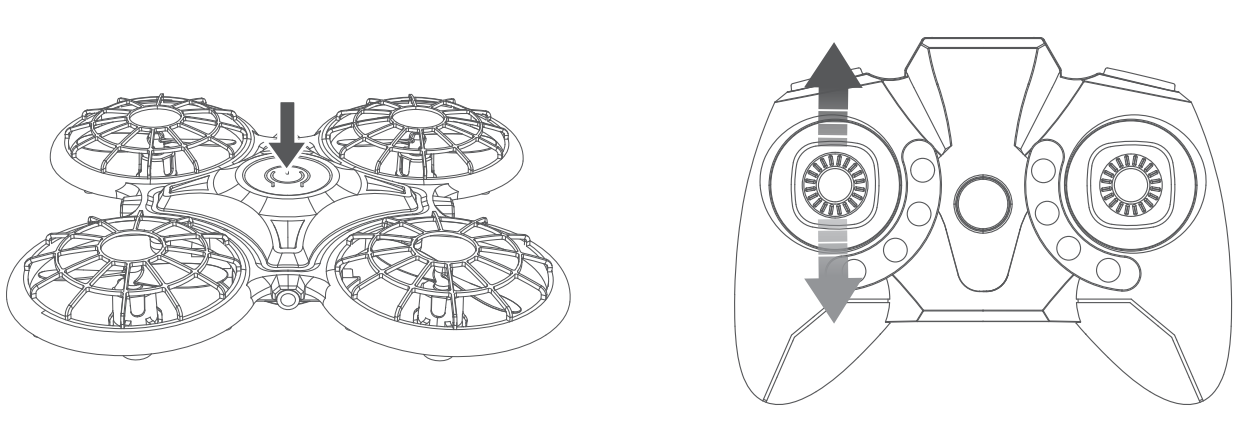
- Place the drone on a flat surface. Press and hold the Power button on the drone to power on. The drone’s LEDs will start flashing.
Press the Power button on the remote control to power on. Wait for a few seconds and the pairing will be completed automatically, the LEDs on the drone will change from white to colorful and solid on.
Calibrate
Simultaneously move the left joystick to the bottom right at a 45° angle and move the right joystick to the bottom left at a 45° angle and hold for 3 seconds to calibrate the drone. The LED lights on the drone will blink white for about 3 seconds. The calibration is complete when the colorful LED lights turn on, and you will hear a beep from the remote control.
- Flight instructions
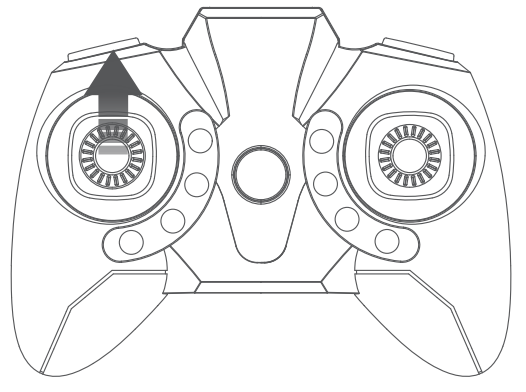
Take-off- After finishing the pairing, push the Left joystick forward to unlock. The four propellers will then start rotating. Push the Left joystick forward again, the drone will take off.
After finishing the pairing, push the Left joystick forward to unlock. The four propellers will then start rotating. Press the One key take-off button to take off.
DIRECTIONS
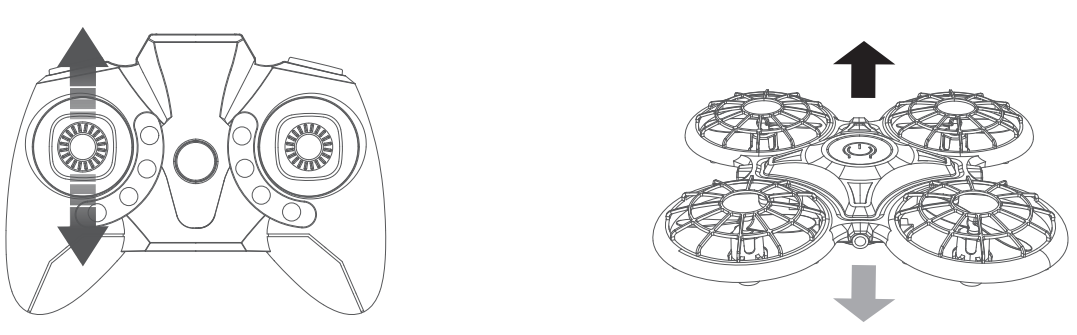
- Left joystick
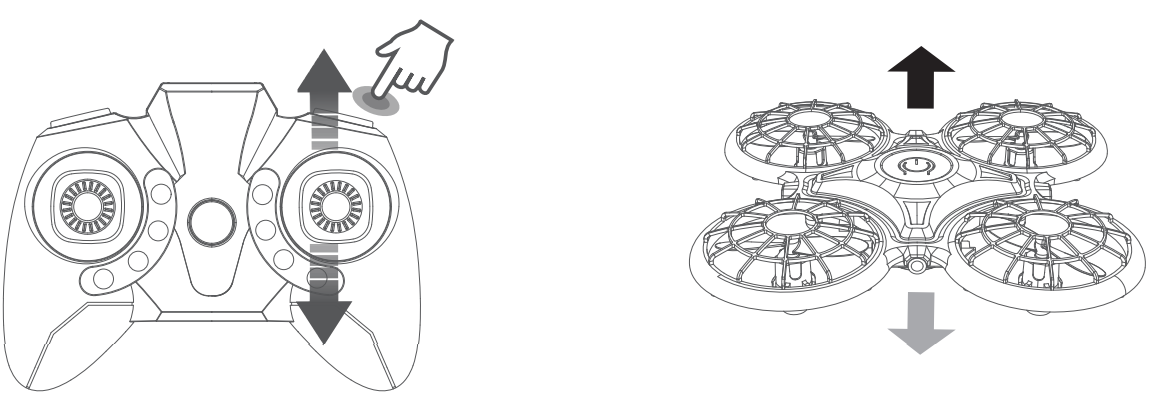
Ascend and descend: Push the Left joystick forward and the drone will ascend; pull it backward and the drone will descend.
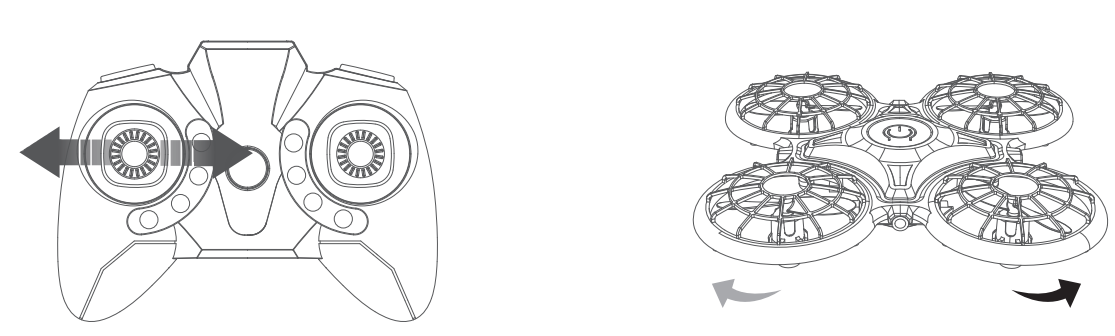
Rotate left and rotate right: Pull the Left joystick leftward and the drone will rotate to the left; pull it rightward and the drone will rotate to the right.
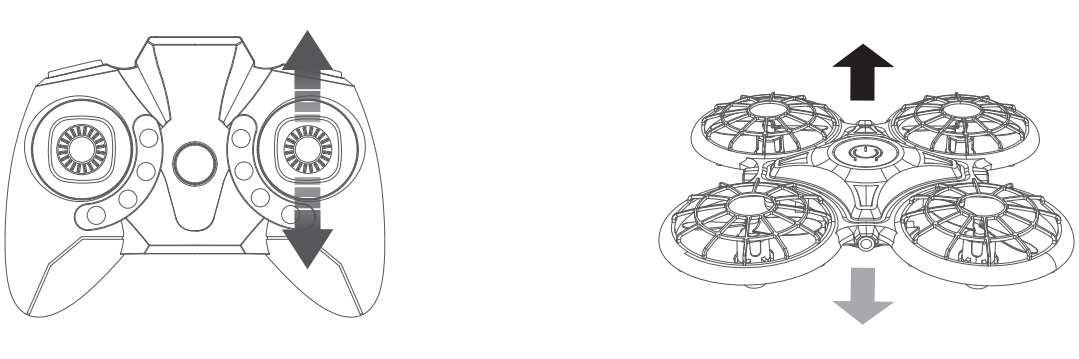
- Right joystick
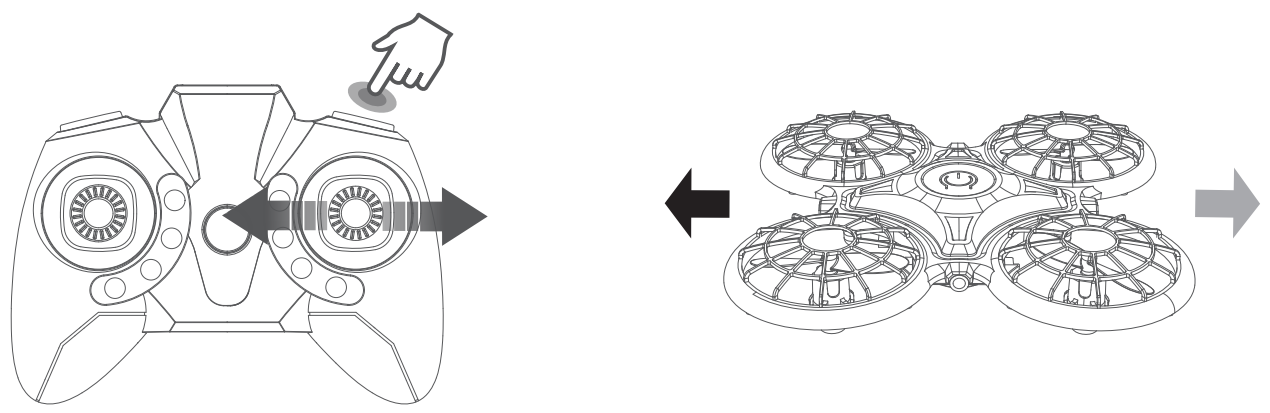
Forward and backward: Push the Right joystick forward and the drone will fly forward; pull it backward and the drone will fly backward.
Leftward and rightward: Pull the Right joystick leftward and the drone will fly leftward; pull it rightward and the drone will fly rightward.
- Flight trimming
- Trimming can be important in helping you control your drone.
- If the drone drifts forward or backward during the flight, press and hold the 360°Flip button, then gently move the Right joystick backward or forward to adjust.
If the drone drifts leftward or rightward during the flight, press and hold the 360°Flip button, then gently move the Right joystick rightward or leftward to adjust.
Release the Right joystick and the 360° Flip button to exit the trimming mode.
360° Flip
After flying the drone to an altitude of over 2 meters, press the Right joystick and 360° Flip button to activate 360° Flip function. Release once the flip is completed. Move the Right joystick forward/backward/leftward/rightward to flip the drone 360° in the corresponding direction. Please note that this function cannot be activated when the battery power of the drone is low. Release the Right joystick and the 360° Flip button to exit the trimming mode.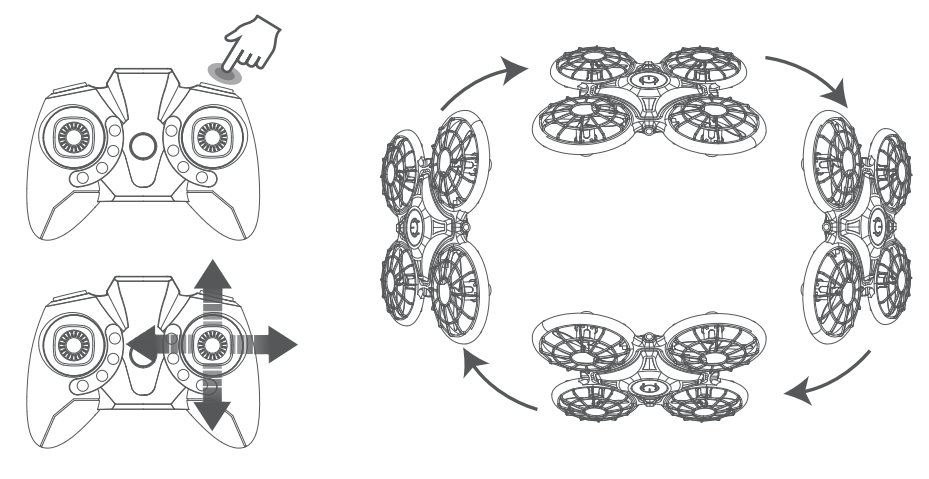
- Speed switch
Low speed is the drone’s default setting. Press the Speed switch button once for medium speed, indicated by two beeps from the remote. Press it again for high speed, indicated by three beeps from the remote. A third press will return the drone to low speed, indicated by one beep from the remote. - One key return
Press and hold the One key return button, the drone will fly backwards in the reverse direction of its original flight path. Press and hold the button again to exit this mode. - Headless mode
Press the Headless mode button to activate the function. The LEDs on the drone will flash and users will hear a beeping sound from the remote. In this mode, the drone will fly following the direction of the Right joystick regardless of the position of your drone’s head or tail. Press the same button again to exit this mode. - Infrared obstacle avoidance
Press down the One key take-off/Infrared obstacle avoidance button to activate the Infrared obstacle avoidance mode. The drone will fly in another direction when it detects an obstacle. Press it down again to exit this mode. - Emergency stop
Press down and hold the One-key Landing button for 3 seconds, the drone will stop flying and fall to the ground. To avoid any unpleasant accidents, please make sure there is nobody under the drone when using emergency stop. - Altitude hold/Hover
This is one of the drone’s default settings. When you release the Left joystick after the ascending/descending action, the drone will hover at its current flight altitude. Proper trimming can help achieve a stable flight. - Landing
- Press down the One key landing button to land.
- during the flight, pull the Left joystick backward as far as possible to land the drone, and hold it for 3 seconds until all the rotor blades stop rotating.
FLIGHT WITH THE GRAVITY SENSOR REMOTE CONTROL
Power on and pair the remote with the drone
Place the drone on a flat surface. Press and hold the Power button on the drone to power on. The LEDs on it will start flashing.
Press and hold the Power button to power on the remote control. The LEDs on it will start flashing and the remote will automatically pair with the drone. When the pairing is completed, the LEDs on both the drone and remote will remain on.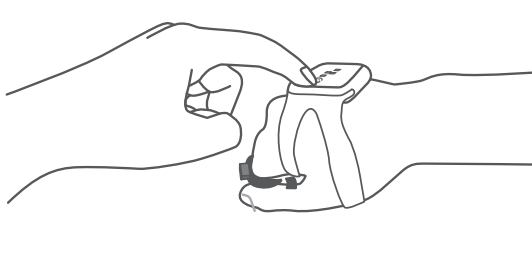
- Calibrate
Press the Power button on the drone. The LEDs on the drone will then start flashing quickly. The calibration is complete when the LEDs on the drone remain on constantly. - Flight instruction
Take-off
Clench your fist, then make sure the remote is parallel with the surface on which you are stood. Press the Finger button, then release it. The drone will take off vertically to an altitude of 1.2 meters.
- Directions
- Forward: Release the Finger button during the flight, then tilt your fist downward. Backward: Release the Finger button during the flight, then tilt your fist upward.
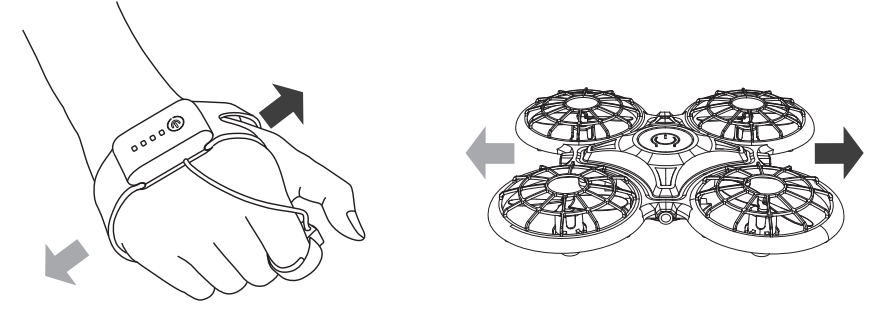
Leftward: Release the Finger button during the flight, then lean your fist leftward. Rightward: Release the Finger button during the flight, then lean your fist rightward.
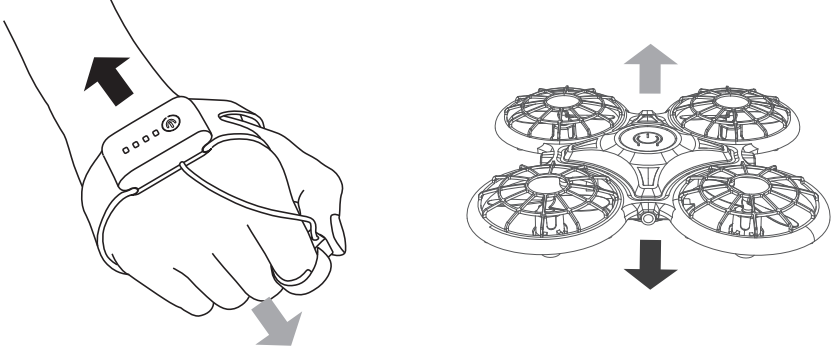
- Ascend: Press and hold the Finger button during the flight, then tilt your fist upward.
Descend: Press and hold the Finger button during the flight, then tilt your fist downward.
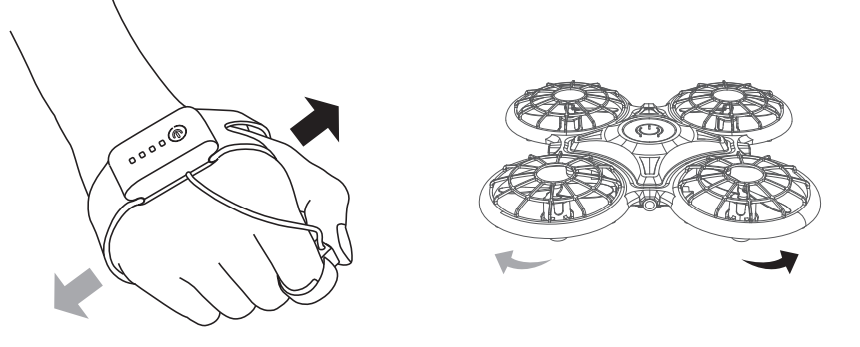
- Rotate left: Press and hold the Finger button during the flight, then lean your fist leftward.
Rotate right: Press and hold the Finger button during the flight, then lean your fist rightward.
360° Flip
Move your fist to make sure the remote is parallel with the surface on which you are stood during the flight (as you were before take-off). Press the Finger button, then release it. The LEDs on the drone will start flashing quickly. Then move your fist forward/backward/leftward/rightward to flip the drone accordingly.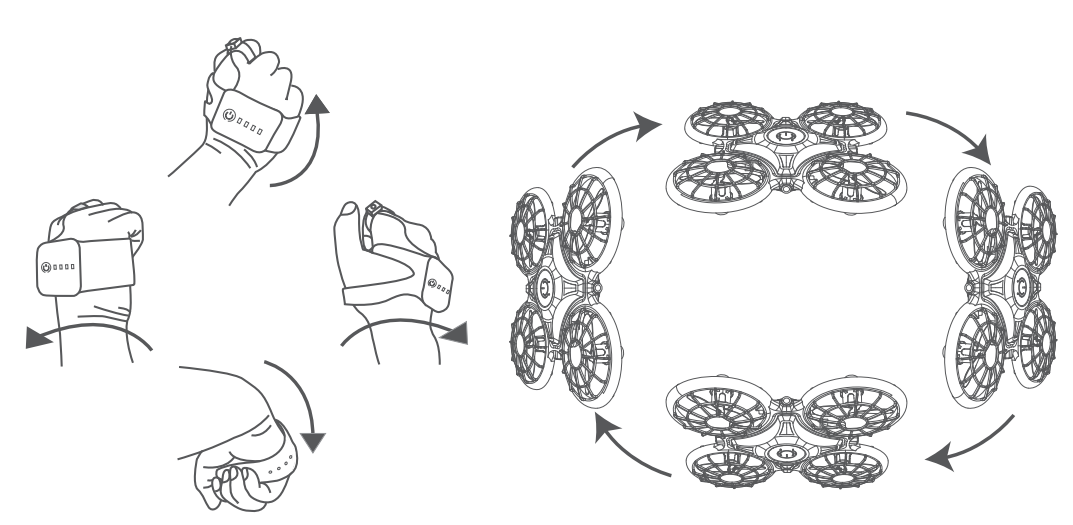
- Infrared obstacle avoidance
Continuously press the Finger button 3 times to activate infrared obstacle avoidance mode during the flight. The LEDs on the drone will flash 3 times, then remain on constantly. The drone will fly in another direction when it detects an obstacle. Continuously press the Finger button 3 times again to exit the mode. - Emergency stop
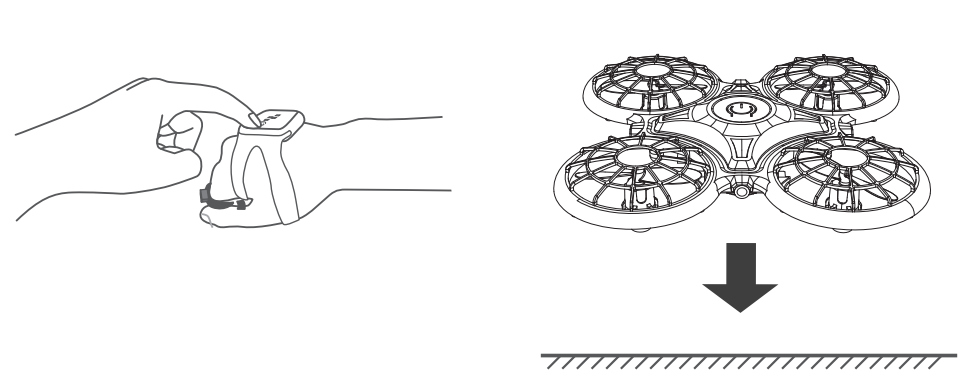
Press and hold the Power button on the remote for 2 seconds, the drone will stop flying and fall to the ground. To avoid any unpleasant accidents, please make sure there is nobody under the drone when using the emergency stop. - Landing
Move your fist to make sure the remote is parallel with the surface during the flight. Release the Finger button, then press the Power button on the remote to land.
FLIGHT WITH THE WATERDROP REMOTE CONTROL
Note: Please turn off the standard remote control and gravity sensor remote control before using the waterdrop remote control.
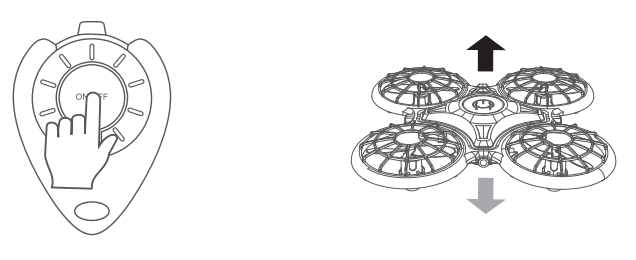
- Power on
Place the drone on a flat surface. Press and hold the Power button on the drone to power on. The LEDs on it will start flashing. You do not need to power on and pair the waterdrop remote control with the drone. - Calibrate
Press the Power button on the drone. The LEDs on the drone will start flashing quickly. The calibration is complete when the LEDs flash slowly. - Flight instructions
Take-offPress the button on the waterdrop remote control to commence take-off.
- Place the drone in the palm of your hand with the head of the drone facing forward. Gently throw it into the air.
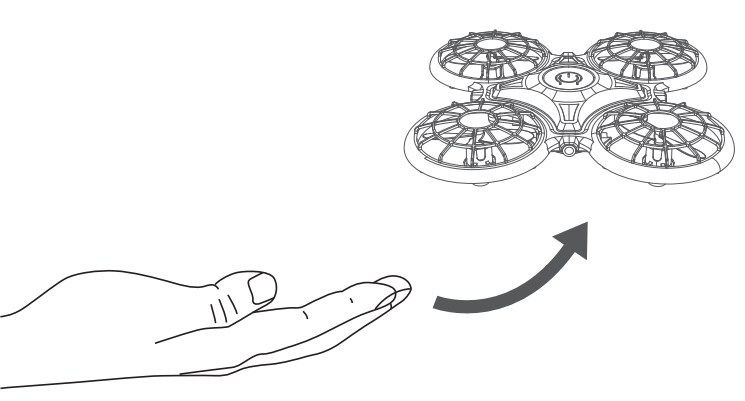
Note: Please make sure there is enough space while throwing the drone up. We recommend this option only for skilled drone users.
- Directions
- Ascend: Put your hand under the drone.
- Descend: When the drone flies over an altitude of 1.2 meters, it will slowly descend automatically.
- Leftward: Put your hand to the right side of the drone.
- Rightward: Put your hand to the left side of the drone.
- Landing
Press the button on the remote to land the drone during the flight.
MAINTENANCE
- Frequently clean this product with a soft clean cloth.
- Avoid exposing this product to sunlight, heat or high temperatures.
- Keep away from water.
- Regularly check the plugs and other components, please repair the product before using it if something is broken or damaged.
SAFETY GUIDANCE
- Keep the small components away from children.
- Please make sure the drone ascends slowly to avoid any potential damage at high speed.
- After landing, please turn off the remote control first, and then power off the drone.
- Please keep the drone a safe distance of 2-3 meters from other people to avoid crashes or accidents during landing.
- Children should be under the supervision of an adult when using this product.
- Please do not charge the battery which is not rechargeable. Make sure that the batteries are installed correctly. DO NOT use old batteries and new batteries at the same time.
- Users are highly recommended to power off the drone and the remotes, and take out the batteries when they are not in use for a long time.
- Be aware of the risk of short circuits.
CAUTION
- When the battery status of the drone or remote control is low, it may affect the remote distance.
- If the battery status of the drone is low, it may have difficulty in maintaining take-off or flight altitude.
- Please stop using this product and repair it as soon as possible if something is broken or damaged. Failure to do so could pose a safety hazard.
- Please take out the batteries in case of battery leakage if it is not in use for a long time.
- Avoid falls or collisions as these will severely shorten the product life.
- This product contains many metallic alloy parts. Please be cautious not to hurt your fingers.
TROUBLESHOOTING
- Drone LEDs are not lighting up.
- Press the Power button on the drone.
- Replace or charge the battery of the drone.
- Make sure the connectors of the battery are firmly plugged in.
- Drone LEDs keep flashing, but the drone is not responding to any commands from the standard remote control.
- Pair the drone and the remote again.
- Replace or charge the battery of the drone.
- Make sure the batteries in the remote have enough power.
- Make sure to turn off the gravity sensor remote control.
- 3. The flight is not stable.
- Return the drone and restart to do calibration as instructed.
- Make the flight trimming accordingly.
- Fly the drone when the weather is good.
- The response from the drone to the control is not sensitive. Make sure the distance between the drone and the remote is effective.
- The drone will fly beyond the control range.
- Activate the Headless mode, then move the Right joystick to fly the drone back.
- The rotor blades need to be replaced.
- The propellers and motors are marked A and B. Please pair them when replacing the rotor blades.
- The waterdrop remote control does not work.
- Make sure you turn off the gravity sensor remote and the standard remote.
Pros & Cons of Dragontouch DK01 Mini Drone
Pros
- Affordable price
- Compact and lightweight design
- Easy-to-use features
- 720P HD camera
- 3D flip feature
Cons
- Short flight time
- Limited control distance
- No advanced features such as obstacle avoidance or follow-me mode
Customer Reviews of DK01 Mini Drone
Customers who have purchased the DK01 Mini Drone have given it positive reviews, praising its ease of use and compact design. However, some customers have noted the short flight time and limited control distance as drawbacks. The most common complaint is that the drone can be difficult to control in windy conditions.
Faqs
How do I set up my DragonTouch DK01 Mini Drone for the first time?
How can I fix the DragonTouch DK01's connection problems?
How long can the DragonTouch DK01 Mini Drone fly?
How can I get the most out of my DragonTouch DK01 drone's battery?
How can I link my phone to the camera on the DK01 drone?
Is it possible to fly the DragonTouch DK01 Mini Drone indoors?
What is the DragonTouch DK01 drone's control mechanism?
How should I proceed if the battery on the DK01 drone refuses to charge?
When flying the DragonTouch DK01, what safety measures should I take?
How long is the DragonTouch DK01 Mini Drone's warranty valid?
Leave a Comment