Dyna Glo Charcoal Offset Vertical Smoker DGO1890BDC-D User Guide
Content
Introduction
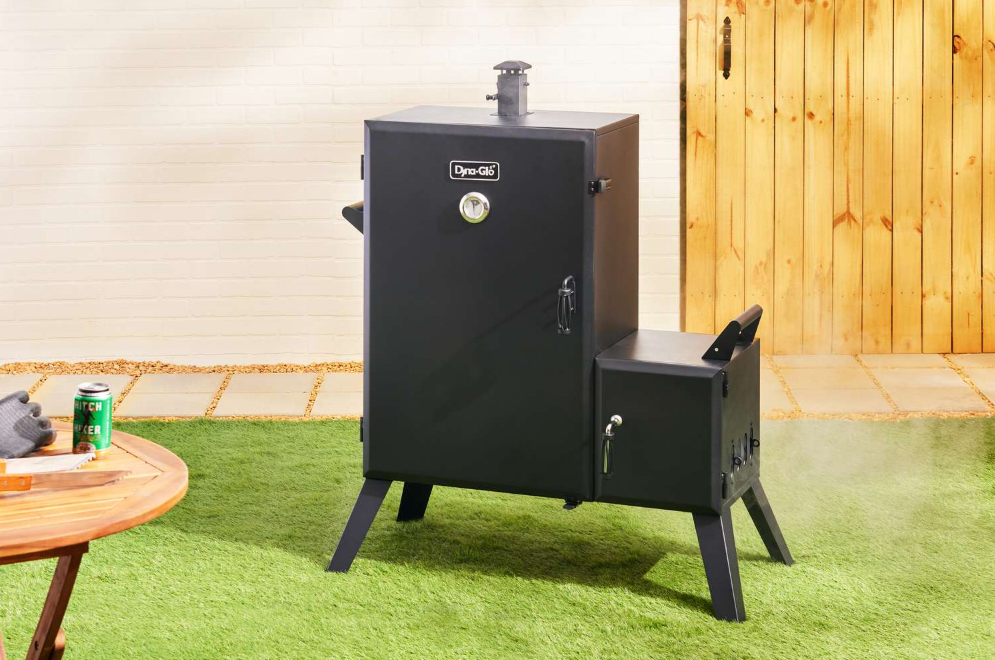
The Dyna Glo Charcoal Offset Vertical Smoker DGO1890BDC-D is a robust and versatile smoker designed for barbecue enthusiasts who seek rich, smoky flavors in their meats. With 1,890 square inches of cooking space across six height-adjustable grates, it can accommodate a variety of food types, from ribs to whole turkeys. The offset design allows for indirect cooking, ensuring even heat distribution. Priced at $335.90, this smoker is an excellent choice for both beginners and seasoned pitmasters.
PACKAGE CONTENTS
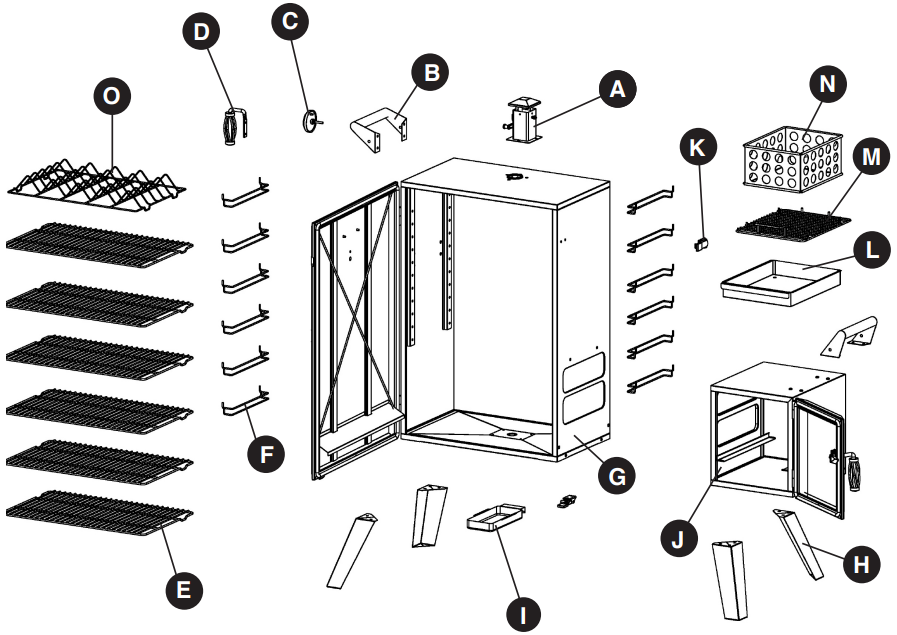
PART | DESCRIPTION | QUANTITY |
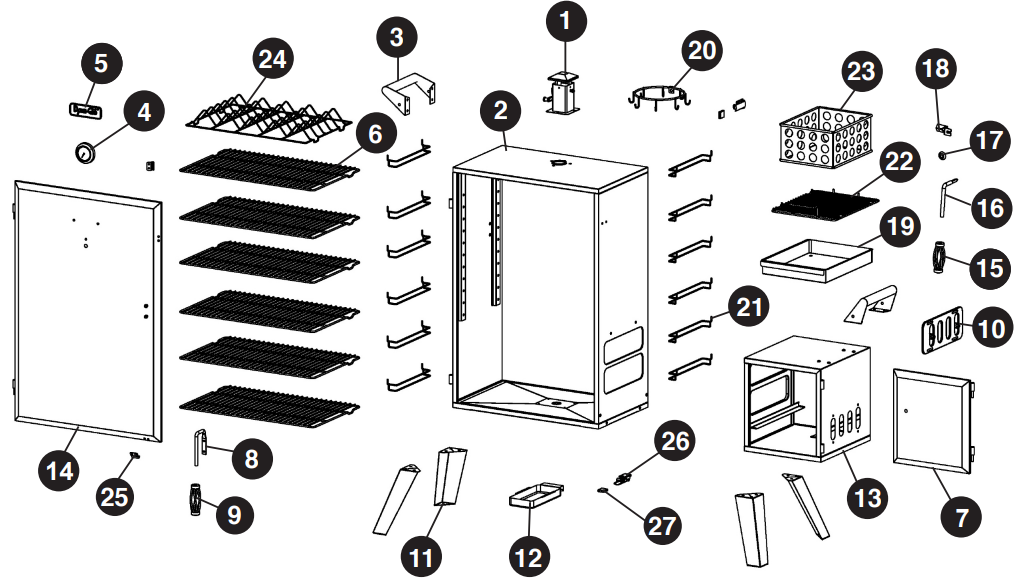
A | Smoke stack assembly | 1 |
B | Lifting handle | 2 |
C | Temperature gauge | 1 |
D | Door handle | 1 |
E | Cooking grate | 6 |
F | Cooking grate support | 12 |
G | Smoker body-left | 1 |
H | Leg | 4 |
I | Grease cup | 1 |
J | Smoker body-right | 1 |
K | Door latch | 2 |
L | Ash Tray | 1 |
M | Charcoal Grate | 1 |
N | Charcoal Chamber | 1 |
O | Rib Rack | 1 |
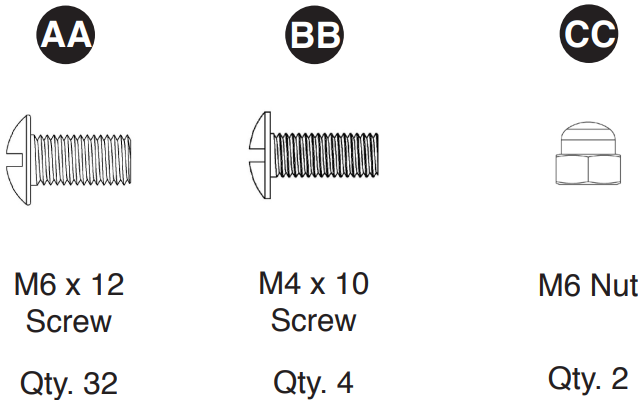
HARDWARE CONTENTS
Detailed Specifications
The Dyna Glo Charcoal Offset Vertical Smoker DGO1890BDC-D boasts several key features that make it a standout in its category. Here are some of the most notable specifications:
- Offset design with a large charcoal chamber
- Total cooking area of 1,890 square inches across six adjustable racks
- Heavy-gauge porcelain-coated steel construction for durability
- EZ-Access heavy-gauge porcelain-coated steel lid
- Adjustable chimney and smokestack for optimal ventilation
- Temperature range from 100°F to 350°F
- Charcoal tray with handles for easy ash removal
PREPARATION
Before beginning assembly of the product, make sure all parts are present. Compare parts with the package contents list and hardware contents above. If any part is missing or damaged, do not attempt to assemble the product. Contact customer service for replacement parts.
Estimated Assembly Time: 15 minutes

Tools Required for Assembly (not included):
- Phillips Screwdriver,
- Pliers,
- Adjustable Wrench
Description
The Dyna Glo Charcoal Offset Vertical Smoker DGO1890BDC-D is built with durability and performance in mind. The heavy-gauge porcelain-coated steel construction ensures long-lasting use and resistance to rust and corrosion. The smoker features an offset design, allowing for separate charcoal and cooking chambers, which helps in maintaining consistent temperatures and reducing flare-ups.
The six adjustable racks provide ample space for smoking various types of food simultaneously, making it an excellent choice for large gatherings. The smoker also includes an adjustable chimney and smokestack to help control ventilation and ensure optimal smoke circulation.
ASSEMBLY INSTRUCTIONS
CAUTION: Remove both doors before turning the smoker upside down.
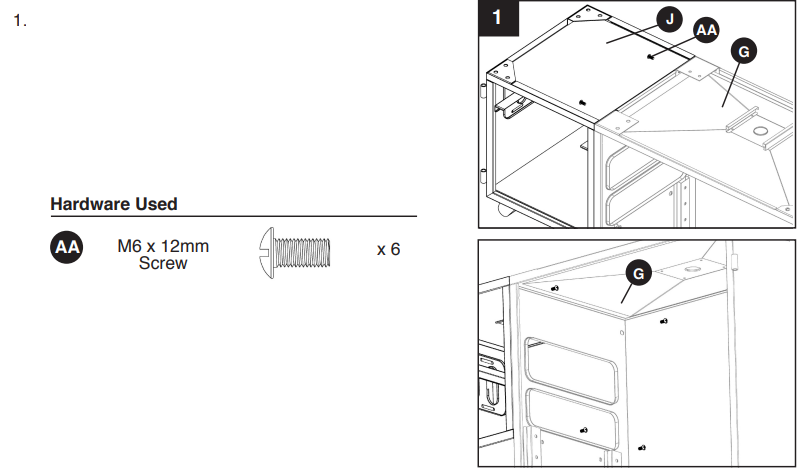
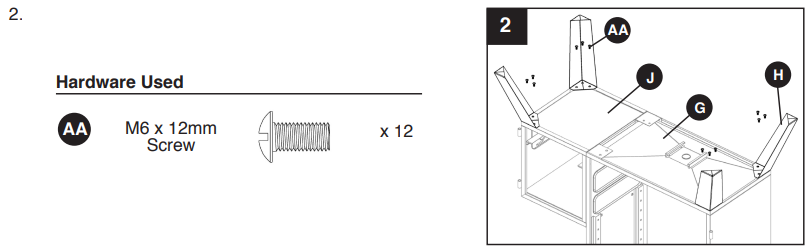
With smoker body-right (J) turned upside down, attach smoker body-left (G) to smoker body-right (J) using six M6x12 screws (AA).
Attach legs (H) to smoker body-left (G) and smoker body-right (J) using twelve M6x12 screws (AA).
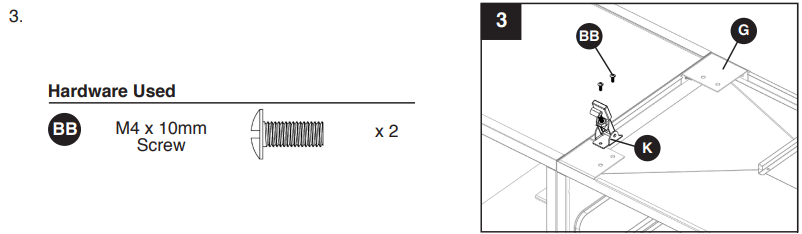
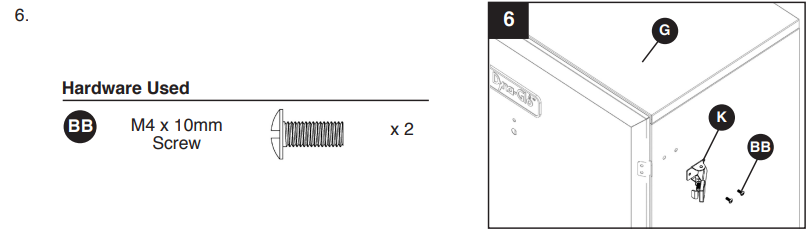
Attach door latch (K) to smoker body-left (G) using two M4x10 screw (BB).
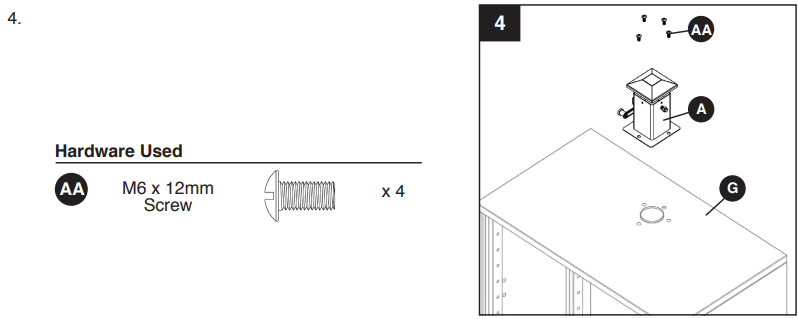
CAUTION: This unit is HEAVY! Do not attempt this step without assistance! With the assistance of a helper, stand the unit upright on its legs on a firm and level surface. (Make sure that legs are attached). Position the square smoke stack (A) with the control arm to the left as shown. Using 4 bolts (AA), attach the square smoke stack (A) to the top of the smoker body (G). Securely tighten with a Phillips screwdriver. Reattach both doors.
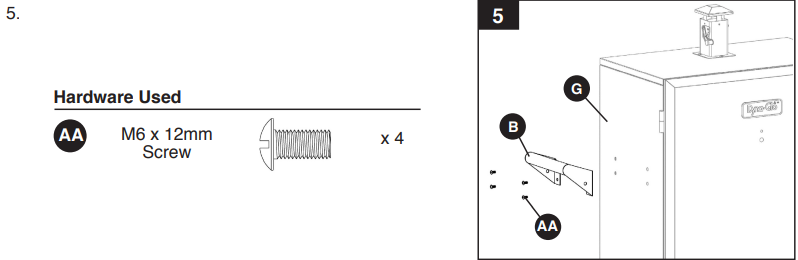
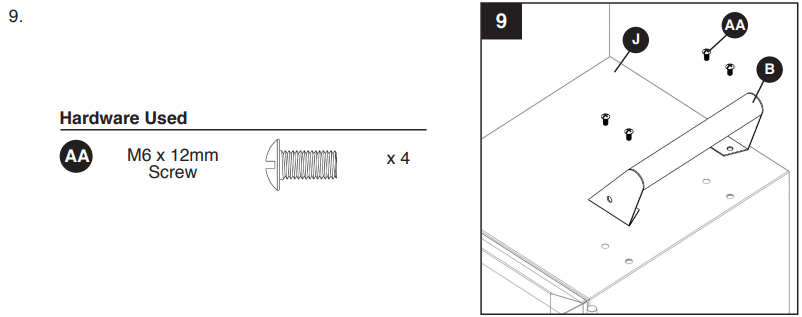
Attach lifting handle (B) to smoker body-left (G) using four M6x12 screws (AA).
Attach door latch (K) to smoker body-left (G) using two M4x10 screws (BB).
Attach door handle (D) to the primary door on the smoker body-left (G) using two M6x12 screws (AA) and two M6 nuts (CC).
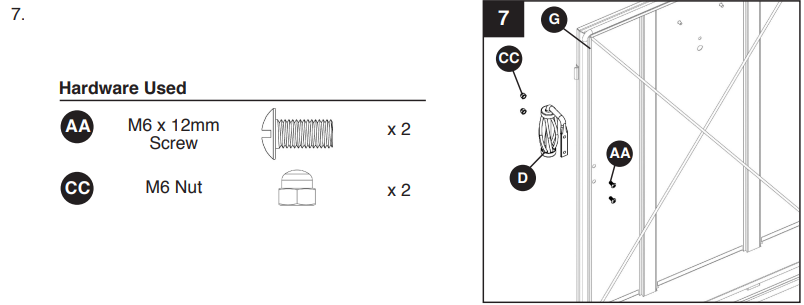
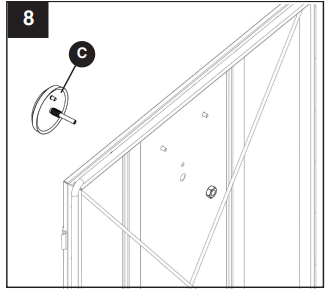
Remove the pre-assembled nut from the temperature gauge (C). Insert the probe through the hole of the smoker door from the outside. Secure with the nut from the inside panel. Tighten with a wrench.
Attach lifting handle (B) to smoker body-right (J) using four M6x12 screws (AA).
- Insert the cooking grate supports (F) into the corresponding holes inside the smoker body (G), starting from the bottom up.
NOTE: There are 12 possible positions to install the cooking grate according to the need of the user. Slide the cooking grates (E) onto the grate supports (F) inside the smoker body (G).
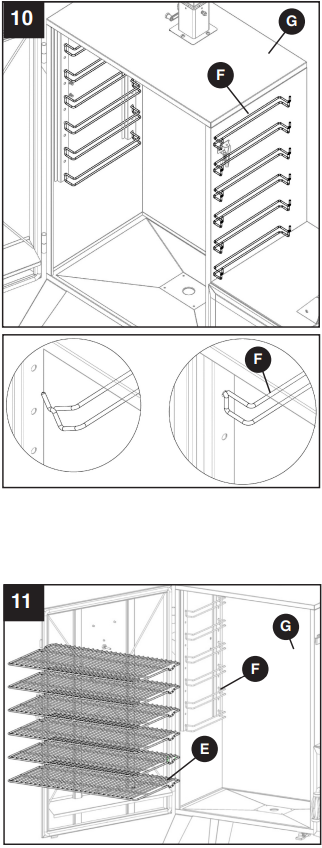
- Installing the Rib Rack (Optional) Place the rib rack (O) directly onto the desired grate before sliding the grate onto the supports.
NOTE: The left or right edge of the rib rack should not hang over the outer edge of the cooking grate before placing it back into the smoker. Place the charcoal chamber (N) directly onto the charcoal grate (M) and slide the grate onto the support brackets inside the smoker body-right (J). Slide the ash tray (L) under the support brackets.
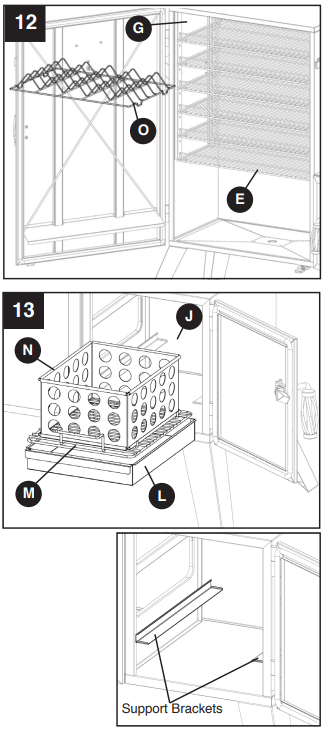
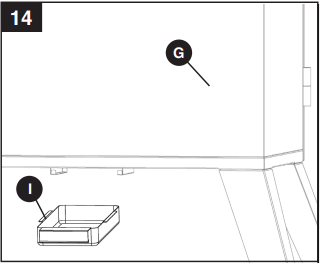
Slide the grease cup (I) to the grease cup support of the smoker body-left (G) bottom.
BEFORE FIRST USE
- Remove all hangings or plastic straps, if present. Before you cook food in your smoker, it is important to "season" your smoker. Seasoning seals the paint and interior of your smoker to enhance flavoring, durability, and overall performance.
- To season your smoker, simply use it as you normally would only do not cook any food. You will need to follow all of the operating procedures in the next few sections of this manual.
- Using your desired flavoring woods and marinades, burn your smoker at low temperatures (around 175°F/79.4°C) for 45 – 60 minutes.
- Let the smoker cool and clean out the wood chips and charcoal. Once seasoning is complete, your smoker's interior will have a durable, seasoned coating.
Lighting Instructions of Dyna Glo Charcoal Offset Vertical Smoker DGO1890BDC-D
DO NOT USE PRETREATED, MATCH-LIGHT CHARCOAL with this smoker. Only use standard, untreated briquettes or lump charcoal and ONLY use charcoal lighting fluid approved for lighting charcoal. Do not use lighter fluid, paint thinners, gasoline, kerosene, alcohol, or other flammable material for lighting charcoal. Damage to the smoker may occur with the use of match-light charcoal.
- Step 1
Remove the charcoal grate and chamber from the offset smoker box. Place the grate on a cement surface that is clear from flammable or combustible materials. Place the chamber directly onto the charcoal grate. The chamber should fit between the grate handles and the raised grate supports. Refer to the assembly instructions for proper placement. Start with at least 5 lbs. (2.3 kgs.) of charcoal (95 standard briquettes). Make adjustments as needed when cooking in colder climates or during high winds, and/or when fair amounts of precipitation are present. - Step 2
Note: Please refer to the manufacturer’s recommended amount of lighter fluid before applying fluid to the briquettes. With the charcoal grate and chamber outside the firebox, saturate the charcoal with the amount of lighting fluid as recommended by the lighter fluid manufacturer. Allow the fluid to soak into the charcoal for 3 minutes before placing the grate and chamber back into the firebox (refer to assembly instructions for proper chamber and grate placement). After soaking the charcoal, place the lighting fluid at a safe distance away from the smoker. - Step 3
With both doors open, stand back and carefully light charcoal and allow it to burn until covered with a light ash (approximately 20 minutes). Charcoal lighting fluid must be allowed to completely burn off prior to closing the doors. (Fumes will tend to collect in the upper cavity if the door is closed). - Step 4
After 20-25 minutes, charcoal should be ready for cooking and/or adding woodchips. Refer to the next section before adding wood chips to pre-lit charcoal.
DANGER: Closing the firebox doors during the lighting procedure could trap fumes from the charcoal lighting fluid in the smoker box and may result in a flash fire or explosion when the door is opened, resulting in property loss, personal injury, or death. Never attempt to add more lighting fluid to the charcoal once it has been lit.
ADDING WOOD CHIPS (BEFORE AND DURING COOKING)
WARNING: Use caution since flames can flare up when fresh air suddenly comes in contact with the fire. When opening the door, keep hands, face, and body a safe distance from hot steam and flame flare-ups.
Presoaked Wood Chips
Soak the desired amount of chips in water for 30 minutes. Wrap the wood chips in aluminum foil and poke holes on the top of the foil wrapping. FOLLOW THE STEPS BELOW BEFORE ADDING PRESOAKED WOOD CHIPS.
Dry Wood Chips
Dry wood chips can be placed directly onto the pre-lit charcoal without aluminum foil. FOLLOW THE STEPS BELOW BEFORE ADDING DRY WOOD CHIPS.
The amount and type of wood used is entirely dependent on the desired amount of flavor.
- Step 1
Stand back and carefully open the smoker box door allowing heat and steam to escape away from your face. Use caution since flames can flare up when fresh air suddenly comes in contact with the fire. Inspect the charcoal level in the pan. - Step 2
Wearing flame-retardant oven mitts/gloves, use long metal cooking tongs to lightly brush aside ashes on hot coals. Use the long metal cooking tongs to add wood chips (and/or charcoal) to the charcoal chamber, being careful not to stir up ashes and sparks.
WARNING: Never add charcoal lighting fluid to hot or even warm coals as flashbacks may occur causing severe burns. - Step 3
Close the smoker box door and allow the food to continue cooking. Allow the ashes to completely cool before reusing or cleaning the smoker.
TIPS ON SMOKING
Pairing wood chips with a specific type of food will depend on the preferences of the user. This page can be used as a general guideline for acquiring the ideal flavor.
- Hardwoods such as hickory, pecan, apple, cherry, or mesquite typically burn slower and produce more smoke over longer periods of time.
- To prolong the burn cycle for wood chips, pre-soak them in a separate bowl of water for at least 30 minutes, and/or wrap the chips in perforated aluminum foil.
- Most smoke flavoring occurs within the first hour of cooking. Adding wood chips after the first hour is typically not necessary unless extra smoke flavoring is desired.
Here's a list of the most popular smoking woods and a little information about each.
| Type of Wood | Suggested Food | Comments |
|---|---|---|
| Apple | All meats | Mild and sweet flavor with a slight hint of fruity flavor. Each species of Apple wood should offer a slightly different flavor. Apple smoke produces an attractive browning effect. |
| Almond | All meats | Produces a sweet smoke with a natural nutty flavor. |
| Ash | Fish and red meat | Very light flavor. |
| Citrus | Pork and chicken | Lemon and orange wood produce light but fruity flavor. |
| Cherry | Pork and beef | Light and fruity flavor. |
| Fruitwood | Pork, poultry and fish | Wood such as Peach, Pear and Plum produce a mild but sweet smoke with a hint of fruity flavor. |
| Grapevine | Poultry, game and lamb | Grapevine wood produces a lot of smoke. A little wood goes a long way. It produces a tart flavor that has a hint of fruit. |
| Hickory | Pork and beef | Hickory is arguably the favorite wood for smoking. Hickory produces a very strong flavor so we recommend starting slow with this wood. |
| Maple | Pork and poultry | Light and sweet. |
| Mesquite | Beef, chicken and fish | This wood burns very hot so be aware. Much like Hickory, Mesquite is very popular and produces a strong flavor. |
| Oak | Red meats, game, ribs and fish | Another wood that produces a heavy smoke. Start slow with this wood. |
| Pecan | Ribs and red meat | Produces a light smoke that offers a sweet and nutty flavor. |
SUGGESTED SMOKING AND MEAT TEMPERATURES
Smoking Temperatures
Accurate smoking temperatures are critical for safely cooking food when meat probes are not available. Please understand that using the factory-installed temperature gauge is an acceptable tool for smoking food; but it’s not always the ideal means of measuring the most accurate smoking temperature because internal smoker temperatures can vary between the top and bottom cooking grates. Also, keep in mind that the probes used on most gauges are designed to measure the temperature at the tip of the temperature probe and not the overall temperature of the smoker.
Alternatively, it is recommended that users either purchase an aftermarket, oven-ready temperature gauge, or a meat thermometer. Meat thermometers are the most effective way of determining when the food is cooked to the minimum temperature required for safe consumption.
Please refer to the chart below for cooking temps.
SUGGESTED SMOKING TEMPERATURES
Suggested Smoking Temperatures |
Safe Minimum Food Temperatures | |
Meat, Poultry, Fish | ||
Beef, veal and lamb (pieces and wholecuts) | ||
Medium-rare | 225°F (107.2°C) | 145°F (63°C) |
Medium | 225°F (107.2°C) | 160°F (71°C) |
Well done | 225°F (107.2°C) | 170°F (77°C) |
Pork (ham, pork loin, ribs) | ||
Pork (pieces and whole cuts) | 225 - 240°F (107.2 - 115.6°C) | 160°F (71°C) |
Ground meat and meat mixtures (burgers, sausages, meatballs, meatloaf, casseroles and mechanically tenderized beef) | ||
Beef, veal (including mechanically tenderized), lamb and pork | 250- 300°F (121 - 149°C) |
160°F (71°C) |
Poultry (chicken & turkey) | 250- 300°F | 165°F (74°C) |
Poultry (chicken, turkey, duck) | ||
Pieces | 250°F (121°C) | 165°F (74°C) |
Whole | 240°F (115.6°C) | 185°F (85°C) |
Seafood | ||
Fish | 225 - 240°F (107.2 - 115.6°C) | 158°F (70°C) |
Shellfish (shrimp, lobster, crab, scallops, clams, mussels and oysters) | 225 - 240°F (107.2 - 115.6°C) |
165°F (74°C) |
Since it is difficult to use a food thermometer to check the temperature of shellfish, discard any that do not open when cooked. | ||
| Suggested Smoking Temperatures | Safe Minimum Food Temperatures | |
Game | ||
Chops, steaks and roasts (deer, elk,moose, carribou/reindeer, antelope and pronghorn) | ||
Well done | 225°F (107.2°C) | 170°F (77°C) |
Large Game | ||
Bear, bison, muskox walrus, etc. | 250- 300°F (121 - 149°C) | 165°F (74°C) |
Small game | ||
Rabbit, muskrat, beaver, etc. | 225 - 240°F (107.2 - 115.6°C) |
165°F (74°C) |
Ground Meat | ||
Ground meat and meat mixtures | 250- 300°F (121 - 149°C) |
165°F (74°C) |
Ground venison and sauage | 250- 300°F (121 - 149°C) |
165°F (74°C) |
Game birds/waterfowl (wild turkey, duck, goose, partridge and pheasant) | ||
Whole | 250°F (121°C) | 180°F (82°C) |
Breasts and roasts | 250°F (121°C) | 165°F (74°C) |
Thighs, wings | 250°F (121°C) | 165°F (74°C) |
Stuffing (cooked alone or in a bird) | 250°F (121°C) | 165°F (74°C) |
Setup Guide
Setting up the Dyna Glo Charcoal Offset Vertical Smoker is relatively straightforward. Here’s a brief guide to help you get started:
- Unpack all components and ensure no parts are missing.
- Assemble the smoker according to the provided instructions. This includes attaching the legs, chimney, and adjusting the racks.
- Season the smoker by heating it to 200°F for about an hour before first use.
- Load charcoal into the charcoal chamber and light it according to your preferred method.
- Once lit, adjust the dampers to control airflow and achieve the desired temperature.
CARE AND MAINTENANCE
AFTER USE SAFETY AND MAINTENANCE
WARNING
- Use caution when lifting and moving the smoker to avoid strain injuries. Two people are recommended to lift or move the smoker.
- DO NOT store the smoker near gasoline or other combustible liquids or where combustible vapors may be present. Keep the area around the smoker clear and free of combustible materials and vapors.
- DO NOT store this smoker in an area accessible to children or pets. Store the smoker in a dry, protected location.
- DO NOT allow anyone to conduct activities around the smoker following use until it has cooled. It is hot during operation and remains hot for a period of time following use.
- DO NOT leave hot ashes unattended until the smoker cools completely.
- The smoker becomes extremely hot – allow the smoker to cool completely before handling. Allow the smoker to cool before removing and cleaning the grease pan.
- Dispose of cold ashes by wrapping them in heavy-duty aluminum foil and putting them in a noncombustible container.
- If you must dispose of the ashes in less time than it takes for them to completely cool, remove the charcoal tray using heat-resistant gloves and place the ashes in aluminum foil. Completely soak the ashes with water before disposing of them in a noncombustible container.
CAUTION: All care and maintenance procedures are to be performed while the smoker is completely cooled. Always perform maintenance by a qualified service person. Clean the cooking grates with hot, soapy water. Rinse and dry thoroughly. You may prefer to coat the cooking grates lightly with cooking oil or cooking spray. To clean the inside and outside of the smoker cabinet, simply use a damp cloth. Spray-washing with a water hose is not recommended. Moisture should be wiped away and not allowed to stand inside or on top of the smoker. Once cleaned, you may prefer to lightly coat the interior of the smoker cabinet with cooking oil or cooking spray. If rust is present on the exterior surface of the smoker, clean the area with steel wool or emery cloth and use heavy-duty, heat-resistant paint. NEVER apply additional paint to the interior of the smoker. If rust is present on the interior of the smoker, clean it thoroughly with steel wool or emery cloth and lightly coat the area with cooking oil or cooking spray to help minimize recurring rust. To protect your smoker from weather conditions, always keep it covered while not in use.
REPLACEMENT PARTS LIST
For replacement parts, call our customer service department at 1-877-447-4768, 8:30 a.m. - 4:30 p.m. CST, Monday - Friday or log on to [email protected].
PART | DESCRIPTION | PART # |
1 | Square smoke stack | 312-02009-00 |
2 | Smoker body - Left | 70-10-207 |
3 | Lifting handle | 301-01010-00 |
4 | Temperature gauge | 211-02005 |
5 | Logo plate - Dyna-Glo* | 211-02002 |
6 | Cooking grate | 70-01-167 |
7 | Smoker door - right | 313-02202-00 |
8 | Door handlebase | 70-01-170 |
9 | Door handlegrip | 70-01-169 |
10 | Side damper plate | 403-02003-08 |
11 | Leg - standard | 301-01016-00 |
12 | Grease cup | 313-12002-01 |
13 | Smoker body- right | 70-01-208 |
14 | Smoker door- left | 70-01-209 |
15 | Door handle grip-right | 403-02003-05 |
16 | Door handle crank-right | 313-02202-03 |
17 | Right handle washer | 313-02202-04 |
18 | Right door latch | 313-02202-05 |
19 | AshTray | 301-01028-00 |
20 | Sausage hooks | 70-01-159 |
21 | Cooking grate support | 302-01030-00 |
22 | Charcoal grate | 314-00001-01 |
23 | Charcoal chamber | 314-00001-02 |
24 | Rib rack | 70-01-157 |
25 | Door latchbracket | 70-01-156 |
26 | Door latch | 70-01-161 |
27 | Door latch handle | 70-01-160 |
n/a | Hardware pack | 70-09-106 |
n/a | Instruction manual | 70-10-112 |
SAFETY INFORMATION
Please read and understand this entire manual before attempting to assemble, operate or install the product. If you have any questions regarding the product, call our customer service department at 1-877-447-4768, 8:30 a.m.- 4:30 p.m. CST, Monday - Friday or log on to [email protected]. Use caution when lifting and moving the unit to avoid back strain or back injury. Do not move the unit while it is in use.
- DO NOT operate the unit near or under flammable or combustible materials such as decks, porches, or carports. A minimum clearance of 36 in. is required.
- DO NOT operate the unit under overhead construction.
- Minimum clearance to combustible construction is 36 in. from sides and back.
- DO NOT use this appliance as a heater.
- Operate the unit on a stable, level, non-flammable surface such as asphalt, concrete, or solid ground.
- DO NOT operate the unit on flammable material such as carpet or wood deck.
- Use caution when assembling and operating this unit to avoid cuts and scrapes from edges.
- DO NOT use this product in a manner other than its intended purpose. It is NOT intended for commercial use. It is not intended to be installed or used in or on a recreational vehicle and/or boats.
- DO NOT store this unit near gasoline or other combustible liquids or where other combustible vapors may be present.
- DO NOT use, store, or operate this product in an area accessible to children or pets. Store this unit in a dry, protected location.
- DO NOT leave the unit unattended while in use.
- DO NOT leave hot ashes unattended until the smoker cools completely.
- DO NOT move the unit while in use or while ashes are still hot. Allow the unit to cool completely before moving or storing.
- NEVER use gasoline, kerosene, Zippo/Ronson light fluid, or other highly volatile fluids as a starter.
- Always cook your food on the grate after the flame is burned out.
- Dispose of cold ashes by wrapping them in heavy-duty aluminum foil and placing them in a noncombustible container. Make sure that there are no other combustible materials in or near the container.
- If you must dispose of ashes in less time than it takes for the ashes to completely cool down, then remove the ashes from the unit, using heat-resistant gloves along with long metal tongs or a fireplace shovel. Place the coals in aluminum foil and soak them completely with water before disposing of them in a noncombustible container.
- Allow the unit to cool completely before conducting any routine cleaning or maintenance.
- NEVER close the damper completely while cooking.
- This appliance will be hot during and after use. Use insulated oven mitts or gloves for protection from hot surfaces or splatter from cooking liquids.
- Use caution when opening the door of the smoker while in operation. Keep hands, face, and body safe from hot steam or flare-ups. DO NOT inhale smoke.
- DO NOT wear loose clothing while operating the smoker. Tie back long hair while operating the smoker.
- ALWAYS wear shoes that fully cover your feet while operating the smoker.
- NEVER use glassware, plastic, or ceramic cookware on or in your smoker. Use metallic cookware only.
- When using flavoring wood, add a sufficient amount prior to operation to avoid having to add wood while operating.
- Use of accessories not intended for this smoker is not recommended and may lead to injury or property damage.
- Read and follow all warnings and instructions before assembling and using the appliance.
- Follow all warnings and instructions when using the appliance.
CALIFORNIA PROPOSITION 65
Fuels used in wood and charcoal burning appliances and the products of combustion of such fuels contain chemicals known to the State of California to cause cancer, birth defects or other reproductive harm. This product contains chemicals, including lead and lead compounds, known to the State of California to cause cancer, birth defects, or other reproductive harm. Wash hands after handling.
Troubleshooting
Like any smoker, the Dyna Glo Charcoal Offset Vertical Smoker DGO1890BDC-D can encounter some issues. Here are some common problems and their solutions:
- Temperature Fluctuations: Check if the dampers are properly adjusted and ensure there is adequate airflow.
- Smoker Not Heating: Ensure the charcoal is lit correctly and there are no blockages in the vents.
- Rust Formation: Regularly clean the smoker and apply a rust-resistant coating during the off-season.
Always follow the safety instructions provided in the manual to avoid accidents.
WARRANTY
This vertical charcoal smoker is warranted against broken or damaged parts at the time of purchase. All other parts carry a one (1) year limited warranty except the charcoal chamber, which is warranted to be free of defects for 90 days. Paint is warranted to be free of defects for 90 days except for rust, which may appear after repeated use.
Pros & Cons
Pros
- Large Cooking Space: Offers 1,890 square inches of cooking space across six racks.
- Durable Construction: Built with heavy-gauge porcelain-coated steel for long-lasting use.
- Easy Temperature Control: Adjustable dampers and chimneys for precise temperature management.
- Affordable: Priced competitively compared to other smokers in its class.
Cons
- Assembly Required: Requires assembly which can be time-consuming for some users.
- Heavy: Weighs around 100 lbs, making it difficult to move without assistance.
- Charcoal Management: Requires regular charcoal loading and ash removal.
Customer Reviews
Customers have generally been very satisfied with the Dyna Glo Charcoal Offset Vertical Smoker DGO1890BDC-D.
Here are some common praises and complaints:
Many users appreciate the large cooking space and ease of temperature control, noting that it produces consistent results. However, some users find the assembly process cumbersome and mention that it could be improved. Additionally, there are occasional reports of rust formation if not properly maintained.
Faqs
What is the total cooking area of the Dyna Glo Charcoal Offset Vertical Smoker?
How do I season my new Dyna Glo Charcoal Offset Vertical Smoker?
How often should I clean my Dyna Glo Charcoal Offset Vertical Smoker?
Can I use this smoker for slow cooking?
What type of charcoal should I use in my Dyna Glo Smoker?
How do I control the temperature on this smoker?
Is assembly required for this smoker?
How do I prevent rust on my Dyna Glo Smoker?
Can I use wood chips or pellets in this smoker?
Leave a Comment