Philips Induction Cooker HD4929 User Manual | Usage & Settings
Content
Introduction
Congratulations on your purchase and welcome to Philips!
Philips, a trusted name in electronics, has introduced the HD4929 Induction Cooker, a must-have for modern kitchens. This innovative appliance combines style, safety, and energy efficiency to deliver an exceptional cooking experience. With an estimated price range of $100 - $150 and a launch date set for Q2 2023, the Philips Induction Cooker HD4929 is poised to revolutionize your culinary adventures.
What’s in the box
- Induction cooker main unit
- User manual
Overview
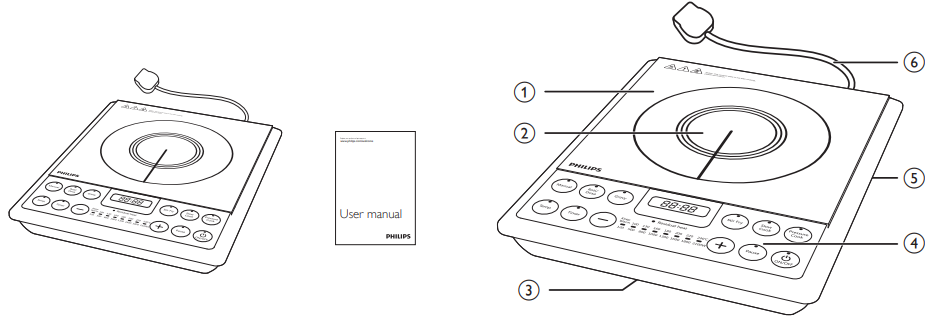
1 | Cooking plate | 4 | ControlPanel |
2 | Cooking zone | 5 | Air outlets |
3 | Air inlet | 6 | Power cord |
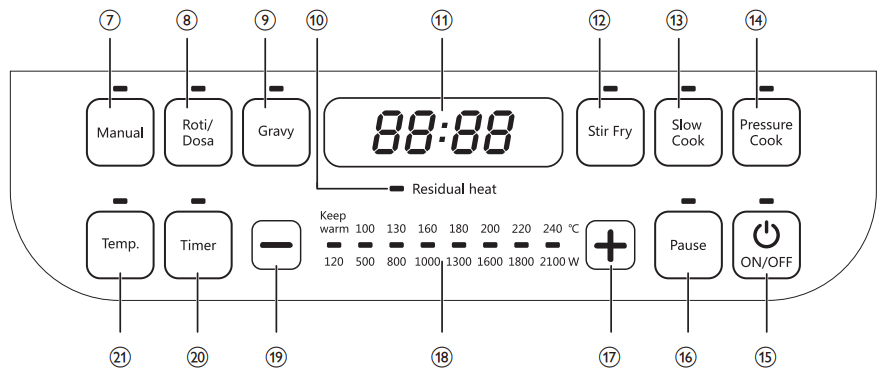
Controls overview of Philips Induction Cooker HD4929
7 | Manual Button | 15 | ON/OFF button |
8 | Roti/Dosabutton | 16 | Pause button |
9 | Gravy button | 17 | Increase button |
10 | Residualheat indicator | 18 | Cooking temperature and power |
11 | Screen | 19 | Decrease button |
12 | Stir Fry button | 20 | Timer Button |
13 | Slow Cook button | 21 | Temp. Button |
14 | PressureCook button |
|
|
HD4928
HD4929

Getting to know the cooking modes
Refer Philips Induction Cooker HD4929 to below tables for more details of different cooking modes.
Cooking mode | Default cooking time (minute) | Cooking temperature range | Adjustable cooking time range (minute) |
| Manual | 120 | Keep warm - 240°C | 1-180 |
| Roti/Dosa | 60 | Keep warm - 160°C | 1-180 |
Gravy | 45 | Keep warm - 160°C | 1-180 |
Slow Cook | 180 | 100°C | 1-180 |
Stir Fry | 60 | 100 - 180°C | 1-180 |
Pressure Cook | 30 | Keep warm - 220°C | 1-45 |
Manual | This setting can be used for all types of cooking especially if you want to controlthe time and temperature setting yourself. Press the manual button and use the ( ) or ( ) button to increase or decrease the cooking temperature. |
Roti/Dosa | This setting can be used to cook food on a flat induction type tawa. In case the tawa gets overheated or is less heated, the temperature can be adjusted using the ( ) or ( ) button. |
Note
- Do not unplug the appliance before the fan stops working.
- Never immerse the appliance in water nor rinse it under the tap.
- Never use scouring pads, abrasive cleaning agents or aggressive liquids such as petrol or acetone to clean the appliance.
- Do not put vinegar on the cooking plate.
Before first use
Remove all packaging materials from the Philips Induction Cooker HD4929.
Preparing for use Philips Induction Cooker HD4929
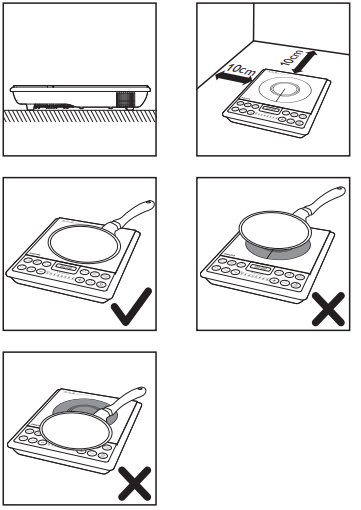
- Place the appliance on a dry, stable and level surface.
- Make sure there is at least 10cm free space around the appliance to prevent overheating.
- Always place the cookware on the cooking zone during cooking.
- Make sure you use cookware of the correct types and sizes.
Choosing the proper cookware
Use Philips Induction Cooker HD4929 that meets below requirements:
| Material | Cookware with a bottom made of iron or magnetic stainless steel |
| Shape | Cookware with a flat bottom |
| Size | Cookware with a bottom diameter of 12-20cm |
| Weight | Cookware with a weight up to 8kg (including contents) |
Use below cookware
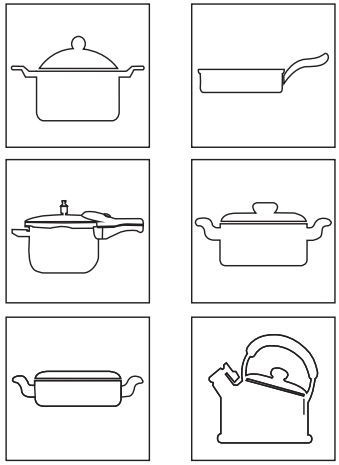
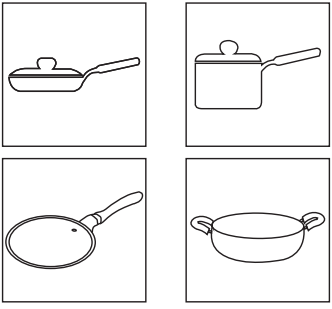
Use cookware with a flat bottom made of iron or magnetic stainless steel, and with a bottom diameter of 12-20cm.
Do not use below cookware
| Material | Cookware with a bottom madeof non-iron metal,heatresistant glass pots,ceramic, glass, aluminum or copper. |
| Shape | Cookware with a concave or convex bottom |
| Size | Cookware with a bottom diameter of less than 12cm or more than 20cm |
| Weight | Cookware witha weight over8kg (including contents) |
Do not use cookware described as below:
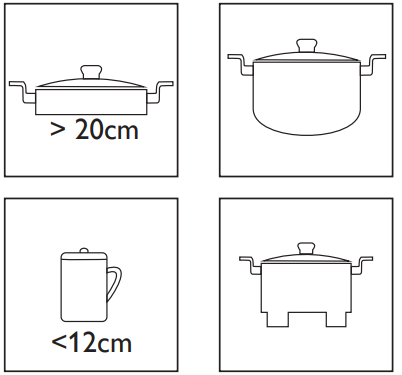
Do not use cookware with a concave or convex bottom made of non-iron metal, heat resistant glass pots, ceramic, glass, aluminum and copper, or with a bottom diameter of less than 12cm or more than 20cm.
Using the induction cooker
There are six preset cooking modes: Manual, Roti/Dosa, Gravy, Stir Fry, Slow Cook and Pressure Cook.
- Follow the steps in “Preparing for use”.
- Press the ON/OFF button ( POWER ) to switch on the appliance, and the ON/OFF indicator lights up.
- Press the desired cooking mode button, and the corresponding indicator lights up.
The appliance starts working in the selected mode. - When the cooking is finished, press the ON/OFF button ( ) to switch off the appliance.
- Unplug the appliance after the fan stops working.
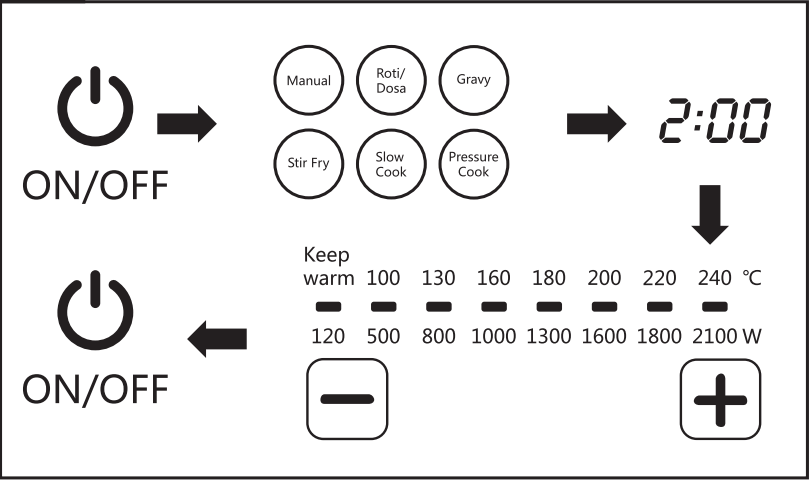
Using the timer
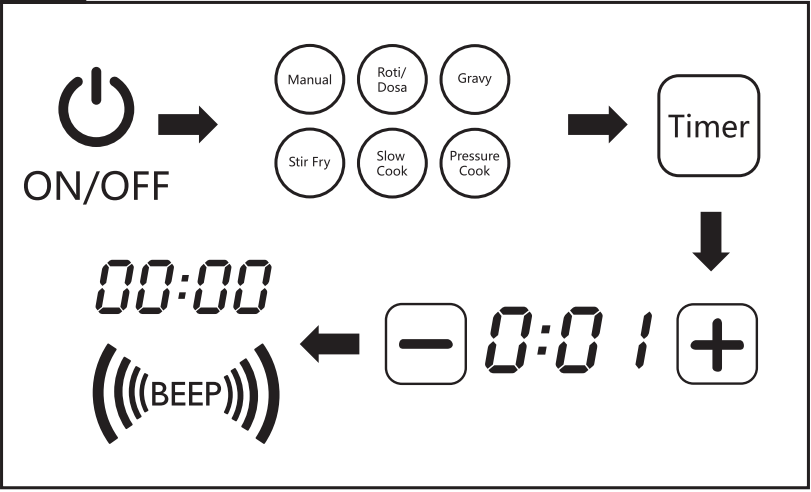
Note
- During cooking, you can change the power level by pressing the Increase ( ) or Decrease ( ) button (not applicable in Slow Cook mode).
- The time for induction cooking may be less than the time taken on a gas stove. Make sure that you keep all the ingredients you need ready before you start cooking.
- Press the "Temp." button, and the induction cooker starts working at the power of 800W.
- Press the "Pause" button to stop the cooking process at any time. Press the "Pause" button again to resume cooking.
- When the "Residual heat" indicator lights up, do not touch the cooking plate as the temperature is high.
Description
The Philips Induction Cooker HD4929 boasts a sleek, compact design with a user-friendly interface. Its key features include:
- 9-power level settings, allowing precise temperature control
- A timer with auto shut-off for added safety and convenience
- A cool-touch surface for worry-free handling during and after cooking
- Energy-efficient technology that reduces electricity consumption
Cleaning
Unplug the Philips Induction Cooker HD4929 3 minutes after the cooking is finished and let it cool down.
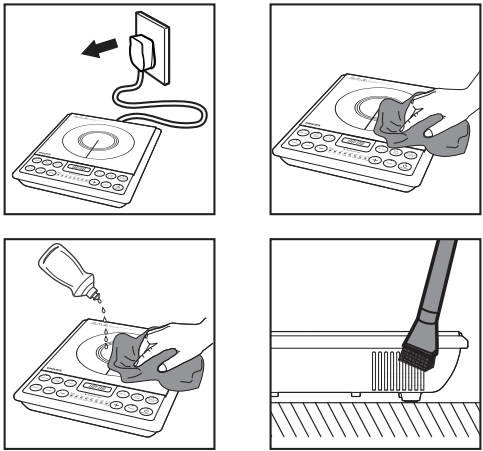
Philips Induction Cooker HD4929 Maintenance
- Improper use can lead to scratches on the cooking plate.
- To avoid discoloring and scratches, use the appliance according to the instructions in this user manual and always clean the appliance and cookware properly after use.
Storage
- Do not place heavy objects on the cooking plate as it is breakable.
- Do not store the appliance in a hot place, for example near a cooker.
- If you are not going to use the appliance for a longer period of time, store the appliance in a cool and dry place.
Environment
Do not throw away the appliance with the normal household waste at the end of its life. Dispose of responsibly. By doing this, you help to preserve the environment.
Troubleshooting
| Problem | Solution |
The On/Off button ( ) does not respond. | There is a connection problem. Check if the induction cooker is connected to the mains and if the plug is inserted firmly into the wall socket |
The appliance beeps continuously and then stopsworking. | You may have put unsuitable cookware on the cooking plate or you may have removed the cookware from thecooking plate during cooking. Make sure the cookware is made of steel, iron or aluminum with stainless steel cladding base and has a base diameter larger than 12cm. |
You may have placed the cookware outside of the cooking zone. | |
| The cookware does not heat up to the required temperature. | The bottomof the cookware may not be flat. Use cookware with a flat bottom. If the problemstill exists, takethe appliance to your Philipsdealer or a service centerauthorised by Philips. |
The appliance does not switch from one preset mode to another. | You need to switch off the appliance and restart with another cooking mode. |
The cookingtemperature of the presetmodes are too high or too low. | You may switch to the Manual mode for better control of temperature.You may also adjustthe cooking temperature in these modes: Manual, Roti/Dosa, Stir Fry and Pressure Cook. |
When I press one of the cooking mode buttons, the lightof the selected mode does not go on. | The lightis defective.Take the appliance to your Philips dealeror a service centre authorised by Philips. |
The cookingtemperature automatically changes in some preset modes. | In Gravy mode, the cooking temperature automatically changes. Switch to Manualmode for better control over the temperature. |
The fan works but the appliance has not startedworking. | You have to press a cooking mode button afteryou have pressedthe ON/ OFF ( ) button. If you do not pressa cooking mode button within one minute, the induction cookerwill switch off and the fan continues to work for a whileto cool down theappliance. |
Error code E1 or E2 is displayed on the screen. | The main sensor is in open circuit or short circuit state.Take the appliance to your Philips dealeror a service center authorised by Philips. |
Error code E3 or E4 is displayed on the screen. | The heat sink sensoris in opencircuit or shortcircuit state.Take the appliance to your Philips dealer or a service center authorised by Philips. |
Error code E5 or E6 is displayed on the screen. | The voltage is either too high or too low. Wait for the voltage to stabilize and try again. |
Error code E7 is displayed on the screen. | The fan has malfunction.Take the appliance to your Philips dealer or a service center authorised by Philips. |
Error code E8 is displayed on the screen. | The main sensor is not working.Take the appliance to your Philips dealer or a service center authorised by Philips. |
Error code E9 is displayed on the screen. | The fuse has malfunction.Take the appliance to your Philips dealer or a service center authorised by Philips. |
Warranty and Service
For any information or problem, contact your local Philips dealer or authorized service center. For a list of authorized Philips service centers visit: https://www.philips.com.pk/ . This apparatus is covered under warranty against any defect due to defecitve material or workmanship for ONE YEAR from the date of purchase. Should a defect develop during the period of warranty, PHILIPS ELECTRONICS INDIA LTD. undertakes to repair the apparatus FREE OF CHARGE through the dealer from whom it has been purchased or at any of the Philips authorized Service Centers.
The warranty is not valid in case:
- Apparatus is not used according to user manual.
- Defects caused by improper or reckless use.
- Repairs done by persons other than Philips Authorized service center.
- Modifications of any nature made in the apparatus.
- Tampered serial number.
- Incomplete warranty card after purchase.
- Product if used for commercial purpose (i.e. other than domestic use).
- Usage of parts not recommended by Philips or those made by other manufacturers.
Philips Pros & Cons Induction Cooker HD4929
Pros
- Precise temperature control for consistent cooking results
- Safety features, such as the timer and cool-touch surface
- Easy-to-clean ceramic glass surface
- Energy-efficient technology, reducing electricity bills
Cons
- May not be suitable for larger pots or pans
- Limited to induction-compatible cookware
- Some users may find the touch controls less intuitive than traditional knobs
Customer Reviews
Customers have praised the Philips Induction Cooker HD4929 for its ease of use, energy efficiency, and consistent cooking performance. However, some users have reported issues with compatibility with certain cookware. It's essential to ensure your pots and pans are induction-compatible before purchasing.
Faqs
How should the Philips Induction Cooker HD4929 be cleaned?
Could the Philips Induction Cooker HD4929 be utilized to prepare a wide variety of foods?
Does the Philips HD4929 induction cooker conserve energy?
How can I determine whether the Philips HD4929 Induction Cooker is on?
What safety functions are included with the Philips HD4929 induction cooker?
What is the maximum duration that can be programmed into the Philips HD4929 induction cooker?
What precautions should I take to avoid harming the Philips Induction Cooker HD4929's surface?
Can a pressure cooker be utilized with the Philips HD4929 induction appliance?
At high altitudes, is the Philips Induction Cooker HD4929 usable?
What should be done if an error code is displayed on the Philips Induction Cooker HD4929?
Leave a Comment
