Setup: Elegoo Neptune 4 Max 3D-Printer User Manual
Content
Introduction
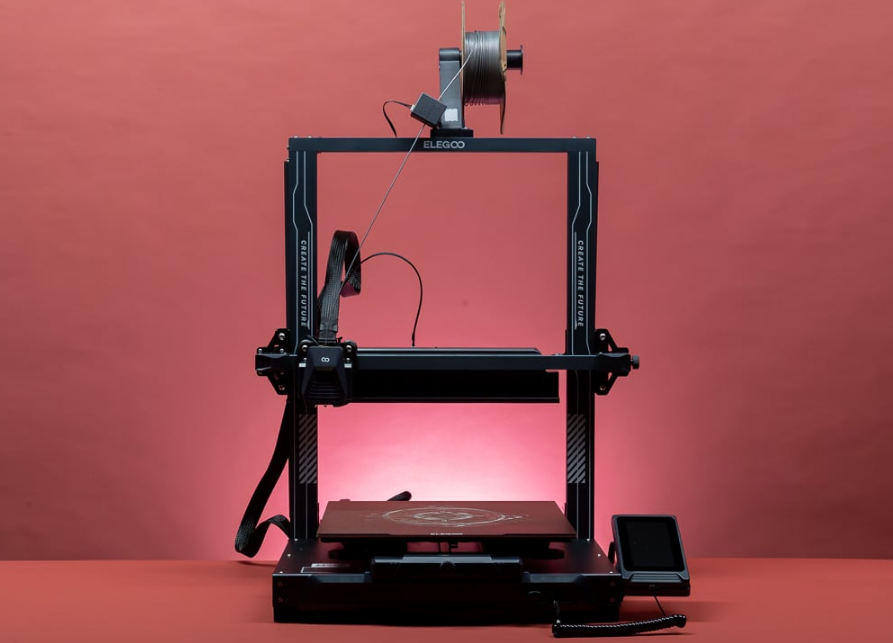
The Elegoo Neptune 4 Max 3D Printer is a robust and high-performance machine designed for serious enthusiasts and professionals alike. With a generous build volume of 420 x 420 x 480 mm, it accommodates a variety of projects, from large models to multiple smaller prints. Equipped with advanced Klipper firmware, it can achieve impressive printing speeds of up to 500 mm/s. The Elegoo Neptune 4 Max is priced at $470.
Machine Specifications
Printer Specifications
- Print Principle: FDM(Fused Deposition Modeling)
- Build Size: 420X420X480(mm³)
- Print Precision: ±0.1mm
- Nozzle Diameter: 0.4mm
- Maximum speed: 500mm/s
- Regular printing speed: 250mm/s
- Maximum acceleration: 8000mm/s²
Operating Temperature Specifications
- Ambient Enviroment Temperature: 5°C~40°C
- Maximum Temperature of Nozzl: 300°C
- Maximum Temperature of Hotbed: 85°C(Ambient temperature:25°C)
Software Specifications
- Slicer Software: Cura
- Input Format: STL、OBJ
- Output Format: Gcode
- Connection Type: U Disk, LAN,WiFi
Power Supply Specifications
- Power Input: 100-120V/220-240V;50/60Hz
- Power Output: 24V
Physical Specifications
- Machine Size: 658*632*740mm
- Net Weight: 18.1kg
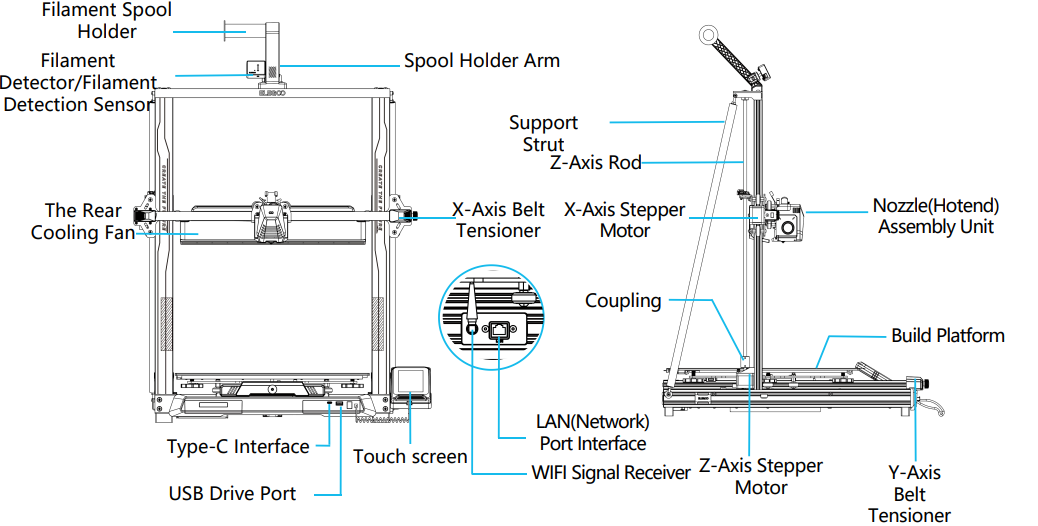
Machine Component Diagrams
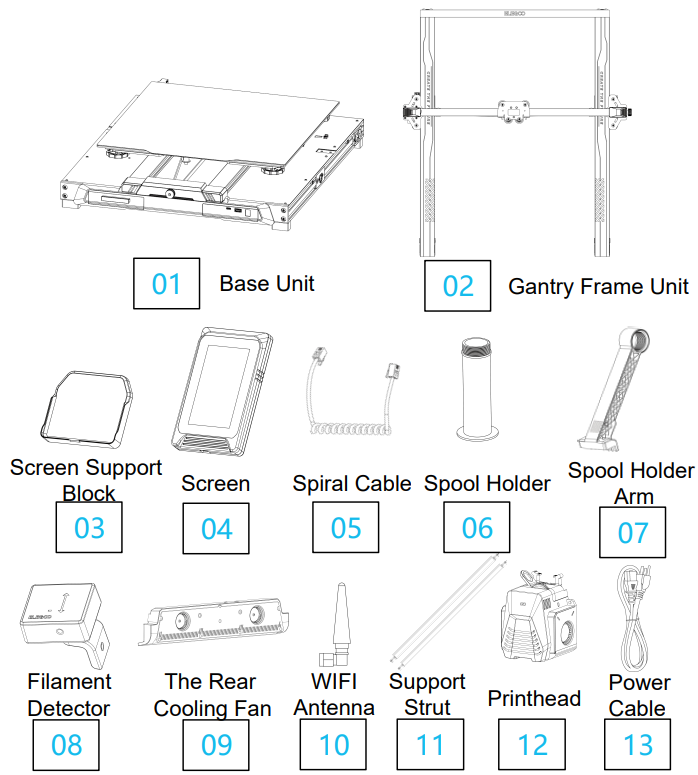
Packing List
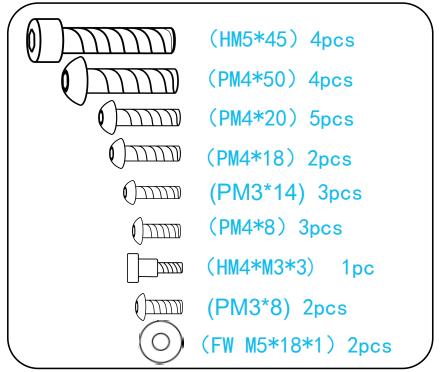
Fasteners

Tools
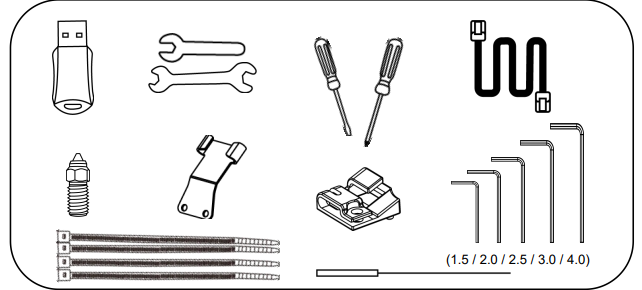
The above accessories shall be subject to actual products, and the pictures are for reference only.
Machine Setup & Installation
Please refer to the included USB Drive for a setup and installation instructional video.
From the rear, attach the printer head assembly using two PM3 x 14 screws to affix the printer head through the holes of the cable strain-relief bracket and two PM3 x 8 screws to affix the underside of the printer head.


When installing, you need to organize the cables and fold them together to install and fix them.

Supplementary Introduction
Special Case:
The Y-axis slider plate is adjusted at the factory, but the machine's pulleys may be loose due to transportation. If the printing platform is shaky or loose, you can use an open-end wrench to slowly unscrew the hexagonal isolation column under the platform until the Y-axis slider plate slides smoothly without shaking!
Similarly, you can adjust the hexagonal isolation column underneath the printhead if it wobbles or becomes loose. There are also corresponding isolation columns for the pulleys on both sides of the gantry that can be adjusted.

Display Screen Operation Introduction

Operation Of The Rear Cooling Fan:
- From the Home Screen, select the Print option. Next select the Fan Icon in order to adjust the cooling fan operational settings during the printing process.
NOTE: The Rear Cooling Fan has three operational modes: Silent(60%), Normal(80%) & Sport(100%). Please select a mode appropriate to your printing needs as shown in photos below.

Print Mode Introduction
- During the printing process, users can adjust the printing mode by clicking the speed icon.
- The three modes correspond to three different speed values, acceleration values, drive mute thresholds, and percentages of fan speed settings during printing.

Display Screen Operation Introduction
Vibration Pattern Optimization Introduction
- It is recommended to perform vibration pattern detection after first use or after the machine is moved or parts are replaced. Users can select the vibration pattern optimization option in the advanced settings.
- Vibration mode optimization is performed on the X-Axis and Y-Axis respectively. Please do not shake the machine during the testing process and wait patiently for the testing to complete.
Auto-Leveling Procedure
When first running the machine, the distance between the platform and the nozzle needs to be calibrated in the leveling mode, which is about the thickness of a piece of A4 paper .
Note that the leveling sensor only detects the metal platform plate, for example, replacing the glass platform for leveling will not produce detection effect, which will cause the nozzle to squeeze the platform.
- When the printer is powered on, select 【Level】.
- Each axis of the printer automatically returns to the home position, after entering the leveling page, place a piece of A4 paper between the nozzle and the platform, and click the compensation value to adjust the distance between the nozzle and the platform (See Picture 2), and push and pull the A4 paper, when there is friction generated, the center point calibration can be completed. Click on the auxiliary leveling 【
 】, calibrate the 6 points of the platform with the A4 paper by hand-twisting nuts, and push and pull the A4 paper, when the paper can be pulled out but not pushed in, the auxiliary leveling can be completed.
 - After completing the auxiliary leveling, enter the automatic leveling【
 】for automatic calibration.
 - The machine will enter the heating state:the nozzle is heated to 140°C, the hot bed is 60°C.(Please preset the hot bed temperature according to the temperature of the consumables to achieve a more accurate leveling value.)
- After reaching the preset temperature: start the 121-point automatic calibration.
- After the leveling is completed, set the Z-axis compensation: place a piece of A4 paper between the nozzle and the printing platform.
Click the compensation value and push and pull the A4 paper to complete the compensation and leveling when friction is generated. - Click the save icon to save.【
 】
】
Note that the leveling sensor only detects the metal platform plate, for example, replacing the glass platform for leveling will not produce detection effect, which will cause the nozzle to squeeze the platform.


Description
The Elegoo Neptune 4 Max 3D-Printer is built with a robust aluminum alloy frame that ensures stability and durability. It features a large build volume of 320x320x400mm, allowing for the creation of large and complex models. The printer is equipped with a heated bed and a high-temperature nozzle, enabling the use of a variety of filaments including PLA, ABS, PETG, and more.
The printer also includes advanced features such as automatic bed leveling, a touch screen interface, and Wi-Fi connectivity for remote operation. The integrated filament run-out sensor and power recovery function add to its convenience and reliability.
Model (Operation) Testing
Printhead Feeding Verification
- First, insert the filament through the filament detection sensor and to the bottom of the Printhead assembly.
- Choose [Prepare] > [Extruder] > [Load ] (the temperature of the nozzle will be automatically heated to 200ºC.
- After the nozzle reaches 200ºC, choose the feed option to extrude filament material from the nozzle.
- Clean melted filament off the nozzle and heated bed before printing.
NOTE: Filament with different hardness have different requirements for “spring” strength. The spring strength of the extruder can be adjusted with an Allen Wrench(within 2.0mm). When turning counter-clockwise, spring strength is increased, while spring strength is decreased when turned in a clockwise direction
Normal Extrusion State
- Rotating the button counter-clockwise: The extrusion force increases, which means that the filament is pushed out of the nozzle with more force.
- Rotating the button clockwise: The extrusion force decreases, resulting in a reduction of the force with which the filament is pushed out of the nozzle.
Printing Functional Test:
- Insert the USB Drive into the printer’s USB port.
- Choose [Print] from the main menu and select the desired file.
- When the nozzle and heated bed reach the required temperatures, the X, Y & Z axis will return to Zero (Home) and begin printing.
NOTE: When printing the test model, please observe the first layer printing and compare against the figure on the right. In cases A and C, the compensation settings are not properly adjusted. You can make compensation adjustments during printing to adjust the distance between the nozzle and the heated bed platform. In case B, the nozzle and the platform are at the ideal printing distance and can continue printing without any further adjustments.
Adjustment of nozzle height while printing

NOTE: While printing and following this procedure for fine-tuning the nozzle height, please ensure that you switch the moving distance to the smaller increment settings of 0.01mm or 0.1mm to prevent the nozzle from potentially dragging excessively along the heated bed platform (which can cause damage to the build plate) or to keep filament from “hanging” in the air.
Resume Printing Function
Power Loss Recovery
- Your printer, has features to continue printing following a sudden interruption or loss of power (an outage) or any accidental events (aka “switching-off” power), and this function does not need to be set manually.
- Once power has been resumed to the printer, simply press the “Resume” option to continue printing.
NOTE: The PEI metal build plate has better overall adhesion when it is fully heated. If the power has been “Off” for too long, the model may become easily dislodged or fall off the PEI plate very easily. In such event, the Resume Printing Function will not be able to continue.
Filaments Detection
This function is to remind the user to replace the filaments before continuing printing when the model is half-printed, which effectively prevents the model from being scrapped due to insufficient consumables.
Software Installation
TIP: We recommend copying the entire contents of the included USB Drive to your local computer for easier access to all of its files.
The included “Slicer” Software program is a modified version of the Cura Open Source Slicer software that is publically available. While you can always use any version of Cura, we strongly urge you to use the ELEGOO version of Cura in order to ensure maximum tested compatibility with your specific ELEGOO printer.
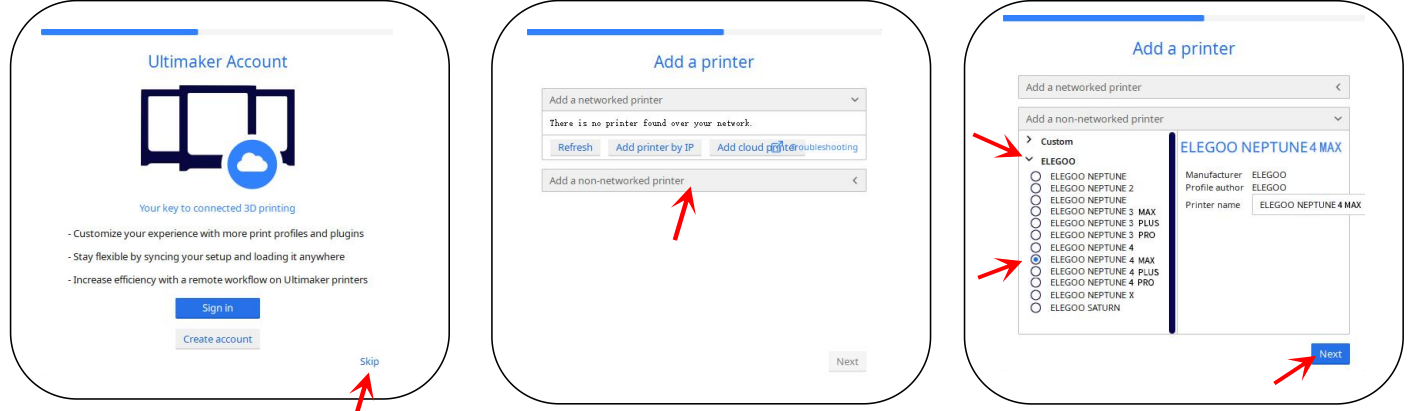
Software Installation Procedure:
- Open the attached USB Drive and navigate into the path: \Software and Software Drivers folder \ELEGOO Software folder and “double-click on the ELEGOO Cura application to begin the installation process.
- Continue by following the prompts in the installation process specific to your system.
Finally, select the corresponding ELEGOO printer model as shown below to complete the settings process.
Instructions for Software Usage
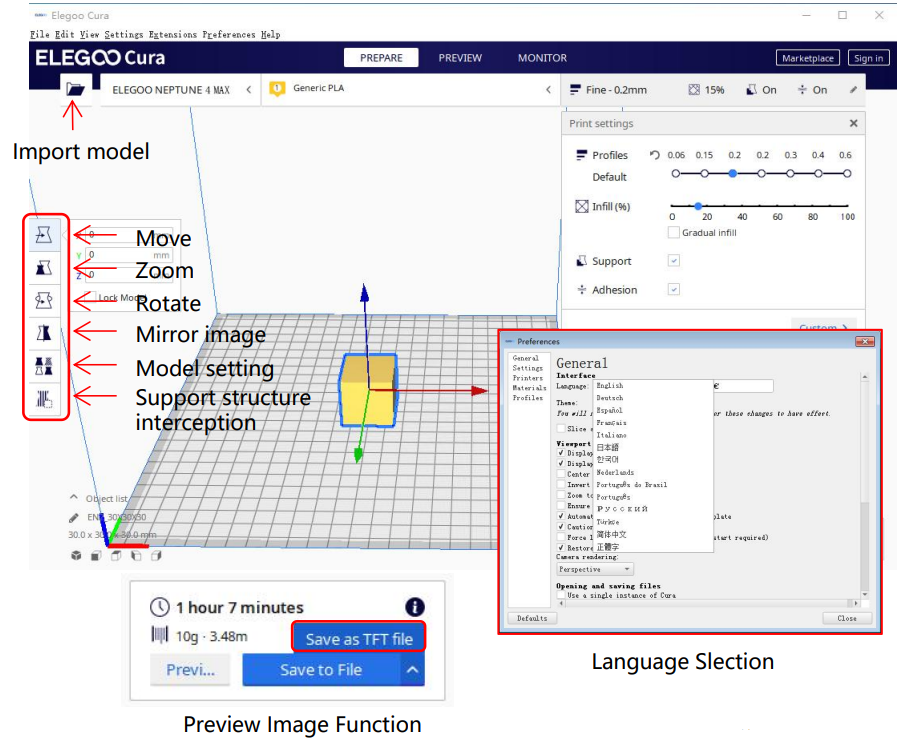
Other Software Usage Tips:
- Use the middle mouse wheel to zoom the viewpoint (in and out) and hold down the middle mouse wheel to move the platform position on screen.
- Press and hold the right mouse button while moving your mouse to pivot around your model’s viewpoint.
- Clicking the right mouse button will bring up a pop-up selection options menu.
Model Settings:
When printing multiple models, you can configure individual slice settings for the specified model.

Support Structure Interception:
This feature enables you to define an intercept region on your model to inhibit the generation support material.
Preview Image Function:
G-code files saved in the TFT file format can use the printer’s preview capabilities to display a thumbnail image of the model.
Language Selection:
You can change the language by accessing the Preferences in the top menu bar. Once you have selected the desired language, you will need to restart the slicing software to apply the changes.
LAN(Network) Printing
The device supports WiFi and network cable connection. After the connection is successful, check the IP address on the screen, and enter the IP address through the browser to access the machine.
Note that the machine and the computer can only be connected to the LAN of the same network segment, and make sure that the circuit wiring port on the machine has already connected, otherwise the access will fail.

- Use Google Chrome to enter the IP address of the device, e.g. 192.168.211.164, and enter it via the Enter key to access the page.
After successful access, you will enter the control interface below the picture

- Movement Control: control the movement of each axis, and can set compensation after leveling.
- Fan and Output: control to turn on the printhead fan and lighting.
- Printer Limit: the maximum acceleration control of the printer, normally no need to change the settings. Temperature Display: display the machine temperature heating condition, and the preheating printhead temperature and hot bed temperature can be set in advance.
- Console: G-code commands can be sent to run the machine.
- Task List: drag the G-code file of the Elegoo Cura slice to the task list here for printing.
Setup Guide
To set up the Elegoo Neptune 4 Max,
- Start by carefully unpacking and assembling the printer according to the included instructions.
- This typically involves attaching the Z-axis, X-axis, and Y-axis components to the main frame.
- Next, perform the automatic bed leveling process to ensure proper calibration.
- Install the filament by feeding it through the extruder and heating the nozzle to the appropriate temperature.
- Finally, connect to the printer via USB, TF card, or Wi-Fi and configure your printing settings using the touch screen interface or through a connected computer.
Mainboard Circuit Wiring Diagram

- Hotend thermosensitive (TH1)
- Heatbed thermosensitive (TB0)
- X- :X axis limit switch
- Y- :Y axis limit switch
- Filament detector (DET1)
- Rear cooling fan/Model fan(FAN2)
- Main board fan/print head fan(FAN1)
- X/Y acelerometer interface(AC)
Troubleshooting
Common issues with the Elegoo Neptune 4 Max include misaligned axes,
- Clogged nozzles, and incorrect bed leveling.
- To resolve these issues, refer to the user manual for detailed troubleshooting guides.
- For misaligned axes, re-check the assembly steps and ensure all screws are securely tightened.
- For clogged nozzles, use a cleaning tool or replace the nozzle if necessary.
- Incorrect bed leveling can be adjusted through the automatic leveling process or manually by adjusting the Z-axis offset.
- Always follow safety instructions and warnings provided in the user manual to avoid injuries and damage to the printer.
Elegoo Neptune 4 Max 3D Printer Pros & Cons
Pros
- Large build volume for bigger prints
- High precision and resolution
- Automatic bed leveling and touch screen interface
- Wi-Fi connectivity for remote operation
- Robust aluminum alloy frame for stability
- Compatible with various types of filaments
Cons
- Assembly required which can be time-consuming
- May require some technical knowledge for optimal performance
- Noisy operation during printing
- Customer support can be limited compared to more established brands
Customer Reviews
Customers have generally praised the Elegoo Neptune 4 Max for its high-quality prints and robust construction. Many users appreciate the large build volume and advanced features such as automatic bed leveling and Wi-Fi connectivity.
However, some users have reported issues with assembly and calibration, highlighting the need for detailed instructions and possibly more customer support. Despite these minor drawbacks, the overall consensus is that the Elegoo Neptune 4 Max offers excellent value for its price.
Most Common Complaints
One of the most common complaints is the complexity of the assembly process. Some users find it challenging to align the axes correctly and calibrate the bed properly. Additionally, there have been reports of noisy operation during printing which might be a concern for those who plan to use the printer in quiet environments.
Faqs
What is the build volume of the Elegoo Neptune Printer?
What types of filament are compatible with the Elegoo?
How do I calibrate the bed on the 3D Printer?
Can I print remotely with the 3D Printer?
What is the maximum temperature of the nozzle on the Elegoo?
How do I resolve a clogged nozzle on the Elegoo Neptune 4 Max 3D Printer?
What power supply does the Elegoo Neptune 4 Max use?
Can I upgrade or replace parts on the 3D Printer?
Leave a Comment