Elica Decorative Kitchenhood Chimney User Manual

Content
Introduction
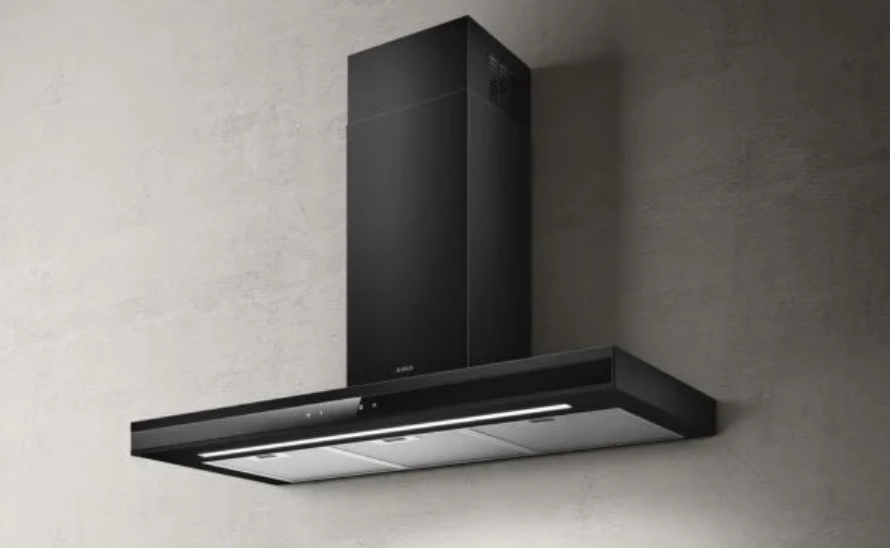
The Elica Decorative Kitchenhood Chimney is a stylish and efficient solution designed to enhance kitchen aesthetics while effectively eliminating smoke and odors. Launched in 2020, this product is manufactured by Elica, a global leader in kitchen ventilation systems. Priced around $300, the chimney features advanced filtration technology and a sleek design, making it a perfect fit for both modern and traditional kitchens, ensuring a clean and pleasant cooking environment.
With advanced filtration systems and powerful suction capabilities, the Elica Decorative Kitchenhood Chimney is not just a decorative piece but also a highly functional appliance that improves air quality and reduces kitchen mess.
Specifications
- Rated Voltage: 230V
- Rated Power: 5OHz
- Frequency Total Power: 18A3W
- Motor: Single
- Airflow: 1100 m3/hr
- Diameter of Air-Outlet Adapter: - 150 mm
- Auto clean type: Electro-thermal auto clean
Description
The Elica Decorative Kitchenhood Chimney stands out with its contemporary design, featuring a combination of stainless steel and glass elements. The stainless steel body is durable and easy to clean, while the glass canopy adds a touch of elegance. The chimney hood is equipped with LED lights that provide ample illumination over the cooking area, making it easier to monitor your culinary creations.
The advanced filtration system includes both baffle filters and activated carbon filters, ensuring that the air in your kitchen remains clean and free from odors. The touch control panel allows for easy operation, with multiple speed settings to cater to different cooking needs.
Operating Instructions
This cooker hood is operated with a feather touch control panel.

Setting the Clock
When the cooker hood will be connected to the mains, the display will show 12:00
- Now place your finger on the "Set" button for about 2-3 seconds.
- The '12' on the hour side will start flashing. Please use the "+" and "-" buttons on the control panel for setting the correct hour.
- Now touch the "Set" button again. The '00' on the minutes side will start flashing. Please use the "+" and "-" buttons on the control panel for setting the correct minutes.
- Now touch the "Set" button again. The time as fed in by you will be set.
Please note that once the cooker hood has been disconnected from mains, you will have to set the time again.
Operation
Place your finger on the "On/Off' button on the control panel. The lights on the control panel will come on. The cooker hood is now in stand-by mode.
- Touch the"
 " button on the panel, the cooker hood will start operating on LOW speed.
 - Touch the"
 " button on the panel, the cooker hood will start operating on MEDIUM speed.
 - Touch the"
 " button on the panel, the cooker hood will start operating on HIGH speed.
 - Press the "On/Off' button in order to stop the operation.
Light
- Touch the "Light" button on the panel, the lights will come on.
- Repeat the action in order to switch-off the lights.
AUTO-CLEAN
A unique "Auto-Clean" function has been provided in this cooker hood.
This cooker hood comes equipped with an oil collector tray. During cooking, the excess oil and dirt which gets sucked into the cooker hood gets drained into this oil collector.
However, over the time, some traces of stubborn grease and oil can get stuck inside the cooker hood.
- In order to eliminate this stubborn grease and clean the cook hood from inside, we have designed this unique feature.
- Please first touch ON/OFF button, then touch "Auto-Clean"buton on the panel. The display mention heating time of 10 minutes and begin to count down. The light for auto clean with start blinking.
- After preheat time of 9 minutes. The indicating lamp of low speed were lit at the same time. The motor will auto-start working of 1 minute. Auto clean function work over once the countdown complete. The cooker hood system restore the stand-by mode. To avoid any bad influence for clean performance, please do not cooking during time of auto clean.
- All the grease through the inside oil outlet pipe which fixing on motor housing. then drop out into oil collector tray located at the back of the filter The auto-clean function will stop operating at the end of 1 minute. Wait for a moment and then carefully remove the oil collector tray ensuring that you do not spill the grease.
- Drain the collected grease into a sink and clean the oil collector tray with a soft cloth.
- Fix the oil collector tray back at its place by sliding it in the rails at both the ends. Ensure that the tray is fixed properly.
- Your cooker hood is clean as new from inside now.
Setup Guide
To set up the Elica Decorative Kitchenhood Chimney, follow these steps:
- Ensure the chimney hood is properly unpacked and all components are included.
- Measure and mark the installation area according to the provided template.
- Install the mounting brackets securely on the wall or ceiling as per instructions.
- Hang the chimney hood onto the brackets, ensuring it is level and secure.
- Connect the electrical connections carefully following the user manual.
- Test the chimney hood at different speed settings to ensure proper functioning.
Maintenance and Cleaning
Proper maintenance of the cooker hood will assure good performance of the unit.
- Disconnect the hood from the mains supply before cleaning or carrying out any maintenance work.
- Clean the grease filters regularly after the specified period of time.
- Clean the hood using a damp cloth and a neutral liquid detergent. Never pour water on the cooker hood or its motor.
- Never use any harsh chemicals and abrasives to clean the cooker hood and its parts as this will damage the product beyond repair.
Filter
This cooker hood has been provided with a high quality stainless steel filter.
The filter has been fixed onto the hood with the help of 2 locks. Kindly unlock the filter in order to clean it.
The grease filter should be cleaned frequently (every month of operation, or more frequently in case of heavy use). Use a warm neutral detergent and water solution. Soak the filters in this solution for about 2-3 minutes. Wear appropriate water proof gloves and clean with a soft brush. Do not apply too much pressure as it will damage the filters. Place the filter under running water in order to wash away the soap and dirt.
Install the clean filter back on to the cooker hood with the help of two screws. Make sure that the filter is dry before installing.

Oil Collector Tray
This cooker hood has been provided with a unique high quality PC oil collector tray.
During use, the excess oils and dirt which may get sucked into the cooker hood are drained out through a special drain located at the back of the filter. In order to clean the drained oil, simply pull the tray towards yourself. Drain the oil/dirt and wipe the oil collector clean with a soft cloth.
Insert the oil collector tray back at its place by aligning it with the rails at both the ends and push it back until it has been fixed.
Important Note
- Please read the operating manual carefully before installation / use.
- The installation work must be undertaken by a qualified and competent person who has sound experience in installing cooker hoods. Please ensure that the mains voltage corresponds to the one mentioned on the rating label of the appliance
- The manufacturer disclaims all liability for any damage or injury caused as a result of not following the instructions for installation and use contained in this manual.
- Save this manual for future reference.
Installation Instructions
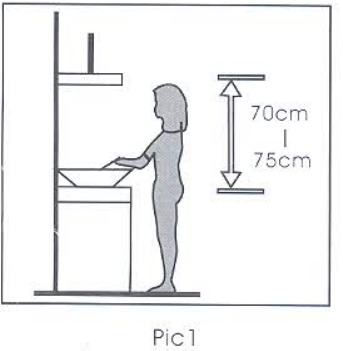
The cooker hood should be installed at a distance of 70-75cm above the cook top/hob for best results. See Pic1.

- Using the hood mounting bracket, mark the holes to be made on the wall.
- Drill 3x8 mm holes for the mounting bracket.
- Insert expandable wall plugs and fix the mounting bracket with screws.
- Carefully hang the hood onto the bracket.
- Fix the air-outlet tube onto the one way valve/outlet adaptor on the top.
- Carefully guide the air-outlet pipe through the provision/hole made in the wall for exhaust air.
- Make the electrical connections with the mains.
Important Note for Installation
- Before installation, please clean the area where the hood is supposed to be installed.
- Do not connect the hood to exhaust ducts carrying combustion fumes of other appliances (boilers, fireplaces, etc.)
- If the hood is used in conjunction with non-electrical appliances ( e. g. gas burning appliances), a sufficient degree of ventilation must be guaranteed in the room in order to prevent the backflow of exhaust gas. The kitchen must have an opening directly with the open air in order to guarantee the entry of clean/fresh air.
- Two or more people are required to install o'r move this appliance. Failure to do so can cause physical injuries.
- After installation, carefully check that the cooker hood has been installed in a straight line. Kindly check the following picture for reference in this regard.

Important Safeguards
- The cooker hood has been designed only for domestic use, for eliminating kitchen fumes.
- Never use the hood for purposes other than what it has been designed for.
- Never leave high naked flames under the hood when it is in operation.
- Adjust the flame intensity to direct it onto the bottom of the pan only; making sure that it does not engulf the pan sides.
- Do not check the status of the filter while the range hood is operating.
- Do not touch the lamps after appliance has been in use.
- Avoid free flames, as it is damaging for the filter/product and is a fire hazard.
- Constantly check food while frying. Overheated oil may become a fire hazard.
- Children don't recognize the risks of electrical appliances. Therefore use of this appliance by children is not recommended.
- This appliance is not intended for use by persons (including children) with reduced physical, sensory or mental capabilities or who have lack of experience and knowledge to use the appliance, unless they are in supervision of the person responsible for their safety and have been given instructions for use of the appliance by their supervisor.
- Children should be supervised to ensure that they do not play with the appliance.
- There should be adequate ventilation of the room when the cooker hood is being used at the same time as appliances working on gas or other fuels.
- There is a fire risk if cleaning is not carried out in accordance with instructions provided in here.
- Do not do flambe cooking under the cooker hood.
- The exhaust air must not be discharged into a flue which is used for exhausting fumes from other appliances burning gas or other fuels.
- The cooker hood is for domestic use only and is not meant for commercial use.
- The cooker hood and its filter should be cleaned regularly in order to maintain good efficiency.
- Disconnect the appliance from the main supply prior to cleaning or undertaking any maintenance.
- Do not disconnect the appliance with wet hands.
- Do not use this appliance outdoors.
- Do not try to repair the appliance by yourself. In case of a malfunction, please contact the nearest authorized service center for examination and repairs.
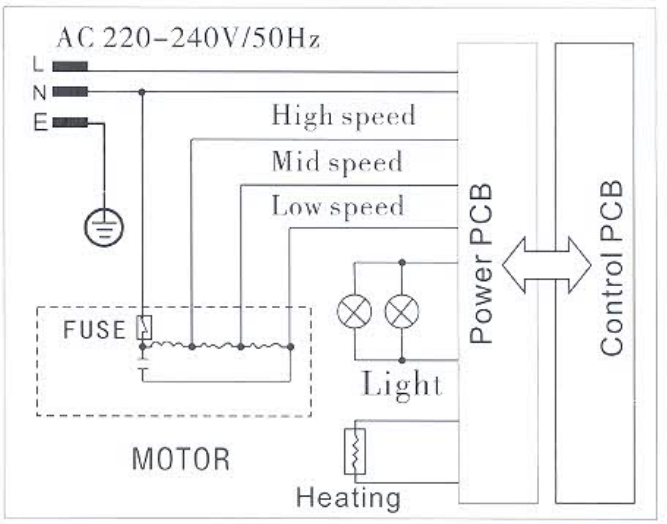
Electrical Diagram

Note
In view of continuous improvement, the appearance, design, features and specifications of the product are subject to change with-out prior notice.
Troubleshooting
If you encounter any issues with your Elica Decorative Kitchenhood Chimney, here are some common problems and their solutions:
- No Power: Check the electrical connections and ensure the chimney hood is properly plugged in.
- Low Suction: Clean or replace the filters as they may be clogged.
- Noisy Operation: Check for loose parts or debris inside the chimney hood and clean it if necessary.
- LED Lights Not Working: Replace the LED lights if they are damaged or contact customer support for assistance.
Always refer to the user manual for detailed troubleshooting instructions and follow safety precautions when performing any maintenance tasks.
Elica Decorative Kitchenhood Chimney Pros & Cons
Pros
- Powerful suction capabilities for efficient smoke and odor removal.
- Sleek and modern design that enhances kitchen aesthetics.
- Advanced filtration system including baffle and activated carbon filters.
- Quiet operation with low noise levels.
- Easy-to-use touch control panel with multiple speed settings.
Cons
- Pricier compared to some other models on the market.
- Installation requires careful measurement and mounting.
- Frequent filter cleaning or replacement may be necessary for optimal performance.
Customer Reviews
Customers commended the Elica Decorative Kitchenhood Chimney for its exquisite look and effective operation. Many people have commented on how well the LED lights illuminate the area and how easy it is to utilize the touch panel. However, some customers have reported that the installation process might be difficult and need accurate measurements.
Common complaints
Consider the higher price tag in comparison to other models and the frequent filter maintenance that is required.
Faqs
What are the dimensions of the Decorative Kitchenhood?
How do I clean the filters of my Elica Chimney?
Is the Kitchenhood Chimney noisy during operation?
Can I install the Elica Decorative myself?
What type of lighting does the Kitchenhood come with?
How often should I replace the filters in my Chimney?
Is the Kitchenhood Chimney energy-efficient?
Can I use the Elica Decorative with an induction cooktop?
What is the warranty period for the Chimney?
How do I reset the Decorative after a power outage?
Leave a Comment
