Engenius AC1750 Outdoor Access Point ENH1750EXT User Guide
Content
Introduction
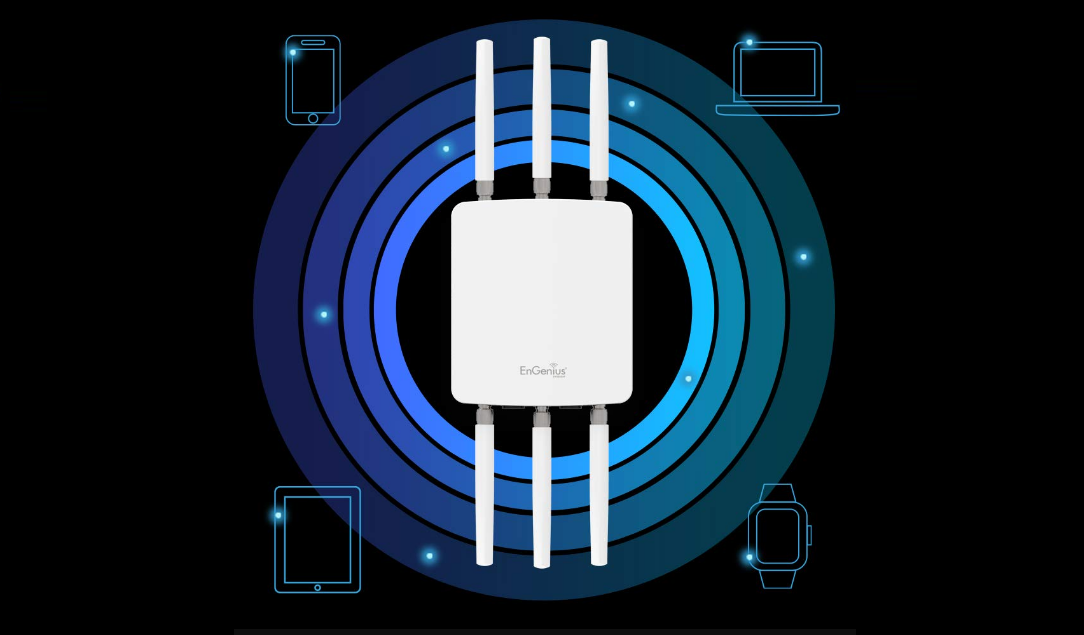
AC1750 Outdoor Access Point ENH1750EXT is a high-powered, long-range 3x3 Dual-Band Wireless 802.11 ac/a/b/g/n Outdoor Access Point with speeds up to 450 Mbps on 2.4GHz and 1300Mbps on 5GHz band. It can be configure as an: Access Point, Client Bridge, or WDS (AP, Station & Bridge). The ENH1750EXT is designed to operate in a variety of outdoor environments. Its high-powered, long-range characteristics make it a cost- effective alternative to ordinary Access Points that don’t have the range and reach to connect to a growing number of wireless users who wish to connect to a business network. The ENH1750EXT supports the 2.4GHz frequency band under 802.11 b/g/n mode while at the same time providing 5GHz band under 802.11 ac/a/n mode for communicating to and from 5GHz capable computers, tablets or smart phones or transferring files. Several ENH1750EXTs can be deployed in a campus setting using the 5GHz band as a backhaul to provide multiple 2.4GHz wireless cells for computers or mobile devices in common outdoor areas.
The ENH1750EXT is easy to install in virtually any location with its included PoE (Power over Ethernet) injector for quick outdoor installation. The ENH1750EXT enables network administrators to control its transmit power and feature settings for selecting narrow bandwidth and traffic shaping. The ENH1750EXT also supports wireless encryption including Wi-Fi Protected Access (WPA-PSK/WPA2-PSK) Encryption, and IEEE 802.1x with RADIUS.
The ENH1750EXT is priced at approximately $199.99.
System Requirements
The following are the Minimum System Requirements in order to configure the device.
- Computer with an Ethernet interface or wireless network capability
- Windows OS (XP, Vista, 7, 8, 10), Mac OS, or Linux-based operatingr systems
- Web-Browsing Application (i.e.:Edge, Internet Explorer, Firefox, Safari, or another similar browser application)
Product Overview
Key Features
- Up to 29 dBm transmit power enabling long range connectivity
- Supports IEEE802.11ac/a/b/g/n wireless standards with up to 450 Mbps data rate on 2.4GHz band and 1300Mbps on 5GHz band
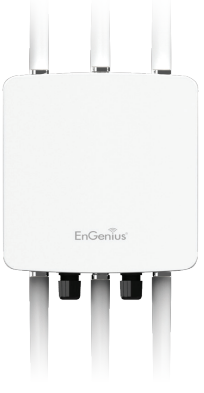
- Three detachable 5 dBi 2.4 GHz Omni-directional antennas
- Three detachable 7 dBi 5 GHz Omni-directional antennas
- Can be monitored after deployment with EnGenius EZ ControllerTM software for Windows (Free online download)
- Mesh Supported
- Can be used with included power adapter or via PoE with PoE 802.3at - capable switches or injectors
- Fast Transition and Handover between Access Points
- Band Steering shifts client devices to a proper frequency band for getting more bandwidth and speed under an Access Point.
- Secured Guest Network option available
Package Contents
The ENH1750EXT package contains the following items:*
- ENH1750EXT Access Point
- 3 detachable 5 dBi 2.4 GHz Omni-directional Antenna
- 3 detachable 7 dBi 5 GHz Omni-directional Antenna
- Power Adapter (48V/0.8A)
- PoE Injector (EPE-48GR)
- Grounding Cable
- Pole Mount Bracket
- Wall Mount Base
- Mounting Screw Set
- Quick Installation Guide
- Technical Support Card
Technical Specifications
- Standard:
- IEEE802.11ac/a/n on 5 GHz
- IEEE802.11b/g/n on 2.4 GHz
- IEEE802.3at
- Antenna
- 6 External N-type Antenna
- 3 x detachable 5 dBi 2.4 GHz Omni-directional Antennas
- 3 x detachable 7 dBi 5 GHz Omni-directional Antennas
- Physical Interface
- 2 x 10/100/1000 Gigabit Ethernet Port with PoE support
- LAN1 Port: IEEE802.3at PoE Input
- LAN2 Port: IEEE802.3af PoE Output
- Both Ethernet Ports support Surge Protection to 6KV
- 2 x 10/100/1000 Gigabit Ethernet Port with PoE support
- LED Indicator
- Power
- LAN 1
- LAN 2
- 2.4 GHz
- 5 GHz
- Power Requirements
- External Power Adapter, DC IN, 48V/0.8A IEEE802.3at support
- Operation Modes
- Access Point
- WDS
- Mesh
- WDS Detail
- WDS AP
- WDS Bridge
- WDS Station
- Mesh Detail
- Mesh AP
- Mesh Only
- Management
- Auto Channel Selection
- Multiple SSID: 16 SSIDs, 8 SSIDs per Radio
- BSSID
- SNMP V1/V2c/V3
- MIB I/II, Private MIB
- VLAN Tag/VLAN Pass-through
- Clients Statistics
- Save Configuration as User Default
- Fast Roaming
- Band Steering
- E-Mail Alert
- RADIUS Accounting
- Guest Network
- Control
- CLI Supported
- Distance Control (Ack Timeout)
- 802.1X Supplicant (CB Mode)
- Multicast Supported
- Auto Reboot
- Obey Regulatory Power
Physical Interface
Dimensions and Weights
- Length: 11.22”
- Width: 8.58”
- Depth: 2.1”
- Weight: 4.17 lbs
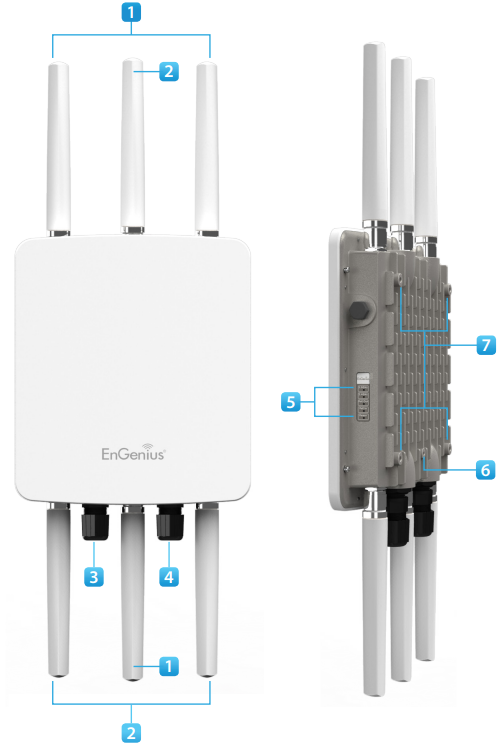
- 2.4 GHz Antennas: Detachable 5 dBi 2.4 GHz Omni-directional
- 5 GHz Antennas Detachable 7 dBi 5 GHz Omni-directional
- LAN Port 1 (802.3at PoE Input): Ethernet port for RJ-45 cable.
- LAN Port 2 (802.3af PSE Output): Ethernet port for RJ-45 cable.
- LED Indicators: LED lights for Power, LAN Port 1, LAN Port 2, 2.4 GHz Connection and 5 GHz Connection.
- Ground
- Mounting Holes: Using the provided hardware, the ENH1750EXT can be attached to a wall or pole.
Description
The EnGenius AC1750 Outdoor Access Point ENH1750EXT is engineered with durability and performance in mind. Its IP67 rating ensures the device can operate in temperatures ranging from -40°C to 60°C and is resistant to dust and water ingress. The device features three external antennas for each band, which are adjustable to optimize signal strength and coverage.
The ENH1750EXT supports advanced features like band steering, load balancing, and client isolation, making it an excellent choice for networks that require high throughput and reliability. Additionally, it supports multiple operating modes including Access Point, Client Bridge, and WDS Bridge/Repeater.
Before You Begin
Computer Settings
Windows XP/Windows 7/Windows 8/Windows 10
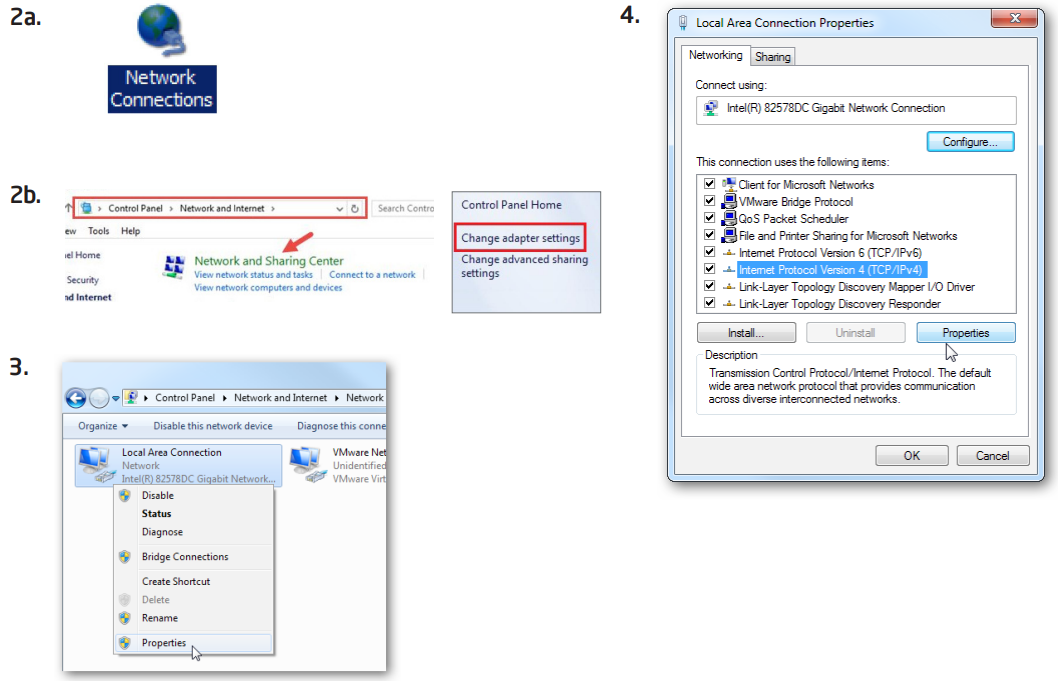
In order to use the Access Point, you must first configure the TCP/IPv4 connection of your Windows OS computer system.
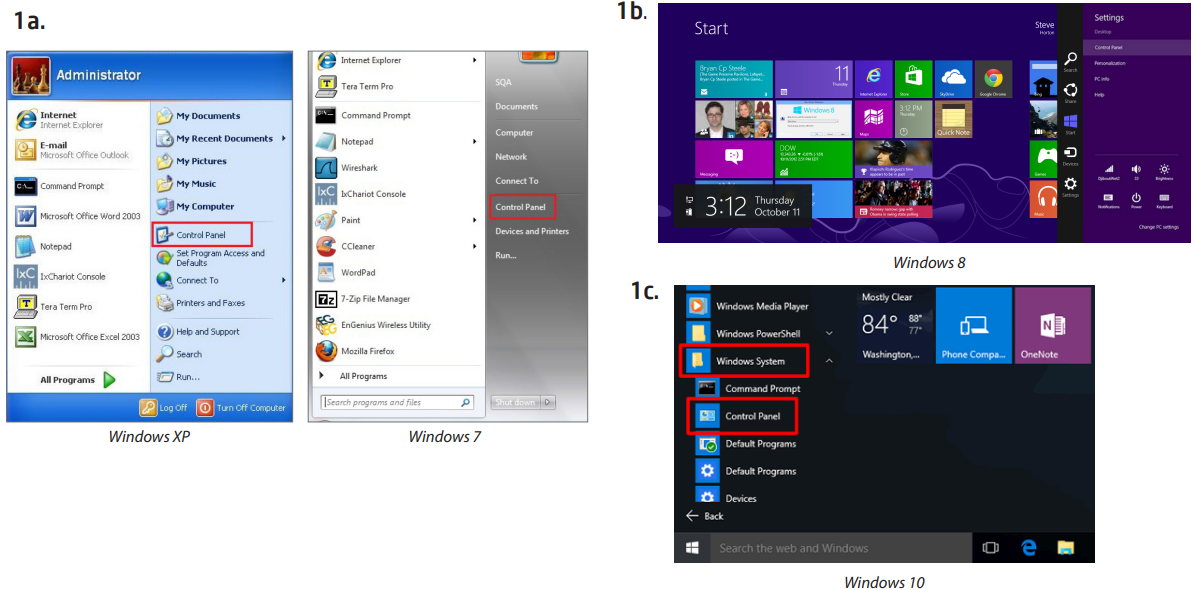
- 1a. Click the Start button and open the Control Panel
- 1b. Move your mouse to the lower right hot corner to display the Charms Bar and select the Control Panel in Windows 8 OS.
1c. In Windows 10, click Start to select All APPs to enter the folder of Windows system for selecting Control Panel.
- 2a. In Windows XP, click Network Connections.
- 2b. In Windows 7/Windows 8/Windows 10, click View Network Status and Tasks in the Network and Internet section, then select Change adapter settings.
- Right click on Local Area Connection and select Properties.
Select Internet Protocol Version 4 (TCP/IPv4) and then select Properties.
- Select Use the following IP address and enter an IP address that is different from the Access Point and Subnet mask, then click OK.
Note: Ensure that the IP address and Subnet mask are on the same subnet as the device.
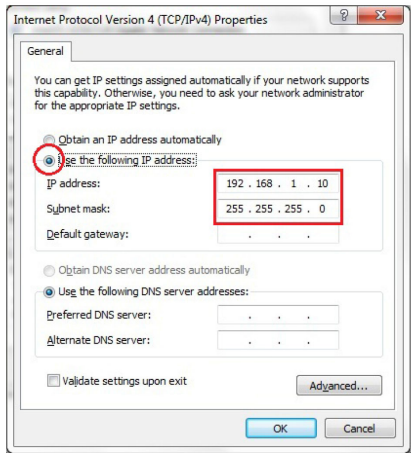
For example:
- ENH220EXT IP address: 192.168.1.1
- PC IP address: 192.168.1.2 – 192.168.1.255
- PC Subnet mask: 255.255.255.0
Apple Mac OS X
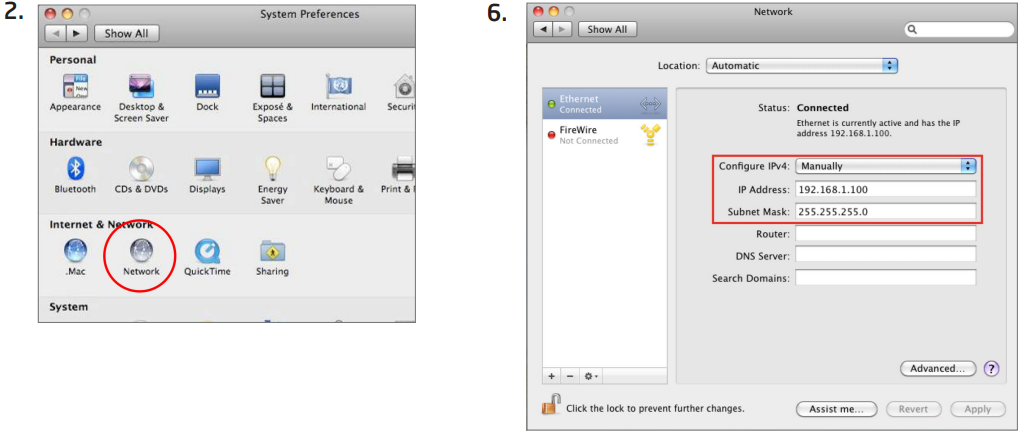
- Go to System Preferences (Which can be opened in the Applications folder or selecting it in the Apple Menu).
- Select Network in the Internet & Network section.
- Highlight Ethernet.
- In Configure IPv4, select Manually.
- Enter an IP address that is different from the Access Point and Subnet mask then press OK.
Note: Ensure that the IP address and Subnet mask are on the same subnet as the device.
For example:- ENH900EXT IP address: 192.168.1.1
- PC IP address: 192.168.1.2 – 192.168.1.255
- PC Subnet mask: 255.255.255.0
Click Apply when done.
Hardware Installation
- Connect one end of the Ethernet cable into the main LAN port (PoE) of the Access Point and the other end to the AP Ethernet port on the PoE injector.
- Connect the Power Adapter to the DC-IN port of the PoE injector and plug the other end in to an electrical outlet.
- Connect the second Ethernet cable into the LAN port of the PoE injector and the other end to the Ethernet port on the computer.
- Screw on the provided antennas to the device. Once both connections are secure, verify the following:
- Ensure that the POWER light is on (it will be green).
- Ensure that the 2.4 GHz/5 GHz WLAN light is on (it will be green for both 5 GHz and 2.4 GHz).
- Ensure that the LAN (Computer/ENH1750EXT Connection) light is on (it will be green).
- Once all three lights are on, proceed to set up the Access Point using the computer.
This diagram depicts the hardware configuration.
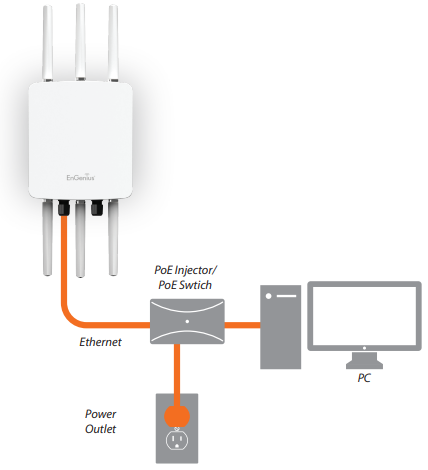
Note: The Access Point supports both IEEE 802.3at PoE (Power over Ethernet) or the included power injector. You may use either one as the power source. Do NOT use both at the same time.
Mounting the ENH1750EXT
Using the provided hardware, the ENH1750EXT can be attached to a wall or a pole.
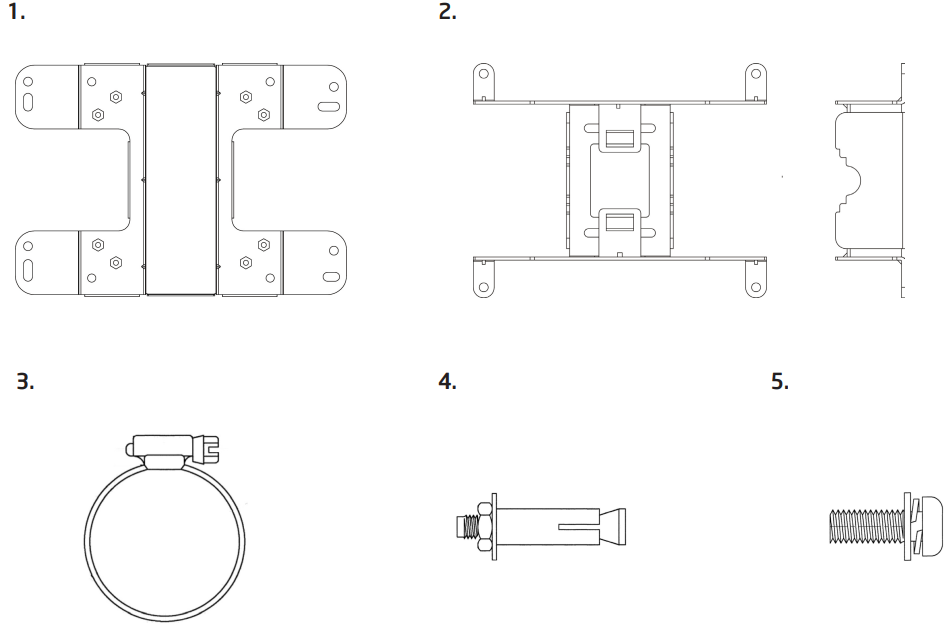
- Wall Mount Kit 260x180x7 (mm)
- Pole Mount Kit 140x112x33 (mm)
- Pipe 63.5 (D) x 12.7 (mm)
- Tool 20(D) x 6 (mm)
Screws: 6.5(D) x 9.95 (mm)
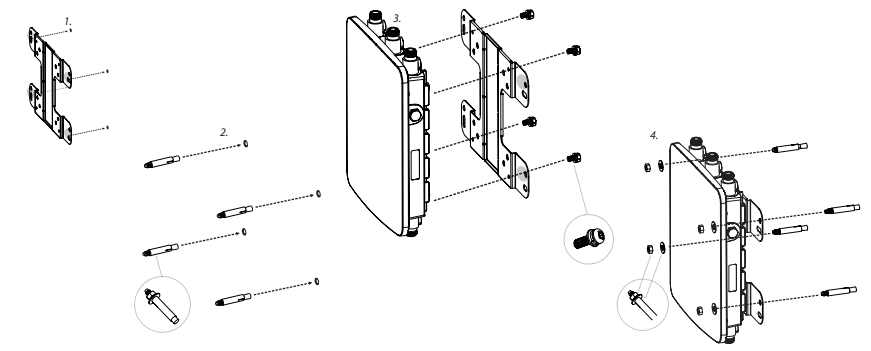
To attach the ENH1750EXT to a wall using wall mounting kit.
- Mark the four locations of the mounting holes on the flat mounting surface.
- Drill a 37 mm deep 8 mm hole in the markings and hammer the bolts into the openings.
- Place the lock and flat washers on the four hex cap screws and drive the screws to attach the bracket to the back of the Access Point.
Tighten the flat washers to secure the bracket to the mounting surface.
To attach the ENH1750EXT to a pole using the provided pole mounting kit:
- Place the lock and flat washers on the four hex cap screws and drive the screws to attach the bracket to the back of the Access Point.
- Drive the four round head screws to attach the Pole Mount Bracket to the bracket.
- Thread the open end of the Pole Strap through the two tabs on the Pole Mount Bracket .
Lock and tighten the Pole Strap to secure the Pole Mount Bracket to the pole.
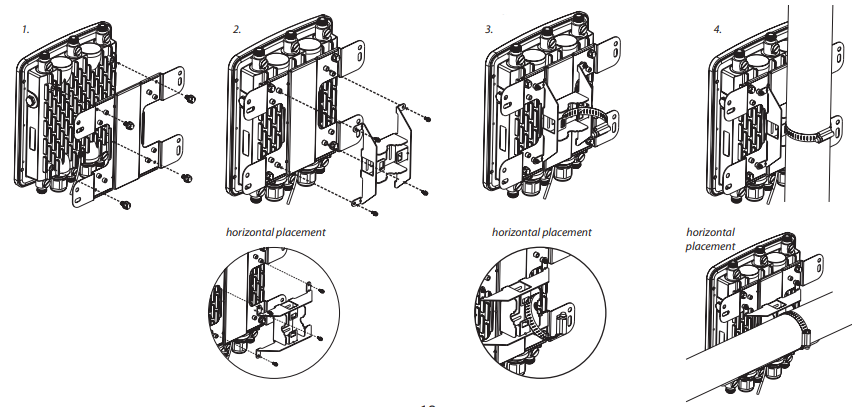
Note: See diagram below for vertical and horizonal placements.
Configuring Your Access Point
This section will show you how to configure the device using the web-based configuration interface.
Default Settings
Please use your Ethernet port or wireless network adapter to connect the Access Point.

Web Configuration
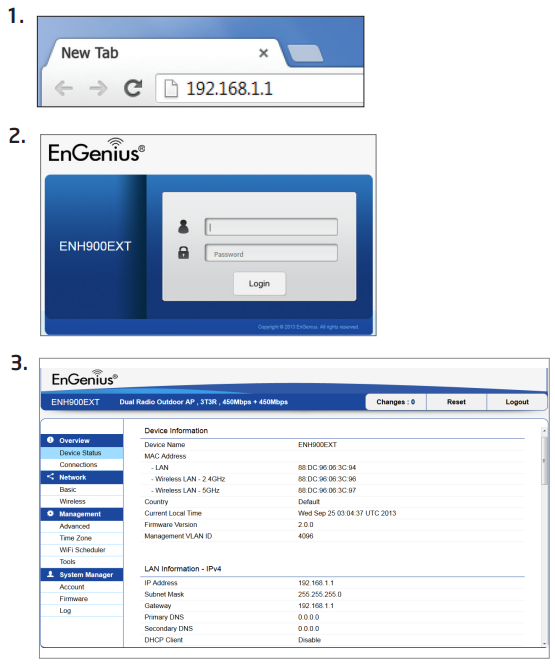
- Open a web browser (Internet Explorer/Firefox/Safari/Chrome) and enter the IP Address http://192.168.1.1
Note: If you have changed the default LAN IP Address of the Access Point, ensure you enter the correct IP Address. - The default username and password are admin.
Once you have entered the correct username and password, click the Login button to open the web-base configuration page. If successful, you will be logged in and see the ENH1750EXT User Menu.
Building a Wireless Network
The ENH1750EXT has the ability to operate in various modes. This chapter describes the operating modes of the ENH1750EXT.
Access Point Mode
In Access Point Mode, ENH1750EXT behaves likes a central connection for stations or clients that support IEEE 802.11a/b/g/n networks. The stations and clients must be configured to use the same SSID (Service Set Identifier) and security password to associate with the ENH1750EXT. The ENH1750EXT supports up to eight SSIDs per band at the same time for secure access.
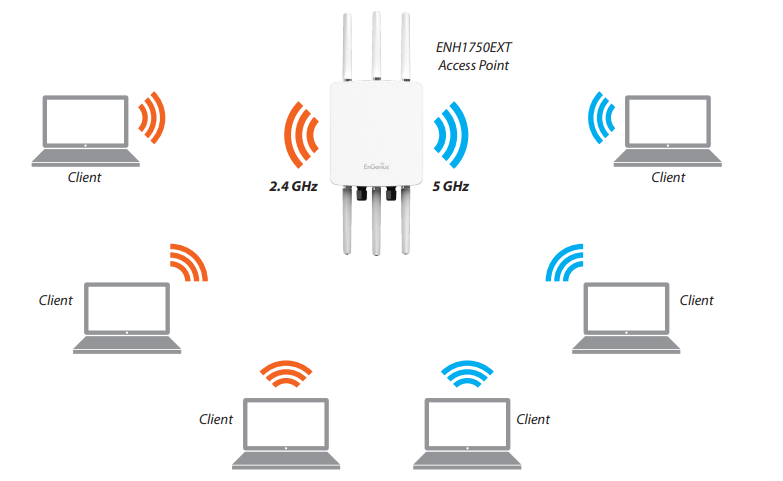
The ENH1750EXT can be used as a centralized Outdoor Access Point with which other EnGenius Wireless N 2.4 or 5 GHz Outdoor Client Bridges can associate; leveraging the long-range capability of their internal high-gain directional antennas, resulting in a very cost-effective solution to expand a company network over a multiple building campus.
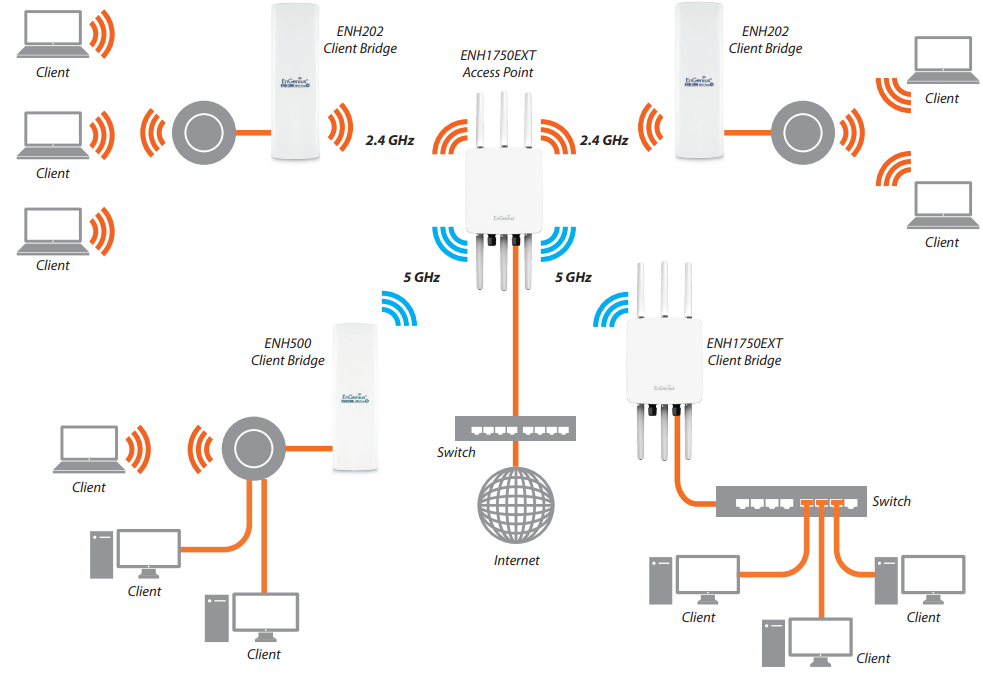
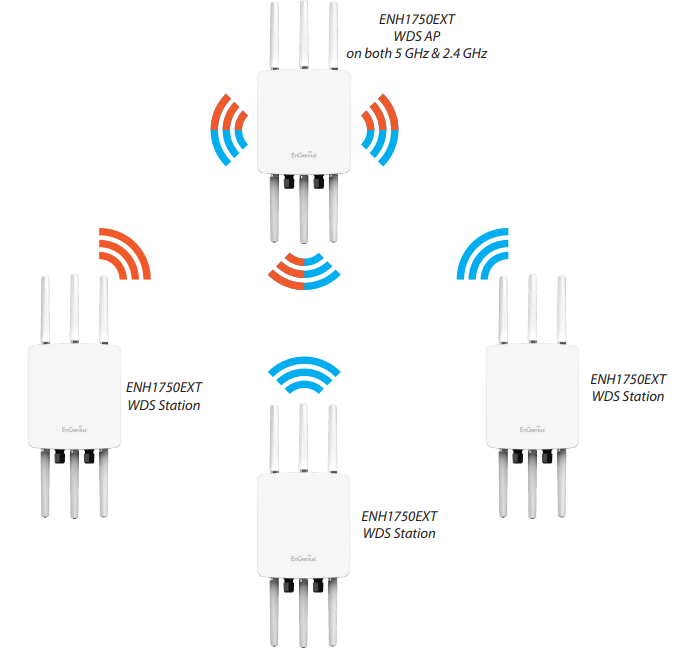
WDS AP Mode
The ENH1750EXT also supports WDS AP mode. This operating mode allows wireless connections to the ENH1750EXT using WDS technology. In this mode, configure the MAC addresses in both Access Points to enlarge the wireless area by enabling WDS Link settings. WDS supports up to four (4) AP MAC addresses.
WDS Bridge Mode
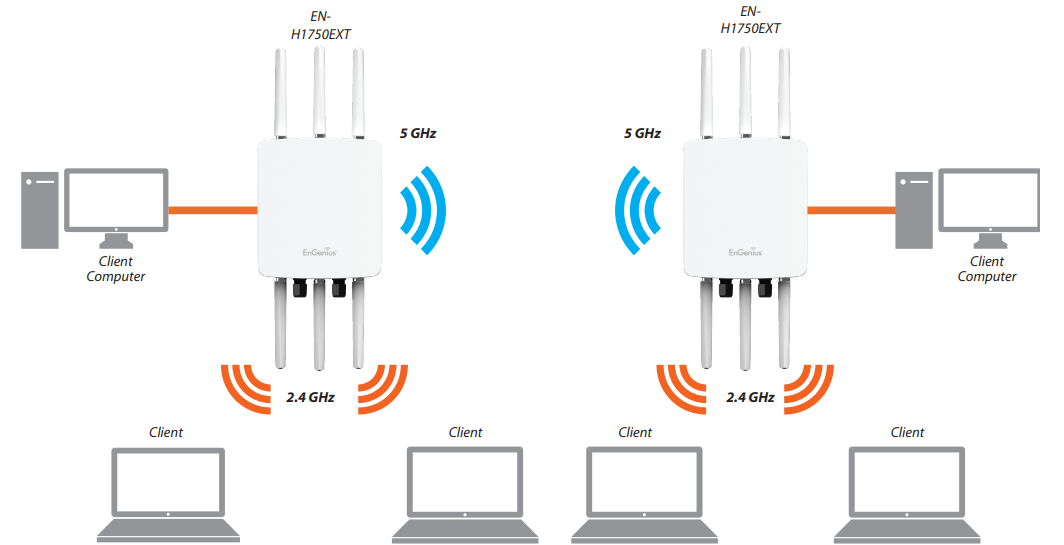
In WDS Bridge Mode, the ENH1750EXT can wirelessly connect different LANs by configuring the MAC address and security settings of each ENH1750EXT device. Use this mode when two wired LANs located a small distance apart want to communicate with each other. The best solution is to use the ENH1750EXT to wirelessly connect two wired LANs, as shown in the following diagram.
WDS Bridge Mode can establish up to four WDS links, creating a star-like network.
Note: WDS Bridge Mode does not act as an Access Point. Access Points linked by WDS are using the same frequency channel. More Access Points connected together may lower throughput. This configuration can be susceptible to generate endless network loops in your network, so it is recommended to enable the Spanning Tree function to prevent this from happening.
WDS Station Mode
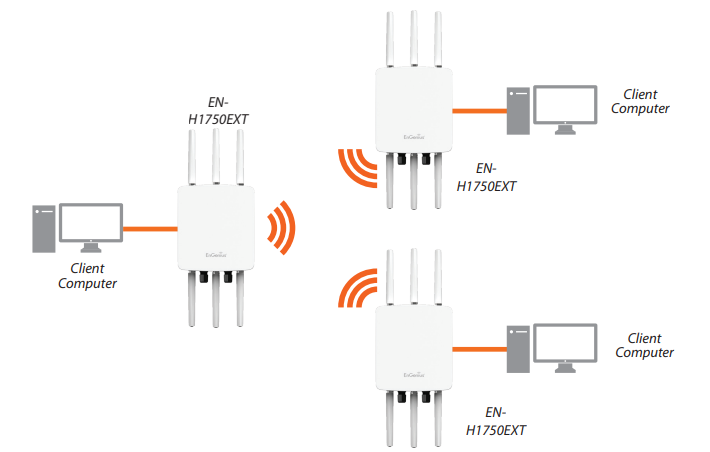
Station mode expands the WDS by receiving a wireless signal/service and sharing it through the Ethernet port.
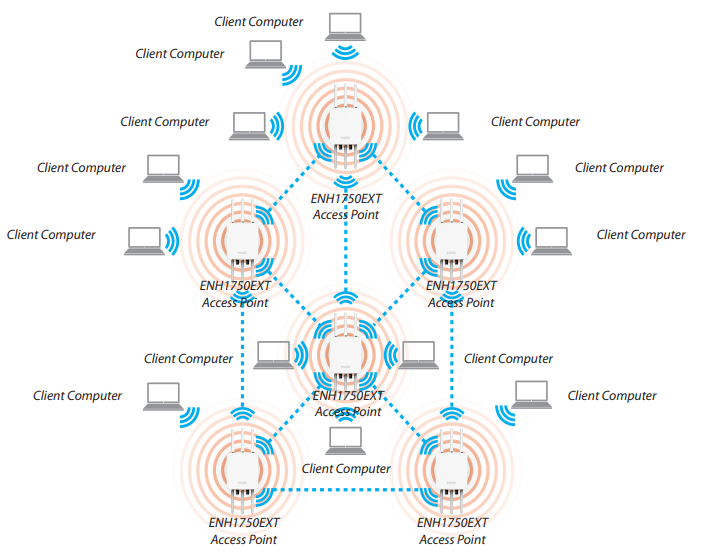
AP Mesh Mode
Under the AP Mesh mode, the ENH1750EXT can be used as the central connection hub for station or clients that support IEEE 802.11 b/g/n network. Under this mode, the ENH1750EXT can be configured with the same Mesh SSID and security password in order to associate with other ENH1750EXTs, as well as connect with clients under the same SSID and encryption signatures. For example, you would use one band to connect Access Points in range with Mesh mode and the other band to broadcast traffic on the network.
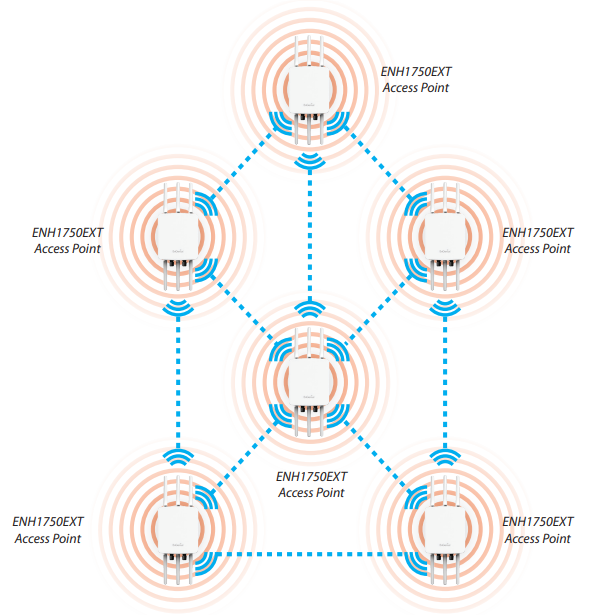
Mesh Only Mode
Under the Mesh-only mode, the ENH1750EXT can be configured with the same Mesh SSID and security password in order to associate with other Mesh enabled ENH1750EXTs, instead of connecting with clients.
Status
Main Status
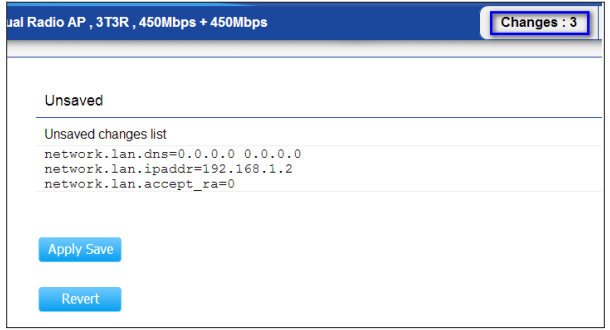
Save Changes
This page lets you save and apply the settings shown under Unsaved changes list, or cancel the unsaved changes and revert to the previous settings that were in effect.
Device Status
Clicking the Device Status link under the Overview menu shows the status information about the current operating mode.
The Device Information section shows general system information such as Device Name, MAC Address, Current Time, Firmware Version, and Management VLAN ID
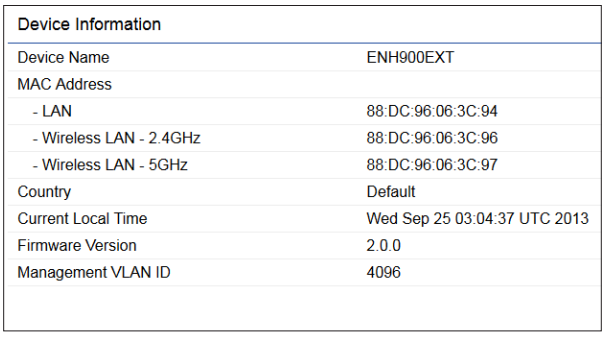
Note: VLAN ID is only applicable in Access Point or WDS AP mode.

The LAN Information section shows the Local Area Network settings such as the LAN IP Address, Subnet mask, and DNS Address.

The Wireless LAN Information 2.4 GHz/5 GHz section shows wireless information such as Operating Mode, Frequency, and Channel. Since the ENH1750EXT supports multiple-SSIDs, information about each SSID, the ESSID, and security settings, are displayed

Note: Profile Settings are only applicable in Access Point and WDS AP modes.
The Statistics section shows Mac information such as SSID, MAC address, RX and TX.

The Wireless Mesh Information - 2.4 GHz section shows wireless information such as Operation Mode, Wireless Mode, Channel Bandwidth, Frequency/Channel, Mesh SSID and Mesh Security.

Connection
2.4 GHz/5 GHz Connection List
Click the connection link under the Overview menu displays the connection list of clients associated to the ENH1750EXT’s 2.4 GHz/5 GHz, along with the MAC addresses and signal strength for each client. Clicking Refresh updates the client list.
Note: Only applicable in Access Point and WDS AP modes.
2.4 GHz/5 GHz WDS Link List
Click the connection link under the Overview menu. This page displays the current status of the WDS link, including WDS Link ID, MAC Address, Link Status and RSSI.
Note: Only applicable in WDS AP and WDS Bridge modes.
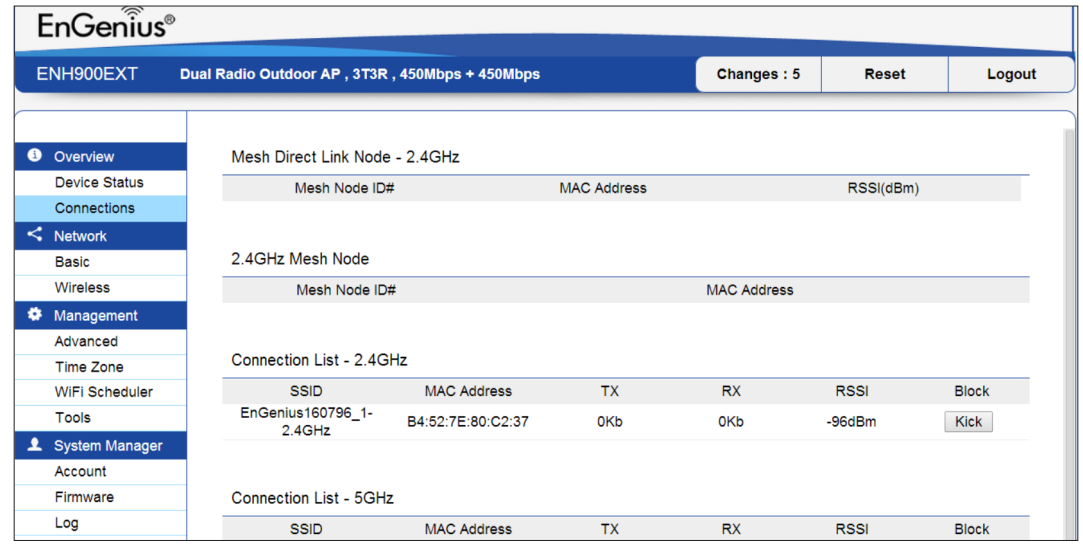
The Mesh Link List
Monitor the 2.4GHz Mesh Link List under the status menu. The page will display the current status of the Mesh Links under the Mesh AP mode and Mesh nodes under the Mesh Only mode.
Note: Only Applicable in the Mesh AP and Mesh Only mode.
Setup Guide
To set up the ENH1750EXT, start by mounting the device in a suitable outdoor location using the included mounting kit.
- Connect the device to your network using a PoE injector or switch.
- Access the web-based management interface through a web browser by typing the default IP address.
- Configure the basic settings such as SSID, channel, and security options.
- You can also configure more advanced features like band steering and load balancing through the interface.
- Ensure to update the firmware regularly to benefit from the latest features and security patches.
EnGenius AC1750 Outdoor Access Point ENH1750EXT Network
Basic IP Settings
IPv4/IPv6 Settings
This page allows you to modify the device’s IP settings.
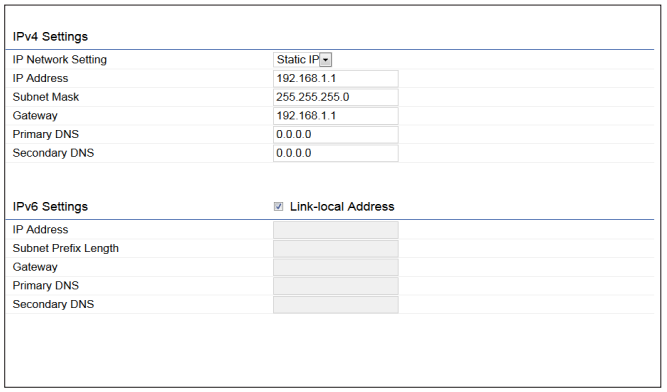
- IP Network Settings: Select whether the device IP address will use a static IP address specified in the IP address field or be obtained automatically when the device connects to a DHCP server.
- IP Address: The IP address of this device.
- Subnet Mask: The IP Subnet mask of this device.
- Gateway: The Default Gateway of this device. Leave it blank if you are unsure of this setting.
- Primary/Secondary DNS: The primary/secondary DNS address for this device.
- Save: Click Save to confirm the changes.
Spanning Tree Protocol (STP) Settings
This page allows you to modify the Spanning Tree settings. Enabling the Spanning Tree protocol will prevent network loops in your LAN network.
_settings_engenius_ac1750_outdoor_access_point_enh1750ext.png)
- Spanning Tree Status: Enables or disables the Spanning Tree function.
- Hello Time: Specifies Bridge Hello Time in seconds. This value determines how often the device sends handshake packets to communicate information about the topology throughout the entire Bridged Local Area Network.
- Max Age: Specifies Bridge Max Age in seconds. If another bridge in the spanning tree does not send a hello packet for a long period of time, it is assumed to be inactive.
- Forward Delay: Specifies Bridge Forward Delay in seconds. Forwarding delay time is the time spent in each of the Listening and Learning states before the Forwarding state is entered. This delay is provided so that when a new bridge comes onto a busy network, it analyzes data traffic before participating in the network.
- Priority: Specifies the Priority Number. A smaller number has a greater priority than a larger number.
- Save: Click Save to confirm the changes.
Troubleshooting
Common issues with the ENH1750EXT include poor signal strength,
- Connectivity drops, and firmware update failures.
- To address poor signal strength, ensure the antennas are properly aligned and positioned.
- For connectivity drops, check the cable connections and ensure the device is properly powered.
- If firmware updates fail, try using a different browser or checking for any firewall restrictions.
- EnGenius support for detailed troubleshooting guides.
Pros & Cons
Pros:
- High-speed performance with up to 1750 Mbps
- Durable IP67-rated weatherproof design
- Advanced features like band steering and load balancing
- Multiple operating modes (Access Point, Client Bridge, WDS Bridge/Repeater)
- Easy setup and configuration via web-based interface
Cons:
- Higher cost compared to some indoor access points
- Requires PoE injector or switch for power supply
- Complex advanced settings may require technical expertise
- Some users report occasional firmware update issues
Customer Reviews
Customer reviews for the EnGenius AC1750 Outdoor Access Point ENH1750EXT highlight its exceptional performance and reliability in outdoor environments. Users appreciate its robust dual-band capabilities, which provide strong connectivity for multiple devices, making it ideal for high-demand applications like streaming and gaming. The IP68-rated waterproof housing is frequently praised for withstanding harsh weather conditions. However, some customers note challenges with installation and configuration. Overall, it is regarded as a solid investment for enhancing outdoor wireless coverage.
Faqs
What is the maximum speed of the EnGenius AC1750 Outdoor Access Point?
Is the Access Point ?
What power supply options are available for the ENH1750EXT?
What are the different operating modes of the EnGenius?
How do I update the firmware of the Access Point ENH1750EXT?
Can I use the Point indoors?
What security features does the AC1750 Outdoor Access Point support?
How many antennas does the EnGenius AC1750 Outdoor Access Point ENH1750EXT have?
Can I manage multiple ENH1750EXT devices from a single interface?
Leave a Comment
