Epson PictureMate Personal Photo Lab PM-400 User Guide
Content
Epson PictureMate Personal Photo Lab PM-400 Introduction
Technical Specifications
Windows System Requirements
To use your product and its software, your computer should use one of these Microsoft operating systems:
- Windows 10
- Windows 8.x
- Windows 7
- Windows Vista
- Windows XP Professional x64 Edition
- Windows XP SP3
OS X System Requirements
To use your product and its software, your Mac should use one of these operating systems:
- OS X 10.10.x
- OS X 10.9.x
- OS X 10.8.x
- OS X 10.7.x
- OS X 10.6.8
Paper Specifications
Note: Since the quality of any particular brand or type of paper may be changed by the manufacturer at any time, Epson cannot guarantee the quality of any non-Epson brand or type of paper. Always test a sample of paper stock before purchasing large quantities or printing large jobs.
Single-sheets
| Size | Dimensions |
|---|---|
| A5 | 5.8 × 8.2 inches [148 × 210 mm] |
| A6 | 4.1 × 5.8 inches [105 × 148 mm] |
| 4 × 6 inches | 4 × 6 inches [102 × 152 mm] |
| 5 × 7 inches | 5 × 7 inches [127 × 178 mm] |
| 3.5 × 5 inches | 3.5 × 5 inches [89 × 127 mm] |
| 16:9 wide | 4 × 7.1 inches [102 × 181 mm] |
Paper Types
- Plain paper Paper distributed by Epson
Thickness
- o.002 inch (0.05 mm) to 0.02 inch (0.6 mm)
- 0.003 inch (0.08 mm) to 0.004 inch (0.11 mm)
Plain Paper Weight
- Weight Range: 17 lb (64 g/m²) to 24 lb (90 g/m²)
Envelopes
| Size | Dimensions |
|---|---|
| No. 10 | 4.1 × 9.5 inches [105 × 241 mm] |
Paper Types
- Plain bond paper
Weight
- 20 lb (75 g/m²) to 24 lb (90 g/m²)
Printable Area Specifications
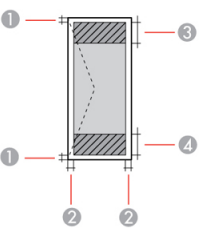
Note: Print quality may decline in the shaded areas shown here due to the printer mechanism.
Single sheets - normal printing

- Margin: 0.12 inch (3 mm) minimum
- A5 (5.8 × 8.2 inches [148 × 210 mm]) paper: 0.39 inch (10.0 mm) Paper smaller than A5 (5.8 × 8.2 inches [148 × 210 mm]): 0.12 inch (3.0 mm)
- Reduced print quality area/top: 1.46 inches (37 mm) minimum
- Reduced print quality area/bottom: 1.56 inches (39 mm) minimum
Single sheets - borderless printing

- Reduced print quality area/top: 1.57 inches (40 mm) minimum
- Reduced print quality area/bottom: 1.65 inches (42 mm) minimum
Envelopes
- Left/right margins: 0.12 inch (3 mm) minimum
- Top/bottom margins: 0.20 inch (5 mm) minimum
- Reduced print quality area/right: 0.71 inches (18 mm) minimum
- Reduced print quality area/left: 1.46 inches (37 mm) minimum
Ink Cartridge Specifications
Note: We recommend that you use genuine Epson cartridges and do not refill them. The use of other products may affect your print quality and could result in printer damage.
The cartridge included with the printer is designed for printer setup and not for resale. After some ink is used for charging, the rest is available for printing. Yields vary considerably based on images printed, print settings, paper type, frequency of use, and temperature. For print quality, a variable amount of ink remains in the cartridge after the "replace cartridge" indicator comes on.
- Color: Cyan, Magenta, Yellow, Black
- Cartridge Life:
- Opened package: 6 months
- Unopened package: Do not use if the date on the package has expired
- Temperature:
- Storage: –22 to 104 °F (–30 to 40 °C)
- Usable for 1 month at 104 °F (40 °C)
- Ink freezes at 3.2 °F (–16 °C)
- Ink thaws and is usable after 3 hours at 77 °F (25 °C)
Note: For best printing results, use up a cartridge within 6 months of opening the package.
Memory Card Specifications
Note: Cards marked with an asterisk (*) require an adapter; consult your adapter documentation for details on using it
Compatible Types and Maximum Capacities
- SD: 2GB
- SDHC: 32GB
- SDXC: 64GB
- miniSD*: 2GB
- miniSDHC*: 32GB
- microSD*: 2GB
- microSDHC*: 32GB
- microSDXC*: 64GB
Voltage Requirements
- Voltage Type: 3.3 V type, dual voltage type (3.3 V and 5V)
- Supply Voltage: 3.3 V
- Maximum Current: 200 mA
External USB Device Specifications
Do not use devices with the following requirements:
- Dedicated driver
- Security settings, such as password or encryption, etc.
- Built-in USB hub
Note: Use only external storage devices with independent AC power sources. External storage devices that are powered via USB are not recommended. Epson cannot guarantee the operation of externally connected devices.
- CD-ROM/CD-R Drive:
- Maximum Capacity: 700MB
- CD-RW: Not supported
- DVD-ROM/DVD-R Drive:
- Maximum Capacity: 4.7GB
- DVD+R, DVD±RW, DVD-RAM, and Blu-ray Disc: Not supported
- Magneto-Optical Drive:
- Capacity: 1.3GB
- Hard Disk and USB Flash Drives:
- Maximum Capacity: 2TB
- Formatting: Formatted in FAT, FAT32, or exFAT
Dimension Specifications
- Height:
- Stored: 3.3 inches (85 mm)
- Printing: 7.9 inches (201 mm)
- Width:
- Stored: 9.8 inches (249 mm)
- Printing: 9.8 inches (249 mm)
- Depth:
- Stored: 6.9 inches (176 mm)
- Printing: 15.1 inches (383 mm)
- Weight (without ink cartridge and AC adapter):
- 4.0 lb (1.8 kg)
Electrical Specifications
Printer Specifications
- Rated DC Input Voltage: DC24V
- Rated DC Input Current: 0.9A
Power Consumption (USB Connection)
- Printing: Approximately 12 W (ISO/IEC 24712)
- Ready Mode: Approximately 6 W
- Sleep Mode: Approximately 1.5 W
- Power Off Mode: Approximately 0.2 W
AC Adapter Specifications
- AC Adapter Model: A461H
- Input: AC100–240V, 1A, 50–60Hz
- Output: DC24V, 1A
Environmental Specifications
- Temperature:
- Operating: 50 to 95 °F (10 to 35 °C)
- Storage: –4 to 104 °F (–20 to 40 °C)
- Usable for 1 month at 104 °F (40 °C)
- Humidity (without condensation):
- Operating: 20 to 80% RH
- Storage: 5 to 85% RH
Interface Specifications
- For computer Hi-Speed USB
- For external USB and PictBridge device
- Hi-Speed USB
Note: Epson cannot guarantee the operation of externally connected devices.
Network Interface Specifications
Standards
- IEEE 802.11 b/g/n: Complies with either IEEE 802.11 b/g or IEEE 802.11 b/g/n, depending on purchase location.
Security
- WEP: 64/128 bit
- WPA2-PSK: AES; complies with WPA2 with support for WPA/WPA2 Personal
Frequency Range
- 2.4 GHz
Coordination Modes
- Infrastructure Mode
- Ad Hoc Mode: Not supported for IEEE 802.11n
- Wi-Fi Direct: Not supported for IEEE 802.11b
Note: Simple AP mode is compatible with Wi-Fi infrastructure mode.
Product Basics
Control Panel Buttons
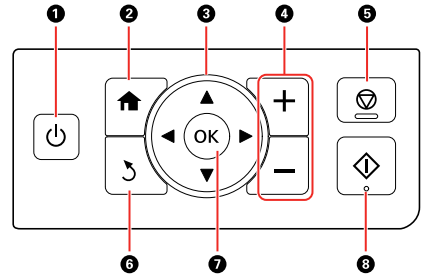
- The
 power button
 - The
 home button
 - The arrow buttons; navigate menus
- The + and – buttons; increase or decrease the number of copies
- The
 stop button
 - The
 back button
 - The OK button
- The
 start button
The LCD Screen
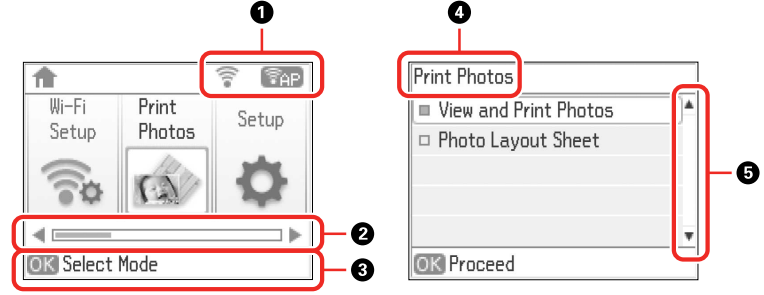
- Displays network status
- You can scroll left or right when these arrows are displayed
- Displays available button options
- Screen name
- You can scroll up or down when these arrows are displayed
Changing LCD Screen Language
You can change the language used on the LCD screen.
- Press the
 home button, if necessary.
 - Press the arrow buttons to select Setup and press the OK button.
- Select Printer Setup and press the OK button.
- Select Language and press the OK button.
- Select a language and press the OK button.
Turning Off Control Panel Sounds
You can turn off the sound heard when you press buttons on the control panel.
- Press the
 home button, if necessary.
 - Press the arrow buttons to select Setup and press the OK button.
- Select Printer Setup and press the OK button.
- Select Sound and press the OK button.
- Select Button Press and press the OK button.
- Select Off and press the OK button.
Product Parts Locations
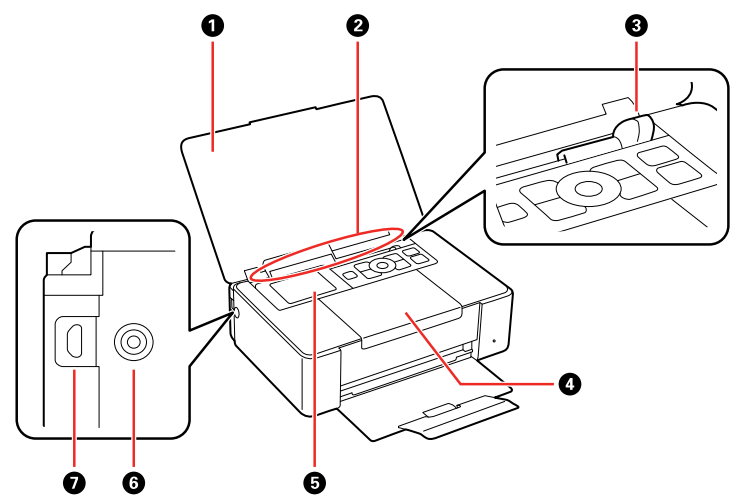
Printer Parts
- Printer cover
- Rear paper feed
- Edge guide
- Inner cover
- LCD screen
- Power inlet
- Micro USB port
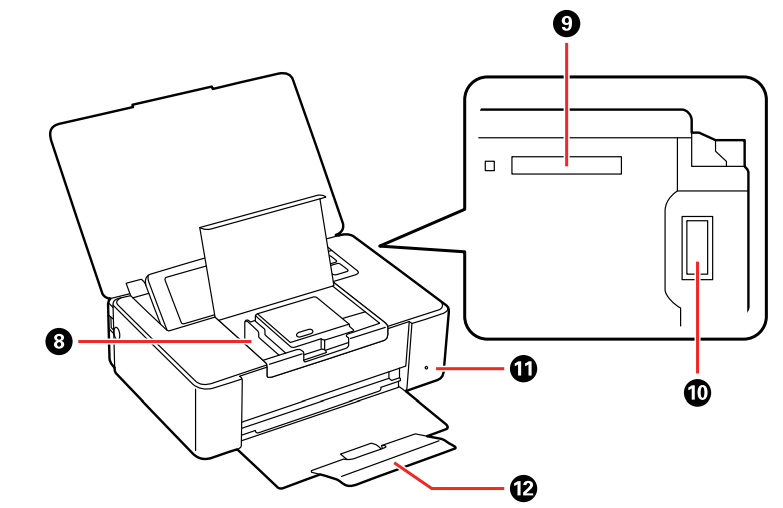
Ink cartridge holder (do not remove)
- Memory card slot
- USB port
- Power light
Output tray and extension
The Power Off and Sleep Timers
The product enters sleep mode or turns off automatically if it is not used for a period of time. You can adjust the time period before power management, but increasing the time reduces the product's energy efficiency.
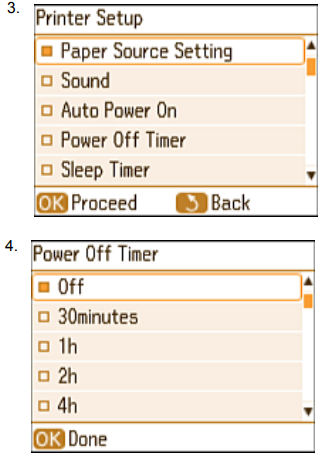
Changing the Power Off Timer Setting from the Control Panel
You can use the product's control panel to change the time period before the printer turns off automatically.
- Press the
 home button, if necessary.
 - Press the arrow buttons to select Setup and press the OK button.
- Select Printer Setup and press the OK button.
You see this screen: - Select Power Off Timer and press the OK button.
You see this screen: - Select the time period you want before the product automatically turns off when it is not in use and press the OK button.
Press the
 home button to exit.
Changing the Sleep Timer Setting from the Control Panel
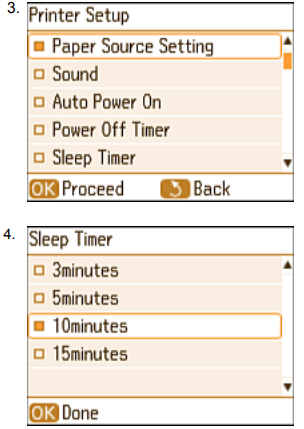
You can use the product's control panel to change the time period before the product enters sleep mode.
- Press the
 home button, if necessary.
 - Press the arrow buttons to select Setup and press the OK button.
- Select Printer Setup and press the OK button.
You see this screen: - Select Sleep Timer and press the OK button.
You see this screen: - Select the time period you want before the product goes to sleep and press the OK button.
Press the
 home button to exit.
Changing the Power and Sleep Timer Settings - Windows
You can use the printer software to change the time period before the product enters sleep mode or turns off automatically.
- Make sure your product is turned on.
- Access the Windows Desktop and right-click the product icon in the Windows taskbar.
- Select Printer Settings.
- Click the Maintenance tab.
Click the Printer and Option Information button.
You see this screen: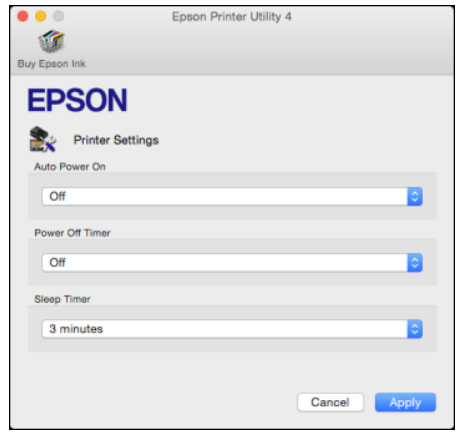
- Turn on the Auto Power On setting if you want the product to automatically turn on when it receives a print job.
Note: This setting works with print jobs sent over a USB or network connection. Enabling this setting slightly increases the product's power consumption in standby mode. - Click Send.
- Select the length of time after which you want the product to automatically turn off when it is not in use as the Power Off Timer setting.
- Click Send.
- Select the time period you want before the product goes to sleep as the Sleep Timer setting.
- Click Send.
- Click OK to close the open program windows.
Changing the Power and Sleep Timer Settings - OS X
You can use the printer software to change the time period before the product enters sleep mode or turns off automatically.
- Make sure your product is turned on.
- In the Apple menu or the Dock, select System Preferences. Select Print & Fax, Print & Scan, or Printers & Scanners, select your product, and select Options & Supplies. Select Utility and select Open Printer Utility.
- Select Printer Settings.
You see this window: - Turn on the Auto Power On setting if you want the product to automatically turn on when it receives a print job.
Note: This setting works with print jobs sent over a USB or network connection. Enabling this setting slightly increases the product's power consumption in standby mode. Click Send.
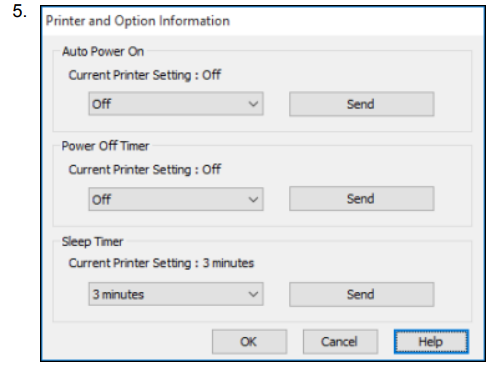
- Select the length of time after which you want the product to automatically turn off when it is not in use as the Power Off Timer setting.
- Select the time period you want before the product goes to sleep as the Sleep Timer setting.
- Click Apply.
- Close the Printer Settings window.
Description
The Epson PictureMate Personal Photo Lab PM-400 is a self-contained printing solution that combines the functionality of a photo printer, scanner, and copier. Its compact design makes it easy to place on any desk or take to events. The device uses Epson’s Claria Photo HD ink set, which ensures vibrant and long-lasting prints.
The 3.7-inch touchscreen interface allows for easy editing and enhancement of photos before printing. Users can adjust brightness, contrast, and even apply filters directly on the device. The PM-400 also supports wireless printing from smartphones and tablets using Epson’s iPrint app.
Transporting and Cleaning Your Product
Carrying and Transporting Your Product
Whenever you transport your product, prepare it as described here.
Caution: Observe the following precautions when transporting the product:
- Avoid tilting the product, placing it vertically, or turning it upside down; otherwise ink may leak.
- Leave the ink cartridge installed. Removing the cartridge can dry out the print head and may prevent the product from printing.
- Avoid strong impacts which may damage the product.
- Do not leave the product in direct sunlight, near heat sources, or inside cars or other hot locations. The product may be deformed or ink may leak.
- Press the
 power button to turn off the product.
 - Make sure the green power light on the front of the product is turned off and then unplug the power cord.
Caution: Make sure the power light is off before unplugging the power cord; otherwise, the print head may not return to the home position. This can cause the print head to dry out and may prevent the product from printing. - Remove all the paper.
- Remove any memory cards inserted in the product.
- Disconnect any connected cables.
Close the LCD screen, cover, and output tray.
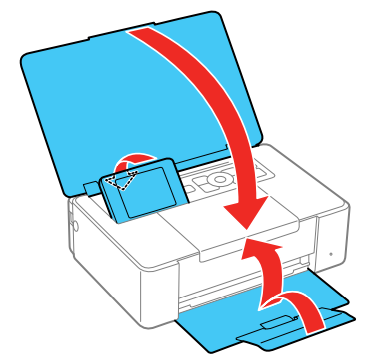
- Place the product in a bag if traveling a short distance, or in its original packaging materials (or equivalent packing materials) when transporting the product a long distance.
If print quality has declined when you print again, clean and align the print head.
Setup Guide
To set up the Epson PictureMate PM-400, start by unpacking the device and all included accessories such as the power cord, ink cartridges, and paper tray.
- Insert the ink cartridges into their respective slots and load the paper tray with your preferred print media. Connect the power cord to a power source and turn on the device.
- For wireless setup, go to the touchscreen menu and select the Wi-Fi option. Follow the on-screen instructions to connect to your network. You can also download the Epson iPrint app on your mobile device to enable wireless printing.
- Finally, calibrate the printer if necessary by following the prompts on the screen.
Cleaning Your Product
To keep your product working at its best, you should clean it whenever necessary. Close the cover and output tray when you are not using the product to protect it from dust.
Caution: Do not use a hard brush, benzene, alcohol, or paint thinner to clean the product or you may damage it. Do not use oil or other lubricants inside the product or let water get inside.
- Turn off the product.
- Unplug the power cable.
- Disconnect any connected cables.
- Remove all the paper.
- Remove any memory cards inserted in the product.
- Clean the outer case and control panel with a soft, dry cloth. Do not use any liquid or chemical cleansers.
Troubleshooting
If you encounter issues with your Epson PictureMate PM-400, here are some common problems and solutions:
- Ink Cartridge Issues: Check if the ink cartridges are properly inserted. Ensure they are not expired or empty.
- Printing Quality: Adjust the print settings or clean the printheads using the maintenance option on the touchscreen.
- Wi-Fi Connection: Ensure your device is connected to the same network as your printer. Restart both devices if necessary.
- Paper Jam: Turn off the printer, open it up carefully, and remove any jammed paper.
Epson PictureMate PM-400 Pros & Cons
Pros:
- Compact and portable design
- High-quality photo printing with vibrant colors
- Wireless connectivity options
- Easy-to-use 3.7-inch touchscreen interface
- Rechargeable battery for on-the-go use
Cons:
- Higher cost compared to basic photo printers
- Ink cartridges can be expensive to replace
- Limited paper handling capacity
- No built-in scanner or copier functionality in some models
Customer Reviews
Customers have praised the Epson PictureMate PM-400 for its ease of use, excellent print quality, and portability. Many have found it ideal for family gatherings and events where instant photo printing adds a fun element. However, some users have noted that the ink cartridges can be costly to replace and that the device may require occasional cleaning to maintain optimal print quality.
A common complaint is that the printer can be slow when printing larger quantities of photos. Despite this, most users agree that the PM-400 delivers professional-grade photos that last long.
Faqs
How do I connect my PictureMate to Wi-Fi?
Can I print from my smartphone using the PM-400?
What types of ink cartridges does the Epson use?
How long does it take to print a 4x6 photo with the Epson PictureMate PM-400?
Is the Epson PictureMate PM-400 portable?
Can I edit photos before printing on the Epson PictureMate?
What is the print resolution of the Epson PictureMate Personal Photo Lab PM-400?
Does the Epson support different paper sizes?
How do I maintain optimal print quality on my Epson?
Can I use third-party ink cartridges with my Epson PictureMate Personal Photo Lab PM-400?
Leave a Comment
