Eufy RoboVac 11S Cleaner T2108Y11 Instruction Manual
Content
Introduction
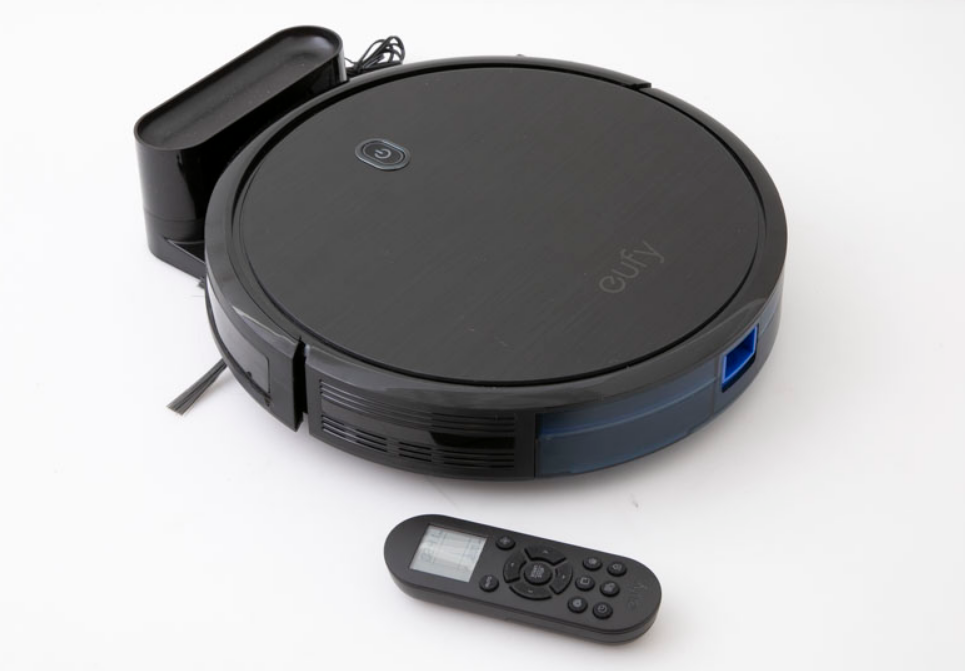
The Eufy RoboVac 11S T2108Y11 is a compact and efficient robotic vacuum designed to simplify your cleaning routine. With its super-slim profile of just 2.85 inches, it easily navigates under furniture while delivering powerful suction of up to 1300 Pa. Equipped with BoostIQ technology, it automatically adjusts suction power for optimal cleaning on various surfaces. The RoboVac 11S is priced at approximately $229.99, making it a budget-friendly option for automated home cleaning.
About Your RoboVac
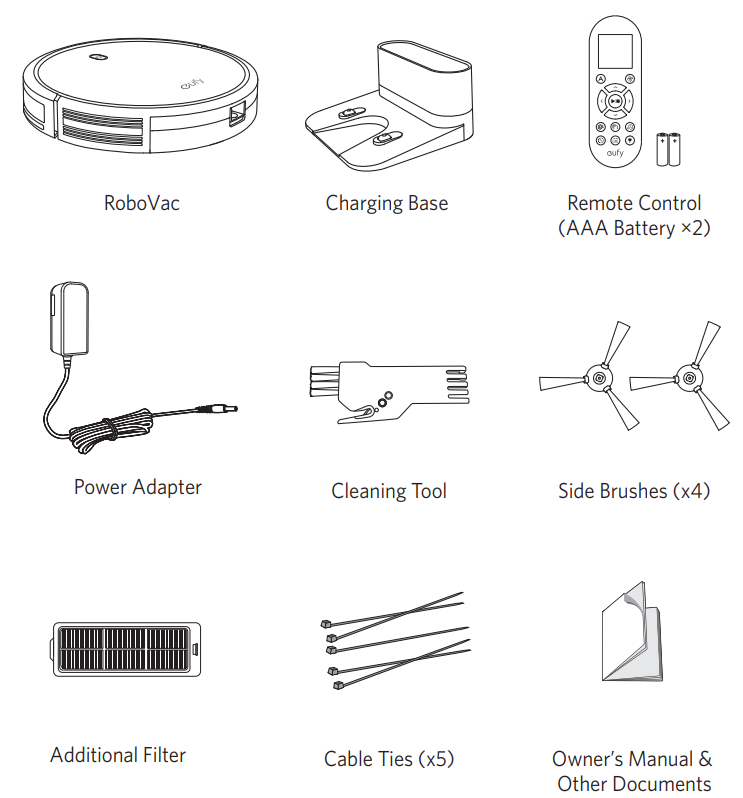
What's in the Box
RoboVac Anatomy
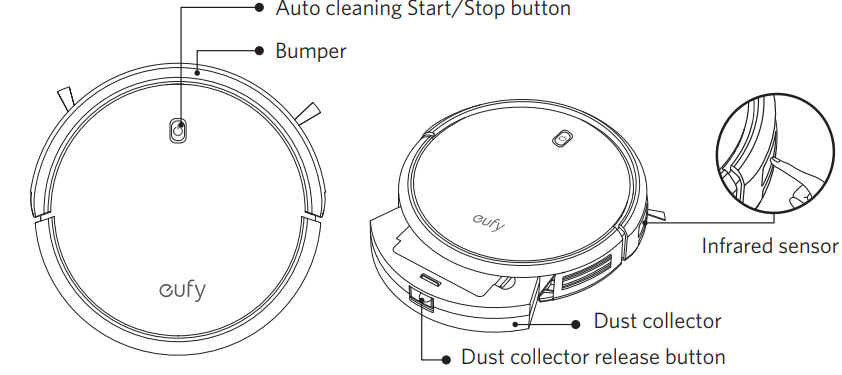
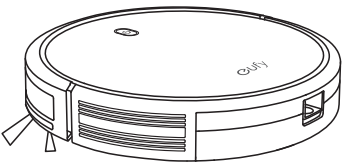
Top & Side
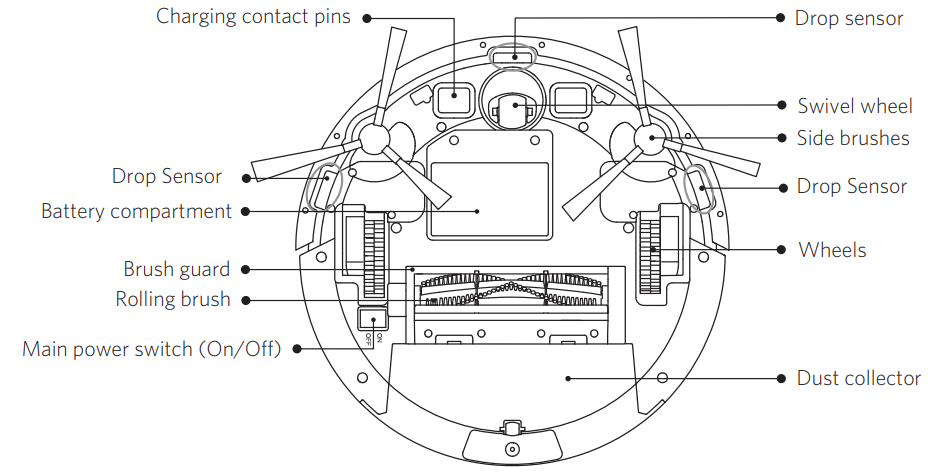
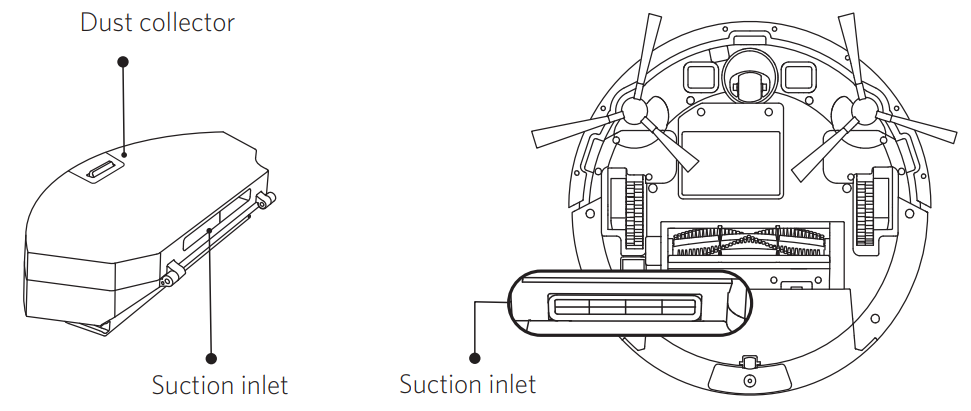
Eufy RoboVac 11S T2108Y11 Bottom
Dust Collector

Suction Inlet
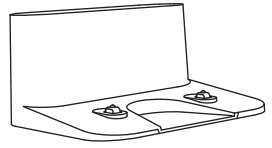
Charging Base

Remote Control
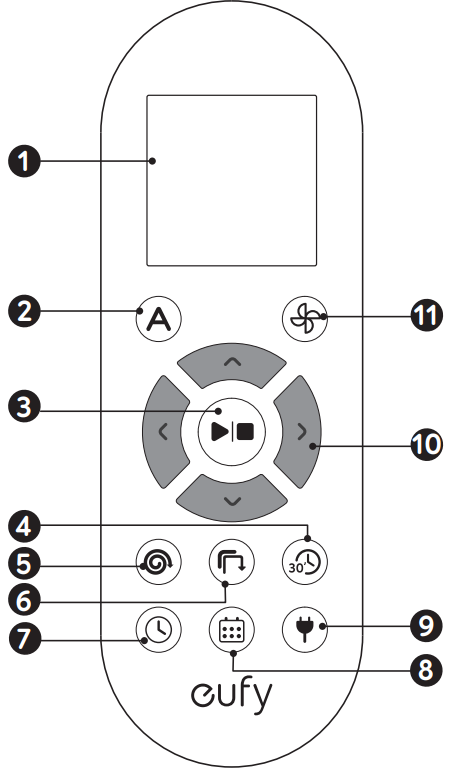
- Display panel
- Start Auto cleaning
- Start Auto cleaning / Stop cleaning
- Start Quick cleaning
- Start Spot cleaning
- Start Edge cleaning
- Adjust time
- Schedule Auto cleaning start time
- Return RoboVac to Charging Base
- Control cleaning direction manually / Adjust the hour and minute
- Adjust suction power level in Auto and Quick Cleaning modes
Remote Control Display
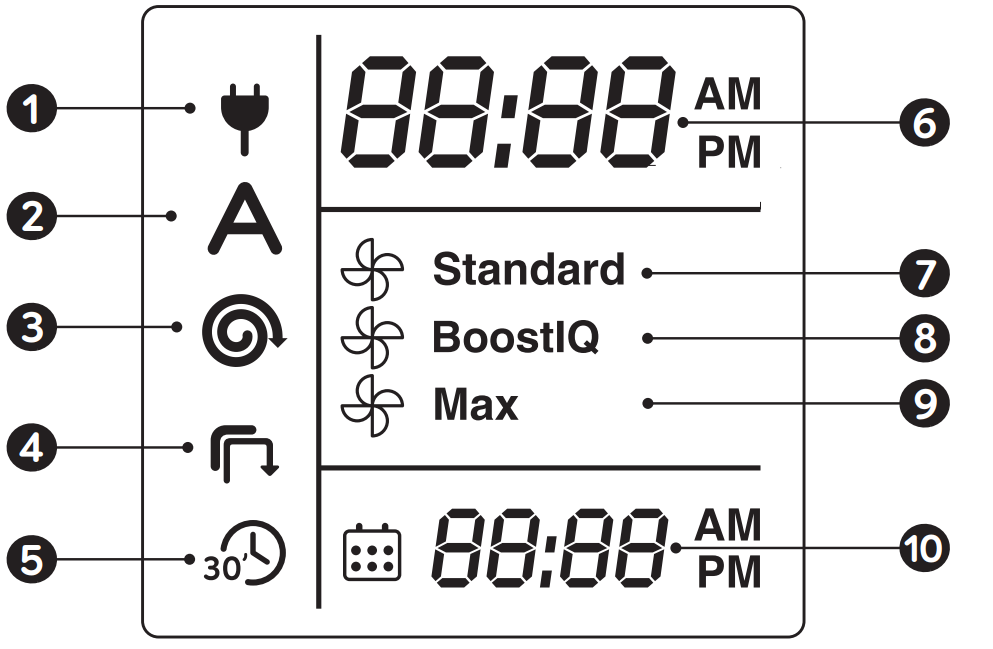
- Returning to Charging Base
- Auto cleaning mode selected
- Spot cleaning mode selected
- Edge cleaning mode selected
- Single Room cleaning mode selected
- Clock
- Standard suction power enabled
- BoostIQ dynamic suction power enabled
- Max suction power enabled
- Scheduled cleaning time
TIP: Install 2 AAA batteries before using the remote control for the first time. Make sure the positive and negative ends are facing the correct polarity direction as marked in the battery compartment.
LED Indication
You can see the status of RoboVac from the LED indicator.
| |
Breathing orange | Charging |
Solid blue | Standby / Cleaning / Fully charged |
Solid orange | Low power and returning to Charging Base |
Off |
|
Flashing / Solid red+ Beeping | RoboVac has an error. Refer to the“Troubleshooting>Error Tone” section inthis manual for solutions. |
Specifications of Eufy RoboVac 11S T2108Y11
| Specification | Value |
|---|---|
| Input | 19 V 0.6 A |
| Battery Voltage | DC 14.4 V |
| Power Consumption | 40 W |
| Battery Type | DC 14.4 V, Li-ion 2600 mAh |
| Dust Collector Capacity | 0.6 L |
| Cleaning Time | Max. 100 mins |
| Charging Time | 300 - 360 mins |
| Specification | Value |
|---|---|
| Input | 19 V 0.6 A |
| Output | 19 V 0.6 A |
Description
The eufy RoboVac 11S Cleaner T2108Y11 boasts a slim profile of only 2.85 inches in height, allowing it to fit under most furniture and navigate through tight spaces. It comes with a 0.6-liter dustbin capacity and a 2600mAh lithium-ion battery that provides up to 100 minutes of continuous cleaning on a single charge. The device includes multiple cleaning modes and a remote control for convenient operation. Additionally, it features anti-collision sensors and a protective bumper to prevent damage and ensure safe operation.
Using Your RoboVac
Important Tips Before Use
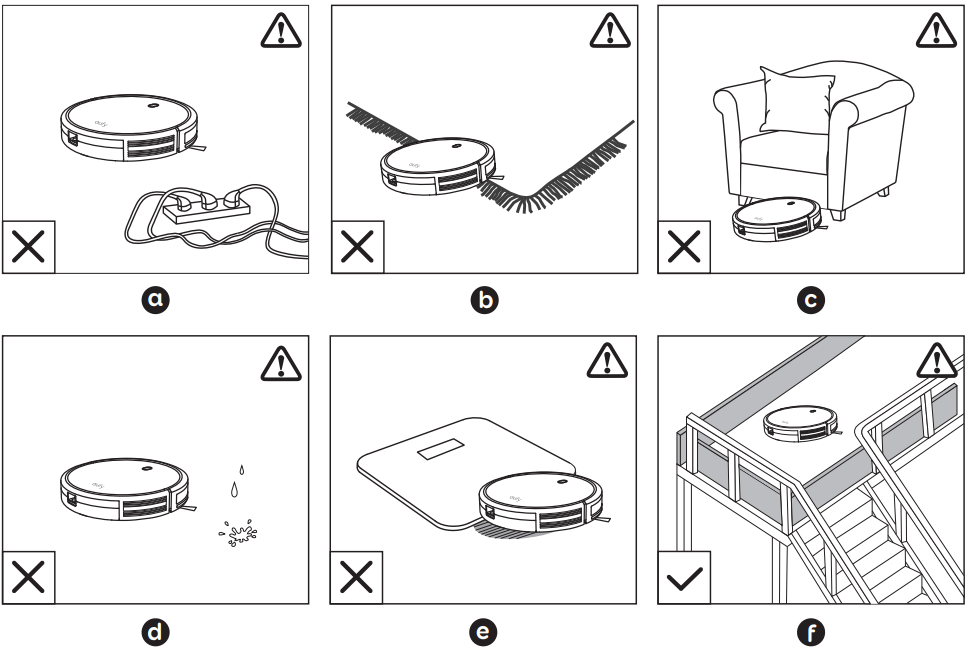
- Remove power cords and small objects from the floor that may entangle RoboVac.
- Fold tasseled edges of area rugs underneath to prevent tangling RoboVac. Avoid cleaning very dark-colored high-pile rugs or rugs thicker than 1.02 in/26 mm as they may cause RoboVac to malfunction.
- Keep RoboVac away from spaces lower than 2.87 in/73 mm to prevent RoboVac from getting stuck. If necessary, place a physical barrier to block off the problem areas.
- Keep RoboVac away from wet areas.
- RoboVac may climb on top of objects less than 0.63 in/16 mm in height. Remove these objects if possible.
- Anti-drop sensors prevent RoboVac from tumbling down stairs and steep drops. They may work less effectively if dirty or used on reflective/very dark-colored floors. It is recommended to place physical barriers to block off areas where RoboVac may fall.
TIP: Place physical barriers in front of fireplaces and areas that may cause damage to RoboVac if entered.
Preparation
- Install the side brushes before use.
Turn on the main power switch on the bottom of RoboVac.
TIP: Remove the sticker next to the power switch, and the foam blocks beside the bumper before use.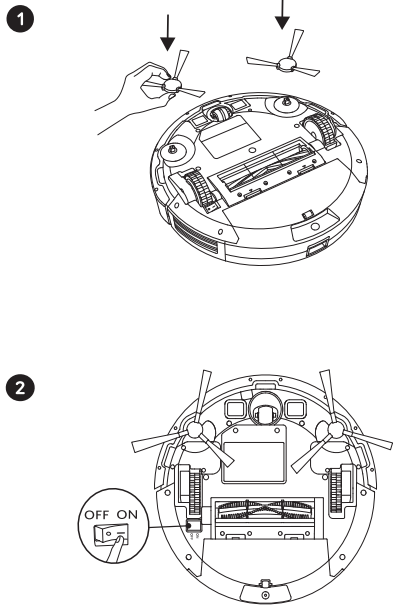
Place the Charging Base on a hard, level surface and against a wall.

- Remove objects within 3 ft/1 m of the left and right side and within 6 ft/2 m of the front of the charging base.
Connect the round connector of the adapter into the power socket on the Charging Base and the other end into a wall outlet.
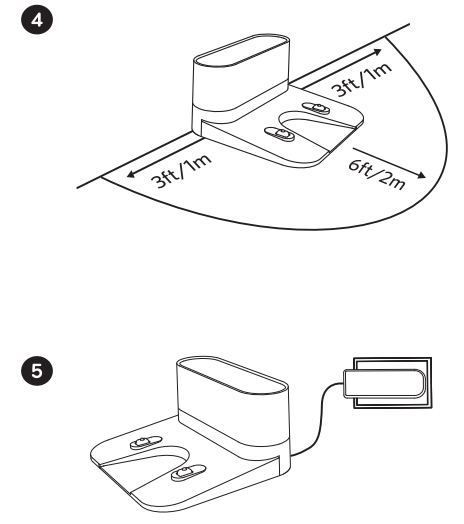
When the Charging Base connects to AC power, the LED indicator on the Charging Base is SOLID WHITE.
TIP: Install the Charging Base in a location that RoboVac can easily access. It is recommended to place the Charging Base against a wall, and on a hard-level surface rather than on rugs or carpets.
Always keep the Charging Base plugged in, otherwise RoboVac will not automatically return to it.
Charge Your RoboVac
- RoboVac has a pre-installed rechargeable battery that has to be fully charged before use.
- RoboVac returns to the Charging Base at the end of a cleaning cycle or when its battery is running low.
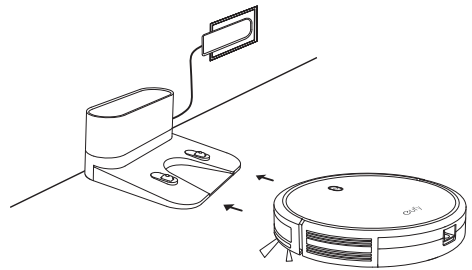
Method 1: Attach RoboVac to the Charging Base by aligning its charging pins with the charging pins on the base.
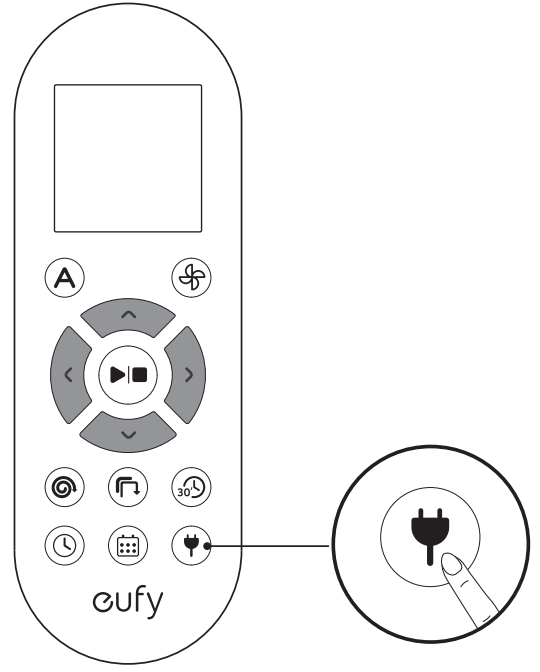
Method 2: Press![]() on the remote control to return RoboVac to the Charging Base.
on the remote control to return RoboVac to the Charging Base.
TIP: Turn off the main power switch if RoboVac will not be used for a long period of time. To preserve the battery’s lifespan, recharge at least once every 6 months.
Start / Stop Cleaning
NOTE: Make sure the main power switch on the bottom of RoboVac is turned on before use.
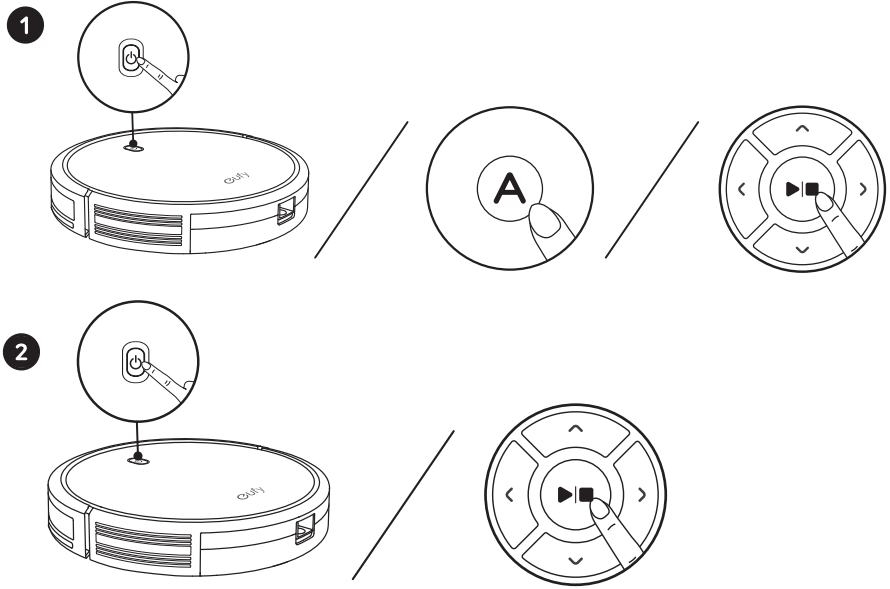
- Press
 on RoboVac or
 on the remote control to start cleaning in Auto Mode.
 Press
 on RoboVac or
 on the remote control to stop cleaning.
Select a Cleaning Mode
Auto cleaning
RoboVac optimizes its cleaning path by selecting different cleaning modes automatically until cleaning is complete. This is the most commonly used cleaning mode.
Press ![]() on RoboVac or
on RoboVac or on the remote control to start cleaning in Auto Mode.

TIP
- RoboVac will return to the Charging Base automatically when the battery level becomes low or when RoboVac finishes cleaning.
- By default, RoboVac starts in Auto cleaning mode when it is turned on.
BoostIQ Feature
When the BoostIQ feature is enabled, RoboVac will automatically increase the suction power if it detects stronger power is needed to ensure the best clean. BoostIQ™ is ideal for cleaning thicker carpets and hard-to-sweep messes, which will reduce the total cleaning time, but increase the noise level. If the vacuuming noise caused by BoostIQ™ disturbs you, you can disable this feature. This feature only works in Auto and Single Room cleaning modes.
In Auto or Single Room cleaning mode, press ![]() on the remote control repeatedly to adjust the suction power level.
on the remote control repeatedly to adjust the suction power level.
The corresponding icon is displayed on the remote control.
Icon | Suction Power Level |
| Standard power (default) |
| Automatically switches between Standard andEnhanced power |
| Maximum power |
TIP: When RoboVac starts cleaning in Auto or Single Room mode the next time, it will clean according to the suction power level you previously selected.
Spot cleaning
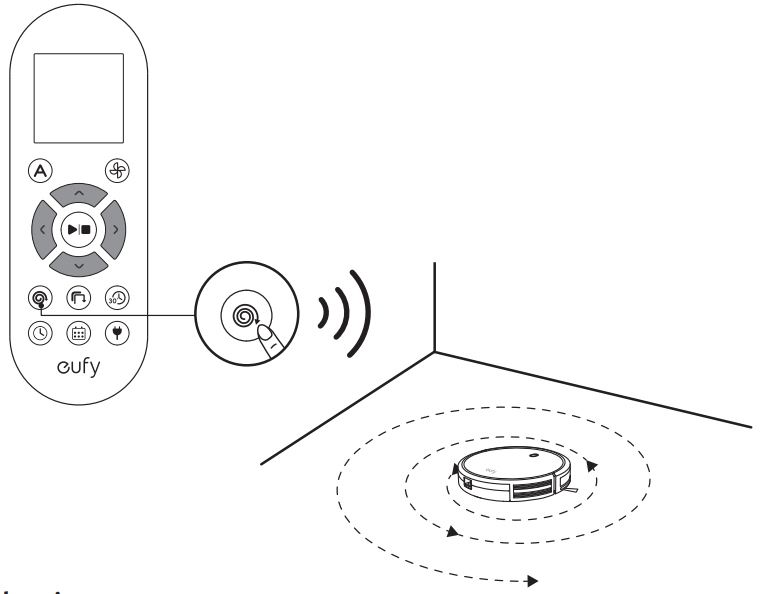
RoboVac intensively cleans a specific area in a spiral pattern, useful if there is a concentrated area of dust or debris. In Spot mode, RoboVac will stop cleaning after 2 minutes.
Press ![]() on the remote control to start cleaning in Spot mode.
on the remote control to start cleaning in Spot mode.
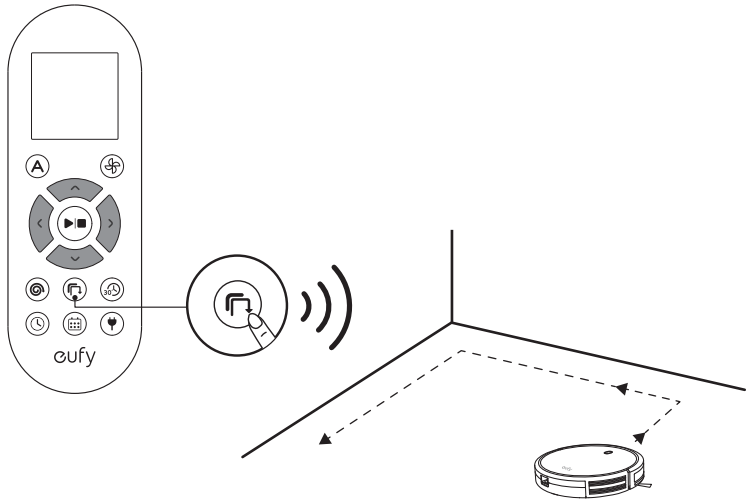
Edge cleaning
RoboVac reduces its speed when it detects a wall and then follows the wall to ensure the edge is cleaned thoroughly. In Edge mode, RoboVac will clean for 20 minutes and return to the Charging Base.
Press ![]() on the remote control to start cleaning in Edge mode.
on the remote control to start cleaning in Edge mode.
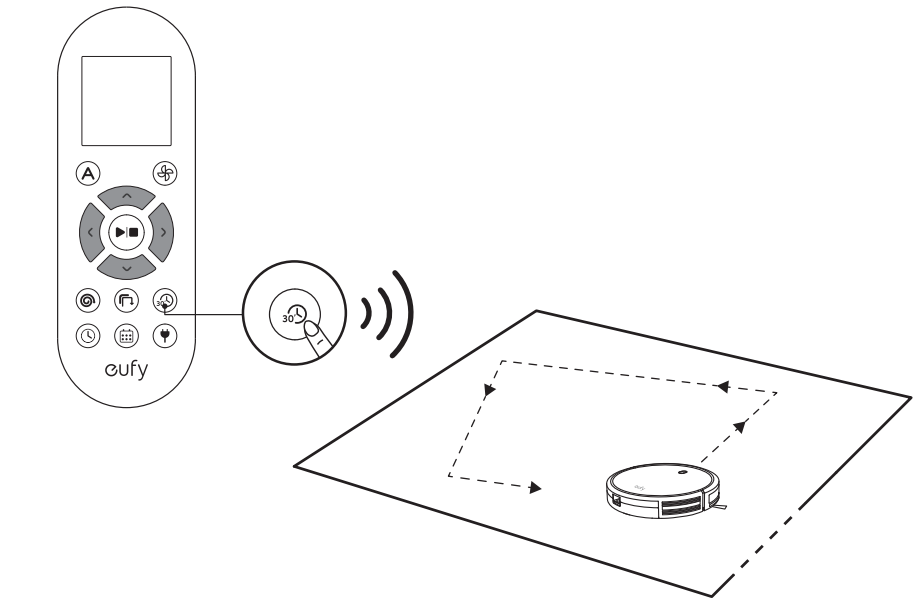
Quick cleaning
RoboVac will automatically stop cleaning after 30 minutes and return to the Charging Base in this mode. If any small room or area needs to be cleaned, it is recommended to select this mode to save time and power.
Press  on the remote control to start quick cleaning mode.
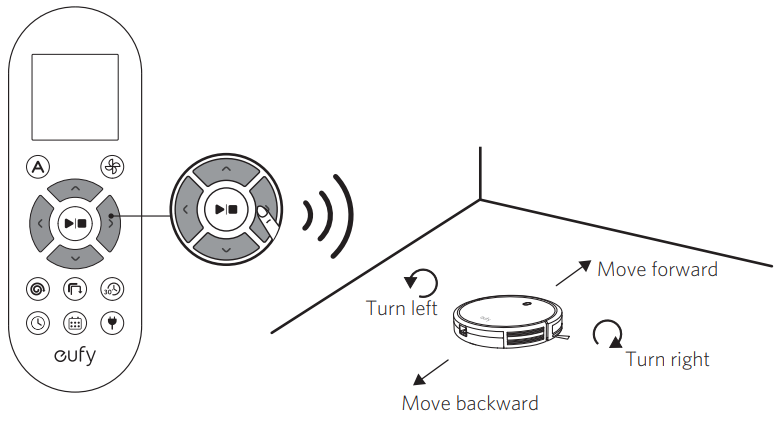
Manual cleaning
You can direct RoboVac to clean a particular area by using the directional buttons on the remote control.
Set Time and Scheduled Cleaning
Set Time
- Make sure the time is set correctly to your local time before setting a scheduled cleaning.
- Make sure the main power switch on the bottom of RoboVac is turned on.
- Press
 on the remote control. The time will blink on the display.
 - Press
 to set the “hour” and “minute”.
Note: Make sure AM/PM is set correctly. - Press
 or
or  to save the setting. RoboVac will BEEP ONCE to indicate the time has been set.
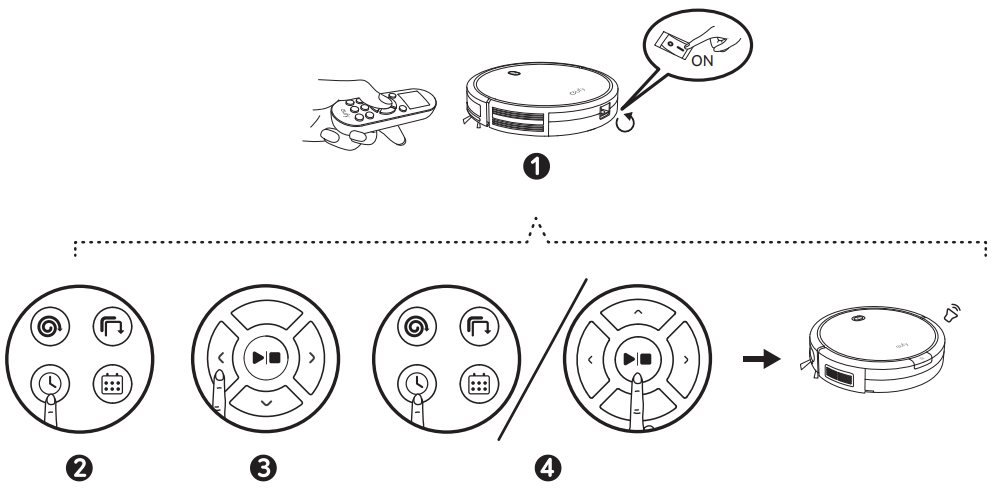
TIP: To ensure the time is set successfully, make sure RoboVac is turned on. You will hear a beep when the time has been set.
Set a Scheduled Cleaning
You can schedule RoboVac to start cleaning at a specified time. To cancel a previously scheduled cleaning, press and hold ![]() for 3 seconds until RoboVac beeps twice
for 3 seconds until RoboVac beeps twice![]() and disappears.
and disappears.
Note: Before setting a scheduled cleaning, make sure the time has been set correctly to your local time; refer to the previous section “Set Time” for how to set the time.
- Make sure the main power switch on the bottom of RoboVac is turned on.
- Press
 on the remote control
 . will blink on the display.
 - Press
 to set the “hour” and “minute”.
Note: Make sure AM/PM is set correctly. - Press
 or
or  to save the setting. RoboVac will BEEP ONCE to indicate the schedule has been set.
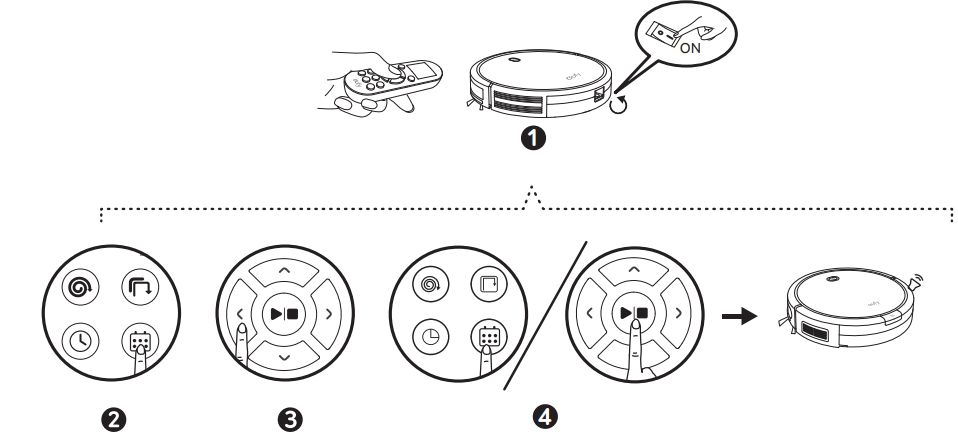
TIP: To ensure the schedule is set successfully, make sure RoboVac is turned on. You will hear a beep when the schedule has been set.
Setup Guide
To set up your eufy RoboVac 11S,
- Start by charging the device for at least 4 hours before the first use.
- Place the charging dock in a flat area, preferably against a wall, to prevent the robot from getting stuck.
- Remove any obstacles or clutter from the floor to ensure smooth navigation.
- Turn on the robot vacuum by pressing the power button on the device or using the remote control. For initial use, it is recommended to run the device in manual mode to help it map out your space efficiently.
Cleaning and Maintenance
For optimal performance, follow the instructions below to clean and maintain RoboVac regularly. The cleaning/replacement frequency will depend on your usage habits of RoboVac.
Recommended cleaning/replacement frequency:
RoboVac Part | Cleaning Frequency | Replacement Frequency |
Dust Collector | After each use | - |
Filters | Once every week | Every 2 months |
Rolling Brush | Once every week | Every 6-12 months |
Side Brushes | Once every month | Every 3-6 months (or when visibly worn) |
Brush Guard | Once every month | Every 3-6 months(or when the silicone rubber strip on the brushguard becomes visibly worn) |
Sensors | Once every month | - |
Charging Pins | Once every month | - |
Swivel Wheel | Once every month | - |
Clean the Dust Collector and Filters
- Press the dust collector release button to pull the dust collector out.
- Open and empty the dust collector.
Take out the filter.
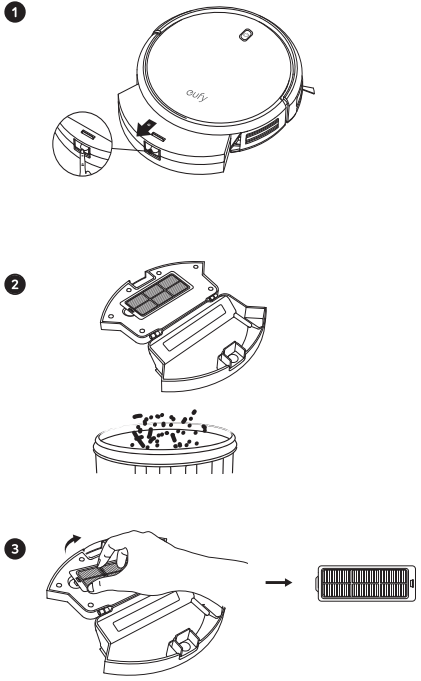
- Tap the filter to remove dust.
- Put the filter back into the dust collector.
Push the dust collector back into the main unit.
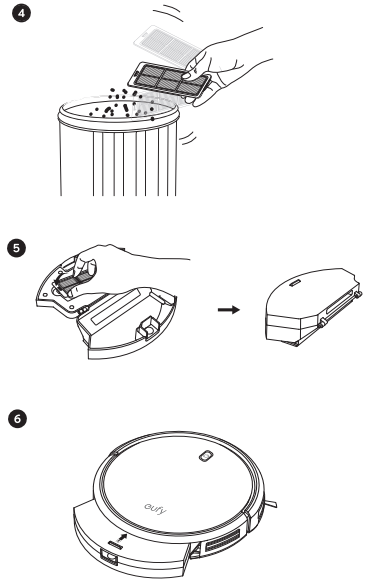
TIP: You can wash the dust collector, pre-filter and foam filter with water. Be sure to air-dry them thoroughly before reassembling. Do not wash the high-performance filter with water, as it may damage the filter and reduce the suction power.
Clean the Rolling Brush
- Pull on the release tabs to unlock the brush guard as shown.
- Lift the rolling brush to remove.
- Clean the rolling brush with the provided cleaning tool or a vacuum cleaner.
- Reinstall the rolling brush by inserting the fixed protruding end first and then clicking into place.
- Press down to snap the brush guard into place.
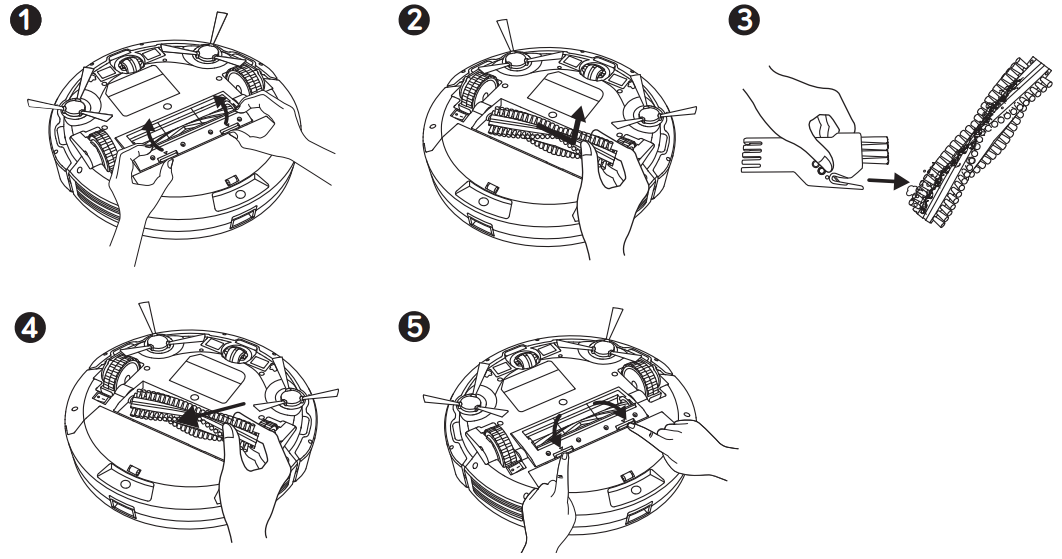
Clean the Side Brushes
Foreign substances, such as hair, can easily get tangled in the side brushes, and dirt may adhere to them. Be sure to clean them regularly.
Remove the side brushes.
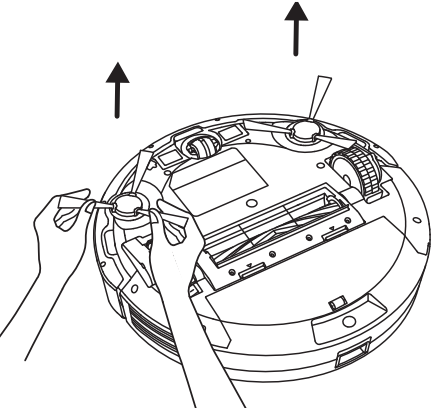
- Carefully unwind and pull off any hair or string that is wrapped between the main unit and the side brushes.
Use a cloth dampened with warm water to remove dust from the brushes or to gently reshape them.
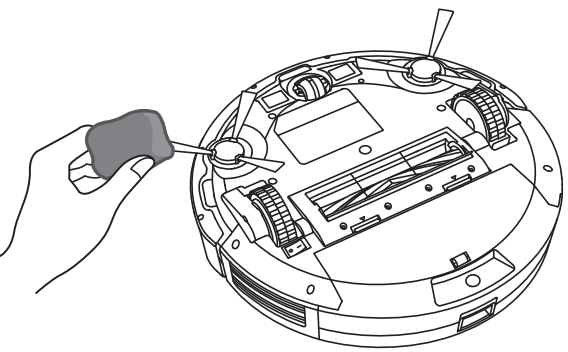
TIP: Only use the side brushes when they are completely dry.
Replace the Side Brushes
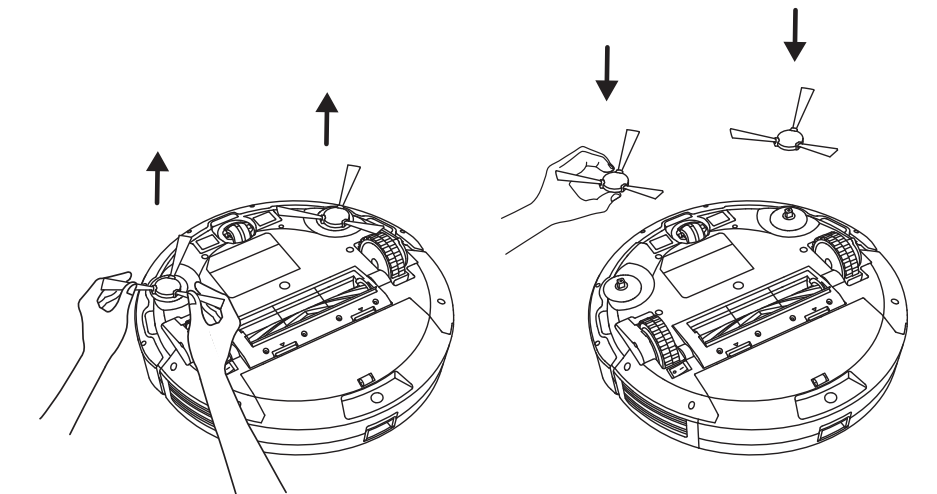
The side brushes may become bent or damaged after being used for a period of time. Follow the instructions below to replace them.
Pull off the old side brushes and snap the new ones into place.
Clean the Sensors and Charging Pins
To maintain the best performance, clean the drop sensors and charging pins regularly.
- Dust off the drop sensors and charging contact pins using a cloth or cleaning brush.

Clean the Swivel Wheel
Hair or dust particles can easily get entangled in the swivel wheel. Be sure to clean the swivel wheel periodically and as needed.
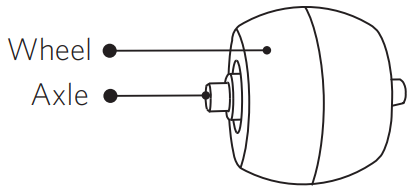
- Pull out the swivel wheel.
- Clean any hair or debris wrapped around the wheel or entangled inside the wheel cavity.
- Reinstall the wheel and push in until it clicks into place.
TIP: Do not clean the swivel wheel with water.
Important Safety Instructions
To reduce the risk of injury or damage, read these safety instructions carefully and keep them at hand when setting up, using, and maintaining this device.
WARNING SYMBOLS USED
This is the safety alert symbol. This symbol alerts you to potential hazards that could result in property damage and/or serious bodily harm or death.
- This device can be used by children aged from 8 years and above and persons with reduced physical, sensory or mental capabilities or lack of experience and knowledge if they have been given supervision or instruction concerning use of this device in a safe way and understand the hazards involved.
- Children should be supervised to ensure they do not play with this device.
- Cleaning and maintenance shall not be performed by children without adult supervision.
- This device is only to be used with the power supply unit provided.
- For the purposes of recharging the battery, only use the detachable power supply unit provided with this device.
- The battery must be removed from this device before this device is disposed of. To remove the battery from this device, first remove the screws on the bottom, then remove the main PCB and unscrew the battery cover using a screwdriver. Remove the battery by disconnecting the quick connector.
- The used battery should be placed in a sealed plastic bag and disposed of safely according to local environmental regulations.
- The external flexible cable or cord of the power supply unit cannot be replaced; if the cord is damaged, the power supply unit shall be disposed of.
- This device is for indoor use only.
- This device is not a toy. Do not sit or stand on this device. Small children and pets should be supervised when this device is operating.
- Store and operate this device in room temperature environments only.
- Clean with a cloth dampened with water only.
- Do not use this device to pick up anything that is burning or smoking.
- Do not use this device to pick up spills of bleach, paint, chemicals, or anything wet.
- Before using this device, pick up objects like clothing and loose paper. Lift up cords for blinds or curtains, and move power cords and fragile objects out of the way. If this device passes over a power cord and drags it, an object could be pulled off a table or shelf.
- If the room to be cleaned has a balcony, a physical barrier should be used to prevent access to the balcony and to ensure safe operation.
- Do not place anything on top of this device.
- Be aware that this device moves around on its own. Take care when walking in the area where this device is operating to avoid stepping on it.
- Do not operate this device in areas with exposed electrical outlets on the floor.
- Do not expose the electronics of this device, its battery, or the integrated Charging Base. There are no user-serviceable parts inside.
- Do not use this device on an unfinished, unsealed, waxed or rough floor. It may result in damage to the floor and this device. Use only on hard floor surfaces or low-pile carpet.
- This device has been designed to be used on floors without scratching them. We still recommend that you test this device on a small area of the room to be cleaned to ensure no scratches are made before cleaning the whole room.
Troubleshooting
Problems Solutions | |
RoboVac cannot be activated. |
|
The remote control does not work. |
|
RoboVac stops working suddenly. |
|
You cannot schedule cleanings. |
|
Suction power is weak. |
|
RoboVac cannot be charged. |
|
RoboVac cannot return to the Charging Base. |
|
The rolling brush does not rotate. |
|
RoboVac’s movements or travel path are abnormal. |
|
RoboVac's cleaning time becomes shorter or is less than 100 minutes. |
|
Error Tones
When RoboVac is in trouble, it will emit a series of short or long beeps and the red indicator on RoboVac will be solid or flashing.
Flashing red indicator light
Error Tone Cause Solution | ||
One beep |
|
Restart cleaning in a new location. |
Two beeps |
RoboVac’s bumper is stuck. | Tap RoboVac’s bumper several times to dislodge any debris that may betrapped underneath. |
Three beeps | RoboVac can get stuckin the following scenarios:
but cannot reverse due to physical barriers in the way.
|
|
Four beeps | RoboVac’s power level is too low. | Manually charge RoboVac for at least 5 hours. |
Solid red indicator light
Error Tone Cause Solution | ||
One beep | RoboVac’s left/right wheel is stuck. | Turn off RoboVac and remove any hair or debris from the left/right wheel. |
Two beeps | RoboVac’s side brush is stuck. | Turn off RoboVac and remove any hair or debris from the side brush. |
Three beeps |
RoboVac’s suction fanis stuck. |
|
Four beeps | RoboVac’s rolling brushis stuck. | Turn off RoboVac and remove any hair or debris from the rolling brush. |
Pros & Cons
Pros
- Slim Design: Fits under most furniture for thorough cleaning.
- Quiet Operation: Runs at just 55 decibels, suitable for use during any time of day.
- Long Battery Life: Up to 100 minutes of continuous cleaning on a single charge.
- Multiple Cleaning Modes: Includes manual, auto, and edge cleaning modes for customized cleaning.
Cons
- No Wi-Fi Connectivity: Does not support remote app control or scheduling.
- No Voice Assistant Integration: Does not work with voice assistants like Alexa or Google Assistant.
- Basic Navigation System: May get stuck in complex environments without advanced navigation features.
Customer Reviews
Customers have praised the eufy RoboVac 11S for its quiet operation, efficient cleaning performance, and ease of setup. Many appreciate its slim design that allows it to reach tight spaces effortlessly. However, some users have noted that it lacks advanced navigation features and does not come with Wi-Fi connectivity or voice assistant integration. Overall, it has received positive reviews for its value and reliability.
Faqs
How does the Eufy RoboVac 11S T2108Y11 operate and what is it?
Can I use the RoboVac Cleaner on any kind of floor?
What is the battery life of the Eufy RoboVac 11S Cleaner T2108Y11?
What is the RoboVac Cleaner suction power?
How is obstacle and stair avoidance handled by the Eufy RoboVac 11S Cleaner T2108Y11?
Does the Eufy RoboVac 11S Cleaner automatically dock back into its charging station?
What kind of upkeep is necessary for the Eufy RoboVac?
Is the Eufy able to efficiently remove pet hair?
What is the Eufy RoboVac 11S Cleaner warranty?
Leave a Comment
